
Accountant Preferences
Set the Account Code as Mandatory and Unique
You can make account codes mandatory for new accounts and ensure each account code is unique. Here’s how:
- Log in to your Zoho Books organization.
- Go to Settings.
- Select Accountant under Preferences.
- In the General tab, under Chart of Accounts, check the following options:
- Make Account Code mandatory for new accounts: This ensures an account code is required for every new account. If you edit an existing account, you must fill in the account code as required if this is enabled.
- Enter a unique Account Code for accounts created: This ensures that each new account has a unique code, helping you distinguish one account from another.
- Click Save.
Now, every time you create a new account or edit an existing account, you must enter a unique account code.
Auto-Generate Account Codes
You can configure account code formats for account types to auto-generate account codes for your accounts.
Note:This feature is available only in early access. To enable this feature, contact our support team at support@zohobooks.com.
Enable Auto-Generate Account Codes
To auto-generate account codes:
Note: If your enable this preference, you can’t disable it or make changes later.
- Go to Settings.
- Navigate to Module Settings and select Accountant under General.
- Check the Auto-generate account codes option.
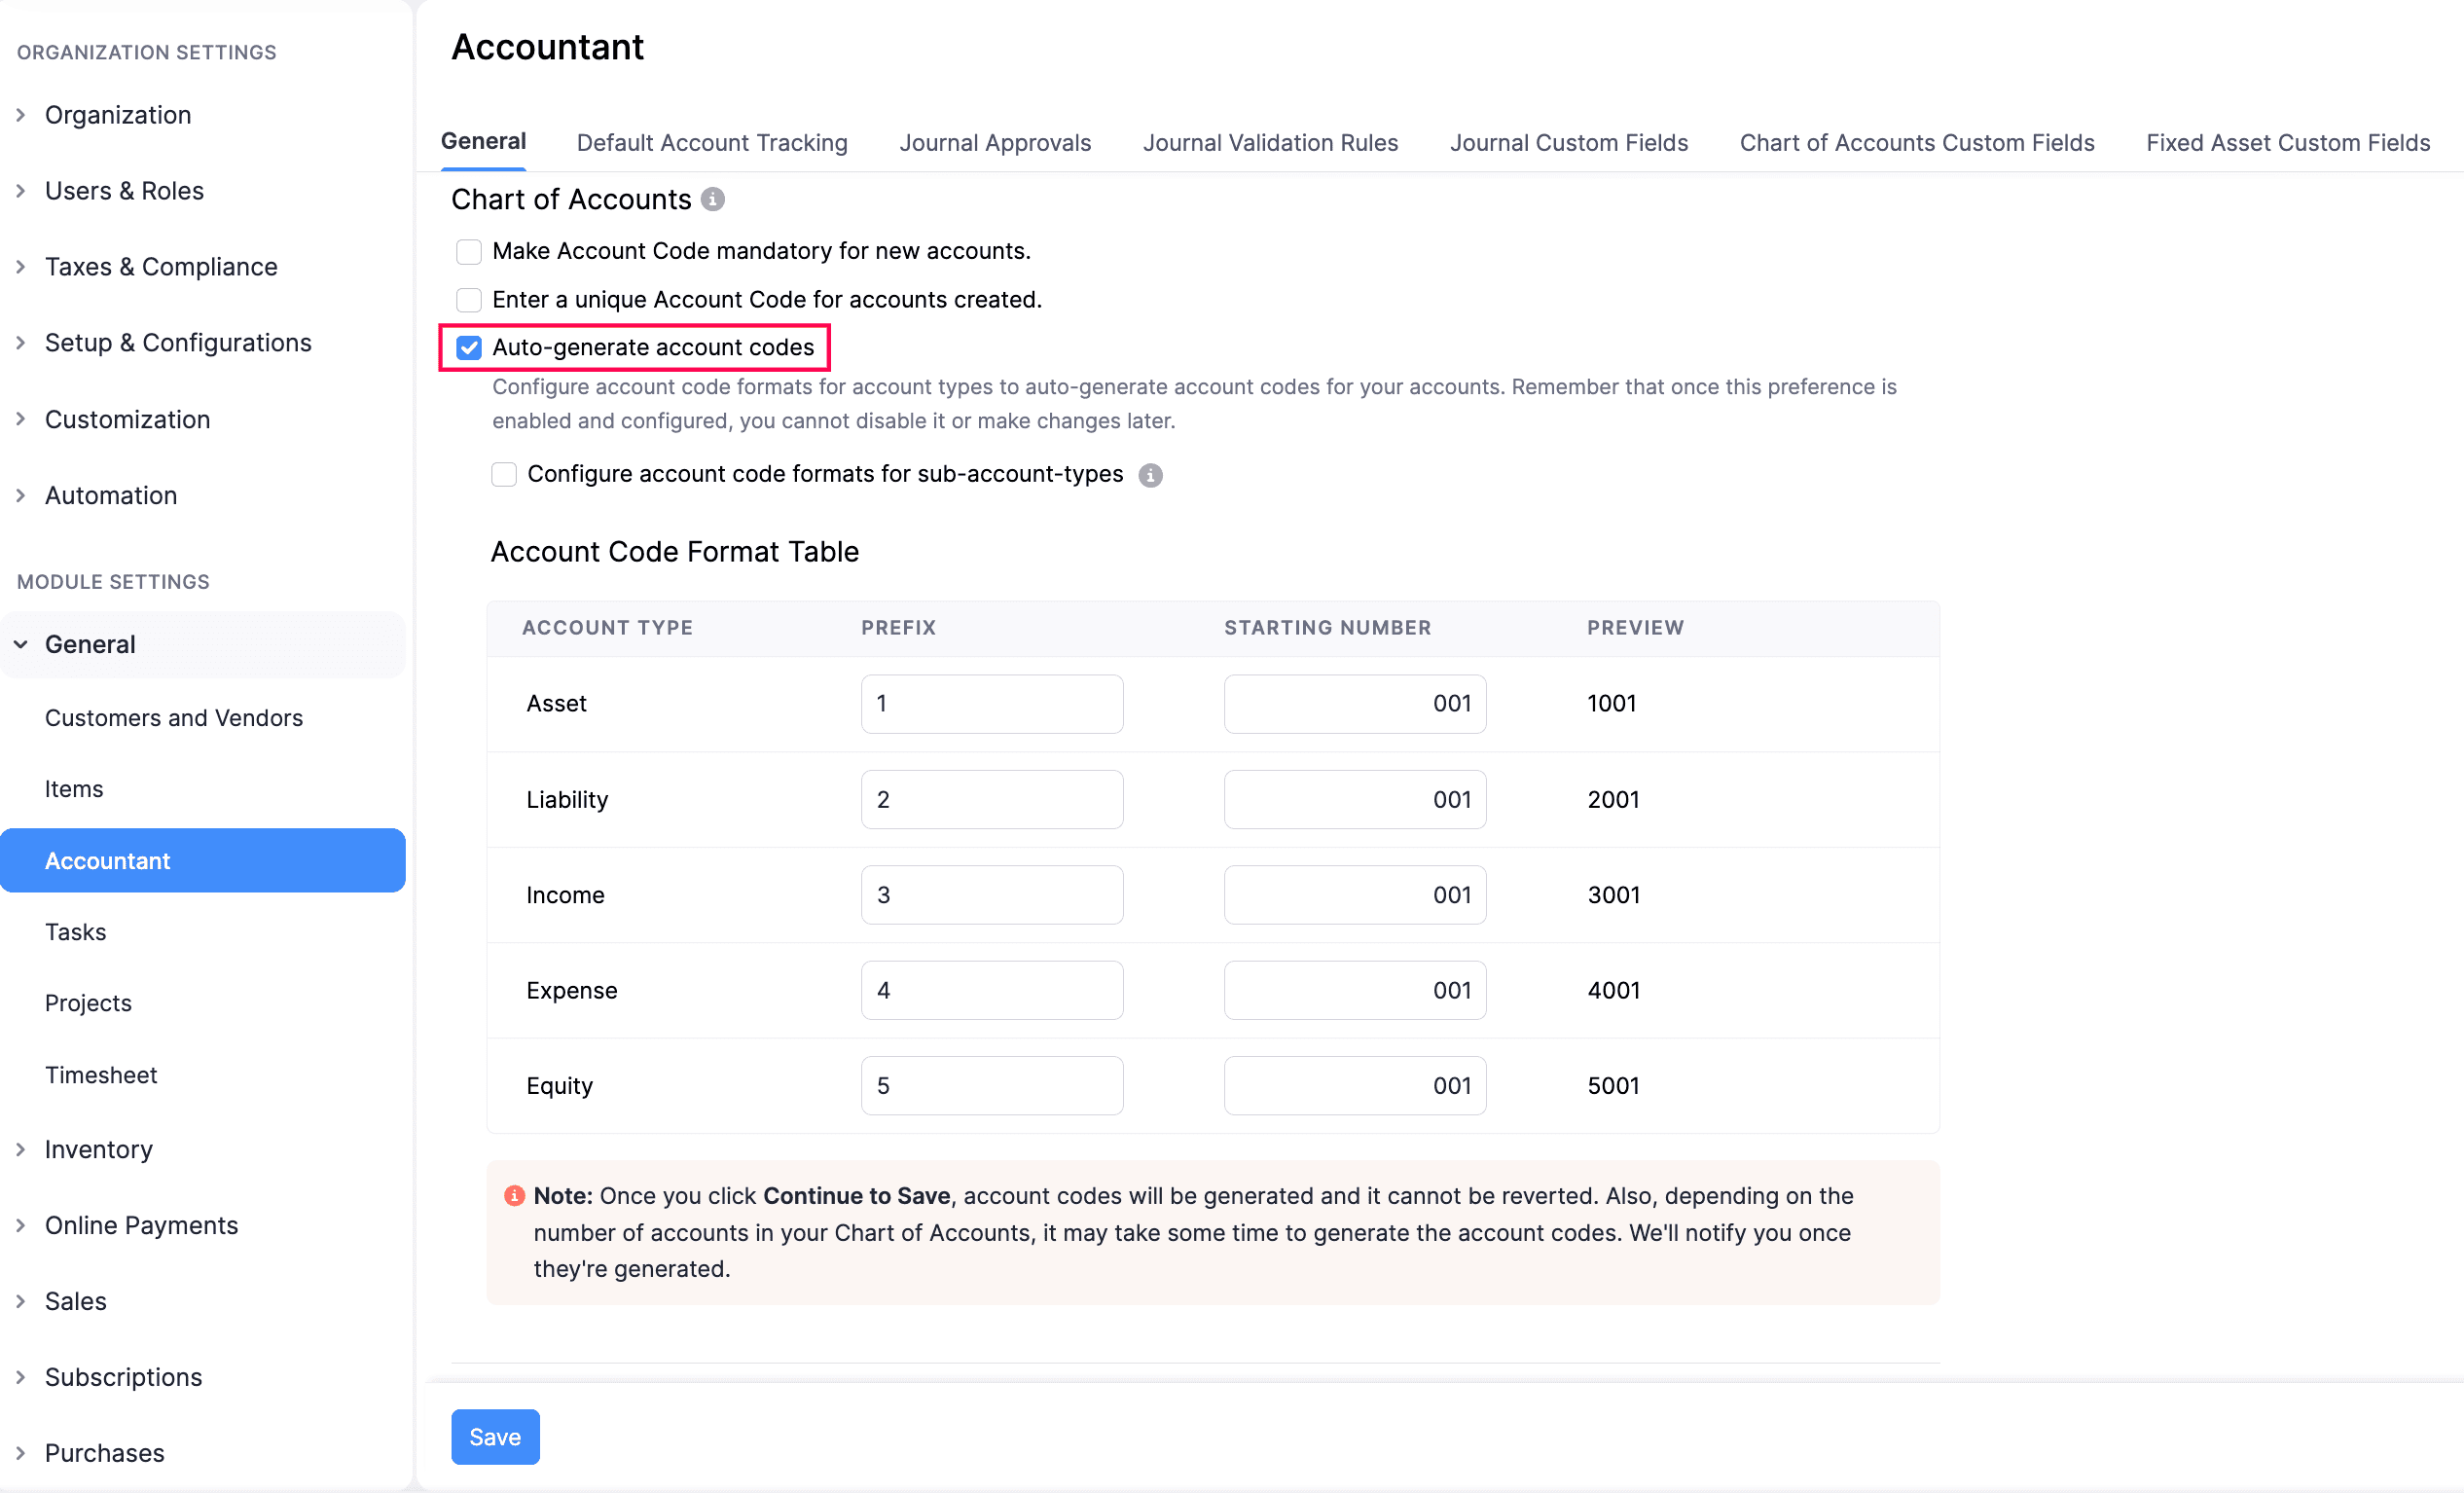
After enabling the option, you can configure the account code format, and the codes will be generated automatically.
Configure Account Code Formats
To configure the account code formats:
Note: This configuration is a one-time setup and cannot be modified later.
- Go to Settings.
- Navigate to Module Settings and select Accountant under General.
- In the Accountant page, navigate to the General tab, and under the Account Code Format Table:
- Enter the Prefix and Starting Number for each Account Type. You can view the account code that will be generated in the Preview.
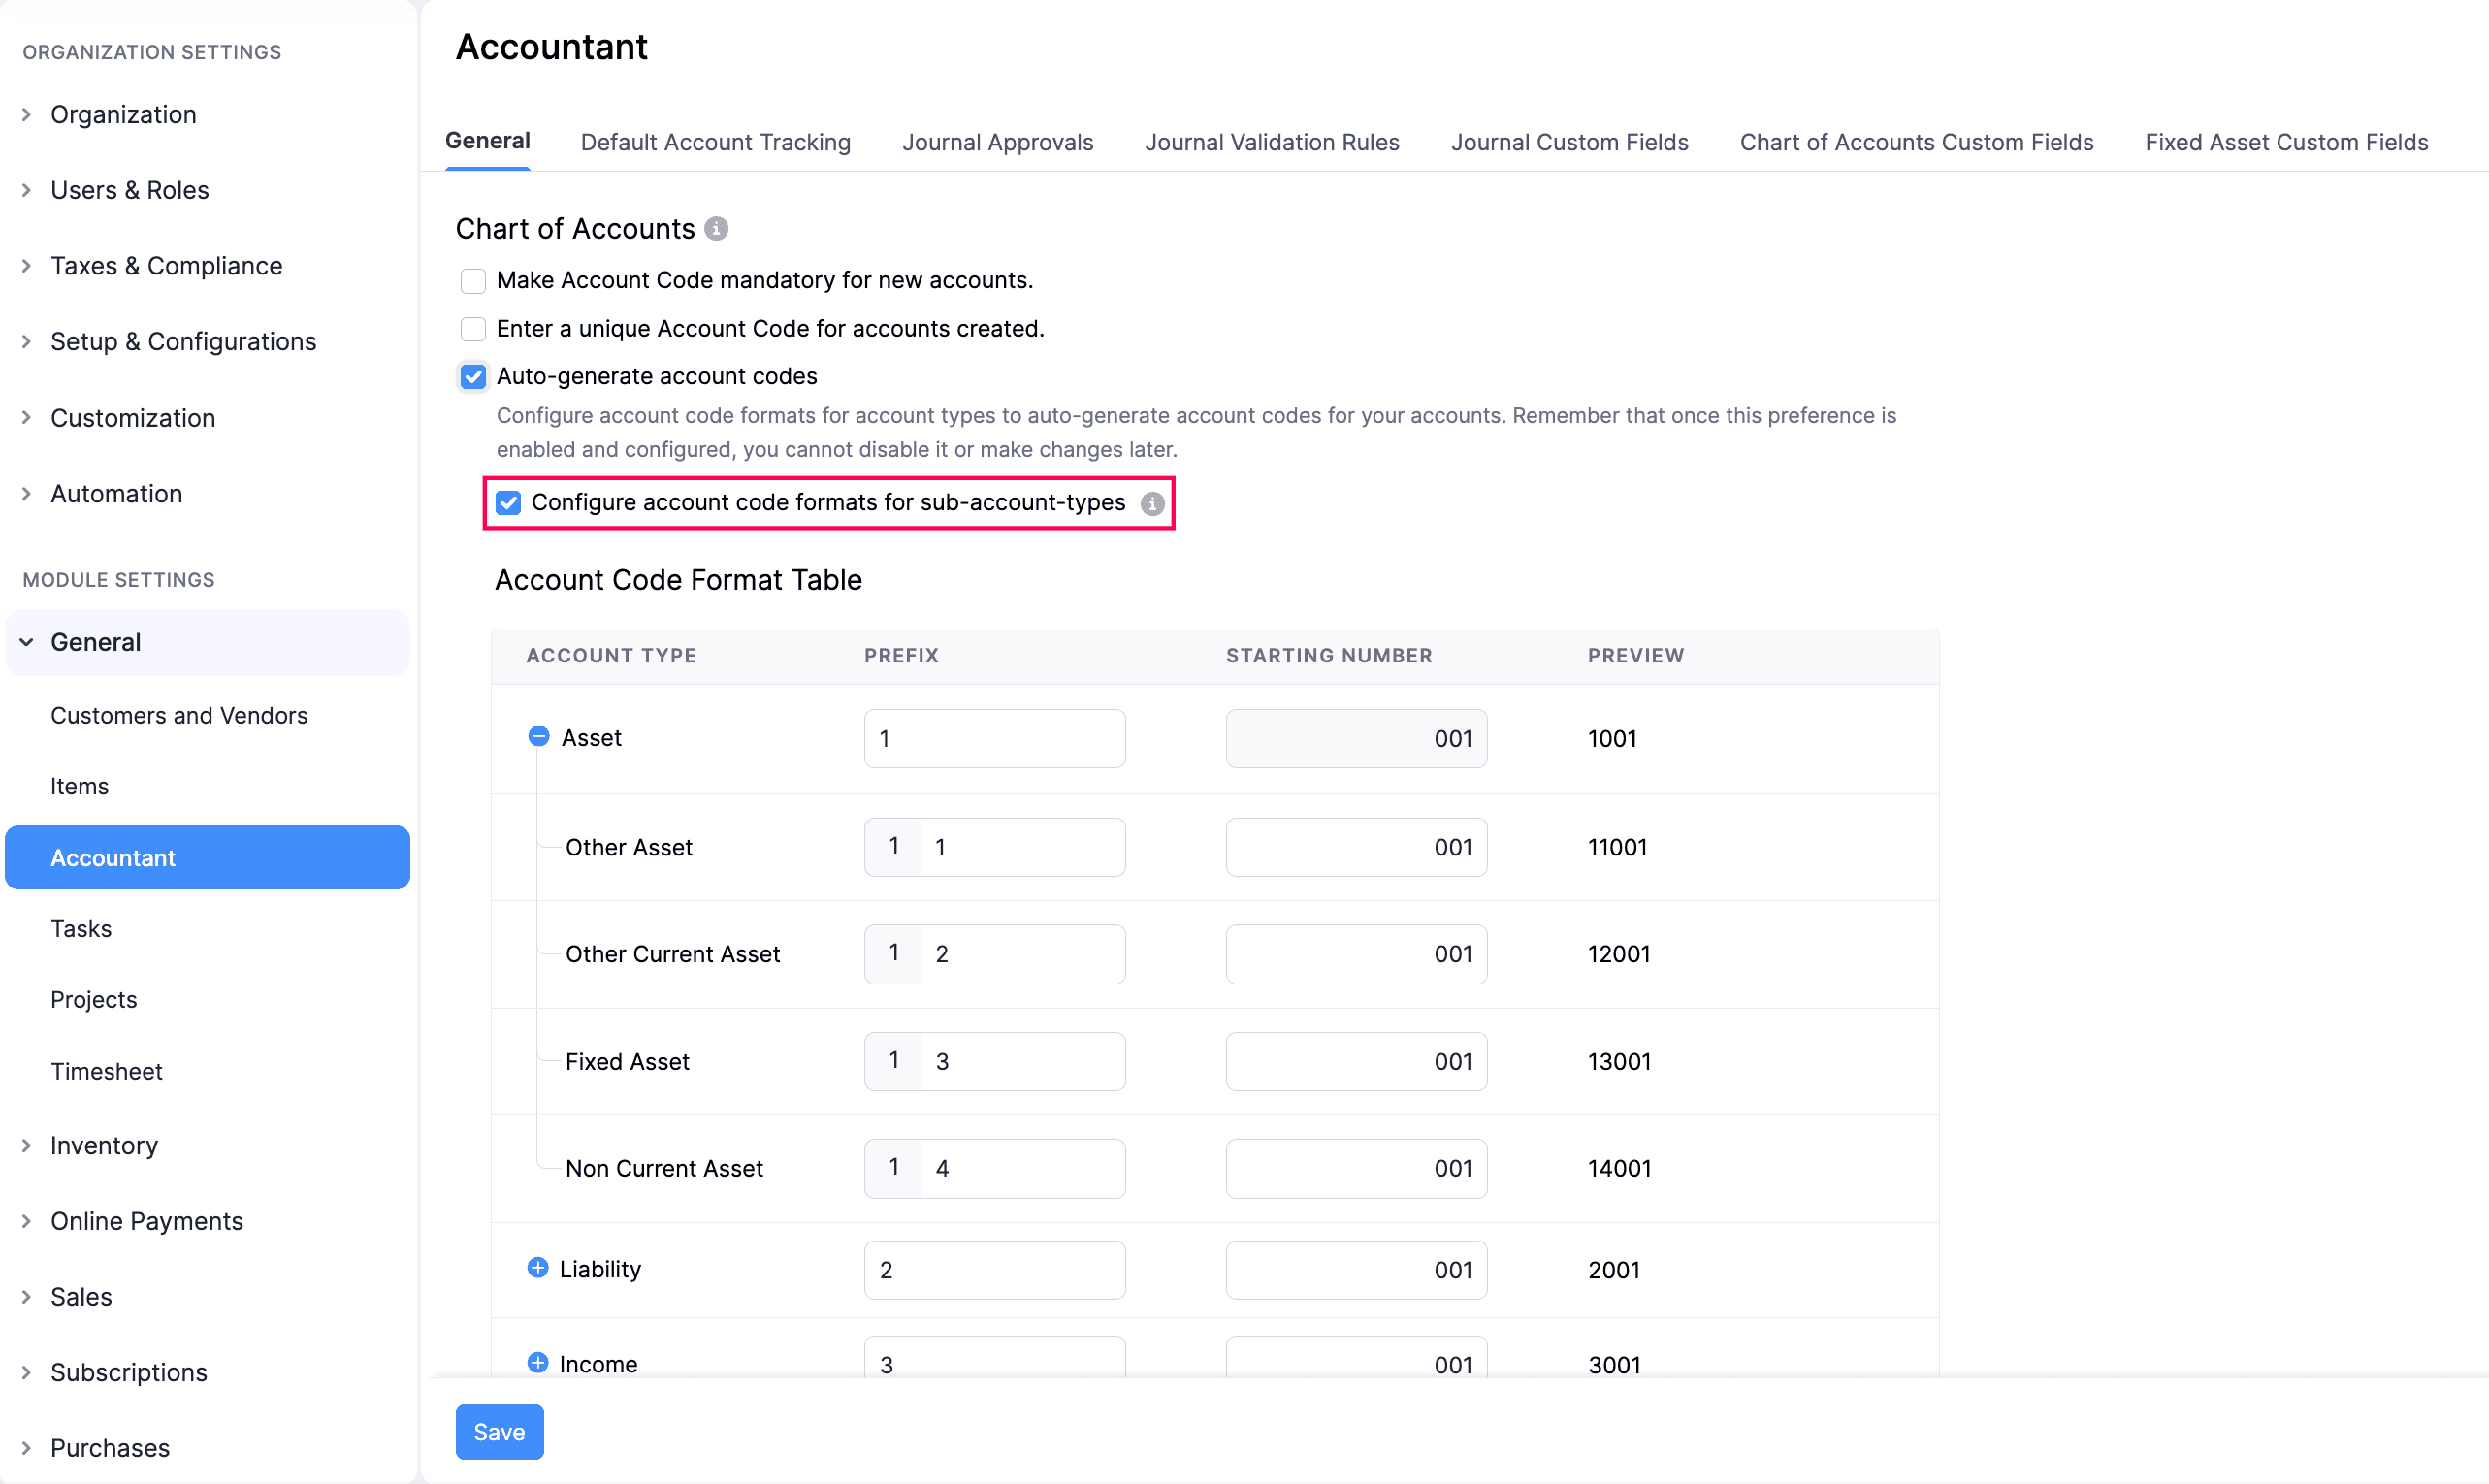
- If you want to configure account code formats for sub-accounts types, check the Configure account code formats for sub-account types option. Then, in the Account Code Format Table:
- Click the + icon next to each Account Type. A list of sub-accounts types under that parent account will be displayed. You can enter the Prefix and Starting Number for each sub-account type and view the generated account code in the Preview.
- Click Save.
- When you save, you’ll be prompted to select your preferences for applying account code auto-generation. In the Preference for Applying Account Code Auto-Generation pop-up:
- Click the dropdown next to the My organization already follows an account code series field and select Yes if your organization already follows an account code series, or No if it does not.
- If you select Yes, click the dropdown next to the Auto-Generate Account Codes For field and choose whether to apply account codes to Empty and New Accounts or Only New Accounts.
- If you select No, click the dropdown next to the Auto-Generate Account Codes For field and choose whether to apply account codes to All Accounts or Only New Accounts.
- Click Continue to Save.
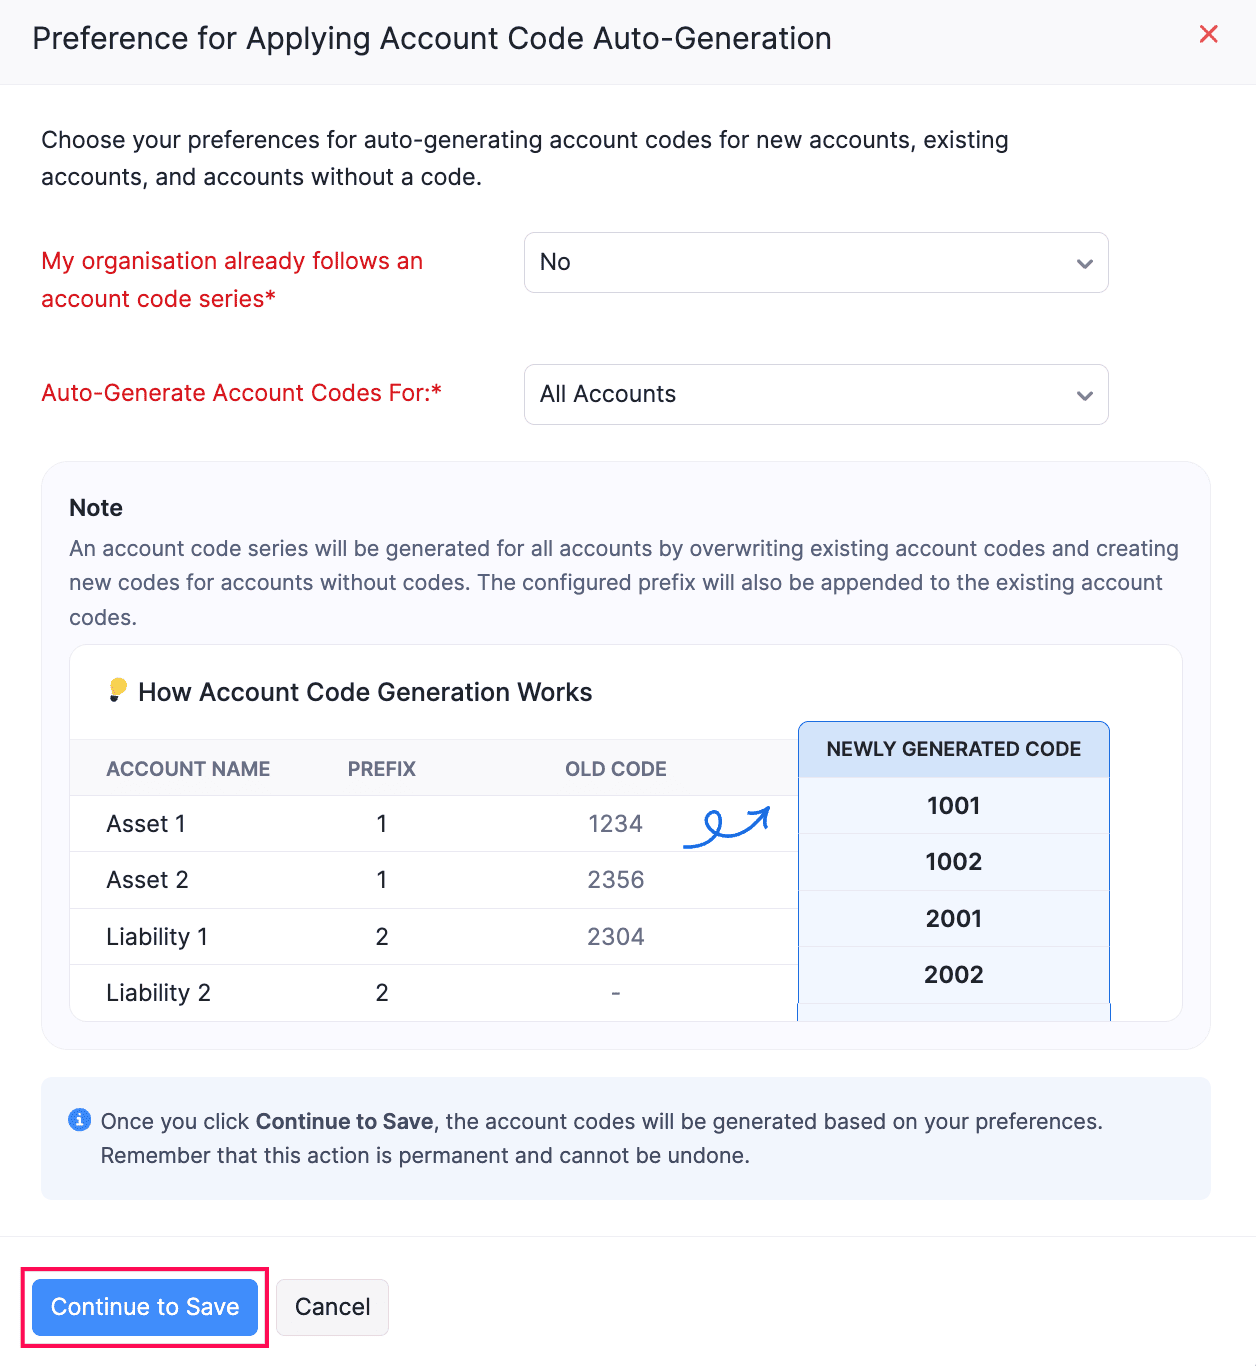
Once you’ve selected your preferred option and saved the changes, Zoho Books will automatically generate the account code format based on your configuration.
Configure Default Accounts Used in Transactions
Note: This feature is available only in certain plans of Zoho Books. Visit our pricing page to check if it’s included in your current plan.
You can configure default accounts for different accounting entries. For example, you can assign a default account for Accounts Receivable to track customer payments and outstanding balances. Similarly, you can configure default accounts for Accounts Payable, Shipping Charges, Adjustments, Discounts, Bad Debt, Vendor Advances, and Customer Advances. Here’s how:
- Log in to your Zoho Books organization.
- Go to Settings.
- Select Accountant under Preferences.
- In the General tab, under Select a default account to track, choose the default account for:
- Accounts Receivable: Track amounts customers owe your business.
- Accounts Payable: Track amounts your business owes vendors.
- Shipping Charge: Track shipping fees.
- Adjustments: Track transaction adjustments.
- Discount: Track discounts applied to items or transactions.
- Bad Debt: Track uncollectable amounts.
- Vendor Advance: Track advance payments to vendors.
- Customer Advance: Track advance payments from customers.
- Click Save.
Now, the accounting entries will be tracked under the configured default accounts.
You can change these default accounts at any time. Let’s say you want to change the default account for Customer Advances. Here’s how:
- Go to Settings in the top right corner.
- Select Accountant under Preferences.
- In the General tab, under Select a default account to track, click the dropdown next to Customer Advance.
- Select the new account you want to set as the default for Customer Advances.
- Click Save. Now, all future customer advance transactions will be recorded under the newly selected account.
Insight: Only future transactions will be recorded under the newly selected default account. Existing transactions will remain unaffected. This applies to all default accounts you configure.
Configure Default Account To Track Exchange Gain or Loss
When you record transactions with foreign currencies, the differences in exchange rates can affect your organization’s base currency value. This results in small amounts of exchange gains or losses in transactions with respect to your base currency. To report this accurately, you can configure default accounts to track these gains or losses. Here’s how:
Go to Settings.
Select Accountant under Preferences.
In the General tab, under Default Account for Currency Exchange Gain/Loss, choose one of the following preferences:
- Track gains and losses in the same expense account: Choose this option to track both the gains and losses incurred under a single expense account. Next, select the required account from the dropdown.
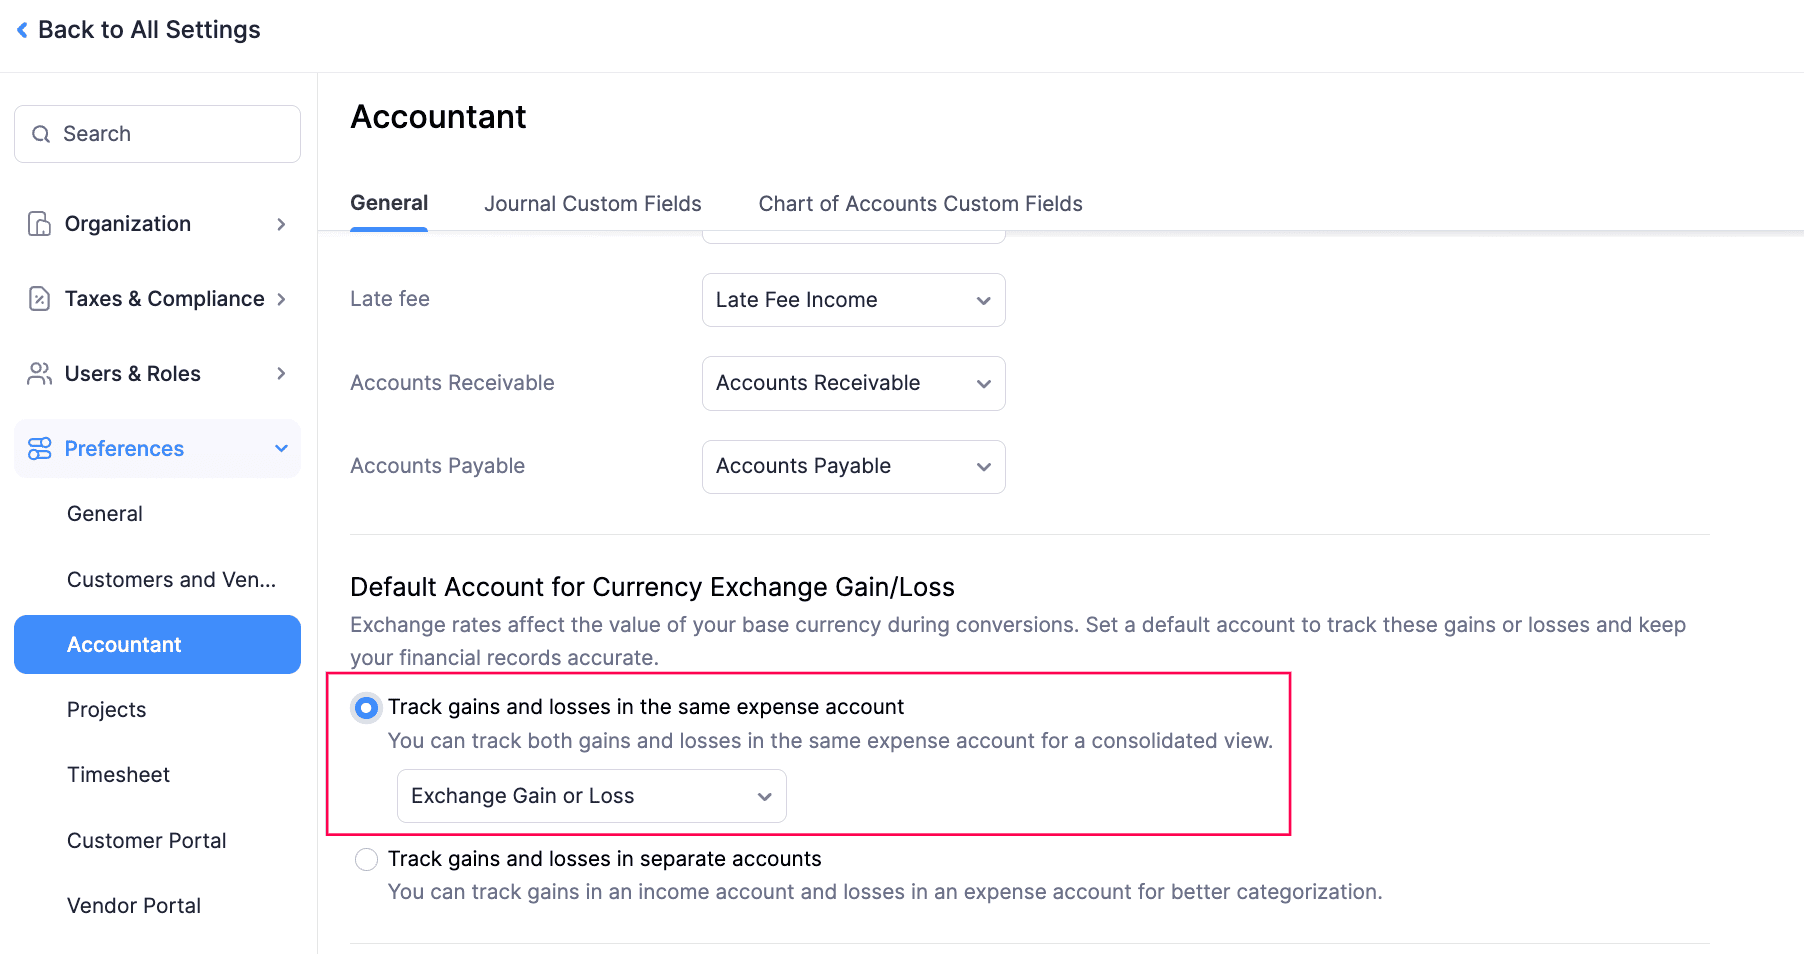
- Track gains and losses in separate accounts: Choose this option to track the exchange gains and losses using different accounts. Next, choose the appropriate accounts from the respective dropdowns.
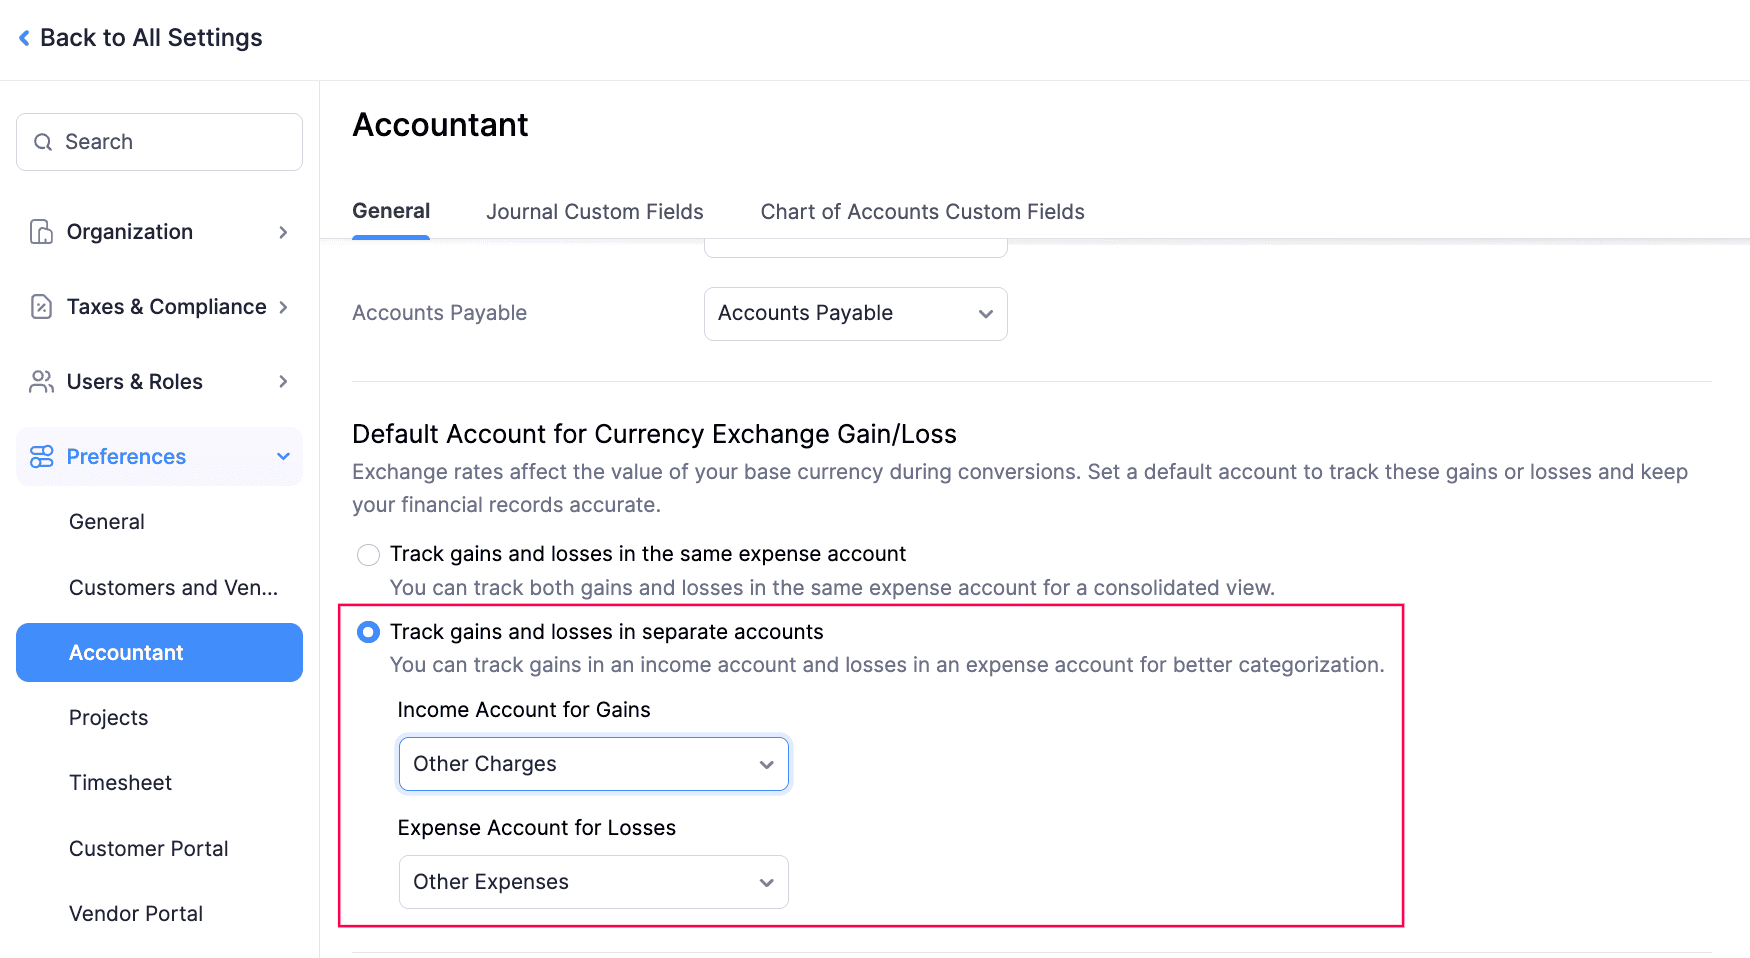
Click Save.
The default account for tracking exchange gains and losses incurred will be configured, based on chosen preferences.
Configure Default Account To Track Exchange Adjustments in Transactions
If you’ve recorded transactions with foreign currencies, there might be differences in values of the transactions when they’re rounded off. These adjustments must be tracked under an account and reported to ensure accurate accounting. Here’s how:
Go to Settings.
Select Accountant under Preferences.
Scroll down to Default Account for Exchange Adjustments in Transactions and select the preferred account. The Exchange Gain or Loss account will be selected by default.
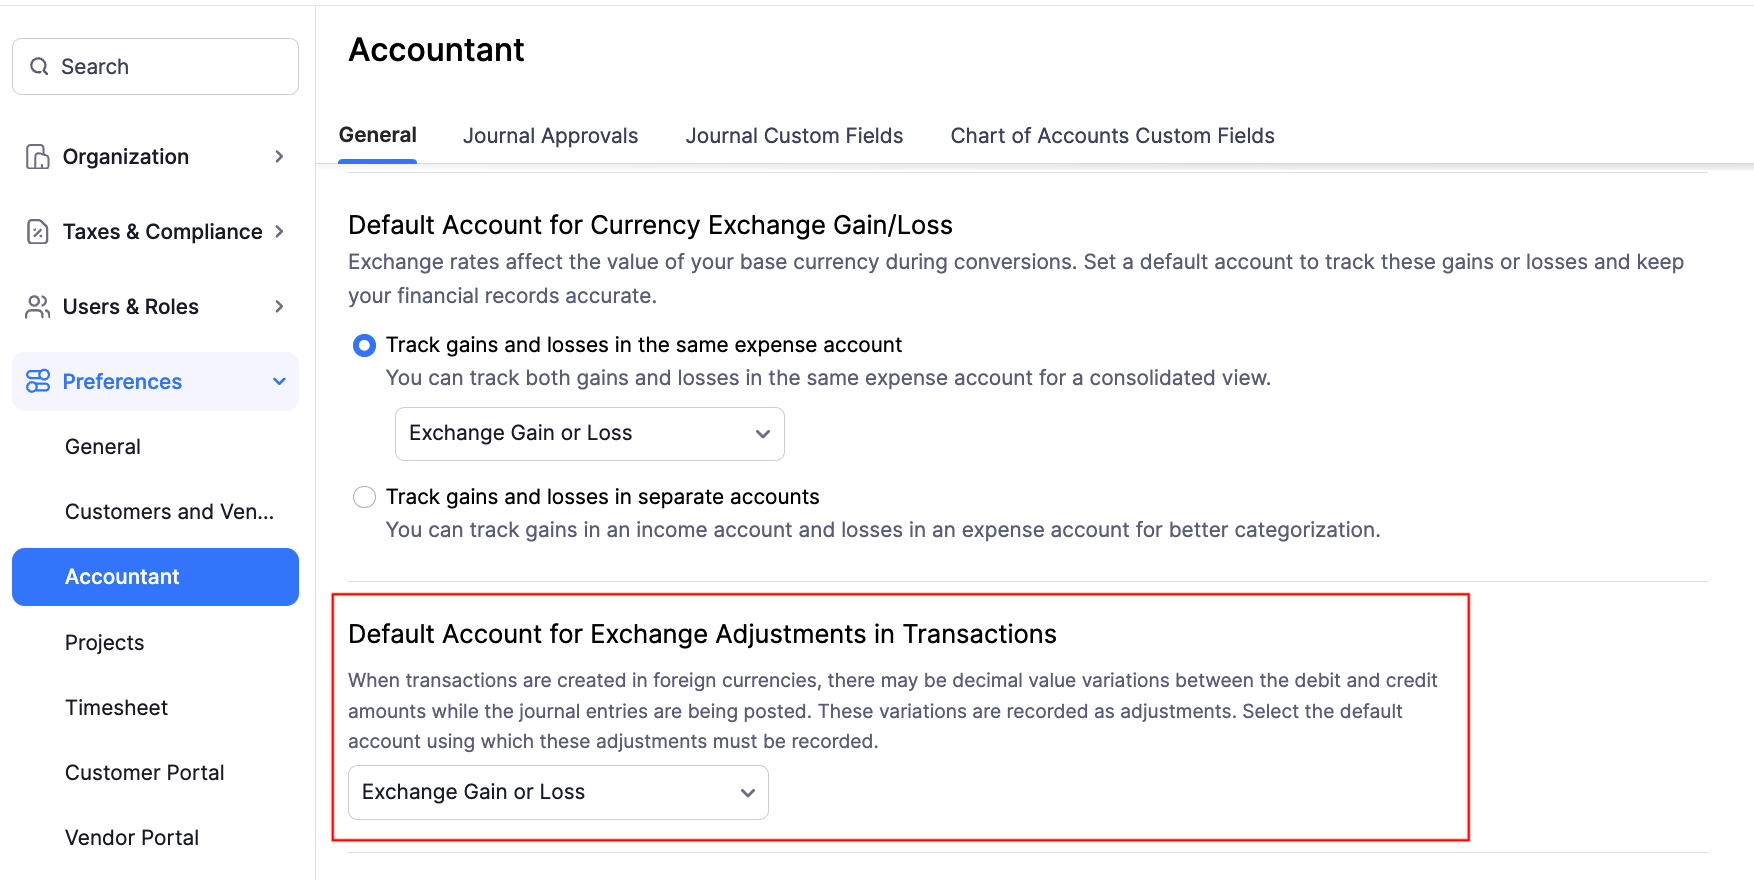
Click Save.
The default account to track adjustments from transactions with foreign currencies will be configured.
Configure Approvals for Manual Journals
Note: This feature is currently available in early access. Write to us at support@zohobooks.com to enable it for your organization.
To configure approvals for manual journals:
- Go to Settings.
- Select Accountant under Preferences.
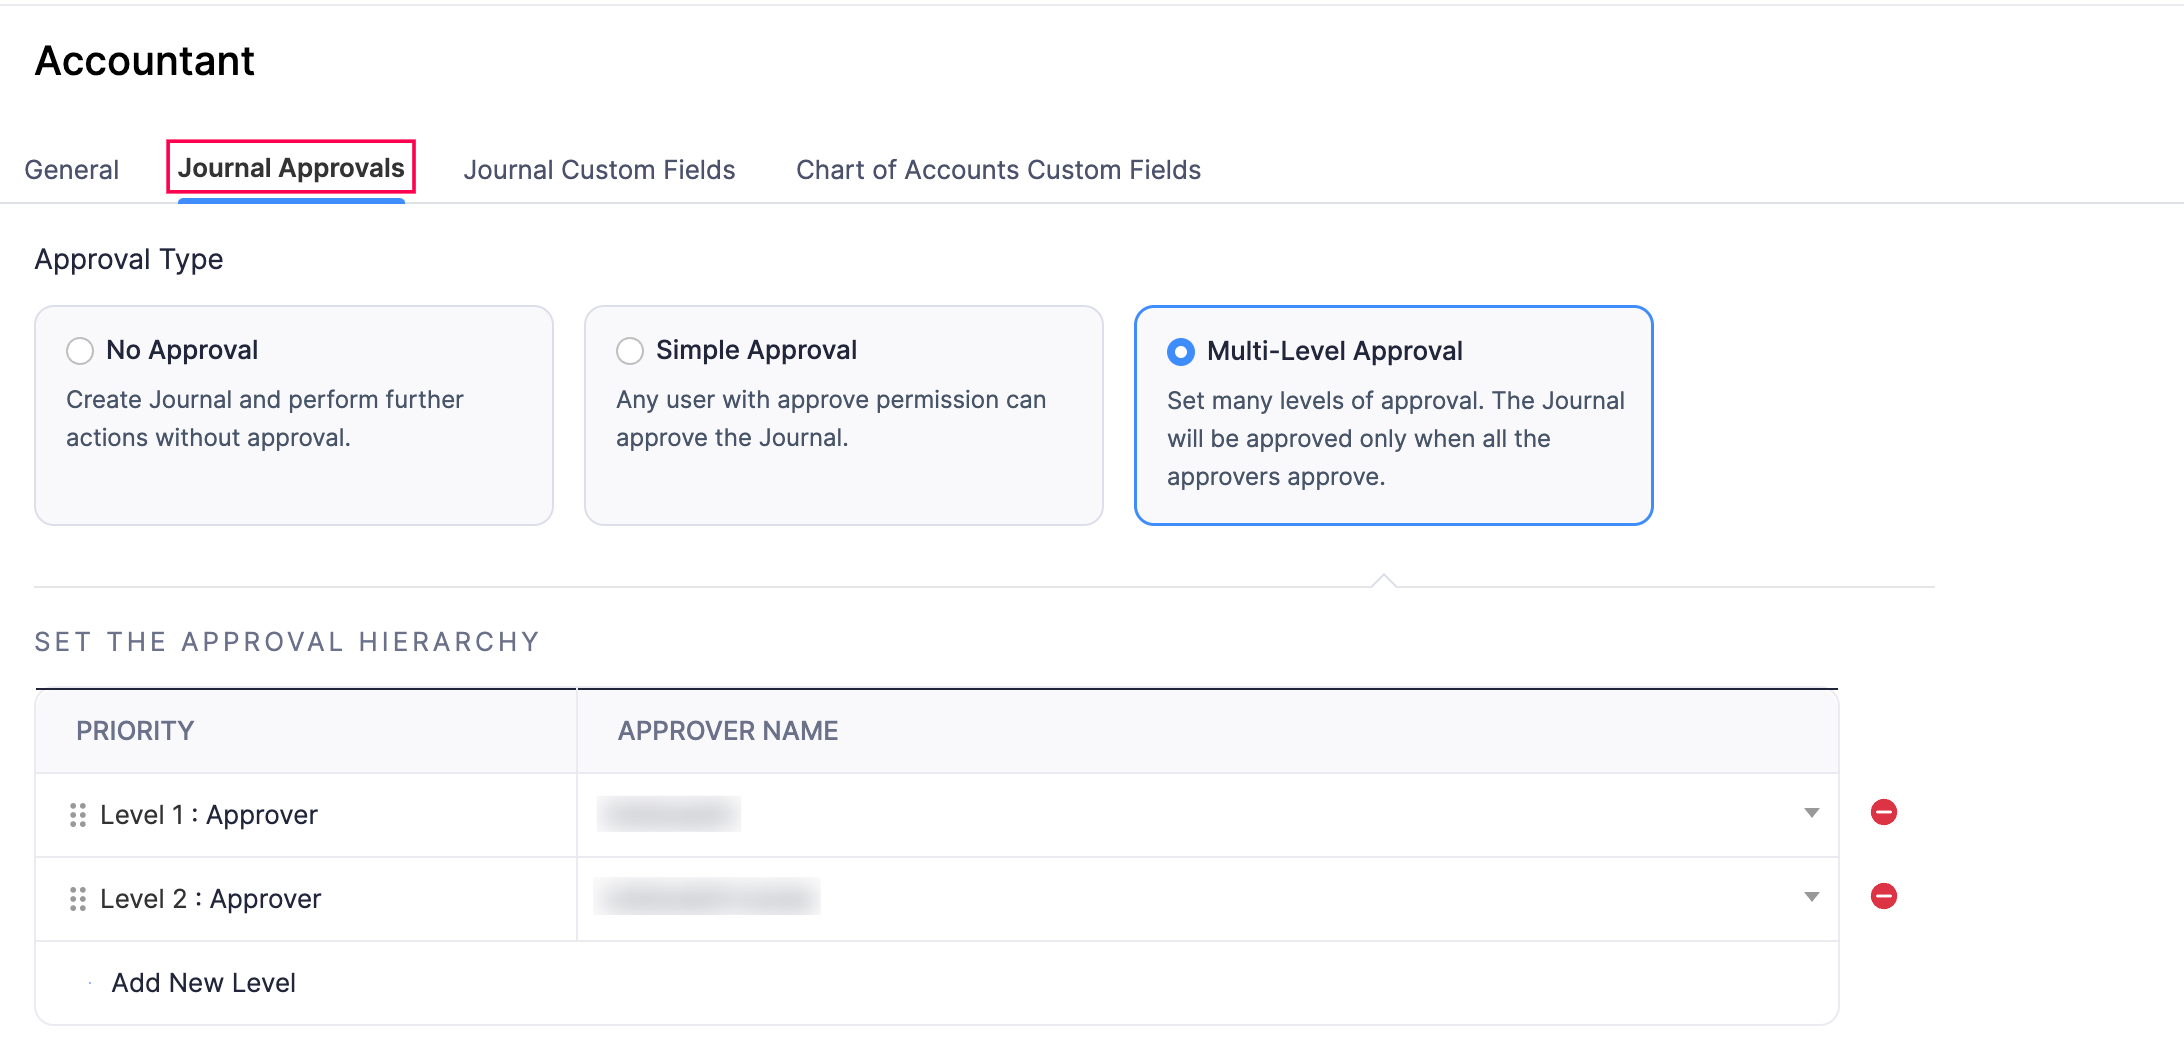
- Click the Journal Approvals tab at the top.
- Under this tab, you can configure the following:
- Approval Type: Choose how you want the manual journals to be approved:
- No Approval: This is selected by default. Manual journals can proceed without approval.
- Simple Approval: Any admin or approver can approve the transaction. Further actions are allowed only after approval.
- Multi-Level Approval: Set up to 10 levels of approval. Manual journals move forward only after all assigned approvers approve them. Click Add New Level to add more approvers and select the approver for each level.
- Approval Preferences: Check Allow approvers to approve the transactions they create if you want approvers to approve their own manual journals.
- Notification Preferences: In this section, you can check any of the following options:
- Send email and in-app notifications when transactions are submitted for approval to notify approvers when a manual journal is submitted.
- Notify the submitter when a transaction is approved or rejected to alert the person who submitted the manual journal about its approval or rejection.
- Approval Type: Choose how you want the manual journals to be approved:
- Click Save.
Your selected approval settings will now apply to manual journals in your organization.
Set Preferences for Recurring Journal Entries
Recurring journals are automated journal entries for repetitive transactions like rent or depreciation. You can save them as drafts or publish them immediately. To set your preference on how the child journals must be saved:
- Log in to your Zoho Books organization.
- Go to Settings.
- Select Accountant under Preferences.
- In the General tab, under Recurring Journals, choose one of the following options:
- Create manual journals in the Draft state: Creates journal entries as drafts for later review and publishing.
- Create manual journals in the Published state: Creates journal entries directly in the published state.
- Click Save.
All recurring journals will now follow your selected preference.
Journal Fields
In Zoho Books, you can create fields for journal entries to capture additional information. For example, you can create a journal field to track transaction references, audit notes, or even tax details. Read our help article on Fields to learn how to create custom fields for journal entries and manage them.
 Yes
No
Yes
No
Thank you for your feedback!