Custom Reports
With Zoho Books, you have the option to customise reports in two ways:
- Create a new custom report.
- Customise an existing report.
You can either create a new custom report based on your preferences or save the customisations made to an existing report as a new custom report in Zoho Books. This way, all the preferences applied to a report will be saved, and you can access it instantly.
Note: This feature is available only for certain plans of Zoho Books. Visit the pricing page to check if it’s available in your current plan.
Create a New Custom Report
To create a new custom report:
- Go to Reports on the left sidebar.
- Navigate to the Custom Reports or select a Report Category on the left sidebar.
- Click Create New Report.

- Select a Parent Module from the dropdown.
- Click the Plus icon to add a Child Module.
- Select a Child Module from the dropdown.
Note: Click the Delete icon to remove the selected Child Module.
Note: By default, the Show Related Records Only option will be selected. This will display only the transactions related to the Parent Module you’ve selected. To view all transactions, click the Edit icon next to the field and select Show All Records. This will display all your transactions regardless of the selected Parent Module.
- Click Next.
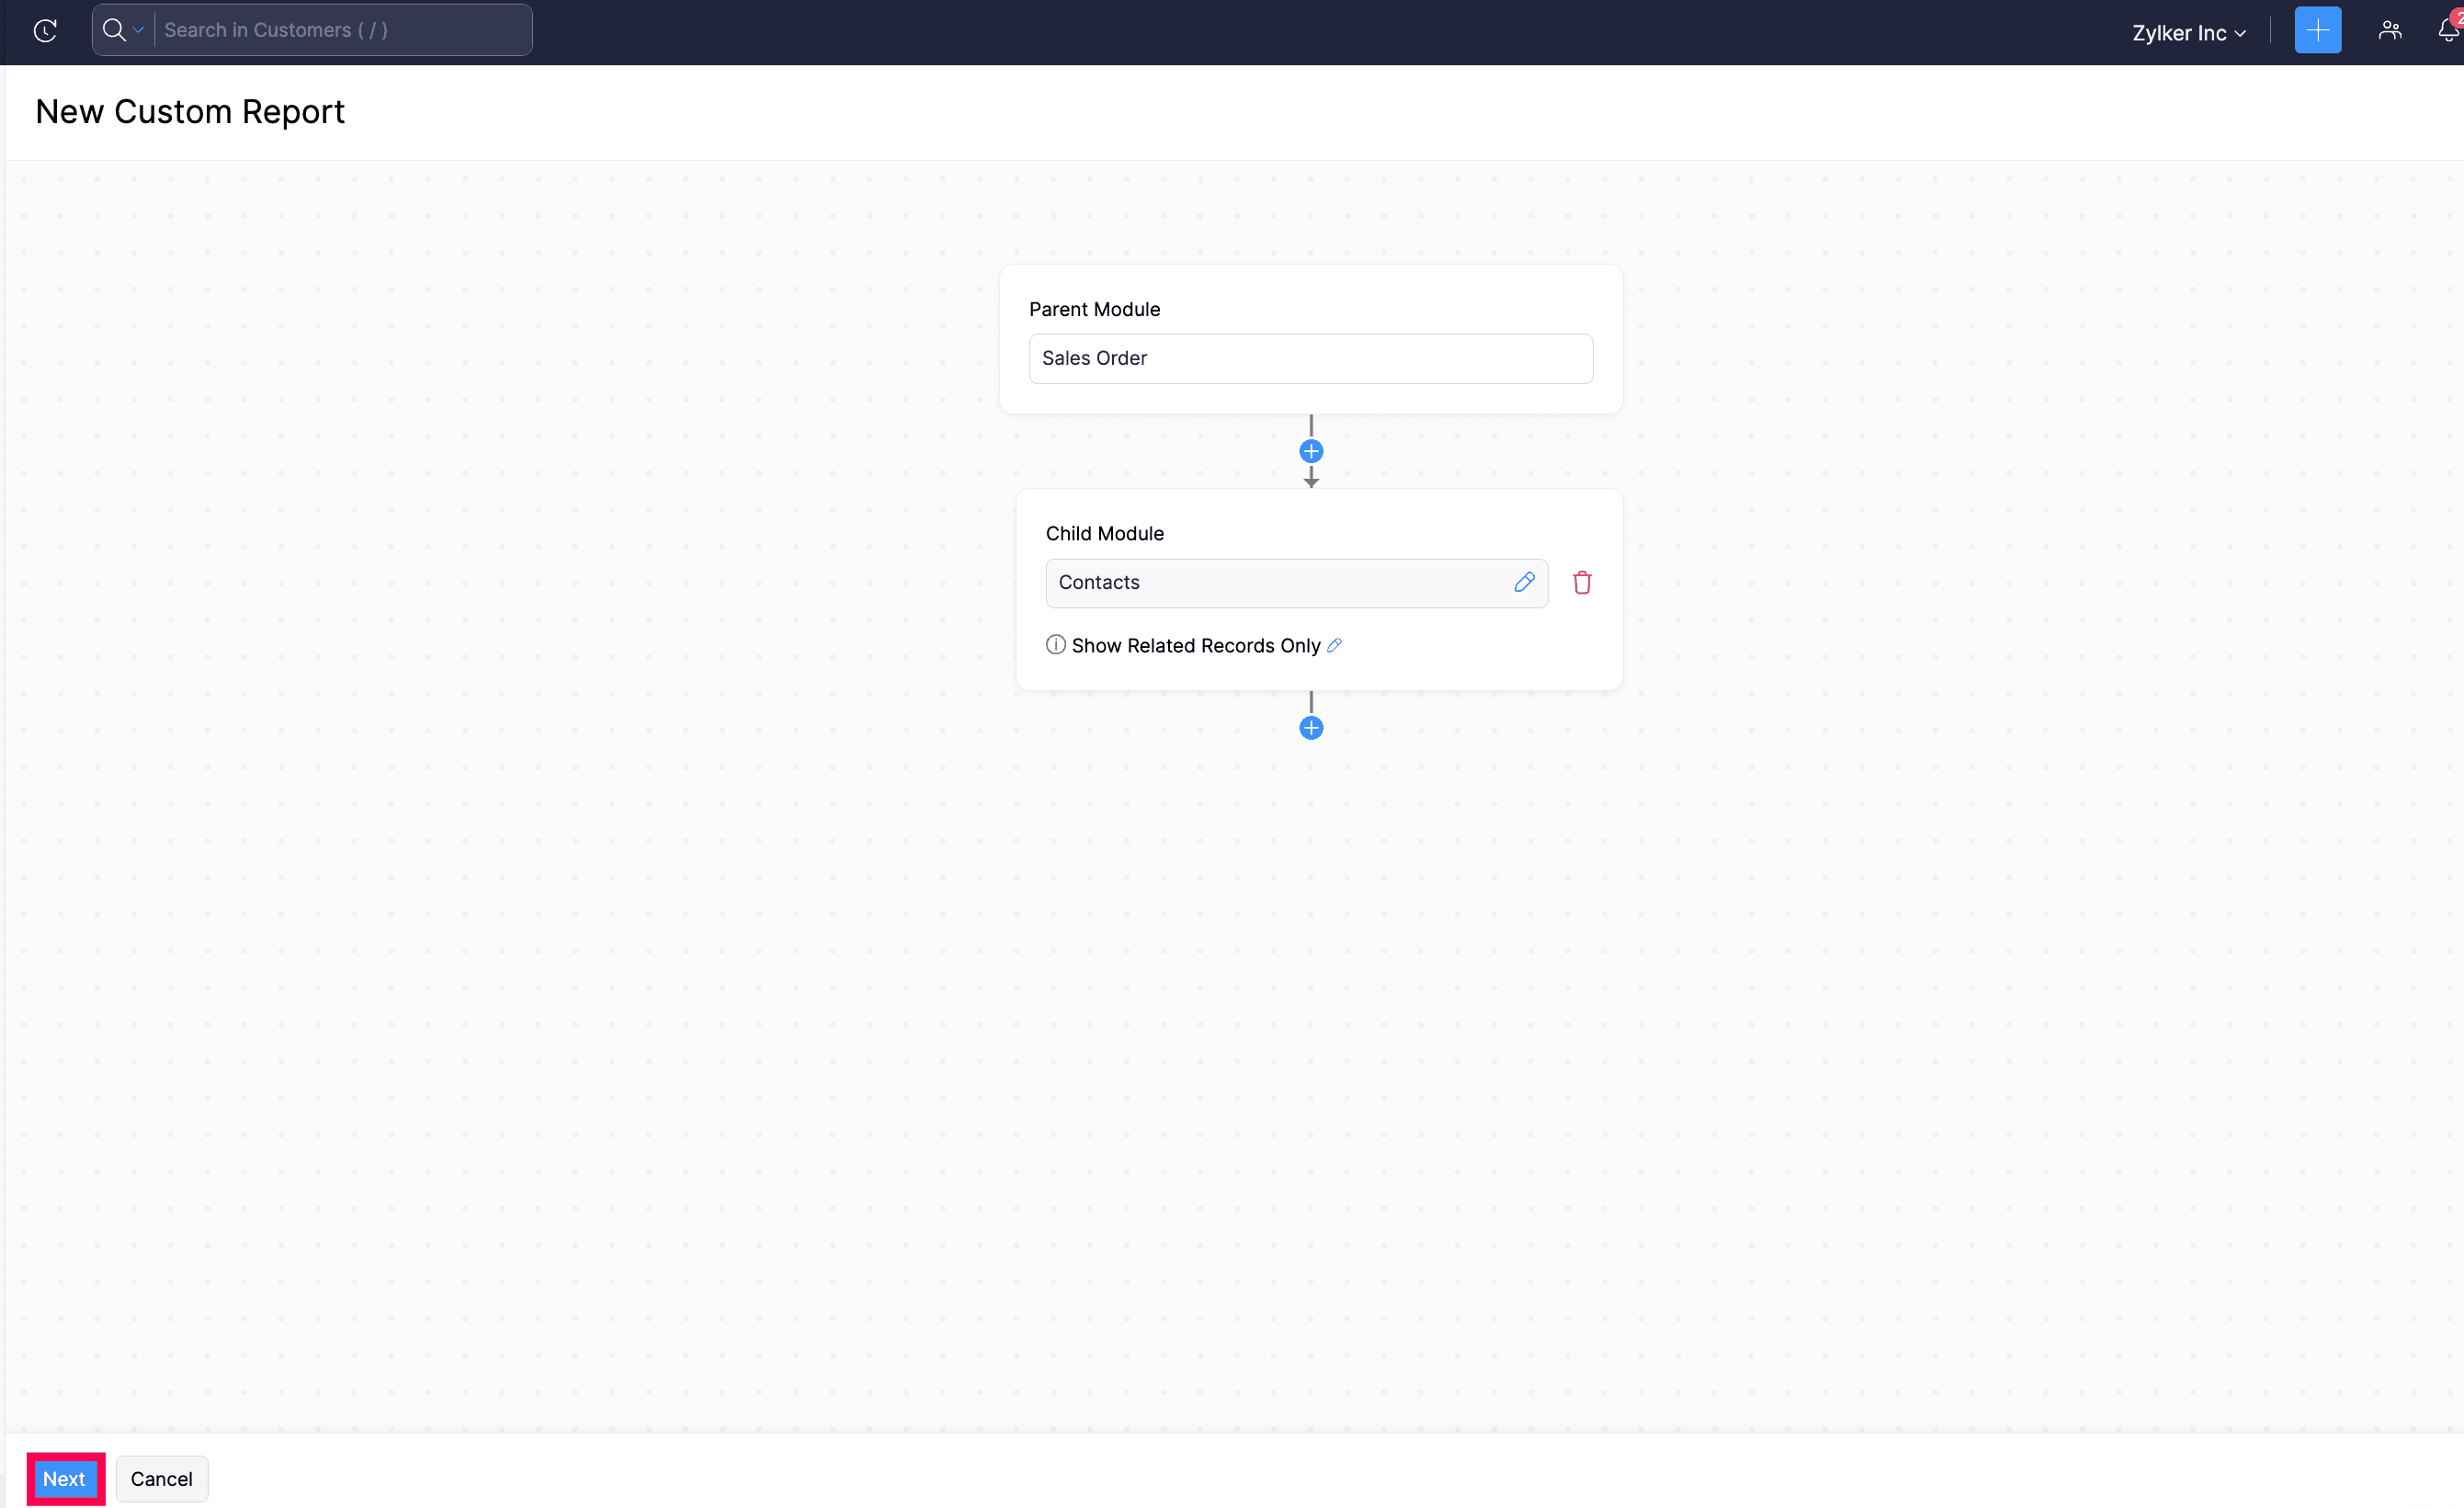
You will be redirected to the General section.
1. General
In the general section, you can customise your report based on the following filters:
| Filters | Description |
|---|---|
| Date Range | By selecting a Date Range, you can generate the report for a specific week, month, quarter, or year, or set a custom duration. |
| Group By | You can group the report based on the options that you select. |
| Advanced Filters | Filter your report based on your chosen criteria. |
- Click Next.

You will be redirected to the Show/Hide Columns section.
2. Show/Hide Columns
In this section, you can customise the columns of your report. Here’s how:
- In the Available Columns section, hover your cursor over the column you want to add and click the + icon next to it.
- In the Selected Columns section, you can view the existing columns of your report. You can change the order of the selected columns by dragging and dropping.
- Click Next.

You will be redirected to the Report Layout section.
3. Report Layout
In the Report Layout section, you can configure the layout and the details displayed in the report when you print or export it.
Choose Details to Display
In the Choose Details to Display section, you can select the information to be included in your report when it is printed or exported.
| Table | Description |
|---|---|
| Organisation Name | Enable this option to display your organisation’s name on the report. |
| Report Basis | Select the accounting method to be displayed on your report: cash-based or accrual-based. |
| Page Number | Enable this option to auto-generate the page number in the footer section for your reports. |
| Generated By | Selecting this option will display the name of the admin who is generating the report. If you have scheduled the report to be generated, selecting this option will indicate that the report is generated Zoho Books. |
| Generated Date | Enable this option to display the date when the report was generated. |
| Generated Time | Enable this option to display the time at which the report was generated. |
Note: The Generated Time will not be enabled if you don’t choose to display the Generated Date.

Report Layout
In the Report Layout section, you can configure the layout of your report using the following fields:
| Field | Description |
|---|---|
| Table Density | This option affects the size of the rows in the report that is printed or exported. You can select from three options: Classic, Compact, and Super Compact. |
| Paper Size | Based on the medium where this would be printed, you can select either A4 or Letter sizes. |
| Orientation | Select either Portrait or Landscape based on how you’re displaying the report. |
| Font Family | This is the font that will be used to display content in this report. A note will appear under the selected font explaining which language it’s best suited for. Pro Tip: |
| Margins | The margins of the reports determine the distance between the report’s content and the edges of the medium on which it is printed. |
- Click Next.

4. Report Preferences
In this section, you can configure the name, description, and share permissions of the report.
- In the Report Preferences section, enter the Report Name.
- Enter a name for the report in the Name in Export field, which will be report’s name when it is exported.
- In the Configure Permissions section, configure who can view, export, or schedule the custom report. You can find different share options such as:
| Field | Description |
|---|---|
| Only Me | Only you will be able to view, export, or schedule the custom report. |
| Only Selected Users & Roles | Only the selected users will be able to view, export, or schedule the custom report. |
| Everyone | Everyone in the organisation will be able to view, export, or schedule the custom report. |
- If you select the Only Selected Users & Roles option, configure the access permissions for each user.
- Click Save Custom Report.
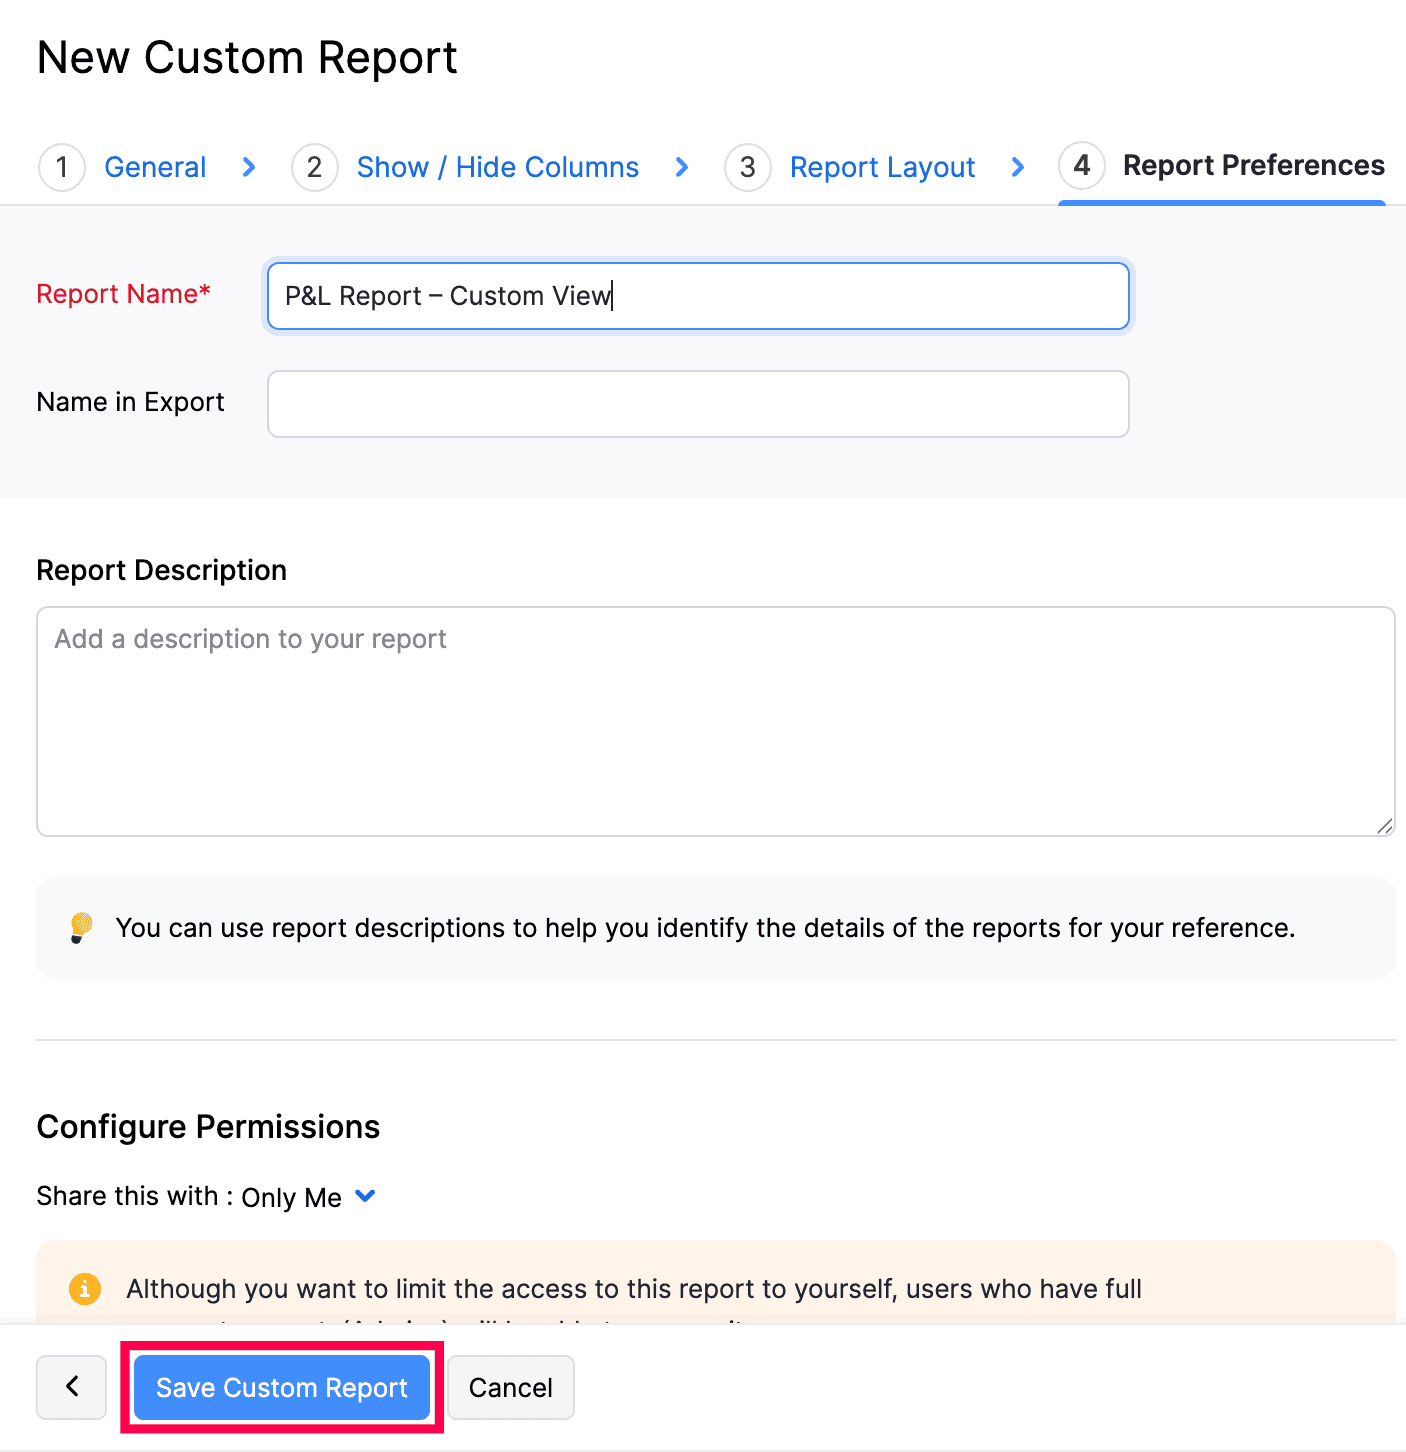
Note: You can schedule your custom reports that you have saved to be sent to your email address or other users in the organisation. In the custom report details page, click Schedule Report. These reports will be sent in different time intervals at a specific time you configure.
All the customisations made will now be saved as a new custom report in the Custom Reports section under Reports.
Customize an existing report
To customise an existing report:
- Go to Reports on the left sidebar
- Navigate to the Custom Reports or select a Report Category on the left sidebar
- Click the dropdown next to Create New Report.
- Select Create From Existing Report from the dropdown.

- Select the report that you want to customise and click Proceed.

You will be redirected to the General section.
1. General
In this section, you can customise your report based on the following filters:
| Filters | Description |
|---|---|
| Date Range | By selecting a Date Range, you can generate the report for a specific week, month, quarter, or year, or set a custom duration. |
| Report Basis | Select the accounting method to be displayed on your report: cash-based or accrual-based. |
| Group By | You can group the report based on the options that you select. |
| Filter Accounts | Filter accounts that you’d like to include. This can be: 1. All accounts 2. Accounts with transactions 3. Accounts without zero balance |
| Compare With | Compare the report with previous periods, months, quarters, or years. To compare your report with the previous years or previous periods, select your preferred date range. To compare your report with the previous months, select month-wise ranges like Jan 1 to Jan 31 as your custom date range. To compare your report with the previous quarters, select quarter-wise ranges based on your organisation’s fiscal year. For example, if your fiscal year is January to December, select date ranges like Jan 1 - Mar 31, Apr 1 - Jun 30, etc., as your custom date range. |
| Advanced Filters | Filter your report based on projects, reporting tags, and branches and more. |
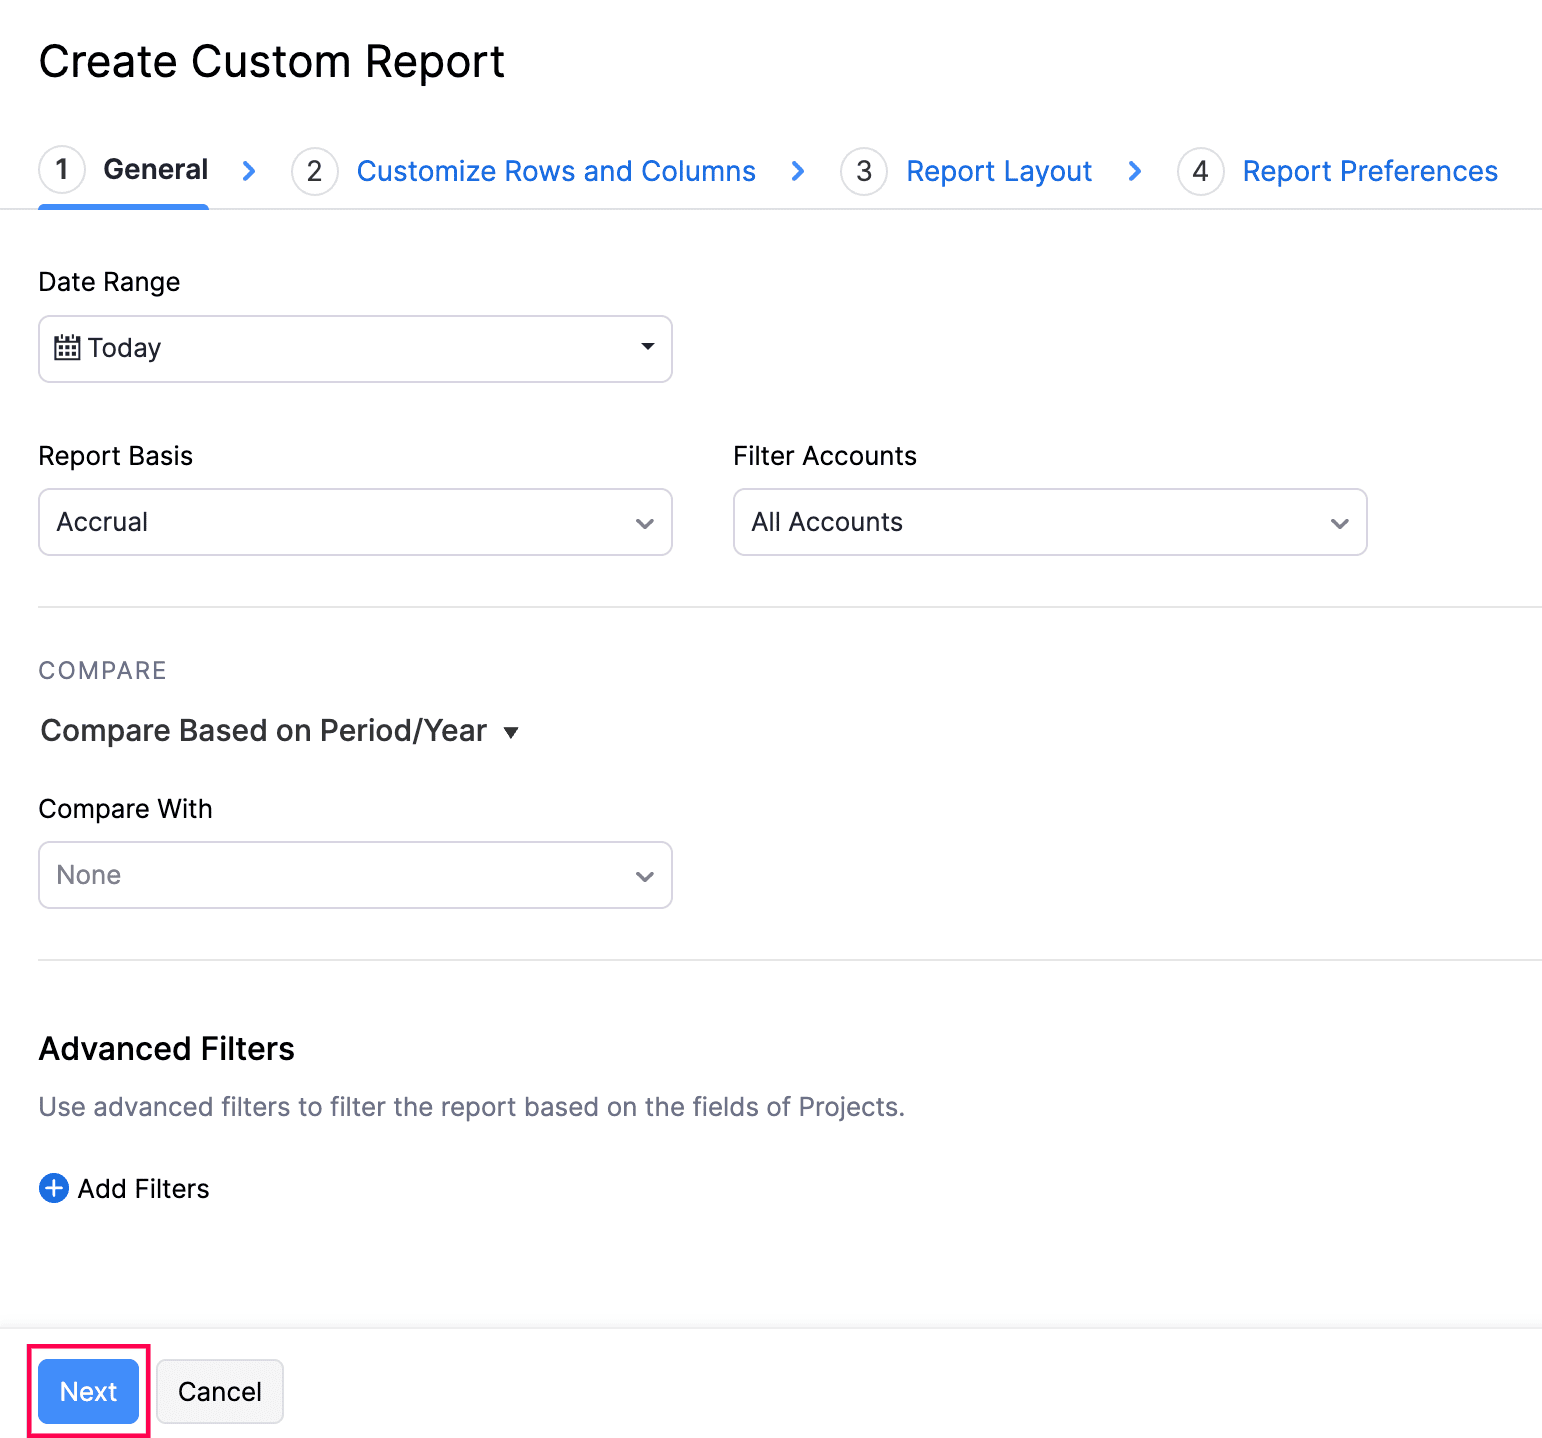
- After configuring the above filters, click Next to go to the Show/Hide Columns section.
2. Show/Hide Columns
In this section, you can customise the columns of your report. Here’s how:
- In the Available Columns section, hover your cursor over the column you want to add and click the + icon next to it.
- In the Selected Columns section, you can view the existing columns of your report.
- Click Next.
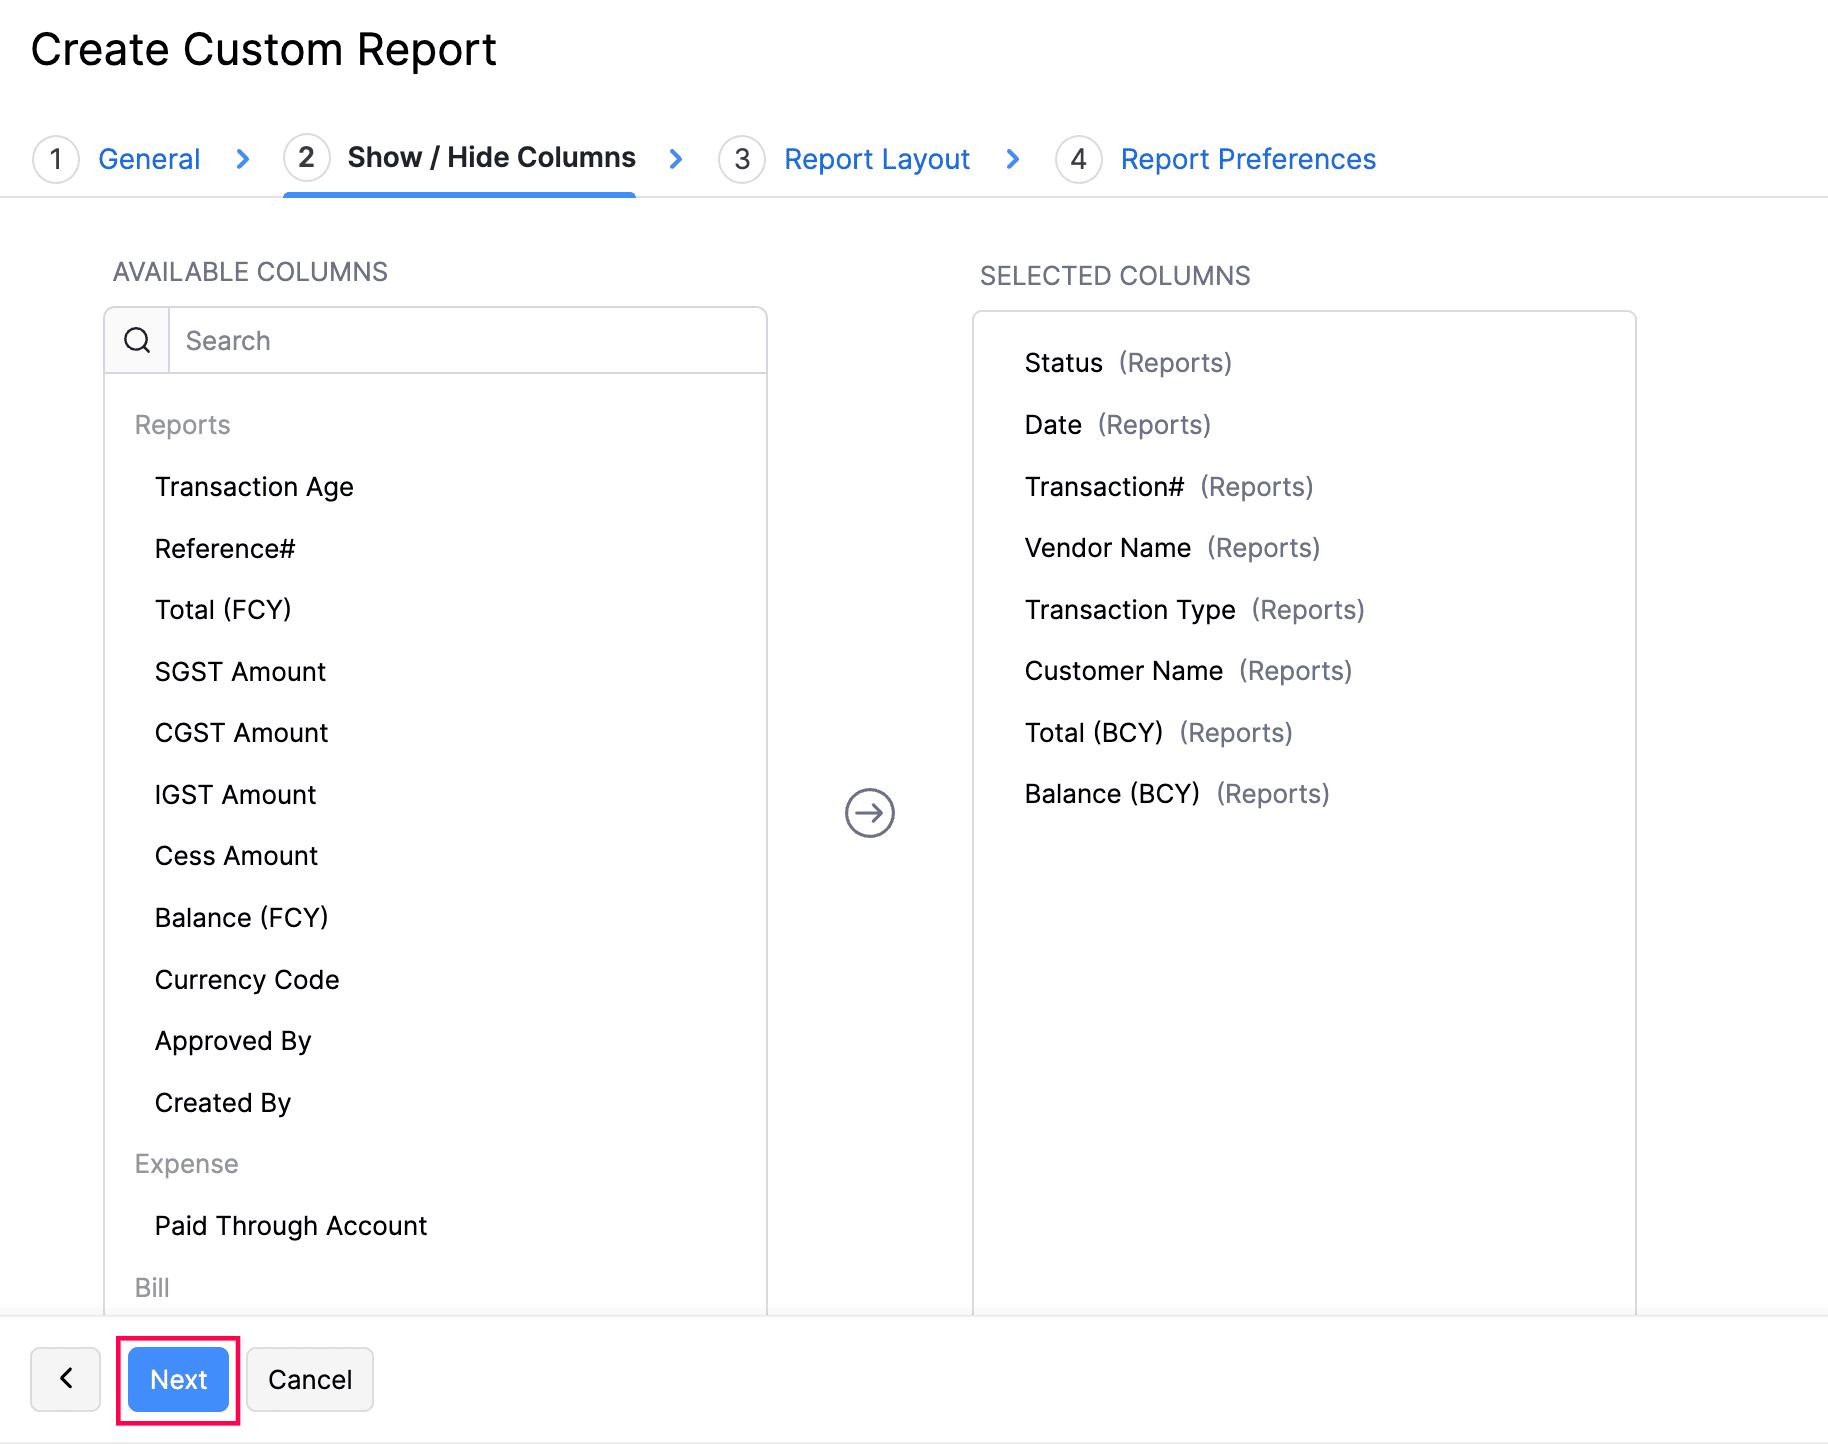
You will be redirected to the Report Layout section.
Customize Rows and Columns
In the Customise Rows and Columns section, you can customise the rows and columns of your report.
Add New Account Group
An account group is a group of related accounts in a report used for reporting and analysis. To add an account group in a report:
- In Customise Rows and Columns section, hover over a row and click the + icon to add another row below it.
- Select Account Group in the New Row section to add it as a new row or Select Account Group in the New Child Row section to add it as a child row to the existing one.

- Enter the Group Name and configure Preferences in the pop-up that appears.
- In the Account Criteria section, select the accounts you want to add to the account group.
- Once you have configured the account group, click Add New Row.
The account group will be added as a new row or a new child row to the report.
Add New Text Field
You can add text fields as new rows in your custom reports. Here’s how:
- In Customise Rows and Columns section, hover over a row and click the + icon to add another row below it.
- Select Text Field in the New Row section to add it as a new row or select Text Field in the New Child Row section to add it as a child row to the existing row.

- Enter the text and click Save in the pop-up that appears. The text field will be added as a new row or new child row in the report.
Add New Formula Row
A formula row is composed of two or more accounts, account groups or formula rows and mathematical operators. You can create formulas and add them as rows to your custom reports. Here’s how:
In Customise Rows and Columns section, hover over a row and click the + icon to add another row below it.
Select Formula Row in the New Row section to add it as a new row.

Enter the Formula Row Name in the pop-up that appears.
Create a formula using the accounts or formulas in the Select accounts or formulas dropdown and the operators next to the dropdown.
Once you create a formula, click Check Syntax to check the formula.
Click Add New Row to save the formula.
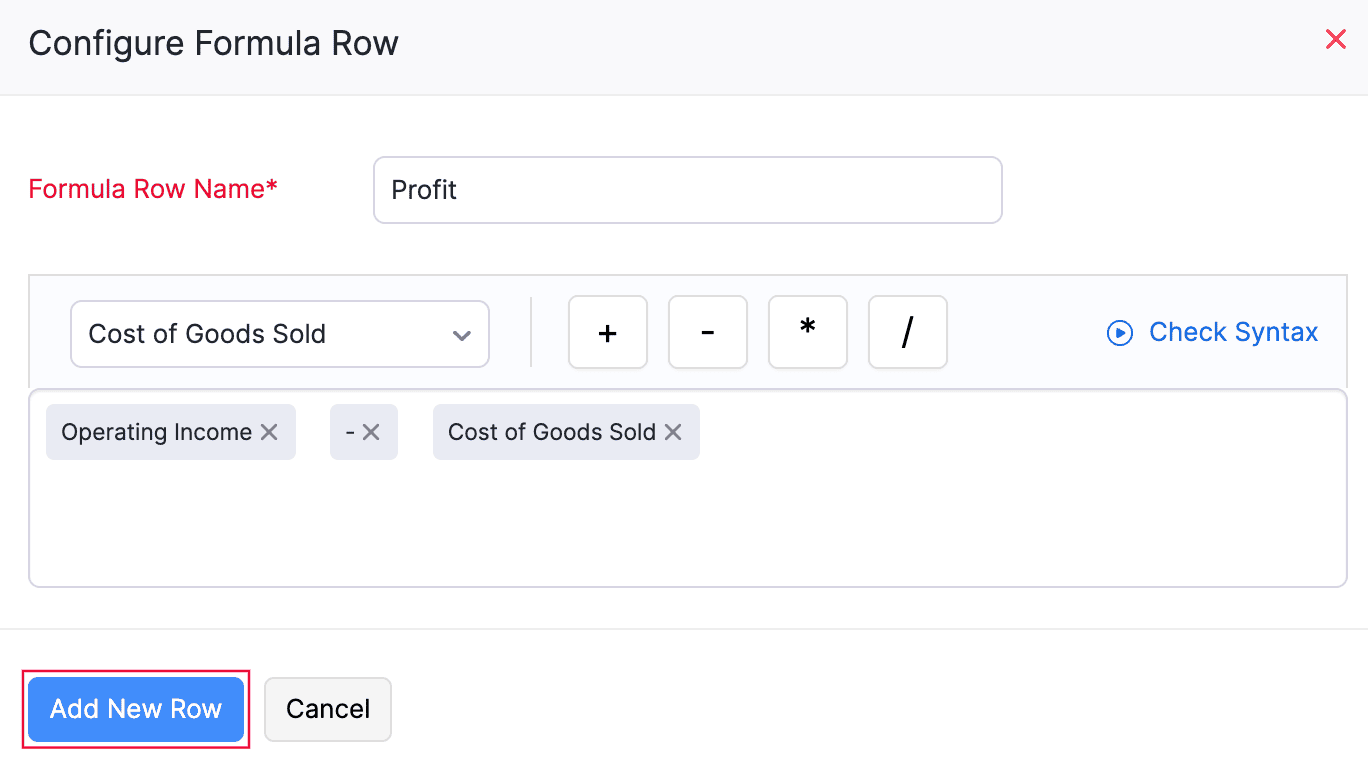
The formula row will be added as a new row in the report.
- Next, click Refresh Preview to preview the rows of the report.
- Click Next.
You will be redirected to the Report Layout section.
3. Report Layout
In the Report Layout section, you can configure the layout and the details displayed in the report when you print or export it.
Choose Details to Display
In the Choose Details to Display section, you can select the information to be included in your report when it is printed or exported.
| Table | Description |
|---|---|
| Organisation Name | Enable this option to display your organisation’s name on the report. |
| Report Basis | Select the accounting method to be displayed on your report: cash-based or accrual-based. |
| Page Number | Enable this option to auto-generate the page number in the footer section for your reports. |
| Generated By | Selecting this option will display the name of the admin who is generating the report. If you have scheduled the report to be generated, selecting this option indicates that the report is generated by the Zoho Books |
| Generated Date | Enable this option to display the date when the report was generated. |
| Generated Time | Enable this option to display the time at which the report was generated. |

Note: The Generated Time will not be enabled if you don’t choose to display the Generated Date.
Report Layout
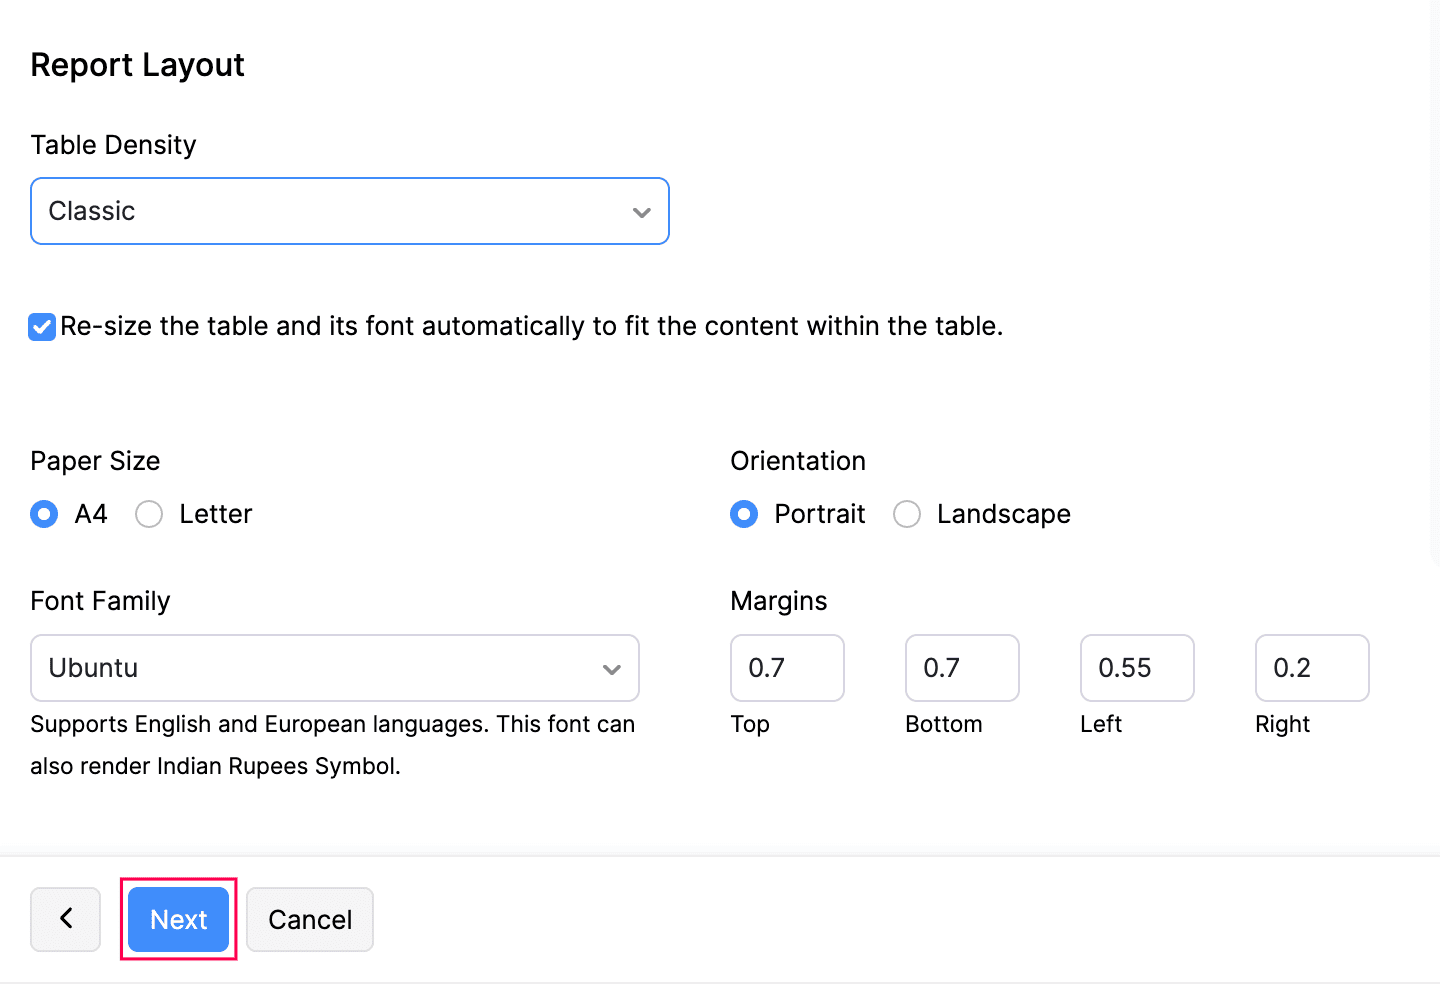
In the Report Layout section, you can configure the layout of your report using the following fields:
| Field | Description |
|---|---|
| Table Density | This option affects the size of the rows in the report that is printed or exported. You can select from three options: Classic, Compact, and Super Compact. |
| Paper Size | Based on the medium where this would be printed, you can select either A4 or Letter sizes. |
| Orientation | Select either Portrait or Landscape based on how you’re displaying the report. |
| Font Family | This is the font that will be used to display content in this report. A note will appear under the selected font explaining which language it’s best suited for. |
| Margins | The margins of the reports determine the distance between the report’s content and the edges of the medium on which it is printed. |
- Click Next.
4. Report Preferences
In this section, you can configure the name, description, and share permissions of the report.
- In the Report Preferences section, enter the Report Name.
- Enter a name for the report in the Name in Export field, which will be used while exporting it.
- In the Configure Permissions section, configure who can view, export, or schedule the custom report. You can find different share options such as:
| Field | Description |
|---|---|
| Only Me | Only you will be able to view, export, or schedule the custom report. |
| Only Selected Users & Roles | Only the selected users will be able to view, export, or schedule the custom report. |
| Everyone | Everyone in the organisation will be able to view, export, or schedule the custom report. |
- If you select the Only Selected Users & Roles option, configure the access permissions for each user.
- Click Save Custom Report.


 Yes
Yes