Preferences
The Preferences section will help you configure your Zoho Books organisation, and also settings for various sales and purchase modules, projects, accountant and other modules.
IN THIS PAGE…
General
This section lets you in enable certain modules in your Zoho Books organisation and consists of other generic functions.
To access the general settings:
- Go to Settings.
- Select General under Preferences.
Enable modules
Select the modules you want to enable in Zoho Books. Once you enable them, they will be shown in the left sidebar. You’ll be able to access and configure these modules only when you enable them in this page.
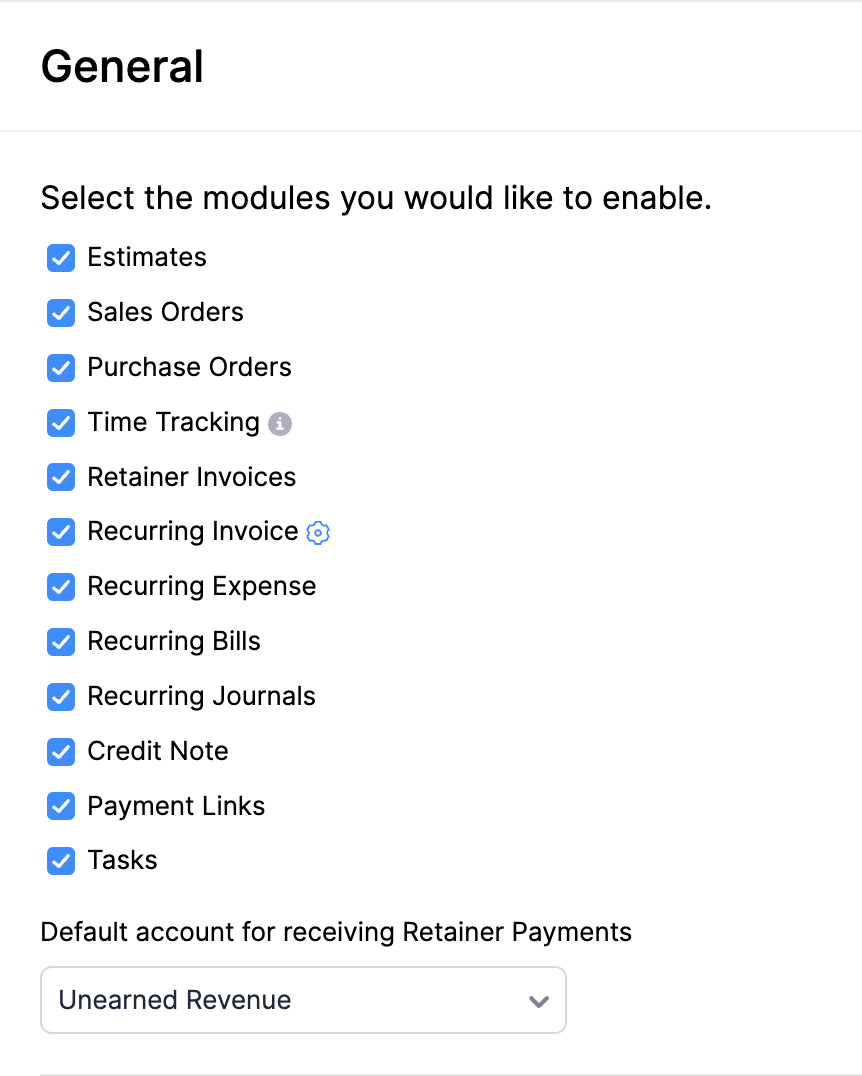
Note:You can access the modules via API even if they are disabled in the Zoho Books browser application.
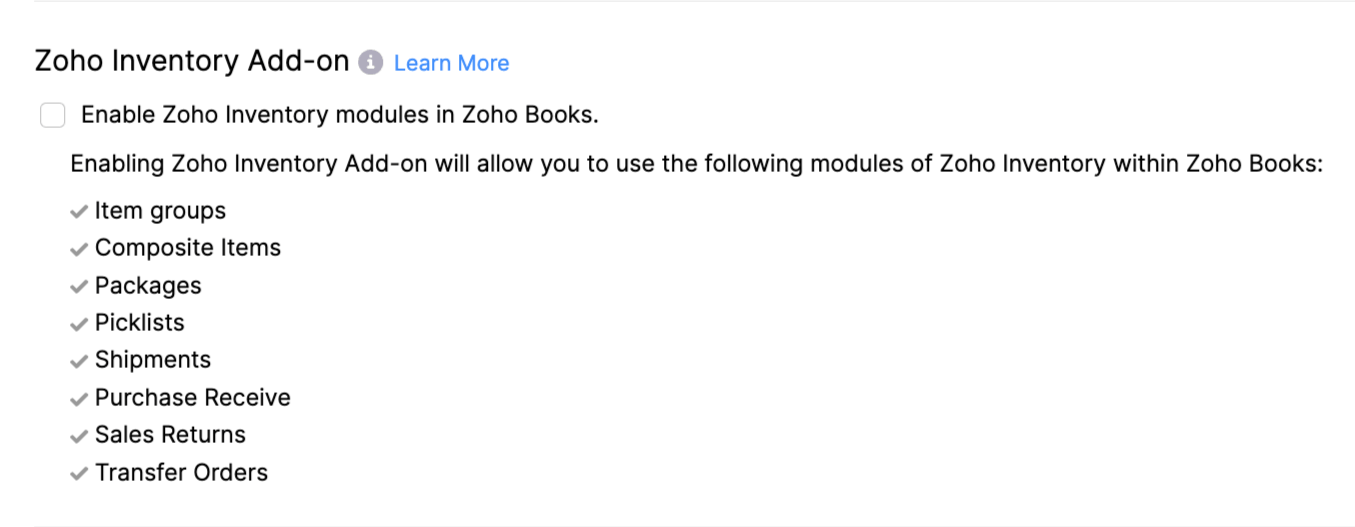
Zoho Inventory Add-on
If you want to integrate with Zoho Inventory, you should have created an active organisation in Zoho Inventory either in the Standard or Professional plan. After you integrate with Zoho Inventory, you can enable the add-on here. Upon enabling this add-on, all the modules pertaining to the integration will be displayed in Zoho Books, from where you can access all the required features.
Learn more about the Zoho Inventory Add-on.
First day of work week
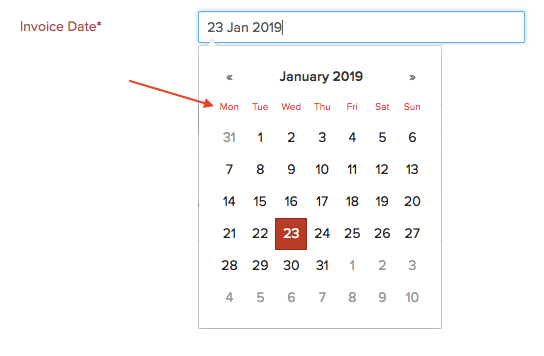
By default, the first working day of the week is Sunday in Zoho Books. However, you can change the first day of your work week to Sunday, Monday or Saturday.
When you change the first day of your work week, the days and dates in the calendar will be updated accordingly. This will be useful when you are selecting dates for sales and purchase transactions, and other modules.
For example, let’s say you’ve set the first day of the week as Monday. When you create an invoice and select the invoice date, this is how the calendar will be displayed.
Attach links of quotes and invoices
Attach the corresponding PDF of the quote or invoice in the email while sending it to your customer.
Encrypt PDF Files
Secure your PDF files by encrypting them while sending them to your customers. When you encrypt your PDF files, they cannot be:
- edited (or)
- converted into another file format.
Discounts
If you give discounts to your customers, you can select the level of discounts applicable on the transactions.
Choose how discounts are applied in transactions:
-
I don’t give discounts: If you don’t give discount to your customers, then select this option.
-
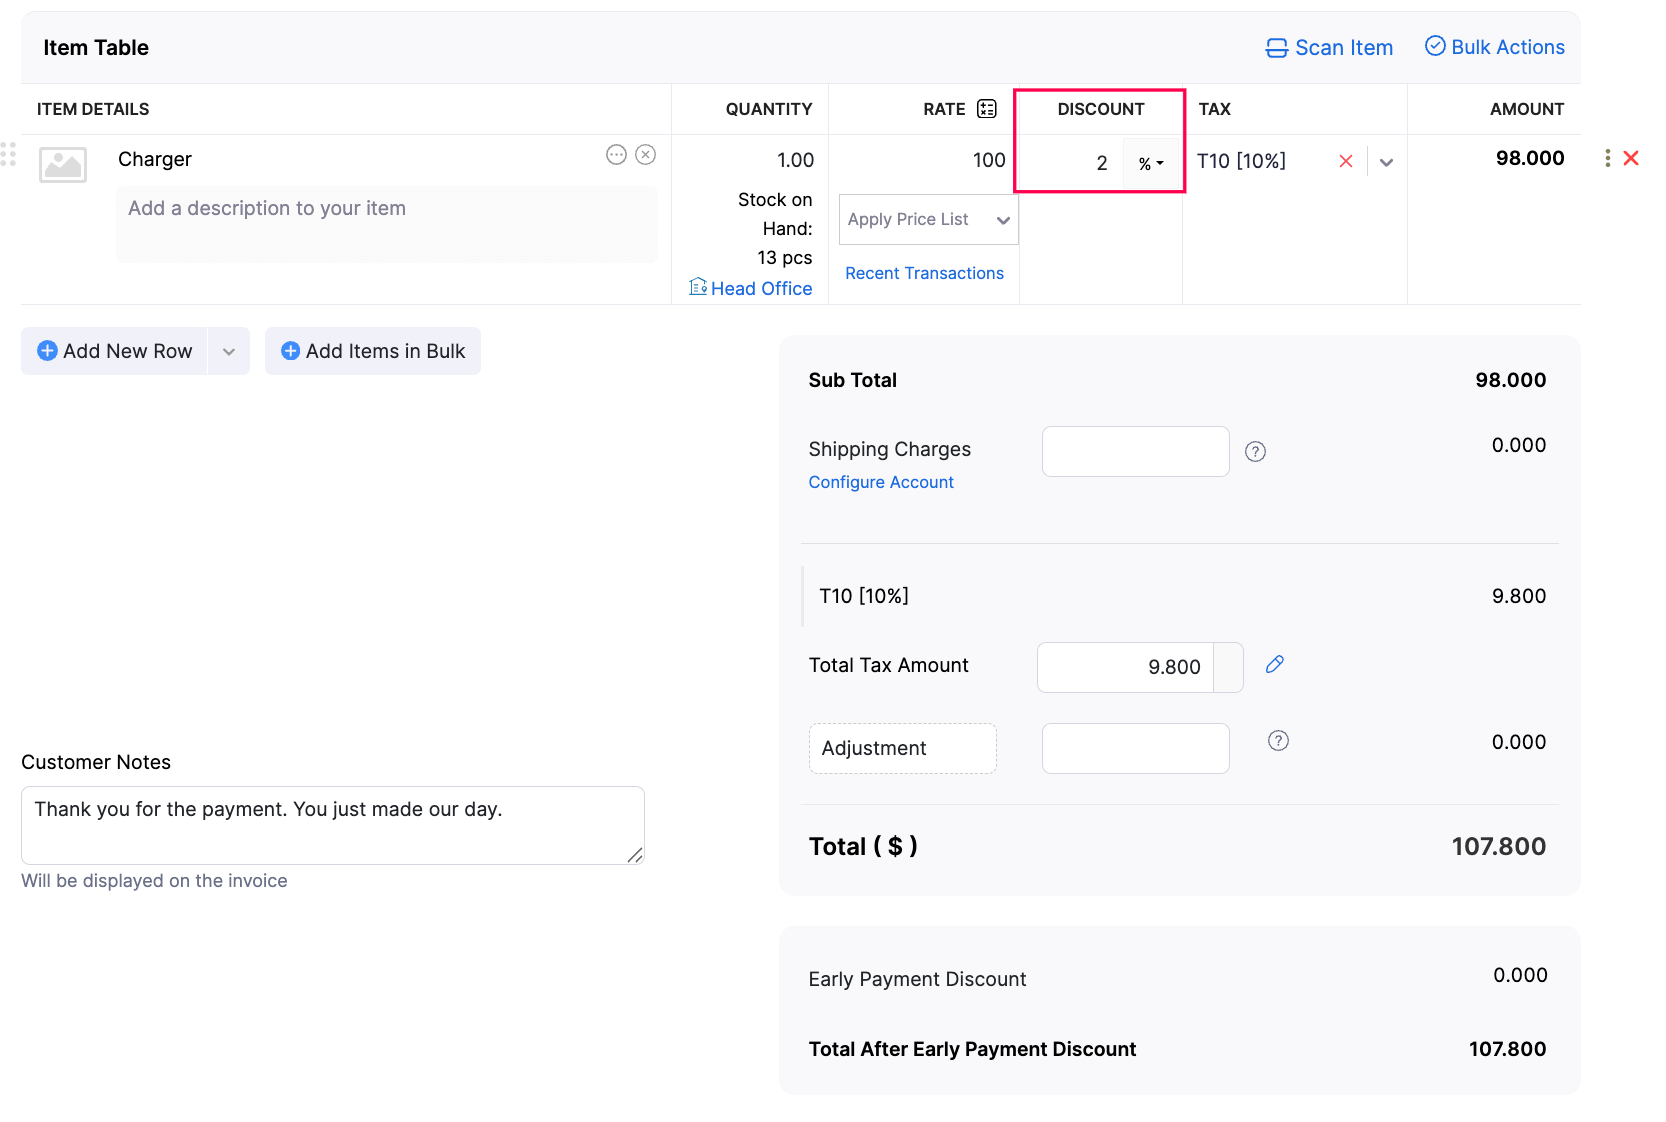
At line item level: Discount is provided for every item individually in a transaction (like an invoice).
If you have applied taxes on the line item(s), the tax is calculated after the discount is applied.
- At invoice level: Discount is provided on the whole amount in the invoice.
If you select a discount to be applied at invoice level, you can also choose to apply the Discount Before Tax or Discount After Tax.
Additional charges
To add additional charges, you’ll have to enable it:
- Go to Settings.
- Select General under Preferences.
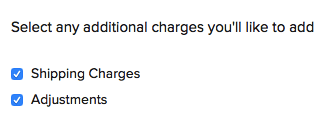
- Scroll down to Select any additional charges you’ll like to add and check the boxes Adjustments and/or on Shipping charges to include these on your quotes and invoices.
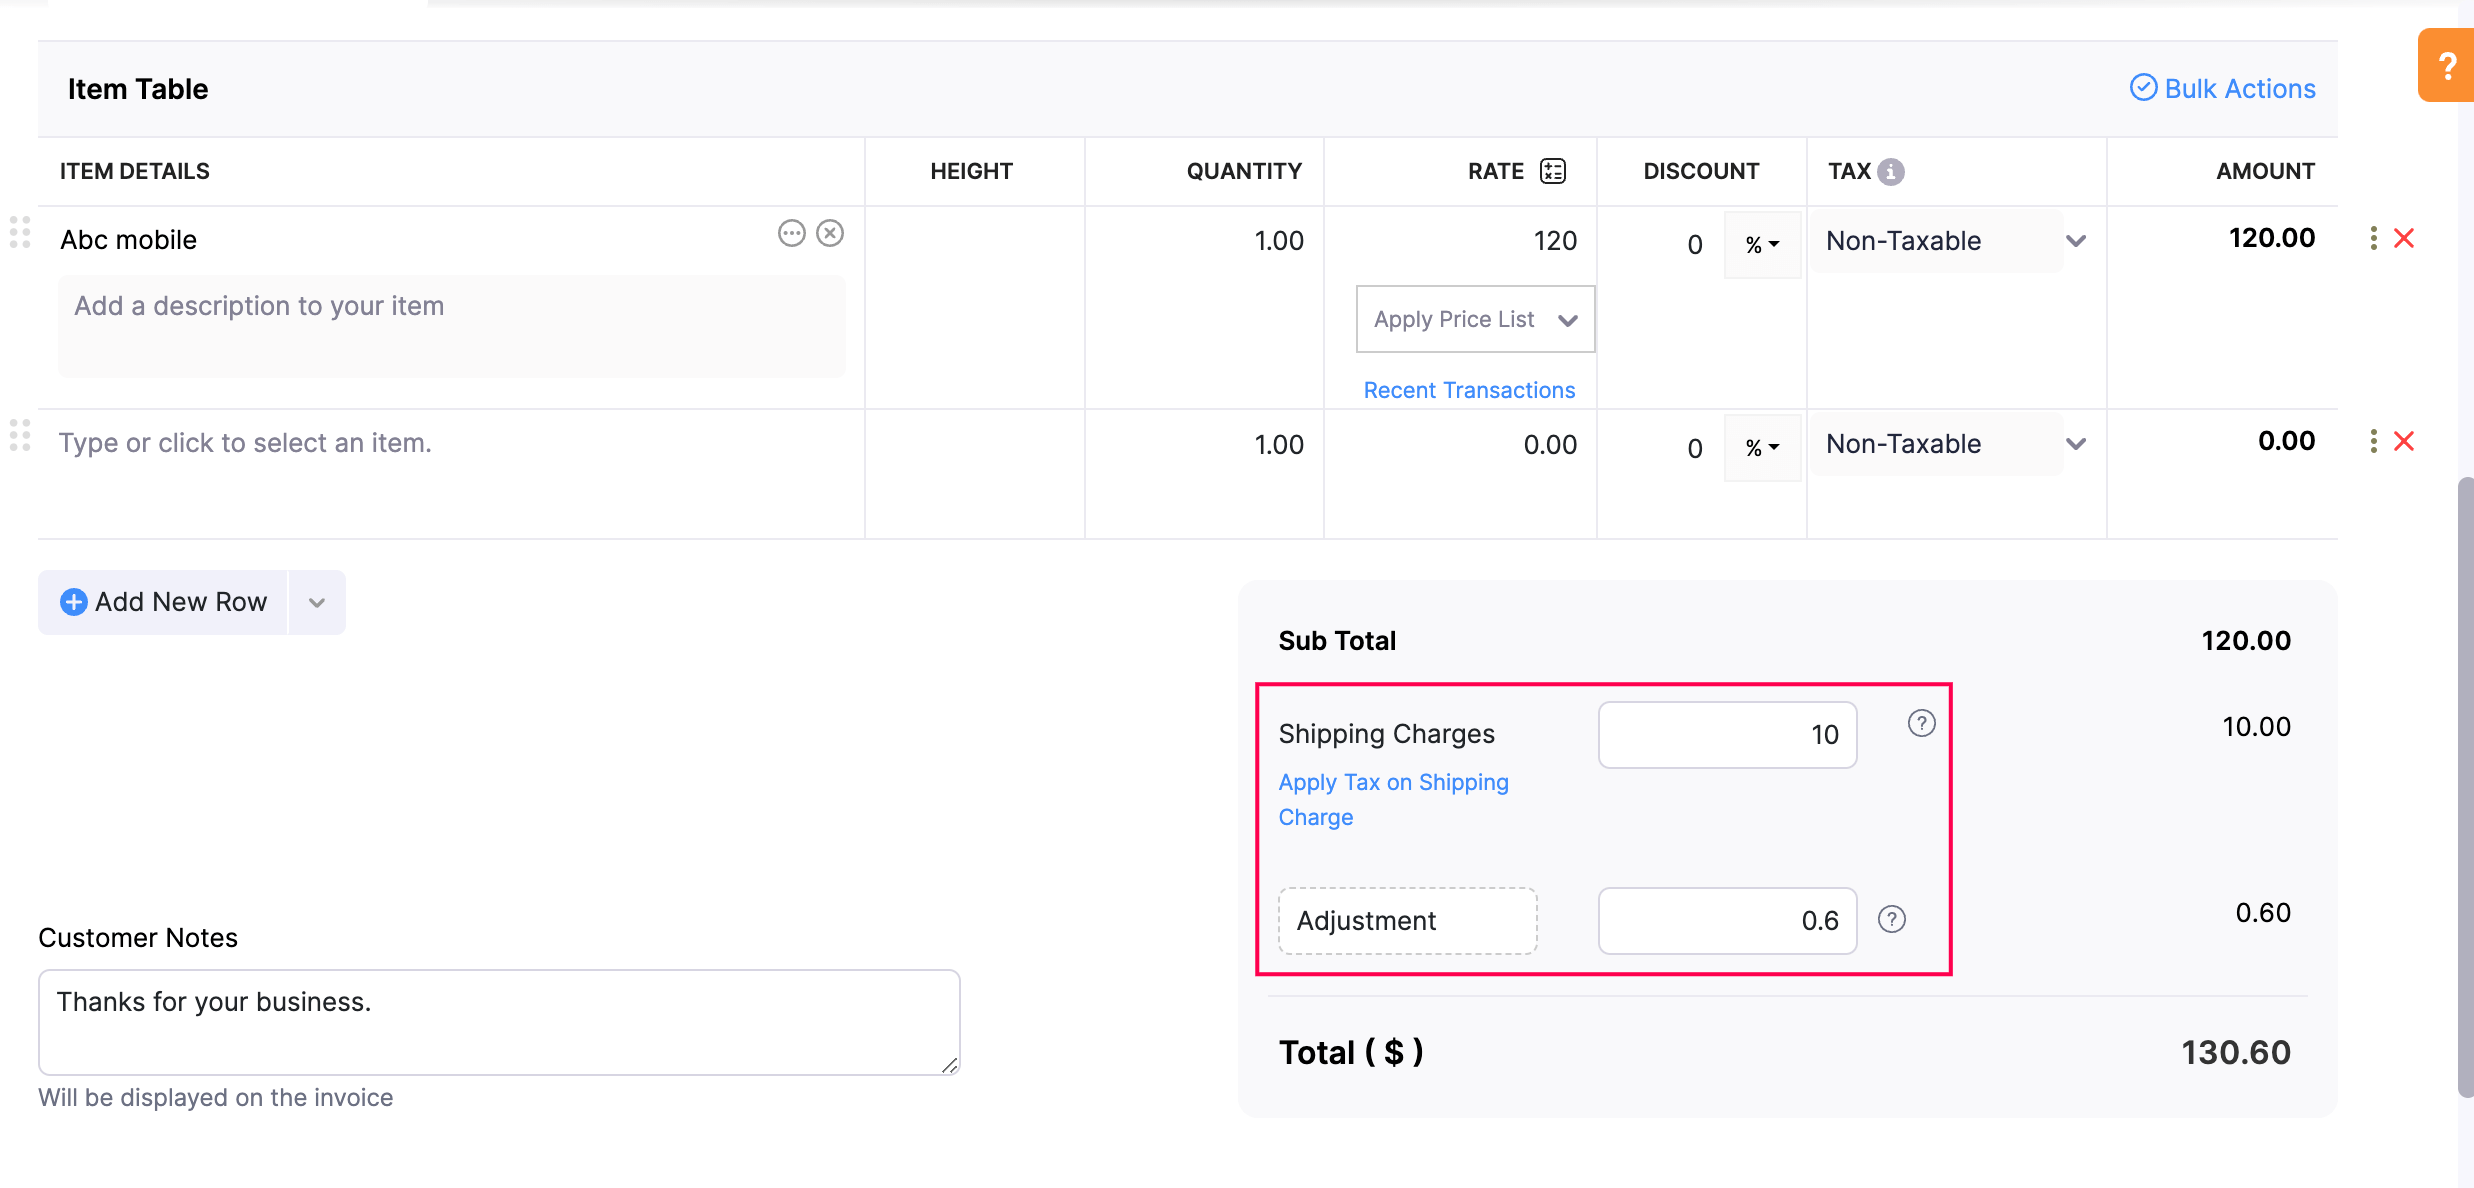
These additional charges will show up when you are creating transactions like an invoice or a quote.
Salesperson
If you have sales persons in your organisation who manage different sales transactions, then you can associate them with the corresponding transactions (like an invoice) in Zoho Books. .
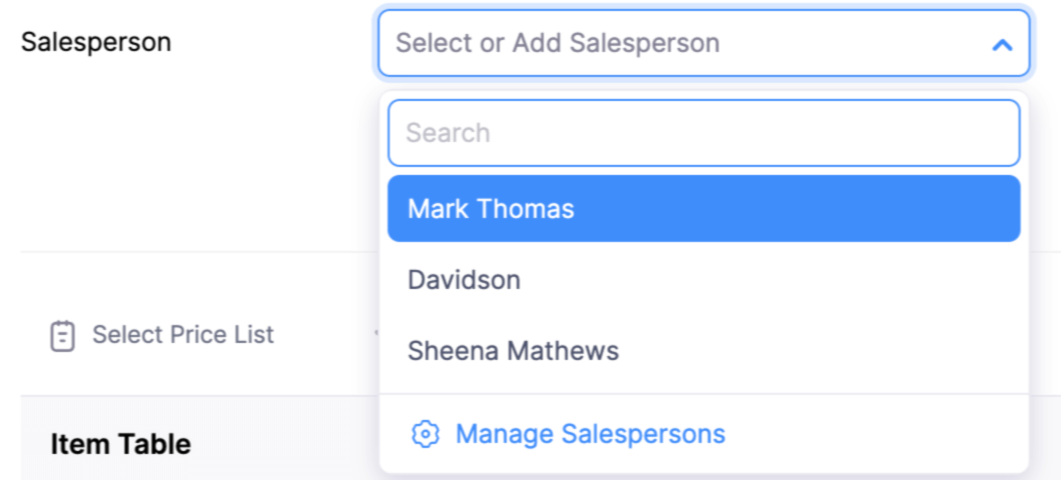
To enable sales persons for your organisation, mark the box I want to add a field for salesperson.
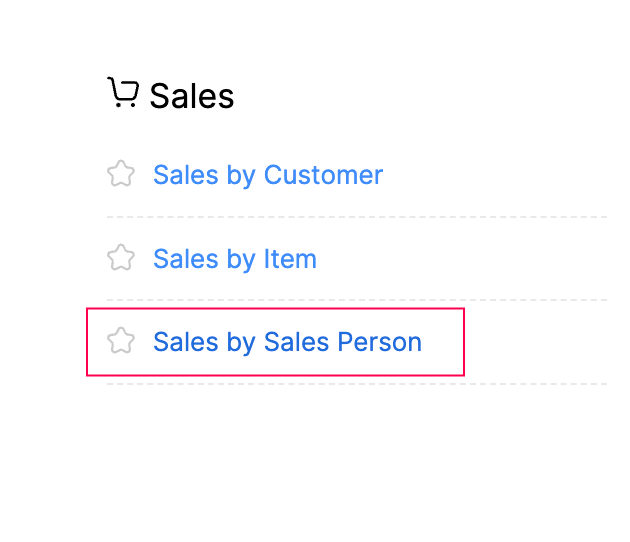
To view all the sales done by different sales persons in your organisation:
- Go to Reports on the left sidebar.
- Select Sales by Salesperson report under Sales.
Default Account for Billable Bills and Expenses
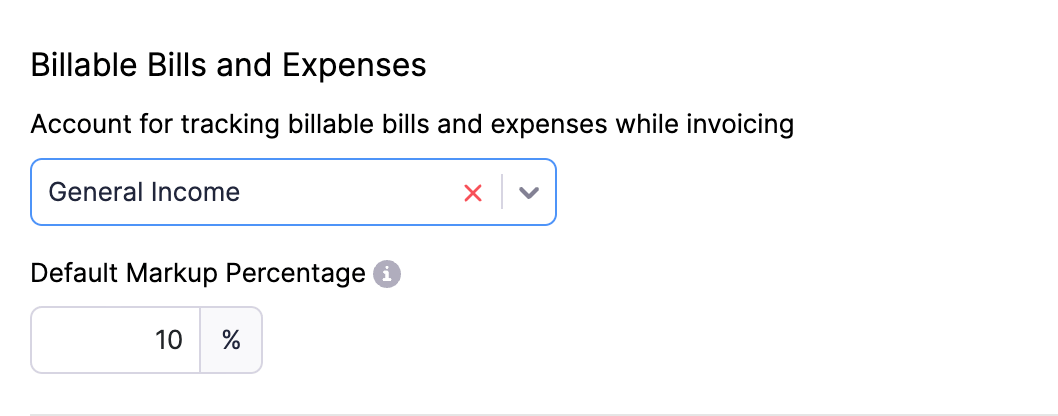
Choose a default Income account to track the amount in billable bills and expenses, when they are invoiced. Once you select this account, the system will automatically associate the account when an expense or a bill is invoiced.
Note: The income account will be applied only for non-inventory items. For inventory items, the specified sales account will take the precedence.
- Select the Account for tracking billable bills and expenses while invoicing.
Let’s look at a scenario to understand how configuring this preference will affect the journal that’s recorded.
Scenario: Kumar is handling a project for his client Nita. During the project, Kumar incurs an expense of $225 in Advertising and Marketing expense. He invoices this expense to Nita and the following journal entry is created in Zoho Books.
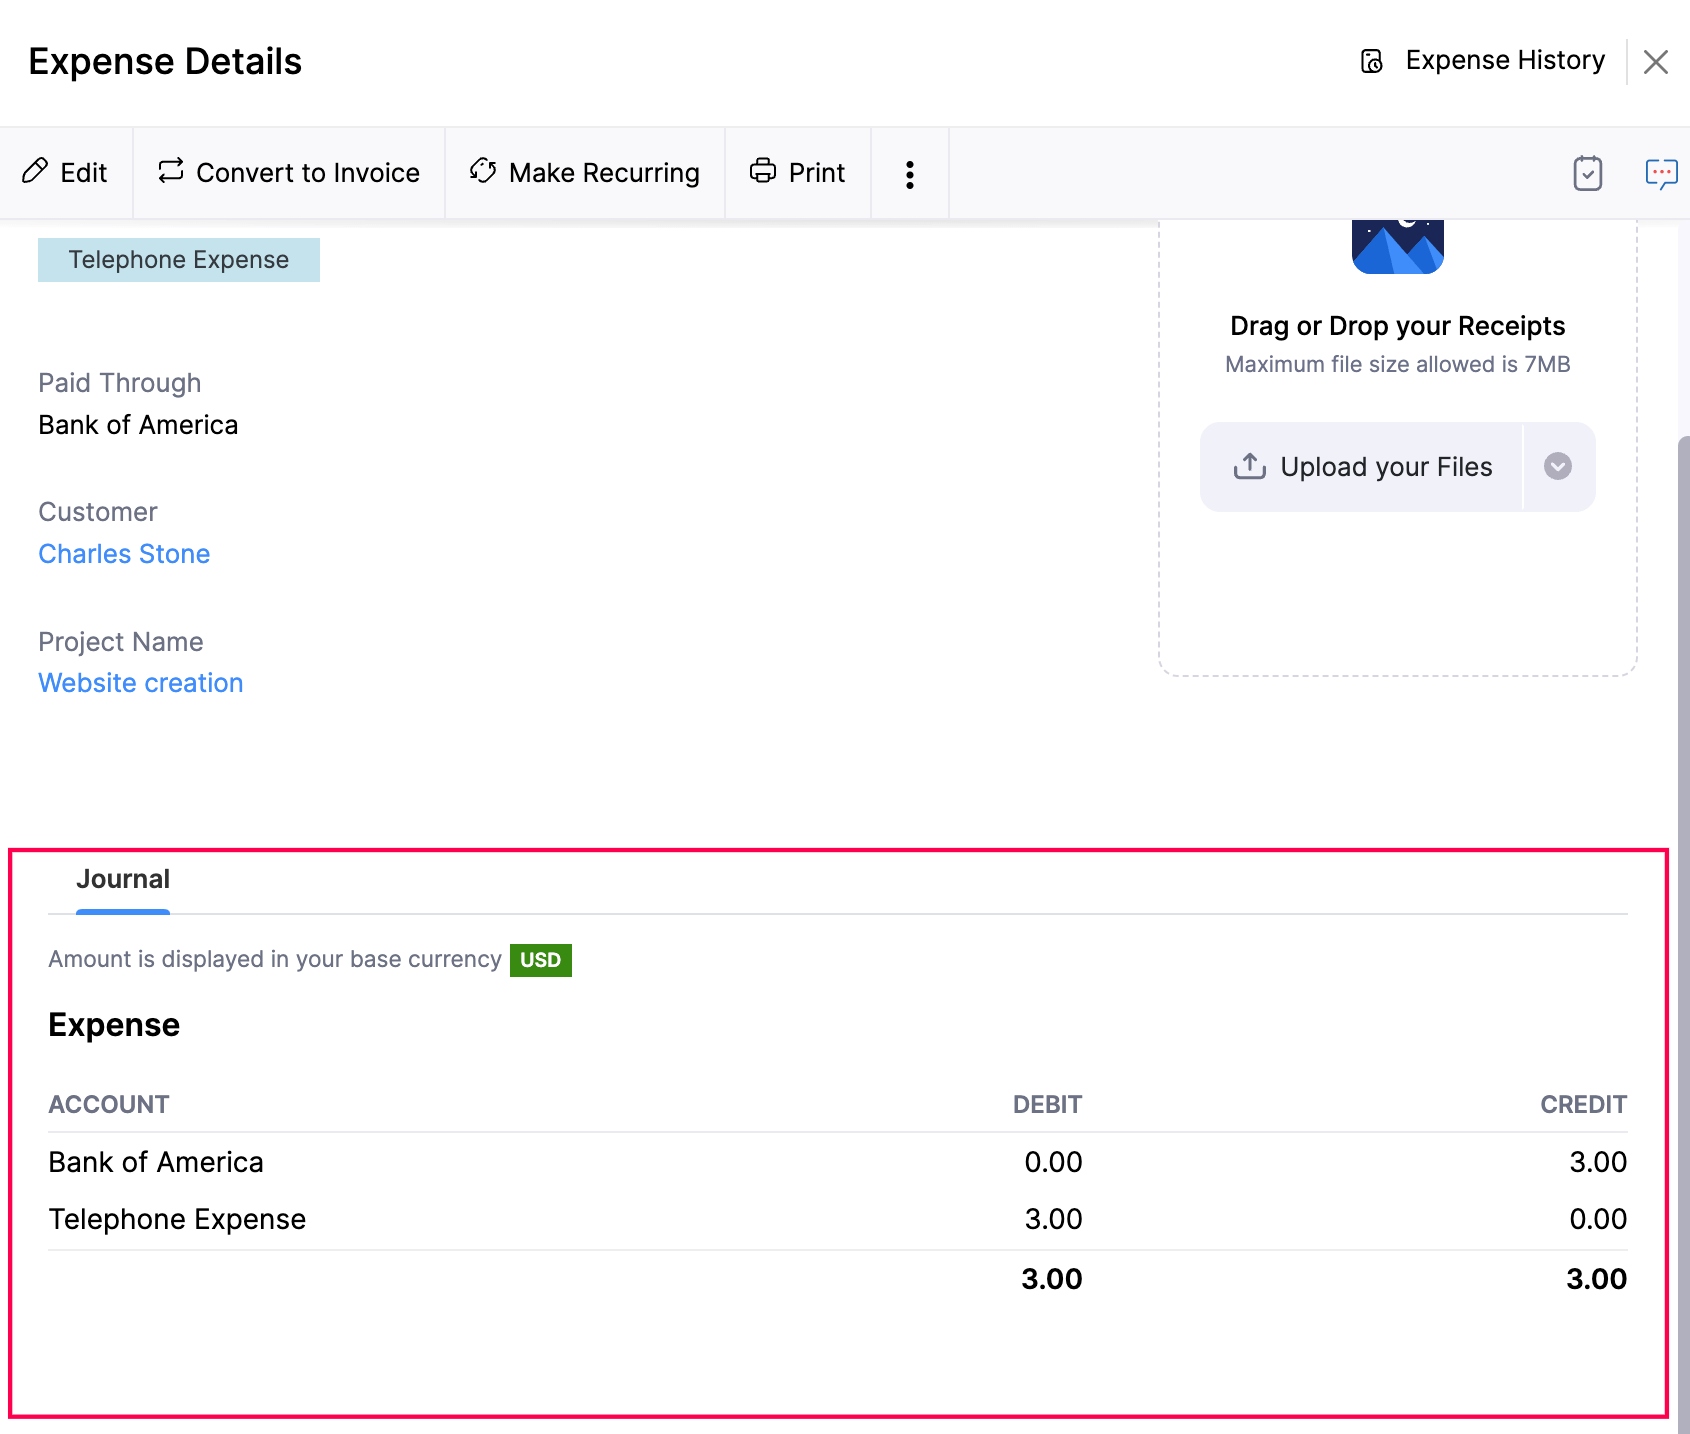
Scenario (Contd.): If Kumar chooses an income account in the Preferences to track the amount in billable bills and expenses, the journal entry will be created as mentioned below.
Scenario (Contd.): If Kumar does not choose an income account in the Preferences, the Expense account from billable bills or expenses will be used in the journal as shown below.
Markup for Billable Bills and Expenses
The bills and expenses that you incur on behalf of your customers, which you will invoice them later are billable bills and expenses. There are two common methods of invoicing customers:
- Invoicing the actual cost: If you incur an expense of $100, you will invoice the same amount to the customer for them to pay.
- Adding a markup: If you incur an expense of $100, you can mark up the expense amount and invoice $105 to the customer. This method will generate a 5% of extra revenue to your business.
To set a default markup percentage for billable bills and expenses:
- Enter the markup percentage.
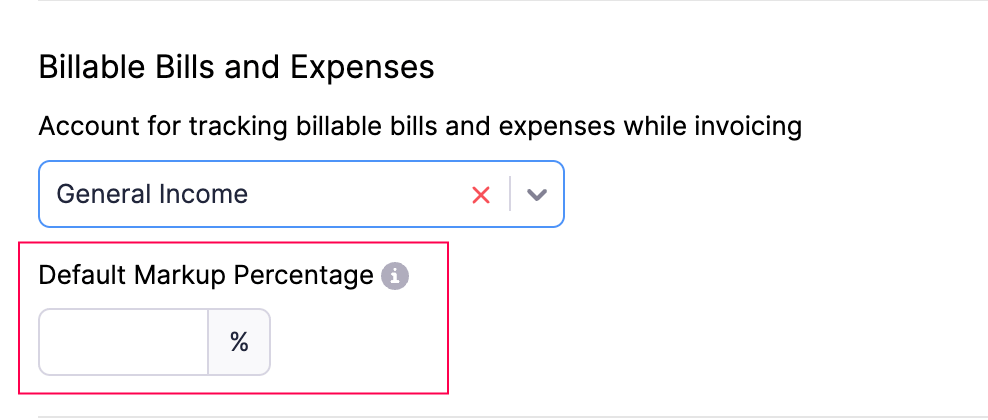
- Click Save.
Now, when you choose the billable option in a bill or an expense, the default markup percentage will be pre-filled in the Mark up by field.
Weekly Summary Report
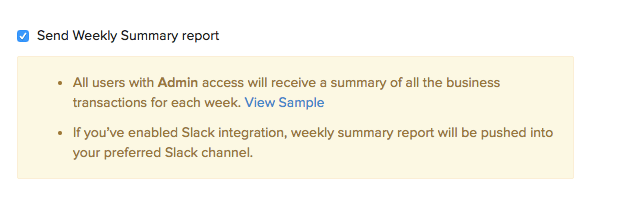
All the admins of your organisation can receive the summary of business transactions done in the week in their email. You can also receive the report through your Slack channel if you have integrated your Zoho Books organizaton with Slack.
To enable weekly summary reports:
- Go to Settings in the top right corner of the page.
- Select General under Preferences.
- Mark the box Send Weekly Summary report
Organization Address Format
You can change the way your organisation or business address appears on all your sales and purchase transactions.
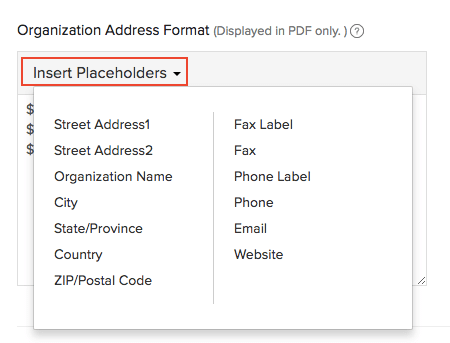
Rearrange the existing placeholders or to change the format add new placeholders by clicking the Insert Placeholders drop-down.
After making all the changes in the General section, click Save.
Customer Portal
In the Customer Portal Preferences page, you can:
- Upload or remove Your organisation Logo
- Change the theme of your Organisation
- Configure Portal settings
- Set up Custom Domains
Learn more about Customer Portal Preferences.
Vendor Portal
In the Vendor Portal Preferences page, you can:
- Configure vendor portal preferences
- Enable notifications
- Allow vendors to upload documents
- Allow vendors to accept/reject purchase orders
Learn more about Vendor Portal Preferences.
Customers and Vendors
In the Customers and Vendors Preferences page, you can:
- Allow duplicates for contact display name
- Set a customer credit limit
- Change the billing address format of the customer
- Change the shipping address format of the customer
Learn more about Customer and Vendor Preferences.
Projects
Configure different settings related to the Projects module in Zoho Books such as:
- Round off time
- Maximum hours/day for logging time
- Timesheet Approvals
Learn more about Project Preferences.
Accountant
Configure different settings related to the Accountant module in Zoho Books such as:
- Chart of Accounts
- Vendor Advances
- Journal Custom Fields
Learn more about Accountant Preferences.
Transaction Number Series
The transactions you create in Zoho Books are numbered by the default transaction series. For instance, the first invoice you create will be numbered as INV-001, the second invoice as INV-002, followed by INV-003 and so on.
However, some businesses might require their transactions to be numbered and tracked by a different transaction series that is not the default series. Let’s take the help of a scenario to understand this better.
Scenario: Brandon runs a hardware store that sells various items. To track the sales of pipes, he decides to use the unique prefix PIPE. In Zoho Books, he configures a transaction number series with this prefix. Now, whenever Brandon creates an invoice for pipes, he can select the configured transaction series, and the invoice will automatically include the prefix PIPE in its number.
Similarly, you can create multiple transaction series in addition to the default transaction series. Each transaction series can be created with unique prefixes and series.
Insight: You can create transaction series for credit notes, journals, customer and vendor payments, purchase and sales orders, retainer invoices, vendor credits, bills of supply, debit notes, invoices, quotes, sales receipts, and delivery challans.
Once you’ve created a transaction series, you can select it while creating a transaction. Consequently, the transaction will be numbered based on the prefix and series that had been configured while creating the transaction series.
Note: This feature is available only for certain plans of Zoho Books. Visit the pricing page to check if it’s available in your current plan.
- Enable Transaction Series
- Add Transaction Series
- Configure Transaction Series
- Delete Transaction Series
Enable Multiple Transaction Series
To start configuring multiple transaction numbers series:
- Go to Settings.
- Select Transaction Number Series under Customisation.
- Click Enable Multiple Transaction Series in the top right corner.
Add Transaction Series
You will be able to view the current transaction series for your transactions listed as the Default Transaction Series. In addition to the Default Transaction Series, you will be able to create new transaction series. To do this:
- Go to Settings.
- Select Transaction Number Series under Customisation.
- Click + New Series in the top right corner.
- Enter the name for the transaction series.
Pro Tip: If you’ve enabled the branches feature in your organisation, you can associate branches to multiple transaction series. This way, you can select two or more transaction series while creating a transaction for a specific branch.
- Enter the prefix and the series numbers for the transactions of your choice.
- Click Save.
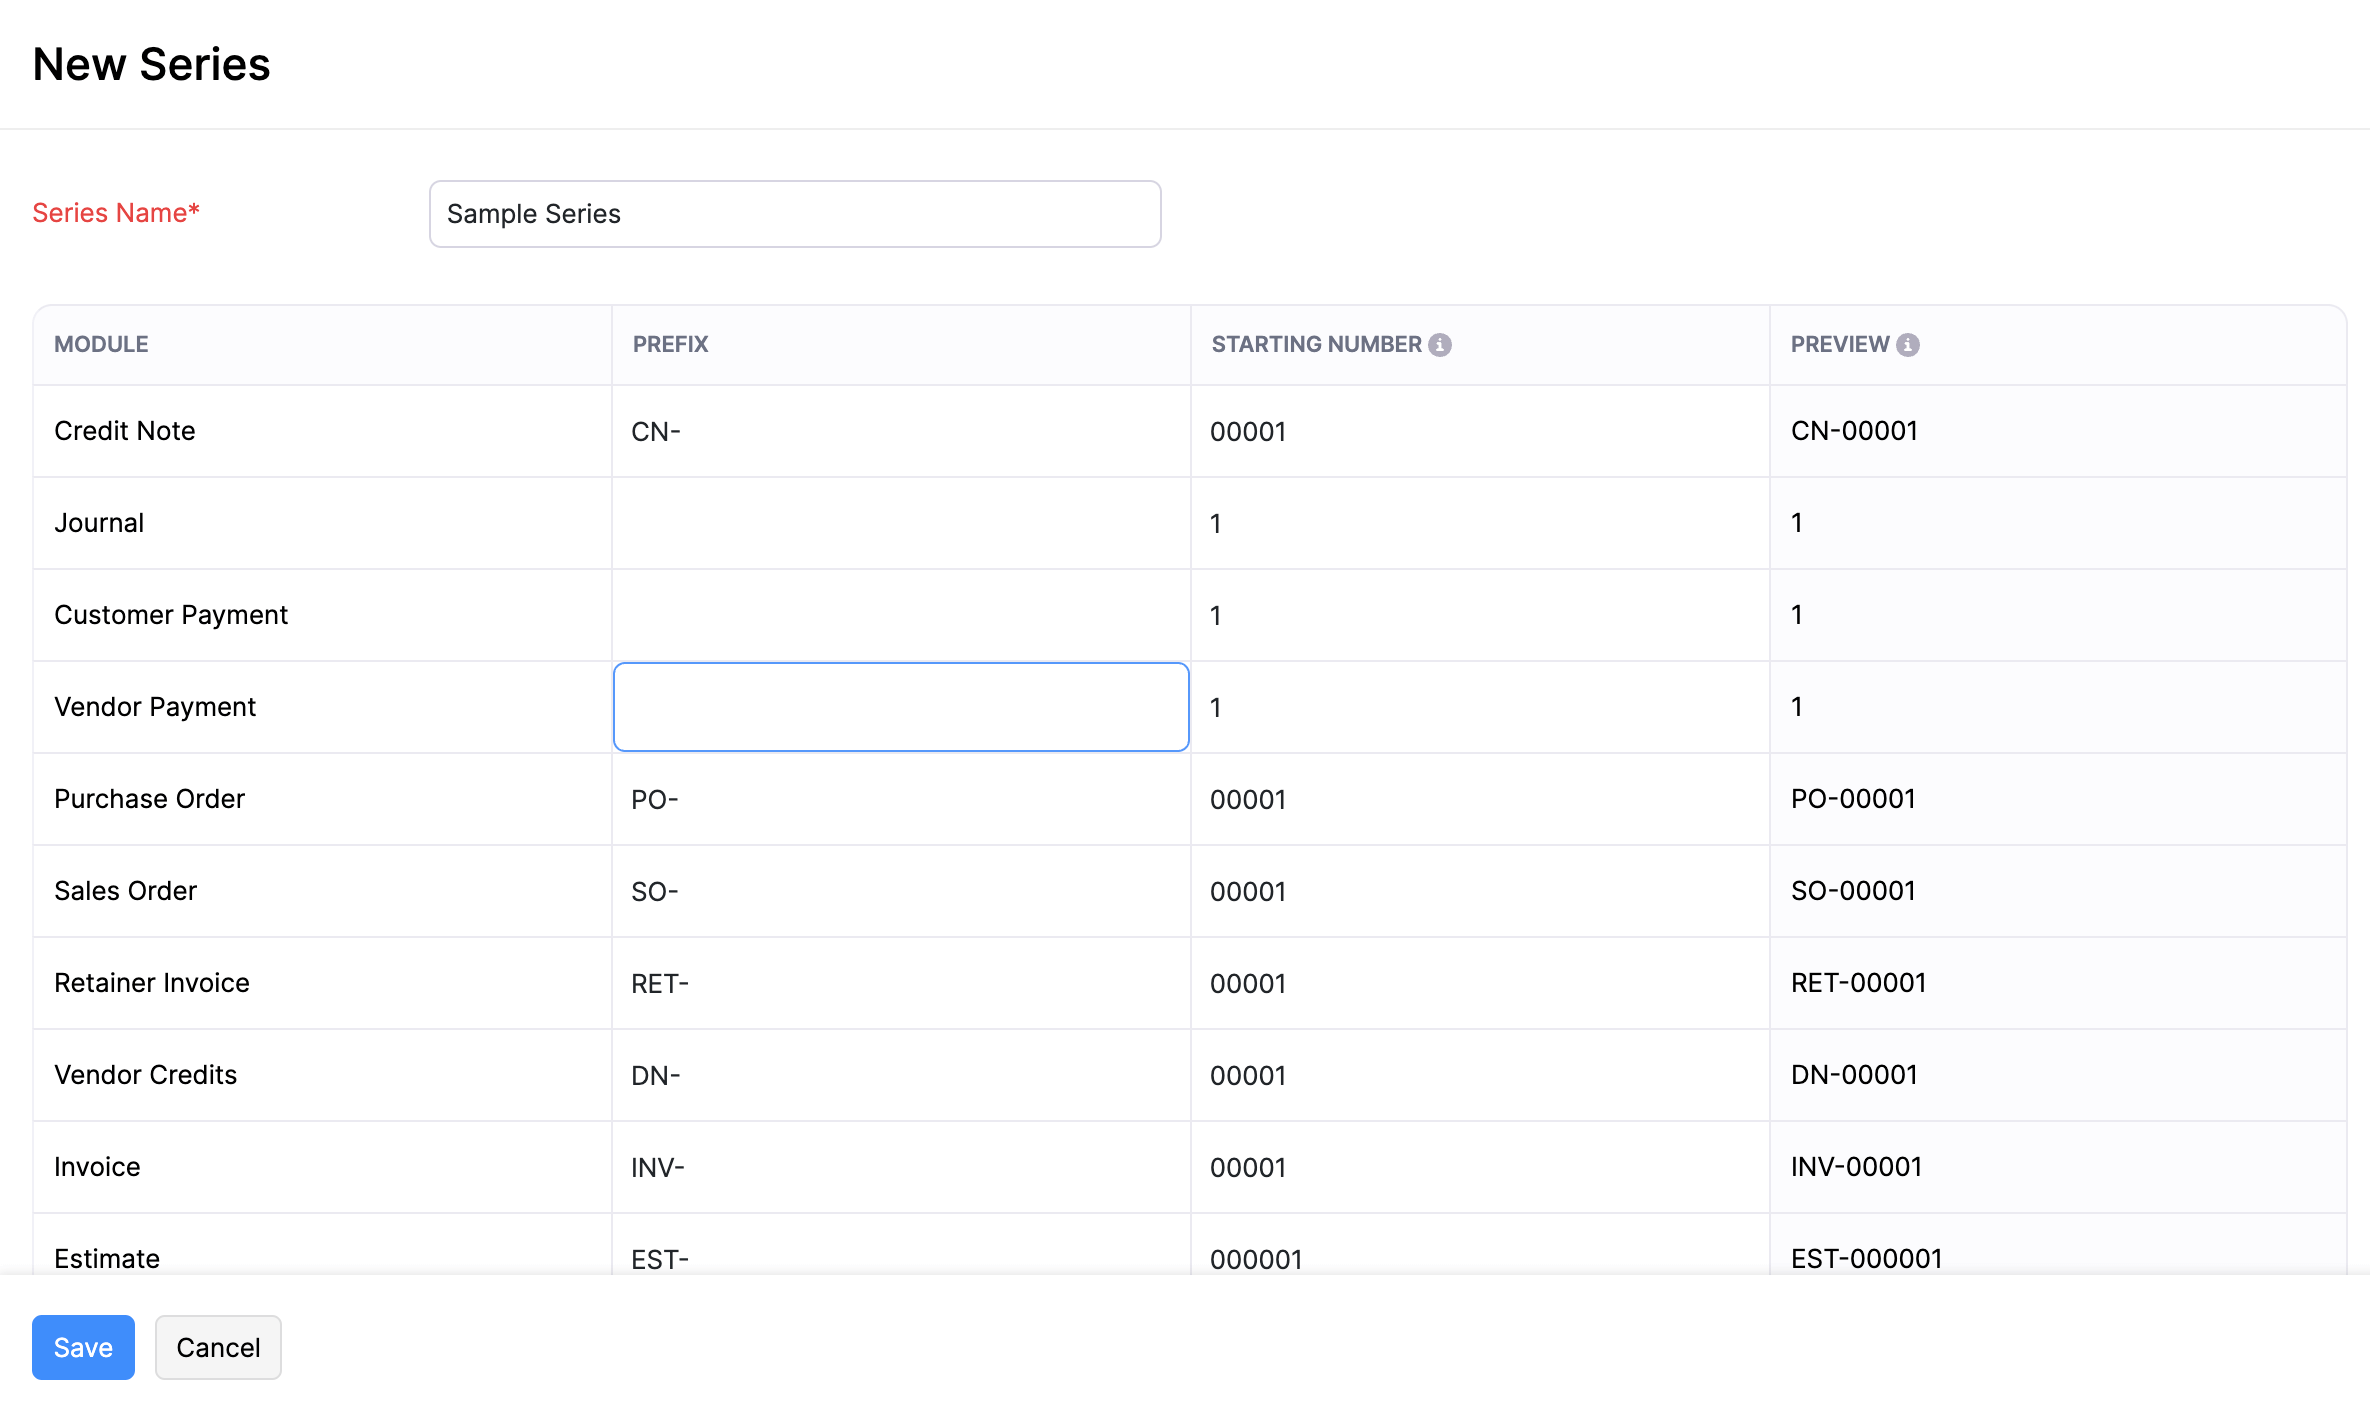
Once you’ve created a transaction series, you will be able to select the transaction series while creating the respective transaction.
Edit Transaction Series
To edit the transaction series you’ve created:
- Go to Settings.
- Select Transaction Number Series under Customisation.
- Hover over the transaction number series and click Edit from the dropdown to the right of the transaction series.
- Make the necessary changes and click Save.
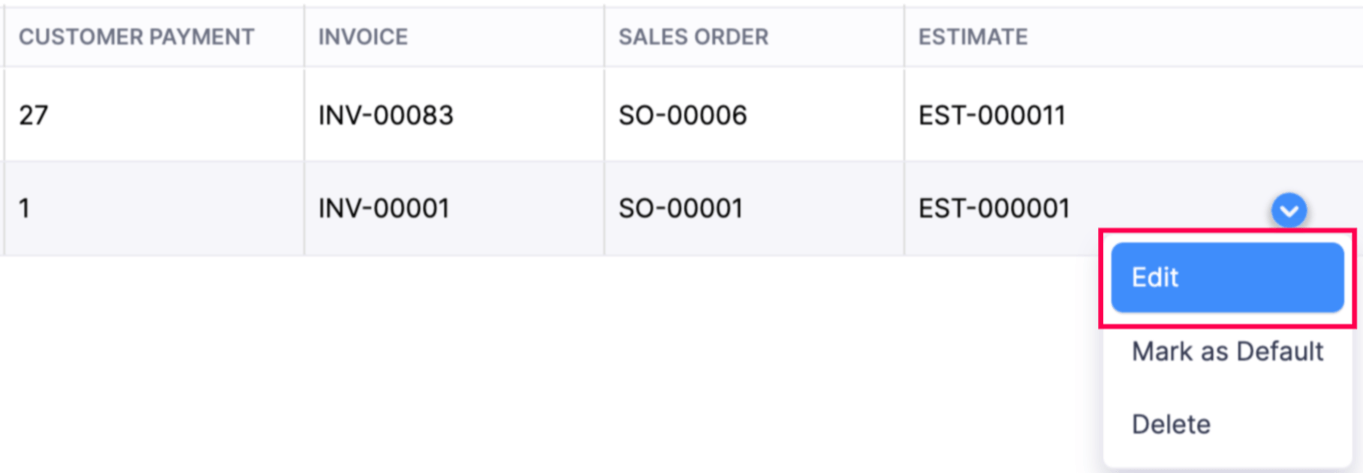
- Enter the prefix and the series numbers for the transactions of your choice.
- Click Save.
Pro Tip: You can also configure the default transaction series.
Once you configure the transaction series, the transactions you create will be numbered based on the new prefix and series.
Delete Transaction Series
To delete a transaction series you’ve created:
- Go to Settings.
- Select Transaction Series under Customisation.
- Hover over the transaction number series and click the dropdown to the right.
- Click Delete.
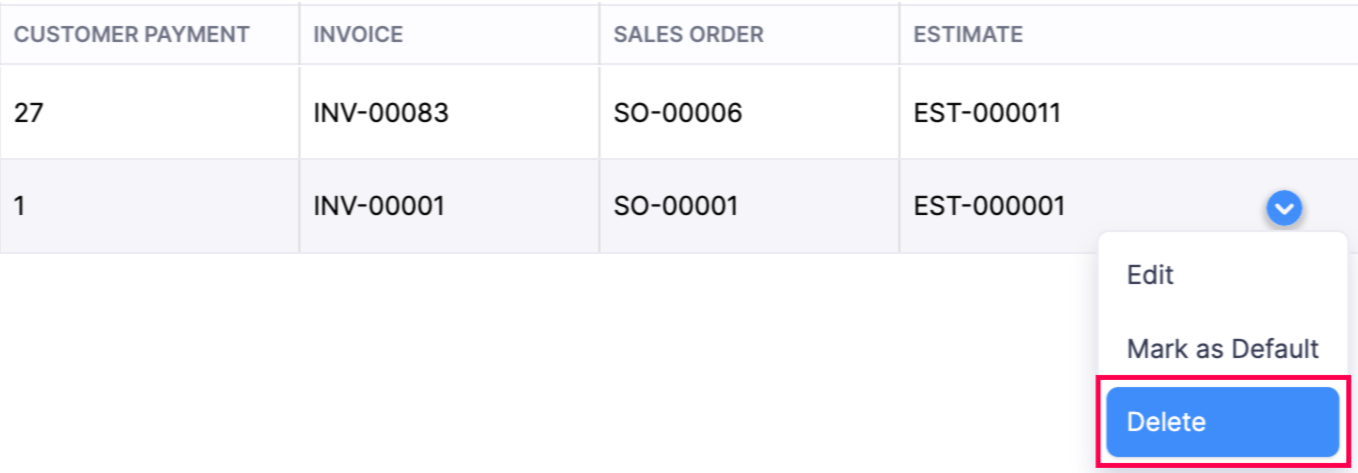
Once you delete the transaction series, you will no longer be able select the transaction. series while creating a transaction. Furthermore, the transaction series information of the deleted transaction series will not be available.
Note: Your transactions will be numbered based on the default series if your transactions are automatically generated, such as from a recurring invoice.
Record Locking
Record Locking allows you to lock the records (invoices and credit notes) in your organisation. Once locked, only the users and roles with sufficient permission will be able to edit or delete them.
Note: This feature is available only in specific plans of Zoho Books. Visit the pricing page to check if it’s available in your current plan.
Enable Record Locking
To enable Record Locking for a module:
- Go to Settings.
- Select the module for which you want to enable record locking.
- In the General tab, scroll down and slide the toggle next to Record Locking to Enabled.
- Click Save.
Note: Record Locking is currently available for Invoices and Credit Notes modules.
Provide Users Permission to Edit Locked Records
By default, your organisation’s admins can lock and unlock records, and edit or delete locked records. However, if you also want other users in your organisation to be able to edit locked records, you can create a new role and add users to it, or edit and provide permission to an existing role.
To provide permission to a new user:
- Go to Settings.
- Select Roles under Users & Roles.
- Click New Role in the top right corner of the page.
- Enter the Role Name.
- Scroll down and go to the module for which you want to give the user the permission to edit locked records.
- Select the Edit Locked Records option for that module.
- Click Save.
To provide permission to an existing role:
- Go to Settings.
- Select Roles under Users & Roles.
- Click Edit next to the role for which you want to provide permission to edit the locked records.
- Scroll down and go to the module for which you want to give the user the permission to edit locked records.
- Check the Edit Locked Records option for that module.
- Click Save.
Note: You will be able to edit permissions for custom created roles only.
Lock a Record
Now that you’ve enabled Record Locking, you can lock individual records. To lock a record:
- Go to the module in which the record that you want to lock exists. For example, go to the Invoices module.
- Select the invoice that you want to lock.
- Click the More button and select Lock Invoice from the dropdown.
- In the pop up that appears, enter the reason for locking the invoice and click Lock.
The invoice is now locked and only users with permission to edit locked records will be able to edit or delete it.
Insight: Once the record is locked, the Edit button will be disabled for users who don’t have permission to edit the record. A lock icon will be displayed next to the record number. Users who do not have permission to edit locked records can hover the cursor over the lock icon to see why the record is locked.
Unlock a Record
To unlock the record that you previously locked:
- Select the record that you had locked. For example, the invoice that we locked previously.
- Click the More icon and select Unlock Invoice from the dropdown.
- In the pop up that appears, enter the reason for unlocking the invoice and click Unlock.
Note: Once you unlock a locked record, any user in your organisation can edit or delete that record.
Disable Record Locking
To disable record locking for a module:
- Go to Settings.
- Select the module for which you want to disable record locking.
- In the General tab, scroll down and slide the toggle next to Record Locking to Disabled.
- Click Save.
Warning: Once you disable Record Locking for a module, all the records in that module that were locked will be unlocked and any user in your organisation can edit or delete these records.
Field Customization
In Zoho Books, you can create additional fields called custom fields for different modules. You can create custom fields from the respective module’s preferences.
When will custom fields be used?
Let’s say you deal with customers from different industries. To track which industry a particular customer belongs to, you can create a custom field called Industry in the Customers and Vendors preferences.
In this section:
- Create Custom Field
- Custom Field Limitations
- Edit Custom Field
- Mark Field as Inactive/Active
- Delete Custom Field
Create Custom Field
To create a new custom field:
- Go to Settings.
- Select the module for which you want to add the custom field in the left menu.
- Select the Field Customisation tab.
- Click + New Custom Field on the top right corner of the page.
- Fill in the following fields:
Label Name
Select an appropriate name for your custom field. This field will be displayed when entering data in the respective transaction.
Data Type
Choose the data type for the data that you will enter or store in the custom field. Zoho Books provides the following data types for custom fields:
Text Box (Single Line)
Select the Text Box (Single Line) data type to record any additional information. You can enter a short text, numerical value, or a combination of both up to 255 characters. Only A-Z, 0-9, and special characters are supported.
You can record additional email addresses using this field. For example, brandon.taylor@zylker.com.
URL
You can record and save website URLs using this field. For example, https://www.zoho.com/books
Phone
You can use the Phone data type to store additional phone numbers. For example, (123)-456-7890.
Number
The Number field can be used to store whole numbers and negative numbers. For example, 7 or -7.
Decimal
This field allows you to record decimal values that are positive or negative. For example, 12.90 or -94.53.
Amount
This field allows you to record the amount along with the default currency code set for your organisation. For example, USD50, GBP76, AUD30 etc.
Percent
You can use this data type to record values in percentage.
Date
In this field, you can record custom as well as relative date values. For example, Custom Date: 19 Jun 2019, Relative Date: Today, Tomorrow, Starting Date of Month etc.
Date and Time
The Date and Time data type is used when you have to display both the date and time values. It displays the value in YYYY-MM-DD HH:MM format.
Check Box
Using the Check Box data type, you can confirm an action or a fact, or enable an option. Here, you can also choose to have the check box ticked by default, if required.
Auto-generate Number
Using this data type, you can auto-generate values with prefixes or suffixes of your choice. Also, you can associate the custom field to existing invoices and auto-generate this number in all of them.
Dropdown
You can use the Dropdown data type in scenarios where you have to select one option from the list of options provided.
Multi-select
The Multi-select data type is similar to the dropdown data type. Using multi-select, you can select up to 30 options from the list of options available.
Lookup
The Lookup data type allows you to pull data from one module and display it inside another module. Learn more about the Lookup data type.
Text Box (Multi-line)
The Text Box (Multi-line) data type also lets you to record any additional information of your choice. You can enter text, numerical value, or a combination of both up to 36000 characters. Only A-Z, 0-9, and special characters are supported.
Attachment
You can use the Attachment data type to add files such as documents, PDFs, and images.
The formats supported for each file type are listed below:
- Images: GIF, PNG, JPG, JPEG, BMP, TIF, and TIFF types.
- Documents: XLS, XLSX, DOC, DOCX, XML, CSV, PDF and TXT types.
You can attach one file whose size limit is less than 7 MB.
Formula
The Formula data type enables you to build a formula that performs calculations using predefined functions, fields, and operators. Learn more about the Formula data type.
External Lookup
Select one of the available Zoho apps and look up data from one of its fields.
Data Privacy
Select PII (Personally Identifiable Information) or ePHI (Electronic Protected Health Information) based on the information you will enter in this field.
-
Select PII if the information you enter is confidential and can be used to identify a person. You can mark fields such as Text, Email, URL, Phone, Number,and Date as PII. You can encrypt and store it if the data is sensitive or store it without encryption if the data is non-sensitive. Choose if the information you enter will be sensitive or not sensitive:
- Sensitive data. Encrypt and store it. This data can be viewed only by users with permission to access PII.
- Not sensitive data. Store it without encryption. Only users with access to protected data can view the details. However, users can use this field to perform advanced searches.
-
Select ePHI if the information that you enter can be used to identify a patient. For example, an electronic copy of a medical report will be ePHI. You can mark only fields such as Text, Email, URL, Phone, and Date as ePHI. The data will be treated as sensitive; therefore, it will undergo encryption before being securely stored. Only users with access to protected data can access the fields. Users cannot use this field to perform advanced searches.
Prevent Duplicate Values
- Select Yes if the value entered in this custom field should be unique.
- Select No if the value entered in this custom field does not have to be unique.
Note: If you are creating a custom field for the invoices, expenses, or bills module and you enable Prevent Duplicate Value, the custom field will not be available in the recurring invoices, recurring expenses, or recurring bills associated with the invoice, expense, or bill, if any.
Default Value
The value you enter will be the default value of the custom field. For example, if you create a custom field for the Invoices module and set the Default Value as 1. It will automatically fill the custom field with 1 when you create an invoice without providing any value for the custom field.
A preview of the field and the data will be shown on the same page.
Note:
- You can only enable Default Value for fields that don’t contain PII.
- If you enable Prevent Duplicate Value for a custom field and set a Default Value, ensure you provide a unique value for the custom field while creating records.
You can also choose to inherit values from fields in other modules. To do this:
- Select Inherit value next to Default Value.
- Click the first dropdown next to the Inherit Value From field and select the module from which you want to inherit the value. You can inherit data from modules related to the module for which you’re creating the custom field. For example, if you’re creating the custom field for the Invoices module, you can inherit the fields in the Customers module.
- Now, click the second dropdown next to the Inherit Value From field and select the field of the module from which you want to inherit the value. This will be the default value for this custom field when you create transactions.
Is Mandatory
If you mark this field as mandatory, then the form in which the field appears cannot be saved if this field is left empty.
Show in all PDF
While you can enter data in the custom field and save it, you can choose whether this data is displayed in the transaction PDF or not.
Display in Portal
In case your custom field is an Attachment, enabling this option allows your customers to view the attachments you’ve added for their invoices and quotes in the portal.
- After providing data in all the fields, click Save.
From now on, when you create a record in the respective module, the custom field will be displayed.
Custom Field Limitations
There are certain limitations to the number of custom fields that can be created for each data type. Based on the limitations, custom fields are split into six sections: Numerical, Decimal, String, Boolean, Long Text, and Multi-select.
You can know the number of custom fields that are available for your use. Here’s how:
- Go to Settings.
- Select the module for which you want to view the number of custom fields.
- Click the Field Customisation tab.
- Click Custom Fields Usage near + New Custom Field in the top right corner.
Now, you will be able to view the custom field usage for different modules.
Note: The limitations on custom fields will vary from one subscription plan to another.
Edit Custom Field
You can change the details you have saved for a custom field you created in Zoho Books. Here’s how:
- Go to Settings.
- Select the module for which you want to edit the custom field in the left menu.
- Click the Field Customisation tab.
- Hover over the custom field that you want to edit.
- Click Edit.
- Make the required changes and click Save.
Note: If you enable Prevent Duplicate Values for an existing custom field and if there are more than 10,000 records in that module, it will take some time to update the custom field’s details in all the records. You’ll receive an in-app notification once the process is completed.
API Field Name
Once you save a custom field, you can edit it to find the API Field Name. This name will be used when referring to this custom field for an API call.
Mark Field as Inactive/Active
If you don’t want to enter data in any custom field temporarily, you can choose to mark it as inactive.
To mark as custom field as inactive:
- Go to Settings.
- Select the module for which you want to mark a custom field as inactive in the left menu.
- Click the Field Customisation tab.
- Hover over the custom field you want to mark inactive and click the Dropdown icon.
- Click Mark as Inactive.
If you have marked a custom field as inactive, you can make it active again. Here’s how:
- Hover over the custom field you want to mark active and click the Dropdown icon.
- Click Mark as Active.
Delete Custom Field
You can delete a custom field you have created in Zoho Books. Here’s how:
- Go to Settings.
- Select the module for which you want to delete the custom field in the left menu.
- Click the Field Customisation tab.
- Hover over the custom field you want to mark active and click the Dropdown icon.
- Click Delete Custom Field.
If you have added data in a custom field which is associated with a transaction, you cannot delete the custom field. If you want to delete the custom field, you would have to delete the corresponding transaction.
Alternatively, you can mark the custom field as inactive.
Validation Rules
Validation Rules in Zoho Books help you create new rules that set restrictions for the data being recorded. So, when a user tries to enter data in a field that you have set a restriction for, it passes through the validation rule. If the value you enter in the field violates the condition you’ve set, an alert message is displayed and the transaction is not created. The user will also be able to set multiple criteria for a single validation rule.
Let us understand how validation rules work with the help of few scenarios.
Scenario 1: Patricia runs a catering business where she handles client orders and provides services. When customers ask for details, she sends them a quote with a small discount. If she’s unavailable, her team responds to customers. However, her staff sometimes offers higher discounts than she approves of. To prevent this, Patricia quickly sets up a rule that limits discounts to no more than 10%.
Scenario 2: Peter also wants his employees to enter the terms and conditions of an ongoing-offer in the transaction. He creates a rule and ensures that the users are not able to create a transaction without entering the terms and conditions.
Note: This feature is available only for certain plans of Zoho Books. Visit the pricing page to check if it’s available in your current plan.
In this section:
- Create Validation Rule
- Multiple Criteria and Subrules
- Execute Validation Rules
- Other Actions for Validation Rules
Create Validation Rule
You can create a validation rule by setting certain criteria for the fields in a transaction. Here’s how:
- Go to Settings.
- Select the module for which you would like to create a validation rule (e.g., Sales > Quotes).
- Go to the Validation Rules tab and click + New Validation Rule in the top right corner.
- Enter a Validation Rule Name.
- Click + Add Rule and add the condition to be met in the adjacent pop-up.
- Enter the Alert Message to be displayed when the transaction violates the validation rule.
- Click Continue and in the page that follows, click Save.
If you want to create a new validation rule for the same field:
- Select the field for which you had created a validation rule (from the list page).
- Click + Add Rule and repeat the steps mentioned above.
Insight: A validation rule created in Zoho Books will be applicable for other integrated Zoho apps as well. Let’s say, you’ve created a validation rule for sales orders in Zoho Books and your organisation is integrated with Zoho Inventory as well. Now when you try to create a new sales order in Zoho Inventory, the fields will be validated based on the rule you set up in Zoho Books.
Multiple Criteria and Subrules
A validation rule is applicable for all transactions. However, if you would like to apply it for specific transactions based on multiple criteria, or create a new rule with the same condition, refer the following:
Adding Multiple Criteria
When you create a validation rule, it will be applicable for all transactions by default. You can also choose the rule to be applied to transactions based on specific criteria.
Scenario: (Based on Scenario 1) Peter had created a validation rule where the Discount cannot exceed 10% for the transactions created. However, he would like to customise this further as all transactions cannot have a maximum discount of only 10%. So he sets the criteria that the rule should be applicable only when the transaction total is under 100 and when there are shipping charges too.
Here’s how you can add multiple criteria:
- Go to Settings.
- Select the particular module and go to the Validation Rules tab at the top of the page.
- For new rules: While creating a validation rule, enter the details and click Continue. In the page that follows, click the Pencil icon near the rule.
For existing rules: Click the Edit option in the validation rules list page and in the details page, click the Pencil icon near the rule. - Click the option Based on specific criteria in the pop-up that appears.
- Set the criteria using the options provided.
- Click + Add Criteria for more options and click the Delete icon to remove criteria.
- Click Edit icon to change the criteria pattern based on your preferences and click Save.
- Click Done.
Adding Subrules
If you would like to include an additional rule to your existing condition, you can add Subrules. This is applicable only when you’ve chosen to apply the rule to transactions based on specific criteria.
Scenario: Peter had created a rule where the Discount cannot exceed 10% while creating transactions and had also customised it by adding certain criteria. Now, he’d like to use the same condition (<= 10% discount) but create a new rule that this condition is applicable only during off-seasons (July-Nov). So he creates a new subrule with the transaction date to be > July 1.
Here’s how you can create subrules:
- Go to Settings.
- Select the particular module and go to the Validation Rules tab.
- Select the field for which you have created a validation rule.
- Click + Add Subrule and a pop-up appears.
- Enter the Criteria and the Alert Message.
- Click Done.
- Verify the subrule you had created and click Save for the changes to reflect.
Execute Validation Rules
Once a Validation Rule is created and saved, it will be applicable for all transactions created henceforth. When any new transaction violates a validation rule, an alert message will be displayed to the users.
Other Actions for Validation Rules
Once you’ve created a validation rule you will be able to edit, mark it as inactive or delete them. Here’s how:
- Go to Settings.
- Select the module for which you’ve enabled validation rules.
- Hover over the Validation Rules field to perform the following actions:
- Edit: Change the message or the criteria of a validation rule.
- Mark as Inactive: Temporarily disable the validation rule. You can enable it again by clicking Mark as Active.
- Delete: Permanently delete a validation rule by clicking the Trash icon.
Custom Buttons & Links
You can create new custom buttons to perform specific actions for your transactions. You can create them using the deluge script and execute actions based on the functions you add. Also, you can create custom links to open external links from your transactions.
Note: This feature is available only for certain plans of Zoho Books. Visit the pricing page to check if it’s available in your current plan.
You can create custom buttons and links for the following modules:
- Users and Preferences
- Customers and Vendors
- Projects
- Sales
- Purchases
- Items
Insight: You can add up to 10 custom buttons or custom links per module. For example, you can have 10 buttons or links for the Invoices module and 10 for the Quotes module.
In this section:
Custom Buttons
Custom Buttons let you create buttons that trigger actions you configure when clicked.
Scenario 1: Peter runs a business and sells goods on credit to select customers. At the end of each month, he sends out statements for the amounts due. Instead of applying multiple filters and manually emailing the statements, Peter creates a custom button that allows him to send the statement with a single click.
Scenario 2: Patricia charges a 2% late fee on invoices that are not paid by the due date. To make this process simpler and straightforward, he creates a custom button that automatically applies the late fee to overdue invoices.
Scenario 3: John offers a 5% discount to regular customers who pre-order goods. To manage this efficiently, he creates a custom button that he uses to apply the discount directly to the invoice when he generates it.
Scenario 4: Peter sends quotes to customers who inquire about his products and prices. Once a customer accepts a quote, he needs to place an order for the products quickly. To simplify this process, Peter creates a custom button that converts a quote directly into a purchase order.
Create a New Custom Button
To create a new custom button:
- Log in to your Zoho Books account.
- Go to Settings.
- Choose the module where you want the custom button (e.g., Sales > Invoices).
- Click the Custom Buttons tab at the top.
- Click + New in the top right corner.
- In the New Custom Button popup, fill in the following fields:
- Custom Button Name: Enter a name for your button.
- Location: Choose where the custom button will appear on the module page.
- Preview: Click to preview your button.
- Click Proceed.
- In the page that follows, enter the Deluge script code to define the button’s function. Scroll down to When to show this button? and choose one of the options based on your preference:
- Show Always: Select this option to display the button in all records (e.g., INV-01, INV-02, etc.) without any criteria.
- Show based on criteria: Select this option to add criteria to display the custom button for specific records.
Note: You can use predefined criteria templates to create a new criteria by clicking + New Criteria to set conditions for displaying the button. This option is available only for Invoices and Quotes and the button can only be added on the Details page.
- Under Who can access this button?, select who can view and access the button from any of the following options:
- Only me: Select this option if you don’t want other users to access this custom button.
- Only Selected Users: Select this option and select specific users in your organisation who can view and access the button.
- Everyone: Select this option to make the button visible for all users in your organisation.
- Click Save to save and execute it later, or Save and Execute to save and run it immediately.
Now, the custom button will be created, and it will be displayed in the selected module based on the configured preference.
Use the Custom Button
Once you create the custom button, you can use it from the respective module where you’ve configured it to appear. Here’s how:
- Log in to your Zoho Books account.
- Go to the module where you set up the custom button.
- In the Details page, locate the custom button in its configured position, and click it.
- In the pop-up, click Proceed to execute the button’s action.
Now, the custom button will execute its configured function.
Custom Links
You can create custom links that will take you to external websites or resources directly from Zoho Books. You can also add placeholders in these links to redirect users to a specific record or page.
Scenario 1: Sarah manages an online store and needs to track shipments easily. She creates a custom button in the Items module for a shipment tracking website that also includes a placeholder for the invoice number in the tracking URL. Now, when she clicks the button, it takes her directly to the specific shipment’s tracking page.
Scenario 2: Peter uses an external software to manage his customer details. When customers request services, he needs to access their previous service records, which can be time-consuming. To simplify this, he creates a custom button that uses the Customer ID as a placeholder for his external application’s link. By clicking this button on the Customer Details page, Peter quickly opens the external link with the specific customer’s information.
Create a New Custom Link
To create a new custom link:
- Go to Settings.
- Choose the module for the custom button (e.g., Sales > Invoices).
- Click the Custom Buttons tab at the top.
- Click the + New dropdown in the top right corner, and choose New Custom Link from the dropdown.
- In the New Custom Link page, fill in the following:
- Custom Link Name: Enter a name for your custom link.
- Location: Pick where you want the link to appear on the module page.
- Visibility: Choose who can access the link.
- Preview: Click to see a preview of the link’s location.
- URL: Enter the URL and add placeholders if needed by clicking Insert Placeholders at the top of the field if necessary.
- Click Save.
Now, the custom link will be created and shown in the configured location.
Use the Custom Link
Once you create the custom link, you can use it from the respective module where you’ve configured it to appear. Here’s how:
- Log in to your Zoho Books account.
- Go to the module where you set up the custom link.
- In the Details page, locate the custom link in its configured position, and click it.
- In the pop-up, click Proceed to execute the button’s action.
Now, when you click the custom link, it will take you to the configured URL.
Other Actions in Custom Buttons and Links
Edit a Custom Button or Link
To edit a custom button or link:
- Go to Settings.
- Select the module where the custom button is configured (e.g., Sales > Invoices).
- Click the Custom Buttons tab at the top.
- Hover over the custom button or custom link you want to edit and click Edit.
- In the Edit Custom Button page, edit the necessary details, and click Save to save the custom button or Save and Execute to save and run it immediately.
Reorder Custom Buttons
You can change the order of custom buttons to suit your preferences. Here’s how:
- Go to Settings.
- Select the module where the custom button is configured (e.g., Sales > Invoices).
- Click the Custom Buttons tab at the top.
- Select the location where you want to reorder the buttons from the Locations dropdown.
- Click Change Order in the top right corner.
- Drag and drop the buttons the buttons to arrange them in your preferred order.
- Click Save Reorder in the top right corner to apply the changes.
Check Workflow Logs for Custom Buttons and Links
To check the workflow logs for custom buttons and links:
- Go to Settings.
- Select the module where the custom button is configured (e.g., Sales > Invoices).
- Click the Custom Buttons tab at the top.
- Click View Logs in the top right corner.
Now, you’ll be taken to the Workflow Logs page, where you can see the execution logs for your custom buttons and links.
Delete a Custom Button or Link
To delete a custom button or link:
- Go to Settings.
- Select the module where the custom button is configured (e.g., Sales > Invoices).
- Click the Custom Buttons tab at the top.
- Hover over the custom button or link you want to delete, and click the Delete icon.
- In the pop-up, click OK to confirm the deletion.
Related Lists
The Related Lists feature allows you to fetch and view data from within the app as well as from other third-party services. This comes in handy when you want to cross-reference data from different entities.
Note: This feature is available only for certain plans of Zoho Books. Visit the pricing page to check if it’s available in your current plan.
You can create related lists for:
- Items
- Customers and Vendors
- Sales - Quotes, Invoices, Sales Orders, Retainer Invoices and Credit Notes
- Purchases - Expenses, Bills, Purchase Orders and Vendor Credits
- Projects
Insight: You can create a maximum of 10 related lists for each module. For example, 10 for invoices, 10 for quotes, and so on.
In this section:
Create Related Lists
There are two ways to create a related list:
By creating a lookup custom field
The lookup custom field allows you to pull data from one module and access it inside another module in Zoho Books. When you create a lookup field in one module, its associated details will be available as a related list in the other module.
Scenario: Patricia wants to track the efficiency of users in her organisation. So, she decides to track the sales orders the sales team create for a customer. For this, she creates a Lookup custom field in the Sales Orders module and for the module whose data she wants to access (in this case, Users).
By writing a deluge script
With deluge scripts, you can connect Zoho Books with other third-party services to access their data.
Scenario 2: Zylker uses Zoho Books for their sales and purchases, and Zoho Desk to address their customer queries. Now, the admin can write and execute a deluge script to fetch the customer happiness rating from Zoho Desk, and show the consolidated data in a tabular form under each customer in Zoho Books.
To create a related list using deluge:
- Go to Settings in the top right corner of the page.
- Go to the module for which you wish to create a related list. In this case, Customers and Vendors.
- Navigate to the Related Lists tab.
- Click the New button in the top right corner or select New Related List.
- Enter a suitable title for the related list, and choose who can see this list.
- Write a deluge script to fetch data from the connected third-party service. In this case, from Zoho Desk.
- Click Save, or Save and Execute to run the function.
The lists will be displayed under the Related Lists tab in the respective modules.
Note:
- The deluge script must return a map that contains ‘header_context’ and ‘data’ in the following format:
{
header_context: [
{
key: 'customer_name',
value: 'Customer Name'
},
{
key: 'invoice_number',
value: 'Invoice Number
}
],
data: [
{
customer_name: <customer_name>,
invoice_number: <invoice_number>
}
]
}
-
There are two ways to specify the value of the data node:
- To display a customer name as a string:
customer_name: <customer_name>
- To display a customer name as a hyperlink
customer_name: {
"value": <customer_name>,
"isExternal":true, // To open the link in separate tab.
"link": <web_url_path>
}
-
The Deluge script will return a map that can also contain ‘page_context’. When you try fetching all the transaction records at once, it may result in a longer page response time. To resolve this issue, the ‘page_context’ can be helpful in splitting the records based on pages and fetching them faster.
-
For example, if you have 50 transaction records for your customers, you can split those records into 10 records per page and fetch the required data faster using page_context.
-
If you want to fetch records based on pages using the Deluge script, you will have to add ‘page_context’ in the Deluge script returned value, and it should have the following properties:
- page: string
- per_page: string
- has_more_page: boolean (Should be set as false when you reach the last set of data)
{
header_context: [{...}, {...}],
data: [{...}],
page_context: {
per_page: '10',
page: '1',
has_more_page: true/false
}
}
Edit/Delete Related Lists
To edit/delete a related list that you had created:
- Go to Settings in the top right corner of the page.
- Select the module which has the related list you wish to delete.
- Click the Related Lists tab.
- Hover over the list that you wish to delete/edit.
- Click Edit to make changes to the list or click the down arrow and select Delete to permanently delete.
Pro Tip: If you want to temporarily disable the related list, click the down arrow and select Mark as Inactive.
Sample Function
Here’s a sample function for Scenario 2 that allows Zoho Books users to access customer details in Zoho Desk:
\
searchMap = Map();
searchMap.put('fullName',customer.get("contact_name"));
searchMap.put('orgId',XXXXX);//Zoho desk orgId
searchList = invokeurl
[
url :"https://desk.zoho.in/api/v1/contacts/search"
type :GET
parameters:searchMap
connection:"zohodesk"
];
contacts = searchList.get('data').toList();
contact = contacts.get('0');
contactId = contact.get('id');
fromIndex = (page_context.get('page').toNumber() - 1) * page_context.get('per_page').toNumber();
happinessList = invokeurl
[
url :"https://desk.zoho.in/api/v1/customerHappiness?include=contacts,agents,tickets&department=allDepartment&from=" + fromIndex + "&limit=10&contactId=" + contactId
type :GET
connection:"zohodesk"
];
happinessList = happinessList.get('data').toList();
headerData = List();
headerData.add({"key":"ticket.ticketNumber","value":"Ticket Number"});
headerData.add({"key":"rating","value":"Rating"});
headerData.add({"key":"feedback","value":"Feedback"});
headerData.add({"key":"agent.lastName","value":"Agent Last Name"});
happinessCount = invokeurl
[
url :"https://desk.zoho.in/api/v1/customerHappiness/count?department=allDepartment&contactId=" + contactId
type :GET
connection:"zohodesk"
];
happinessCount = happinessCount.get('allDepartment');
totalCount = happinessCount.get('okay') + happinessCount.get('bad') + happinessCount.get('good');
pageContext = Map();
pageContext.put('page',page_context.get('page'));
pageContext.put('per_page',page_context.get('per_page'));
pageContext.put('has_more_page',false);
if(totalCount >= page_context.get('page').toNumber() * page_context.get('per_page').toNumber())
{
pageContext.put('has_more_page',true);
}
resultMap = Map();
resultMap.put("header_context",headerData);
resultMap.put("data",happinessList);
resultMap.put("page_context",pageContext);
return resultMap;