Add Accounts
In the Banking module, you can add your Bank, Credit Card and your PayPal accounts to Zoho Books. Once you add an account, you can import its feeds (automatically or manually) into Zoho Books. After doing this, you will be able to match the transactions in Zoho Books with your bank transactions.
To fetch manual and automatic feeds, you should first connect your bank or credit card account to Zoho Books.
Add Account
To connect your Bank or Credit Card account to Zoho Books,
- Go to the Banking module in the left sidebar.
- Click Add Bank or Credit Card button in the top right corner of the page.

Add Accounts That Support Automatic Bank Feeds
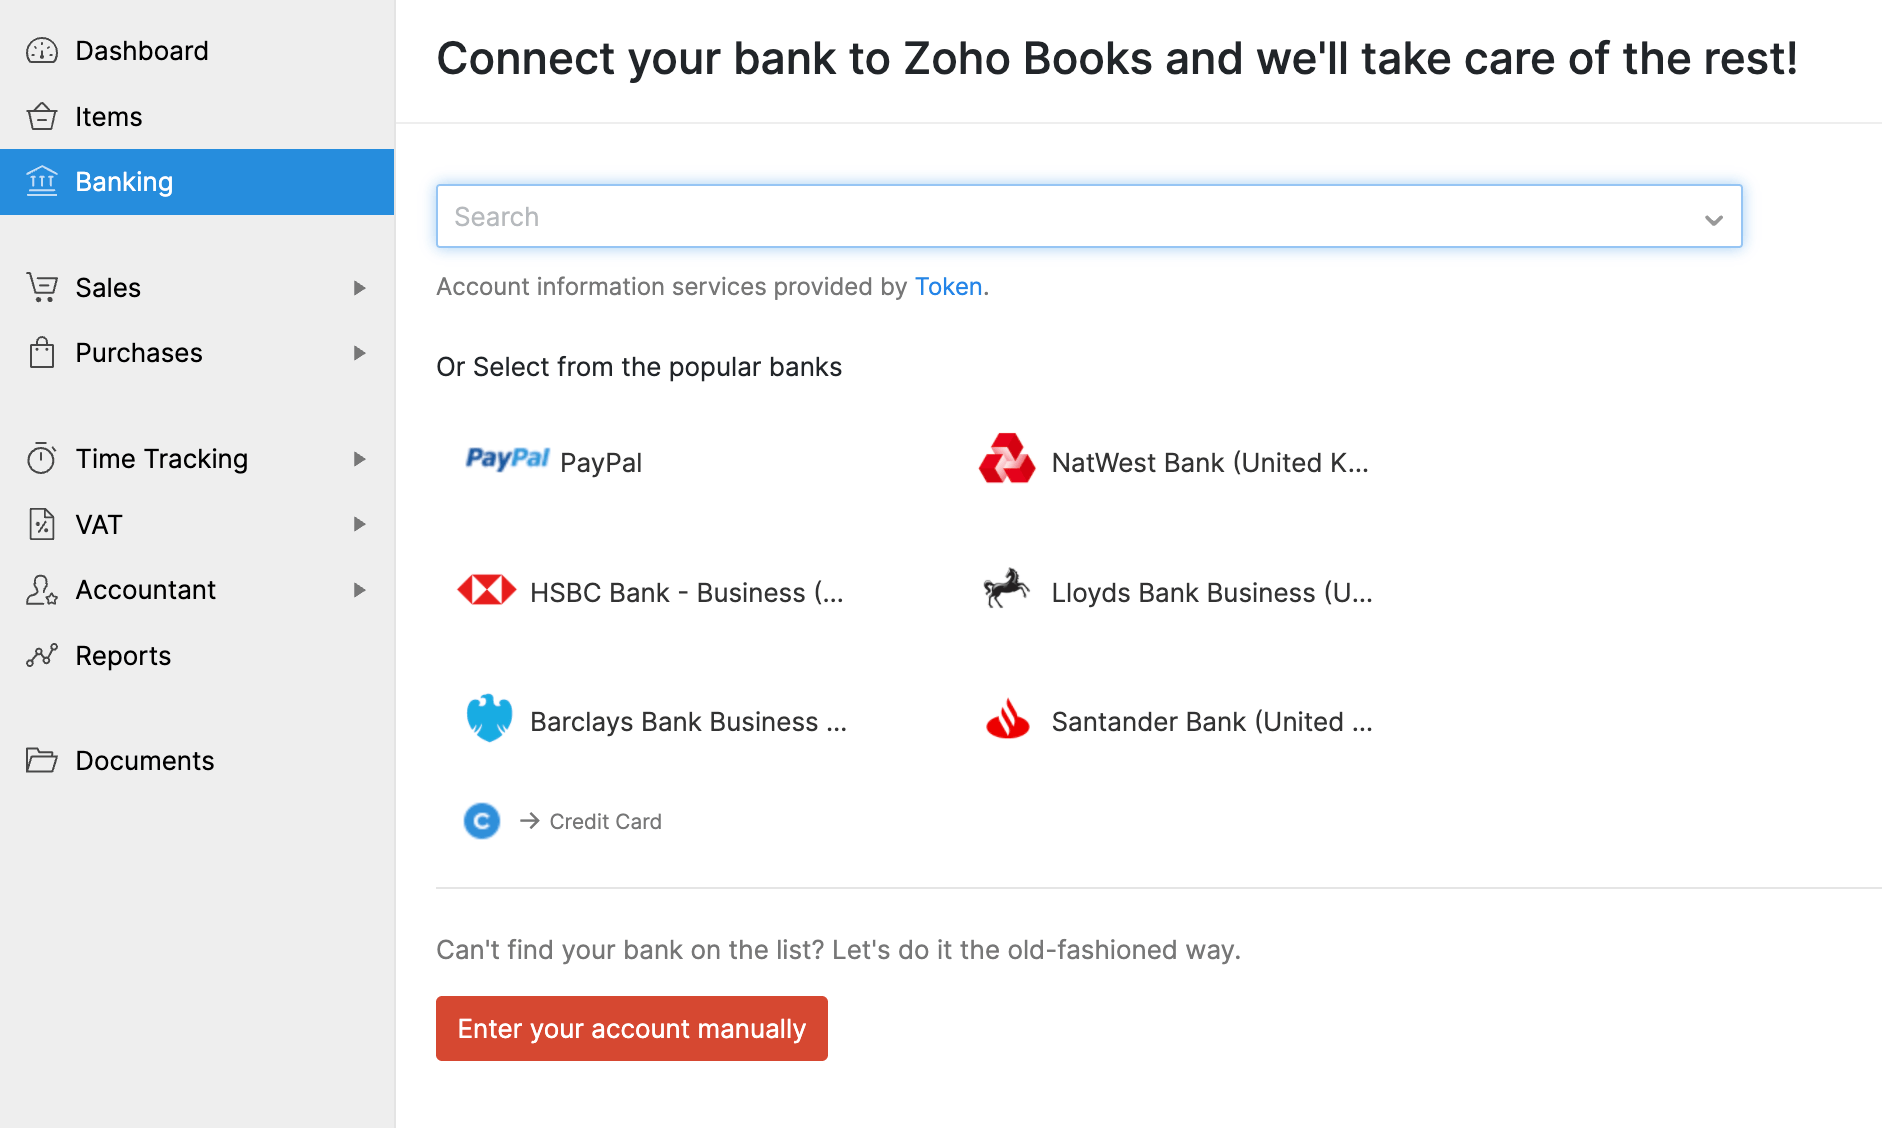
Zoho Books can be connected with all the major banks and credit cards. Just enter the name of a Bank or Credit Card that you would like to connect with Zoho Books and select from the drop down.
Insight: Zoho Books offers you the option to choose from two major account information service providers - Yodlee and Token. If your bank is not one of them, we request you to import bank statements manually. Learn more.

- Select an account information service provider.
- Enter the name of your bank or select one from the list of popular banks.
After selecting the bank or credit card,
- Enter the login credentials.
- Select the account that you would like to connect with Zoho Books.
- Select a date to download transaction history, transaction history from the last 90 days can be downloaded into Zoho Books.
- Select the currency.
- Click Continue.
This will automatically fetch bank feeds into your account.
Your transactions from the selected date will be automatically imported and for transactions before the selected date period or historic transactions, you can always import statements into your account by selecting the Import Statement option.
Note: Zoho Books currently supports five file formats namely CSV, TSV, OFX, QIF and CAMT.053 for statement import. You can import statements if your bank provides statements in any of these four formats.
Add Accounts Manually
Sometimes, the bank or credit card you are searching for might not be available. In this case, you can manually add those accounts and import statements.
- Go to the Banking module.
- Click the Add Bank or Credit Card button.
- Click the Enter your account manually button to add an account manually.

Add Bank Accounts Manually
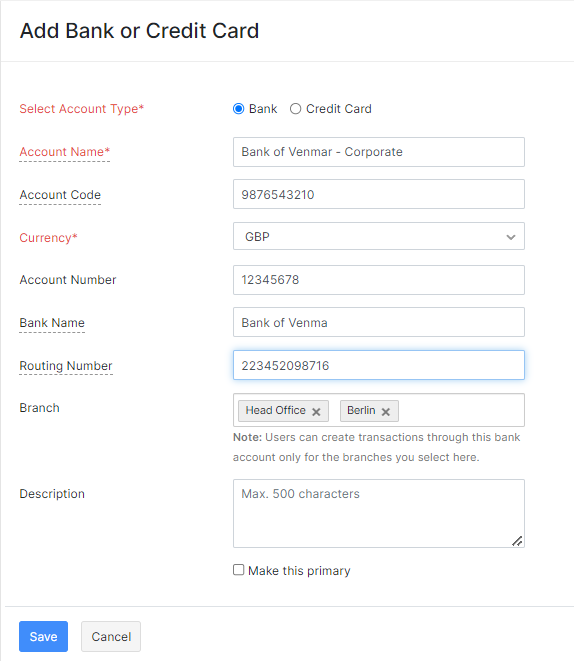
If you wish to add a bank account manually, select Bank option from the Select Account Type tab.

| Fields | Description |
|---|---|
| Account Name | The name of your bank account that will be displayed in the transaction pages. |
| Account Code | A unique code used for identification purposes. |
| Currency | The currency in which the bank account transactions are handled. You can select the currency from the drop down. |
| Account Number | A unique number provided by the bank to identify your account. |
| Bank Name | Name of the bank which maintains the account. |
| Routing Number | A nine digit bank routing number or routing transit number (RTN) used to identify financial institutions in a transaction. |
| Branch | The branches for which users can create, edit and delete transactions under this account. |
Add Credit Card Accounts Manually
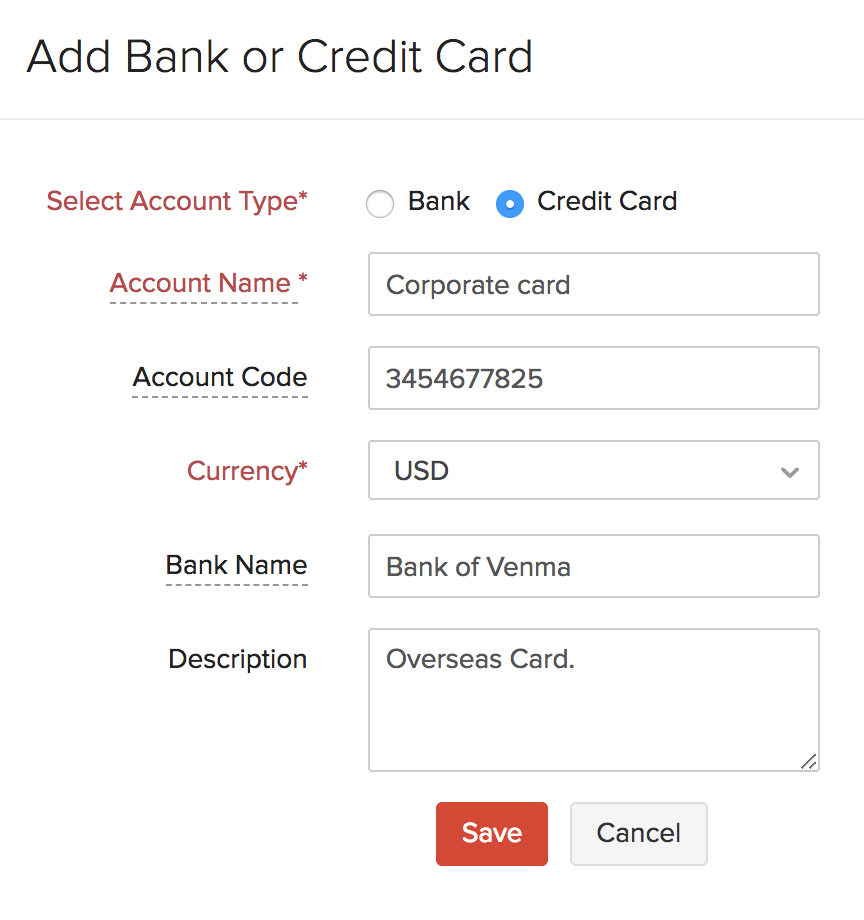
If you wish to add a Credit Card account manually, select the Credit Card option from the Select Account Type tab.

| Fields | Description |
|---|---|
| Account Name | The name of your bank account that will be displayed in the transaction pages. |
| Account Code | A unique code that you can enter for identification purposes. |
| Currency | Currency in which the bank account transactions are handled. You can select the currency from the drop down. |
| Bank Name | Name of the bank which holds the account. |
Click here to know how to import bank statements for manually added bank accounts.
Add PayPal Account{#add-paypal-account}
You can also connect with your Paypal account to fetch automatic feeds into your Zoho Books.
- Go to the Banking module.
- Click the Add Bank or Credit Card button.
- Select Paypal listed under popular banks.
- In the following pop-up, choose the account type (Bank or Credit Card) in Zoho Books to fetch feeds from PayPal.
- After choosing the account type, you will be redirected to the PayPal website.
- Enter your credentials to authorize connection between PayPal and Zoho Books.
- After signing-in, you will receive a message indicating successful integration with Zoho.
- Click Go Back to Zoho to return to your Zoho Books account.
Adding currencies
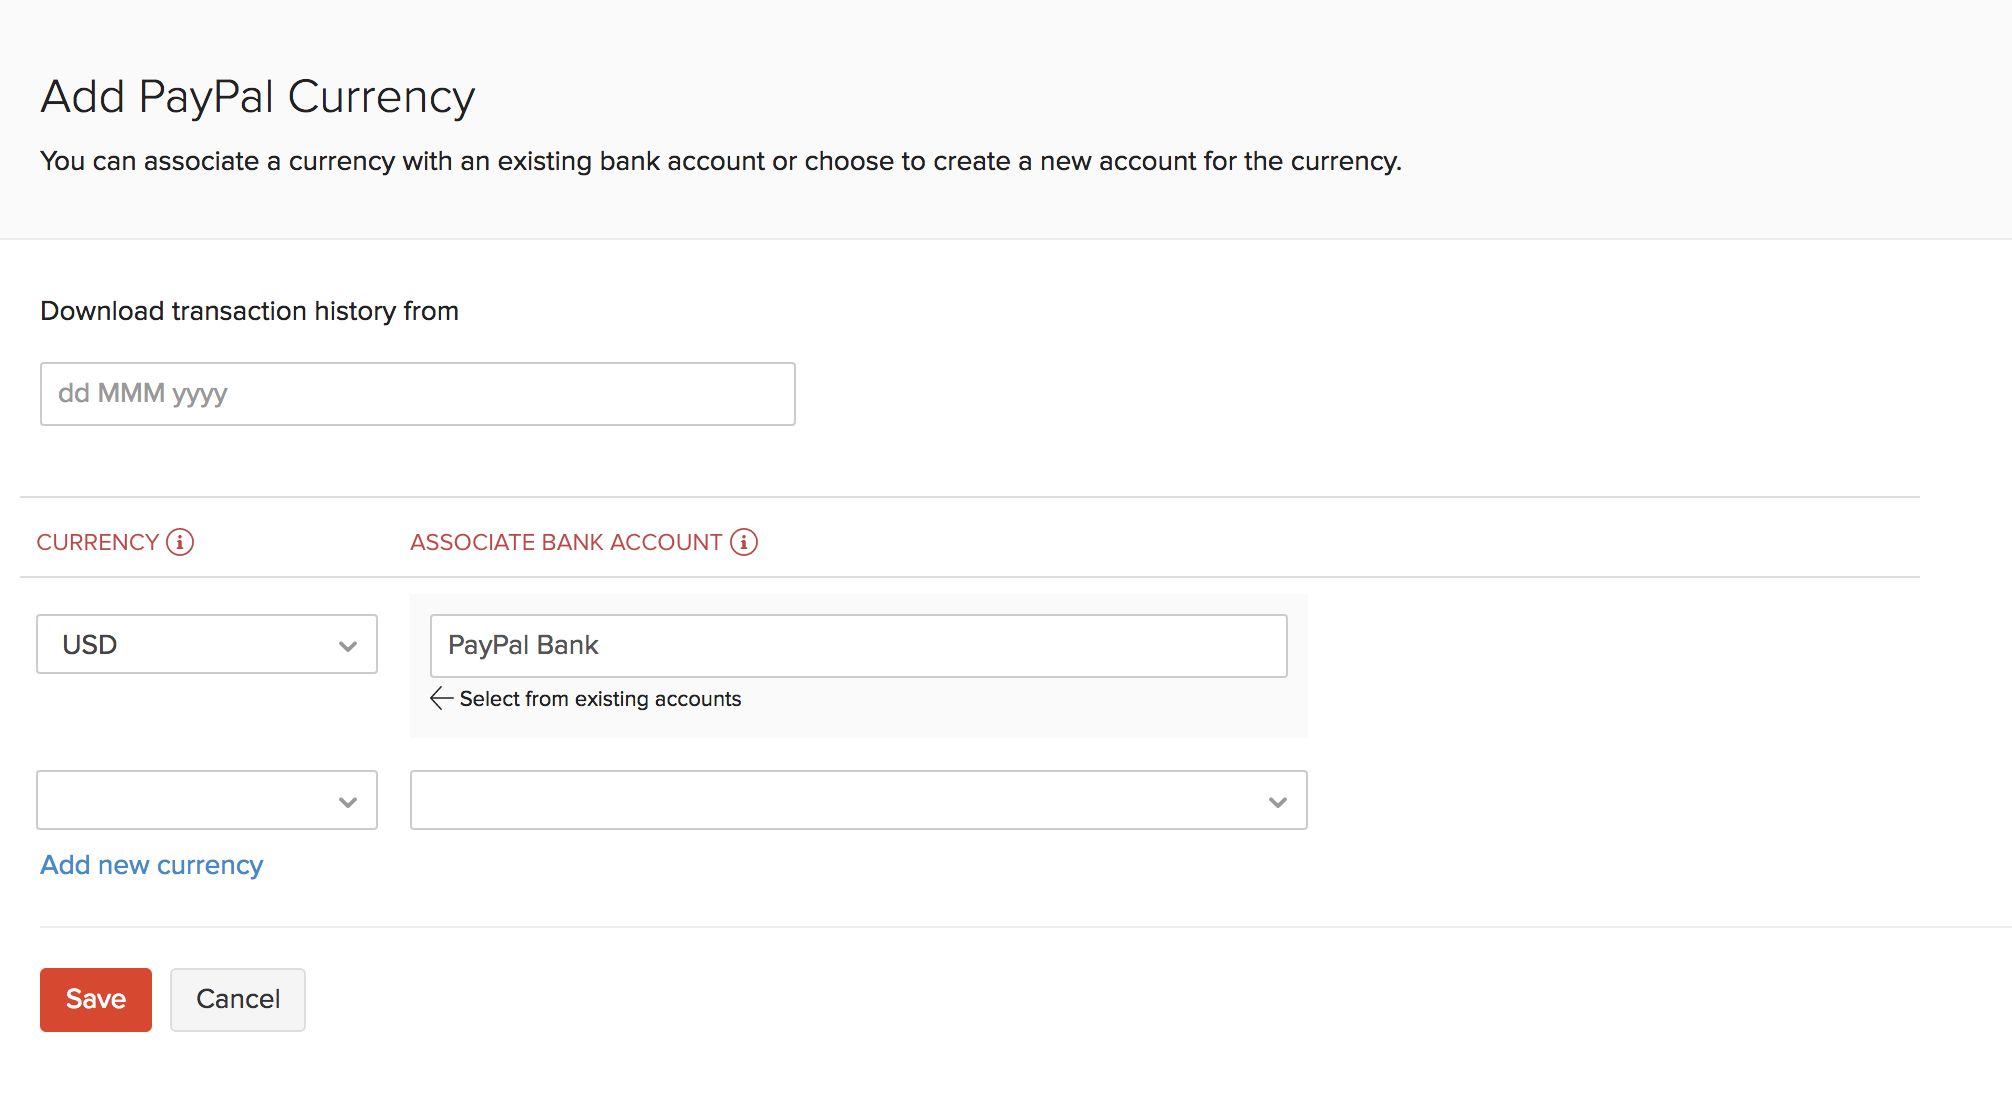
After being redirected back to your Zoho Books account, you will be asked to fill a form where you will be entering the following information.

| Fields | Description |
|---|---|
| Download transaction history from | Enter any date from the past 90 days to import feeds from PayPal. Transaction history for the past 90 days will be fetched by default if no date is specified. |
| Currency | Enter your currencies in PayPal that you wish to track in Zoho Books. |
| Associate Bank Account | You can associate your PayPal currencies to an already existing bank account or choose to create a new account for the currency. |
- To add more currencies, click the Add new currency button.
- After entering all the details, click Save.
Adding new currencies
To add a new PayPal currency,
- Go to the Banking module.
- Click the Add Bank or Credit Card.
- Select PayPal listed under popular banks.
- Click the Add new currency button on the top right corner of the window.

- Add a currency and associate it to an already existing bank account or create a new account for the currency.
- Click Save.
Removing your currency
If you have stopped receiving payments for a particular currency or if you had set up a wrong currency, you can remove that currency feed from PayPal.
Warning: Make sure you deactivate your PayPal feed before removing a currency. Removing all your currencies will remove the PayPal integration.
To remove your currency,
- Go to the Banking module.
- Click the Add Bank or Credit Card button in the top right corner of the page.
- Select PayPal listed under popular banks.
- Now, click the Remove button adjacent to the currency that you want to remove.
- Click OK.
Next >
Related >


 Yes
Yes