Manage Reports
You can manage the reports in Zoho Books by configuring PDF layouts during export, scheduling reports to auto-send them at specific frequencies, configuring role-based access to reports, and sharing reports with other users.
ON THIS PAGE
Configure Layouts For Reports
Zoho Books provides you the option to easily configure report layouts to best suit your business requirements when you print or export them as a PDF.
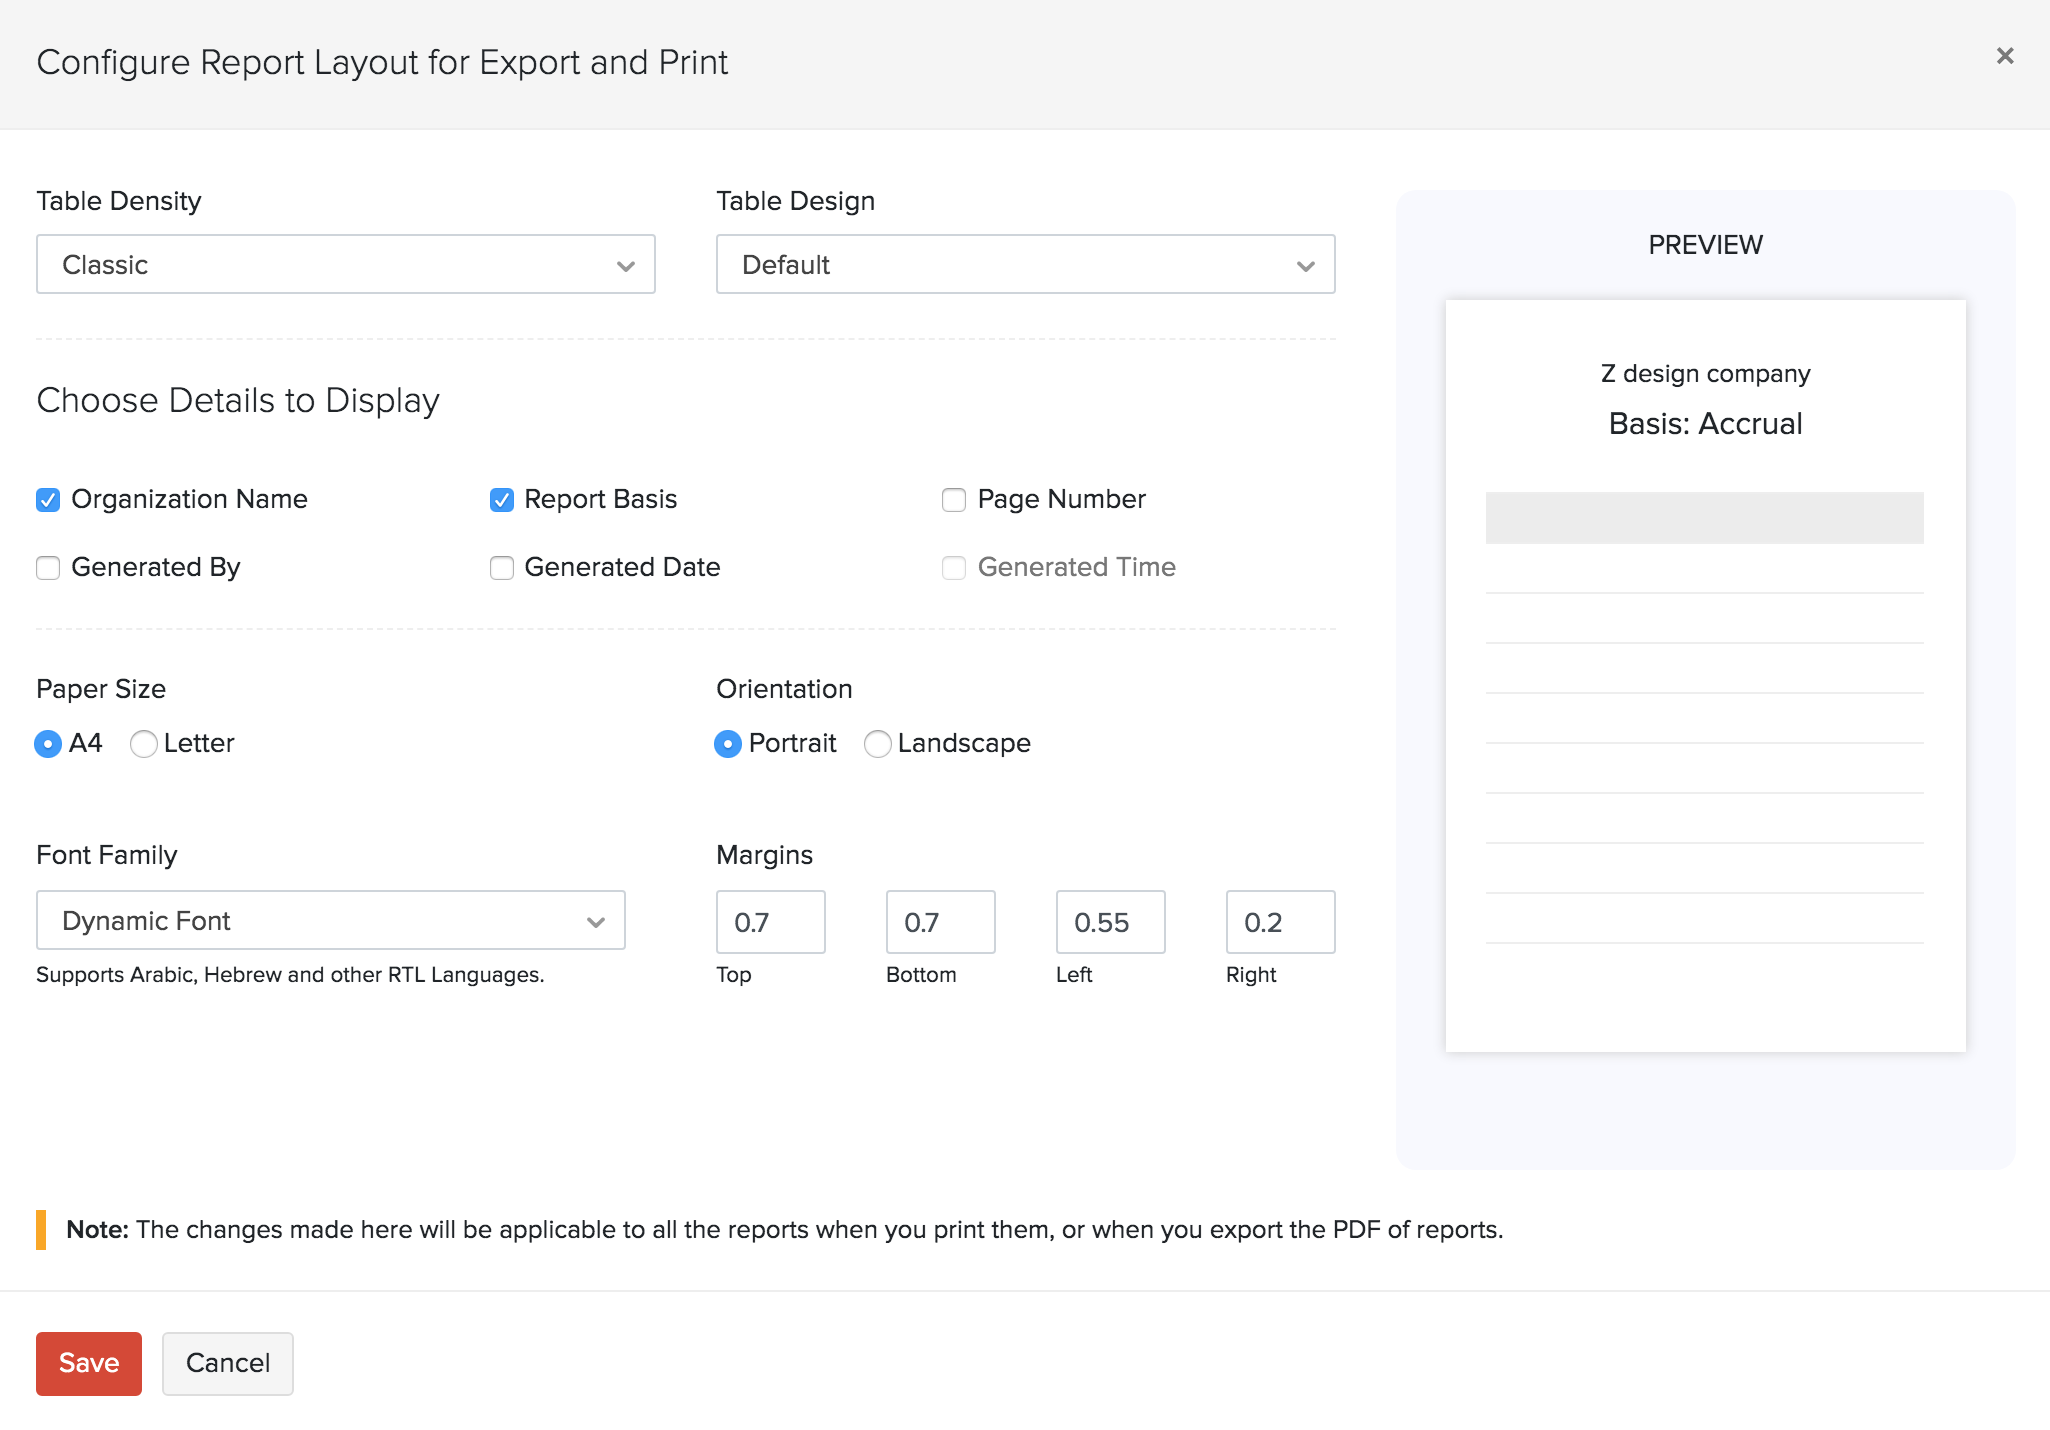
You can choose and the fields that have to be displayed and customize different attributes of the reports such as the table density, design, orientation, margins, paper size, and the fonts. To do this:
- Go to Reports and select the Configure Report Layout option from the top-right corner.

| Field | Description |
|---|---|
| Table Density | These options affect the size of the rows in the report that is printed or exported. You can select from three options: Classic, Compact and Super Compact. |
| Table Design | This option allows you to choose the way you want the information on your report to be tabularized. You can select from three options: Bordered, Alternative Rows and Alternative Columns. |
| Paper Size | Based on the medium where this would be printed, you can select either A4 or Letter sizes. |
| Orientation | Select either Portrait or Landscape based on where you’re displaying the report. |
| Font Family | The Dynamic font will be the default font that will be used to display the contents of the report. |
| Margins | The margins of the reports determine how much distance there is between the report’s content and the edges of the medium on which it’s printed. |
Note: Opting to choose a Table Design that is not the default option i.e., bordered, alternative rows, or alternative columns will not be applicable to the Business Overview and Tax Reports.
Choose Details to Display
This section lets you select the information to be displayed in the report that is going to be printed or exported as a PDF.
| Table | Description |
|---|---|
| Organization Name | Enable this option to display your organization’s name on the report. |
| Report Basis | Select the method of accounting to be displayed on your report: cash-based and accrual-based. |
| Page Number | Enable this option to auto-generate the page number in the footer section for your reports. |
| Generated By | Selecting this option will display the name of the admin who is generating the report. If you have chosen to schedule the report to be generated, selecting this option will mention that the report is generated by the ‘system’ (Zoho Books). |
| Generated Date | Enable this option to display the date on which the report was generated. |
| Generated Time | Enable this option to display the time when the report was generated. |
Note: The Generated Time will be not be enabled if you have not chosen to display the Generated Date.
- Click Save.
Insight: Configuring the layouts will be applicable to all the reports when you print them, or when you export the PDF. However, the configuration can be changed if you wish to make an exception when you want to print or export an individual report just for that instance. These configurations for the individual report will only be applicable for that instance and will not be reflected when you try to print or export the PDFs of the other reports.
Schedule Reports
You can schedule your reports to be sent to your email address or other users in the organization. These reports will be sent in different time intervals at a specific time chosen by you.
Zoho Books allows you to schedule a report to be generated on a weekly, monthly, quarterly or yearly basis as per your preference. The generated report will then be sent to the email addresses of your choice.
Note: The Schedule Report option is available only in certain reports. If you want the Schedule Report option in a report that does not have it, kindly reach out to us at support@zohobooks.com.
Prerequisite: Only the admins and the users who have permission to schedule reports can schedule reports.
To schedule a report:
- Go to Reports and select the report which you wish to be generated based on a schedule.
- Click the Schedule Report option at the top next to the Print icon.
- Select the criteria based on which you wish to schedule the report.
- Click Save.
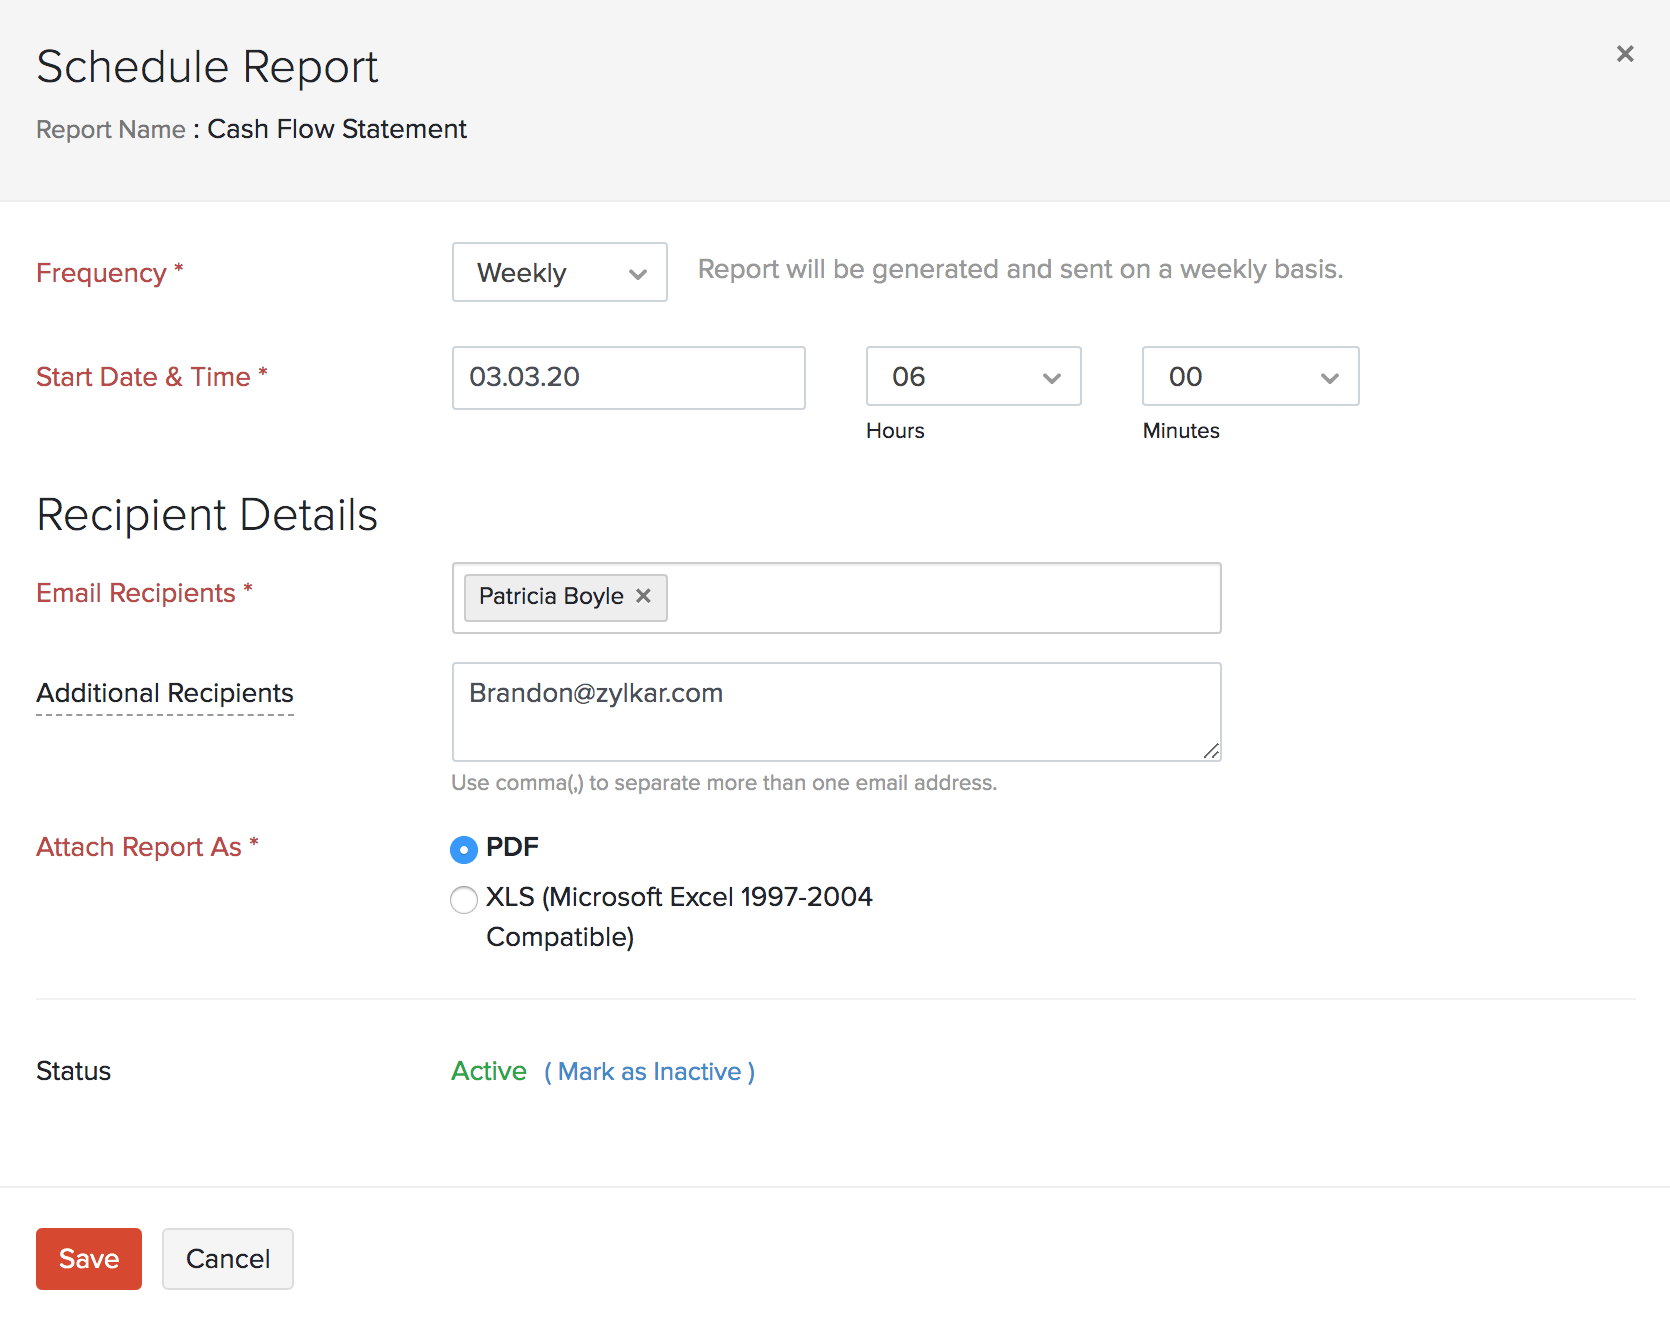
The report will be automatically sent to your email at the specified time and interval.
View Scheduled Reports
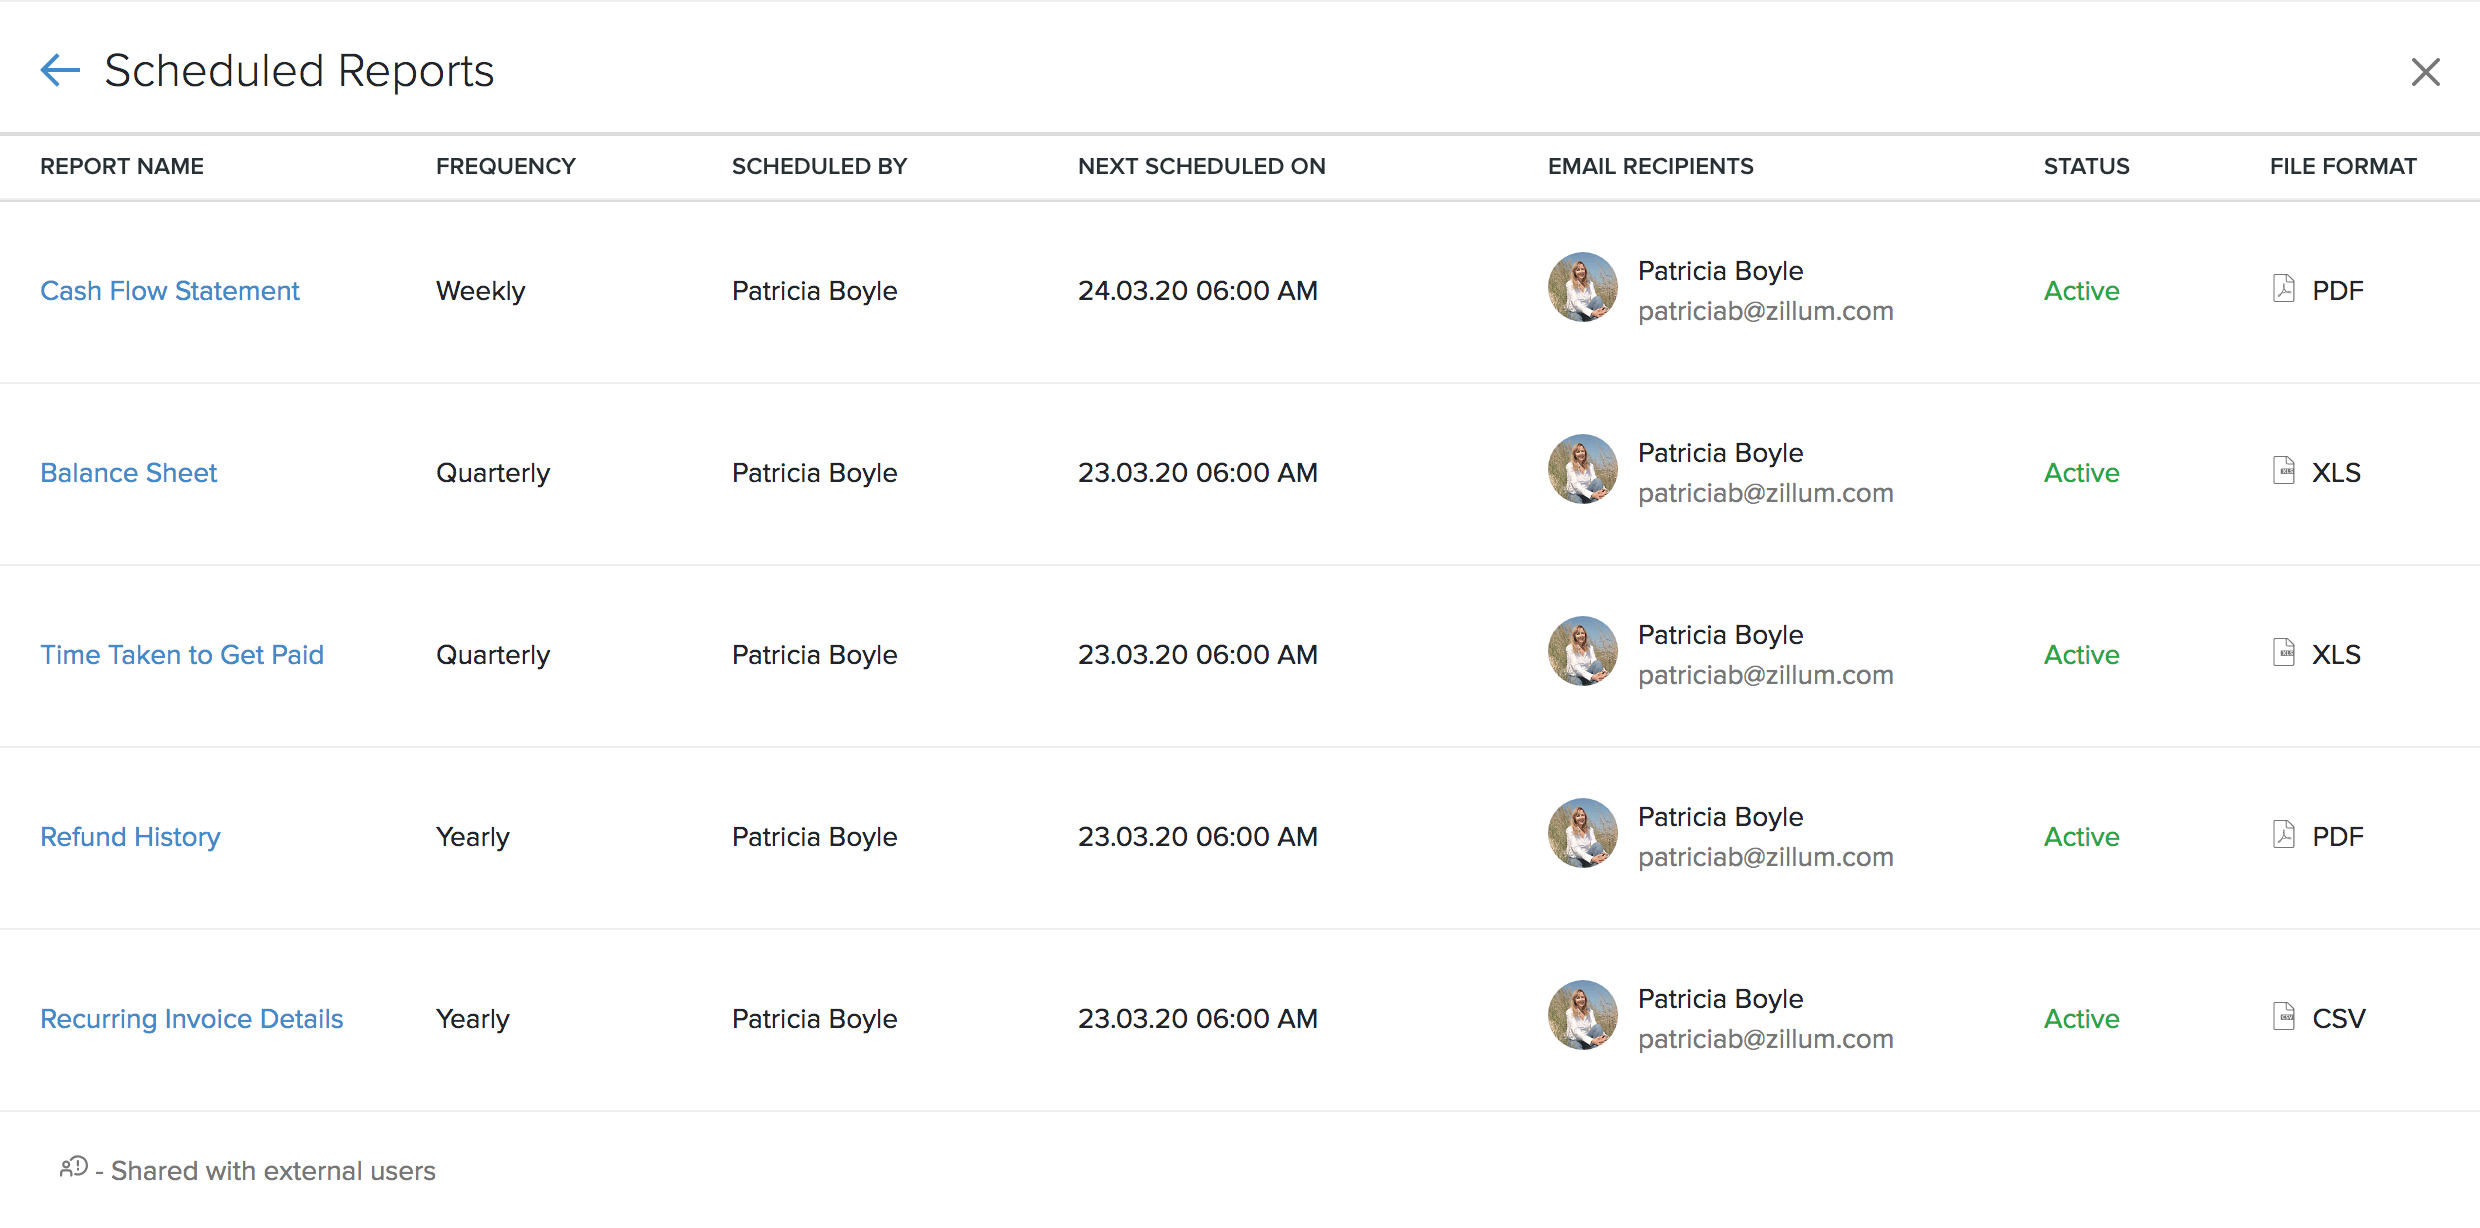
Zoho Books lists all the reports you’ve scheduled, for your reference. You can keep track and view the details of them in our dedicated Scheduled Reports page.
It details the frequency of your scheduled report, the user who scheduled the report, the email recipients, the status of your report, the date when your next report is due and the file format chosen.
Prerequisite: Only the admins and the users who have full access to all the reports can view scheduled reports.
To view your scheduled reports:
- Go to Reports
- Click Scheduled Reports in the top right corner.
Deactivate Scheduled Reports
You can disable a scheduled report by performing the steps mentioned below:
- Go to Reports.
- Click the scheduled report, which you wish to disable (For eg: Sales by Customer).
- Click the Report has been scheduled button in the top right corner of the page.

- In the pop-up window that follows (Report Scheduler), click Mark as Inactive to make the report inactive.
- Click Save for the changes to take effect.
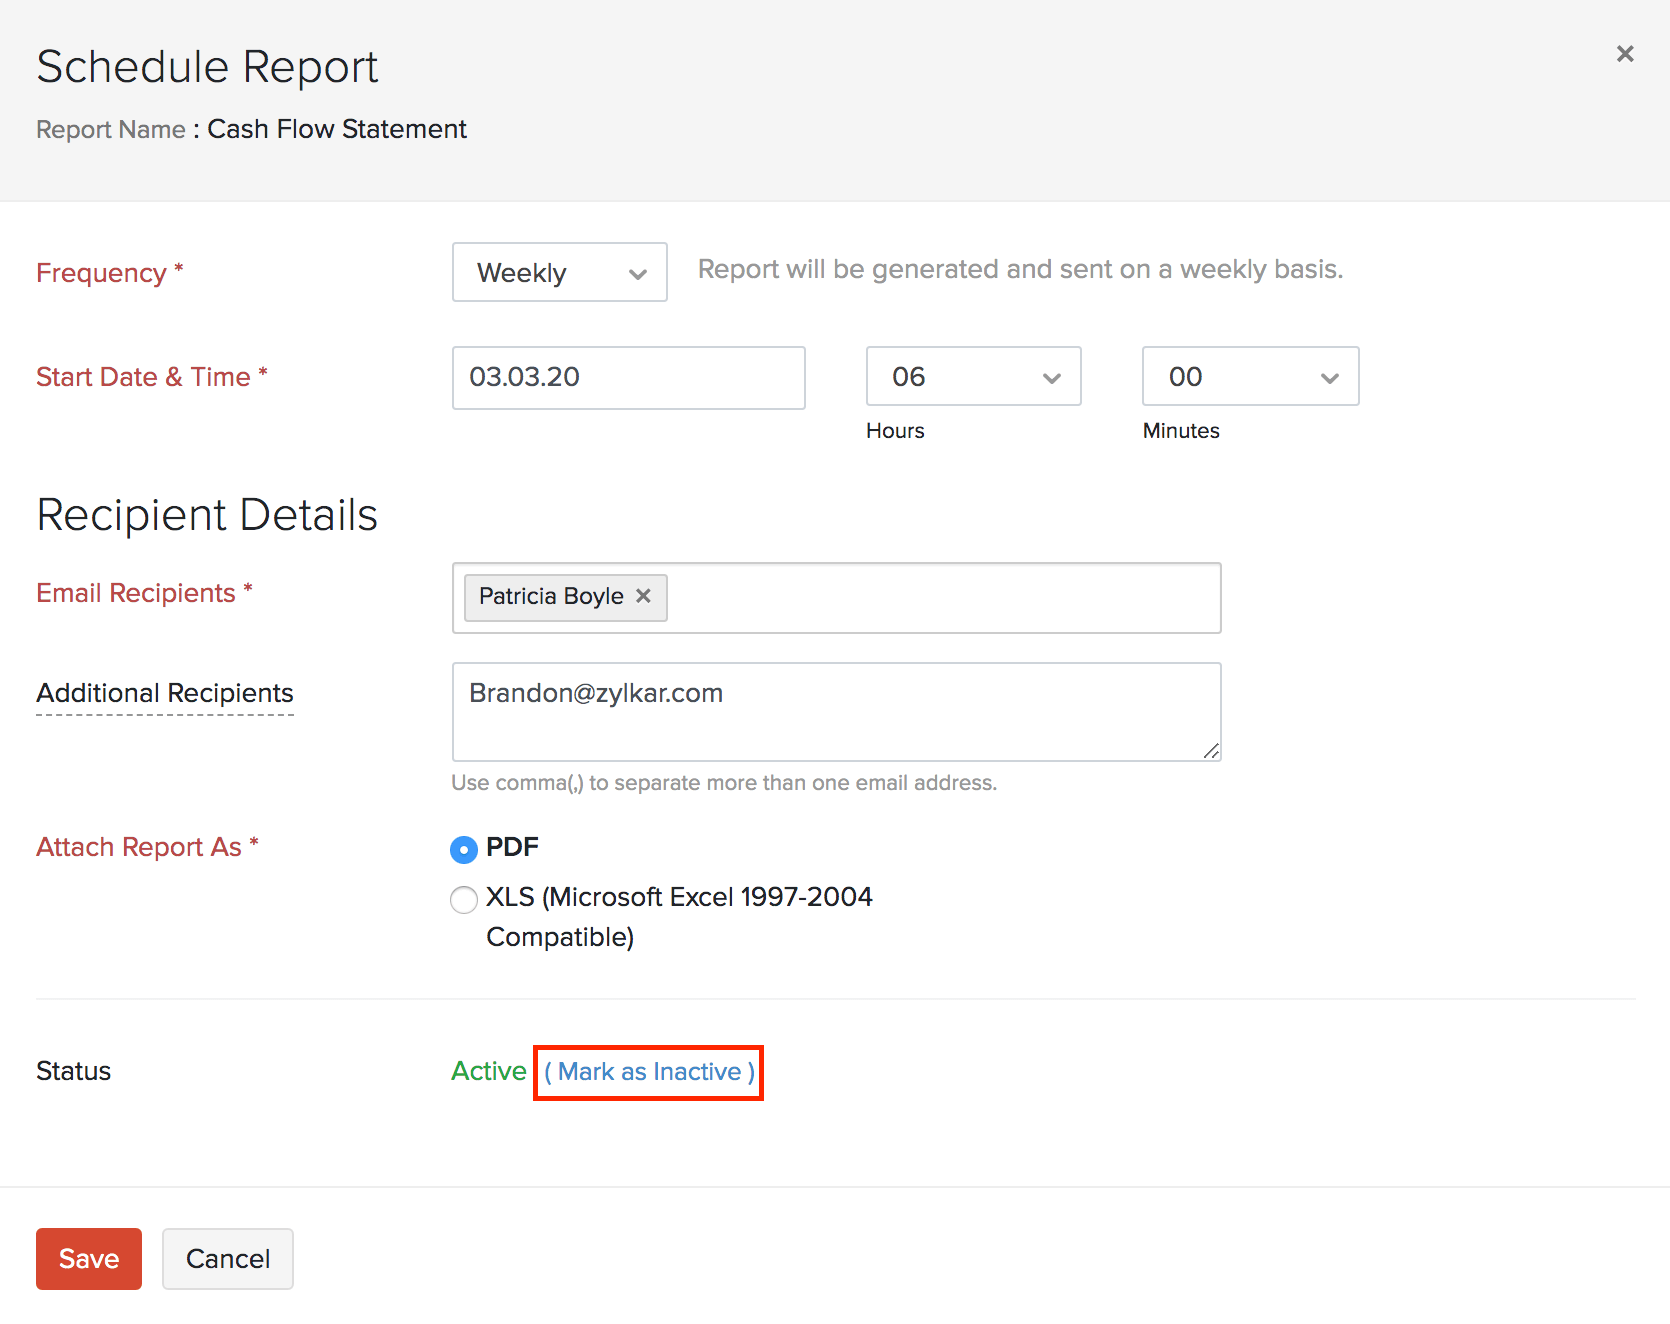
Insight: If you wish to re-enable a scheduled report, kindly click the Active option against Status.
Receive Weekly Summary Reports
Zoho Books can send a Weekly Summary Report to the admin if the option is enabled. The report contains a summary of income and expenditure, cash flow, transaction overview, active projects, alerts, and new feature updates.
To enable this:
- Click Settings on the top right corner of the page.
- Select General under Preferences.
- Mark the box near the Send Weekly Summary report option.
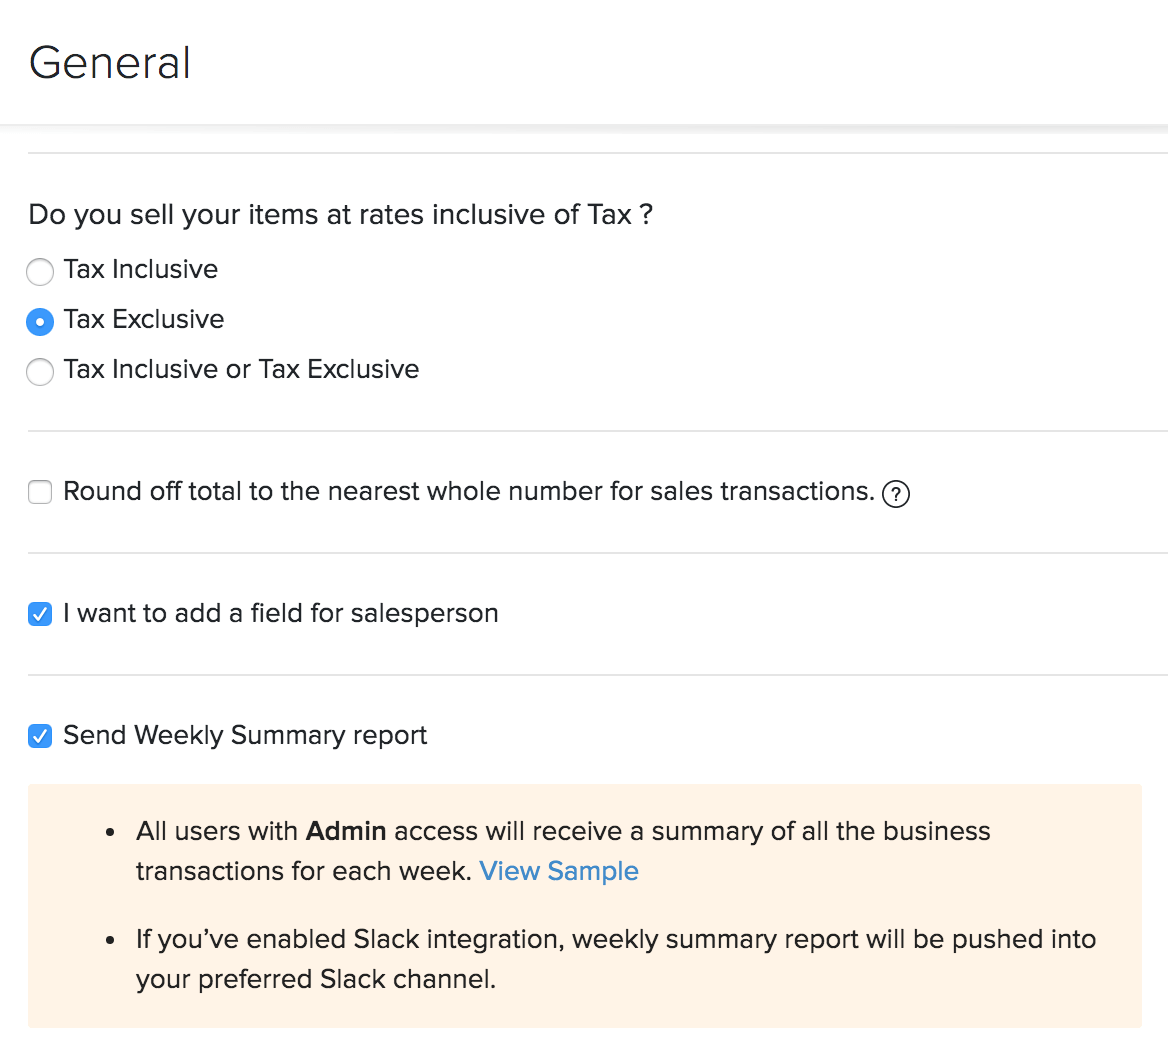
The reports will be sent to the admins of the organization every Sunday.
Configure Role Based Access to Reports
The predefined roles in Zoho Books cannot be edited. However, you can create custom roles and configure the permissions the users with that role will have for reports.
Prerequisite: Only admins can configure roles in Zoho Books.
To configure the report permissions of a role:
- Click the Gear icon in the top right corner of the window.
- Select Users and Roles and click the Roles tab.
- Create a new custom role or edit a custom role that you had already created.
- Scroll down to the bottom of the Edit Role page. You will find the Reports permissions at the end of the page.
- If you want to give this role full access to all the reports in Zoho Books, check the Enable full access for all reports option.
Note: If you want users with this role to view the list of scheduled reports and configure layouts for report PDFs, you will have to enable full access for all reports.
- If you want to give this role limited access to some of the reports in Zoho Books, you can click a report group and mark the permissions the role can have for each report. Later, when new reports are introduced, you will have to edit the role and provide access to the new reports.
- Scroll down and click Save after you’ve configured the report permissions.
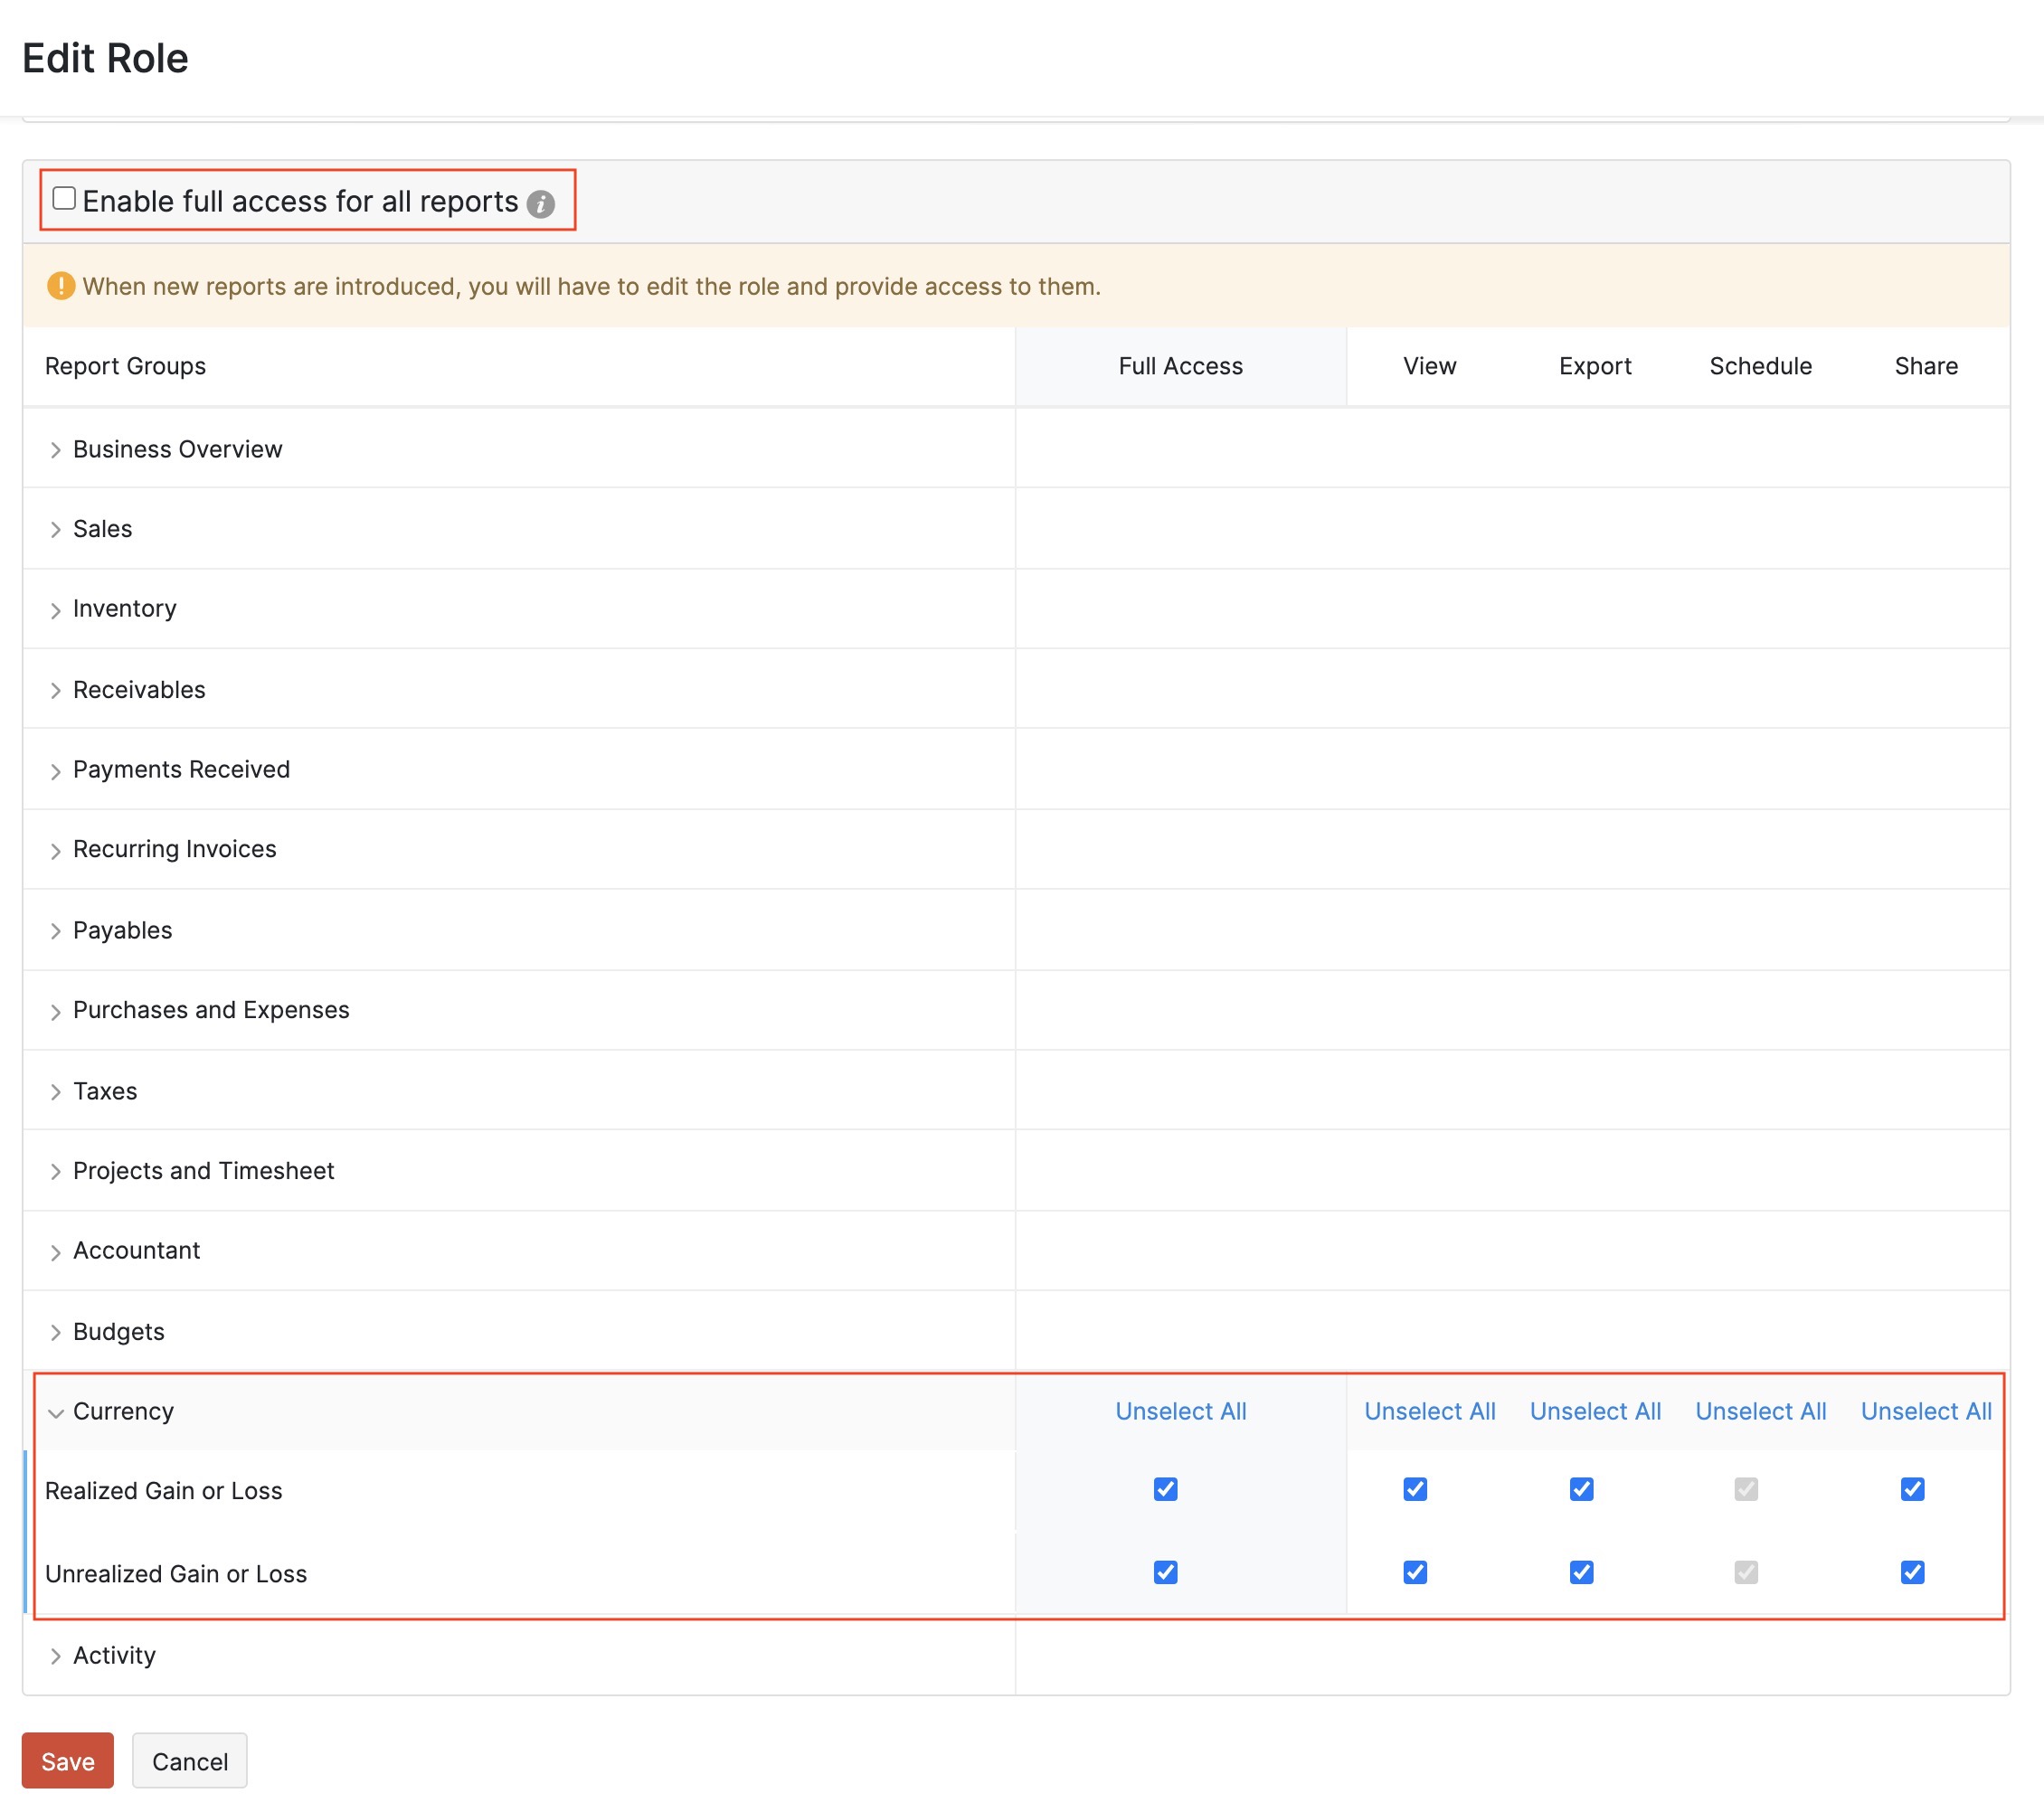
Once you configure the role, all the users with this role will have access only to the reports you’ve permitted for their role.
Share Report With Another User
In Zoho Books, admins have access to all the reports. Based on the permissions granted for a role, a user’s access to reports might be limited. In such cases, when the user needs access to a report, you can share the report with them.
Scenario: John is the Sales lead in his organization, however he doesn’t have access to the reports module. So, he approaches the admin of his Zoho Books organization to give him access to the Sales by Customer report. Now, using the Share Report option, the admin shares the report with John so that he can view, export, and schedule the report.
Prerequisite: Only Admins and the users with the Share permission in their role can share the report with other users.
To share a report with another user:
- Go to Reports in the left sidebar.
- Select the report you want to share with another user.
- Click the Share icon at the top right corner.
- Select the user with whom you want to share the report and the level of access they can have.
- Click Share.
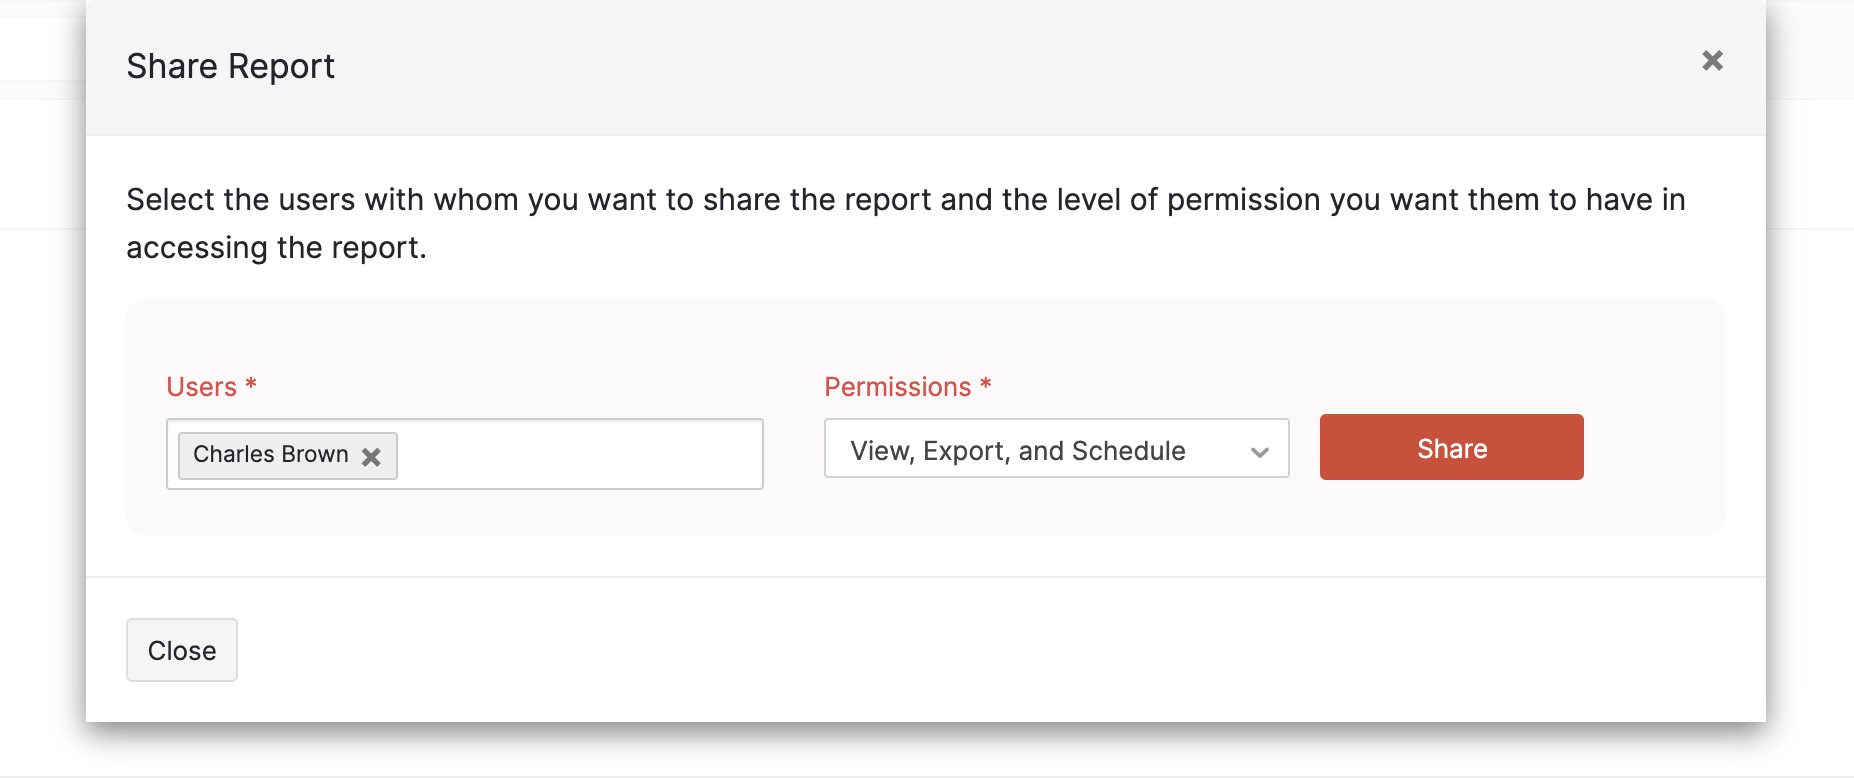
Modify User’s Level of Access to a Report
After you have given access to a report, if you want to change the level of access a user has to a report, you can modify it.
To modify the level of access to a report:
- Go to Reports in the left sidebar.
- Select the report for which you want to modify the sharing permissions.
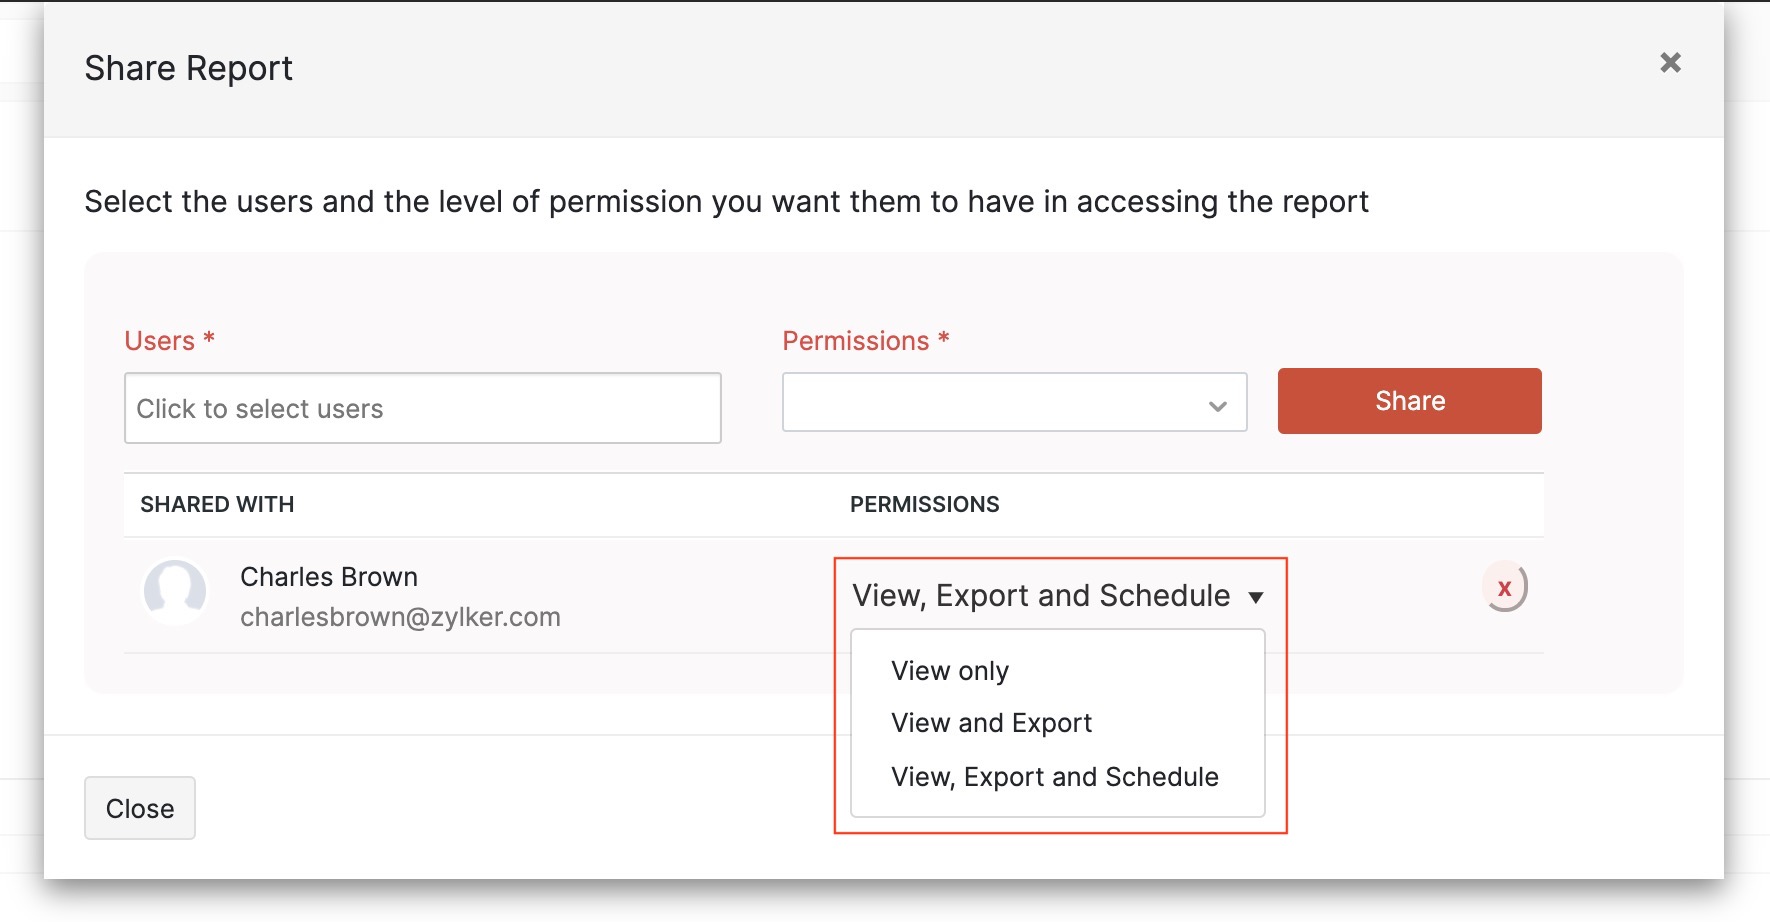
- Click the Share icon at the top right corner. The users who have access to the report will be listed in the popup.
- Click the dropdown in the Permissions column and change the level of access the user has to the report. The permissions will be updated immediately.
Remove User’s Access to a Report
You can remove a user’s access to the report if they no longer need to have access to the report. To remove access:
- Go to Reports in the left sidebar.
- Select the report for which you want to remove a user’s access.
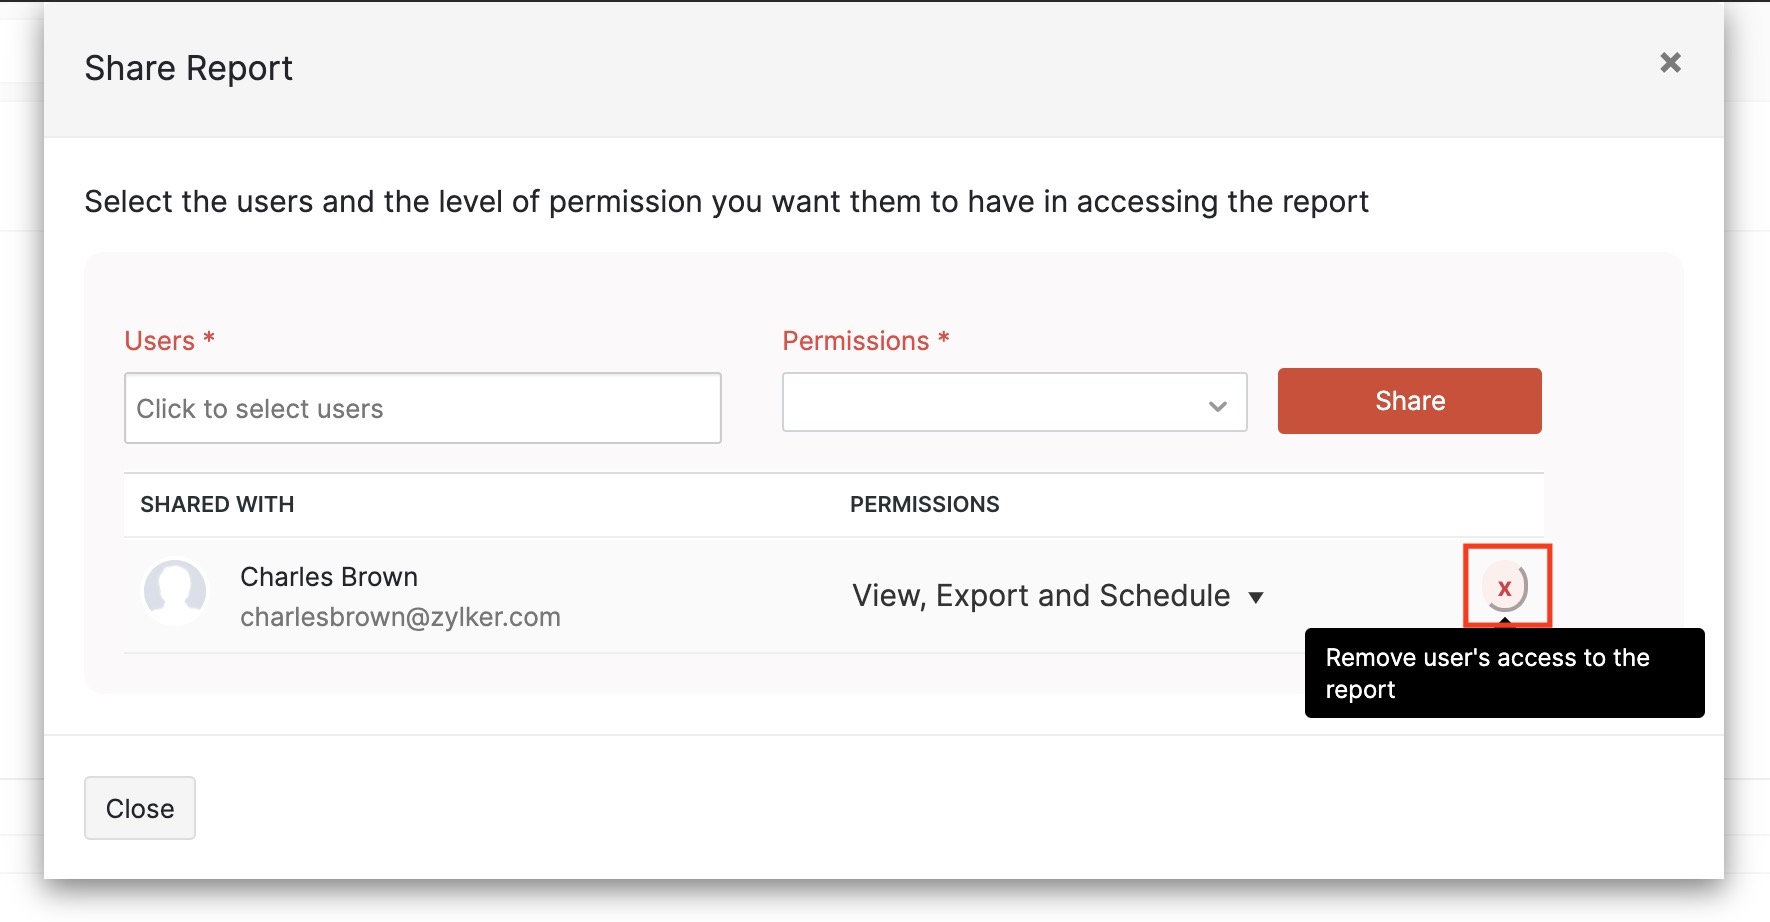
- Click the Share icon at the top right corner. The users who have access to the report will be listed in the popup.
- Click the Remove icon next to the user’s name and level of permissions. The user’s access to the report will be removed immediately.
 Yes
Yes
 Thank you for your feedback!
