Migrate From Wave to Zoho Books
Note: This migration document is for the existing Wave customers who are outside the US and Canada and want to migrate to Zoho Books.
ON THIS PAGE
Zoho Books is an easy-to-use accounting app that will help you manage your everyday business finance needs efficiently.
In this guide, we want to help you migrate from Wave to Zoho Books without a hitch. Depending on your business needs, there are two ways in which you can migrate to Zoho Books:
Method 1: Follow this method if you don’t want to have old transactions in Zoho Books.
Method 2: Follow this method if you want to migrate most of your data from Wave to Zoho Books.
- Set up Zoho Books
- Export and import customers, vendors, products, services, bills, invoices, and receipts
- Start using Zoho Books
Set up Zoho Books
Sign up for Zoho Books
If you’re a Wave customer from outside the US and Canada, Wave would have redirected to a Zoho Books landing page from where you can sign up for Zoho Books.
Before you can start migrating your data to your Zoho Books organization, it’s useful to familiarize yourself with the differences in terms used in Wave and Zoho Books.
Understanding the terms in Zoho Books
While most of the terms used in Wave and Zoho Books are the same, there are a few terms in Zoho Books that are different from Wave and they are listed below for your reference.
| Terms Used in Wave | Terms Used in Zoho Books |
|---|---|
| Business Context: Wave refers to your account as a business and you can create multiple businesses in Wave to manage different businesses. |
Organization Context: Zoho Books refers to your Zoho Books account as an organization and you can create multiple organizations to manage different businesses. |
| Products & Services Context: In Wave, Products & Services are used in the sidebar under Sales and Purchases tabs where you can create the products and services you sell and buy. |
Items Context: In Zoho Books, Items is used instead of Products & Services and it is available in the sidebar as a module. You can create the products and services you sell or buy in this module. |
| Price Context: In Wave, Price is used when you are creating a product or service to denote the selling price and the purchase price. |
Selling Price and Cost Price Context: When you create an item in Zoho Books, you can enter different prices for selling the item and purchasing the item. |
| Notes / Terms Context: When you create an invoice in Wave, you will find Notes / Terms at the bottom to enter any note or terms for your customer. |
Customer Notes and Terms & Conditions Context: Similarly, when you create an invoice in Zoho Books, you will find two separate text boxes for Customer Notes and Terms & Conditions to enter any note or terms to be displayed to customers. |
| Receipts Context: Receipts module is available under the Purchases module in Wave where you can upload your expense receipts and create transactions. |
Expenses Context: Similarly, Expenses is available under the Purchases tab in Zoho Books using which you can create expenses and attach receipts to them. |
| Income by Customer Context: In Wave, you will find this report under the Reports module and it gives you the details about all the income you’ve received from your customers. |
Receivable Summary & Receivable Details Context: In Zoho Books, there are two reports equivalent to the Income by Customer report. Receivable Summary report gives you a summary of all the amounts you have received or yet to receive from your customer while Receivable Details report gives you a detailed view into the transactions. |
| Aged Receivables Context: This report gives you details about all the unpaid and overdue invoices for the last 30, 60, and 90+ days. |
Aging Summary Context: In Zoho Books, you will find a similar report in the Reports module under Receivables that will give you details of unpaid and overdue invoices for the last 15, 30, 45, and 45+ days. |
| Purchases by Vendor Context: In Wave, you will find this report in the Reports module and it gives you the details about all the business purchases you’ve made from your vendors. |
Payable Summary & Payable Details Context: In Zoho Books, Payable Summary and Payable Details are equivalent to the Purchases by Vendor report. Payable Summary report gives you a summary of all the amounts you have paid or yet to pay your vendor while Payable Details report gives you a detailed view into all the purchase transactions. |
| Aged Payables Context: This report gives you details about all the unpaid and overdue bills for the last 30, 60, and 90+ days. |
Aging Summary Context: In Zoho Books, you will find a similar report in the Reports module under Payables that will give you details of unpaid and overdue bills for the last 15, 30, 45, and 45+ days. |
Navigating Zoho Books
The basic navigation of Wave and Zoho Books are similar, and if you’re used to the navigation in Wave, you will find it easy to navigate in Zoho Books. However, there are a few differences between Wave and Zoho Books.
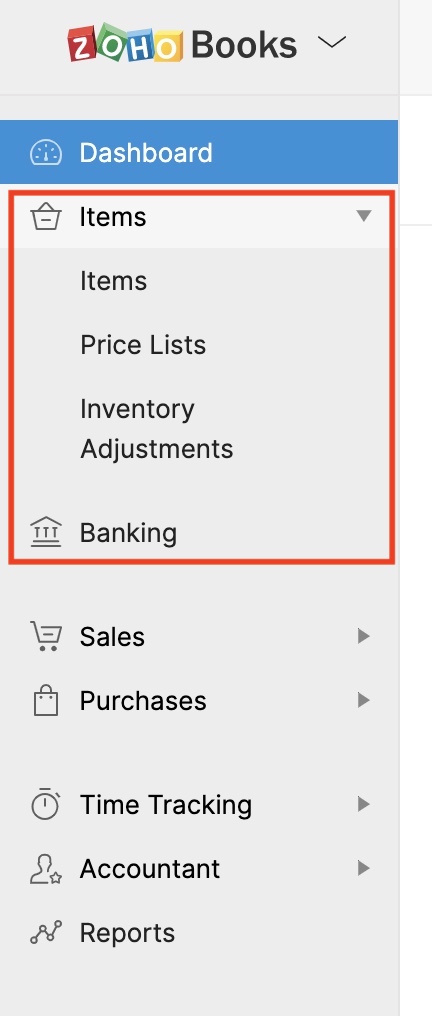
Products & Services
In Wave, this module is present under the Sales and Purchases tab in the sidebar. However in Zoho Books, Products and Services are referred to as Items and they are available as a separate tab in the sidebar.
Customer Statements
In Wave, this is a module that is available under the Sales tab in the left sidebar. In Zoho Books, you will be able to generate a customer statement for a customer by going to the Customers module, selecting the customer and generating a customer statement.
Reconciliation
This is a module that is present in the left sidebar under the Accounting tab. In Zoho Books, you can perform the reconciliation process for bank and credit card accounts from within the Banking module in the left sidebar.
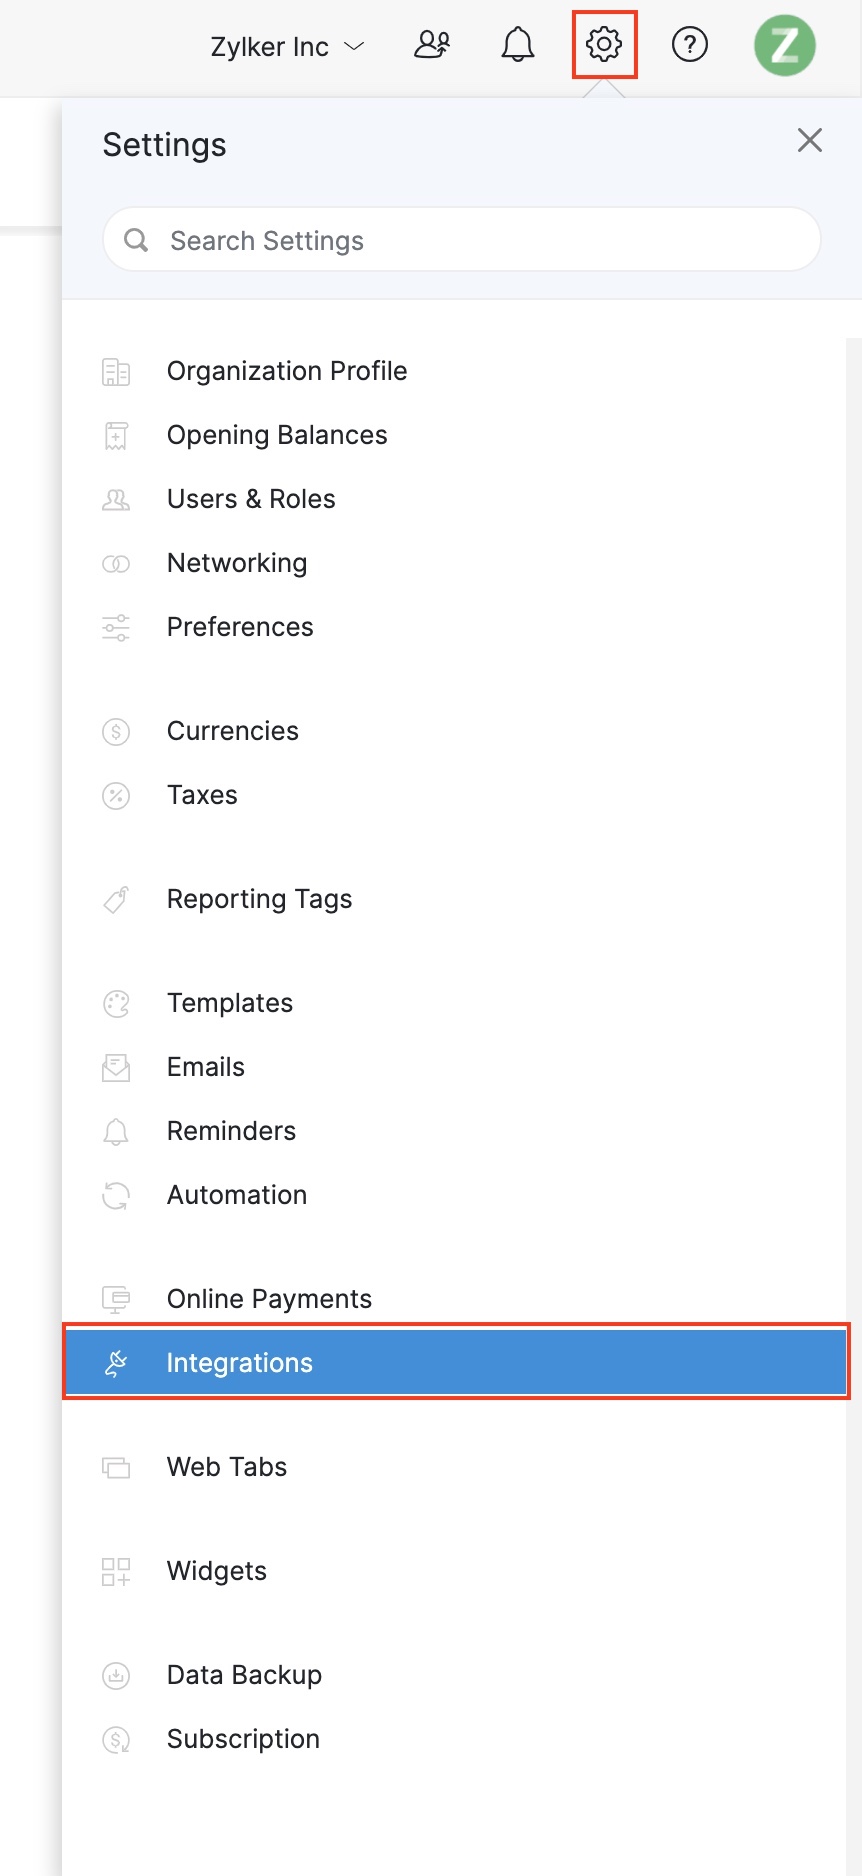
Settings & Integrations
In Wave, these are present in the left sidebar below the modules. In Zoho Books, Integrations are a part of Settings and you can access Settings by clicking the Gear icon at the top right corner of the window.
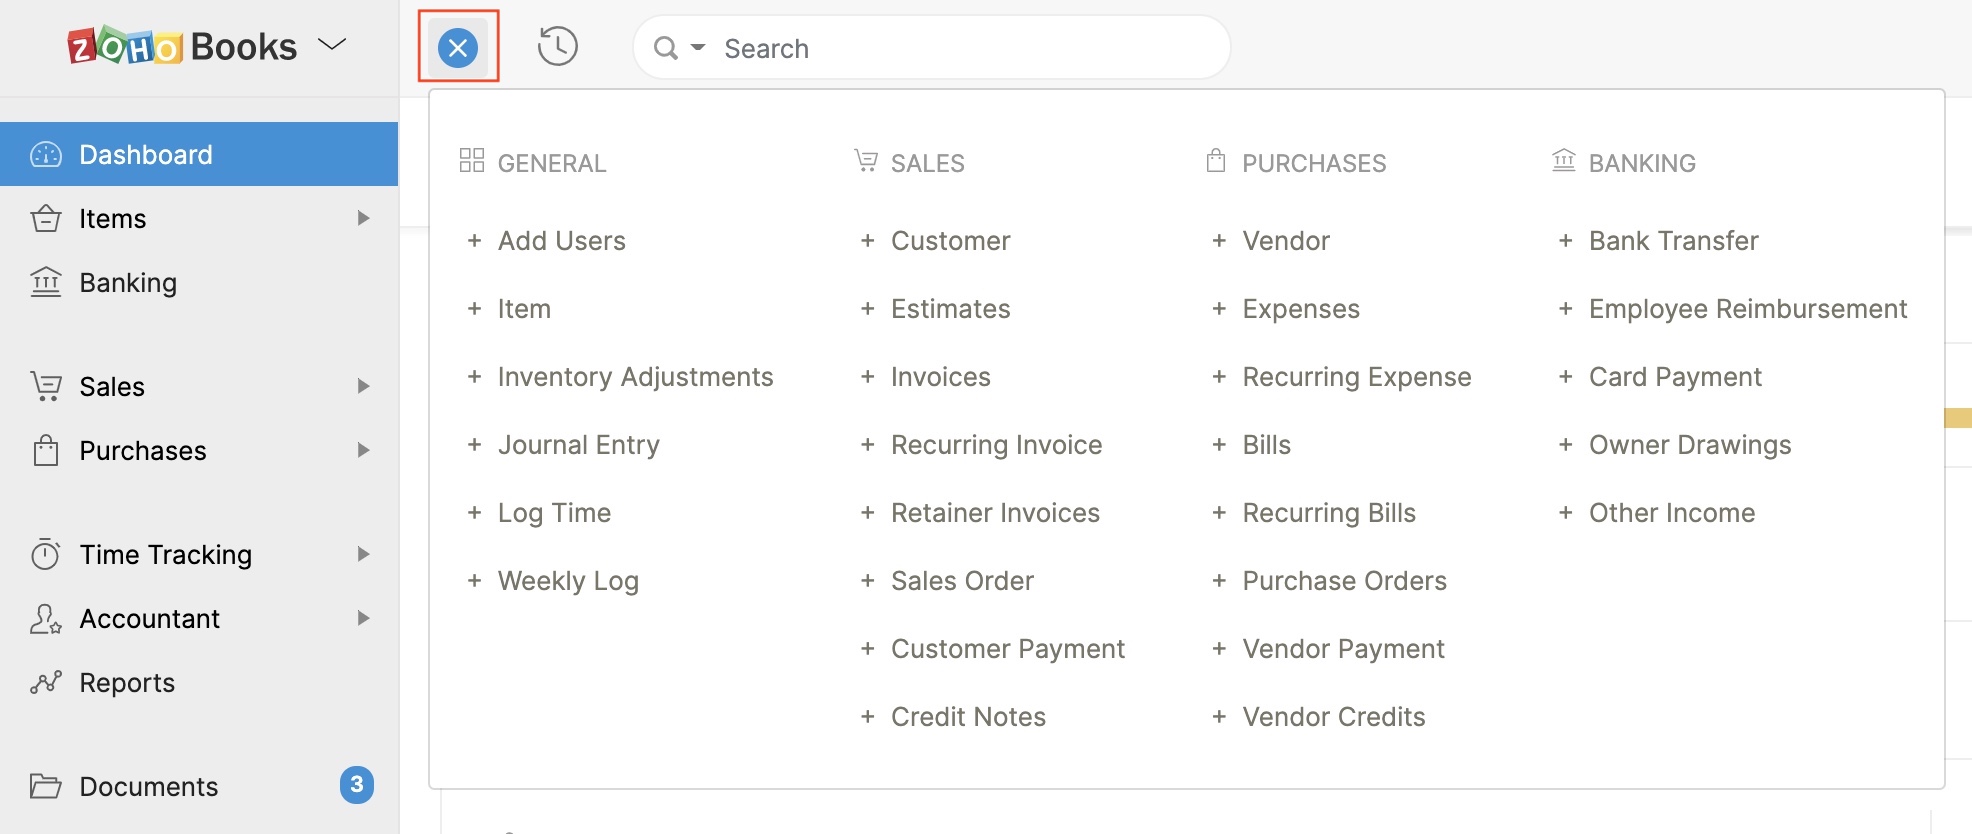
Quick Create Option
The option to quick-create transactions, contacts, and items are present in Wave’s Dashboard. In Zoho Books, the option to quick-create transactions, contacts, and items are present in the top bar. It can be accessed from any screen of Zoho Books enabling you to create transactions faster.
Switching to a different business account
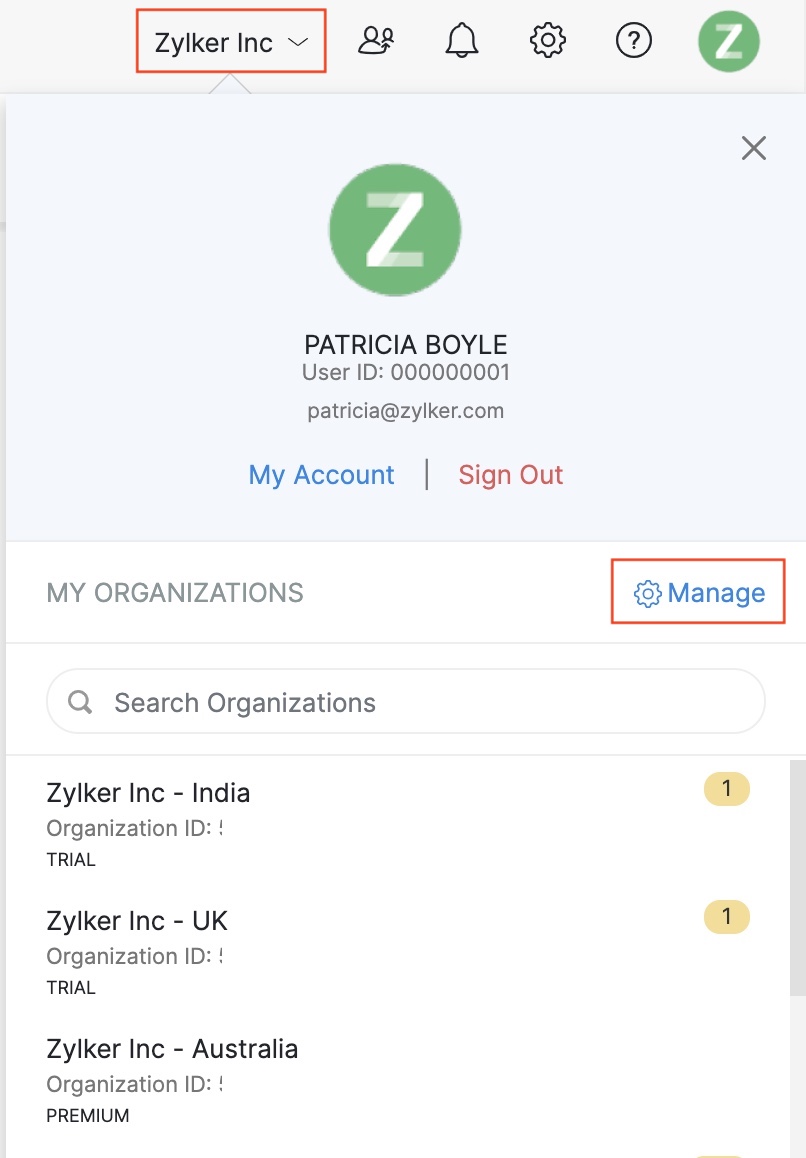
If you have multiple business accounts in Wave, you would have clicked your business name at the top left corner to access your other business accounts. In Zoho Books, we refer to business accounts as organizations. If you create multiple organizations in Zoho Books, you can access them by clicking your organization name at the top right corner of the window and selecting another organization.
Search
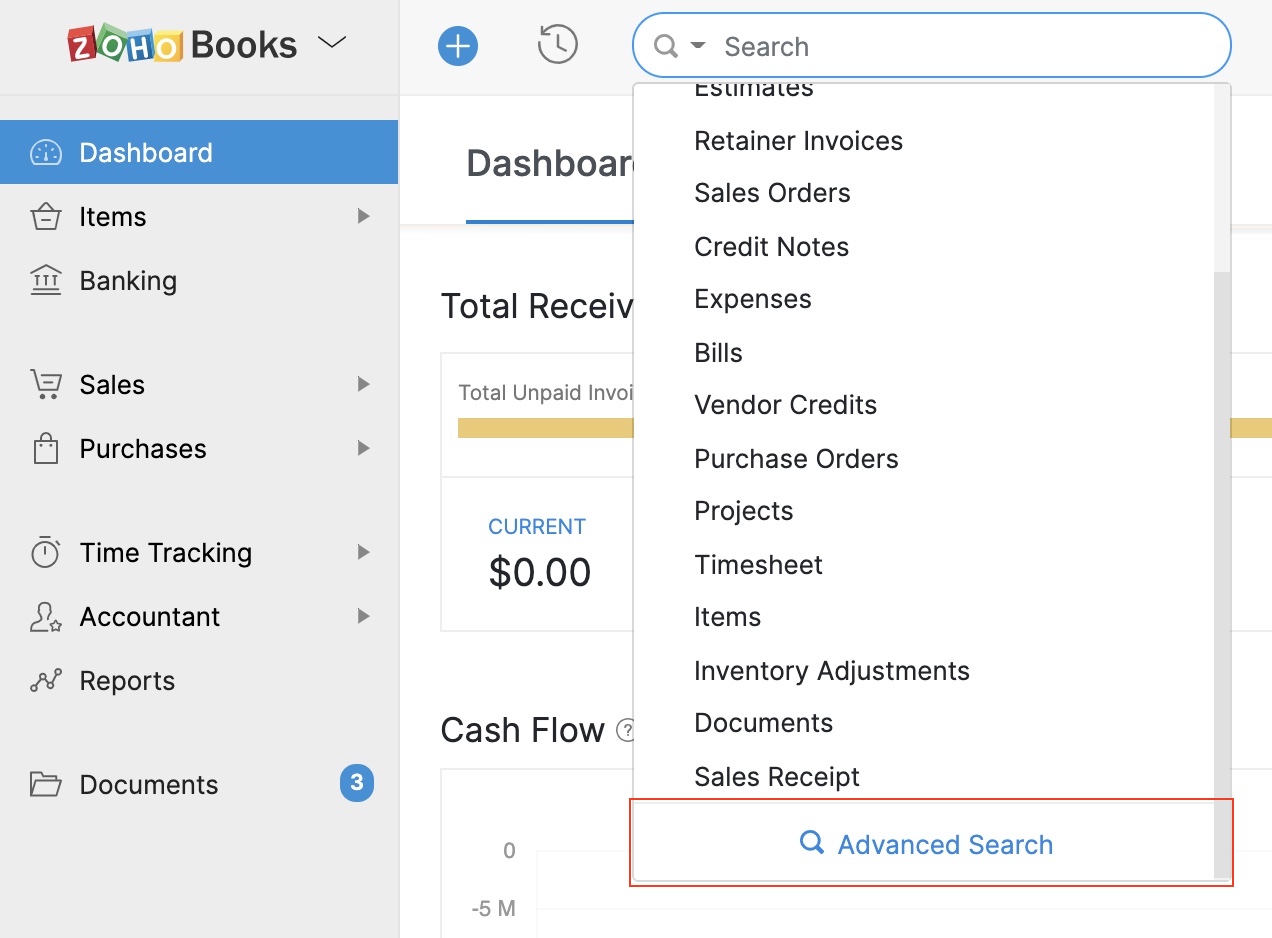
In Wave, you would have had the option to filter and find transactions limited to each module. However, in Zoho Books, you will find the option to search your records on the top bar in any page. Also, you can perform advanced search and find specific records that you are looking for.
Help and Support
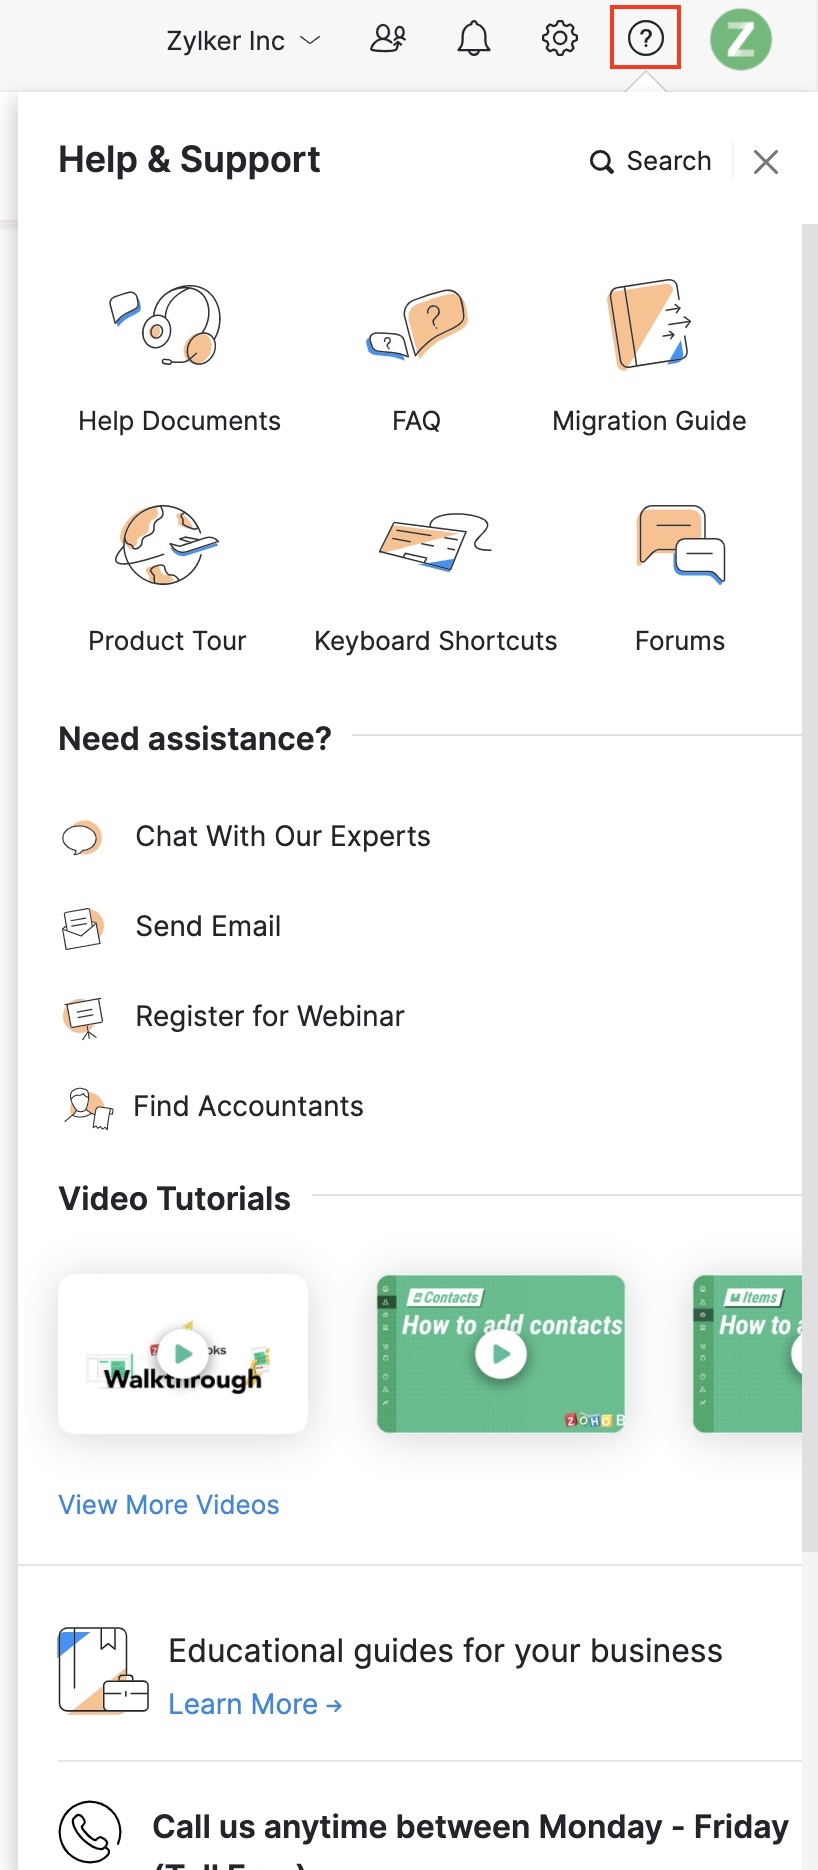
In Wave, you will be able to reach support by clicking the chat bubble at the bottom right corner of the window. Similarly, in Zoho Books, you can click the Contact Support button at the bottom right corner to reach support. Also, you can click the Help icon at the top right corner to find useful help resources in carious formats instantly. Also, each module provides you with Page Tips to help you contextually.
Now that you’ve become familiar with navigating Zoho Books, let’s get started with setting up Zoho Books for your business.
Set up your Organization Preferences
Setting up the organization ensures that the correct information about your business or company is used in all the transactions and records.
To set up your organization:
- Log in to your Zoho Books organization.
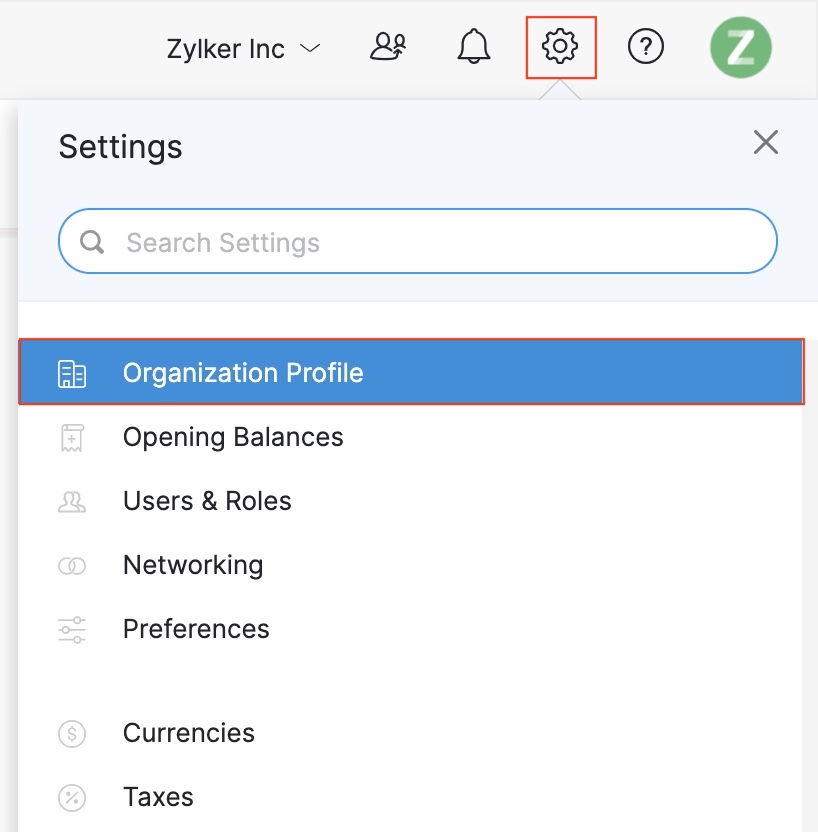
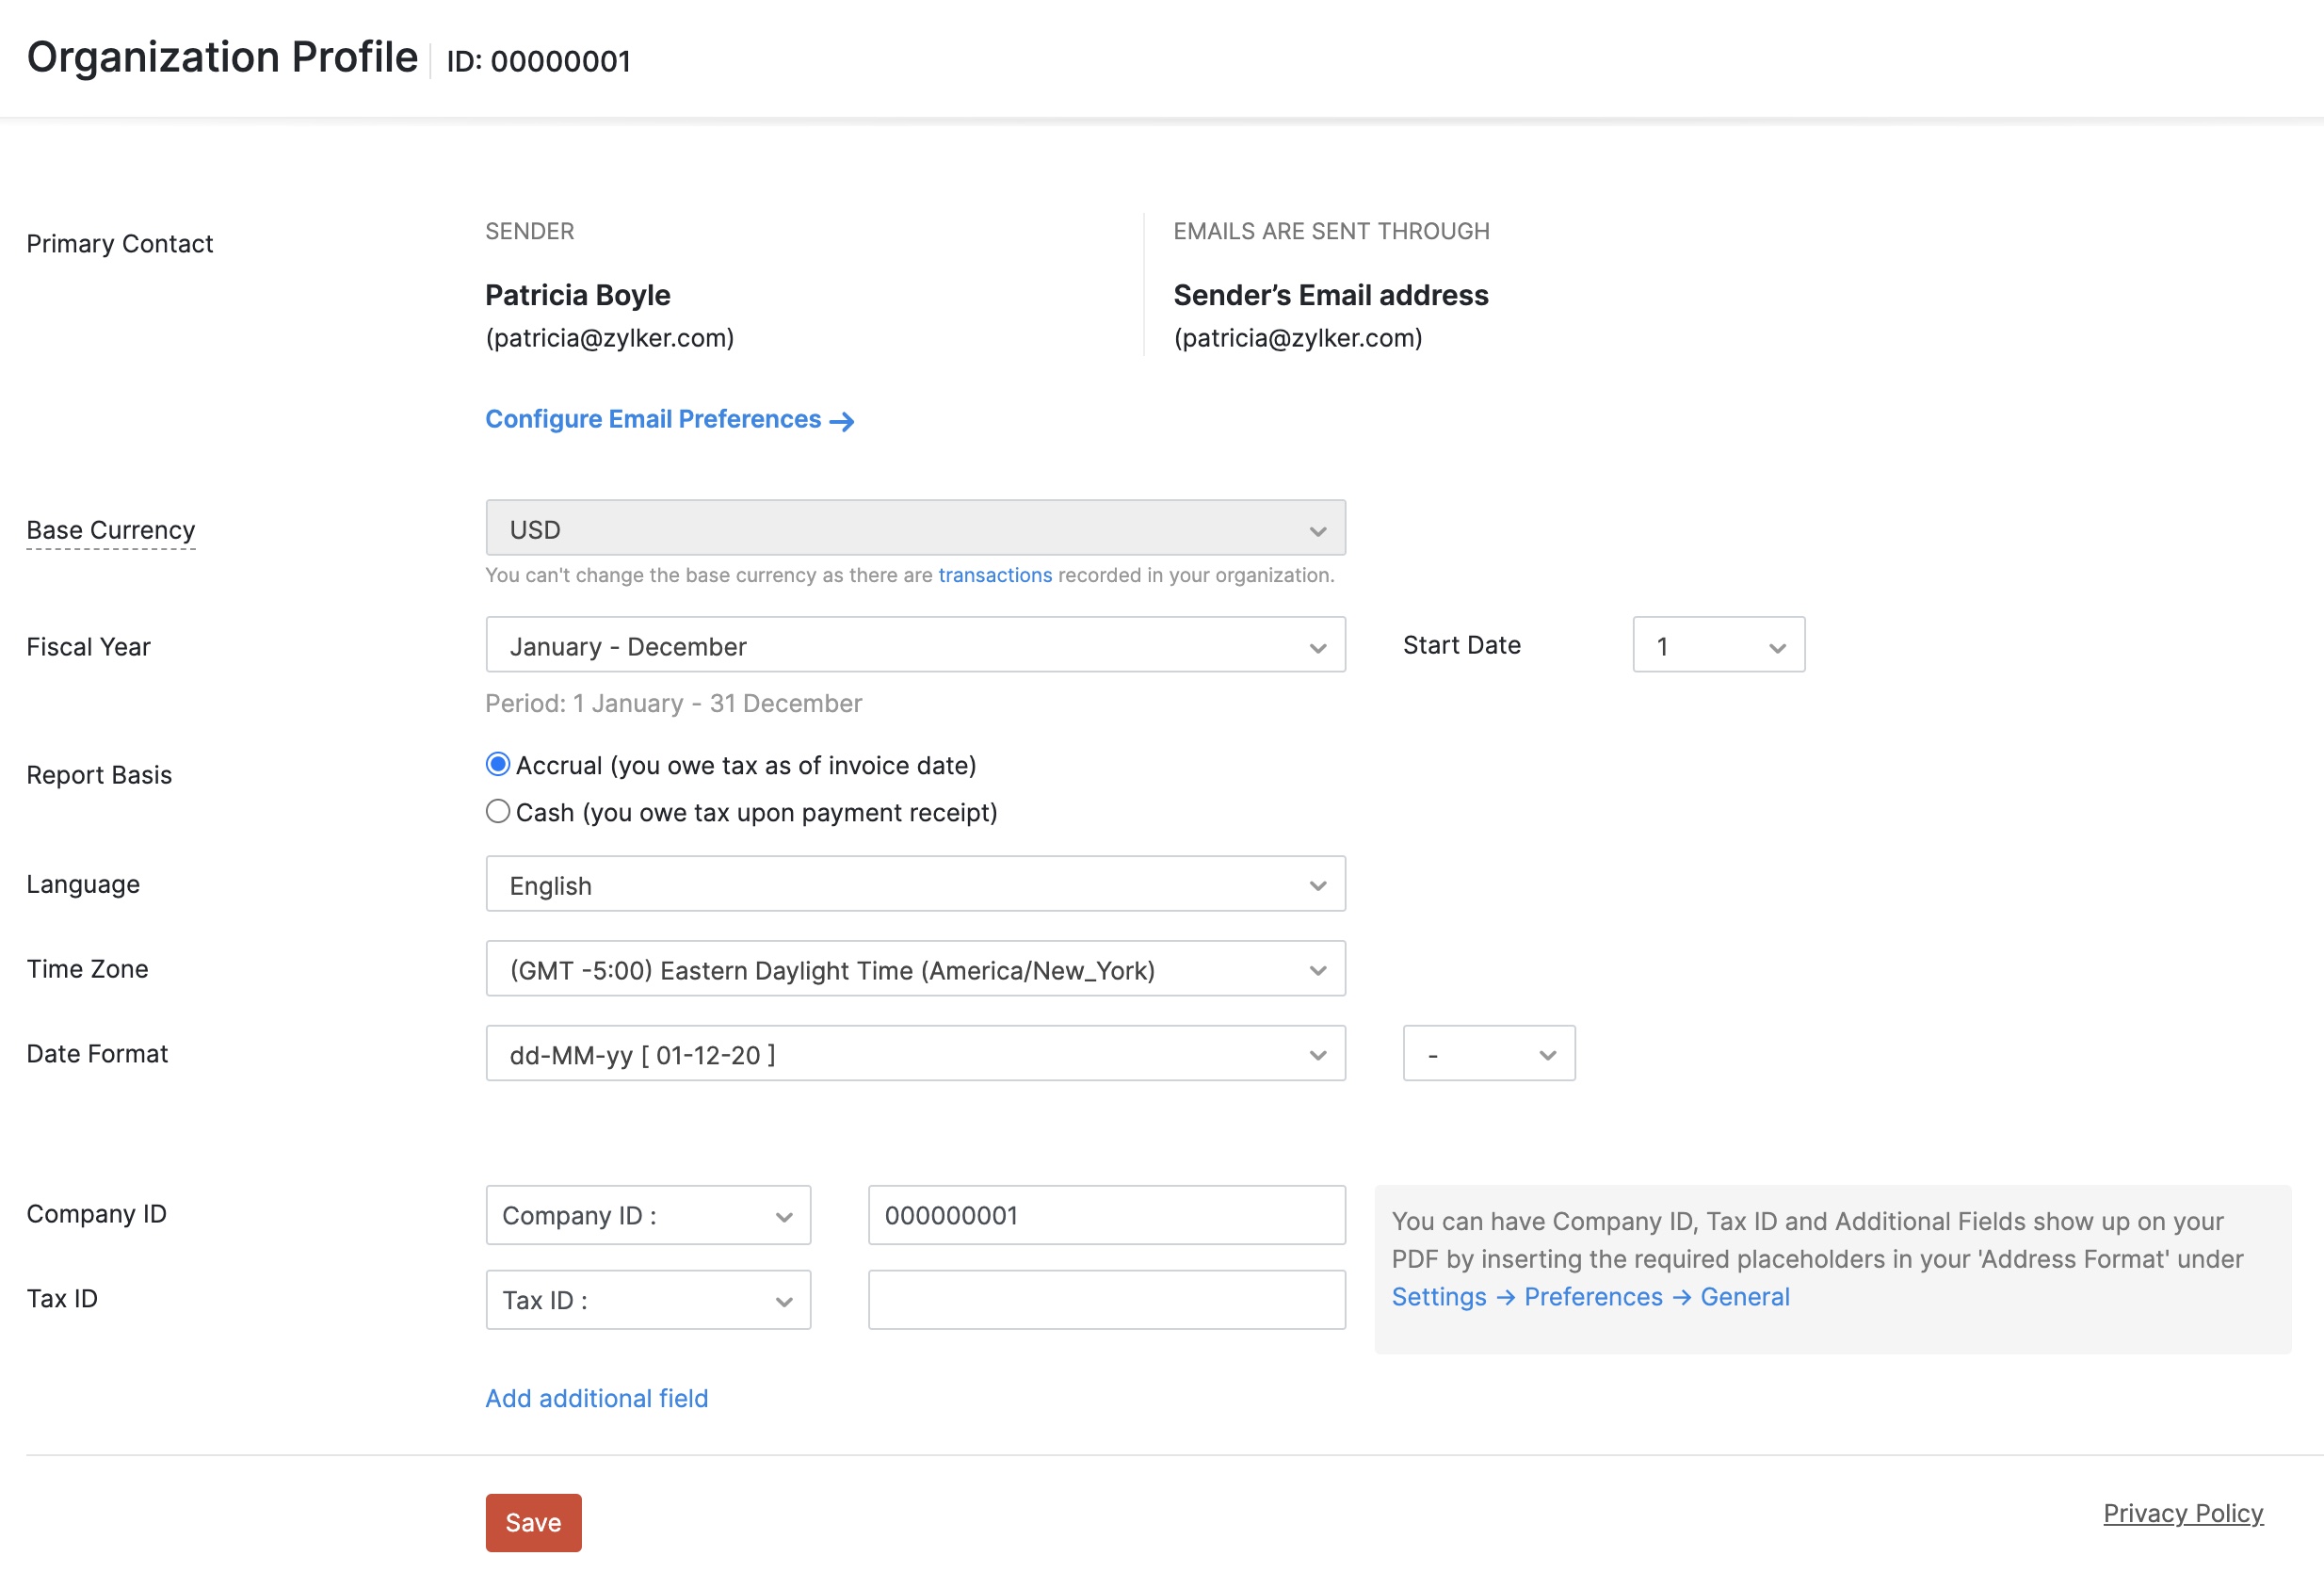
- Click the Gear icon at the top right corner of the window and select Organization Profile. The information that you entered while signing up for Zoho Books will be available in this page. Update any information, if needed.
- By default, the email address that you used to sign up to Zoho Books will be your primary email address and transactions that you send as emails from Zoho Books will be sent using this address. Click Configure Email Preferences to add a new email address or to change your email preferences.
- Choose the Fiscal Year that’s applicable to you based on the region in which your business is located.
- Select Cash or Accrual, the basis on which you want the reports to be generated.
- Choose your preferred Date Format and enter other details.
- Click Save.
Learn more about setting up your organization profile.
Configure Taxes
Next, you will have to configure taxes and the applicable tax rates. This allows you to apply the associate taxes or tax treatments to items, contacts, and transactions.
To configure taxes:
- Click the Gear icon in the top right corner of the window and click Taxes.
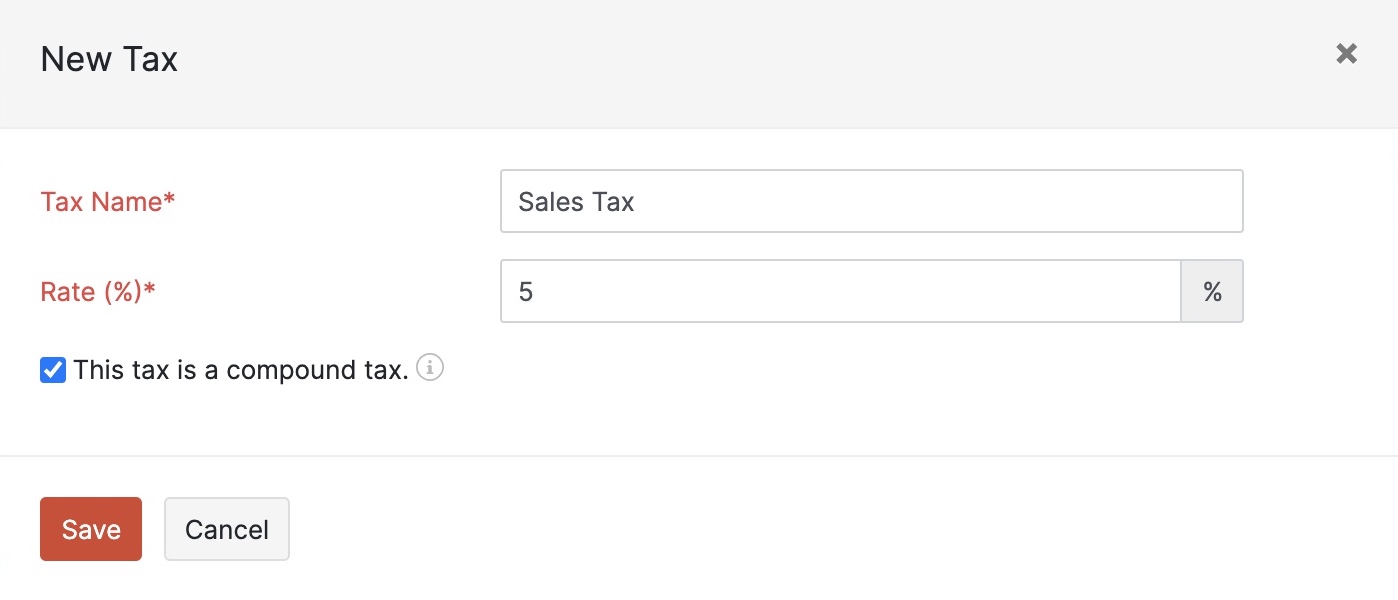
- Click the + New Tax to create a new tax rate.
- Enter the Tax Name and the Tax Rate.
- Check the This is a compound tax option if this is a tax that is created on top of a primary tax.
- Click Save.
Also, you can create new tax groups, configure how the taxes are tracked in Zoho Books under Tax Settings, and track tax on sale of digital services if you’re selling to overseas EU member state customers.
Configure Currencies
Based on the country you have selected during the sign up, that country’s currency will be assigned as the base currency and a set of foreign currencies are pre-populated in Zoho Books. If you sell to overseas customers in foreign currencies, you can add new currencies to assign them to a customer and use them in transactions. Also, Zoho Books allows you to enable automatic fetching of exchange rate feeds.
Prerequisite: You can change your base currency only if you are using the Zoho Books – Global edition and you have not created any transactions.
To configure currencies:
- Click the Gear icon in the top right corner of the window and click Currencies.
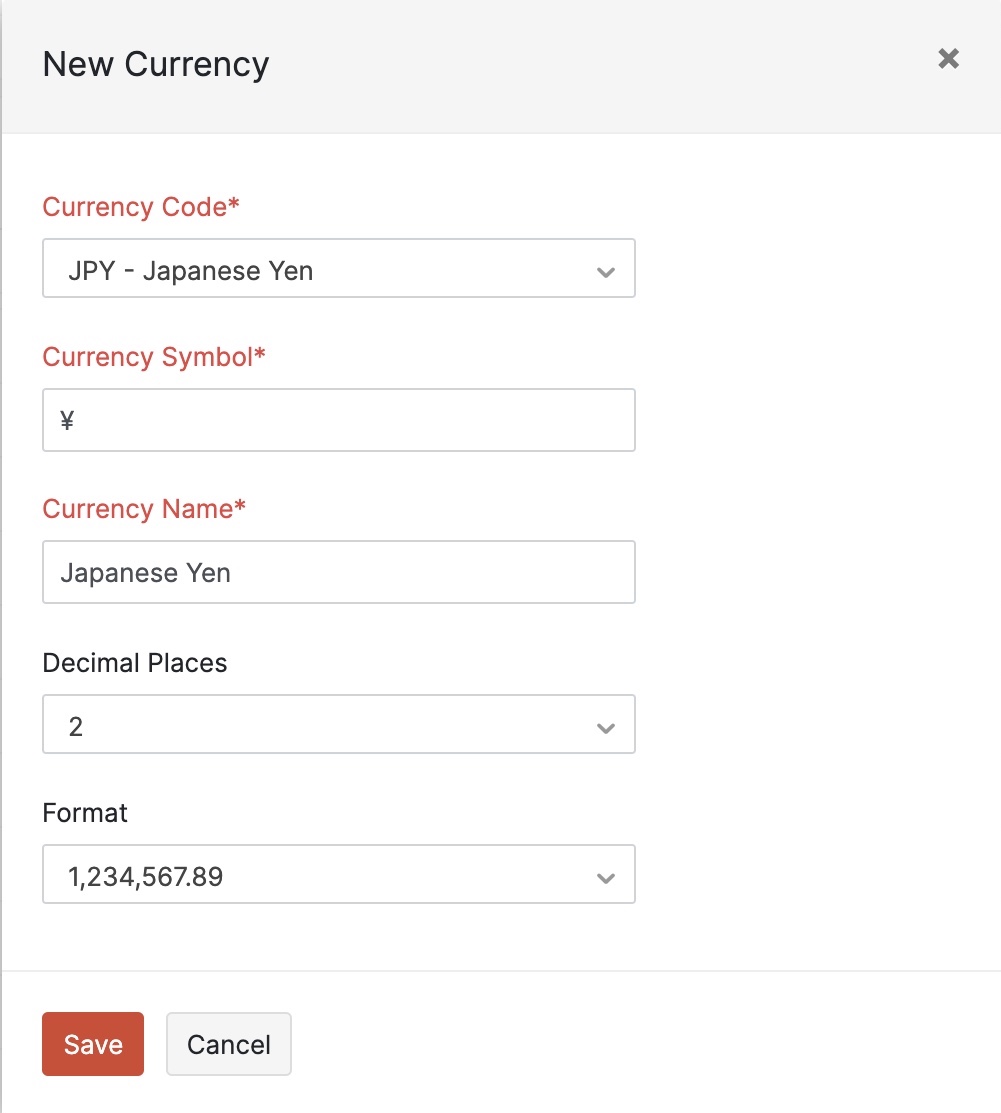
- Click + New Currency to add a new currency.
- Enter the currency name, symbol, decimal places, and the format.
- Click Save.
Learn how you can enable the automatic fetching of exchange rate feeds and perform other actions.
Customize Templates
Zoho Books offers you various templates for all the transactions you record in Zoho Books such as quotes, invoices, payment receipts, bills, vendor payments, journals and more.
You can customize the templates according to your business needs. To customize a template:
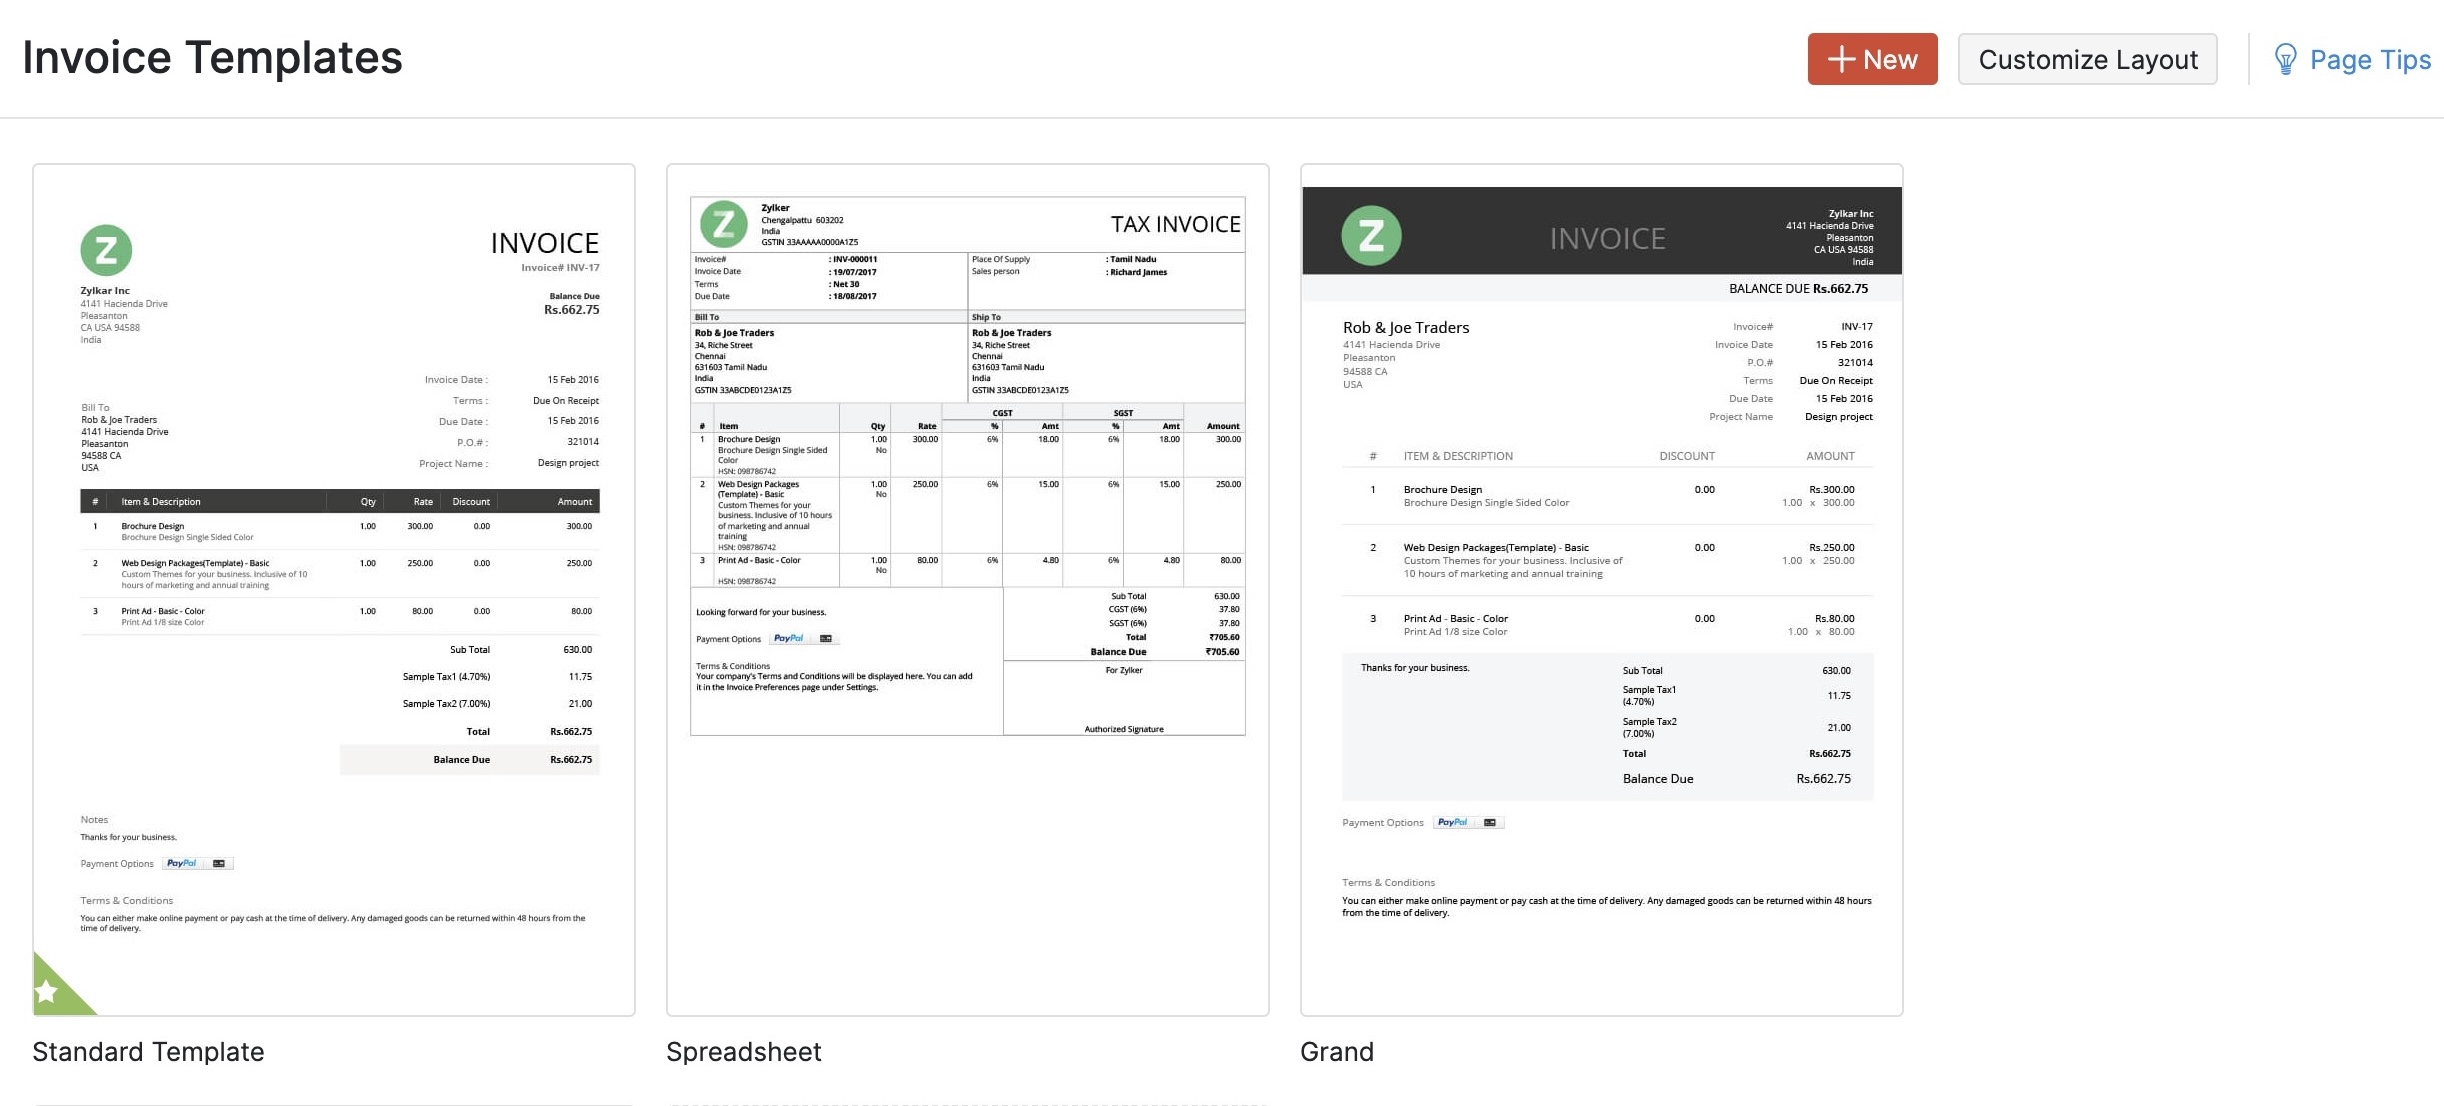
- Click the Gear icon at the top right corner and select Templates. You will see the Invoice Templates page.
- Hover over a template and click Edit to edit that template or click + New at the top right corner to open the template gallery and create a new template. We recommend that you try the Standard, Simple, and Grand templates as they are closer to Wave’s design that you’ve been using.
- Next, customize the template to reflect your brand.
- Click Save.
Similarly, you can customize templates of other modules and set them as default templates.
Customize Email Notifications
Zoho Books allows you to customize the email notifications that you will send to your customers when you email and invoice or other transactions. so that you can include all the details you want to include. Also, you can insert placeholders to display specific field values to your customers.
To customize an invoice email notification:
- Click the Gear icon at the top right corner and select Emails. The Invoice Notifications page will open and you will see the default invoice email template.
- Click the Show Mail Content to view and edit the email template or click + New at the top right corner to create a new template.
- At the bottom of the Edit page, you can check the Set this to default option to make that email template as the default invoice email template.
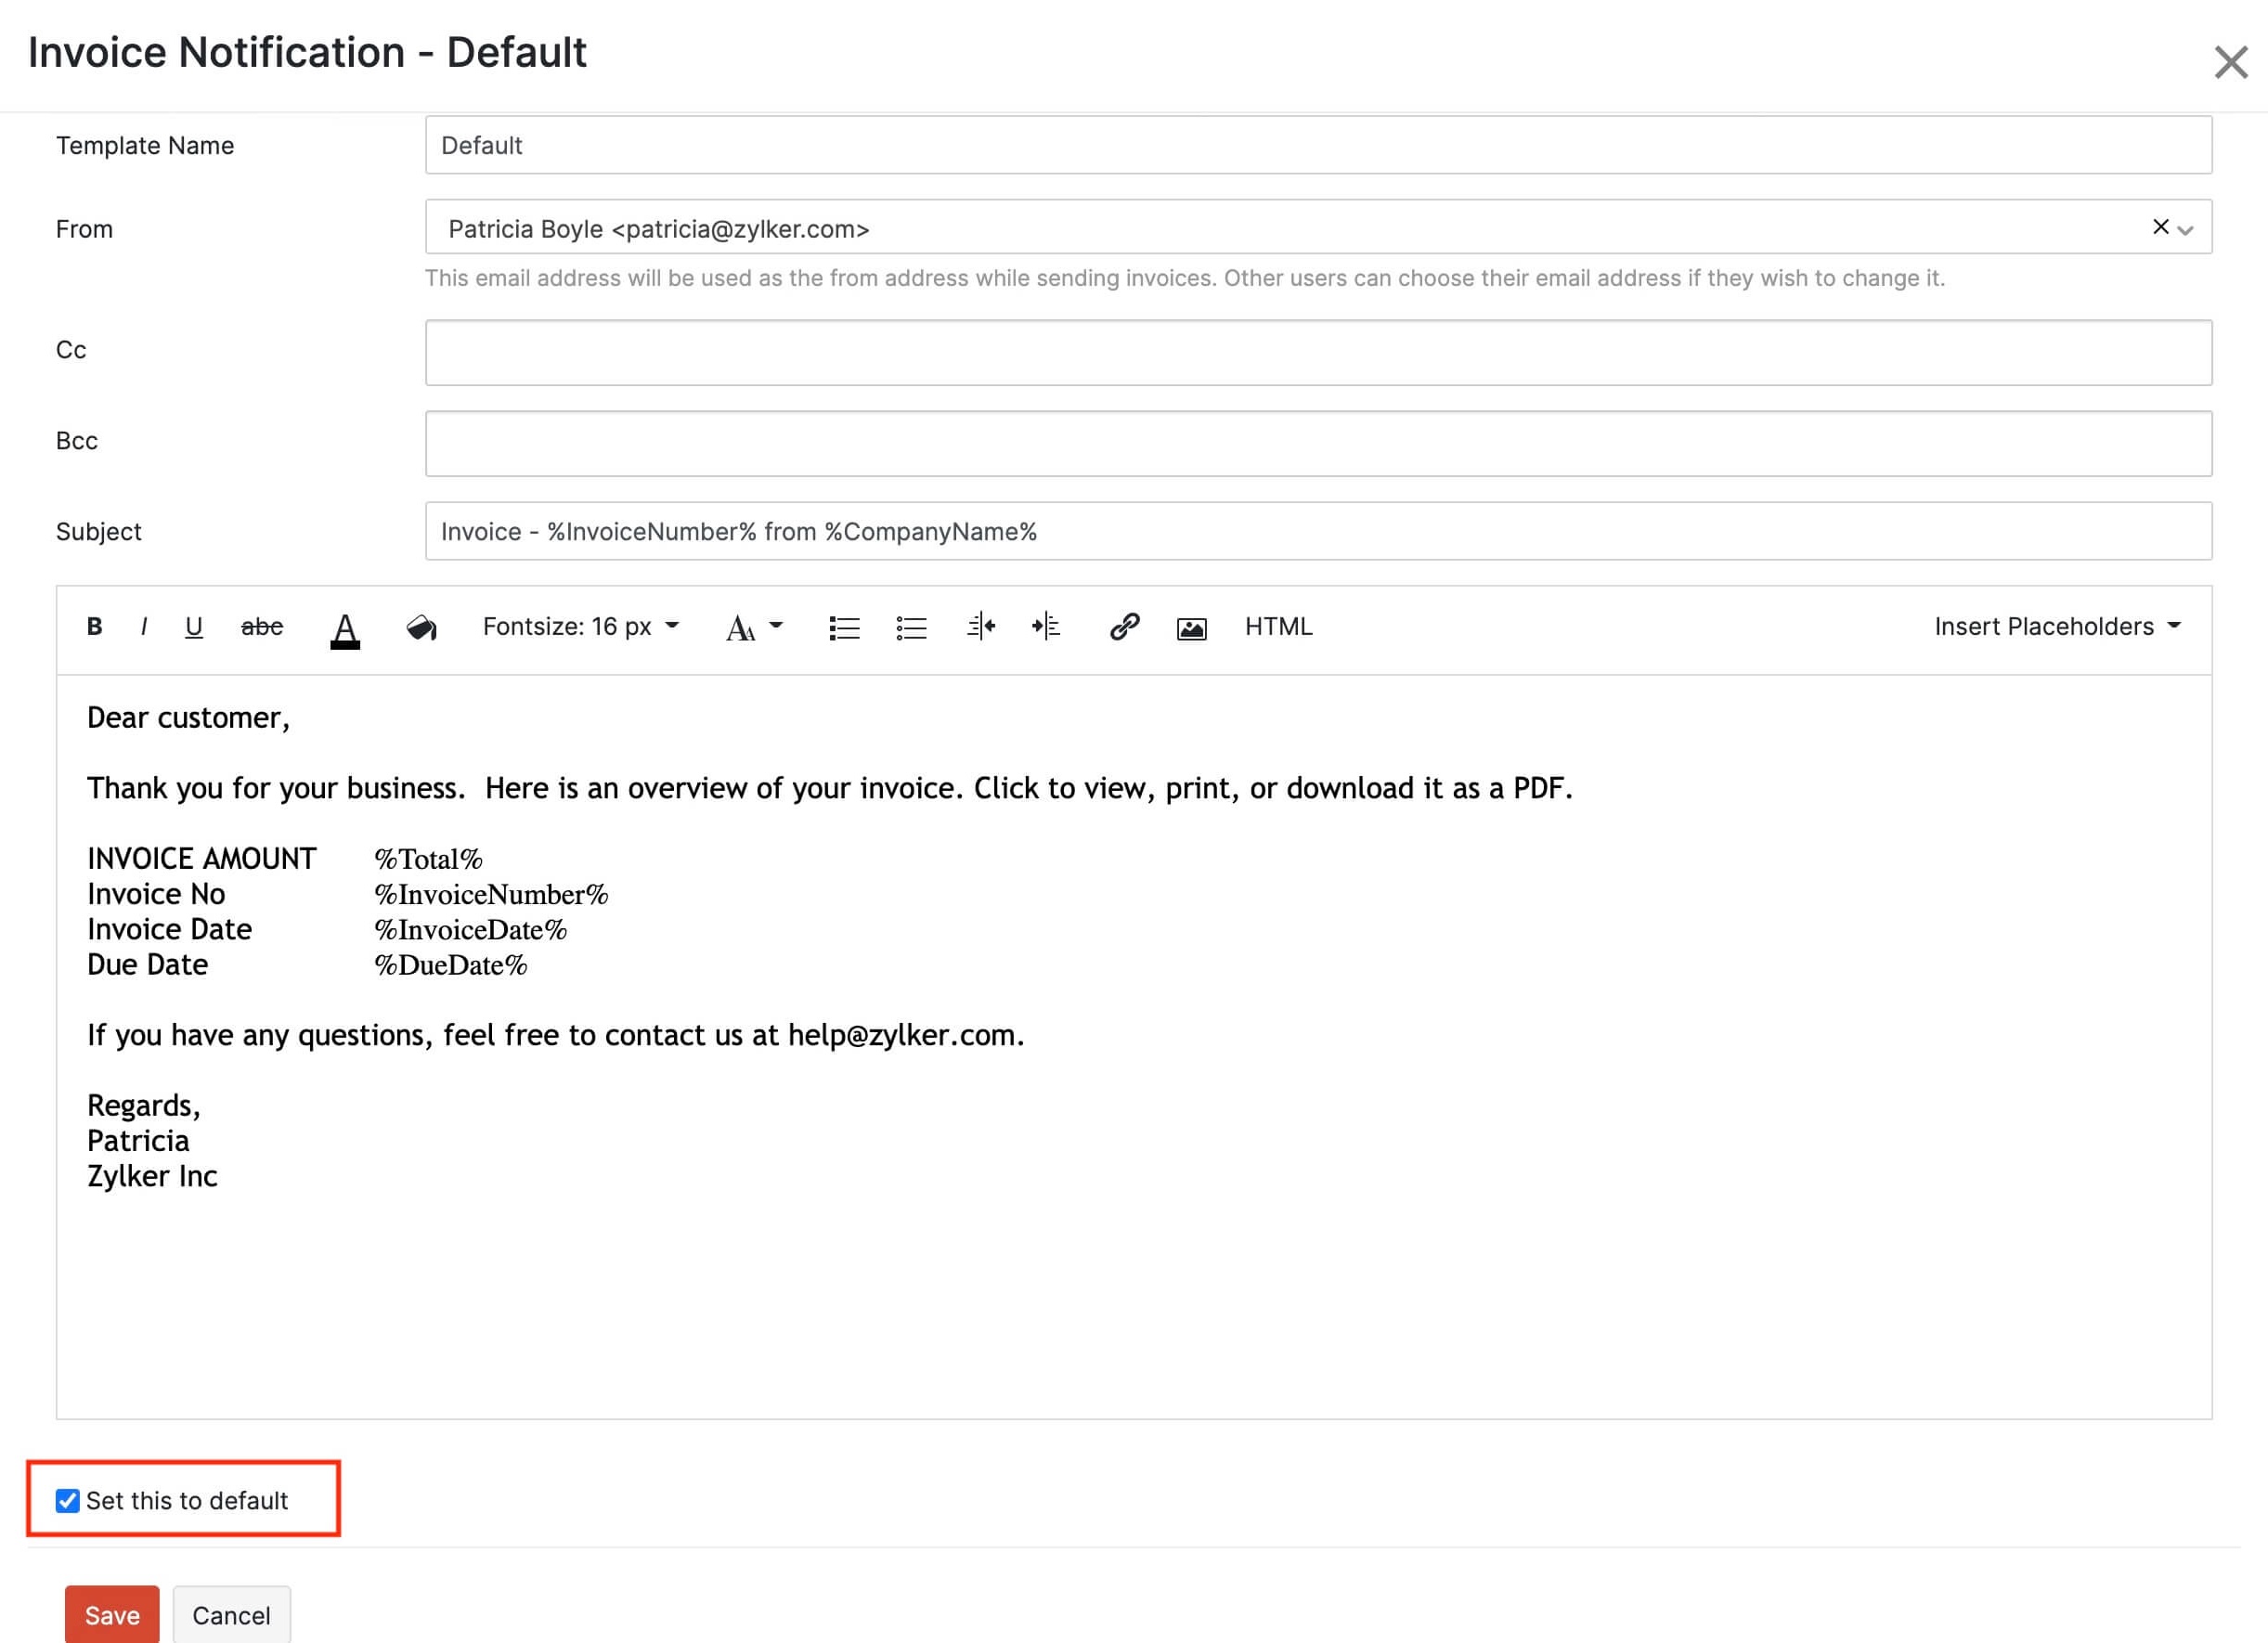
Similarly, you can create, edit, and set default email templates for other modules.
Configure Users and Roles
In Wave, you would have added new users using the available default roles of Admin, Editor, Payroll Manager, and Viewer.
Will you be the sole user of Zoho Books?
Skip this section and go to the Add bank or credit card account section as you will be the admin of your Zoho Books organization and will have complete access to everything.
However, in Zoho Books, apart from the default roles, you can create customized roles for your users which allows you to have greater control over which module is accessible to whom. Before you go ahead and invite a user, try creating a customized user role. To create a role:
- Click the Gear icon in the top right corner and select Users and Roles. You will land in the All Users tab.
- Click the Roles tab at the top bar. The default roles available in Zoho Books will be listed.
- Click the New Role button at the top right corner to create a new custom role.
- Configure all the different permissions you want this role to have and click Save.
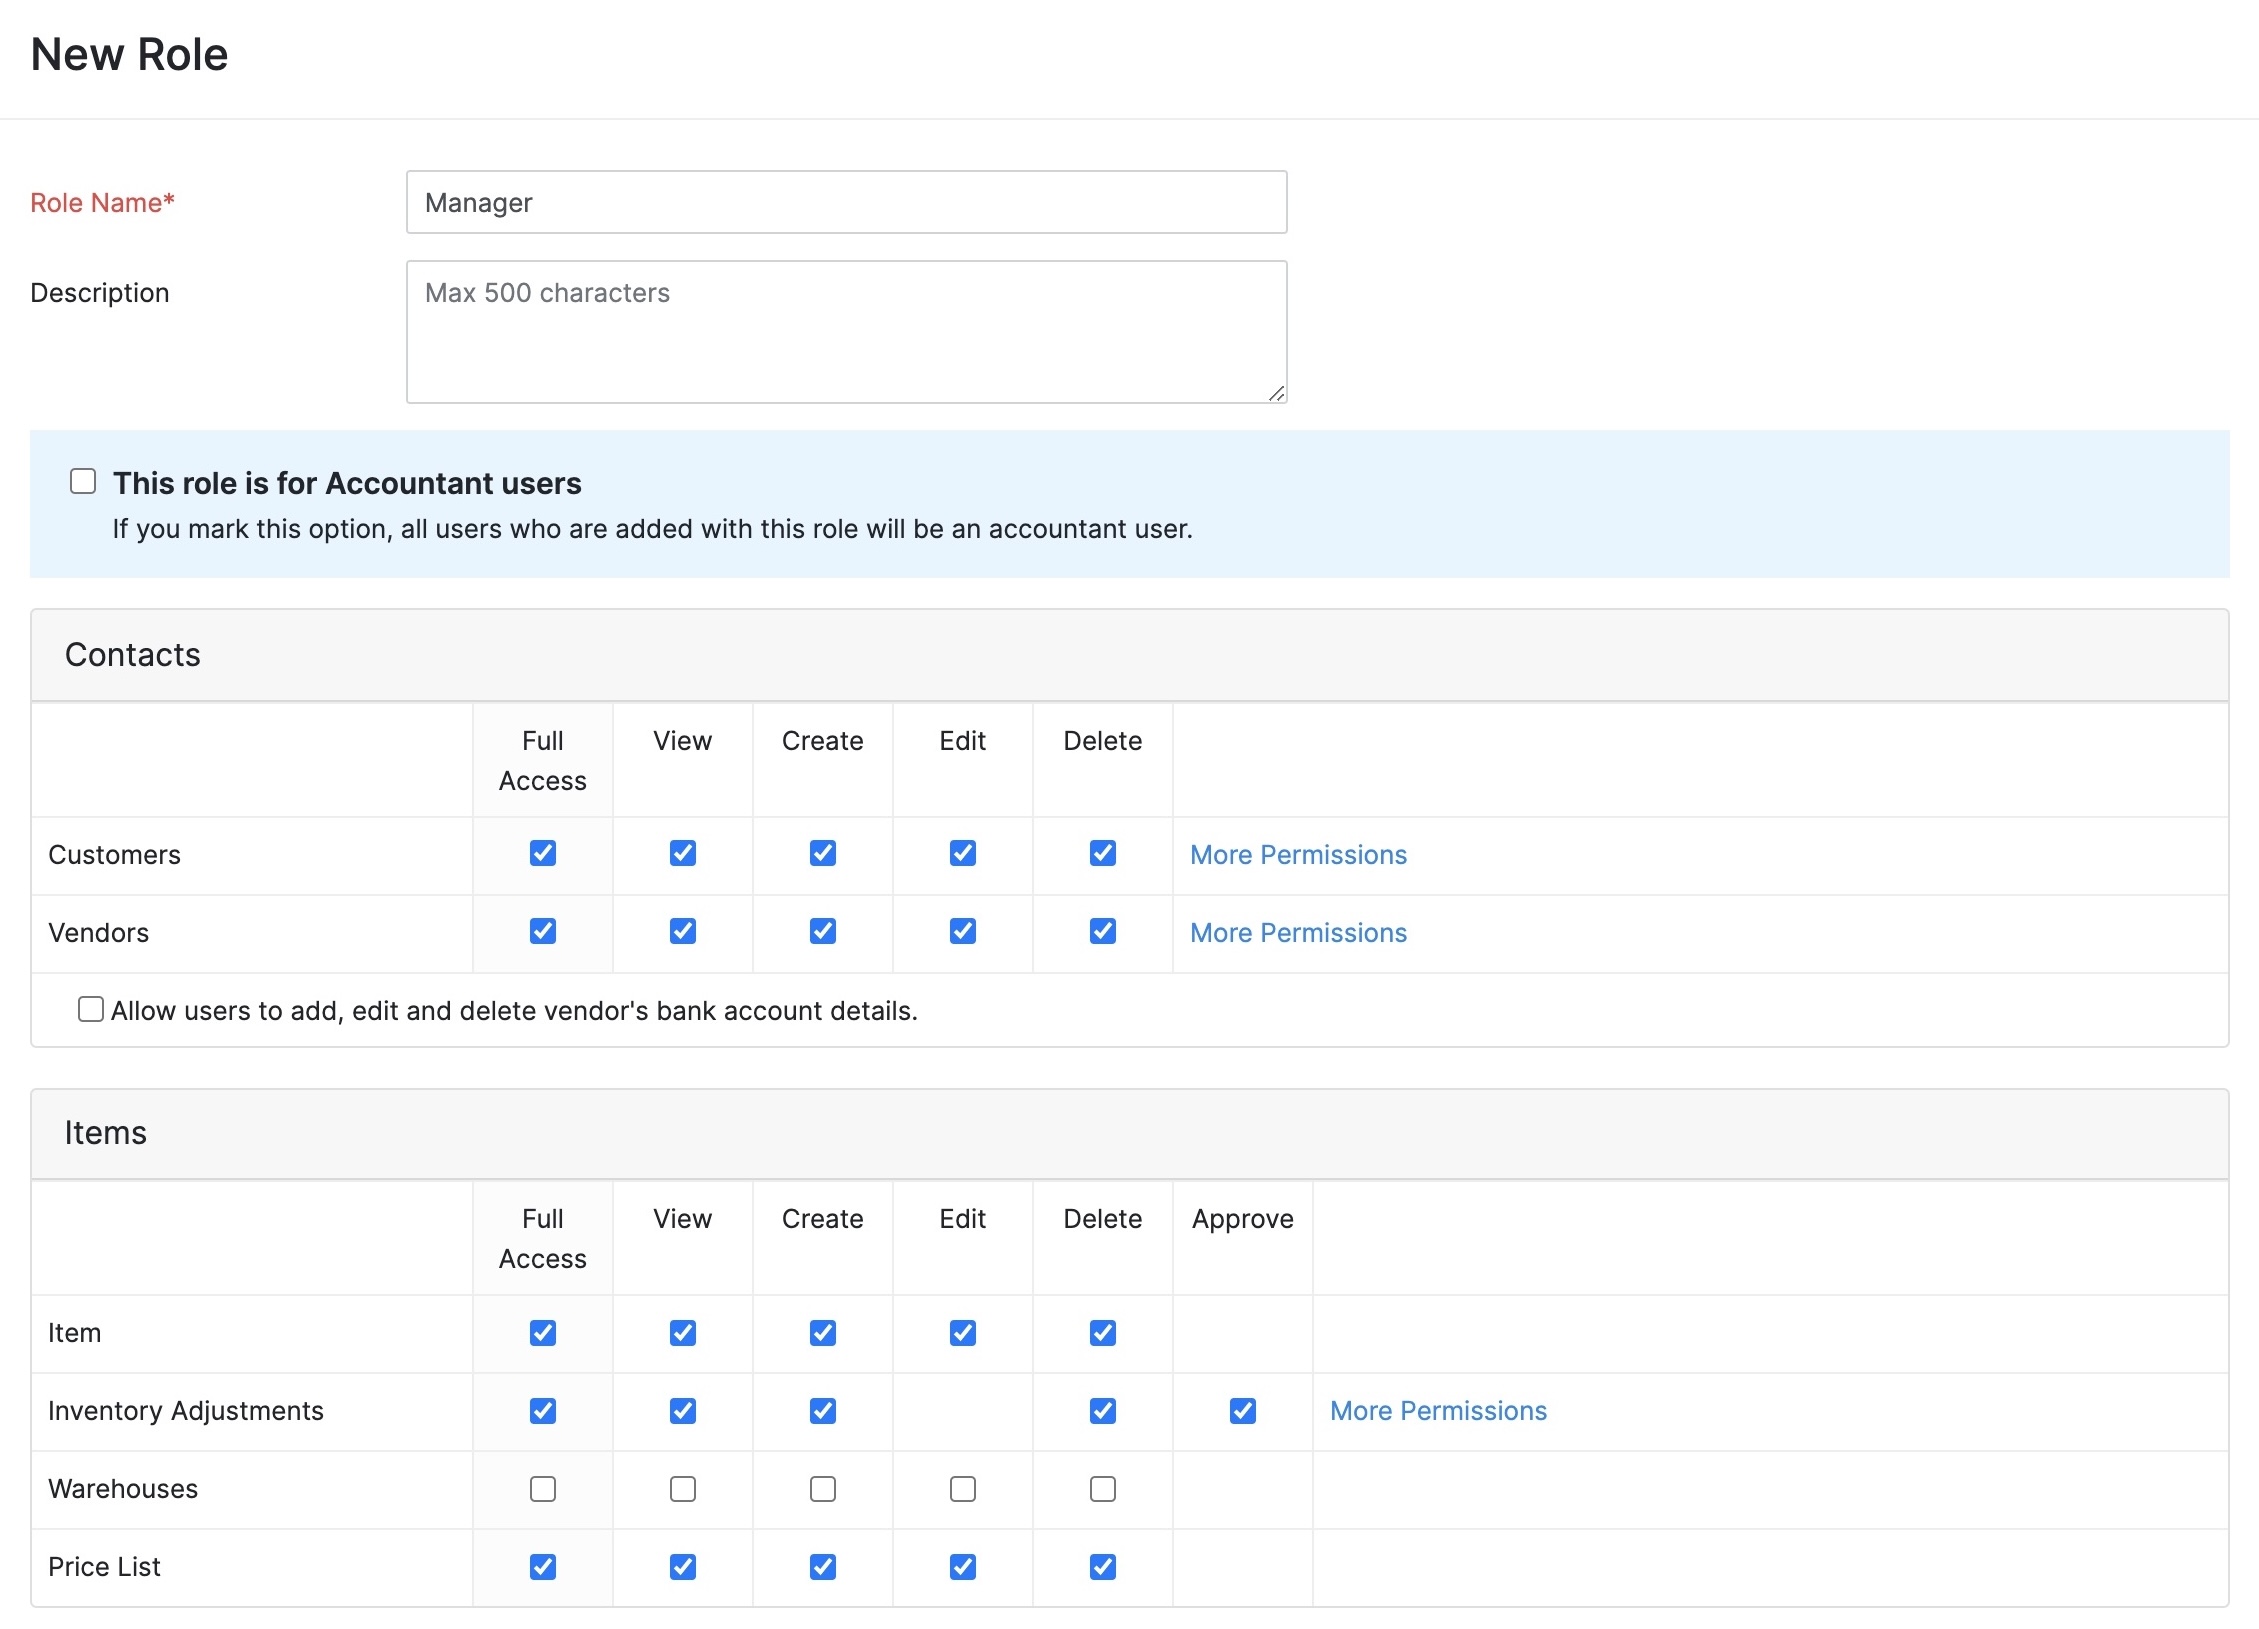
Next, when you invite a new user to Zoho Books, you will be able to select this role.
To invite new users to Zoho Books:
- Click the Gear icon in the top right corner and select Users and Roles. You will land in the All Users tab.
- Click the Invite User button at the top right corner to invite a new user with the available default roles.
- Enter the user’s email address, name, and select the role you want this new user to have.
- Click Invite and an email invitation will be sent to the user. Once the user accepts the invitation, they will be able to access Zoho Books based on their user role. If you want to edit the user invite email, you can edit it from the email template settings.
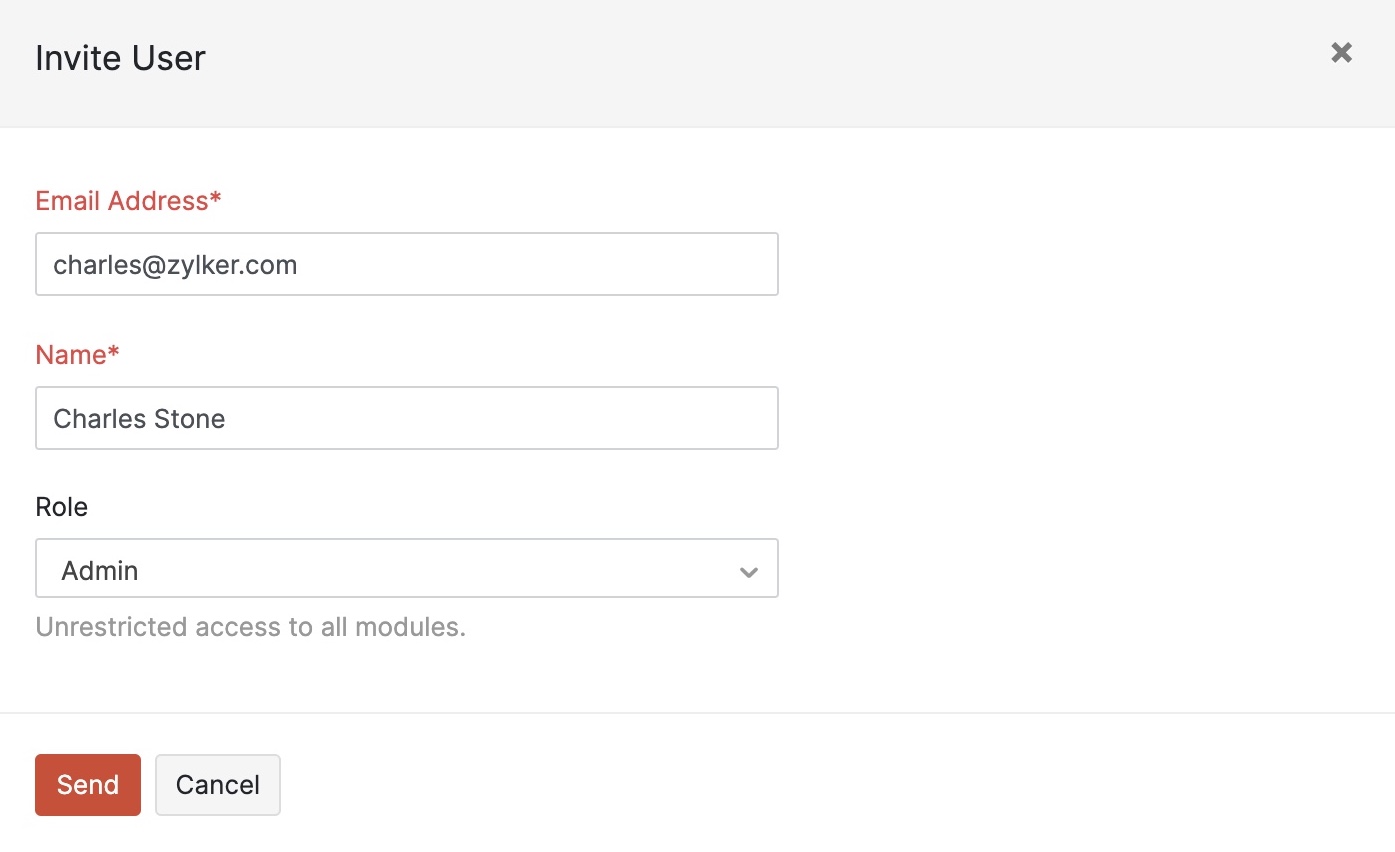
Note: Refer the plan you’re subscribed to, to know the number of users you can add to Zoho Books.
Add bank or credit card accounts
Wave provided you with an option to import bank statements so that you can add transactions to an account. Also, the option to reconcile transactions in Wave with the bank statements manually. However, in Zoho Books, you can directly add your bank or credit card accounts and set up automatic fetching of bank feeds for categorization and reconciliation.
Note: When you import the Chart of Accounts, your bank or credit card accounts will be auto-populated in the Banking module. However, you can choose to add bank accounts manually.
To add a bank account to Zoho Books:
- Go to the Banking module in the left sidebar and click Connect Bank / Credit Card.
- Select your account’s bank from the list of popular banks or type your bank’s name in the Search field and select it. If your bank is available in this list, you will be able to fetch bank feeds automatically into Zoho Books.
OR
Click Enter your account manually if you don’t find it in the list. - Enter the login credentials of your bank account or enter the bank account details to add the bank account manually.
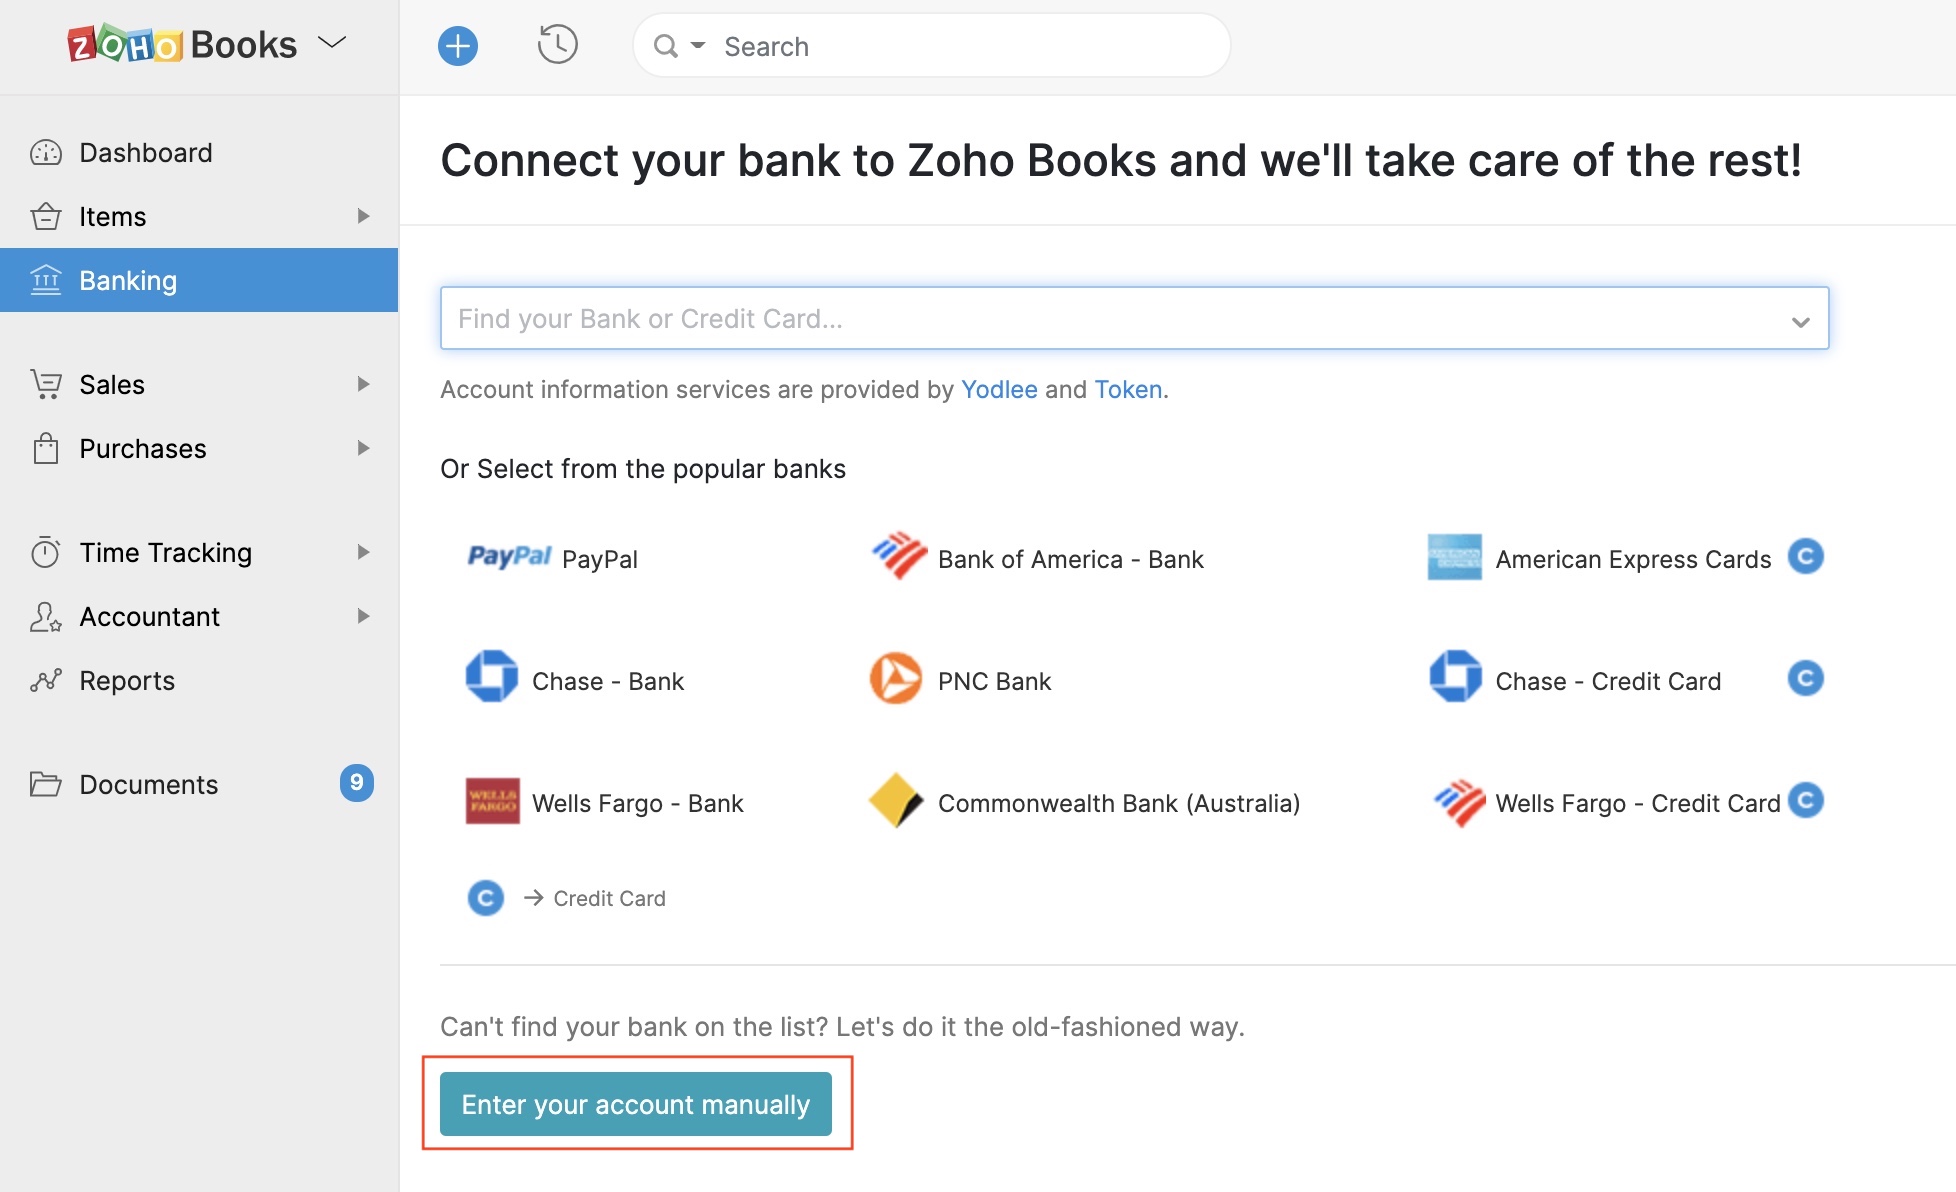
If you’ve added your bank account from the list of bank accounts, the bank feeds will be fetched into Zoho Books automatically. If you added the account manually, you will have to import the bank statements manually. We suggest that you import bank statements into Zoho Books after completing the migration process.
Learn how you can manage your bank accounts and credit cards in Zoho Books from our help documents.
Set up integrations
In Wave, you may have integrated with BlueCamroo. If you did, you may want to switch to a CRM software that works with Zoho Books. Zoho CRM works seamlessly with Zoho Books and enables you to manage your leads and deals efficiently.
Check out the free plan of Zoho CRM and learn how you can migrate from BlueCamroo to Zoho CRM.
If you had set up zaps using Zapier in Wave, you can integrate your Zoho Books organization with Zapier and set up the same zaps in Zoho Books as well.
Apart from these integrations, Zoho Books offers you many more integrations with other apps that will ensure that your data is not stuck in silos.
Export data and import it into Zoho Books
Export Data from Wave
Exporting your data from Wave allows you to import them into Zoho Books and refer the records in future easily. However the data export options in Wave are limited.
You can follow the following two methods to export your data from Wave:
Wave’s Data Export Option
Using this bulk data export option, you will be able to export all your transactions, bills, customers, and vendors as a ZIP file in CSV or Excel format. Also, you will be able to export all the receipts you had uploaded as a ZIP file.
To download these files:
- Log in to your Wave account.
- Go to Settings from the left sidebar and select Data Export.
- Click the Export all transactions for Excel or Export all transactions as CSV cards and a ZIP file containing all transactions, bills, customers and vendors will be sent to the primary email address you use for Wave.
- Click the Export all receipts as a ZIP file card and a ZIP file containing all the receipts you had uploaded to Wave will be sent to the primary email address you use for Wave.
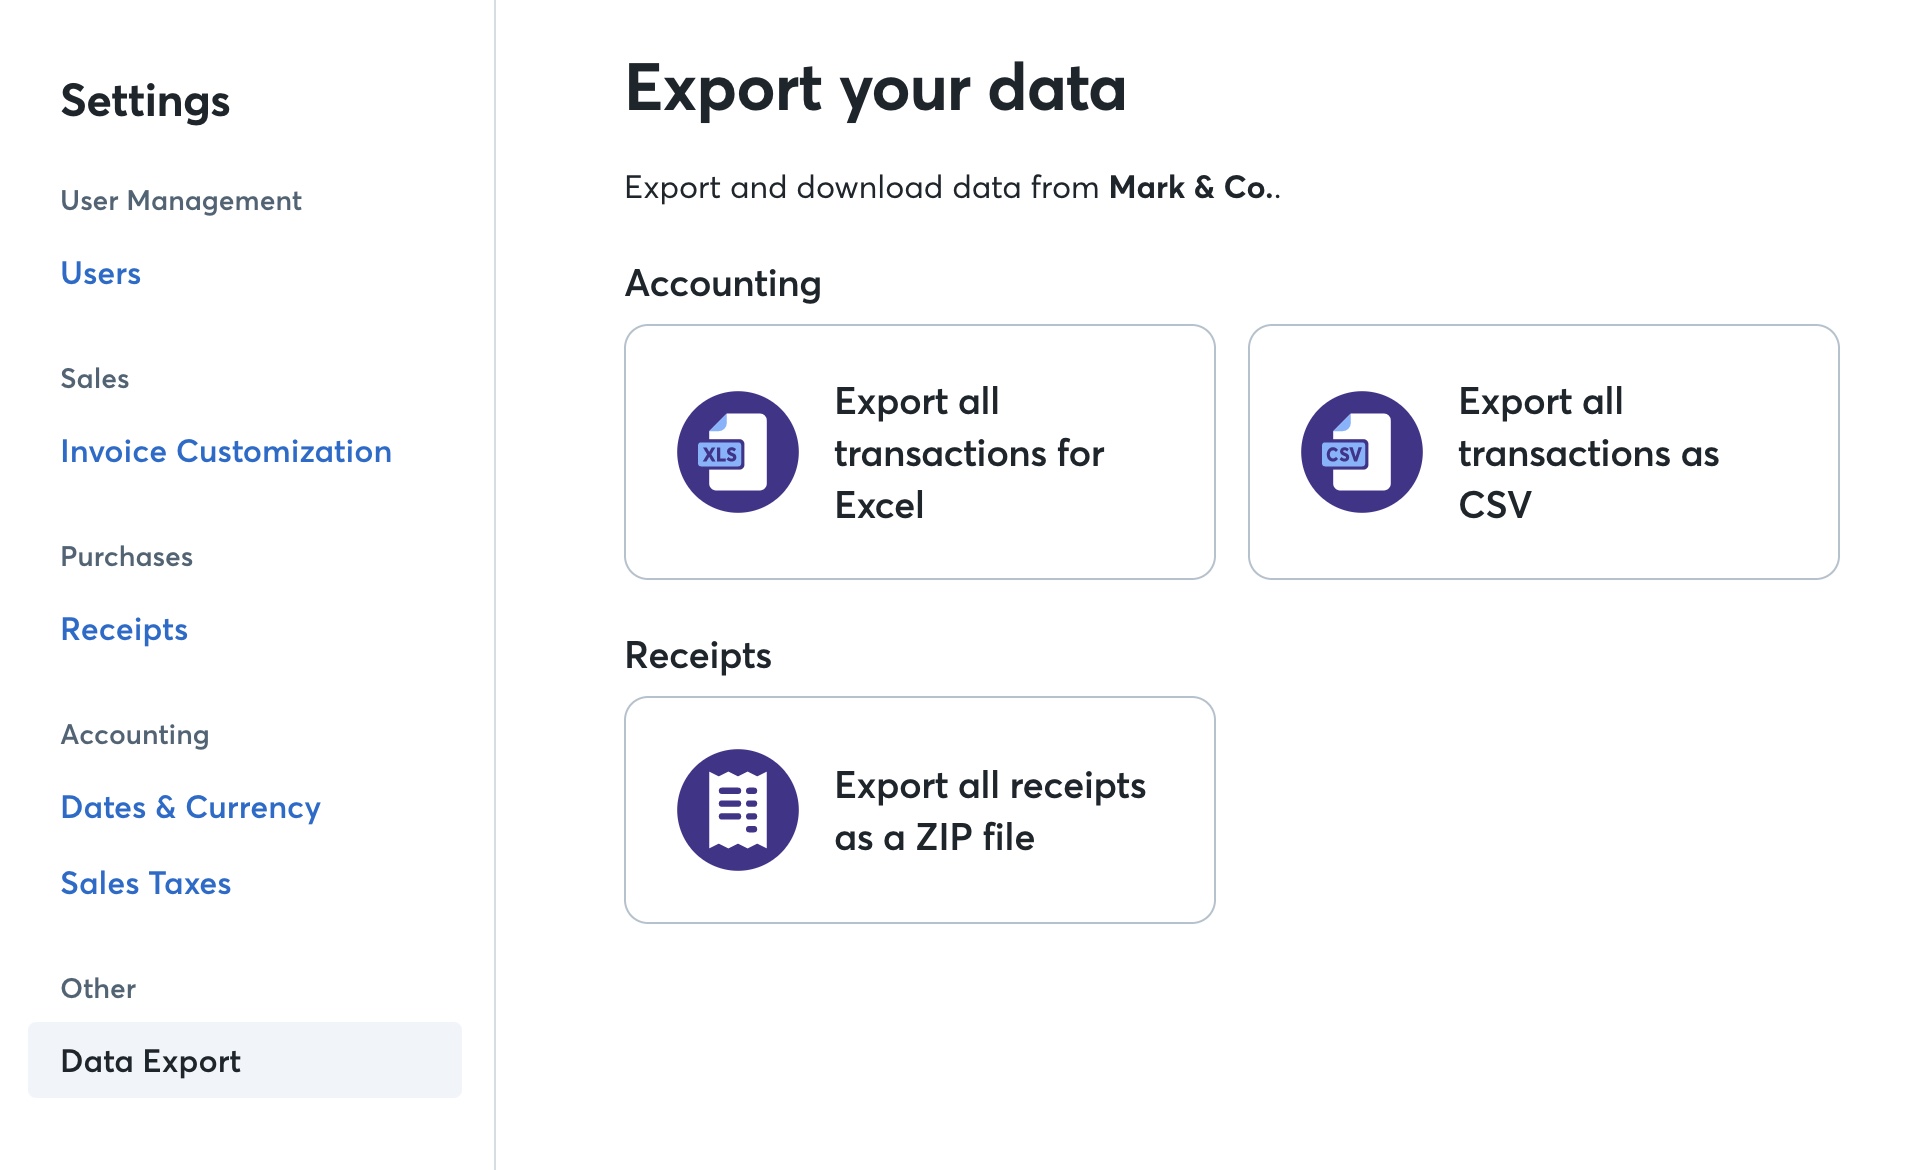
Now, go to your email inbox and use the download link to download the ZIP files to your device. Unzip them to view all the files.
Pro Tip: Make sure you download the ZIP files using the download link you receive from Wave, as the link will be active only for 24 hours.
Export Data Using Wave Connect Add-on
It is likely that you may be using the Wave Connect add-on provided by Wave to download and upload data. Using this add-on you can export the products & services and invoices from Wave.
If you have not configured the Wave Connect Add-on before, you can set it up easily. Else, go to the next section: downloading data from Google Sheets.
To set it up:
- Log in to your Wave account.
- Go to Integrations and click Add to Sheets on the right of Google Sheets. You will be redirected to Google Workspace Marketplace to install the add-on.

- Click the Install button below the name.
- Sign in to Google, if you are not signed in already.
- Click Continue in the popup that asks for your permission to start installing.
- Choose your Google account in the new tab that opens.
- Click Allow in the following screen to give permission to access your data.
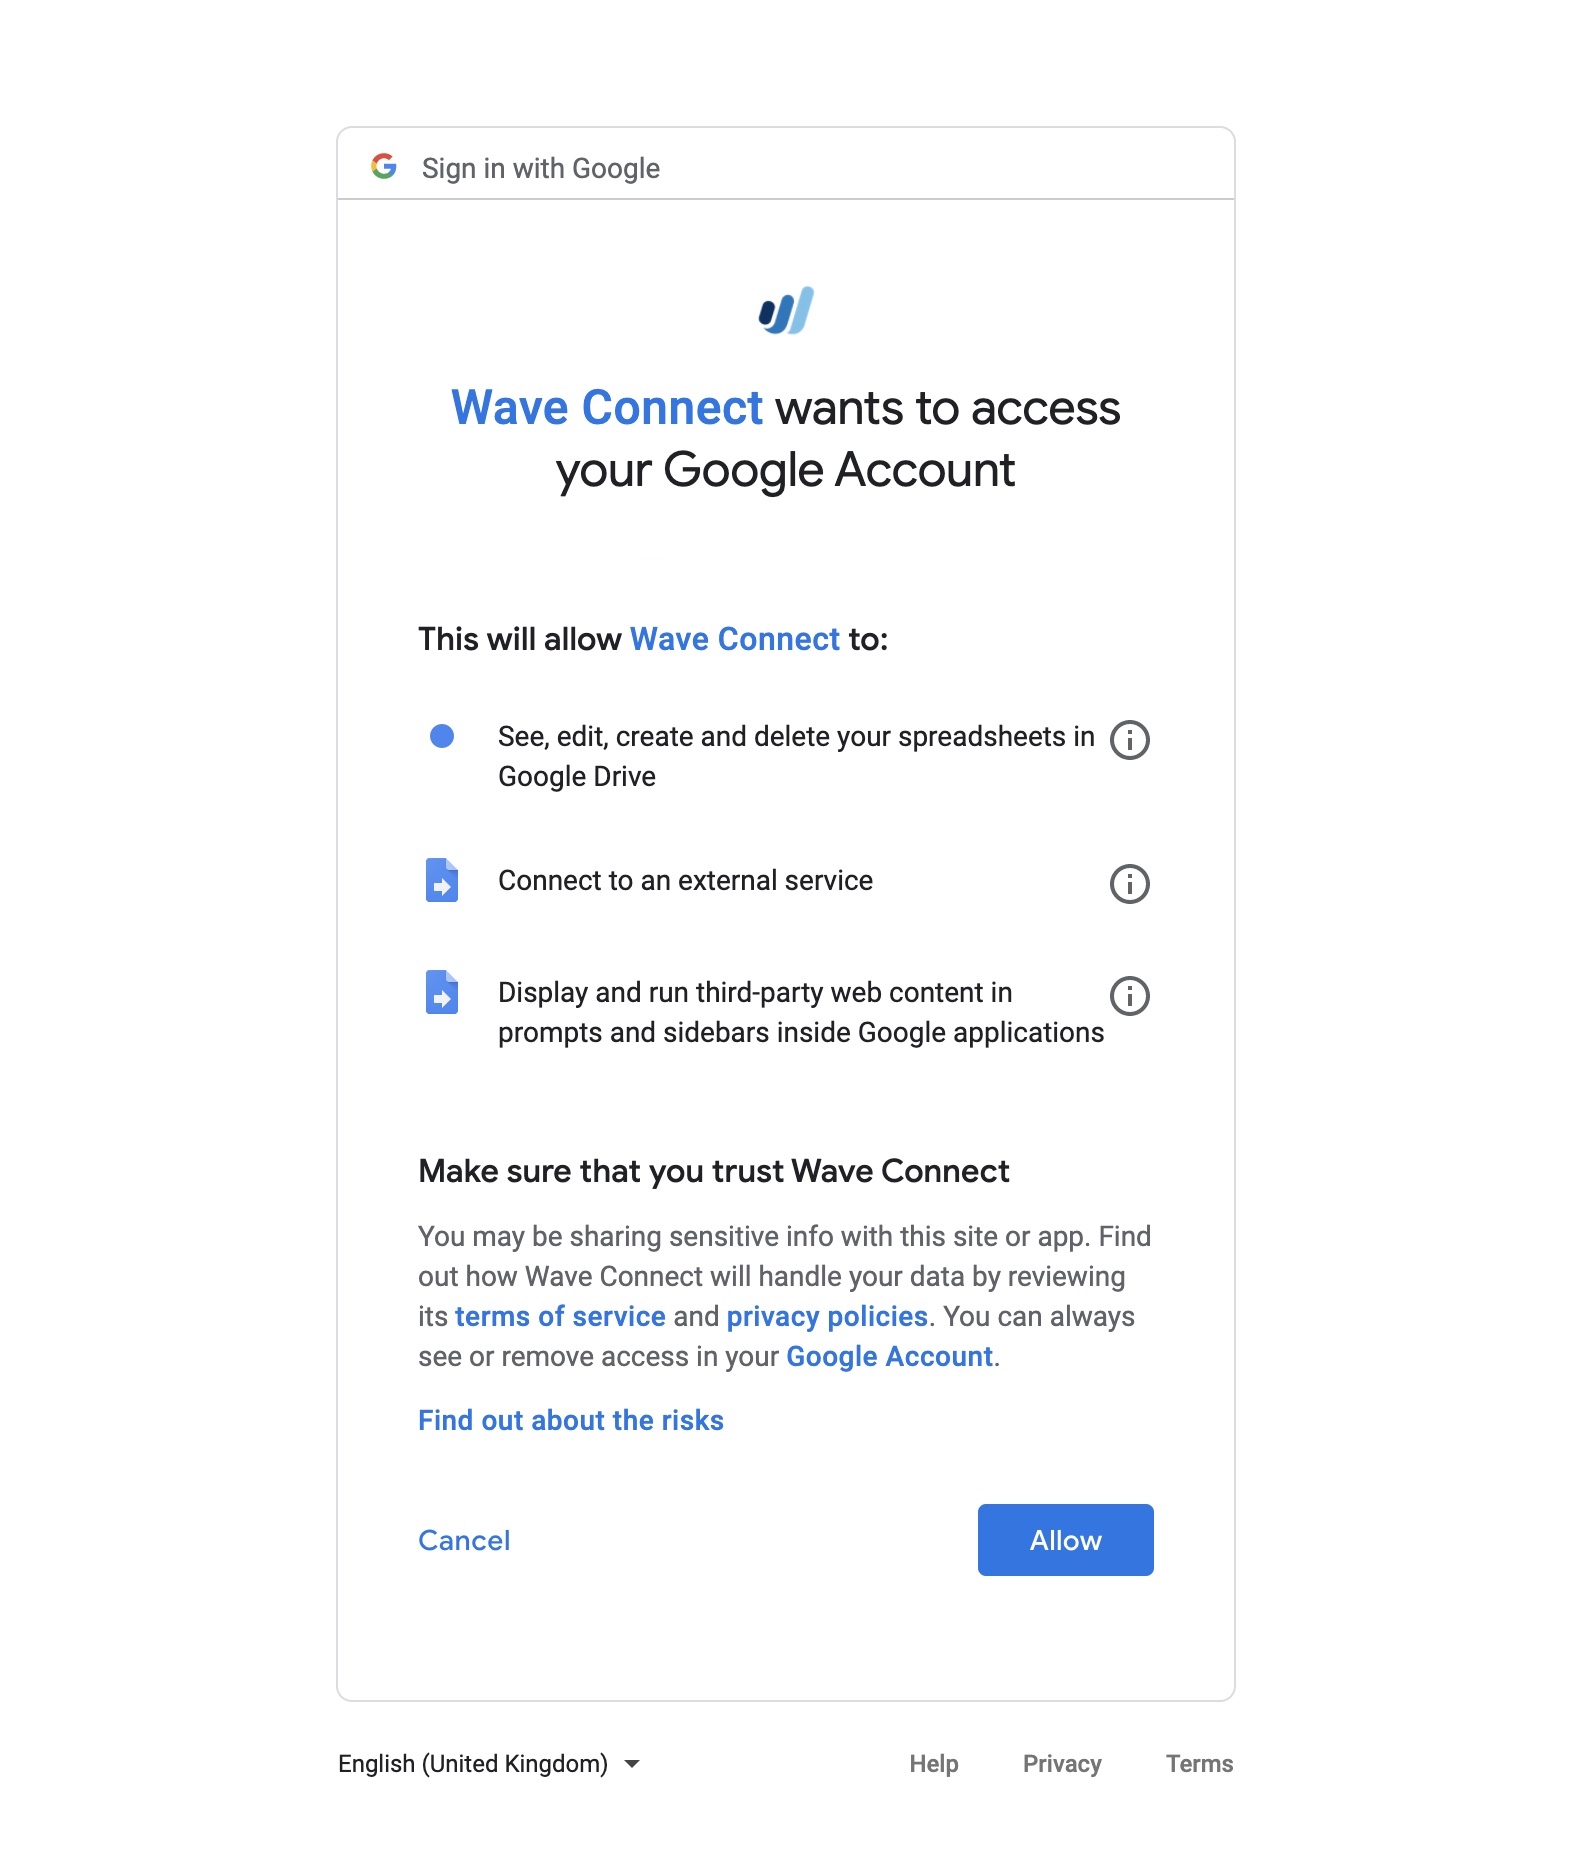
Wave Connect add-on will be installed in Google Sheets.
Next, you can enable the Wave Connect add-on in Google Sheets and download Wave’s data.
To enable the add-on:
- Open Google Sheets. Ensure that you’re logged into the Google account in which you installed the add-on.
- Open a blank Google Sheet and give it a suitable name.
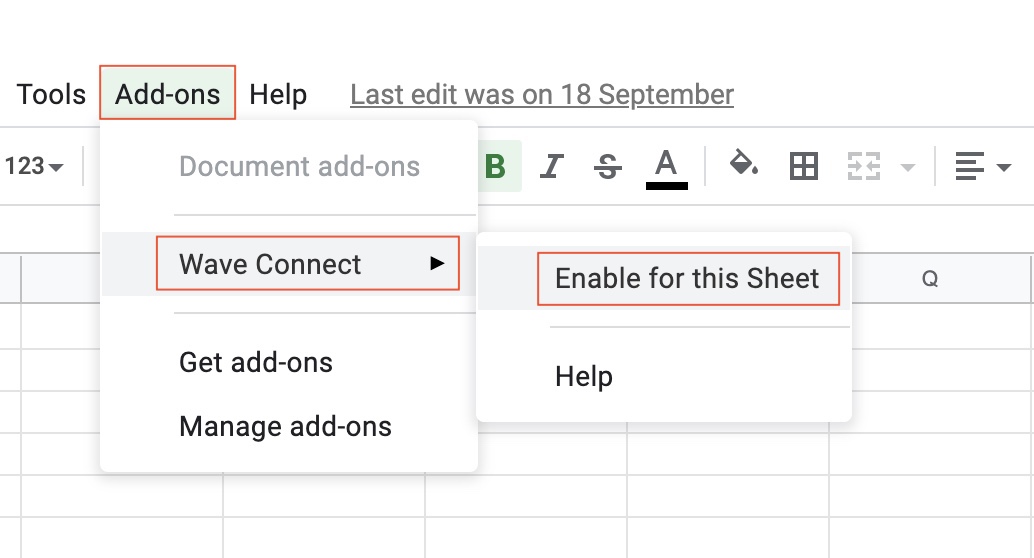
- Click the Add-ons tab at the top bar, select Wave Connect, and click Enable for this Sheet. Immediately, the add-on will be enabled for that Sheet.
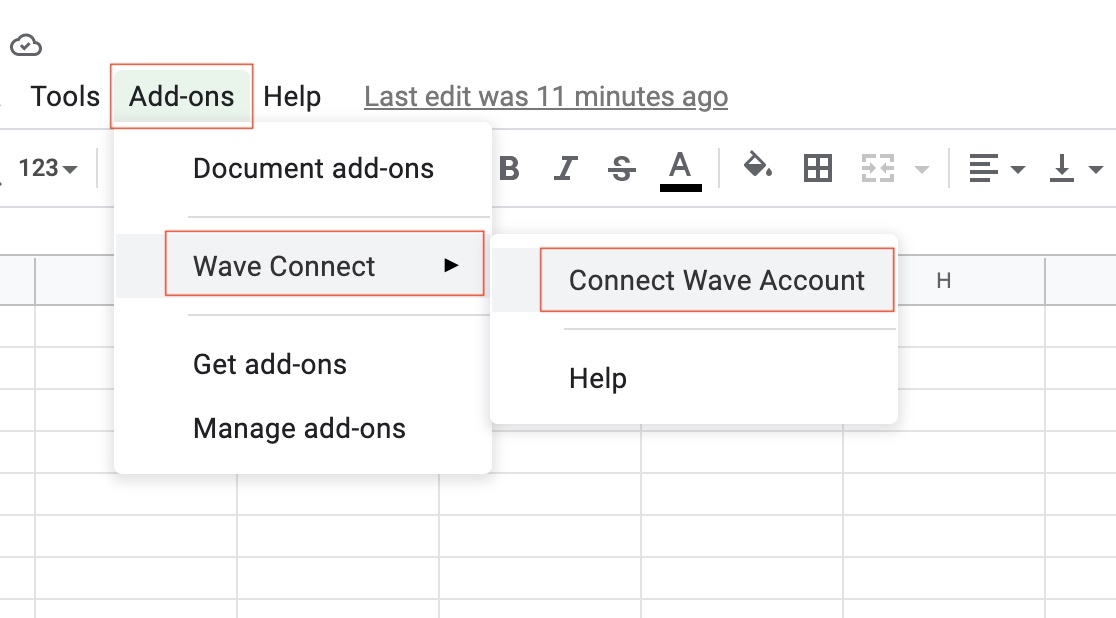
- Next, click the Add-ons tab at the top bar, select Wave Connect, and click Connect Wave Account to connect your Wave account to the Sheet. Ensure that you’re logged in to your Wave account.
- In the new tab, click Allow Access to give permission to Wave Connect to read or write at both ends.
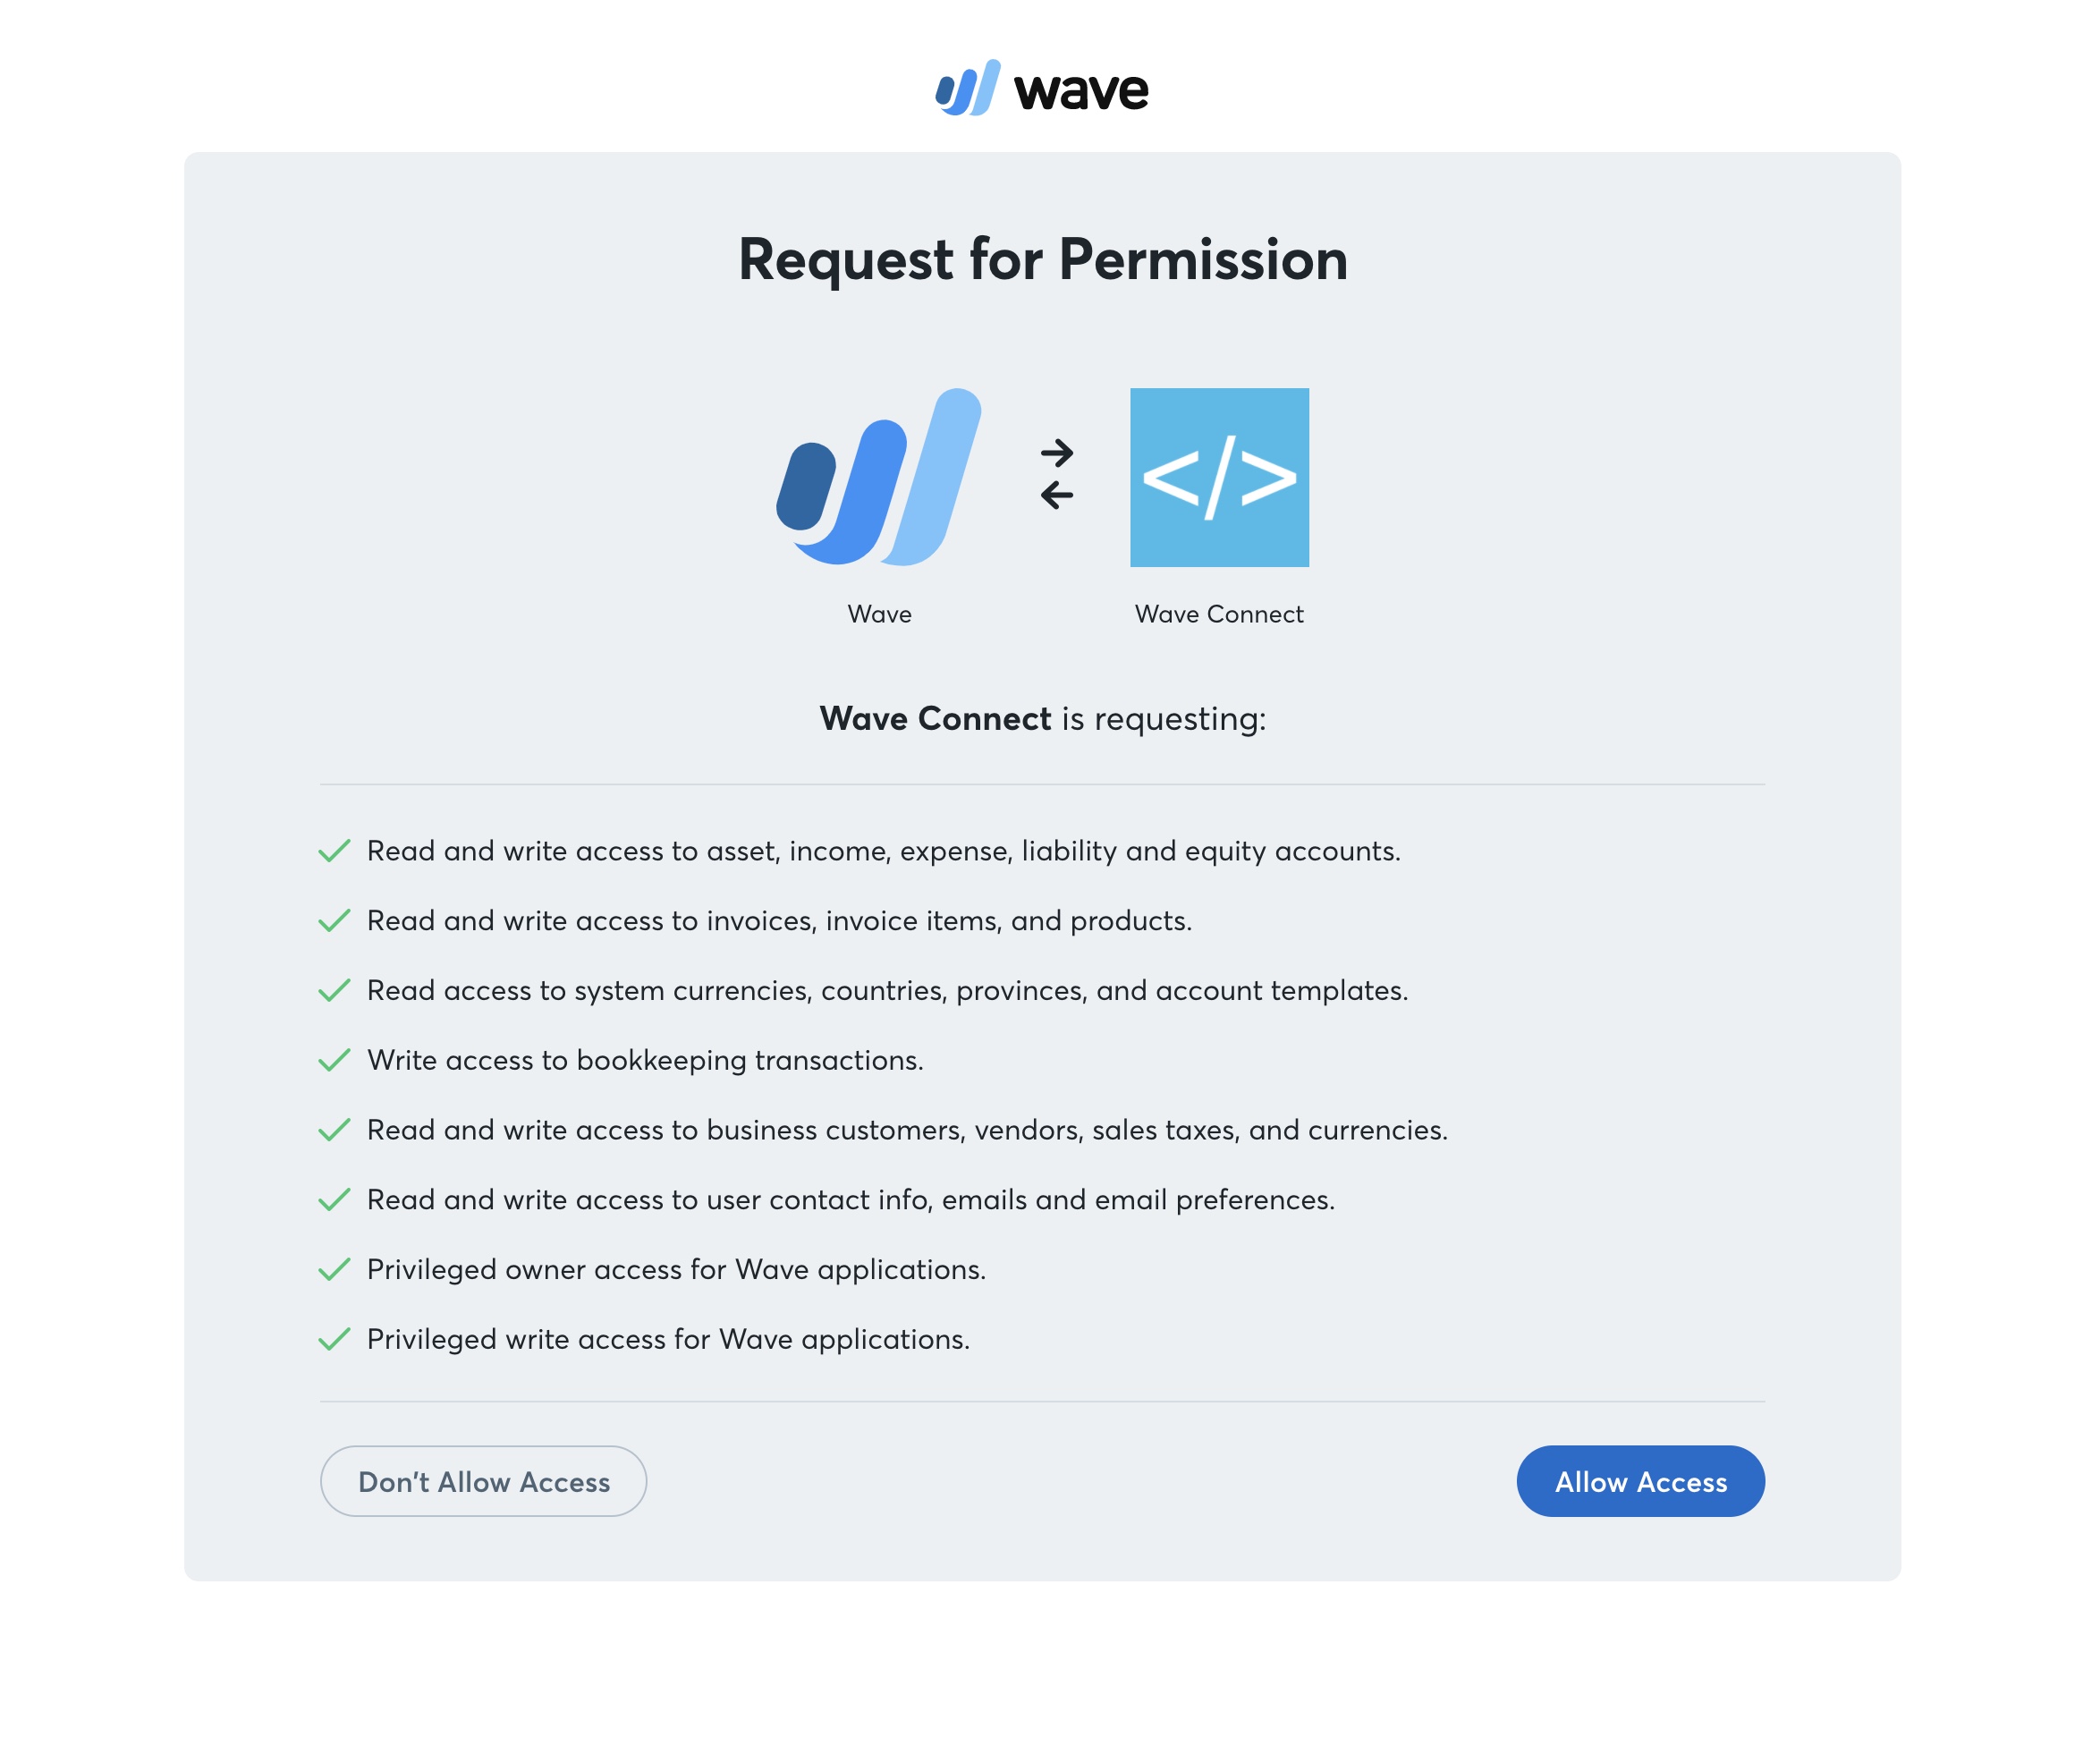
Immediately, your Wave account and that Google Sheet will be connected.
Download data from Google Sheets
- Open the sheet which you had connected with your Wave account. If you didn’t connect the sheet with your Wave account, set up Wave Connect add-on
- Click the Add-ons tab at the top bar > Wave Connect > Download > Customers (or Products or Invoices or Chart of Accounts).
- A pop-up opens where you can select your Wave account and mark the fields that you want to download to the Google Sheet. When you download invoices, you can also download the invoice payments. To download, choose Data to Download as Invoice Data and Payments in the popup to download the invoice payments.
- Select all the fields and click Download Customers (or Download Products or Download Invoices or Download Accounts). The respective data from Wave will be downloaded to the Sheet. If it’s a Sheet with existing data, choose to overwrite it to have the latest list of customers.

- Next, click the File tab at the top bar, select Download, and select Comma-separated values (.csv, current sheet). The sheet containing the list of your customers will be downloaded to your device as a CSV file.
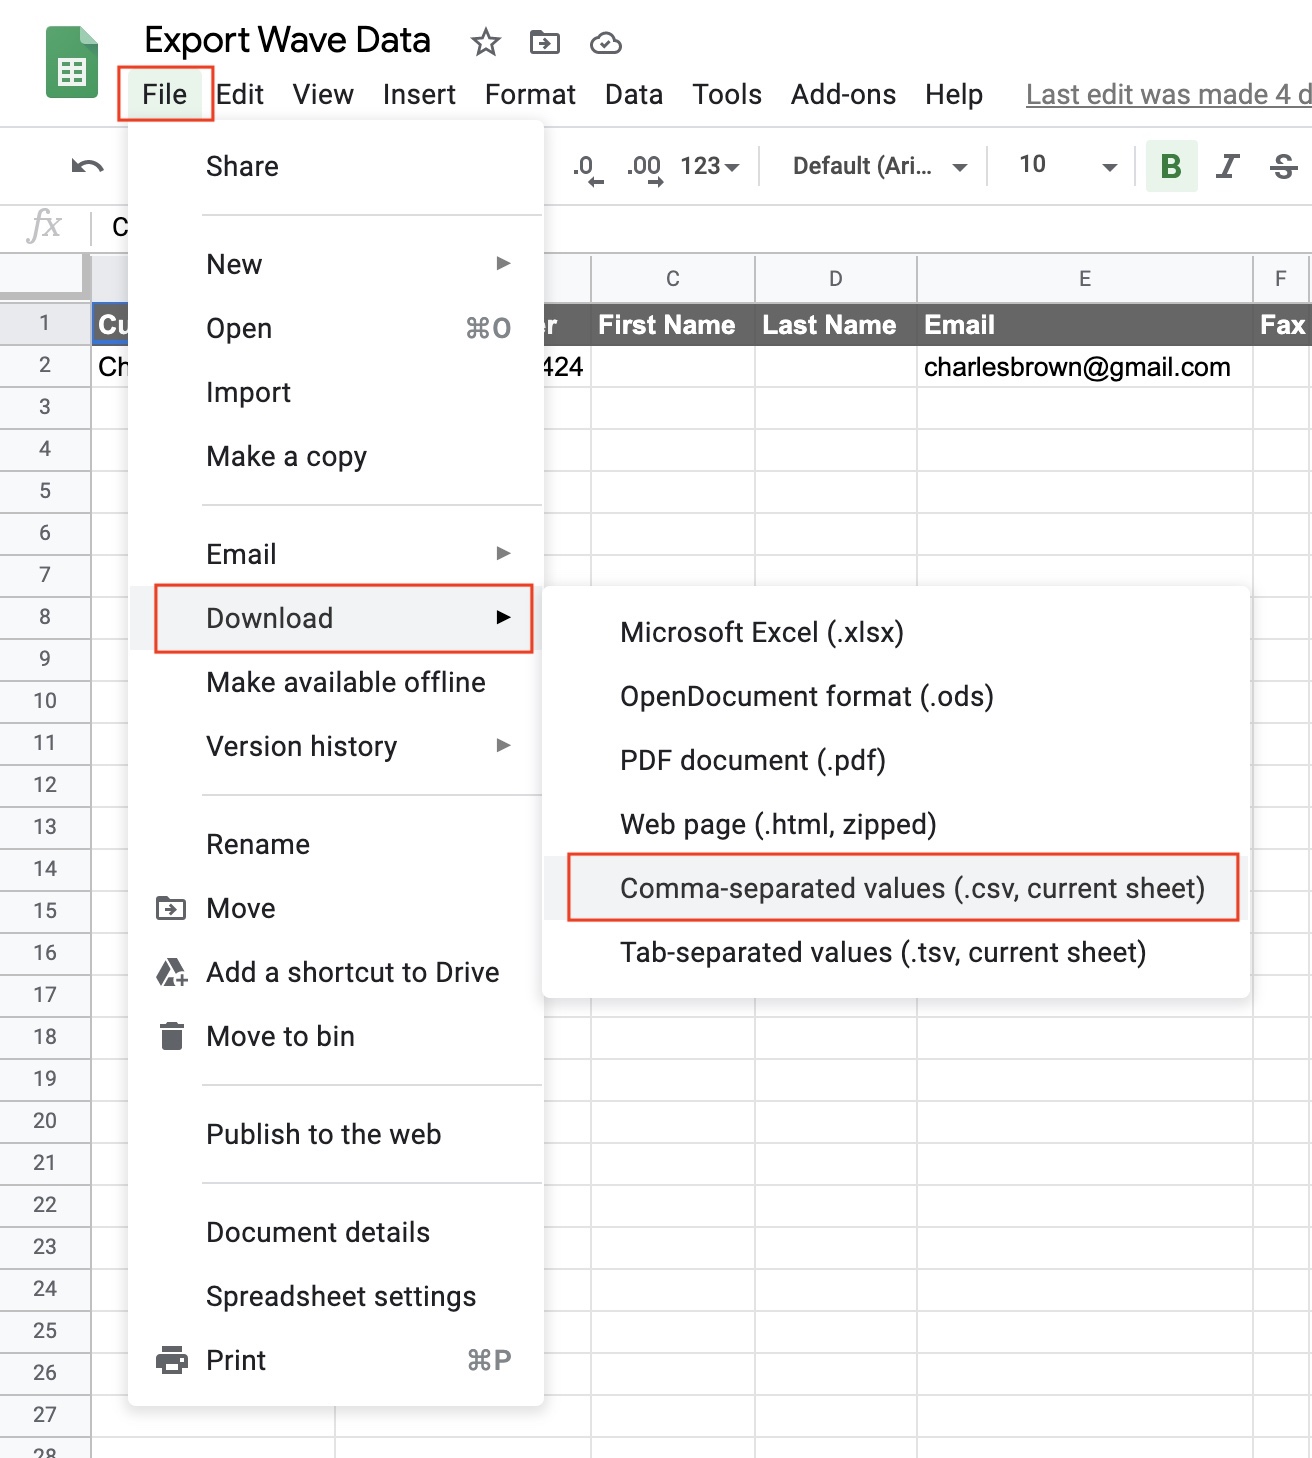
- Next, click the + icon at the bottom left corner to create a new sheet and repeat the above steps to download your products, invoices, and chart of accounts from Wave to your device.
Download Trial Balance Report
To download the Trial Balance report:
- Click the + icon at the bottom left corner to create a new sheet.
- Click the Add-ons tab at the top bar > Wave Connect > Reports > Trial Balance.
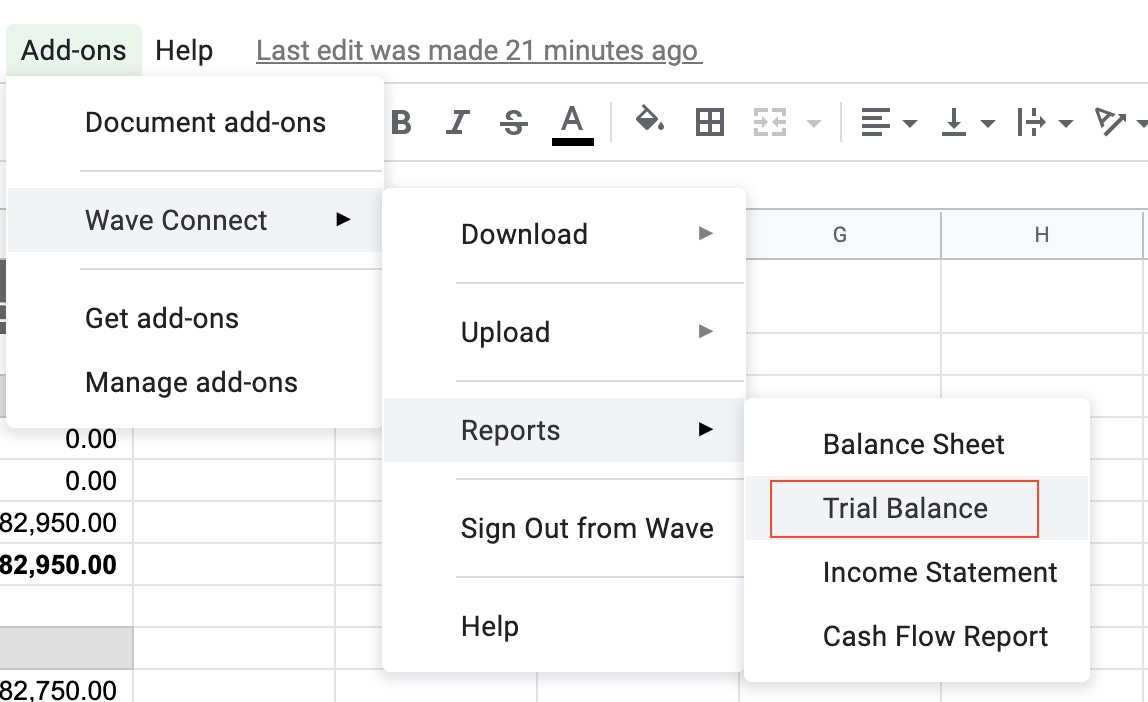
- Select the Balance Date in the popup on the right side of the page.
- Click Run Report and the report will be downloaded to the Google Sheet.
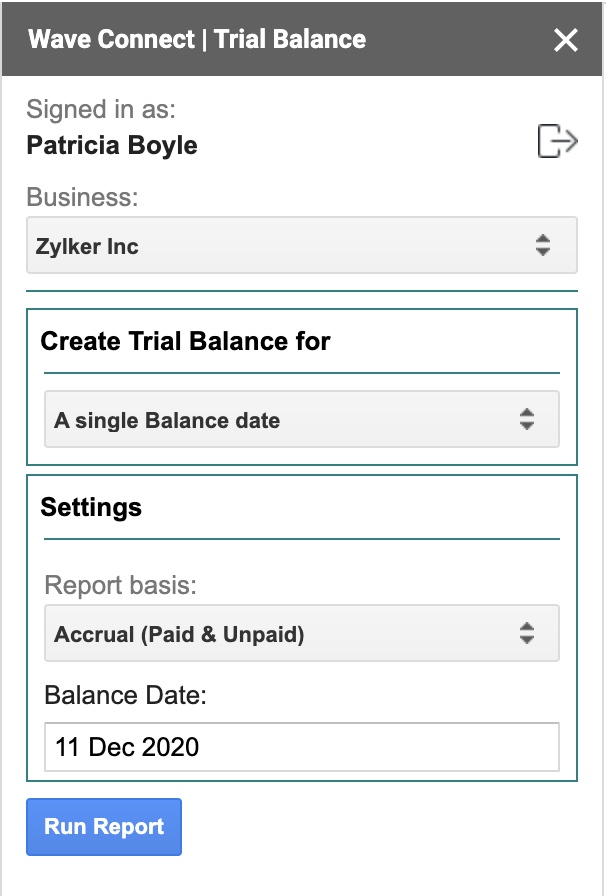
- Next, click the File tab at the top bar, select Download, and select Comma-separated values (.csv, current sheet). The sheet containing the list of your customers will be downloaded to your device as a CSV file.

Now, you can use these CSV files to import your data into Zoho Books.
Import Data into Zoho Books
Zoho Books has built a Migration Wizard to help you upload your CSV files and import your data into Zoho Books easily.
To migrate data using the migration wizard:
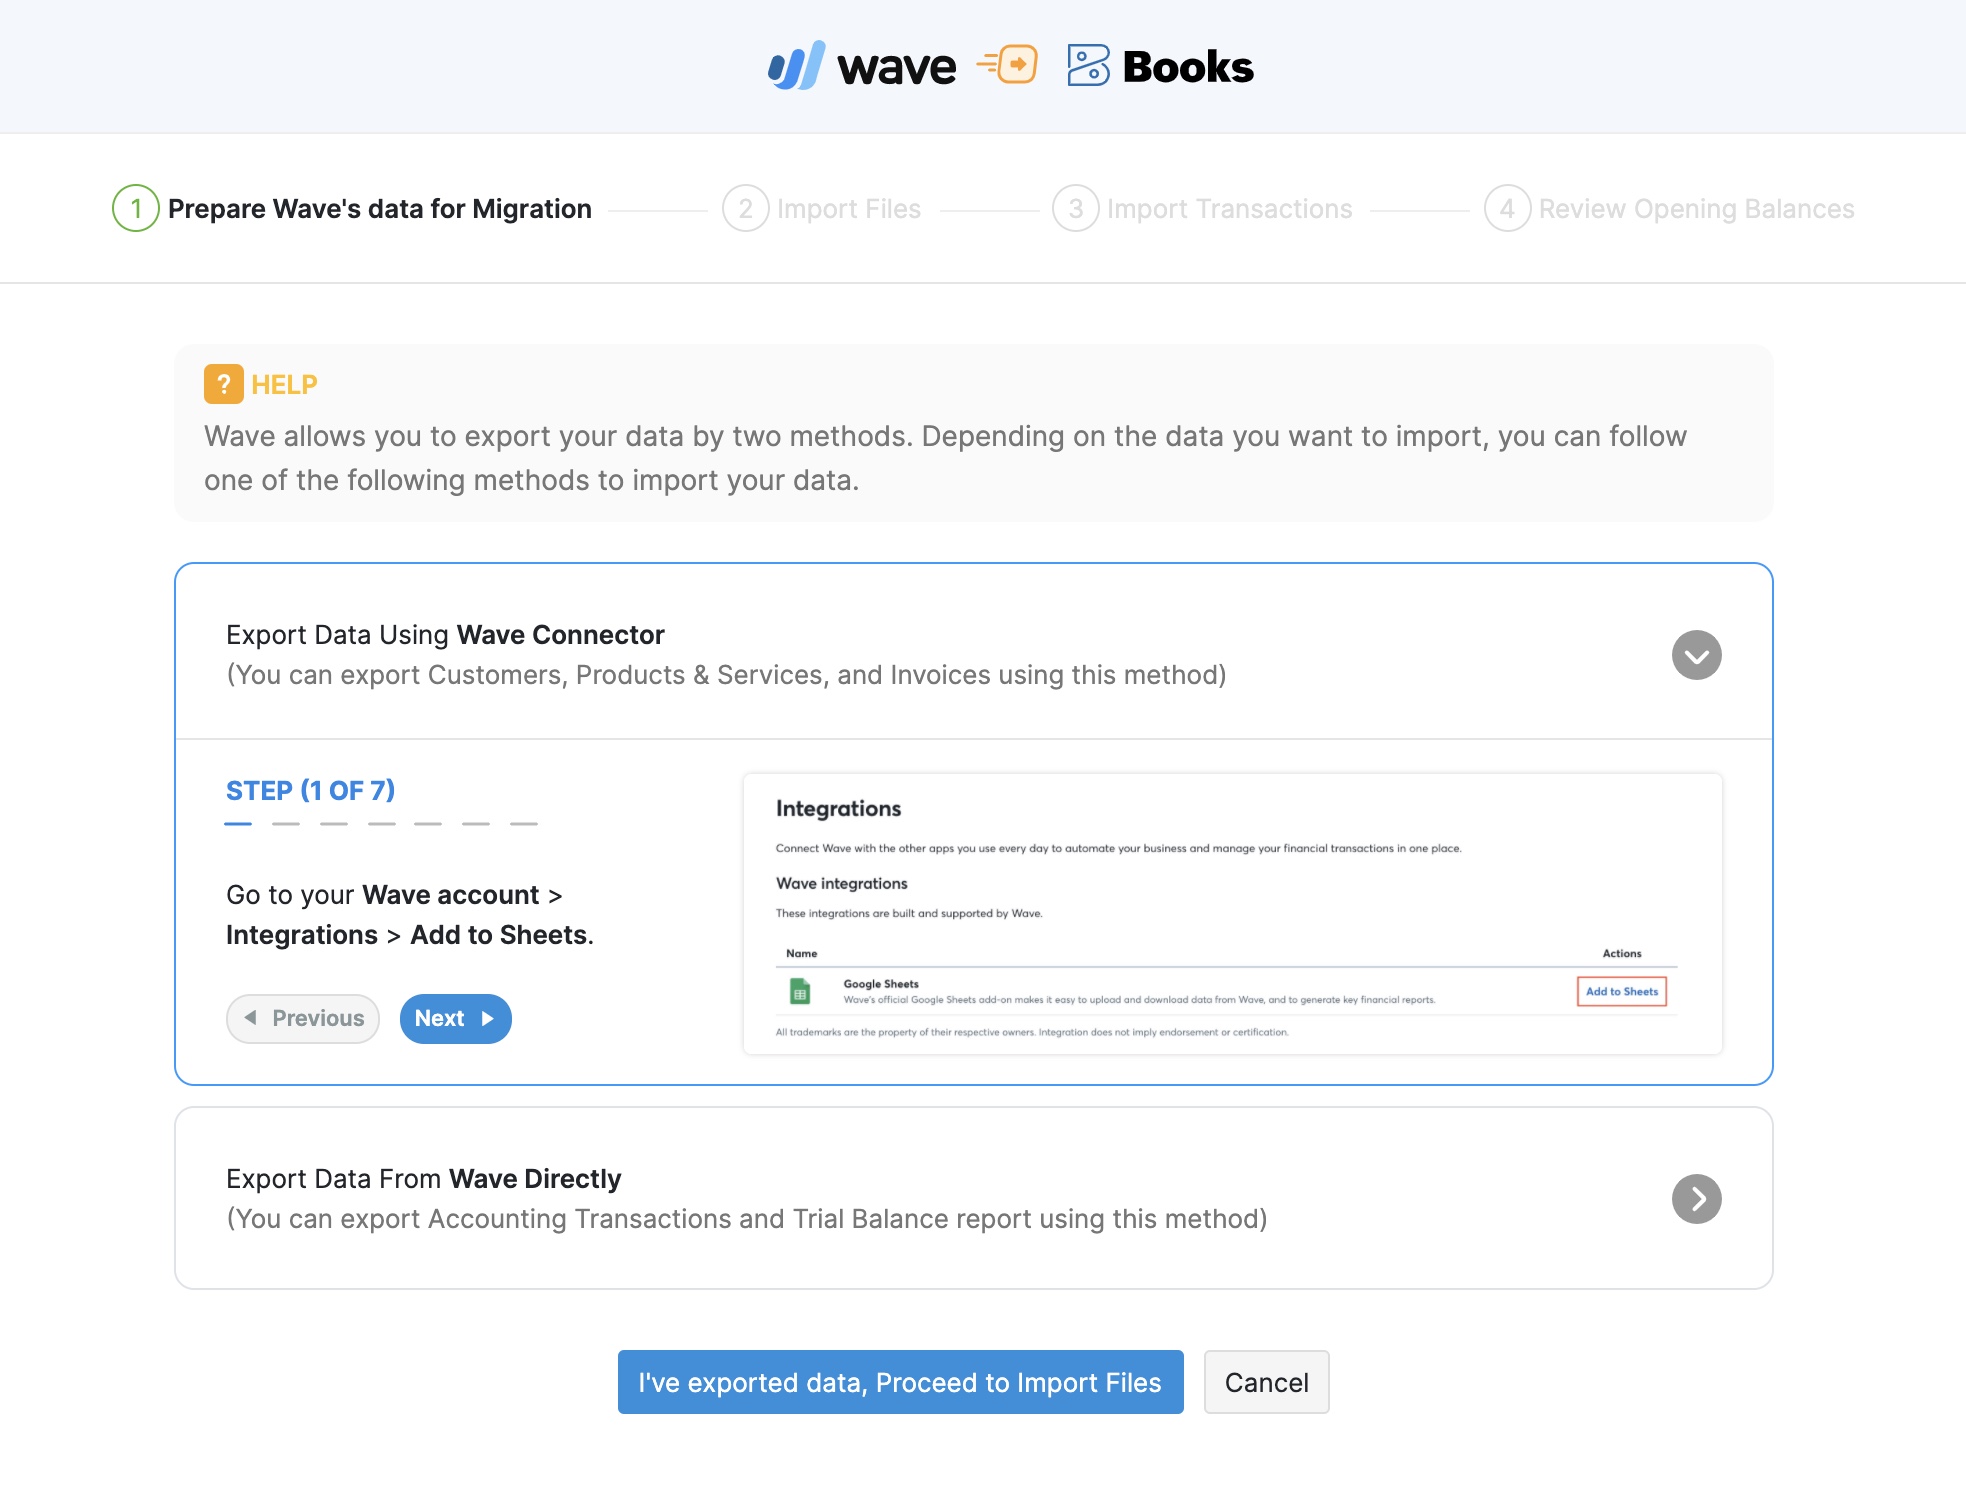
- Go to your dashboard and click Migrate Data. A new page will open with steps to export data.

- If you have followed the steps above, you can click I’ve exported data, Proceed to Import Files. Else, follow the steps to export your data from Wave.
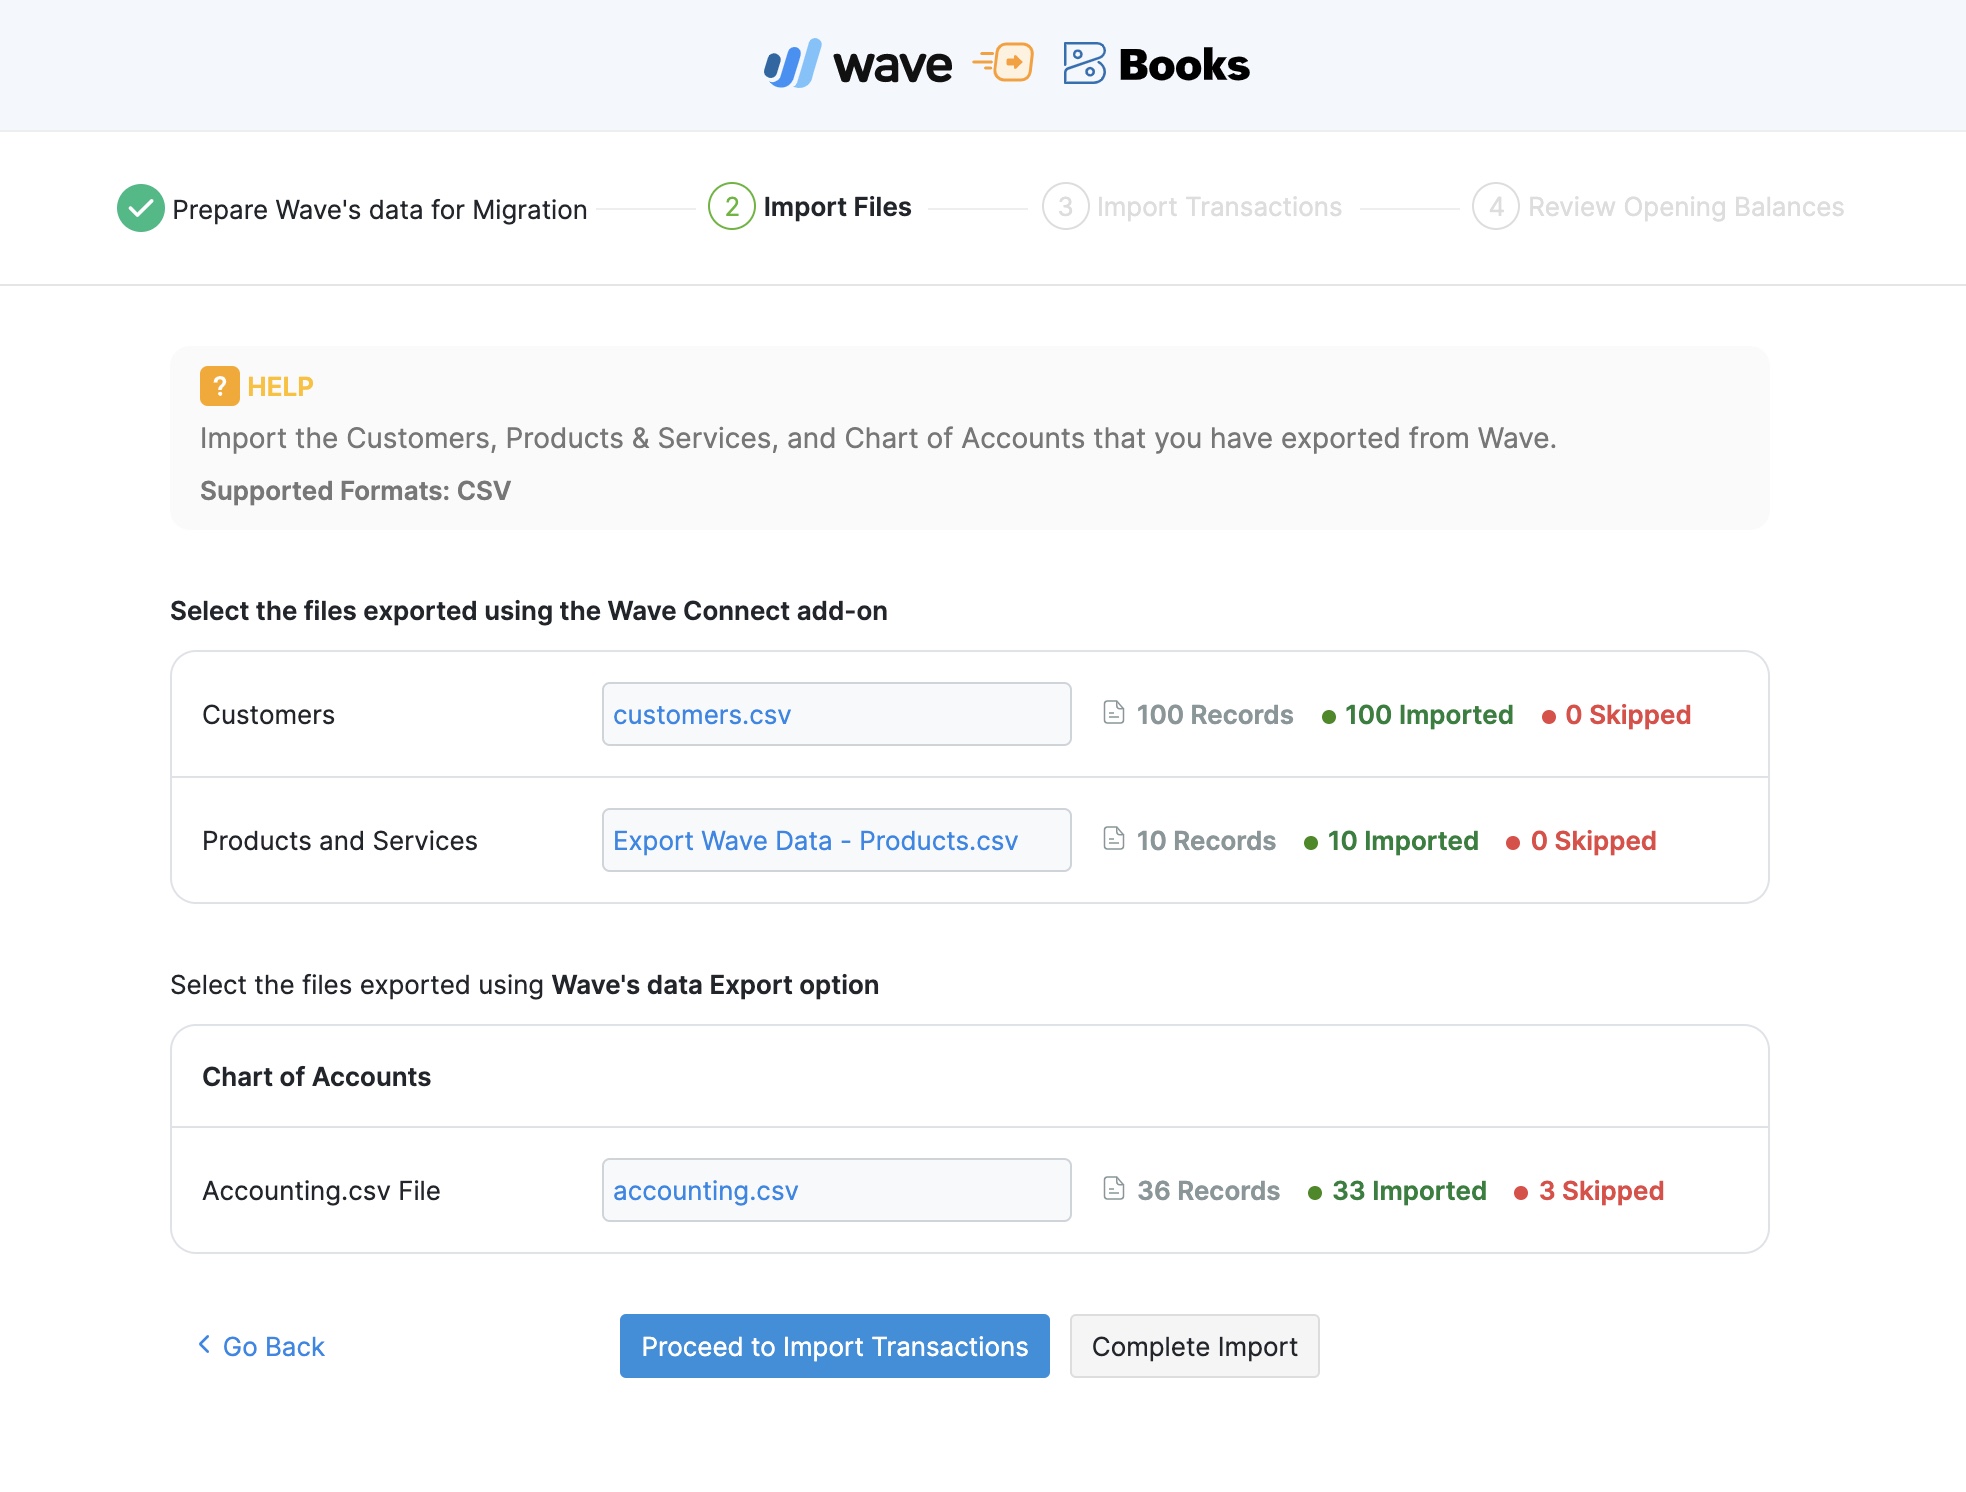
- Choose and upload the Customers, Products, and the Accounting.csv files.
- Click Import Files. The data from the CSV files will be imported into Zoho Books and the number of records that were imported and the number of records that were skipped will be shown.
- Click Proceed to Import Transactions if you want to import the outstanding invoices (unpaid and partially paid invoices) from Wave into Zoho Books. Else, click Complete Import to end importing and start using Zoho Books.
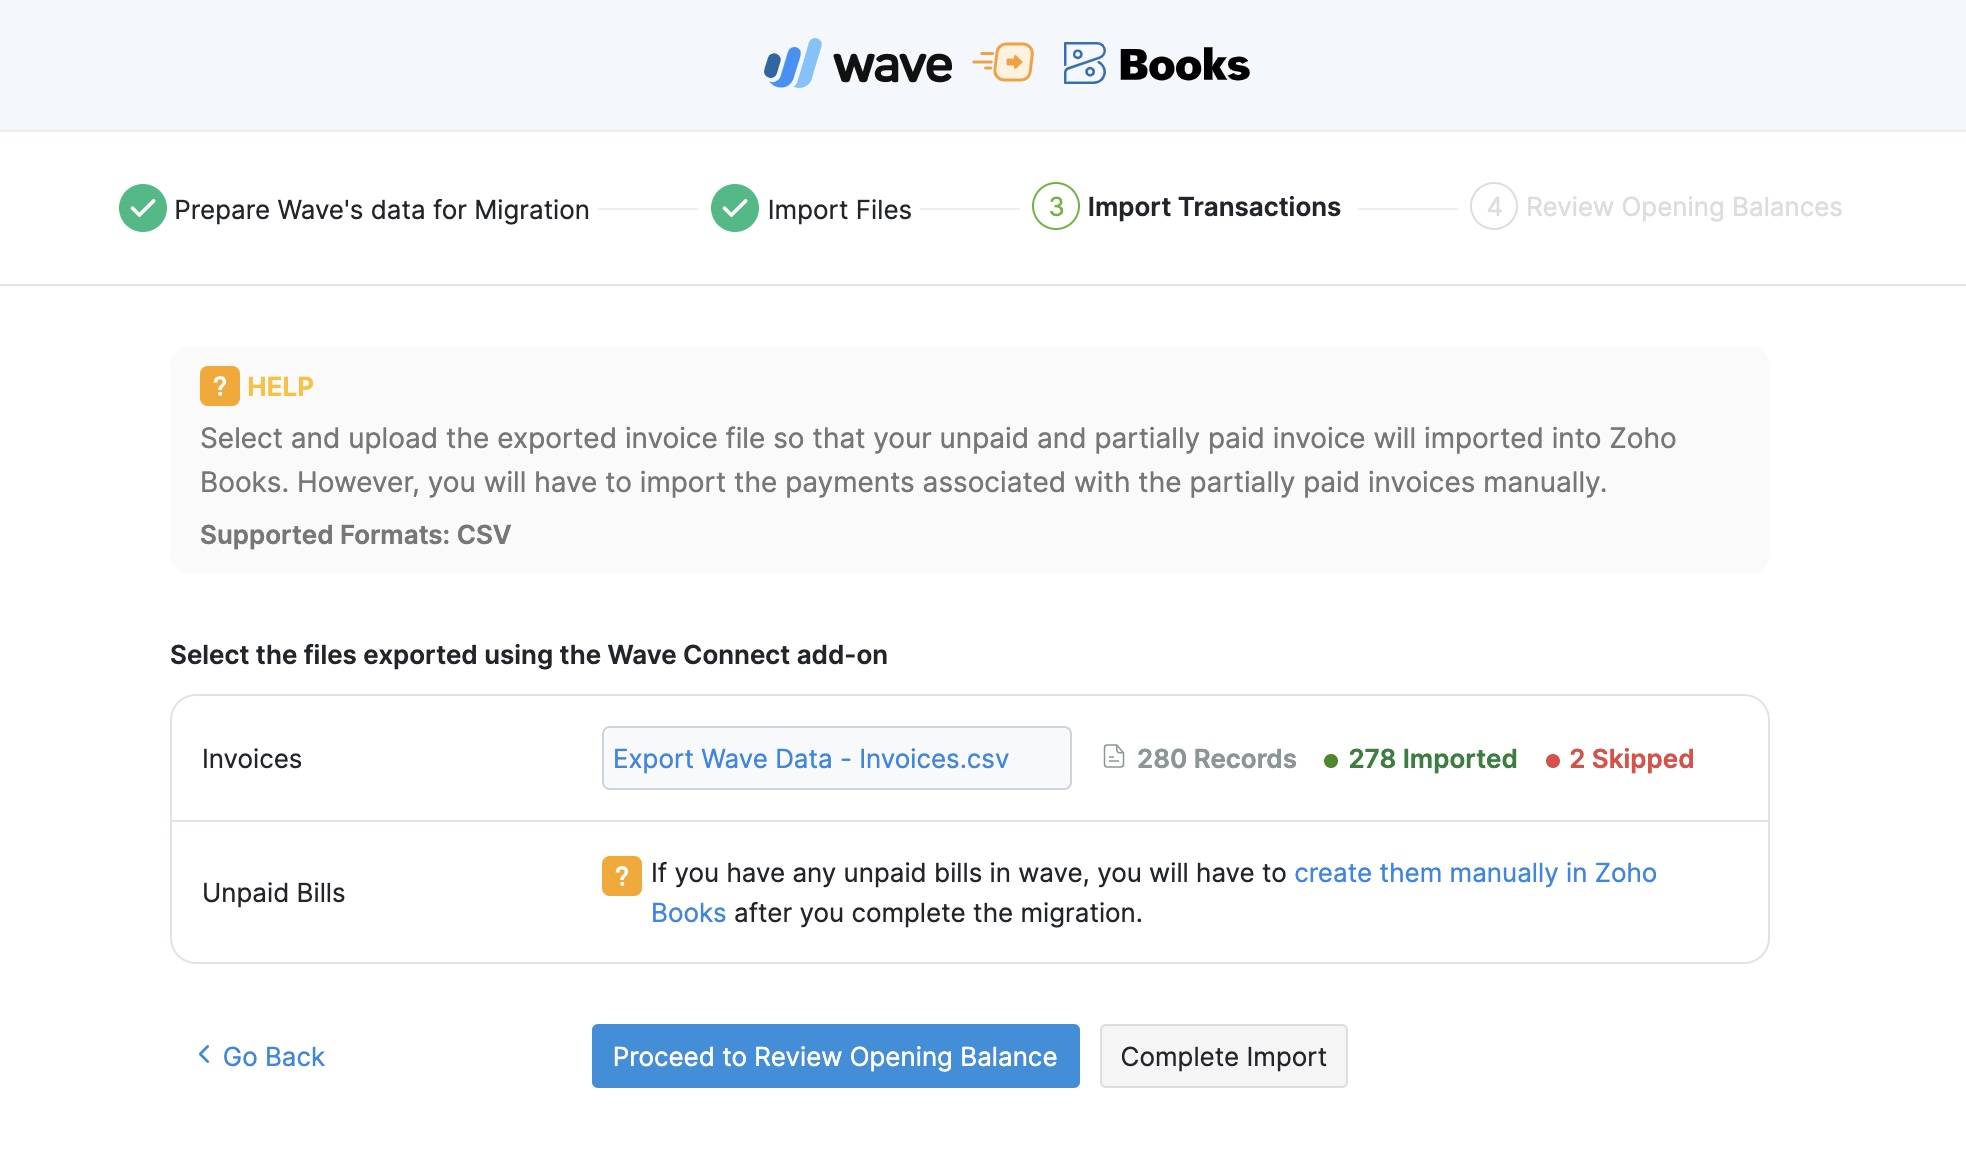
- On the Import Transactions page, select and upload the exported invoices file.
- Click Import Transactions and the outstanding invoices from Wave will be imported.
Note: If you want to import the paid invoices and the payments made for invoices, you will have to import them manually.
- Click Proceed to Review Opening Balance if you want to import the balances of your accounts from Wave. Else, click Complete Import to end importing and start using Zoho Books.
Note: Opening Balances in Zoho Books is the amount you have in the different accounts of your business at the start of an accounting period, or when switching to a new accounting system. When switching from Wave you need to ensure that all your accounts and their balances are brought into Zoho Books.
If you’re switching to Zoho Books at the end of your financial year, the closing balances of the previous year should be entered as your opening balances for the current year in Zoho Books.
If you’re switching to Zoho Books during any other time of the financial year, you can generate a Trial Balance report on the date of migration to identify all the debit and credit balances of your accounts.
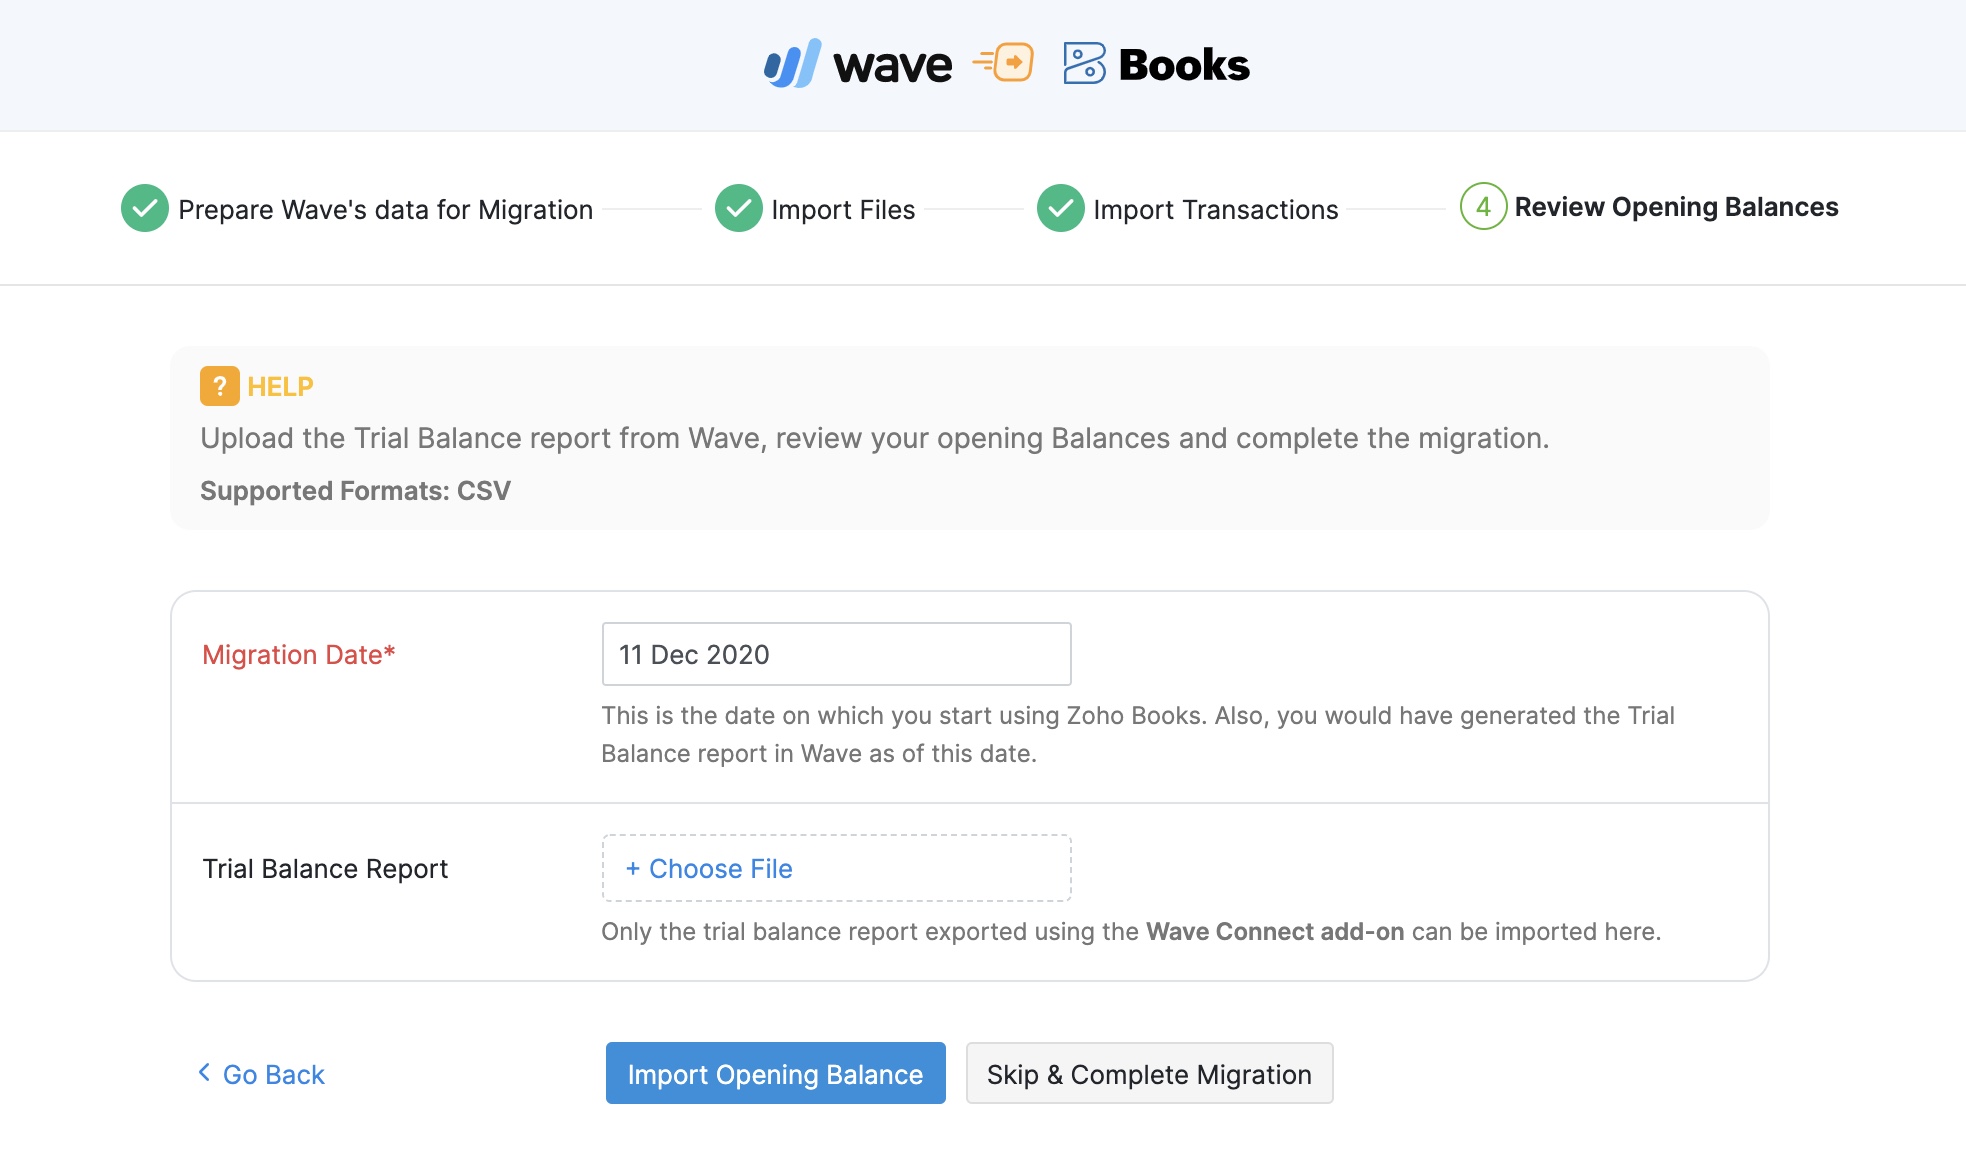
- Select the MIgration Date. This is the date on which you migrate from Wave and start using Zoho Books. Also, the Trial Balance you generate in Wave must have its As of date as the Migration Date. This ensures that all your account balances are imported correctly.
- Click + Choose File and select the Trial Balance report that you exported from Wave using the Wave Connect add-on.
- Click Import Opening Balance. The opening balances will be imported and you can review the balances to ensure that they are accurate.
- Click Complete Migration.
Now, your data from Wave will be available in Zoho Books.
Want to import the bills and receipts?
Import your bills, and receipts into Zoho Books and ensure that the status of the bills is accurate for it to reflect properly in your Trial Balance report.
Import Bills
You would have downloaded the import file for bills using the Data Export option in Wave. You can import them into Zoho Books easily.
To import bills:
- Go to Purchases > Bills.
- Click the Hamburger icon in the top right corner of the page.
- Select Import Bills.
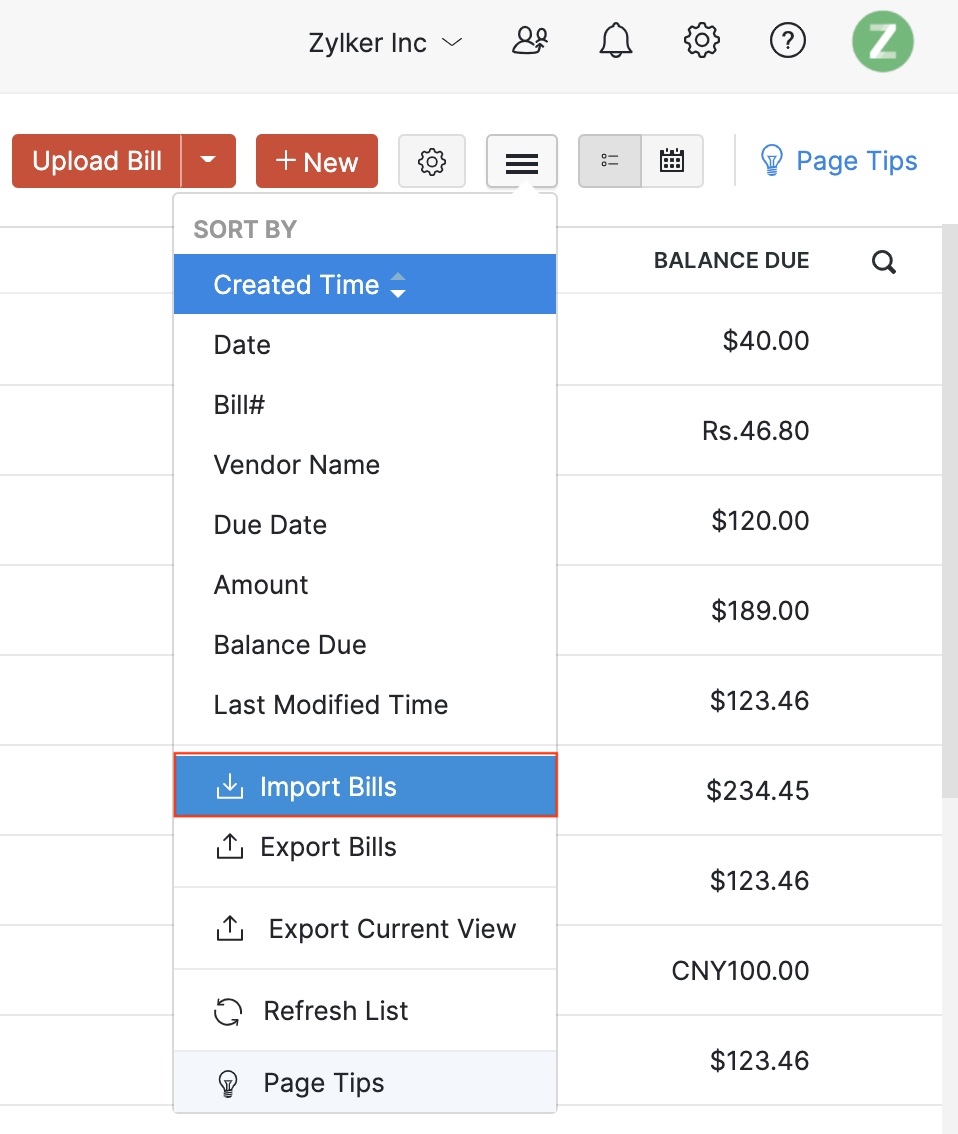
- Click the Choose File button under Upload file.
Pro Tip: You can download the sample import file to know the format of the import file, i.e. the columns and data to be included in the import file.
Insight: Make sure that the file size is not more than 1 MB.
- Choose the Character Encoding and File Delimiter for your file.
- Click Next.
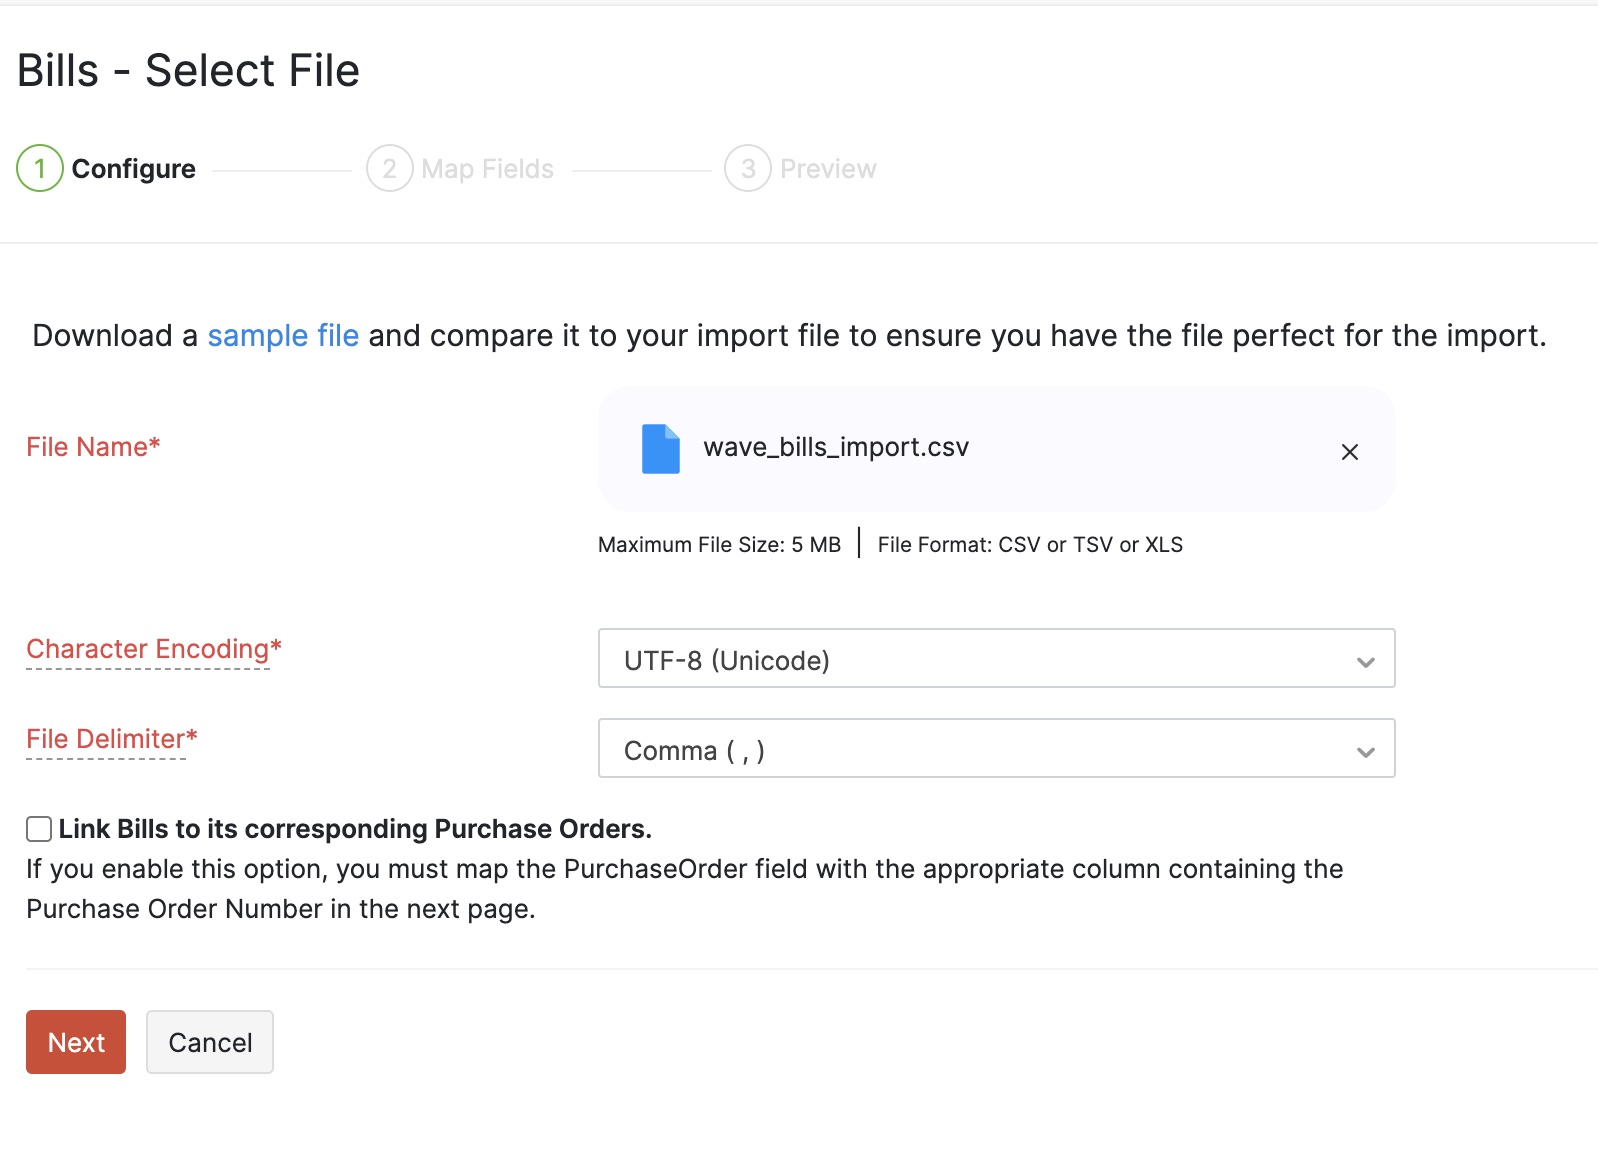
- Ensure that all the fields are mapped correctly in the Map Fields page.
- Mark the Save these selections for use during future imports option if you want to use the similar import format next time.
- Click Next.
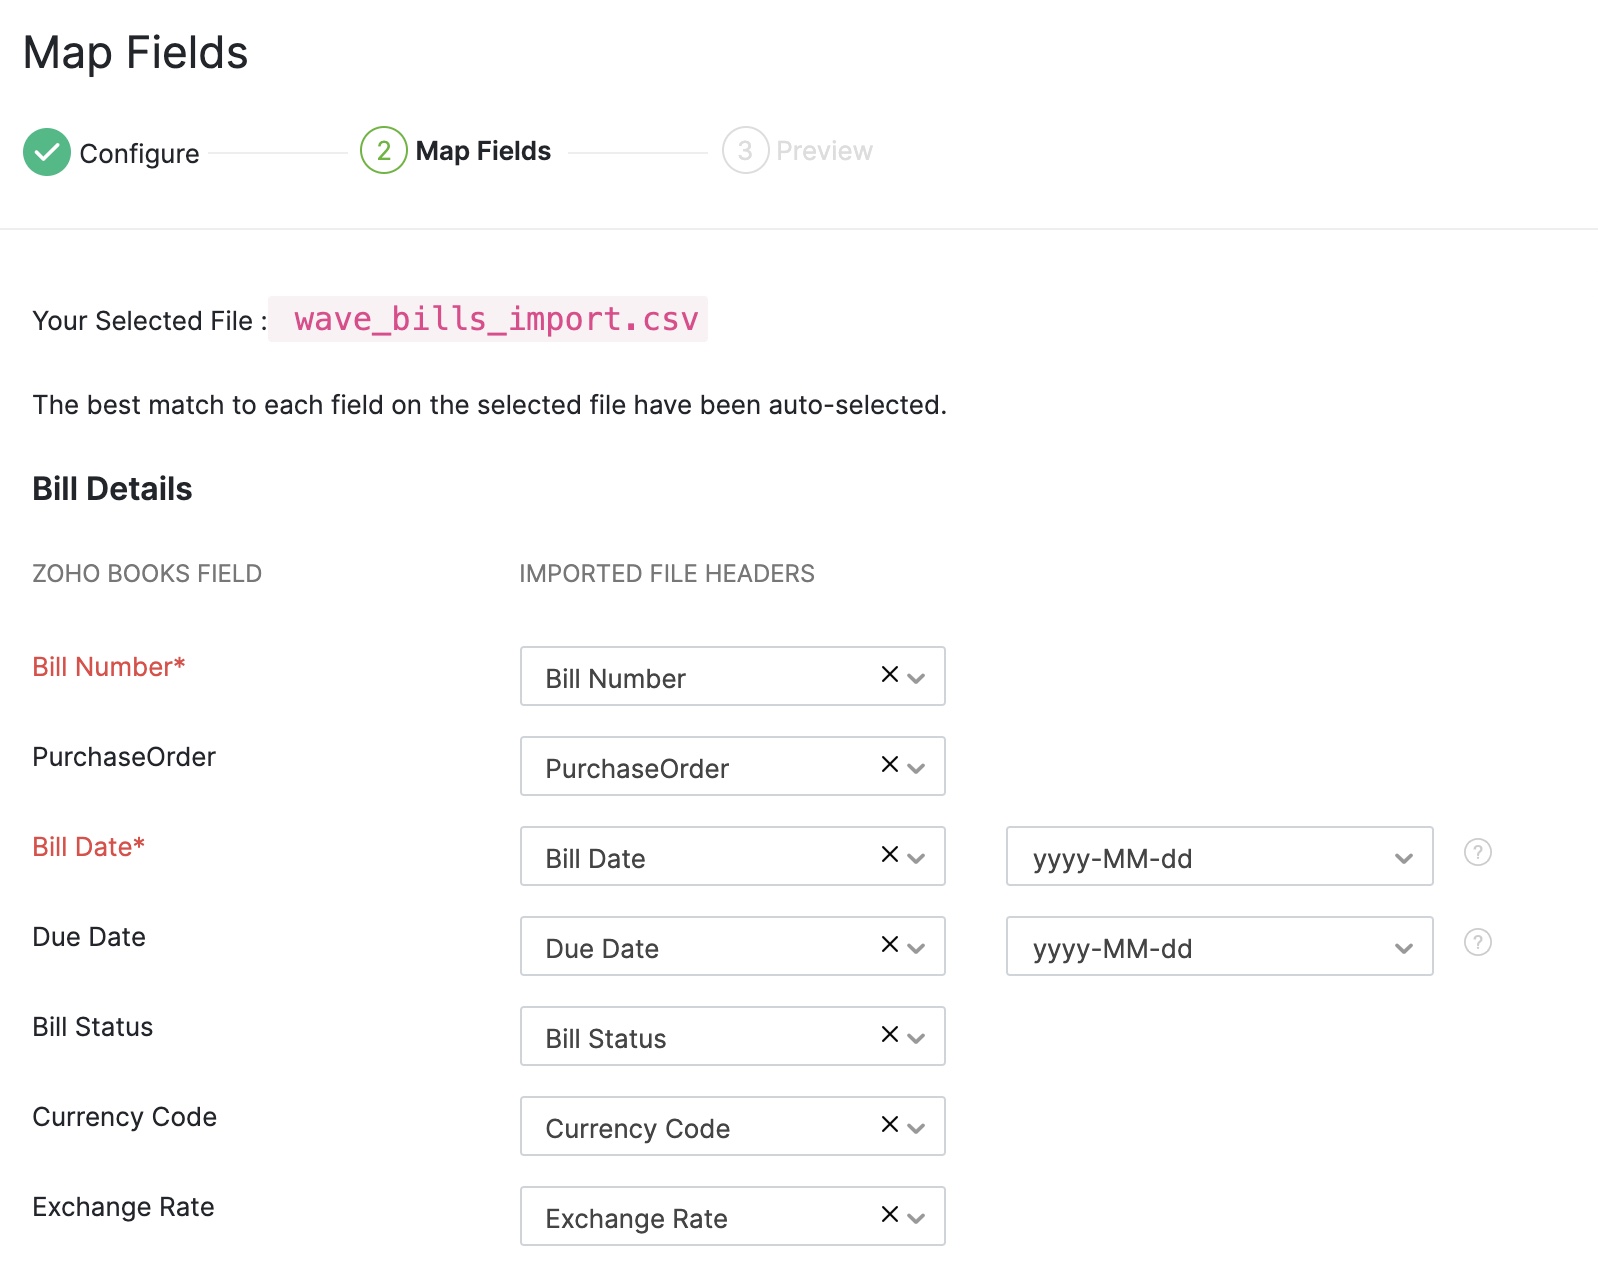
- In the Preview window, click Import.
Similarly, to import outstanding invoices:
- Go to Sales > Invoices.
- Click the Hamburger icon in the top right corner of the page.
- Select Import Invoices.
Note: You can import only the paid invoices by removing all the rows that have the Status column as unpaid.
Also, if you want to set up an approval process for invoices, you can set it up easily from Settings in Zoho Books. Learn How >
Next, follow the same steps that you followed to import bills in Zoho Books. Learn more about managing invoices in Zoho Books from our help documents.
Import Receipts
The receipts you had in Wave can be uploaded to Zoho Books where it can be stored securely to create expenses or for any future reference. The receipts will be imported into the Documents module on the left sidebar.
Prerequisite: Before you can import the receipts, you have to enable the Documents module in Zoho Books.
Next, you can upload the receipts to Zoho Books. To upload:
- Click the Upload File button and select the receipts that you had downloaded from Wave.
The receipts will be uploaded into Zoho Books which can be auto-scanned if you have purchased the Auto-scan add-on. Also, in your everyday use, you can upload your receipts and documents in Zoho Books by emailing them or uploading from a cloud service.
Handling non-exported data
Quotes, receipt transactions, and recurring invoices cannot be exported from Wave to import them into Zoho Books. Although Wave allows you to export all transactions, at the moment it is not possible to import them directly into Zoho Books as all the transactions are listed together. You will have to modify the sheet manually into a suitable format before you can import it.
If you want a record of these transactions in Zoho Books, the best option is to create quotes, receipt transactions, and recurring invoices manually in Zoho Books.
Sync Transactions
After you have imported all the required transactions, it is important that you check if they’ve been properly synced with the Opening Balances. This will ensure that you get accurate account values in the Trial Balance report.
If you had imported transactions that are dated on or before the migration date, then you need to sync them manually with the Opening Balances in Zoho Books. To sync opening balances:
- Go to Settings on the top right corner of the page.
- Select Opening Balances under Organization. The number of transactions that are backdated will be listed here.
- Click Sync.
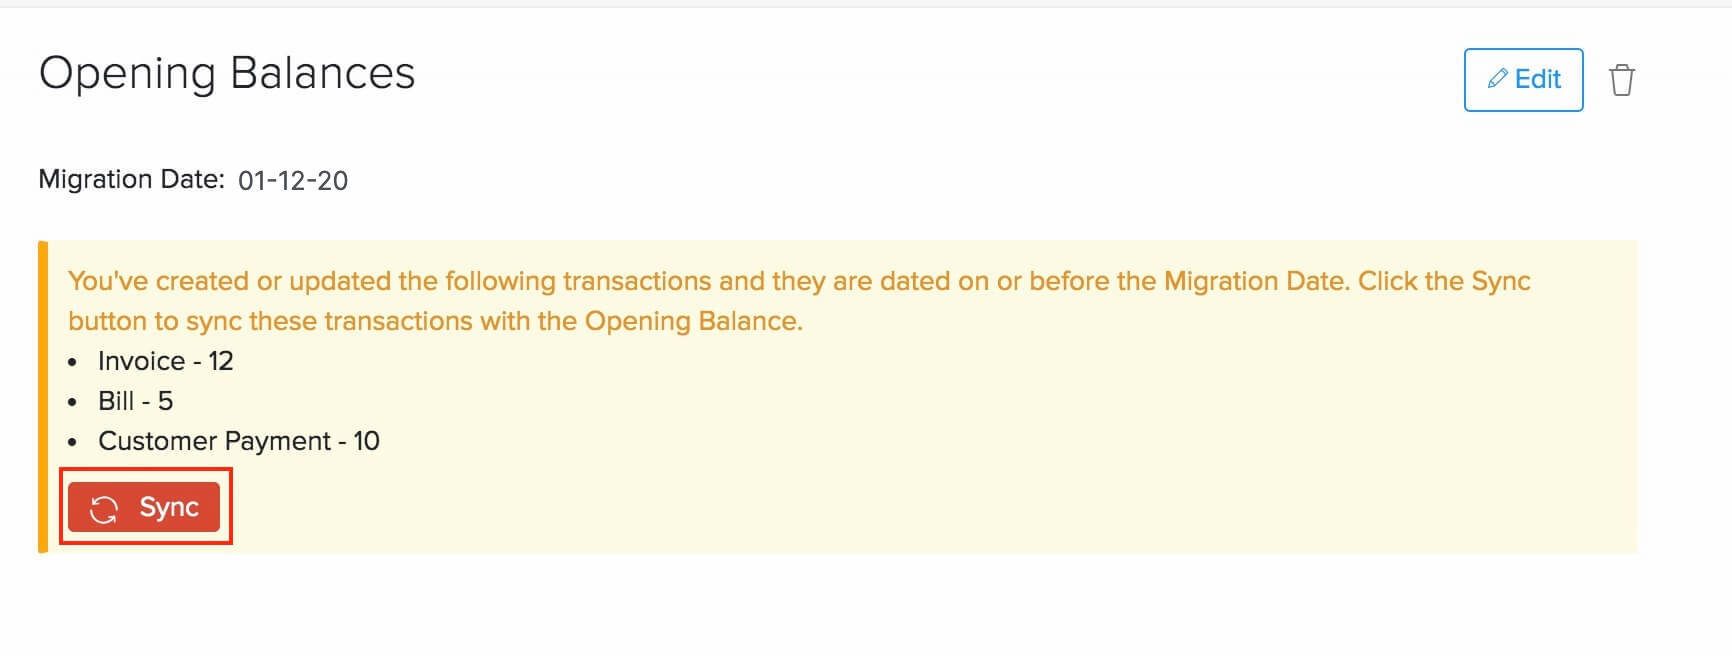
Compare Trial Balance report from Wave and Zoho Books
Finally, you will have to make sure that all the records that you’ve imported into Zoho Books are posted into the correct account and the account balance matches between Wave and Zoho Books.
So, generate the Trial Balance report in Wave and generate the Trial balance report in Zoho Books and compare the values to check if they are the same. If there is any mismatch, you will have to check the records created for those accounts and make sure they match.
With this final step, you’re all set to start using Zoho Books!
Set up Online Payments
Zoho Books allows you to receive payments online from your customers and enables you to collect payments faster. Set up a payment gateway to get started with collecting payments.
If you are using Zoho Books – Global edition, you can set up Stripe, our preferred payment gateway to start collecting payments from your customers.
To set up your integration, you will have to connect your Stripe account first and then configure the integration to start tracking payments.
Connect to your Stripe account
If you have a Stripe account, you can connect it with Zoho Books easily. To connect your Stripe account with Zoho Books:
- Go to Settings on the top right corner of the page.
- Select Payment Gateways under Online Payments.
- Click Set up Now next to Stripe and you will be redirected to Stripe.

- Enter your login credentials and click Sign in/Sign up.
- Select your account and click Connect my Stripe Account in the following page.
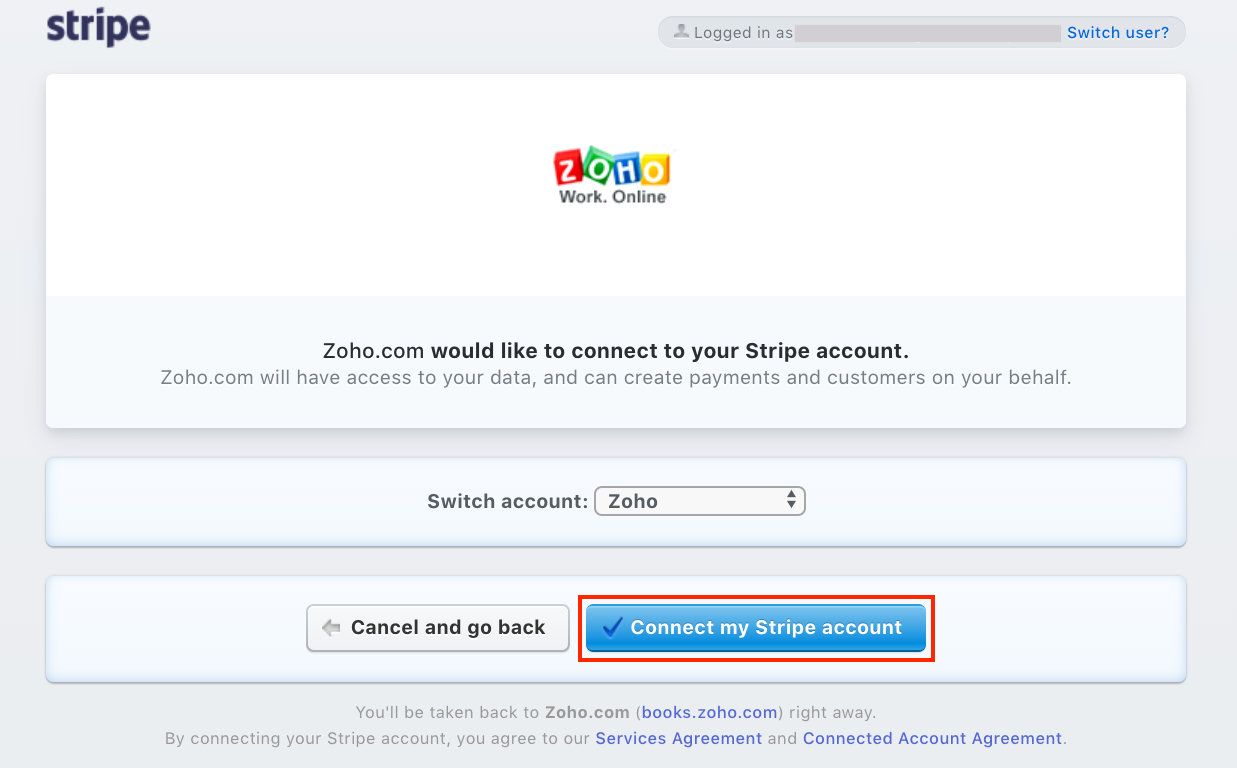
You will be redirected to the configuration page of your Zoho Books account to finish setting up the integration. Once it is set up, you will be able to start receiving payments from your customers.
Do you have recurring invoices in Wave where you were using the card information stored in Stripe to collect payments automatically?
You can import the card profiles easily into Zoho Books and set up recurring invoices in auto-pilot mode. Learn How >
Zoho Books Mobile Apps
You can manage your business finances from anywhere using the Zoho Books’ iOS and Android mobile apps. The mobile apps are packed with features, from adding customers to generating and viewing your reports.
Download Zoho Books from the Apple App Store or the Google Play Store.
Do more with Zoho Books
Zoho Books offers a lot of useful features that will make it easier to manage your business finance. Explore >
Now that you have migrated to Zoho Books successfully, you can customize your organization further. You can set up payment gateways to accept online payments or integrate with other apps such as Zoho CRM and Zoho Analytics.
Zoho Books also has many features that you can utilize to streamline your accounting process, here’s some of them to get you started:
 Yes
Yes
 Thank you for your feedback!
