Webhooks Examples
In this page:
Purpose: Calculate Sales Commission
Calculate Sales Commission in Zoho Creator App upon creating a new invoice in Zoho Books.
Scenario: Homes4Us is a company that helps people find homes for buying real estate. They have a dedicated sales team to handle multiple customers at a time. The sales person gets paid 3.5% of the property value as a commission. Donald, the Head of Sales at Homes4Us wishes to automatically enter the details of the customer, sales person and the sales commission in a form as soon as an invoice has been raised for their services.
Prerequisites:
- Account in Zoho Creator Application
- Permission to access Zoho API
- Familiarity with Zoho Creator
Procedure:
- Create the Sales Commission App in Zoho Creator (Refer Zoho Creator Tutorial on Creating Apps).
- Configure webhook in Zoho Books.
- Set up Workflow Rule.
- Test your webhook integration.
Step 1: Create Sales Commission App in Zoho Creator
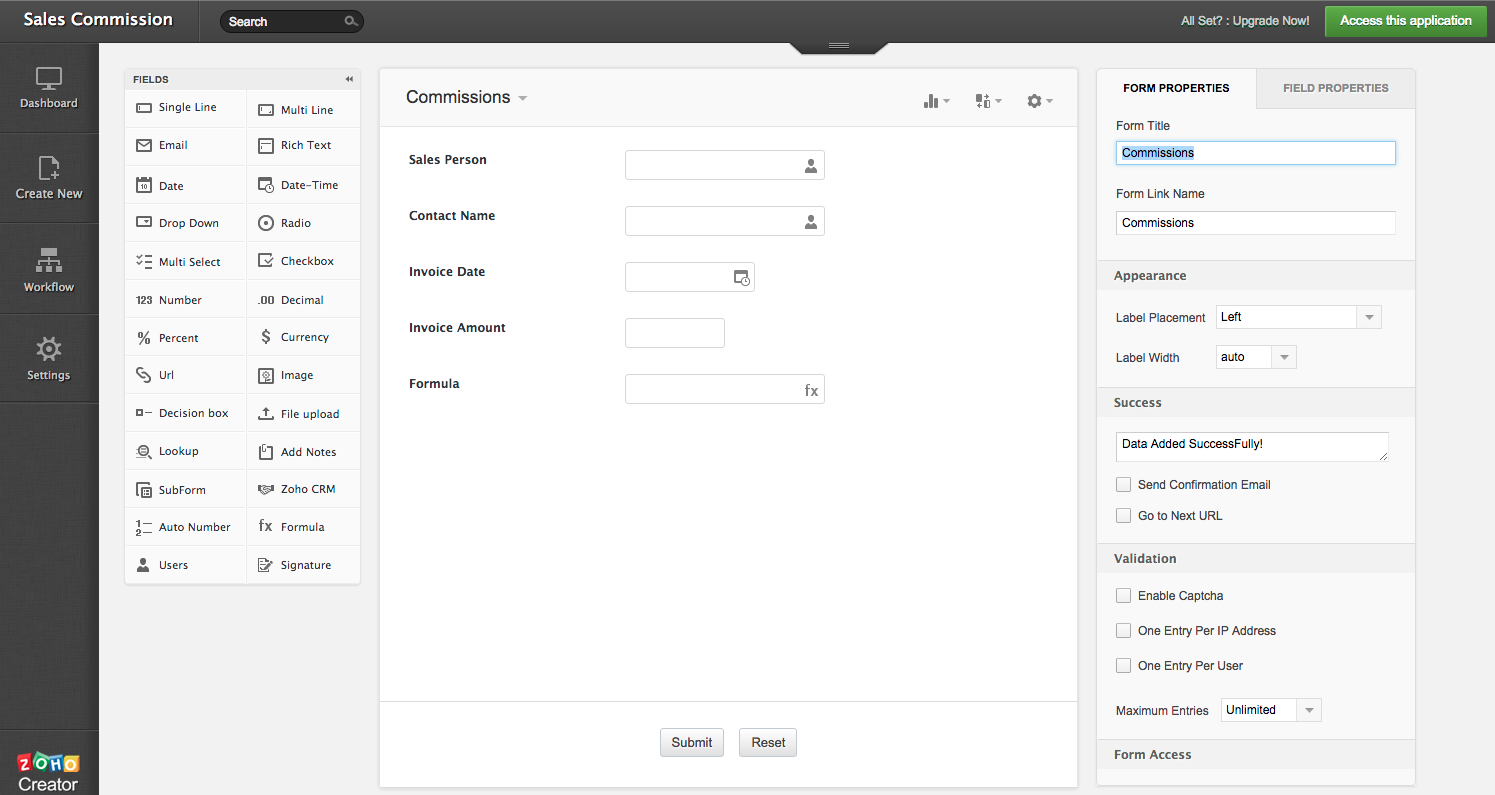
In Zoho Creator, create a Sales Commission application with the following fields,
- Sales Person
- Contact Name
- Invoice Date
- Invoice Amount
Note: “(0.035 * Invoice_Amount)” as the syntax for the formula to calculate the sales commission.
Step 2: Configure Webhook
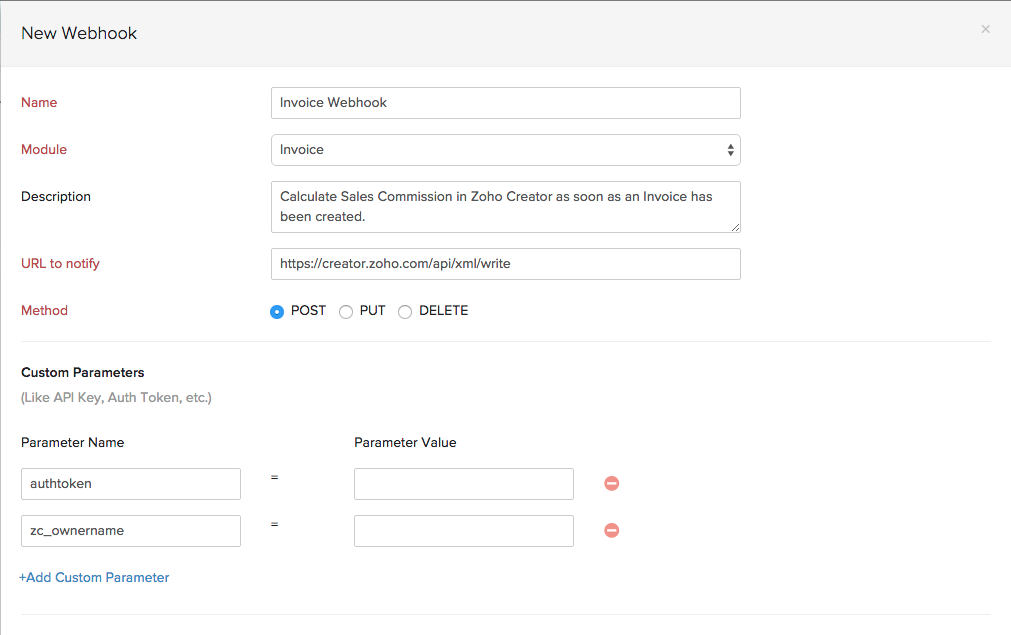
While setting up the webhook, specify the following details:
URL to Notify: https://creator.zoho.com/api/xml/write
Method: POST
Custom Parameters:
- authtoken: Specify authtoken from your creator account. Refer to the Creator Help Documentation for more details.
- zc_ownername: Specify the application owner’s name of your creator account.
User Defined Parameters:
Select the following Fields from the Invoice and Contacts module while setting up user-defined parameters:
- Sales Person
- Contact Name
- Invoice Date
- Invoice Amount
\
XMLString
<ZohoCreator><applicationlist><application name="sales-commission"><formlist>
<form name="Commissions">
<add>
<field name="Sales_Person">
<value>${INVOICE.SALES_PERSON}</value>
</field>
<field name="Contact_Name">
<value>${INVOICE.CONTACT_NAME}</value>
</field>
<field name="Invoice_Date">
<value>${INVOICE.INVOICE_DATE}</value>
</field>
<field name="Invoice_Amount">
<value>${INVOICE.INVOICE_TOTAL}</value>
</field>
</add>
</form>
</formlist>
</application>
</applicationlist>
</ZohoCreator>
Notes:
- In the above XML string, name represents the field in Zoho Creator App and the value for data is to be pushed from Zoho Books/Invoice using a valid placeholder.
- ‘applicaton name’ is the name of the application that contains the form in Zoho Creator. Get your application name from the Application Settings tab of Zoho Creator.
- ‘form name’ is the name of the form where you edit records in Zoho Creator. Get your form name from the Form Settings of your Zoho Creator account.
- Ensure that the date format in the Creator app is in yyyy-MM-dd format. You can change the date format from the Application Settings of your Zoho Creator account.
Step 3: Setup Workflow Rule
Follow the steps below to create a Workflow Rule,
- Choose when to Trigger: When an invoice is Created.
- Immediate Action: Select the Type as Webhook from the drop-down and select any webhook from the adjacent box.
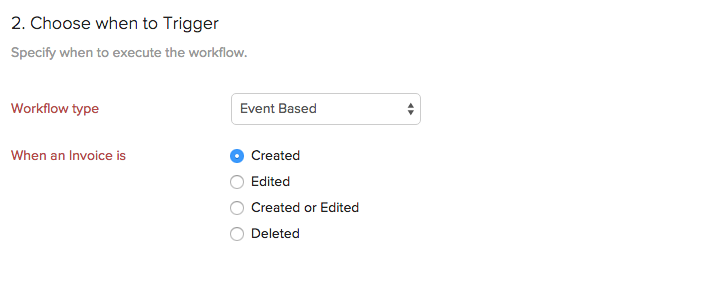
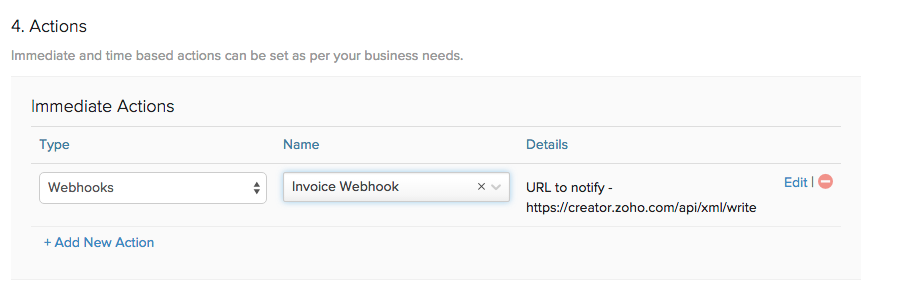
Finally, click on Save to save the Workflow Rule.
Step 4: Test your workflow
Test your workflow by creating a new invoice. Make sure that the Sales Person, Contact Name, Invoice Date and Invoice Amount fields are filled with correct information.
Therefore, when an invoice is created, a workflow will be triggered which will calculate the sales commission and have it saved in a form in Zoho Creator.
P.S: You can improve upon this functionality by automatically creating an expense towards sales commission in your Zoho Books account. Depending on the needs of the organization, you can either create an expense towards ‘Sales Commission’ every time an invoice is created. You could also set up a Custom Schedule for your form, which will, say, calculate the Grand Total of the Sales Commission for one Sales Person and create an expense by for the same in Zoho Books. Click here to know more about how to create records in Zoho Books using Zoho Creator.
Purpose: Send a ‘Thank You’ and Order Confirmation SMS to customers
Send a ‘Thank You’ and Order Confirmation SMS to the customers upon creating a new invoice in Zoho Books.
Scenario: Intelly Inc. is a company that makes customized coffee mugs, T-Shirts, umbrellas and various gift items. Customers can browse the website and place an order on their website and can pay for their purchase upon delivery of their product. Tony, one of the person handling orders creates an invoice as soon as he receives an order. Once the invoice has been created, an SMS goes out to the customer thanking them for the order along with a reference number.
Prerequisites:
- Account in SMS gateway service
- Permission to access Workflow Rules
Procedure:
- Create an account in SMS gateway service.
- Configure webhook in Zoho Books.
- Set up the Workflow Rule.
- Test your webhook integration.
Step 1: Create an account in SMS gateway service
Create an account with an SMS gateway service of your choice. Selecting an SMS gateway may depend on a lot of factors including country, time zone, cost etc.
Once you create the account with the SMS gateway, provide the following details to configure the webhook,
- Invoice Number
- Invoice Date
- Invoice Amount
- Phone Number
You can purchase SMS credits and get the API details from the SMS provider.
Step 2: Configure webhook in Zoho Books

While setting up the webhook, specify the following details,
URL to Notify: http://api.smsgateway.com/http/sendmsg
Method: POST
Custom Parameters:
Select the following Fields while setting up user-defined parameters
- Username
- Password
- Auth Token/API ID
User Defined Parameters:
Under the Entity Parameters section, select Append Selected Parameters; Enter the parameter name and select Mobile Phone after selecting Contacts from the drop-down. Click on the check-box Add User defined Parameters, enter the Parameter Name(This field may vary depending on the service provider). Enter the message in the space provided and finally click Save.
Note: The code may vary based on the parameters required by the service provider.
Step 3: Setup Workflow Rule
Follow the steps below to create a Workflow Rule,
- Choose when to Trigger: When an invoice is Created.
- Immediate Action: Select the Type as Webhook from the drop-down and select any webhook from the adjacent box.
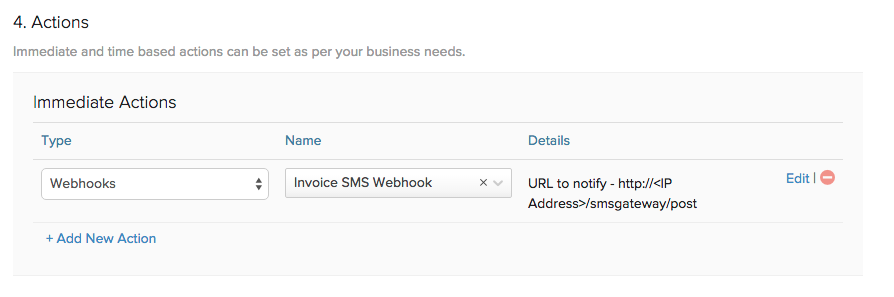
Finally, click on Save to save the Workflow Rule.
Step 4: Test your workflow
Test your workflow by creating a new invoice. Make sure that the Contact Name, Phone Number , Invoice Date and Invoice Amount fields are filled with correct information. Therefore, when an invoice is created, a workflow will be triggered to send an SMS thanking the customer and confirming the order.
Purpose: Creating a Potential in Zoho CRM upon raising a quote
A Potential must be created for a contact in Zoho CRM when a quote is raised for him/her in Zoho Books.
Scenario: Jonathan runs a company, ‘Connect-O’ that supplies computers and computer peripherals in large numbers to multinational corporations. One such organization has requested a quote for 50 high-end computers and 25 wireless printers. Jonathan uses Zoho CRM to manage customer data and engage with them while he uses Zoho Books to take care of his finances. He wishes to automatically create a potential in Zoho CRM as soon as a quote is raised in Zoho Books.
Prerequisite: Ensure you have an account set up in both Zoho CRM and Zoho Books
Procedure:
- Configure Webhook in Zoho Books.
- Create a quote.
- Set up Workflow Rule.
- Test your webhook integration.
Step 1: Configure Webhook
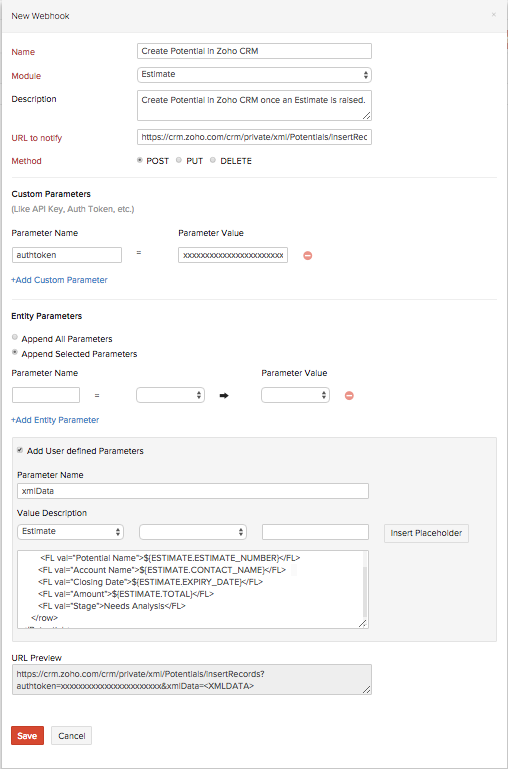
While setting up the webhook, specify the following details:
URL to Notify: https://crm.zoho.com/crm/private/xml/Potentials/insertRecords
Method: POST
Custom Parameters:
- authtoken: Specify authtoken from your Zoho CRM account. Login to Zoho Accounts to know your authtoken.
User Defined Parameters:
Specify the following fields from Zoho Books and Zoho CRM while setting up user-defined parameters:
Zoho Books:
- Quote Number
- Contact Name
- Expiry Date
- Quote Amount
Zoho CRM:
- Potential Name
- Account Name
- Closing Date
- Amount
\
<Potentials>
     <row no="1">
        <FL val="Potential Name">${QUOTE.QUOTE_NUMBER}</FL>
       <FL val="Account Name">${QUOTE.CONTACT_NAME}</FL>
       <FL val="Closing Date">${QUOTE.EXPIRY_DATE}</FL>
       <FL val="Amount">${QUOTE.TOTAL}</FL>
       <FL val="Stage">Needs Analysis</FL>
    </row>
</Potentials>
Notes:
- Ensure that the date format in your Zoho Books organization is in MM/dd/yyyy format. You can change the date format from the Organization Settings of your Zoho Books account.
- The list of fields mentioned above is not exhaustive. You may also use other fields pertaining to the Zoho Books and Zoho CRM modules. Remember to include a line in the XML string for every additional field.
Step 2: Create a Quote
Click here to learn how to create and send a quote in Zoho Books.
Step 3: Setup Workflow Rule
Follow the steps below to create a Workflow Rule,
- Choose when to Trigger: When a quote is Created.
- Immediate Action: Select the Type as Webhook from the drop-down and select any webhook from the adjacent box.
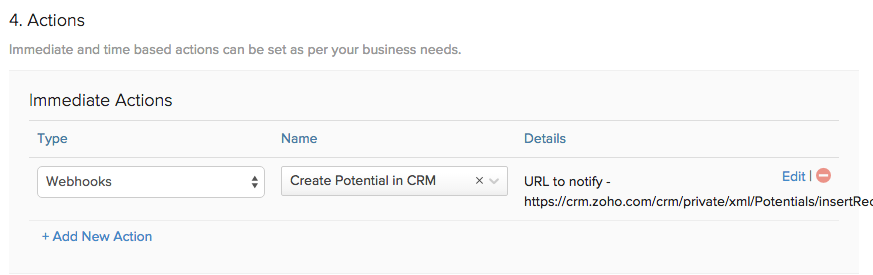
Finally, click on Save to save the Workflow Rule.
Step 4: Test your workflow
Test your workflow by creating a new quote. Make sure that the Zoho Books and Zoho CRM fields are filled with correct information.
Therefore, when a quote is created, a workflow will be triggered to create a Potential in Zoho CRM.
 Yes
No
Yes
No
 Thank you for your feedback!