Integrate Zoho Books with Zoho CRM
Integrate Zoho Books with Zoho CRM to bridge the gap between your sales and finance teams. This means that you can track and manage key CRM as well as accounting information in the same place.
Benefits of the Integration
- Capture all your customer information in one place, so that you can work with the same information at hand in both the apps.
- View your customer’s key accounting metrics such as sales details and outstanding receivables right from Zoho CRM.
- Sync your transactions seamlessly between both apps.
- Automate business workflows like creating an invoice when a potential is won.
ON THIS PAGE
Set up the Integration
Prerequisites:
- You can only integrate with a Zoho CRM organization that is on the Professional plan or above.
- If you’ve enabled multi-currency in Zoho CRM, ensure that the base currency matches the base currency in Zoho Books.
Insight: When you integrate, the following data from Zoho Books will be shared with Zoho CRM:
- Your organization name, email address, and your country.
- All your contacts’ details.
To set up the CRM integration from Zoho Books:
- Go to Settings on the top right corner of the page.
- Select Zoho Apps under Integrations.
- On the Zoho Apps page, click Connect next to Zoho CRM.

- Click Connect again in the integration details page under Zoho CRM Credentials.
- In the pop-up that follows, select the Zoho CRM organization you want to connect with Zoho Books from the dropdown next to the Organization field. If you have only one organization in Zoho CRM, the dropdown will be disabled.
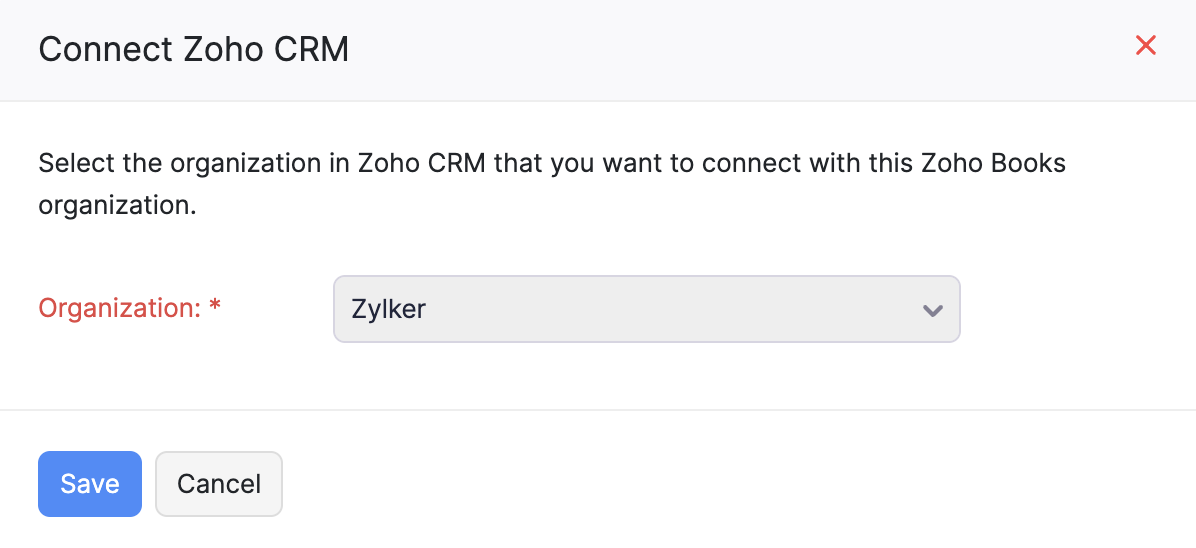
- Click Save to connect with Zoho CRM.
Insight:A ZSC Key is unique to a particular Zoho product, and can be used to access your data in that product from other Zoho products. To generate this key, click on the link which reads ‘Click here to generate the ZSC key of Zoho CRM’. This will take you to Zoho CRM from where you can get this key.
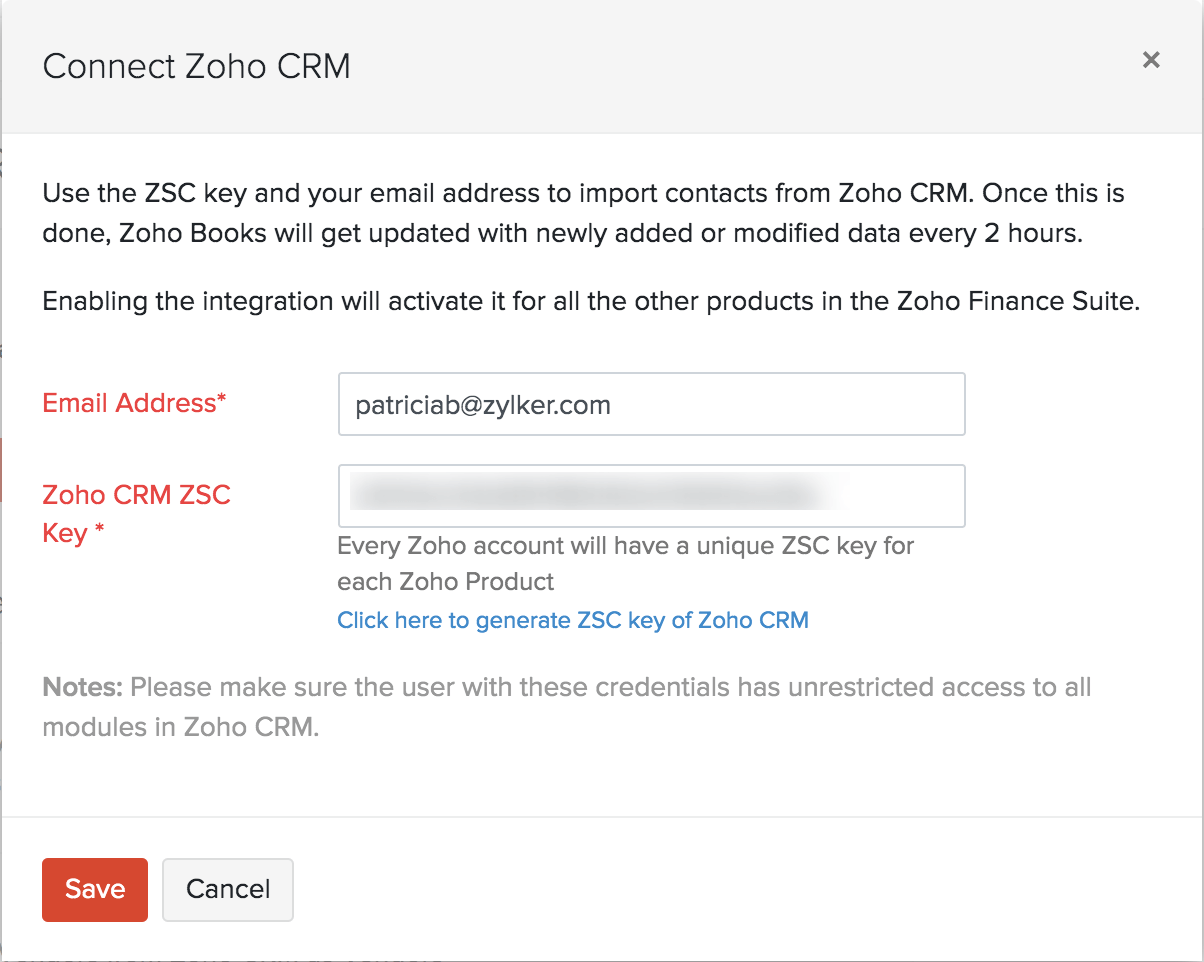
Note: Once you integrate a Zoho Books organization with a Zoho CRM organization, a two-way sync will be established, which means that data will be fetched from Zoho CRM and vice-versa.
If you want to integrate multiple Zoho Books organizations with a Zoho CRM organization, write to us at support@zohobooks.com and we will help you set up the integration. However, it will be a one-way sync, which means that data will be fetched only from Zoho CRM into Zoho Books and not vice-versa.
Pro Tip: If you’re connecting to a Zoho CRM account where you’re not an admin user, you can follow the same process as above after obtaining the necessary email address and ZSC key from the admin of that Zoho CRM account.
Configure the Modules to be Synced
After setting up the integration successfully, you can configure the modules that should be synced between Zoho Books and Zoho CRM.
To do this:
- Go to Settings on the top right corner of the page.
- Select Zoho Apps under Integrations.
- On the Zoho Apps page, click Show Details next to Zoho CRM.
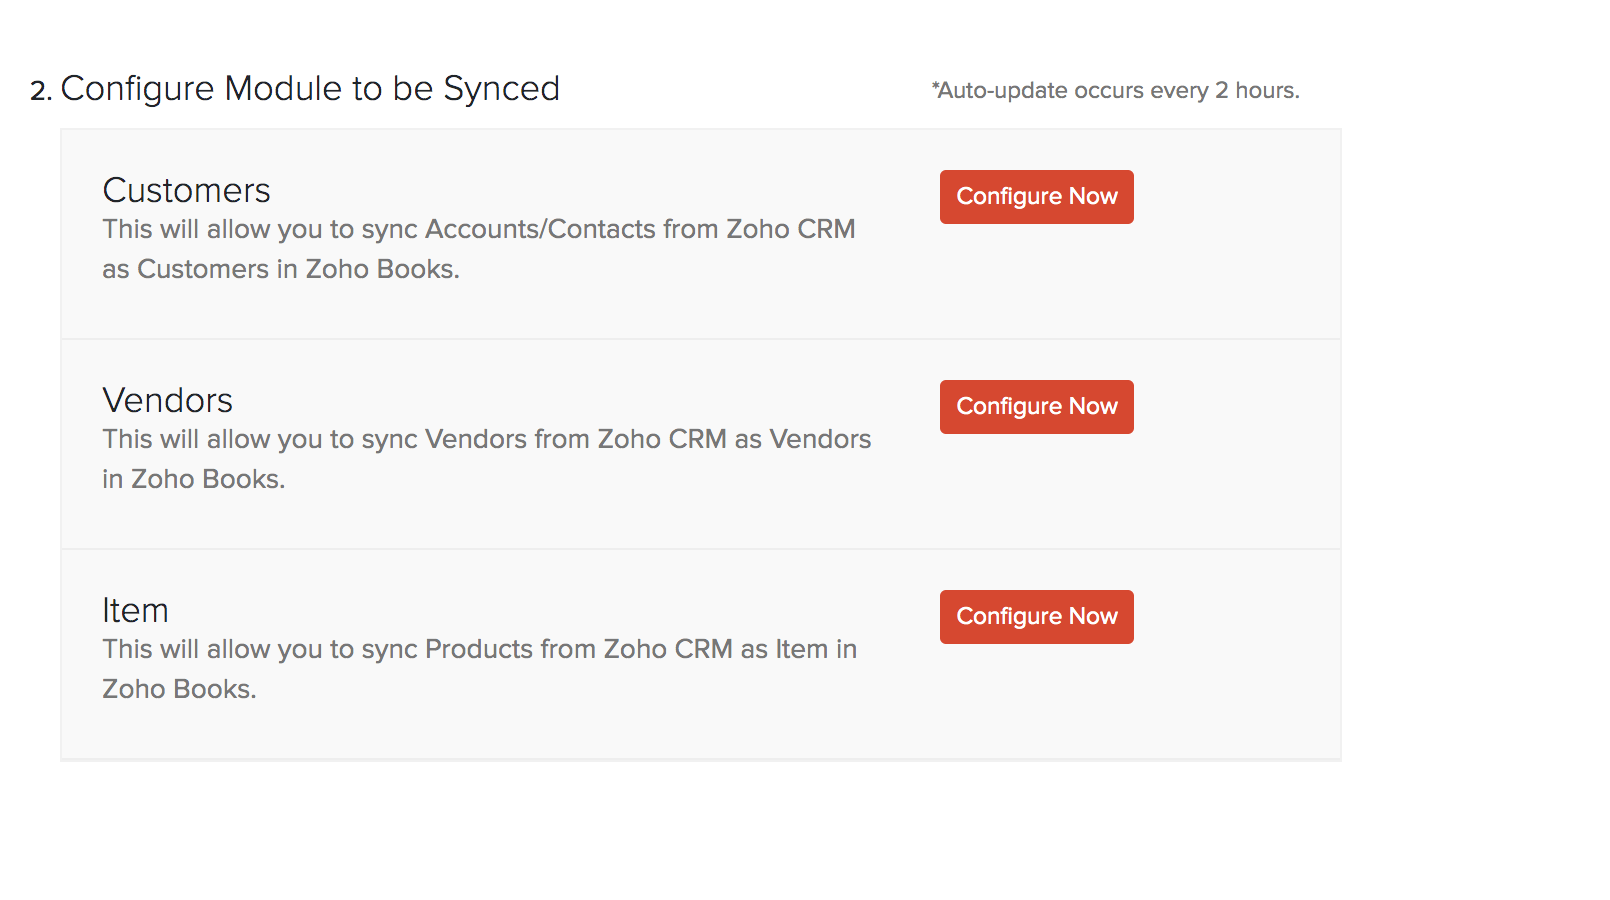
- In the Configure Module to be Synced section, click Configure Now next to the corresponding modules.
You can sync customers, vendors, and items.
Sync Customers
Syncing your customers in Zoho Books with the accounts/contacts in Zoho CRM is a five step process:
Step 1: Select the module to be synced
Choose the module in Zoho CRM that you want to sync with Zoho Books:
- Accounts: The Accounts in Zoho CRM will be synced as Customers in Zoho Books with their Customer Type as Business.
Note: The Contacts in Zoho CRM will not be synced to Zoho Books.
- Contacts: The Contacts in Zoho CRM will be synced as Customers in Zoho Books with their Customer Type as Individual.
Note: The Accounts in Zoho CRM will not be synced to Zoho Books.
- Accounts and their Contacts: The Accounts and their Associated Contacts in Zoho CRM will be synced as Customers and their Contact Persons in Zoho Books. The Contacts in Zoho CRM that are not associated with an Account will not be synced. To sync these contacts, check the Include contacts that are not associated to any accounts in Zoho CRM option. These contacts will be synced as Customers in Zoho Books with their Customer Type as Individual.
If you choose the extent of sync as both ways, then a “Business” customer in Zoho Books will be synced with the Accounts module of Zoho CRM, and an “Individual” customer in Zoho Books will be synced with the Contacts module of Zoho CRM.

Step 2: Select the extent of sync
Choose how information flows between the two apps:
- Fetch from CRM: Only the records from Zoho CRM will be fetched into Zoho Books. No Zoho Books data will be available in Zoho CRM. However, data that’s already been pushed to Zoho CRM will not be affected.
- Sync both ways: The records from Zoho CRM will be fetched into Zoho Books, and vice versa. The CRM records will be fetched first.

Step 3: Handle duplicate records
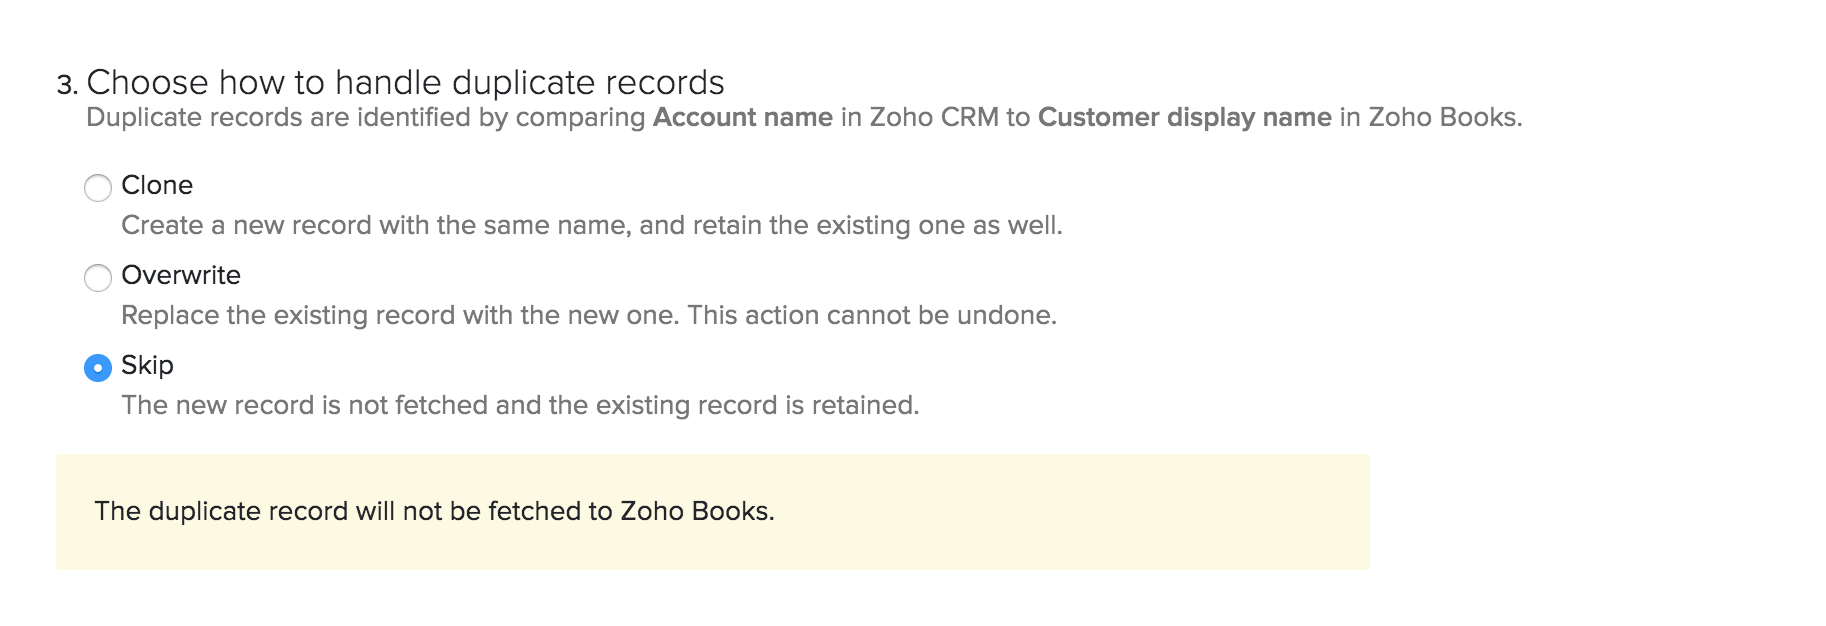
When syncing data between both the apps, there might be a record in Zoho CRM which is already present in Zoho Books. Duplicate records are identified by comparing Account name in Zoho CRM to Customer Display Name in Zoho Books. Choose how you want to handle such duplicate records:
- Clone: The duplicate record will be cloned while syncing,i.e. both the original and the new record will be available.
- Overwrite: The duplicate record will overwrite the existing record. That is, when there are duplicates, the Zoho CRM data will replace existing Zoho Books data.
- Skip: The duplicate record will not be synced, and the existing record will be retained.
Step 4: Select a view to be synced
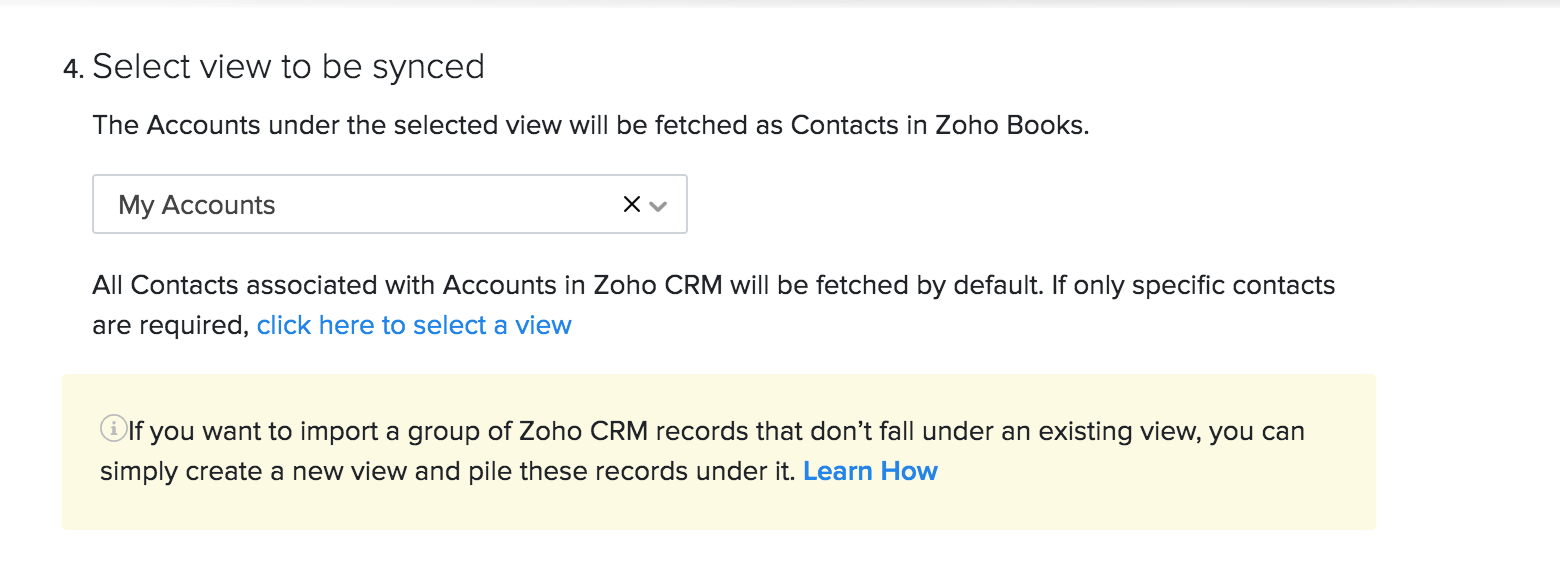
If you want to push only specific records of your Zoho CRM account, you can create a view and choose to sync only that view into Zoho Books. A view in Zoho CRM is a collection of similar records (based on a specified criteria) listed together. Some of the predefined views such as All Accounts, My Accounts, Recently Created Accounts, will be listed by default when syncing.
Pro Tip: Learn how you can create a view in Zoho CRM to import only select accounts/contacts into Zoho Books. You can also read more about views from Zoho CRM’s help resource.
When you select the module (Accounts, Contacts, or Both) to be synced, a list of the corresponding views available in Zoho CRM for that module (both predefined and user created) will be listed under the dropdown.
If you had chosen to sync the module ‘Accounts & their Contacts’, you have the option to select the Account view as well as the Contact view required to be synced. You can choose to sync only specific contacts associated with the selected account view.
Step 5: Map fields
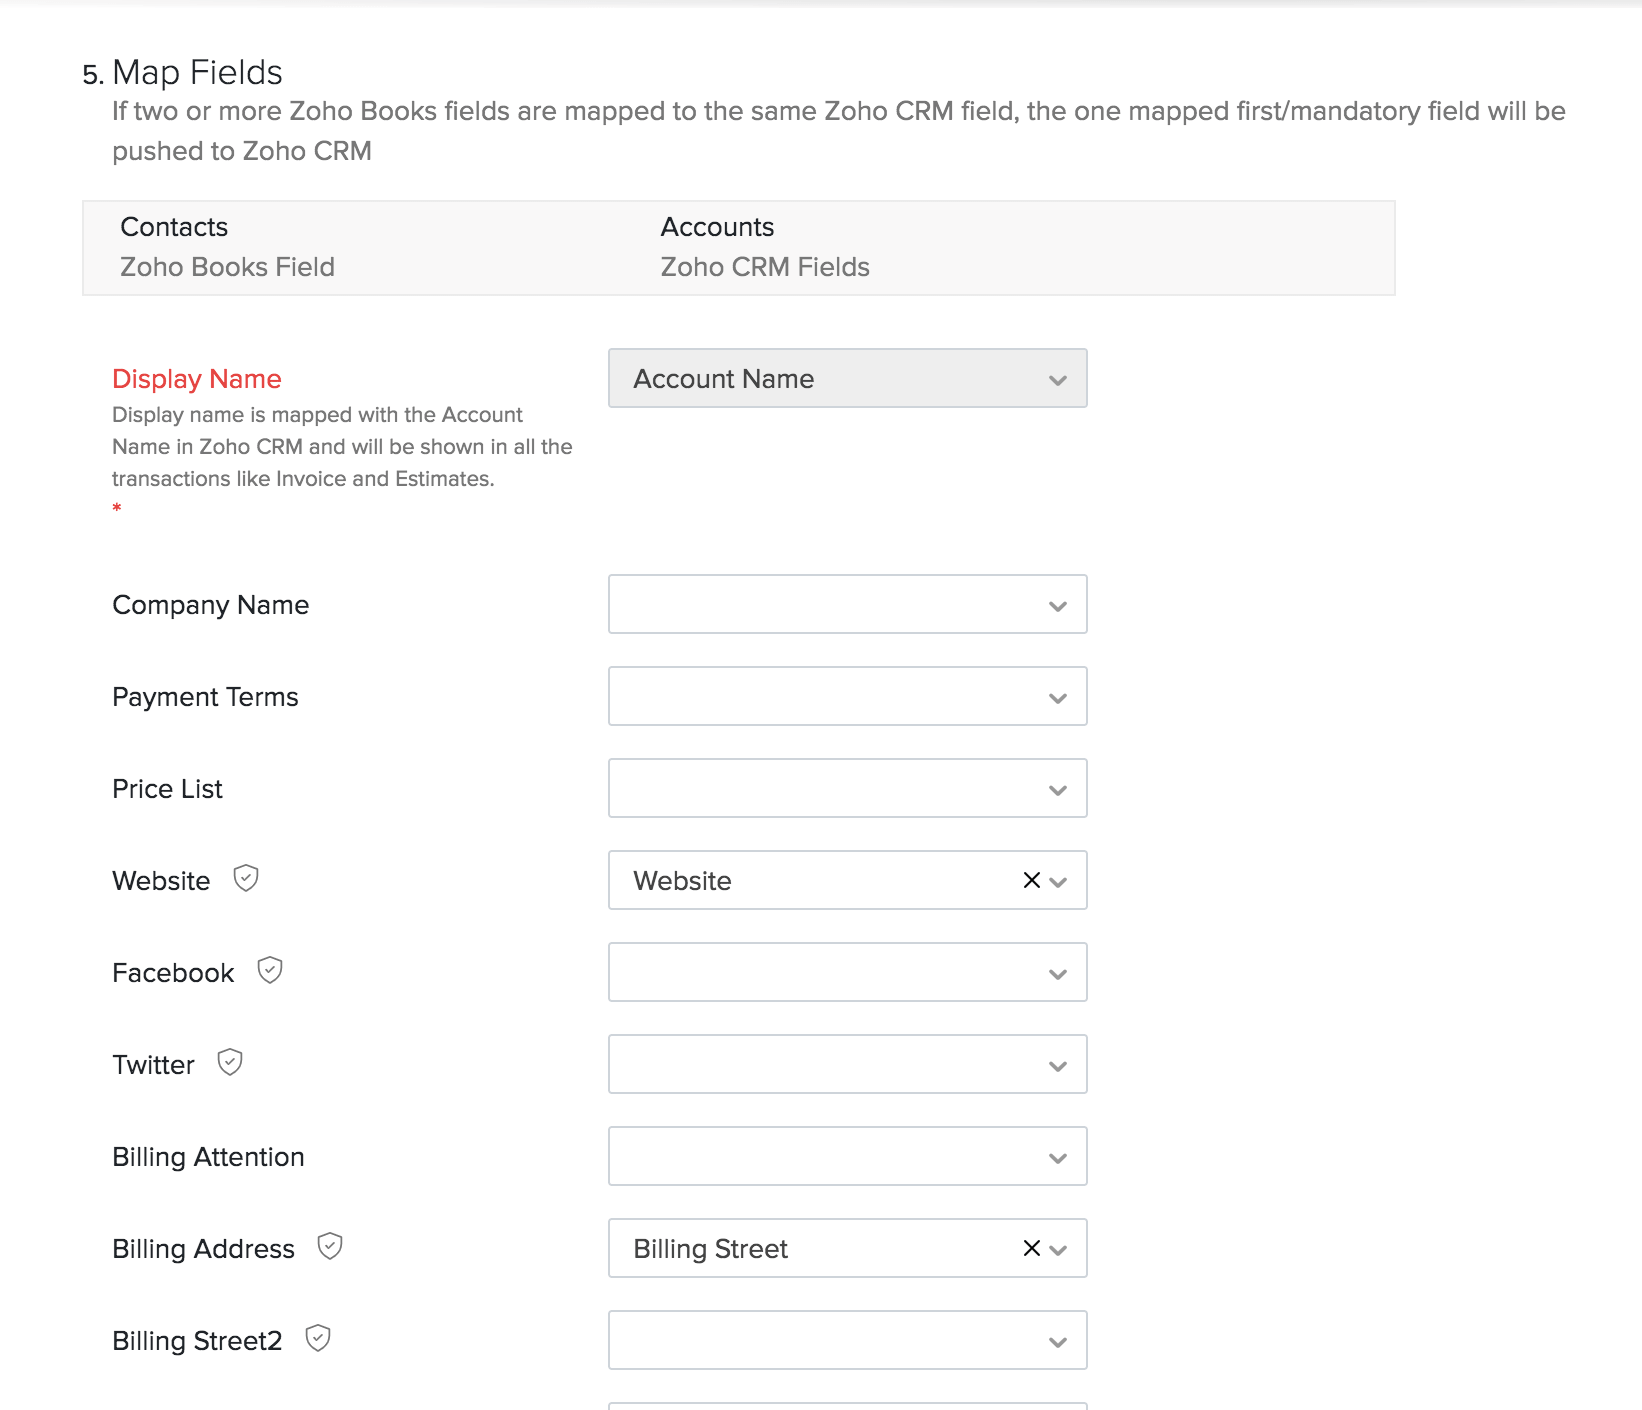
Next, you can map the fields in Zoho Books with the right field in your Zoho CRM organization. This mapping ensures that when Zoho CRM records are synced as Zoho Books entities, all the fields match perfectly when viewed in Zoho Books. A few of the basic fields will be mapped by default, while you can map the rest manually.
If you have certain fields in Zoho CRM that can’t be mapped to any of the default fields in Zoho Books, you will have to create custom fields in Zoho Books first. These custom fields will then be displayed when you map the fields.
Insight: If you have enabled multi-currency in Zoho CRM, then ensure that the base currency is the same as that in Zoho Books, before mapping the fields.
Once you have completed all these steps, you can click Save and Sync to start the sync process. Click Save and Sync Later if you wish to only save your preferences now and sync them later.
Sync Vendors
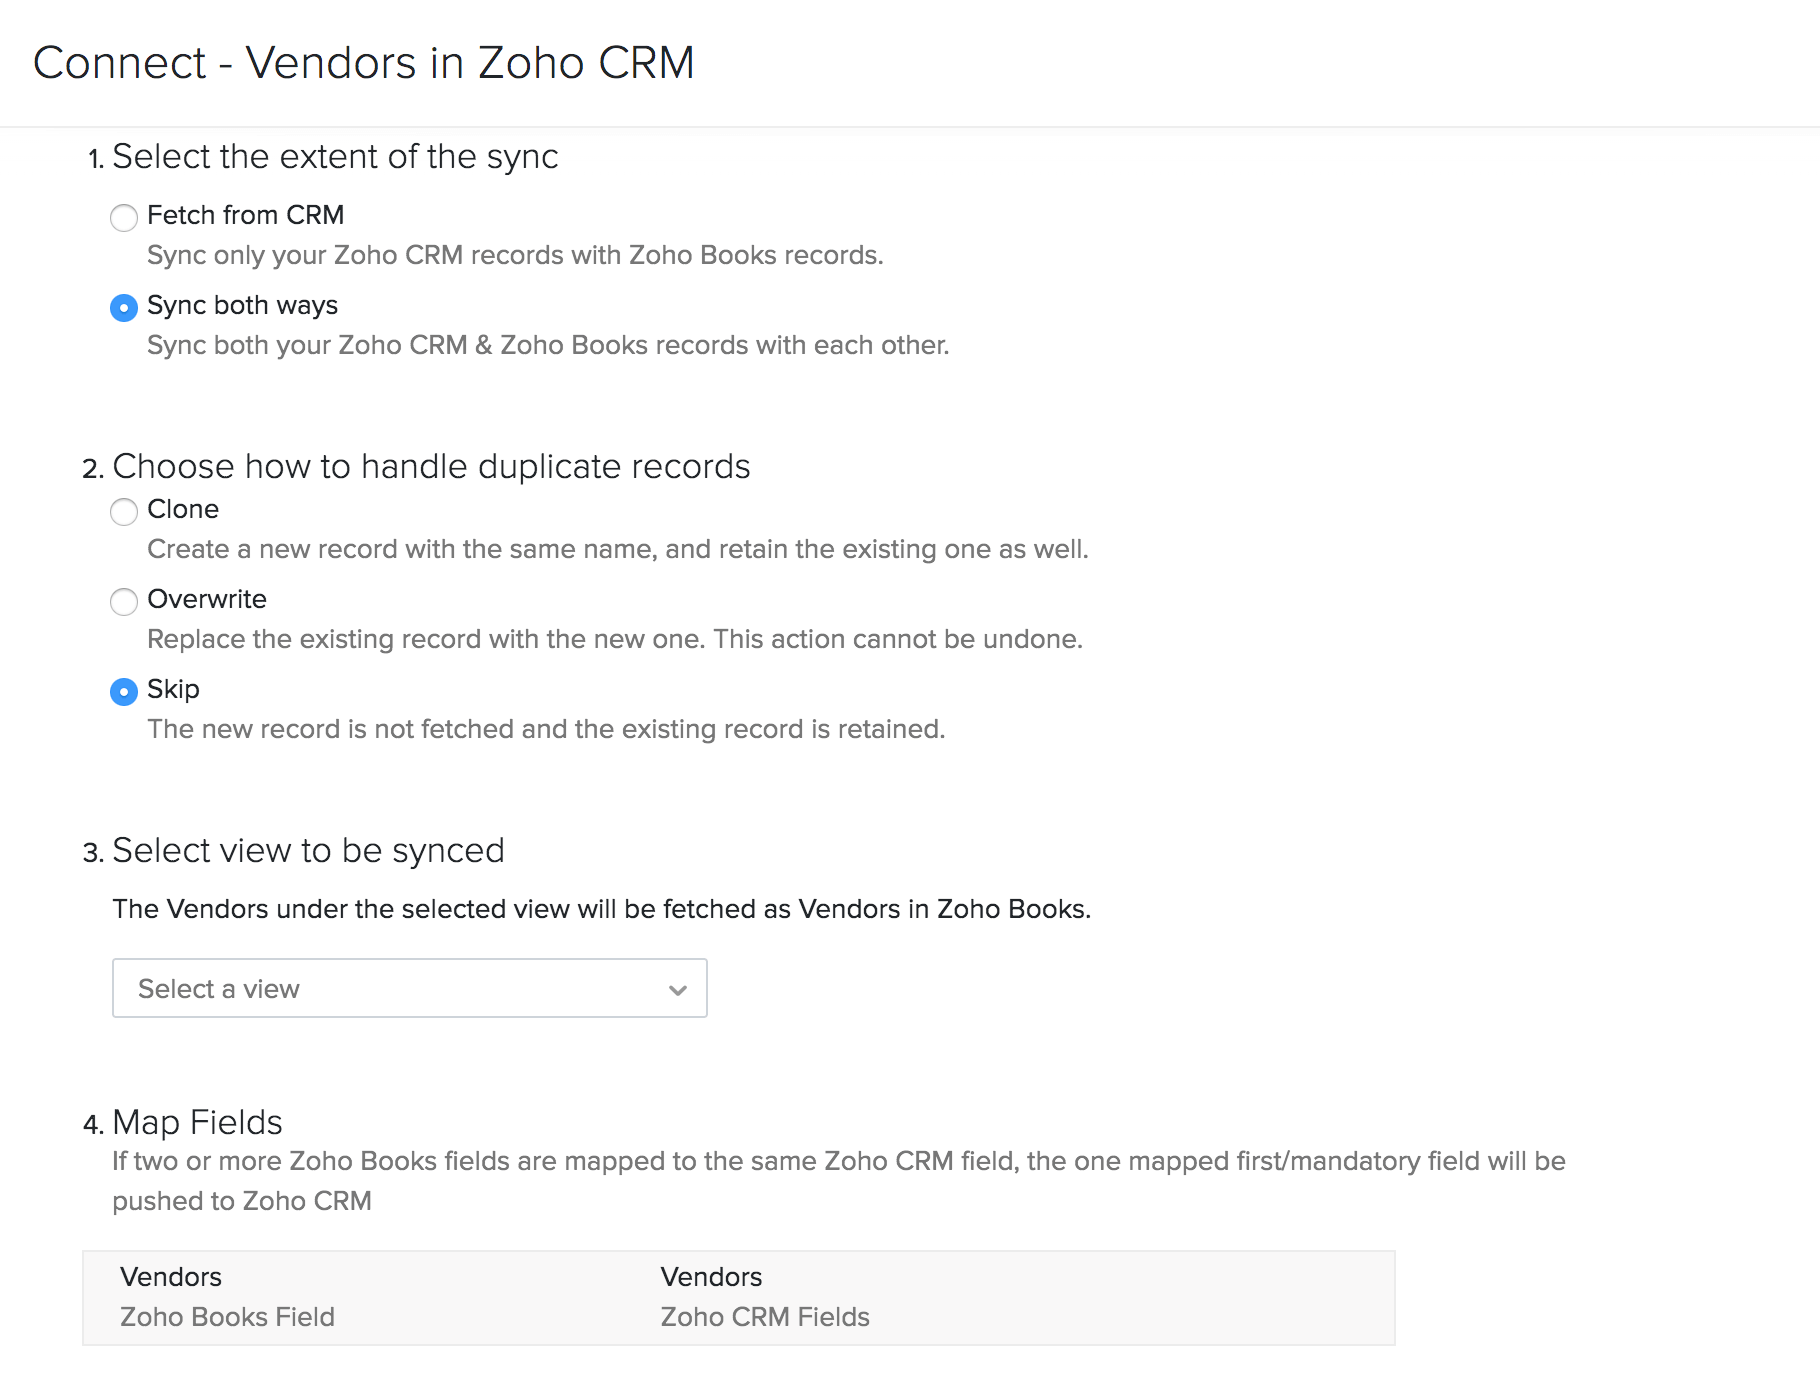
Syncing vendors in Zoho CRM to vendors in Zoho Books is similar to how you synced customers. It is a four step process which involves:
- Selecting the extent of sync: Choose if you only want to import the vendors from Zoho CRM, or want the sync to take place both ways.
- Handling duplicate records: Choose if you want to clone, overwrite, or skip duplicate records while syncing.
- Selecting the view to be synced: To sync only specific vendors from Zoho CRM, you can select the view in Zoho CRM that you want to sync with Zoho Books.
- Mapping fields: Map the fields for vendors in Zoho Books with their corresponding fields in Zoho CRM. If needed, you can create custom fields in Zoho Books to match with Zoho CRM.
Once you have completed all these steps, you can click Save and Sync to start the sync process. Click Save and Sync Later if you wish only to save your preferences now and sync them later.
Sync Items
You can sync your items in Zoho Books with the products in Zoho CRM. It is a four step process, similar to how you synced customers or vendors:
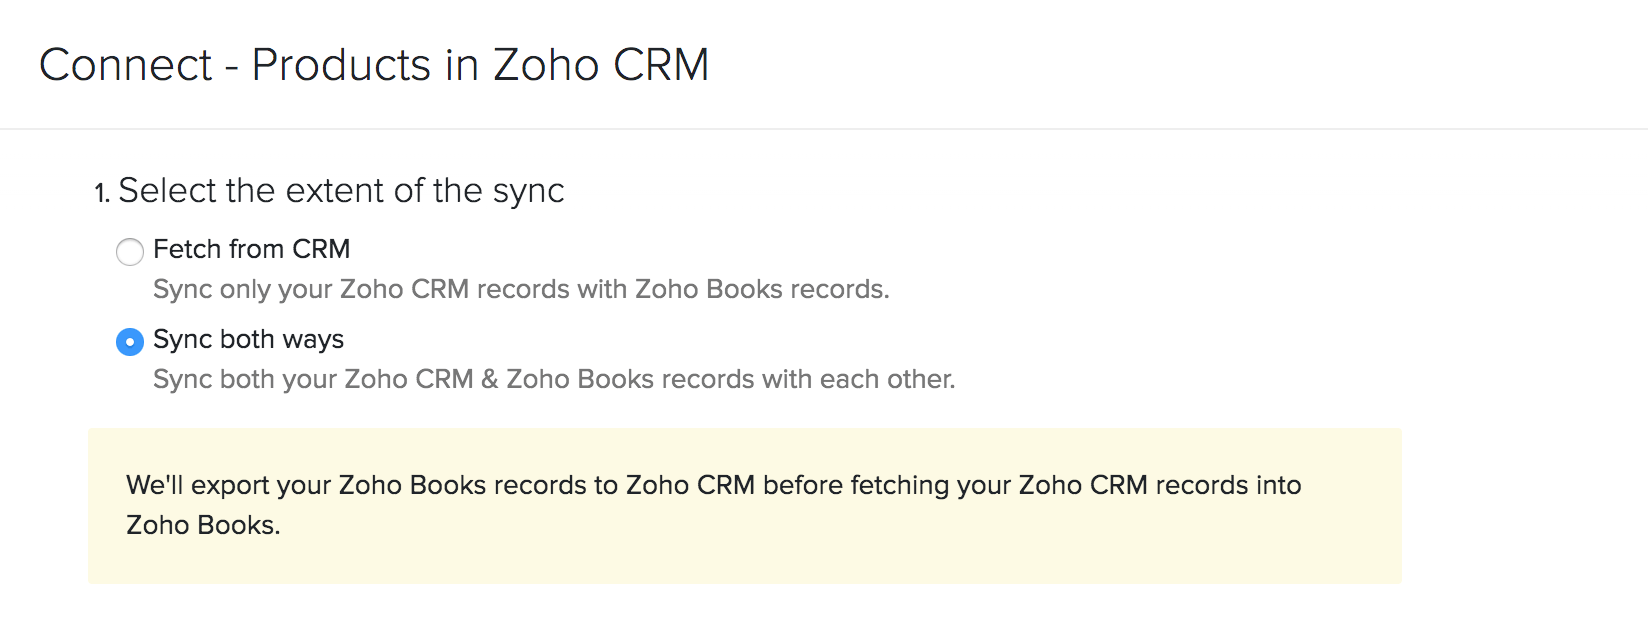
Step 1: Select the extent of sync
Choose how information flows between the two apps:
- Fetch from CRM: Only the products in Zoho CRM will be imported as items in Zoho Books. However, no Zoho Books data will be exported to Zoho CRM.
- Sync both ways: Items from Zoho Books will be exported as products to Zoho CRM and vice versa. The records from Zoho Books will be synced first.
Step 2: Handle duplicate records
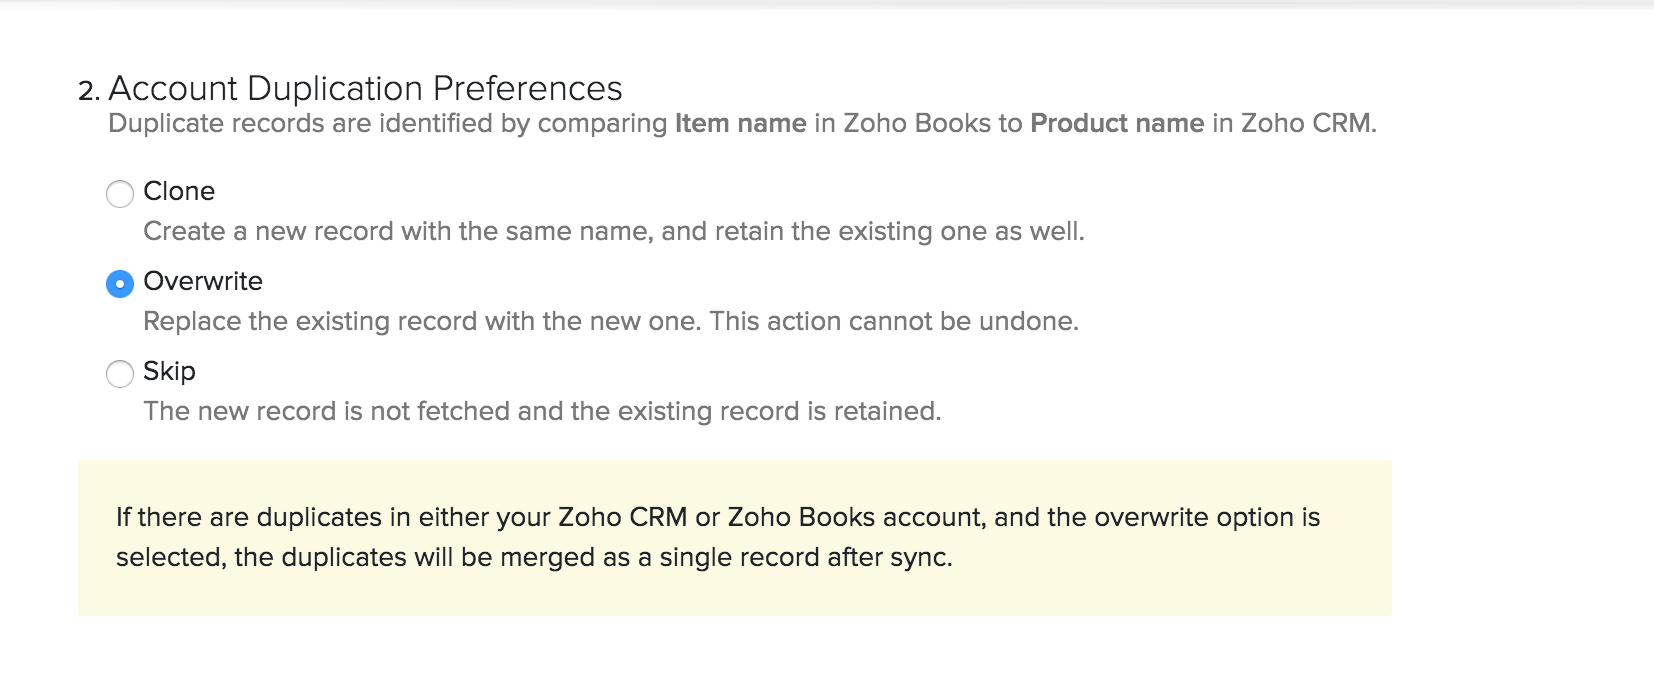
When syncing data between both the apps, an item in Zoho Books might have the same name as a product in Zoho CRM. In such cases, this particular record is said to be duplicated during the sync.
Insight: If you had chosen to sync both ways in the previous step, Zoho Books items will be pushed to Zoho CRM first and hence, duplicate records will fall in Zoho CRM. If it is a one way sync, the duplicate records will be in Zoho Books.
You can choose what you want to do with such duplicate records:
- Clone: The duplicate record will be cloned while syncing,i.e., both the original and the new record will be available.
- Overwrite: The duplicate record will overwrite the existing record. When there are duplicate records, the Zoho Books record will replace the existing Zoho CRM record.
- Skip: The duplicate record will not be synced, and the existing record will be retained.
Step 3: Select a view to be synced
If you want to push only specific Zoho CRM products, you can create a view and choose to sync only that view into Zoho Books. A view in Zoho CRM is a collection of similar records (based on a specified criteria) listed together. Visit their help resource to learn how to create a view in Zoho CRM.

Step 4: Map fields
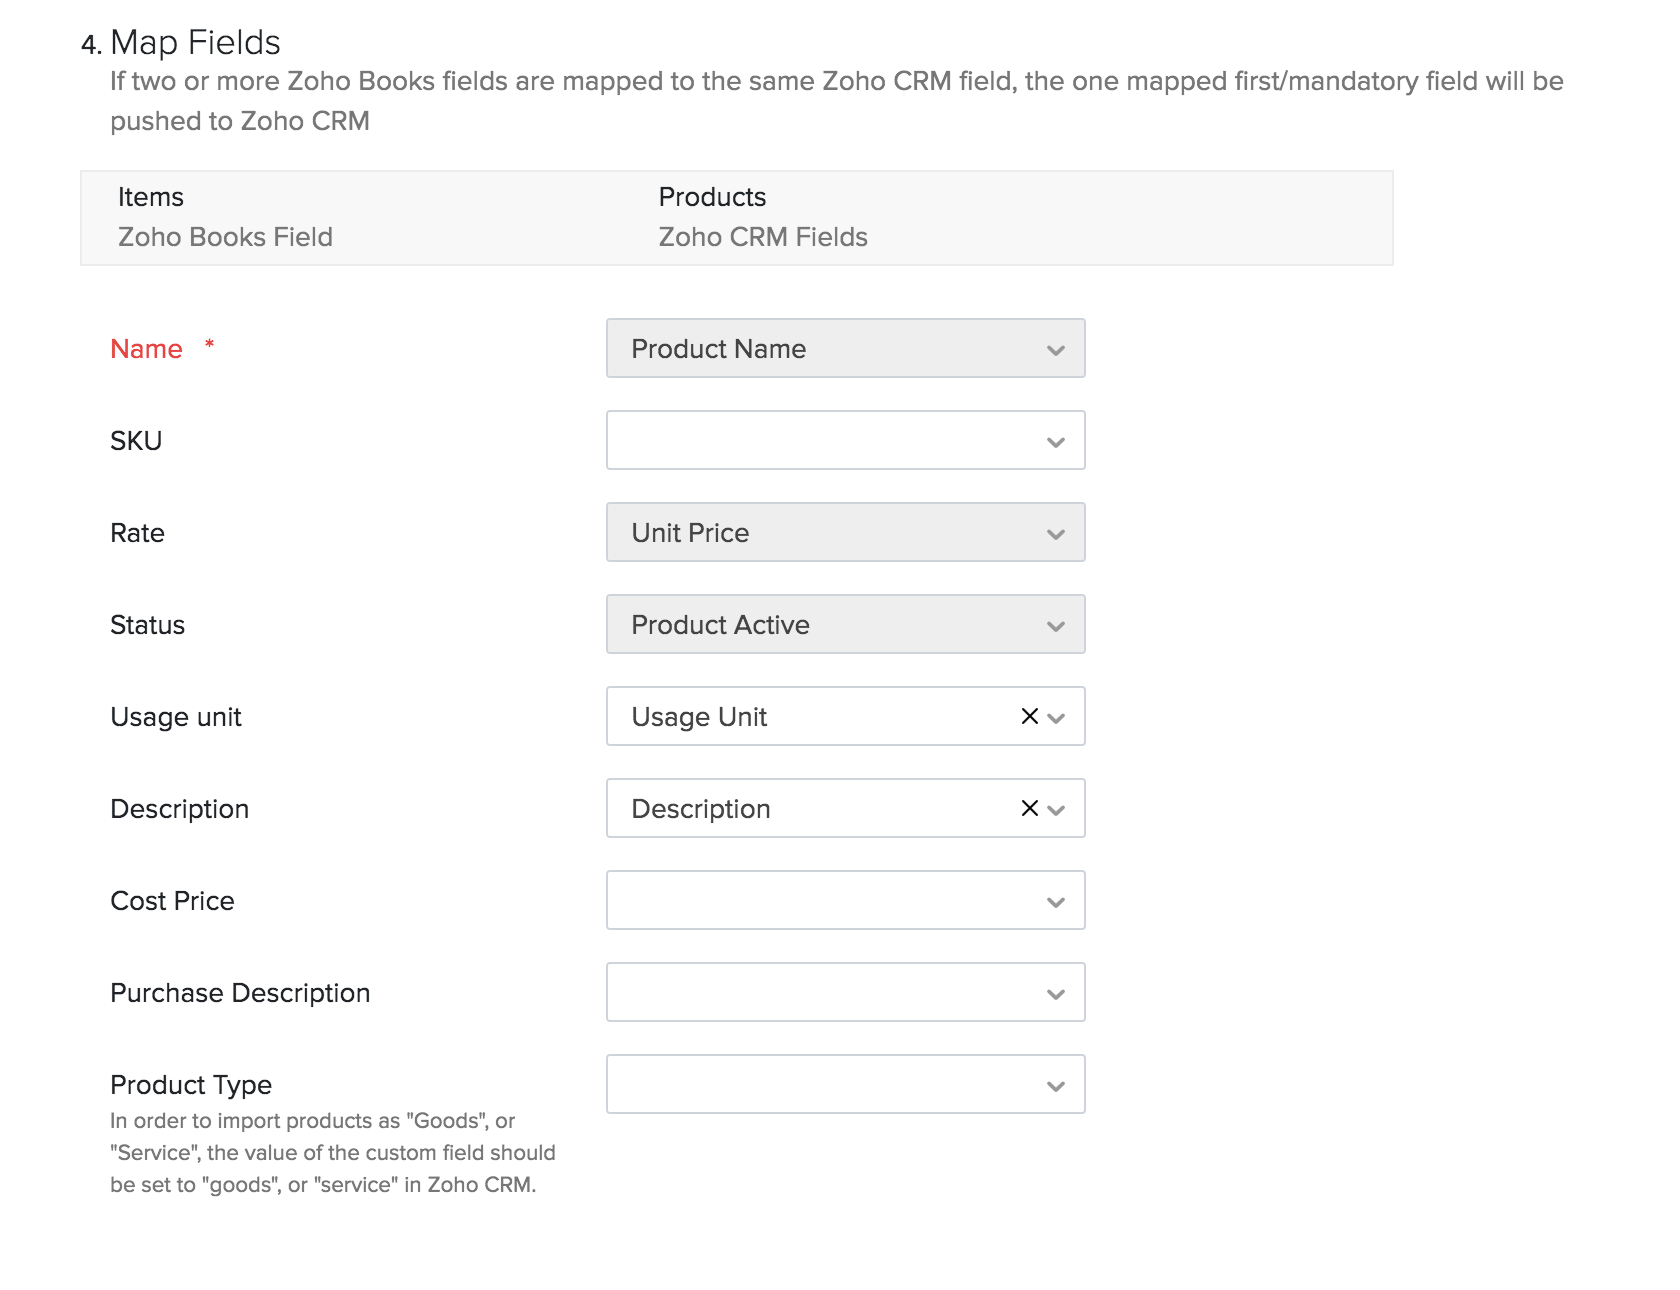
Next, you can map an item’s fields in Zoho Books with the right field in your Zoho CRM account. A few of the basic fields will be mapped by default, while you can map the rest manually.
Insight: Unlike Zoho Books, the products in Zoho CRM are not categorized based on the item type. If you want to classify the products fetched from CRM as goods and services, you have to create a custom field for the products in Zoho CRM with the values as “Goods” and “Services”. Then, map this custom field with the Product Type field of Zoho Books.
Once you have completed all these steps, you can click Save and Sync to start the sync process. Click Save and Sync Later if you wish only to save your preferences now and sync them later.
Sync Transaction Modules
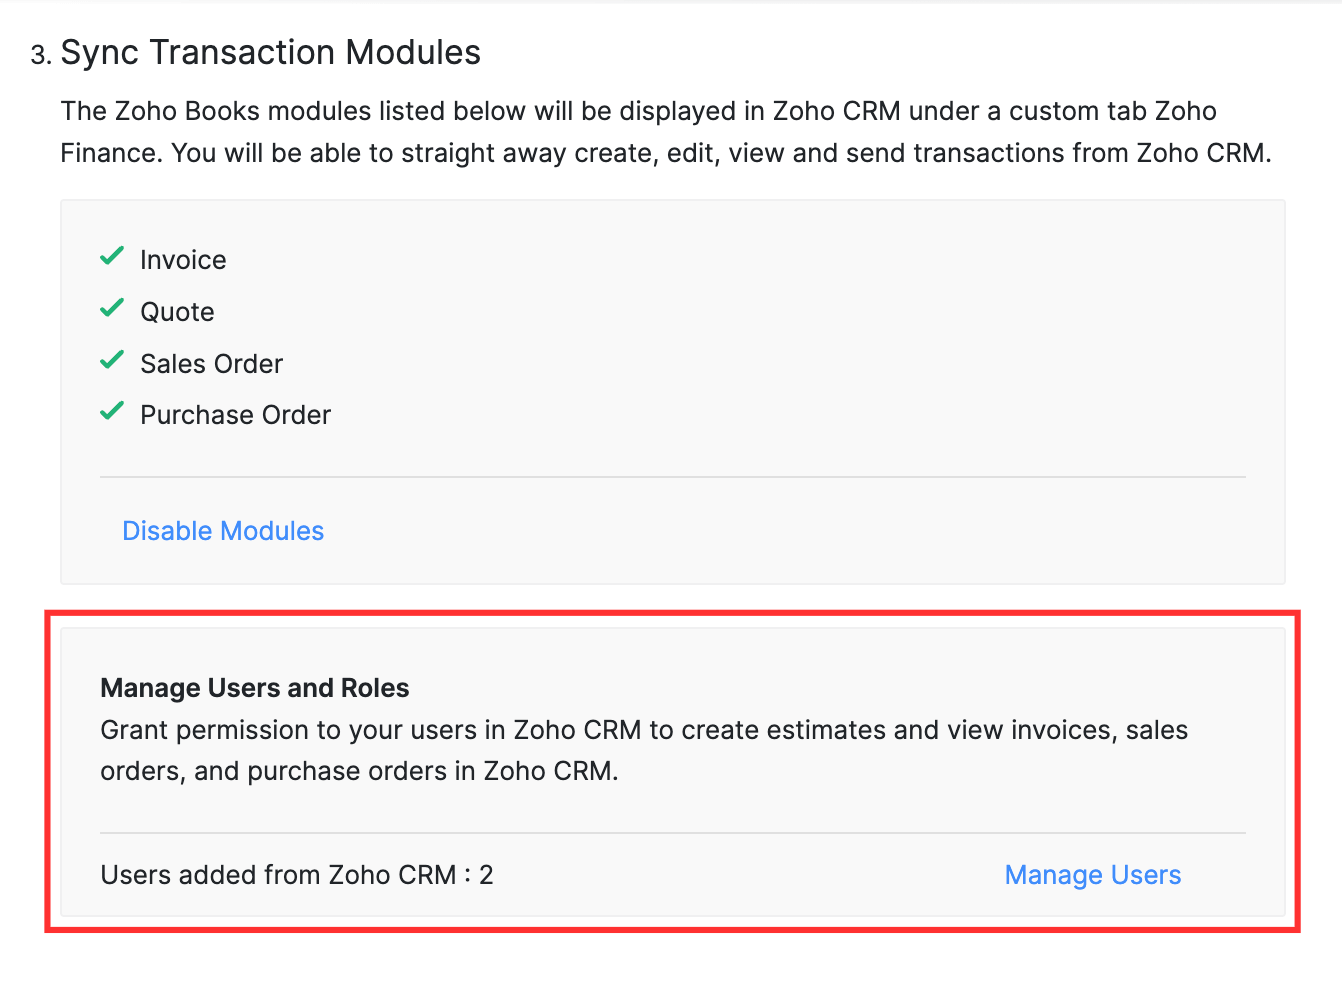
Once you have synced your customers, vendors, and items, you can start syncing the transaction modules between Zoho Books and Zoho CRM. The modules in Zoho Books such as invoices, quotes, sales orders, and purchase orders can be accessed from Zoho CRM. To enable this:
- Go to Settings on the top right corner of the page.
- Select Zoho Apps under Integrations.
- On the Zoho Apps page, click Show Details next to Zoho CRM.
- In the SyncTransaction Modules section, click Enable.
- Click Confirm in the popup that follows.

Now, these modules can be accessed from the Zoho Finance module inside Zoho CRM. Only the transactions created in this module in Zoho CRM will be fetched to Zoho Books during syncing.
Insight: If you have created custom fields for these transactions in Zoho Books, they will be available in Zoho CRM as well.
Manage Users and Roles
Prerequisite: The Manage Users and Roles section will be enabled only when you’ve enabled all the modules in the Sync Transaction Modules section.
Now that you’ve synced the transaction modules, you can grant permission to the users in Zoho CRM to create quotes and sales orders, as well as view invoices and purchase orders in the Zoho Books section of Zoho CRM. To do this:
- Go to Settings.
- Select Zoho Apps under Integrations and Marketplace.
- In the Zoho Apps page, select Show Details next to Zoho CRM.
- In the Manage Users and Roles section, click Manage Users.
- In the pop-up that follows, you can view the list of users from Zoho CRM. You can filter them by roles as well.
- Selecting the users or the roles here will give them the permission to make changes and view the transactions from the Zoho Books section in Zoho CRM.
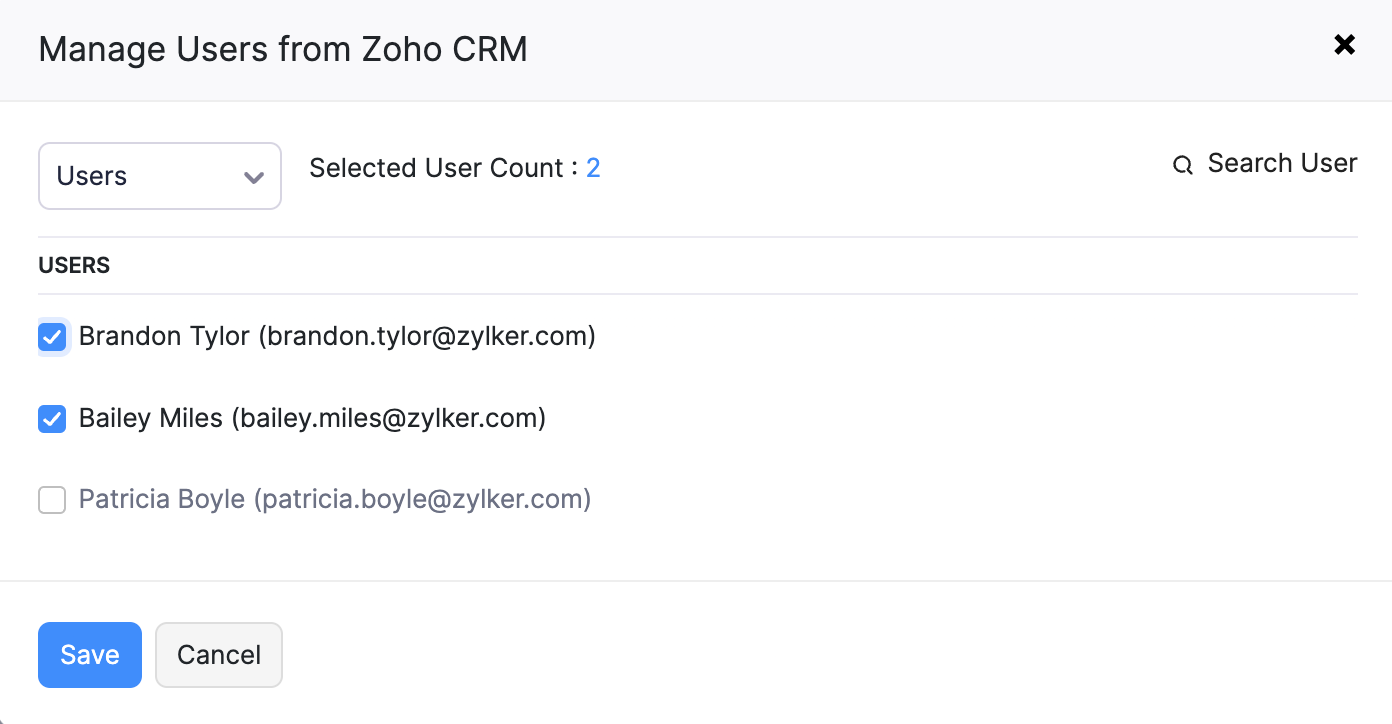
- Click Save.
Notes
- These users will be active and they will only be able to view the data in Zoho CRM. They will not have access to view the data in Zoho Books.
- You can add up to 1000 users to the Integration User (Zoho CRM) role. These users will not be included in your Zoho Books users add-on if any.
You can view the list of users who have access to the Zoho Books section in Zoho CRM from the Users and Roles section.
- Go to Settings on the top right corner of the page.
- Select Users under Users and Roles.
- You can view the list of CRM users who’ll have create and view access to the Zoho Books section in Zoho CRM. Also, you can view the total users in the Integration User (Zoho CRM) role by clicking Users Added at the top.

Users of this role will not be able to access Zoho Books. If they try to access Zoho Books, the following screen will be displayed.
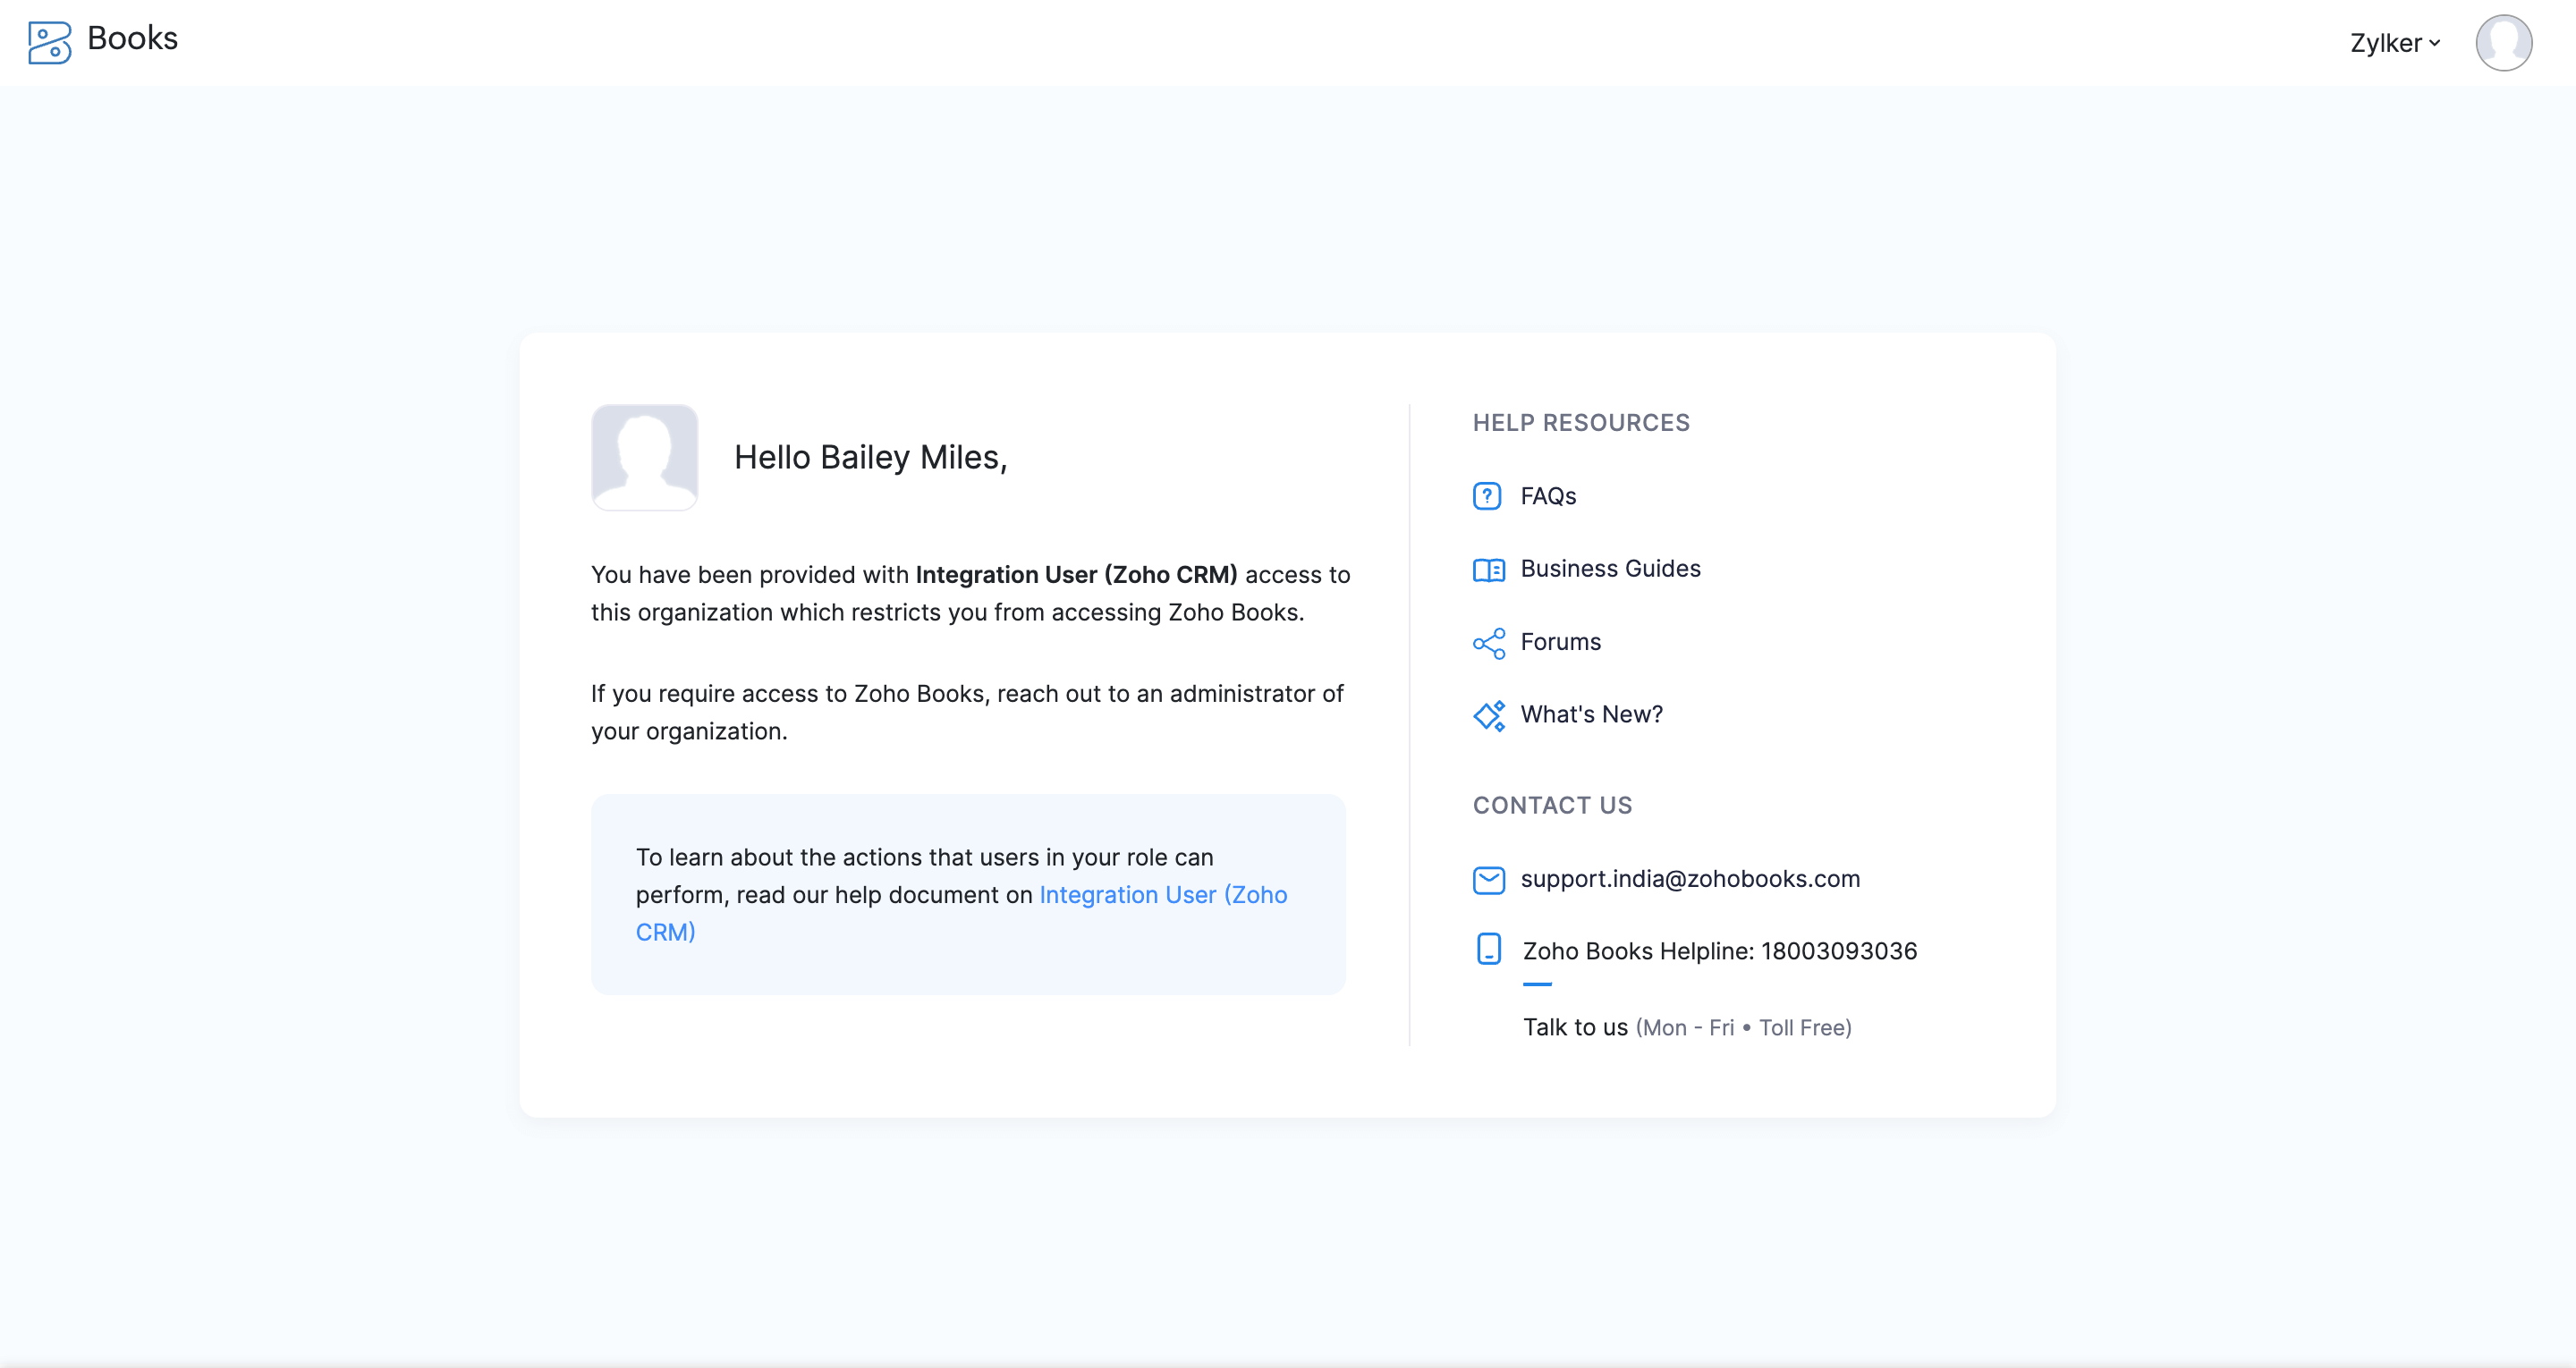
You cannot delete the users of the Integration User (Zoho CRM) role from the Users page in Settings. However, you can delete them from the Zoho CRM integration page. Here’s how:
- Go to Settings on the top right corner of the page.
- Select Zoho Apps under Integrations.
- In the Zoho Apps page, select Show Details next to Zoho CRM.
- In the Manage Users and Roles section, click Manage Users.
- In the pop-up that follows, uncheck to delete the users.
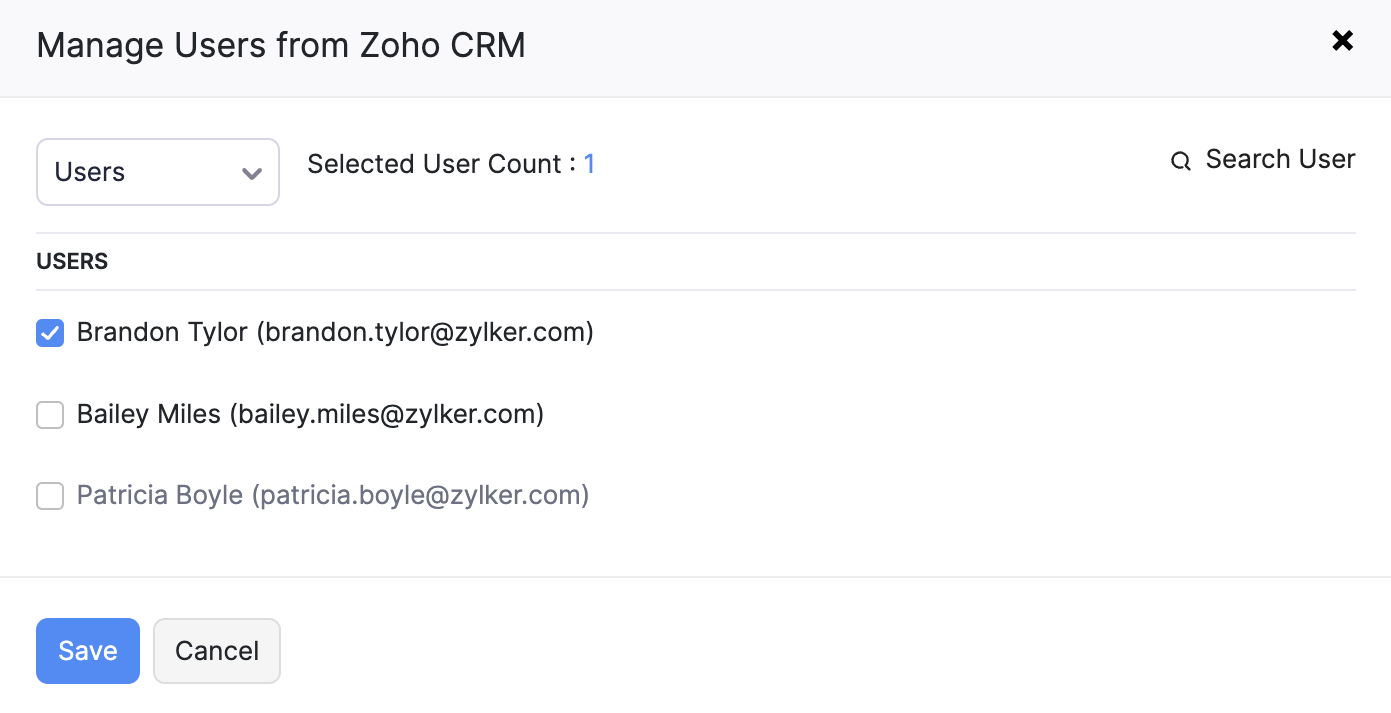
- Click Save.
The users that you’ve unchecked will be deleted from your Zoho Books organization.
Automate Based on the Deal/Potential’s Stage
While setting up the integration, you can configure triggers to automate a few tasks in Zoho Books based on the deal/potential’s stage in Zoho CRM. For example, by setting up a trigger, you can opt to have a quote created automatically in Zoho Books each time you create a potential in Zoho CRM.
Prerequisite: If Accounts & their Contacts or only Accounts is selected for syncing customers, a potential in Zoho CRM should be associated with an Account for the trigger to be automated. Similarly, if only Contacts are selected, a potential should be associated with a Contact in Zoho CRM.
To set up triggers:
- Go to Settings on the top right corner of the page.
- Select Zoho Apps under Integrations.
- On the Zoho Apps page, click Show Details next to Zoho CRM.
- In the Automate Based on Deal/Potential’s Stage section, click Change Preference.

- Select whether you want to automate Quote or Invoice.
Quote
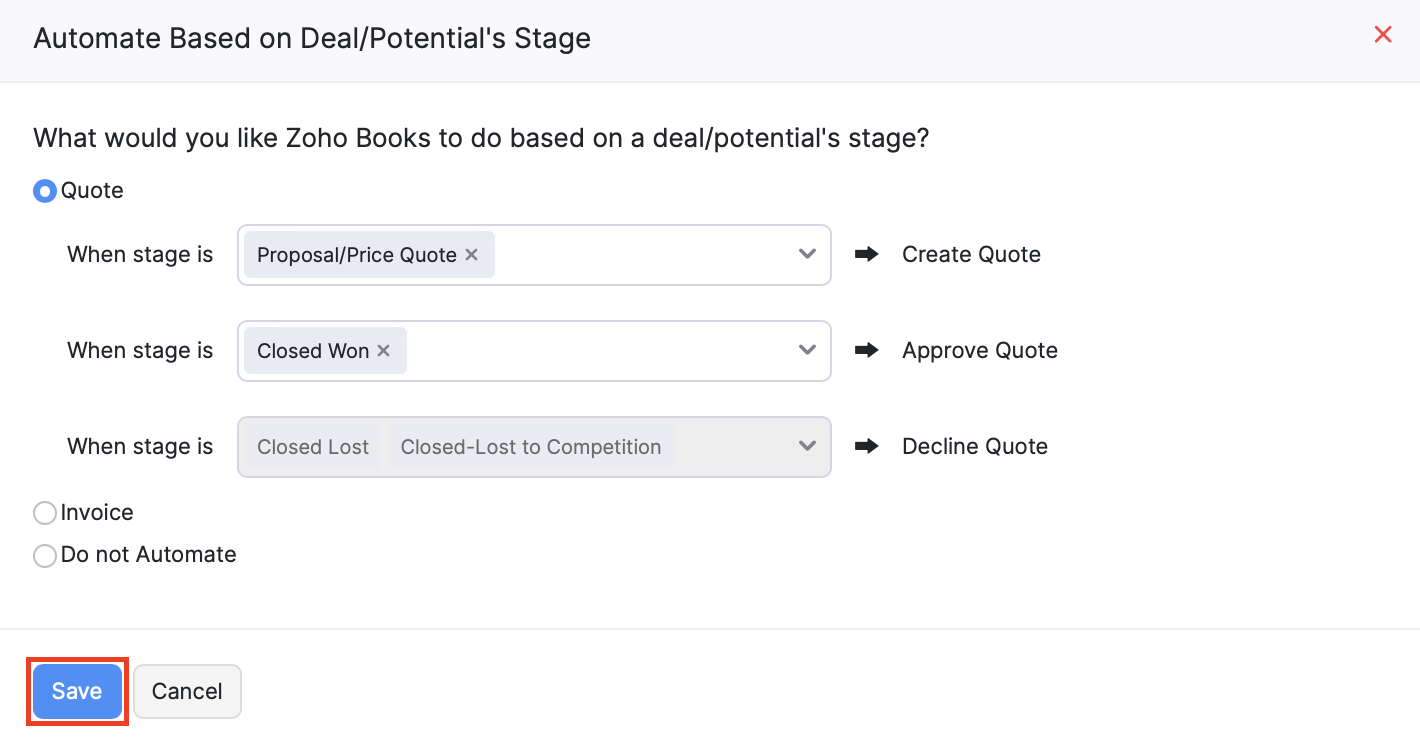
You can choose the stages at which a quote should be created or accepted:
-
Create Quote: Choose the stage at which a quote should be created automatically in Zoho Books. The quote will be created in the draft status.
-
Approve Quote: Choose the stage at which a quote should be approved automatically in Zoho Books. Depending upon your quote’s preference, an invoice will be created in Zoho Books.
-
Decline Quote: Whenever a deal is lost and its status in Zoho CRM changes to closed lost, the corresponding quote for it will be marked as declined.
Invoice
You can also automate invoices in Zoho Books based on the deal’s stage in Zoho CRM. When you choose this option, an invoice will be created in Zoho Books whenever a deal is won, and the corresponding invoice will be voided when the deal is lost.
Whenever you set up a trigger, an invoice or quote will be created in Zoho Books with the following details fetched from Zoho CRM.
| Zoho Books Field | Zoho Books CRM |
|---|---|
| Customer Name | Account or Contact Name |
| Customer Address | Account’s or Contact’s Address |
| Sales Person | Deal Owner |
| Item Name | Deal Name |
| Item Description | Deal Description |
| Item Rate | Deal Amount |
The invoice or quote created will also be available under the Zoho Finance module of that particular deal in Zoho CRM.
Insight: A deal being won or lost in Zoho CRM depends on the deal’s stage-probability mapping. For example, let’s assume that a trigger is set up to create invoices automatically. Now, if the deal’s stage is marked as closed won in Zoho CRM, the probability changes to 100 and an invoice is created in Zoho Books. If the deal is then edited to change the stage to closed lost, the probability changes to 0 and the invoice is voided in Zoho Books.
Warning: Once an invoice or quote has been marked as Sent in Zoho Books, any changes made to the potential in Zoho CRM will no longer activate entity triggers for the transaction.
Sync Options
Once you have configured the integration, any new customer, vendor, or item you add will be updated via the sync that occurs once in every 2 hours after the initial sync. However, if you have chosen to sync transaction modules, transactions between both the apps will be synced instantly.
To take control of the other sync options:
- Go to Settings on the top right corner of the page.
- Select Zoho Apps under Integrations.
- On the Zoho Apps page, click Show Details next to Zoho CRM.
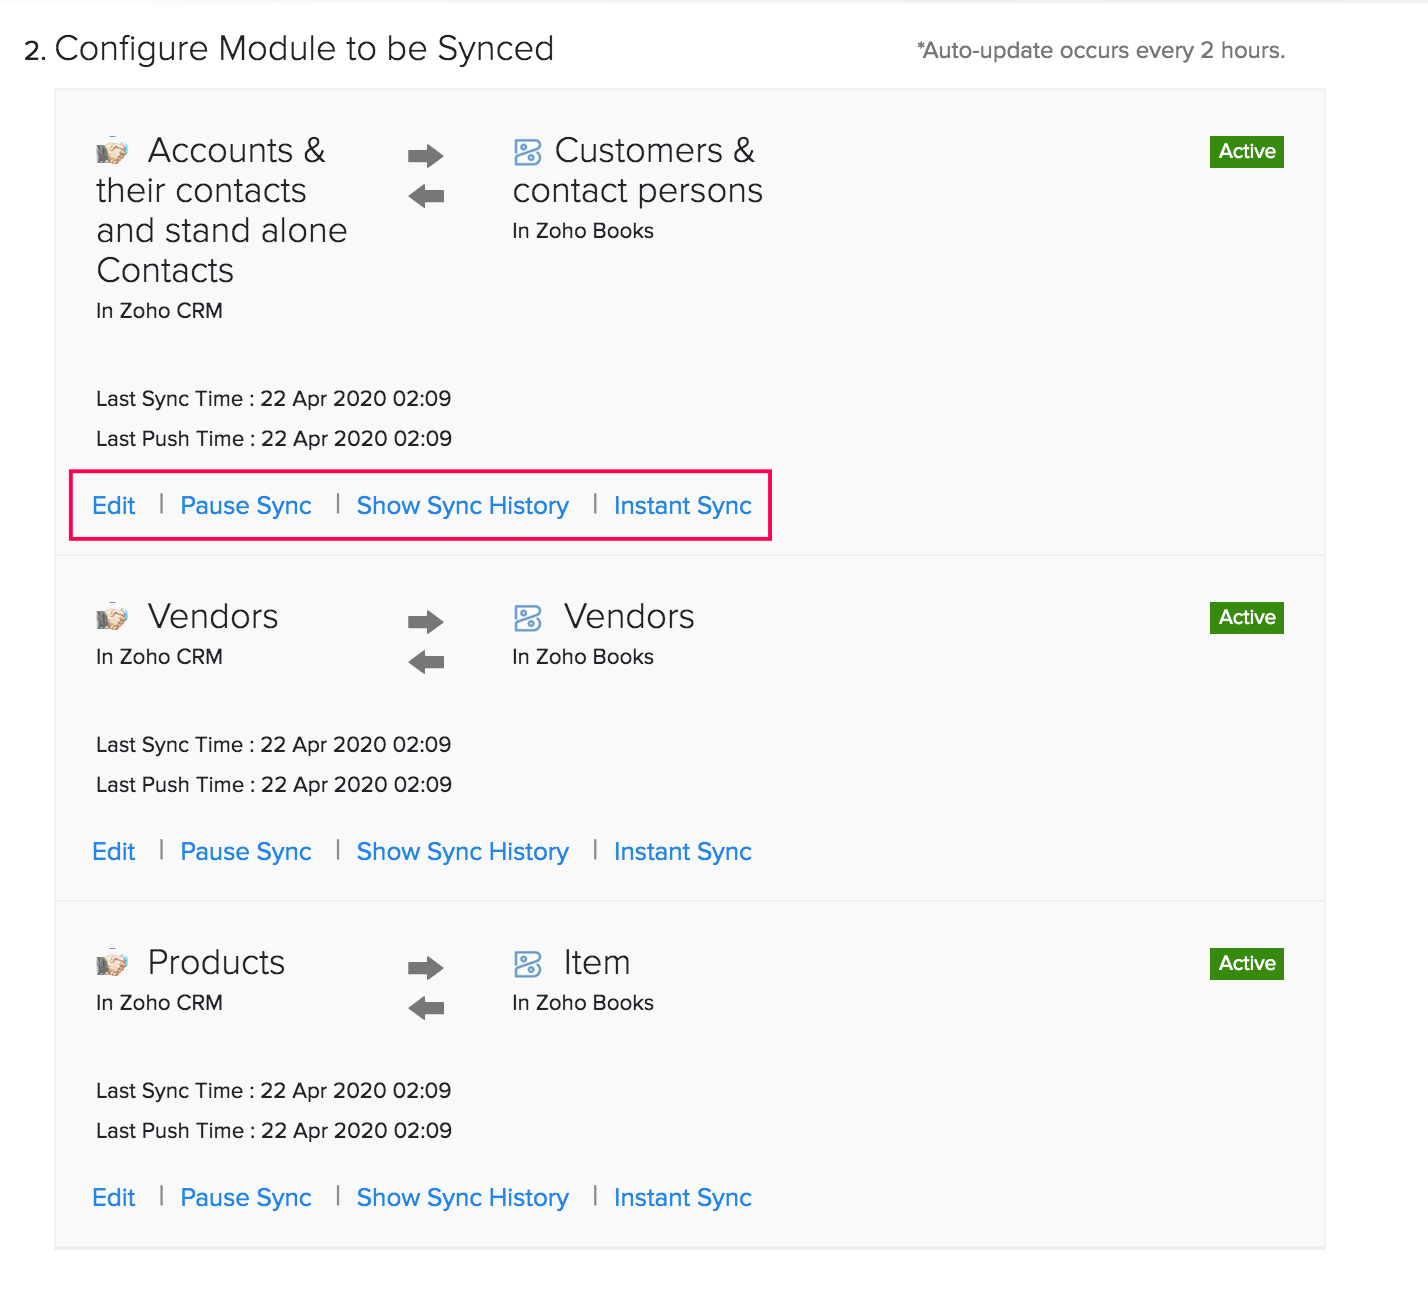
A screen with the integration details opens up. Here, you will have the following options:
- Instant Sync: If you have added any new data and want that change to be reflected immediately, you can click Instant Sync.
Pro Tip: If you want to update changes made in Zoho CRM to a single customer/vendor rather than run a complete sync, you can select that particular contact in Zoho Books > Click More > Select Fetch this contact from Zoho CRM.
-
Show Sync History: This option lets you view a detailed history of the sync including the number of records added, deleted, and updated along with the time and date on which they were synced into Zoho Books. Sync failures are shown and the reason for themn can be viewed as well.
-
Pause/Resume sync: This option allows you to pause the auto sync, as well as disable the option to carry out instant sync. Any manual sync that is already taking place when the ‘Pause’ option is clicked, will be completed before the pause action is put into effect. You can always select ‘Resume sync’ to re-enable auto and manual sync.
-
Edit: This option lets you modify the conditions set for the sync. These settings will be stored for the next automatic or manual sync that’s carried out.
Warning: If you have created a record in Zoho Books, synced it to Zoho CRM, and delete it later in Zoho CRM, this record will not be deleted in Zoho Books. Learn more.
Working with the Integration in Zoho Books
Let’s take a look at the actions you can perform in Zoho Books once you have set up the integration with Zoho CRM:
Access Zoho CRM Contacts within Zoho Books
Depending on how you have chosen to sync contacts during the integration setup, your accounts, contacts, and vendors from Zoho CRM will be available in Zoho Books.
Filter by CRM contacts
You can view all the accounts imported into Zoho Books as customers. To do this:
- Go to Sales > Customers.
- Click the All Customers drop-down on the top-left side of the page.
- Select CRM Customers from the list.

This can be especially helpful if you want to bulk-update the contacts from CRM contacts alone. Similarly, you can filter out and view just the Vendors from CRM in the Vendors module.
Search Contacts in CRM
The contacts you imported from Zoho CRM will be available in Zoho Books and you can create transactions for them. However, you can also create a transaction for a contact in Zoho CRM that you did not import yet. Here’s how:
- Create a new sales transaction. (Invoice, Quote, etc.)
- Click the search icon button next to the Customer Name field.

- In the pop-up, click In Zoho CRM.
- Enter the name of the Zoho CRM account or contact.
- Click Go.
- Select the required account/contact from the list.
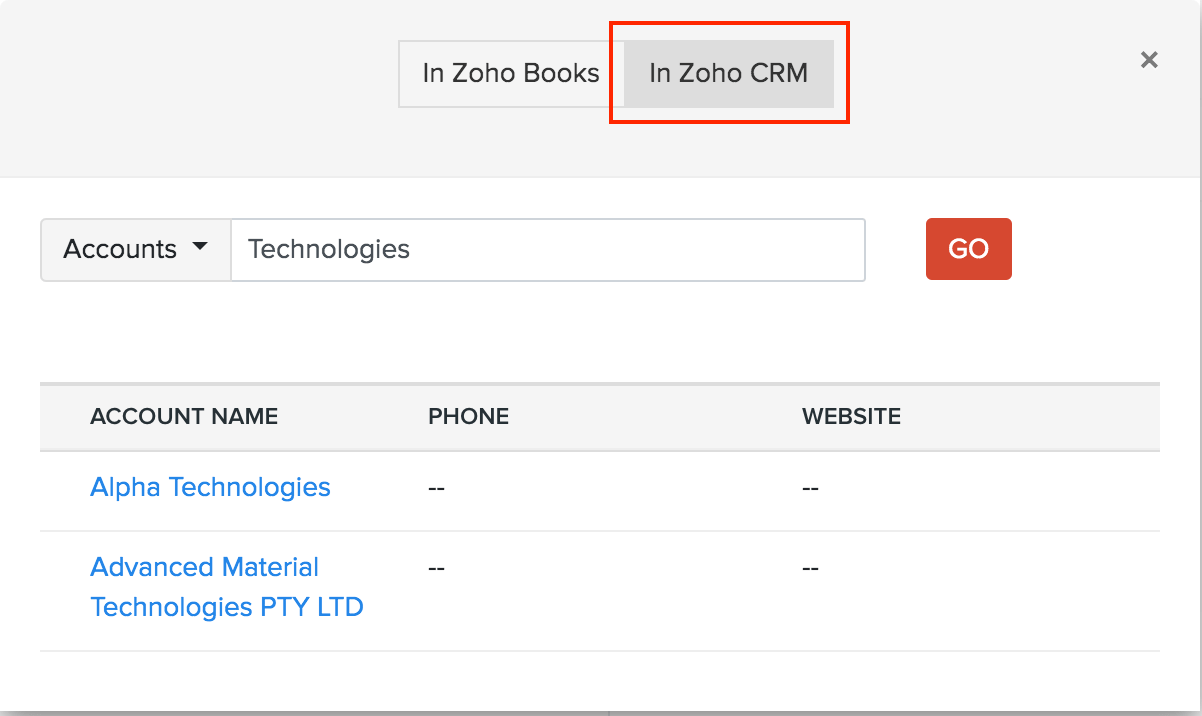
Now, this account will be fetched automatically to Zoho Books as a customer, and can be viewed and updated from here.
Insight: While configuring sync preferences for contacts during the setup, if you had chosen to sync only Contacts, you can search for Zoho CRM contacts using their first and last names. If you had chosen to sync Accounts or Accounts and their Contacts, you can search for a contact using the account name in Zoho CRM. All contacts under the account name you type will be listed.
Similarly, you can create purchase transactions for vendors that have not been fetched yet from Zoho CRM.
Associate Potentials With Transactions
Prerequisites
- Ensure that you have enabled custom modules in your Zoho CRM account.
- Check if the deal is linked to the appropriate account/customer in Zoho CRM.
After integrating Zoho CRM with Zoho Books, you can associate the potentials in Zoho CRM with the quotes, sales orders, invoices, and expenses in Zoho Books.
In this help document, we will explain the steps to associate a potential in Zoho CRM with an invoice in Zoho Books. You can follow these steps for sales orders, quotes, and expenses as well.
To associate a potential with an invoice:
- Go to the Sales module on the left sidebar and select Invoices.
- If you want to associate the potential with an existing invoice, select the invoice and click Edit at the top.
- On the Edit Invoice page, click CRM Actions below the customer name and select Associate Potential from the dropdown.
- If you want to associate the potential with a new invoice, click + New on the top right corner of the page.
- On the New Invoice page, select the customer from the Customer Name field. Click CRM Actions below the customer name and select Associate Potential from the dropdown.

- A pane will open on the right sidebar. In the Potentials tab, hover over the required potential and click Associate.
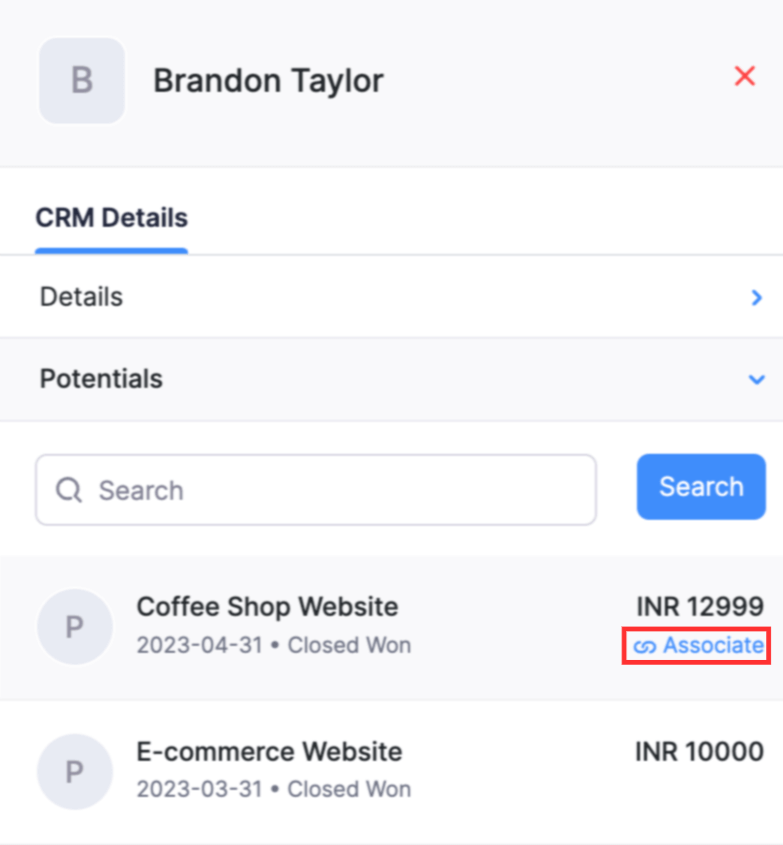
Pro Tip: You can also view this transaction in your Zoho CRM account by selecting the potential and scrolling down to the Zoho Finance section.
Insight: If there are multiple potentials associated with a customer, or if you cannot find the required potential, you can search for them. However, your search results will not display the potentials deleted in Zoho CRM.
Dissociate a Potential
To dissociate a potential:
- Go to the corresponding transaction.
- Click Edit on the transaction’s details page.
- On the page that appears, click Potential below the customer or vendor’s name and select Potential from the dropdown.

- A pane will open on the right sidebar. In the Potentials tab, hover over the associated potential and click Dissociate.
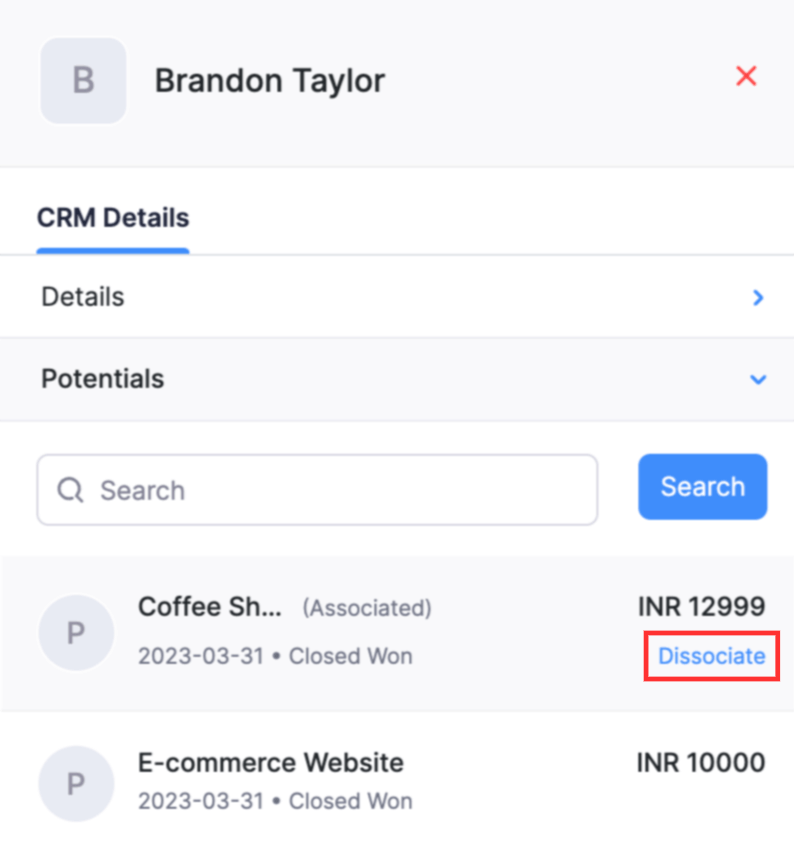
- If the associated potential has been deleted in Zoho CRM, it will be listed at the bottom.
- Click Save.
Warning: Potentials that were associated using triggers cannot be dissociated.
Disable the Integration
You can choose to disable the Zoho Books-Zoho CRM integration temporarily. If you disable the integration, there will not be any further data sync between Zoho CRM and Zoho Books.
Warning: If you have enabled syncing transaction modules, disabling the integration will lead to the deletion of any custom reports and transactions associated with the Zoho Finance module of Zoho CRM. Your existing transactions in Zoho Books, however, will not be affected.
To disable the integration temporarily:
- Go to Settings on the top right corner of the page.
- Select Zoho Apps under Integrations.
- On the Zoho Apps page, click Show Details next to Zoho CRM.
- In the Zoho CRM Credentials section, click Disable Integration.

You can reactivate the integration any time to start the sync, or even integrate a different Zoho Books organization to Zoho CRM. You can also change your Zoho CRM credentials by clicking Update Credentials.
Connect your sales and accounting platform with Zoho CRM integration.
 Yes
Yes
 Thank you for your feedback!
