Migrate to Zoho Books from Other Systems
Zoho Books is your one-stop solution for your business’s accounting needs. This page will guide you on how to migrate from your existing accounting system to Zoho Books. Read on to know about the step-by-step process to switch over to Zoho Books easily.
IN THIS PAGE…
Export Data from Existing System
The first step in migrating to Zoho Books is preparing the required data. You have to export data from your existing system so that it can be imported into Zoho Books later. This also ensures that your data is backed up, which can be useful for future references.
Insight: Zoho Books supports only CSV, TSV and XLS file formats for importing data. So ensure that you export data from your system in one of these formats.
Set up Your Organization Profile
Now that you have the required data ready to import, you can start setting up your Zoho Books organization. After you sign up to Zoho Books, you have to fill up your organization’s details. To do this:
- Log in to your Zoho Books account.
- Go to Settings on the top right corner of the page.
- Select Profile under Organization.
- Fill up the details of your organization.
- Click Save at the bottom of the page.
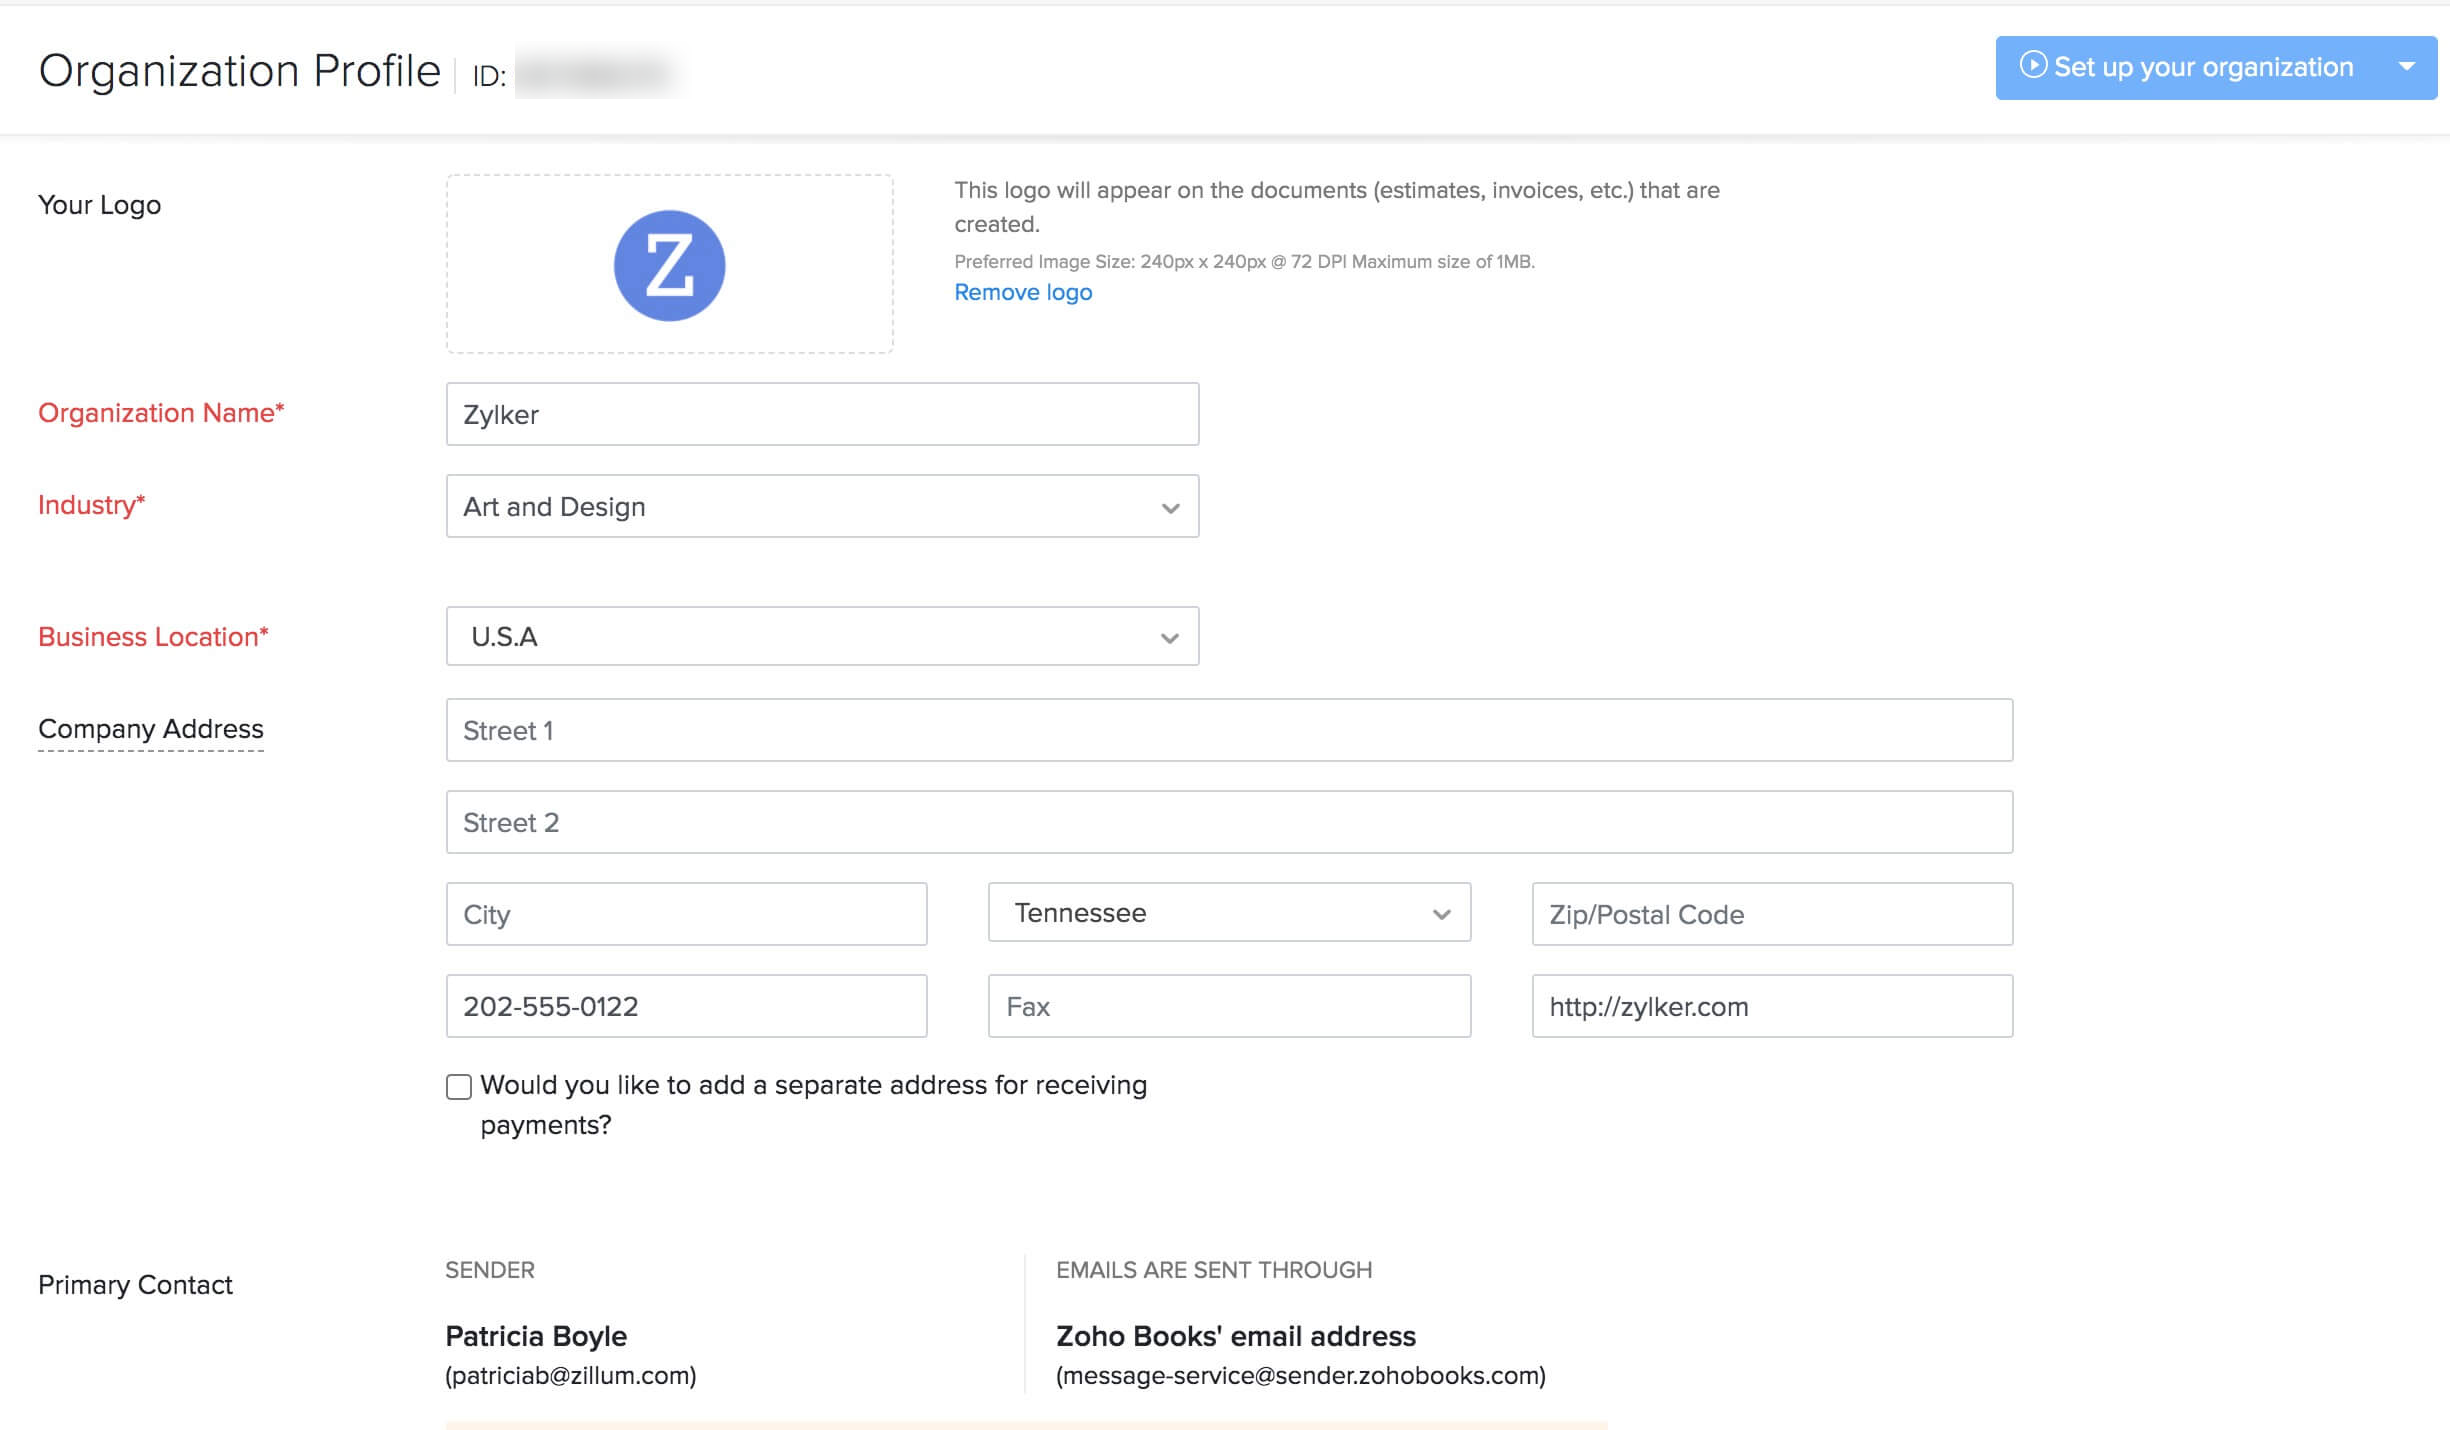
Read more about setting up your organization profile.
Import Chart of Accounts
Zoho Books has a set of predefined Chart of Accounts classified into different types such as Income, Expense, Equity, Liability & Assets. Most of these will be similar to the accounts in your previous system. So you can skip the duplicate account types and import just the additional accounts needed.
Insight: If you have sub-accounts, ensure that you include the parent accounts first in the import file and then the child accounts.
Pro Tip: If you have only a few additional accounts that need to be added in Zoho Books, you can consider creating accounts one-by-one, instead of importing them.
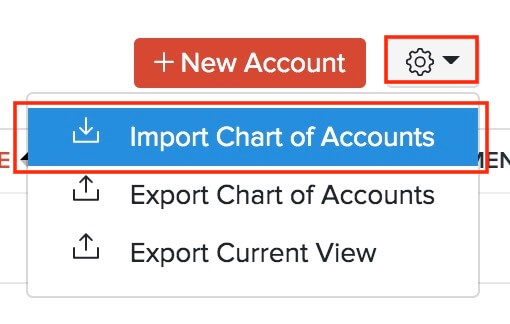
To import the chart of accounts into Zoho Books:
- Click the Accountant module from the left sidebar.
- Select Chart of Accounts.
- Click the Gear icon in the top-right corner.
- Select Import Chart of Accounts.
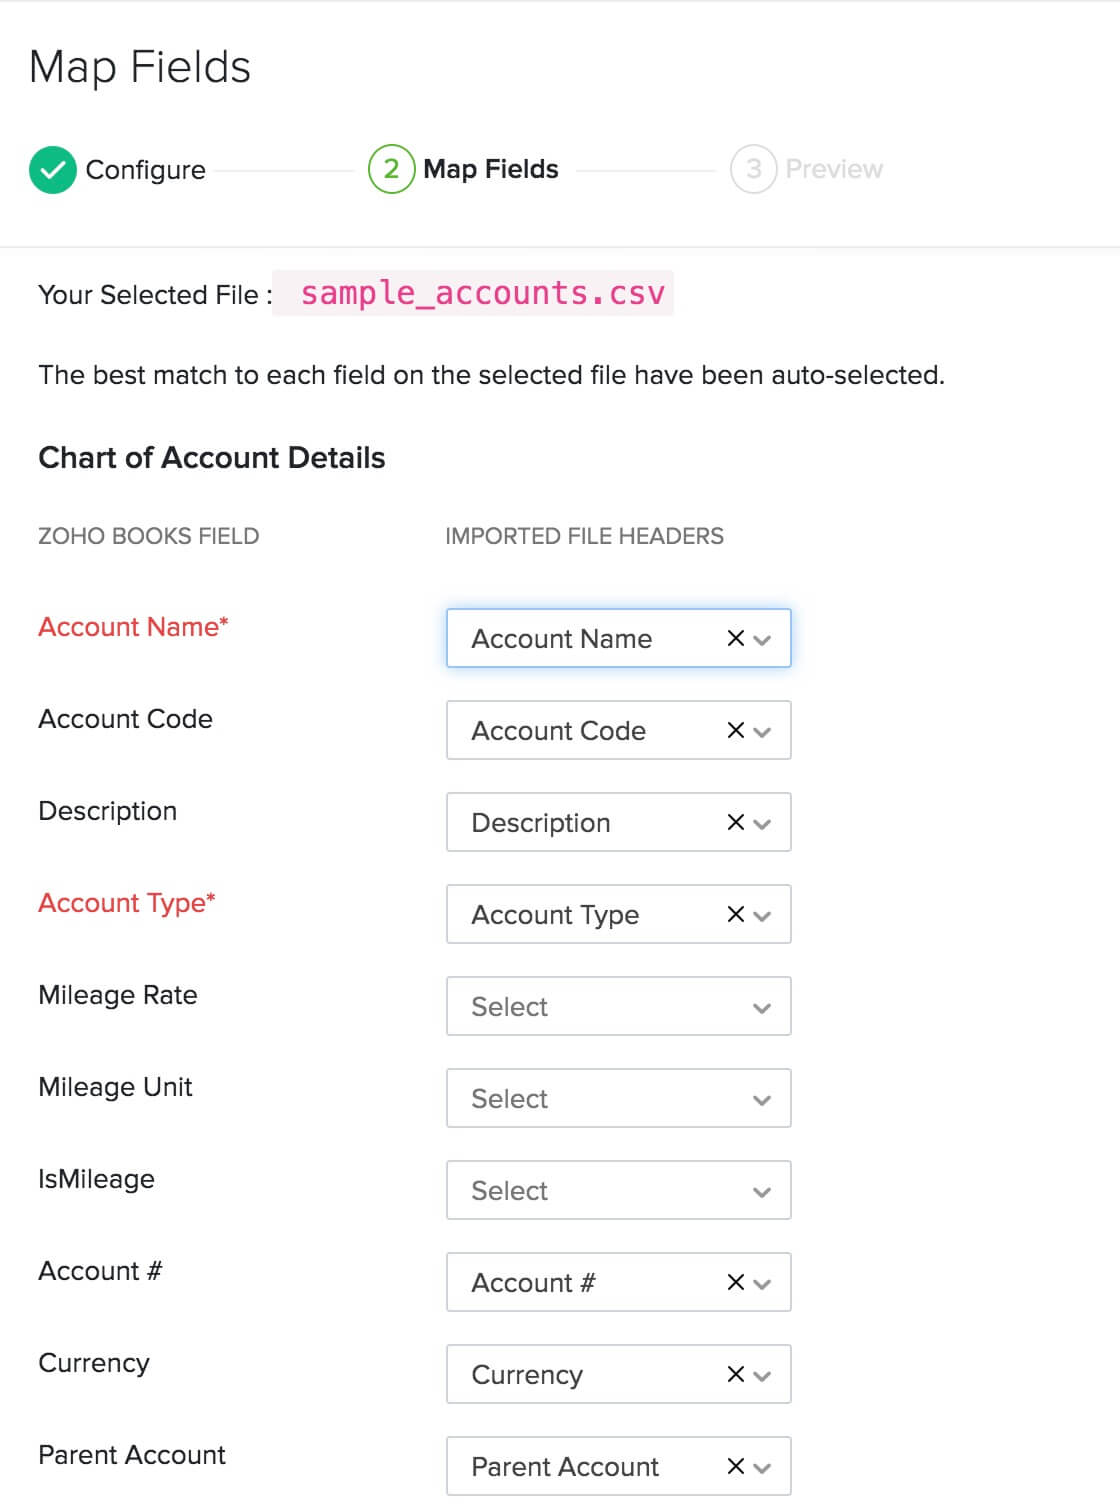
- Click Choose File to select the file to be imported. It is recommended that you download the sample file to check the format required for the import file.
- Select the required Character Encoding and File Delimiter according to your import file.
- Click Next.

- In the Map Fields page, choose the headers in your import file to be mapped with their corresponding Zoho Books fields.
- Click Next.
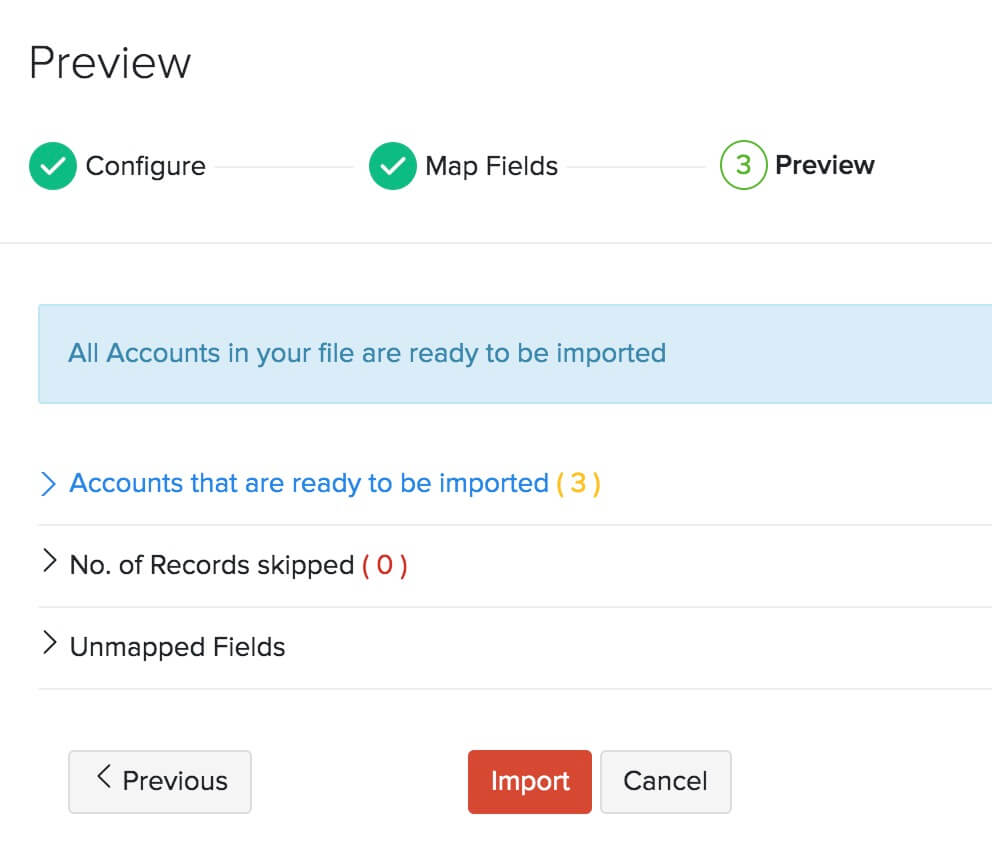
- Check the summary of your import in the Preview page.
- Click Import.
Pro Tip: Once you’ve imported the Chart of Accounts, ensure that your bank accounts have been imported properly. This is important because you won’t be able to enter the opening balances unless you do so.. You can also add your bank or credit card accounts manually if needed.
Configure Settings
You can use the Settings section in Zoho Books to customize your organization to suit your business requirements. To access Settings, click the Gear icon in the top right corner of the page. Here, ensure that you configure the following:
Enable Required Modules
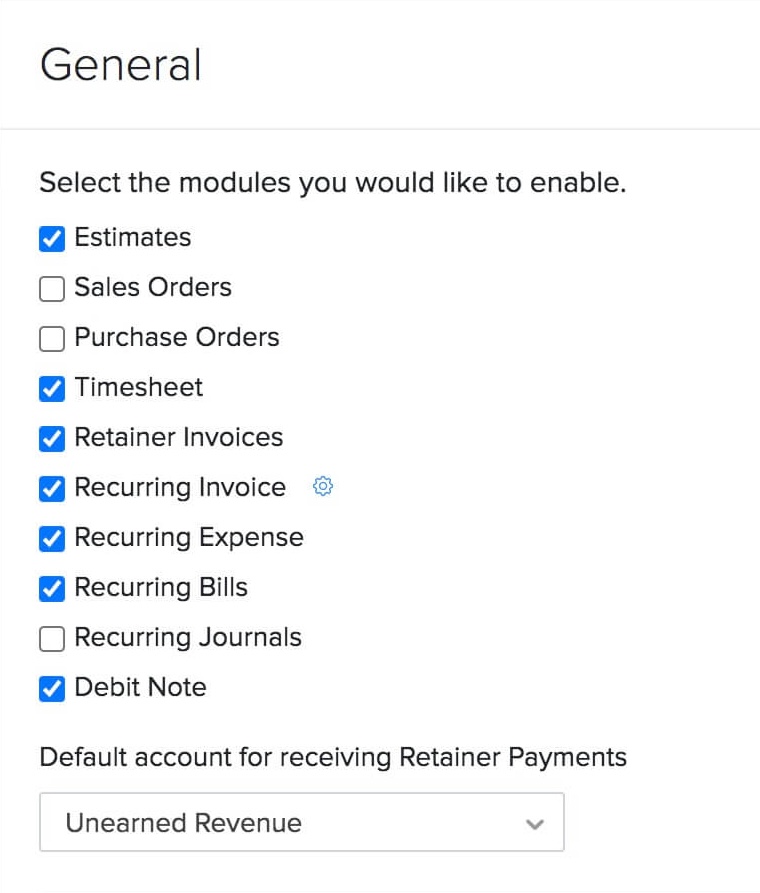
Zoho Books has various modules such as Quotes, Timesheet, Recurring Bills, and Debit Note to manage transactions easily. You can enable the ones that are needed for your business. Here’s how:
- Go to Settings on the top right corner of the page.
- Select General under Preferences.
- Mark the modules that you require under the Select the modules you would like to enable option.
Zoho Books already has features like Stock Adjustments and Inventory Tracking to manage your stock. But if you want an advanced inventory management option that lets you create shipments and manage warehouses, you can enable the Zoho Inventory add-on. Read more about how you can benefit from this add-on.
In this same page, you can also choose how you want to provide discounts (if any) or apply taxes to your transactions.
Once you’ve configured all the details, click Save.
Choose your Module Preferences
Now that you have enabled the modules needed for your business, you can proceed to configure their preferences. You can customize each module to suit your business needs. Go to Settings and select the module that you want to customize.
For each module, there will be many options available that you can customize. You can read about customizing modules from the help document for preferences.
Insight: If you have certain fields in your previous system that you cannot find in Zoho Books, you can create custom fields for them in Zoho Books.
Set up Taxes
In Zoho Books, there are country specific taxes, multiple tax rates, and tax groups that you can configure according to your business needs. After you create a new tax, you can associate it to your items or apply it when creating a transaction.
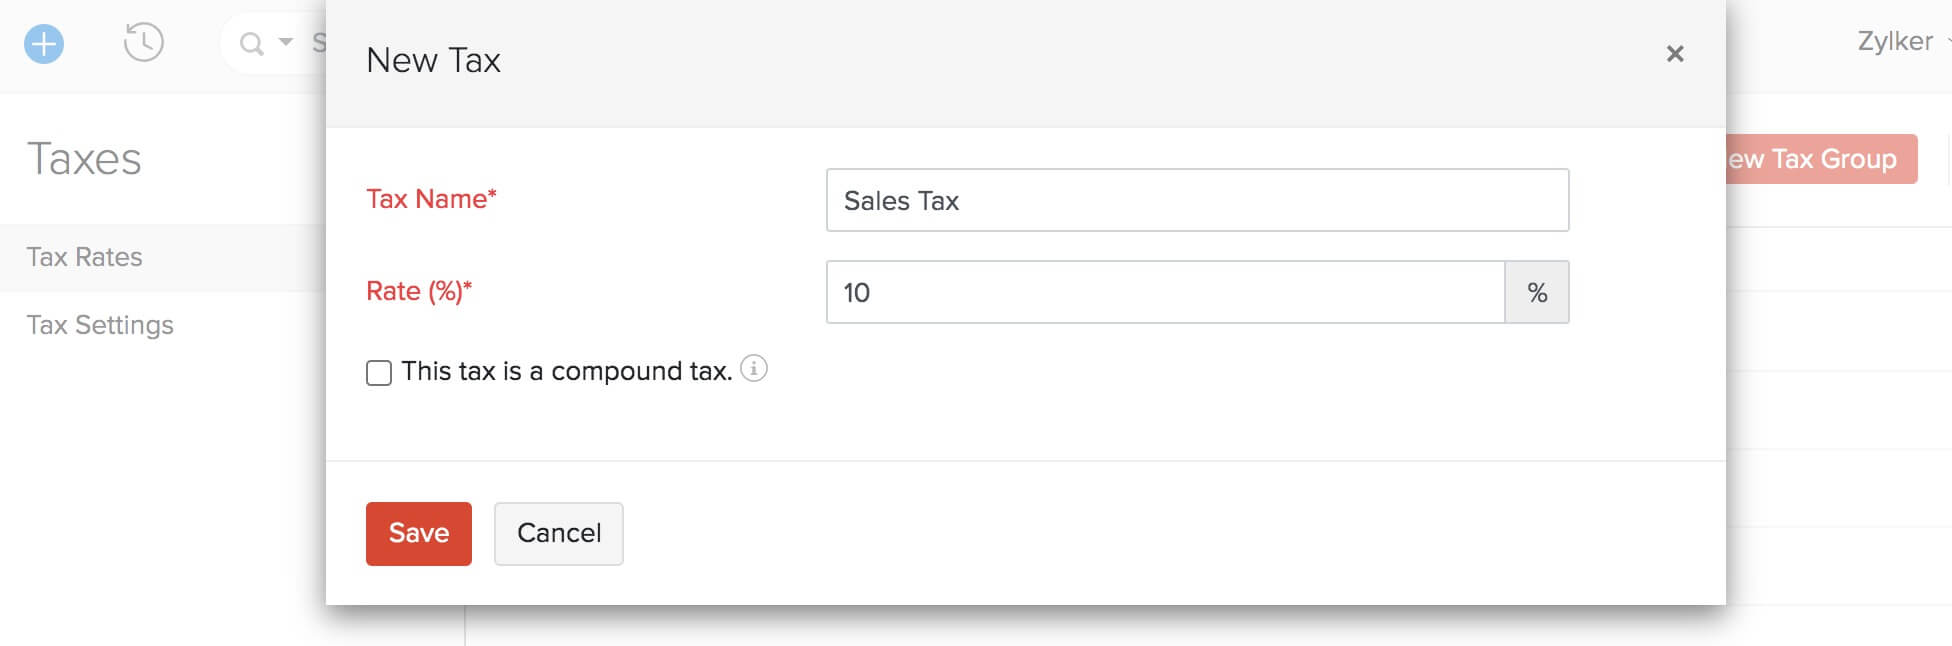
To create a new tax rate:
- Go to Settings on the top right corner of the page.
- Select Taxes under Taxes & Compliance
- Go to Tax Rates in the Taxes pane.
- Click + New Tax in the top right corner.
- Enter the Tax Name and the Rate (%) at which it’s levied.
- Mark the This tax is a compound tax option, if this is a tax that is calculated on top of a primary tax.
- Click Save.
Notes:
-
If you import transactions with taxes associated to them and if those taxes are not present in Zoho Books, then Zoho Books will create new taxes with the available details.
-
If you import transactions with multiple taxes applied to them and if those taxes are not present in Zoho Books, then Zoho Books will create a new tax group with the available details.
Insight: The Taxes module is different for each country and so will differ for the different Zoho Books edition. Ensure that you’re viewing the right version of the Taxes help document by selecting your edition of Zoho Books from the top left corner.
Import Customers & Vendors
The next step in the migration process is to bring in all your contacts. Zoho Books has dedicated modules for Customers and Vendors, so that you can manage them separately.
Pro Tip: When importing customers or vendors, you can include their opening balances as well in the import file and map it with the corresponding field in Zoho Books. This way, you don’t have to prepare a separate file to import the Accounts Receivable and Accounts Payable when entering opening balances under Settings.
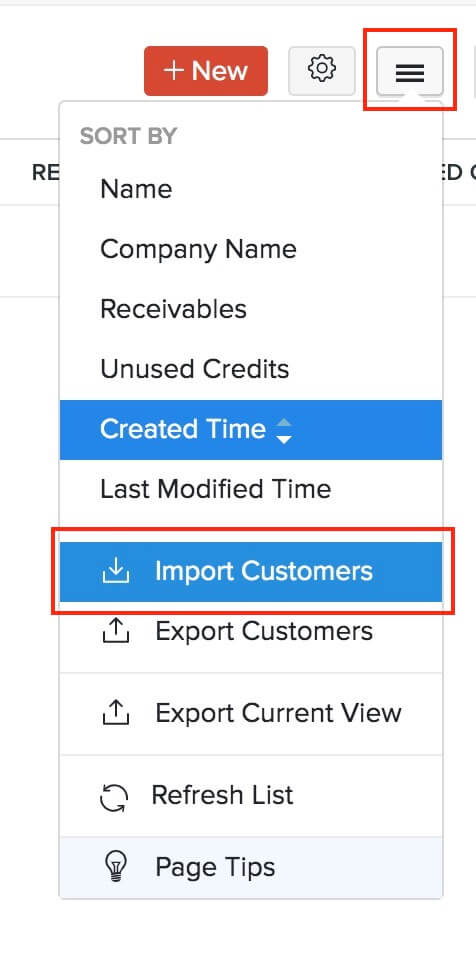
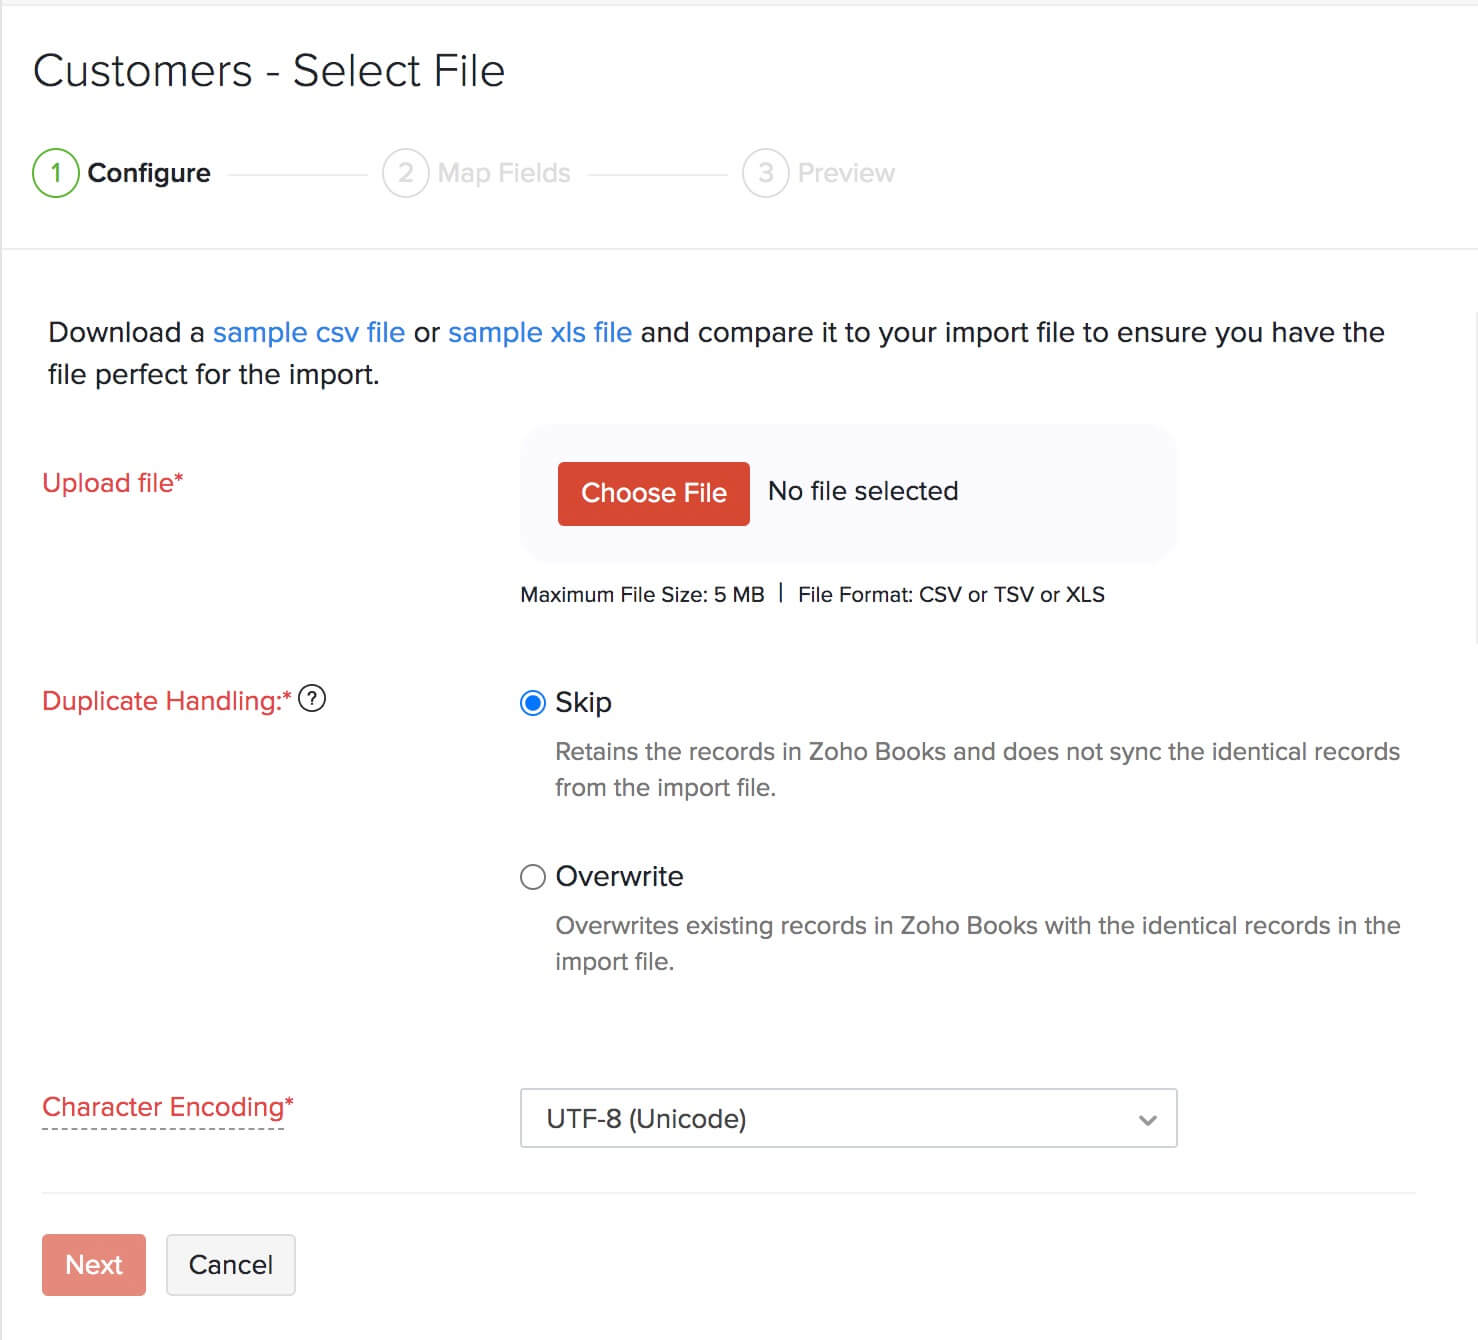
To import customers:
- Click the Sales module from the left sidebar.
- Select Customers.
- Click the Hamburger icon in the top-right corner.
- Select Import Customers.
- Choose Customers in the pop-up and click Continue.
- Click Choose File to select the file to be imported. It is recommended that you download the sample file to check the format required for the import file.
- Select the required Character Encoding and File Delimiter according to your import file.
- Click Next.
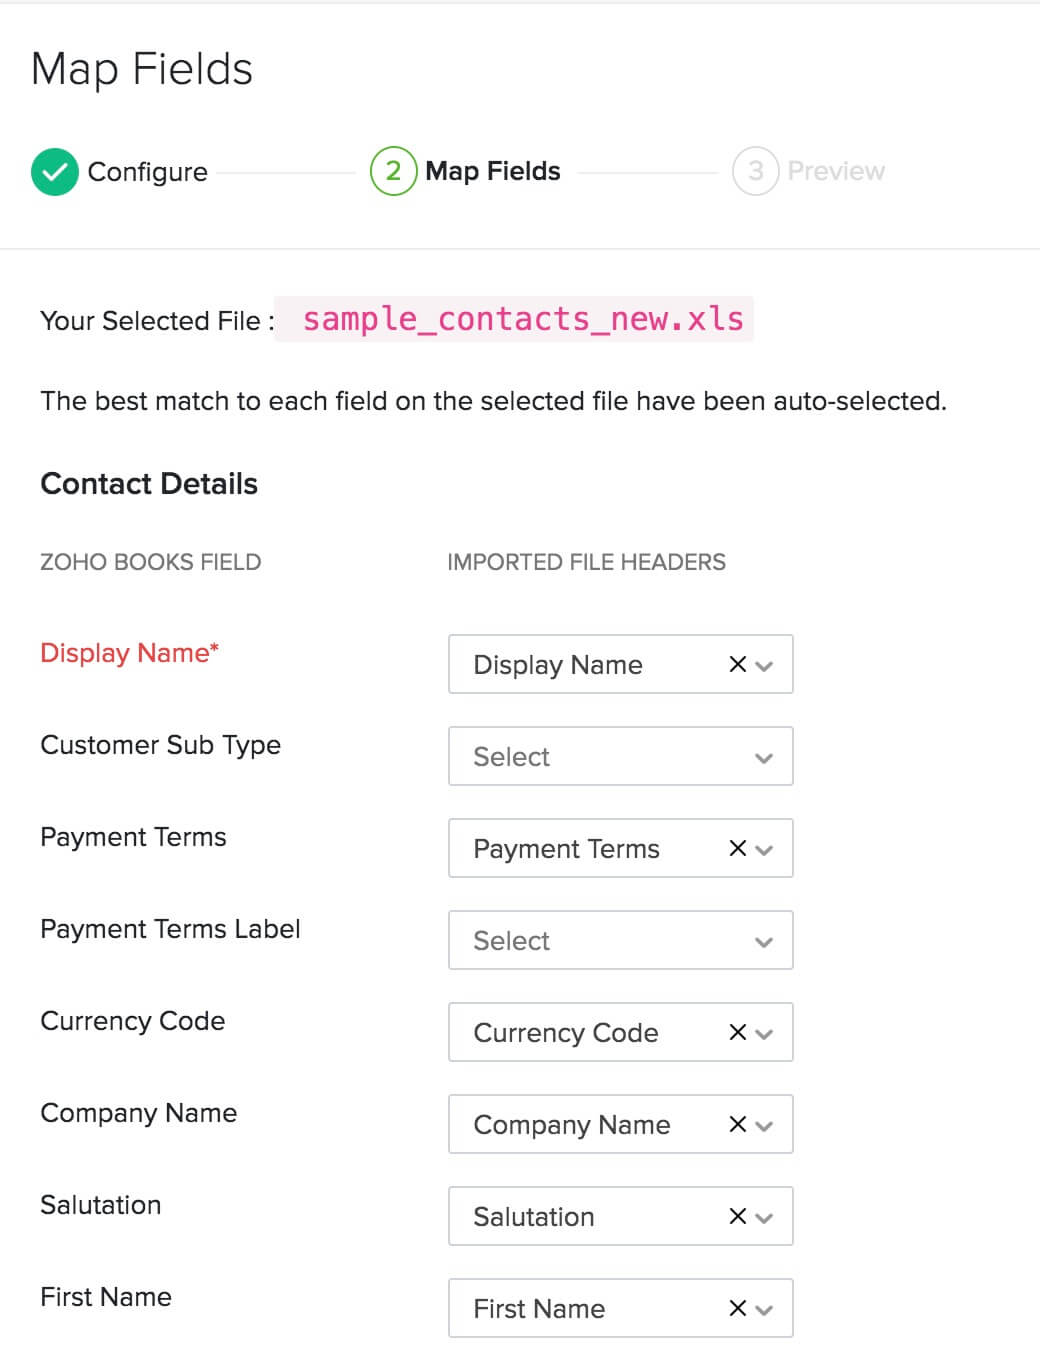
- In the Map Fields page, choose the headers in your import file to be mapped with their corresponding Zoho Books fields.
- Click Next.
- Check the summary of your import in the Preview screen.
- Click Import.
Your customers will now be imported into Zoho Books.
Similarly, you can import vendors. Here’s how:
- Click the Purchases module from the left sidebar.
- Select Vendors.
- Click the Hamburger icon in the top-right corner.
- Select Import Vendors.
Next, follow the same steps as importing the file for customers. You can also import contact persons in the same way.
Import Items
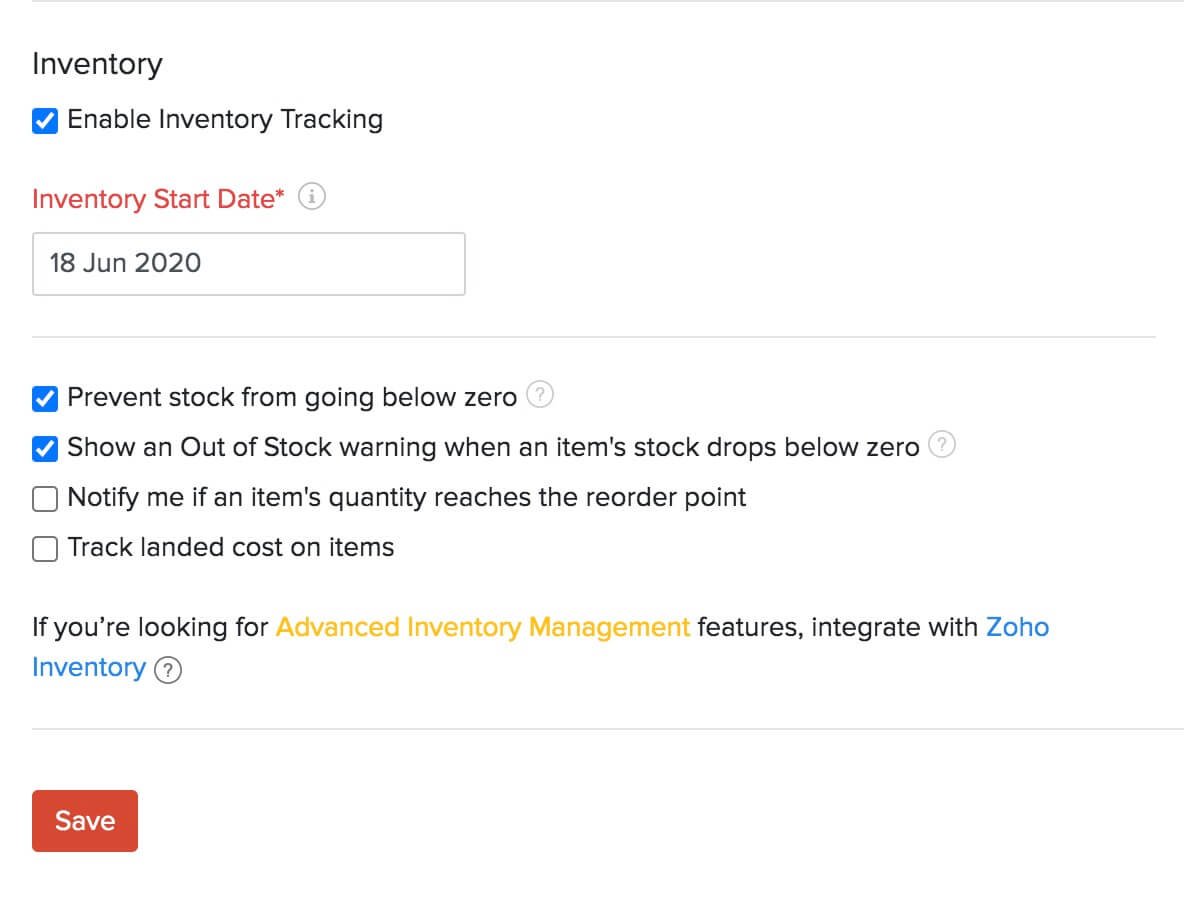
Items in Zoho Books are the goods and services that your business deals with. Before you import them into Zoho Books, if you want to track inventory for your items, you’ll have to enable inventory. To do this:
- Go to Settings on the top right corner of the page.
- Select Items under Items.
- In the General tab of the Items page, check the Enable Inventory Tracking option.
- Select the Inventory Start Date, which should be the same as your Opening Balance Date.
- Click Save.
Prerequisite:If you are importing goods, ensure that you include their opening stocks in the import file. This will be the opening balance for them in Zoho Books.
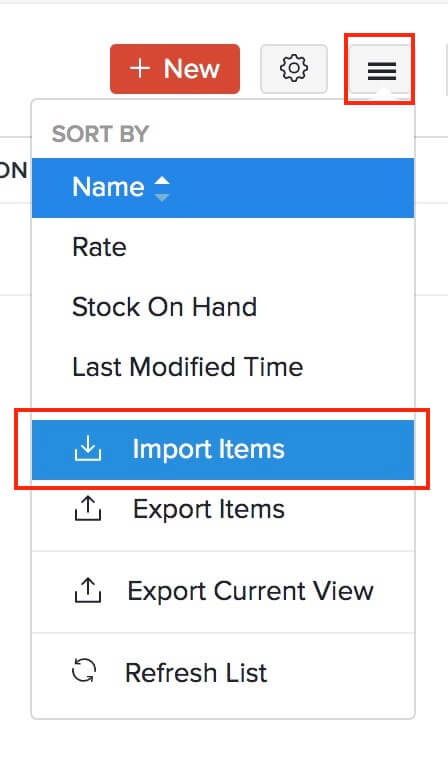
To import items into Zoho Books:
- Click the Items module from the left sidebar.
- Select Items.
- Click the Hamburger icon in the top-right corner.
- Select Import Items.
Pro Tip: If you have certain fields for items that are not available in Zoho Books, you can create custom fields for them in Zoho Books and then map them to the fields in your import file.
- Click Choose File to select the file to be imported. It is recommended that you download the sample file to check the format required for the import file.
- Select the required Character Encoding and File Delimiter according to your import file.
- Click Next.
- In the Map Fields page, choose the headers in your import file that need to be mapped with their corresponding Zoho Books fields.
- Click Next.
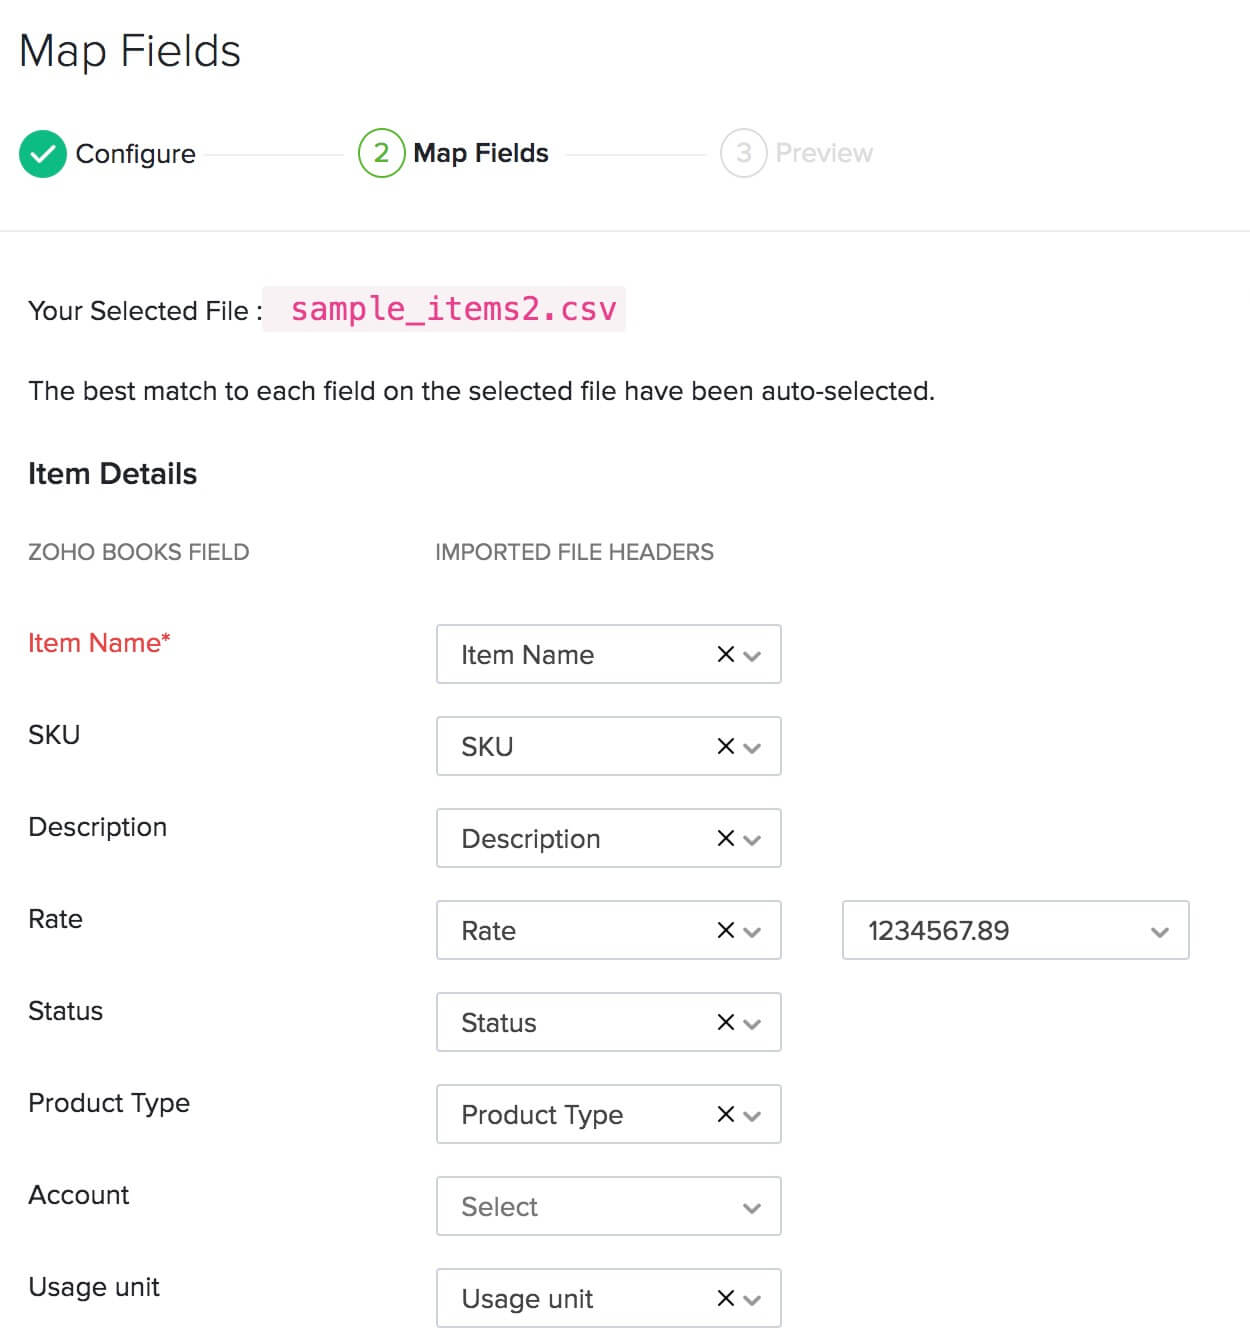
- Check the summary of your import in the Preview screen.
- Click Import.
Your goods and services will now be available in Zoho Books.
If your business sells or purchases items at customized rates, then you can import those details as price lists. A price list in Zoho Books is a set of custom rates for items, which you can assign to a specific customer/vendor or associate with a transaction. You need to enable this option first from Settings > Items > Items > Enable Price Lists. Learn how to import price lists.
If you have any inventory adjustments in your previous accounting system, you can import them as well into Zoho Books. For this, you need to first enable inventory tracking from Settings > Items > Items > Enable Inventory Tracking. To import the adjustments:
- Go to the Items module in the left sidebar.
- Select Inventory Adjustments.
- Click the More button in the top right corner.
- Choose whether you want to Import Quantity Adjustments or Import Value Adjustments.
Then, proceed with the same steps you followed for importing a file for items.
Add Bank or Credit Card Accounts
In Zoho Books, you can add your bank and credit account details, so that your payments through them can be accounted for precisely. When importing your chart of accounts, if you had included these details in your import file, they will be available in the Banking module. If not, you can add them manually as well. Here’s how:
- Click the Banking module from the left sidebar.
- Click the Add Bank or Credit Card button in the top-right corner.

From here, you can either connect to a bank account that supports automatic feeds, or enter the bank acount or credit card details manually.
Enter Opening Balances
Opening Balances is the amount you have in the different accounts of your business at the start of an accounting period, or when switching to a new accounting system. When switching from your previous system, you need to ensure that all your accounts and their balances are brought into Zoho Books.
If you’re switching to Zoho Books at the end of your financial year, the closing balances of the previous year should be entered as your opening balances for the current year in Zoho Books. If you’re switching to Zoho Books during any other time of the financial year, you can generate a Trial Balance on the date of migration to identify all the debit and credit balances of your accounts.
Before you enter the opening balances in Zoho Books, ensure that you have imported the following:
To enter your opening balances in Zoho Books:
- Go to Settings on the top right corner of the page.
- Select Opening Balances under Organization.
- Set the Migration Date. This should be the date on which you generated the Trial Balance report in your previous accounting system for migrating to Zoho Books.
- Click Import to import the balances for your Accounts Receivable and Accounts Payable.
- Enter the balances for your different Bank accounts.
- Click the other categories such as Asset, Expense, and Liability to enter their Debit and Credit balances.
- Click Continue after entering all the balances.
- Verify all the balances in the next screen and click Confirm.

Insight: You’ll be able to see an additional column called Available Balance. The value in this column will be populated based on the transactions (if any) that you have created before the opening balance date.
You can edit the opening balances any time by clicking the Edit option in Settings > Organization > Opening Balances. Read more about Opening Balances in Zoho Books.
Import Transactions
With the basic set up done and the opening balances updated, you can now bring in all your required transactions into Zoho Books. While importing transactions, ensure that you import them in the following order:
Import Projects
Projects in Zoho Books are for businesses that bill their clients based on the number of hours worked on a project, or the tasks done for a project, or a fixed project rate. You can create a project in Zoho Books and record timesheets for them. If you have such projects in your previous system, you can import them into Zoho Books easily. Here’s how:
- Click the Time Tracking module from the left sidebar.
- Select Projects.
- Click the Gear icon in the top-right corner.
- Select Import Projects.

- Click Choose File to select the file to be imported. It is recommended that you download the sample file to check the format required for the import file.
- Select the required Character Encoding and File Delimiter according to your import file.
- Click Next.
- In the Map Fields page, choose the headers in your import file to be mapped with their corresponding Zoho Books fields.
- Click Next.
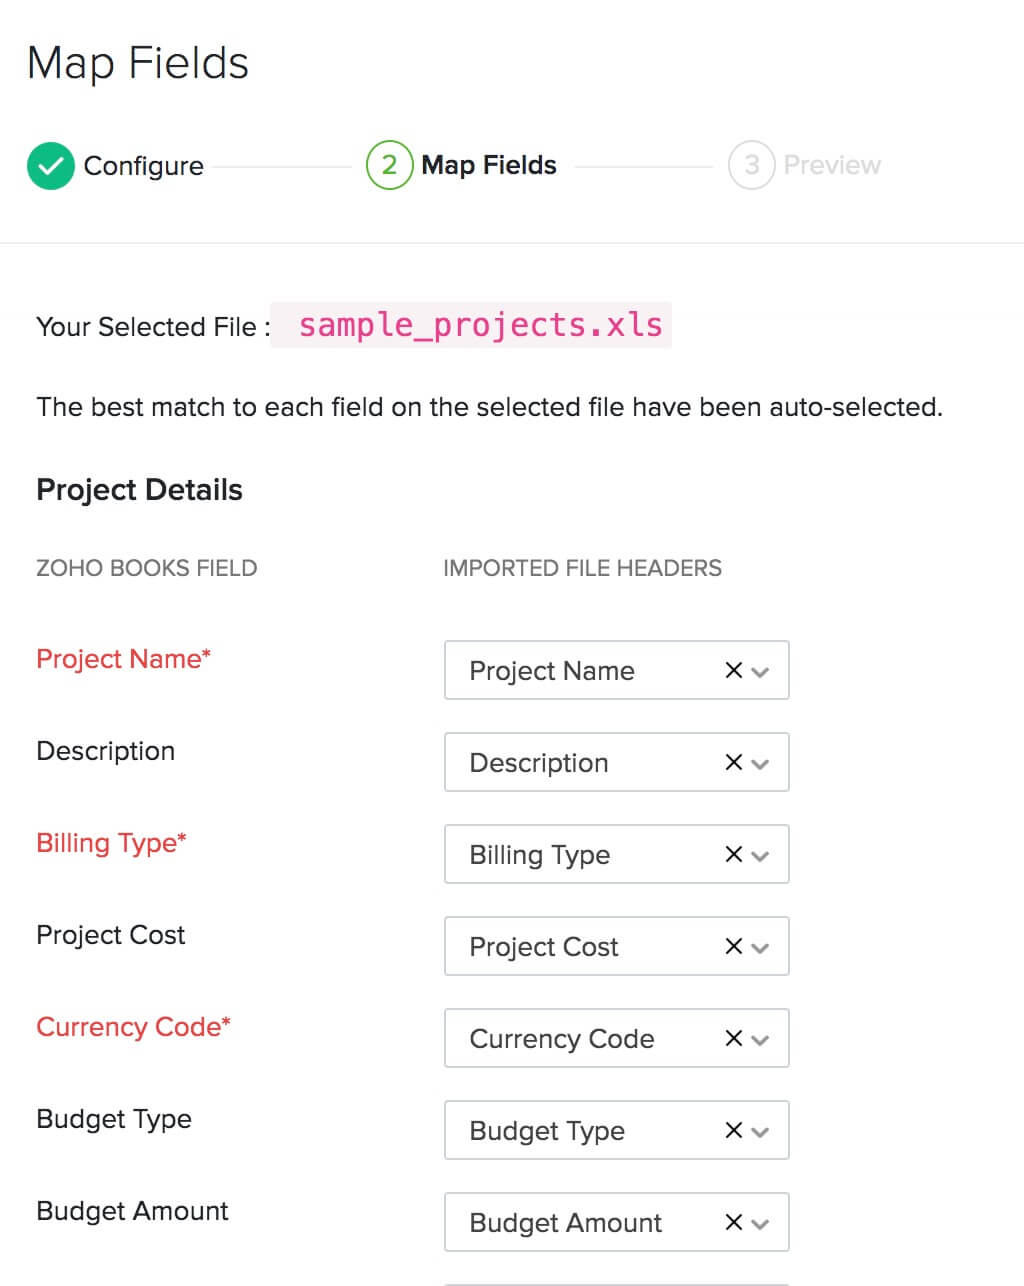
- Check the summary of your import in the Preview screen.
- Click Import.
Once you’ve imported your projects, you can import their tasks and timesheets similarly. Read in detail about how projects and timesheets work in Zoho Books.
Import Purchase Transactions
Zoho Books has dedicated modules for the different purchase transactions such as Expenses, Bills, Purchase Orders, and Payments Made. You can import just the modules that you require for your business.
Let us take a look at how to import bills into Zoho Books:
- Click the Purchases module from the left sidebar.
- Select Bills.
- Click the Hamburger icon in the top-right corner.
- Select Import Bills.

Then, follow similar steps as mentioned in previous sections to import files (read more about importing bills). Similarly, you can import the other purchase transactions and then the payments you’ve made to vendors.
Import Sales Transactions
Zoho Books also offers separate modules for the different sales transactions such as Quotes, Invoices, Retainer Invoices, Sales Orders, and Payments Received. You can import just the modules that you require for your business.
Let us take a look at how to import invoices into Zoho Books:
- Click the Sales module from the left sidebar.
- Select Invoices.
- Click the Hamburger icon in the top-right corner.
- Select Import Invoices.
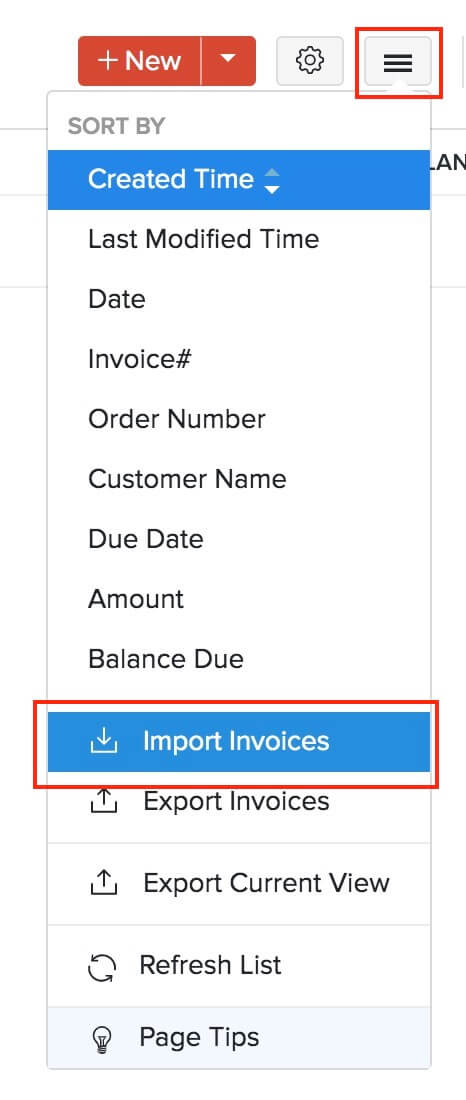
Then, follow the similar steps to import files, as mentioned in the previous sections (read more about importing invoices). Similarly, you can import the other sales transactions and then the payments you’ve received from customers.
Import Manual Journals
If you have manual journals, you can import them into Zoho Books as well. Since Zoho Books is a double-entry accounting system, ensure that the total debit and credit amount for a journal is equal.
To import manual journals:
- Click the Accountant module from the left sidebar.
- Select Manual Journals.
- Click the Gear icon in the top-right corner.
- Select Import Journals.
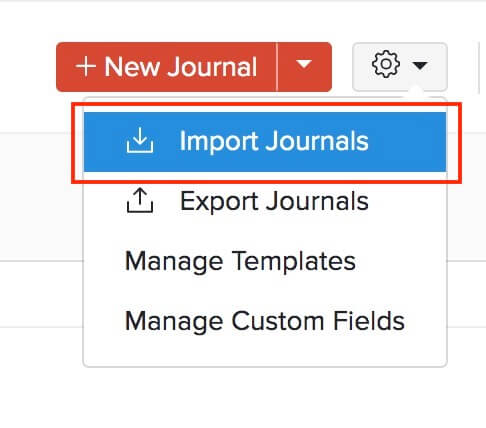
Next, follow the similar steps to import files, as mentioned in the previous sections.
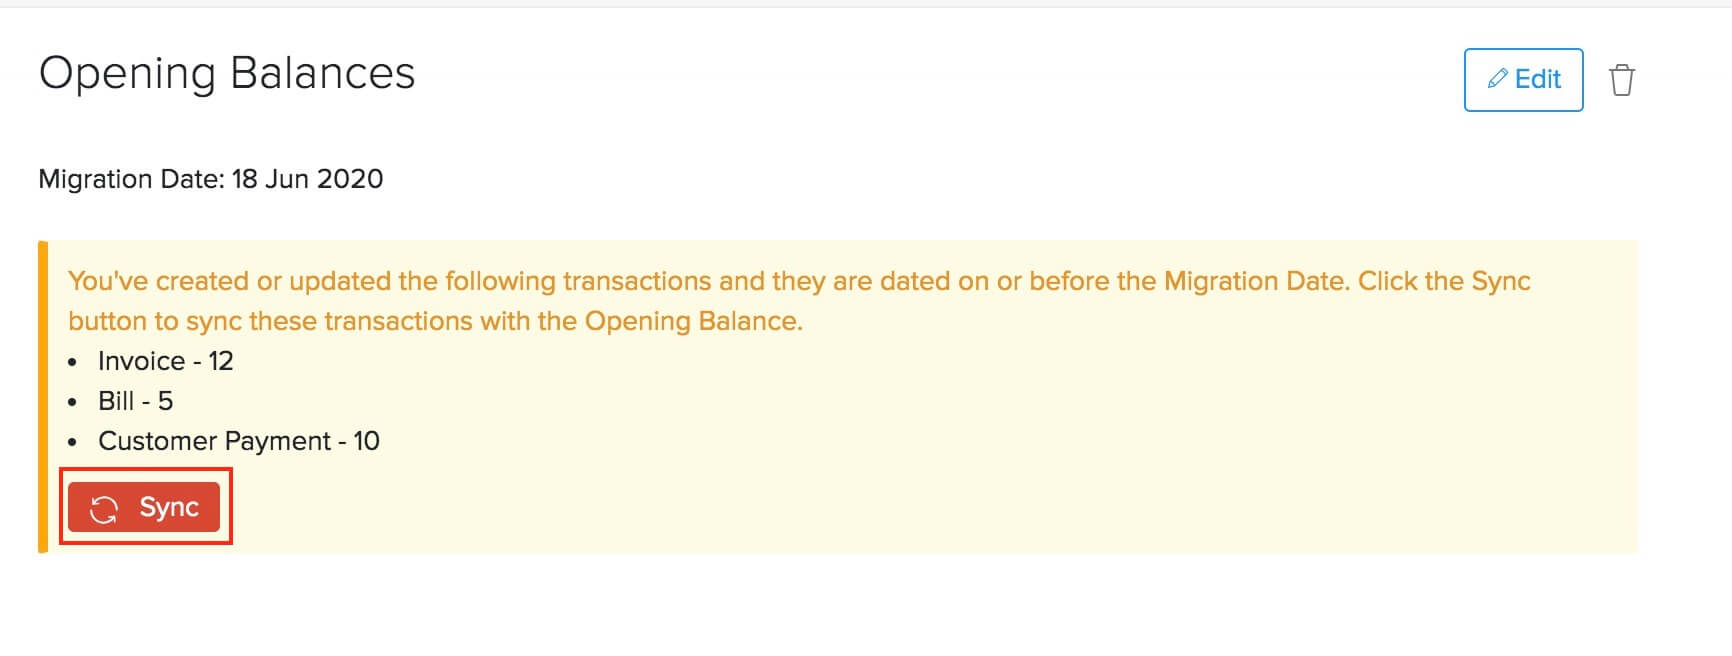
Sync Transactions
After you have imported all the required transactions, it is important that you check if they’ve been properly synced with the Opening Balances. Only then will you get accurate account values in the Trial Balance report.
If you had imported transactions that are dated on or before the migration date, then you need to sync them manually with the Opening Balances in Zoho Books. To do this:
- Go to Settings on the top right corner of the page.
- Select Opening Balances under Organization.
- The number of transactions that are backdated will be listed here.
- Click Sync.
With this final step, your migration process will be completed and you can start exploring the other features offered by Zoho Books.
What You Can Do after Migrating
Now that you have migrated to Zoho Books successfully, you can customize your organization further. You can set up payment gateways to accept online payments or integrate with other apps such as Zoho CRM and Zoho Analytics.
Zoho Books also has many features that you can utilize to streamline your accounting process, here’s some of them to get you started:
- Transaction approvals
- Auto-charge for recurring transactions
- Template customization
- Payment reminders
- Customer Portal and Vendor Portal
Note:If you face any issues or have doubts regarding the migration process, you can write to us at support@zohobooks.com. We’d be glad to help you out.
Points to remember during migration
- We don’t directly support importing your deposits, fund transfers etc., from your existing accounting system. But, you must enter or update the entries in Zoho Books accordingly so that all your accounts match.
- When importing a file, ensure that you map the fields properly and get rid of unnecessary commas, blank columns etc., and special characters like apostrophes, asterisks etc.
- If you have imported all your invoices or bills, ensure that appropriate statuses are maintained even after the migration.
- Please note while you import your files into Zoho Books, the value in the field should match with the data type supported by Zoho Books. There will be unmapped fields in your import file that would not have been mapped to any Zoho Books field. Hence, if you want these fields to be imported, the column header(s) should be mapped properly.
- You’ll not be able to import the data backup files of a Zoho Books organization into a new Zoho Books organization.
 Yes
No
Yes
No
 Thank you for your feedback!