E Signature- Zoho Sign
Integrating with Zoho Sign gives you the advantage of using e-signatures to complete many HR processes smoothly, without having to waste time or resources for document signing:
- Onboarding processes that include signing of documents such as offer letters, social media policy, non-disclosure agreements etc.
- Confirmation letters for employees who have completed their probation process.
- Promotion letters given to employees in other geographical locations.
- Transfer letters authorizing employees to relocate to another office.
- Trainers granting course certifications for virtual training.
- Exit letters along with conduct certificates for employees leaving the organization.
You will initially get to experience the Enterprise edition of Zoho Sign for 14 days after which you will be integrated with the Zoho Sign free edition. Learn more about Zoho Sign plans.
- Integrating with Zoho Sign
- Sending a document for e-signing
- E-Signature related actions
- Supported Formats
- Relative Use Cases
- Configuring workflows for e-signature
- Revoking Integration with Zoho Sign
Integrating with Zoho Sign
If you have an active account in Zoho Sign, follow the steps below to integrate.
- From your home page, go to Settings (gear icon) > Integrations > Zoho.
- Click on Enable under Zoho Sign.
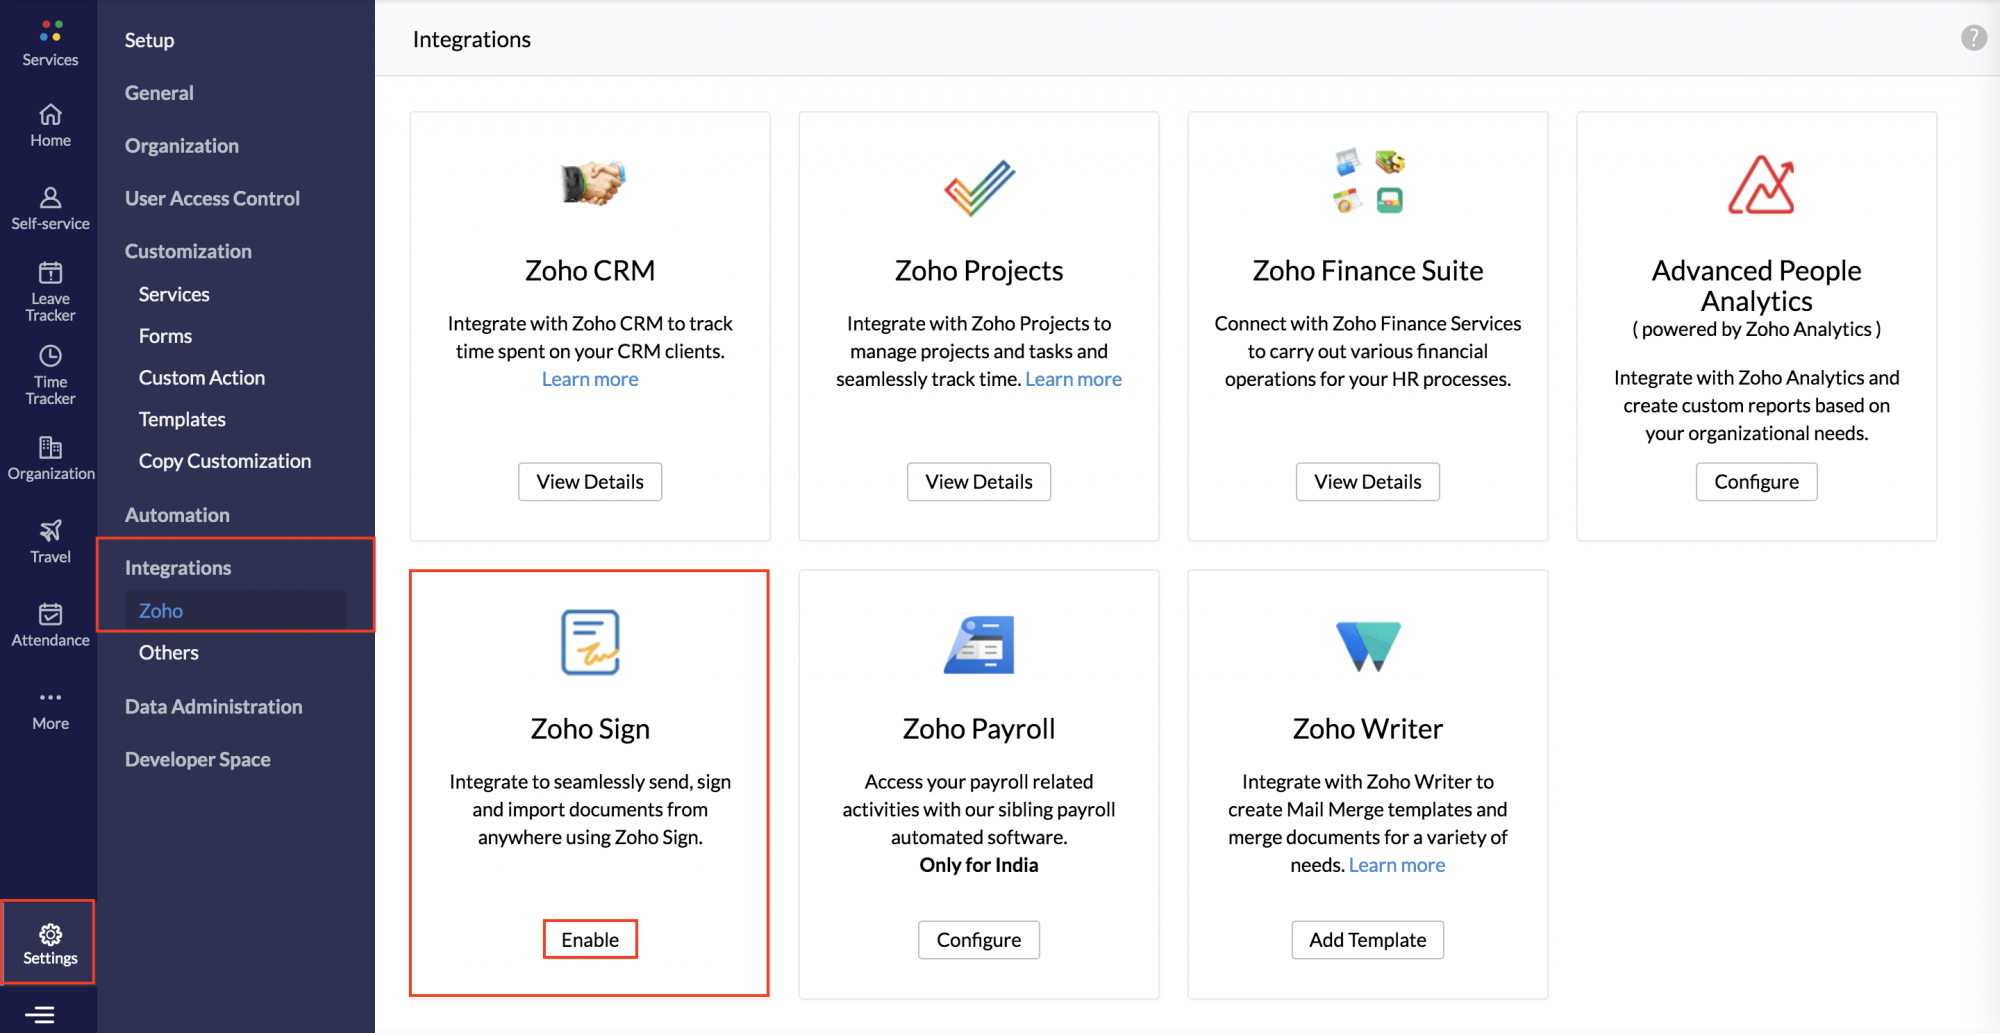
Your Zoho People account has now been integrated with Zoho Sign.
Note: An active account in Zoho Sign is necessary for this integration.
If you do not have an account in Zoho Sign, follow these steps to integrate.
- From your home page, go to Settings (gear icon) > Integrations > Zoho.
- Click Enable under Zoho Sign.

You will be taken to the Sign-up page of Zoho Sign in order to create a new Zoho Sign account
3. Type in your organization's name and click on Save and Proceed.
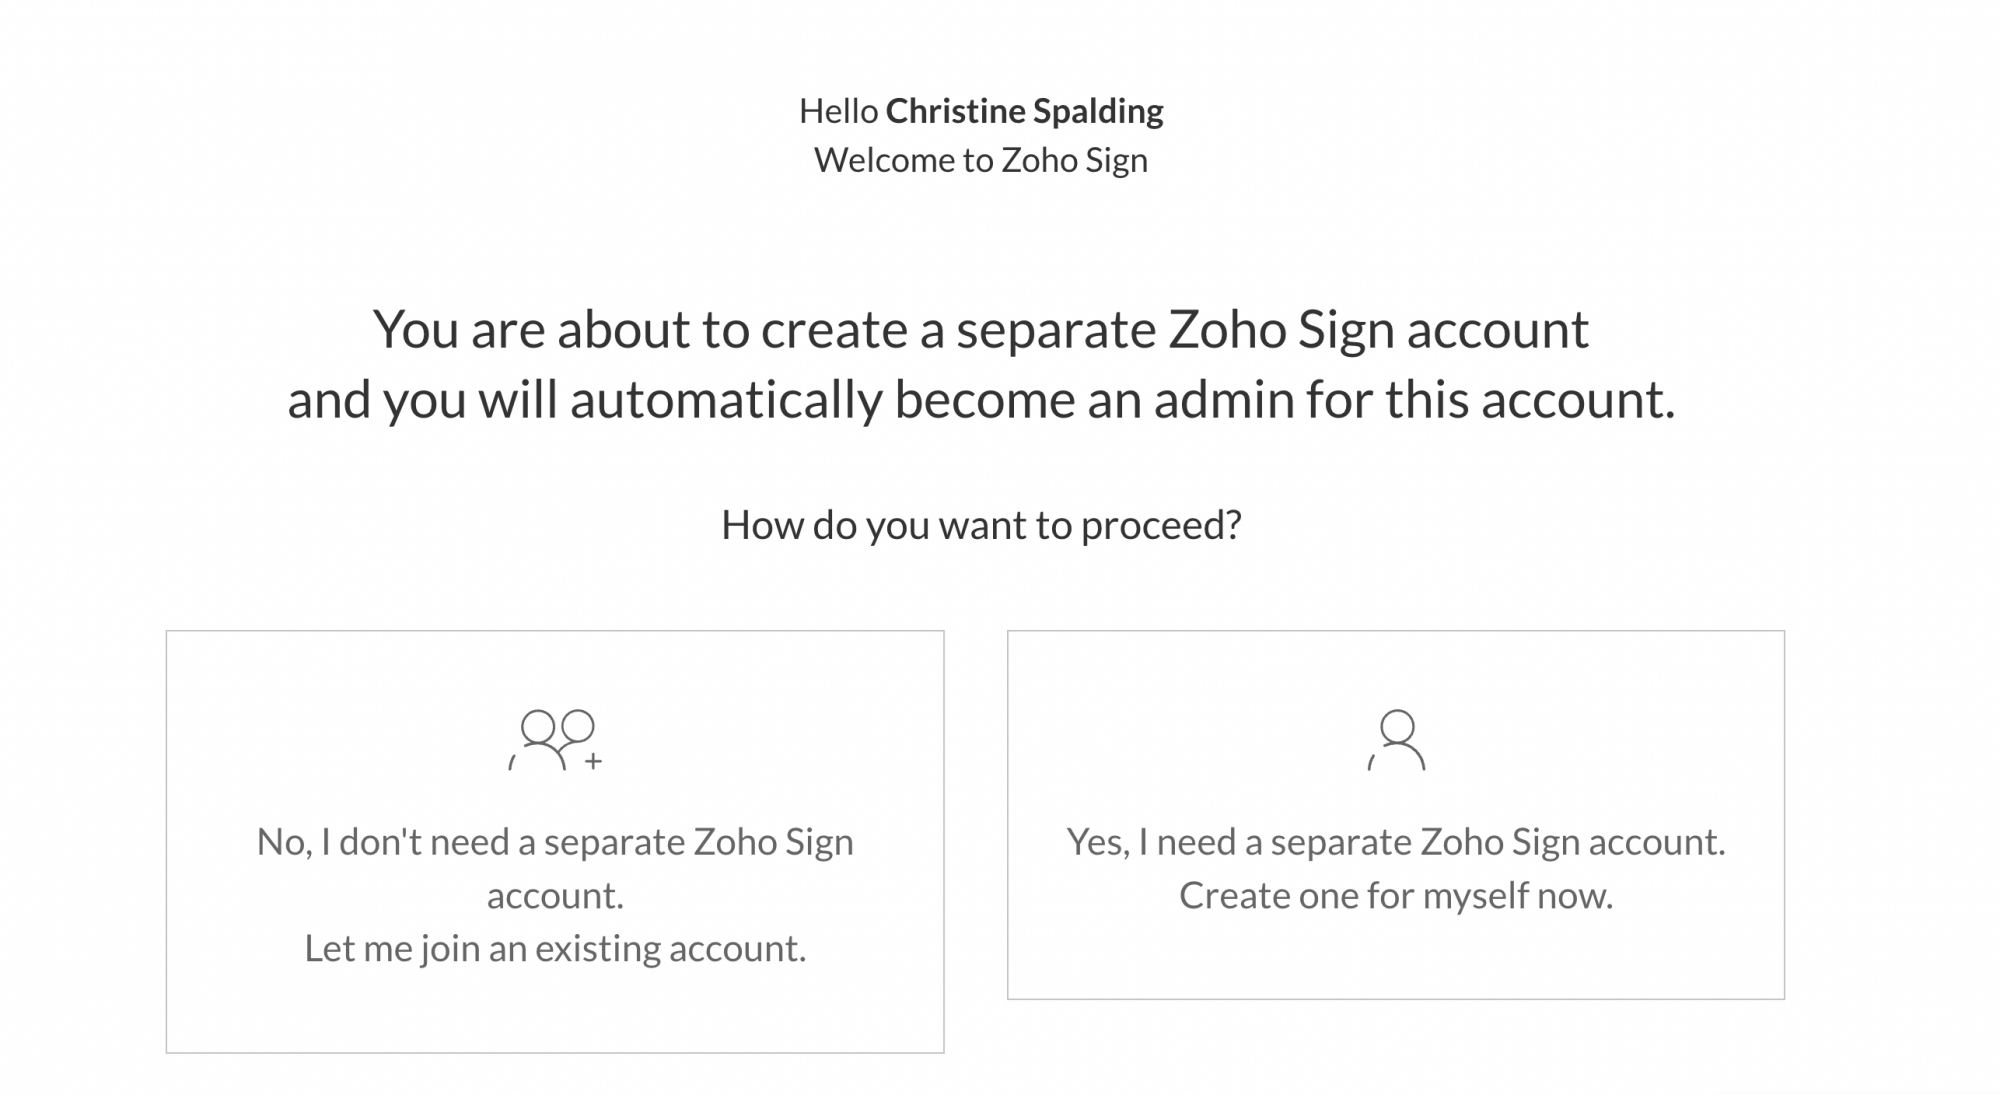
Your new Zoho Sign account has been created.
You will be re-directed to the Zoho People's integrations page. You can find your Zoho People account to be automatically integrated with Zoho Sign.
Sending a document for e-signing
To send a document for e-signature using Zoho Sign,
- From your home page go to Files > E-Signature Documents
- Click on Send for signature
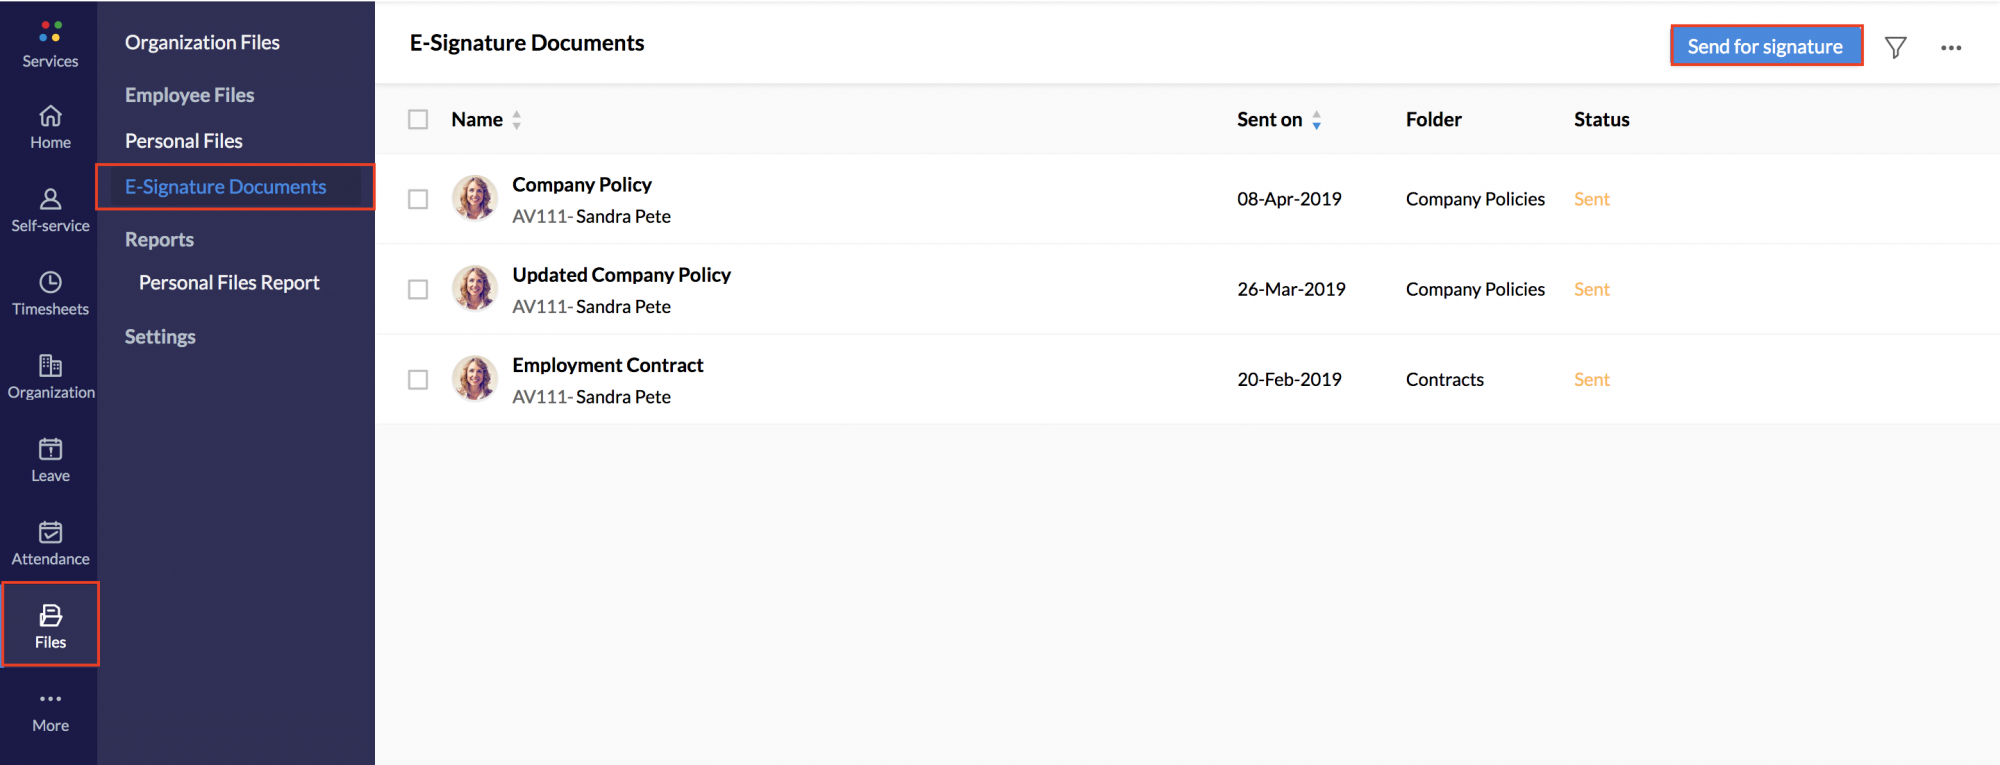
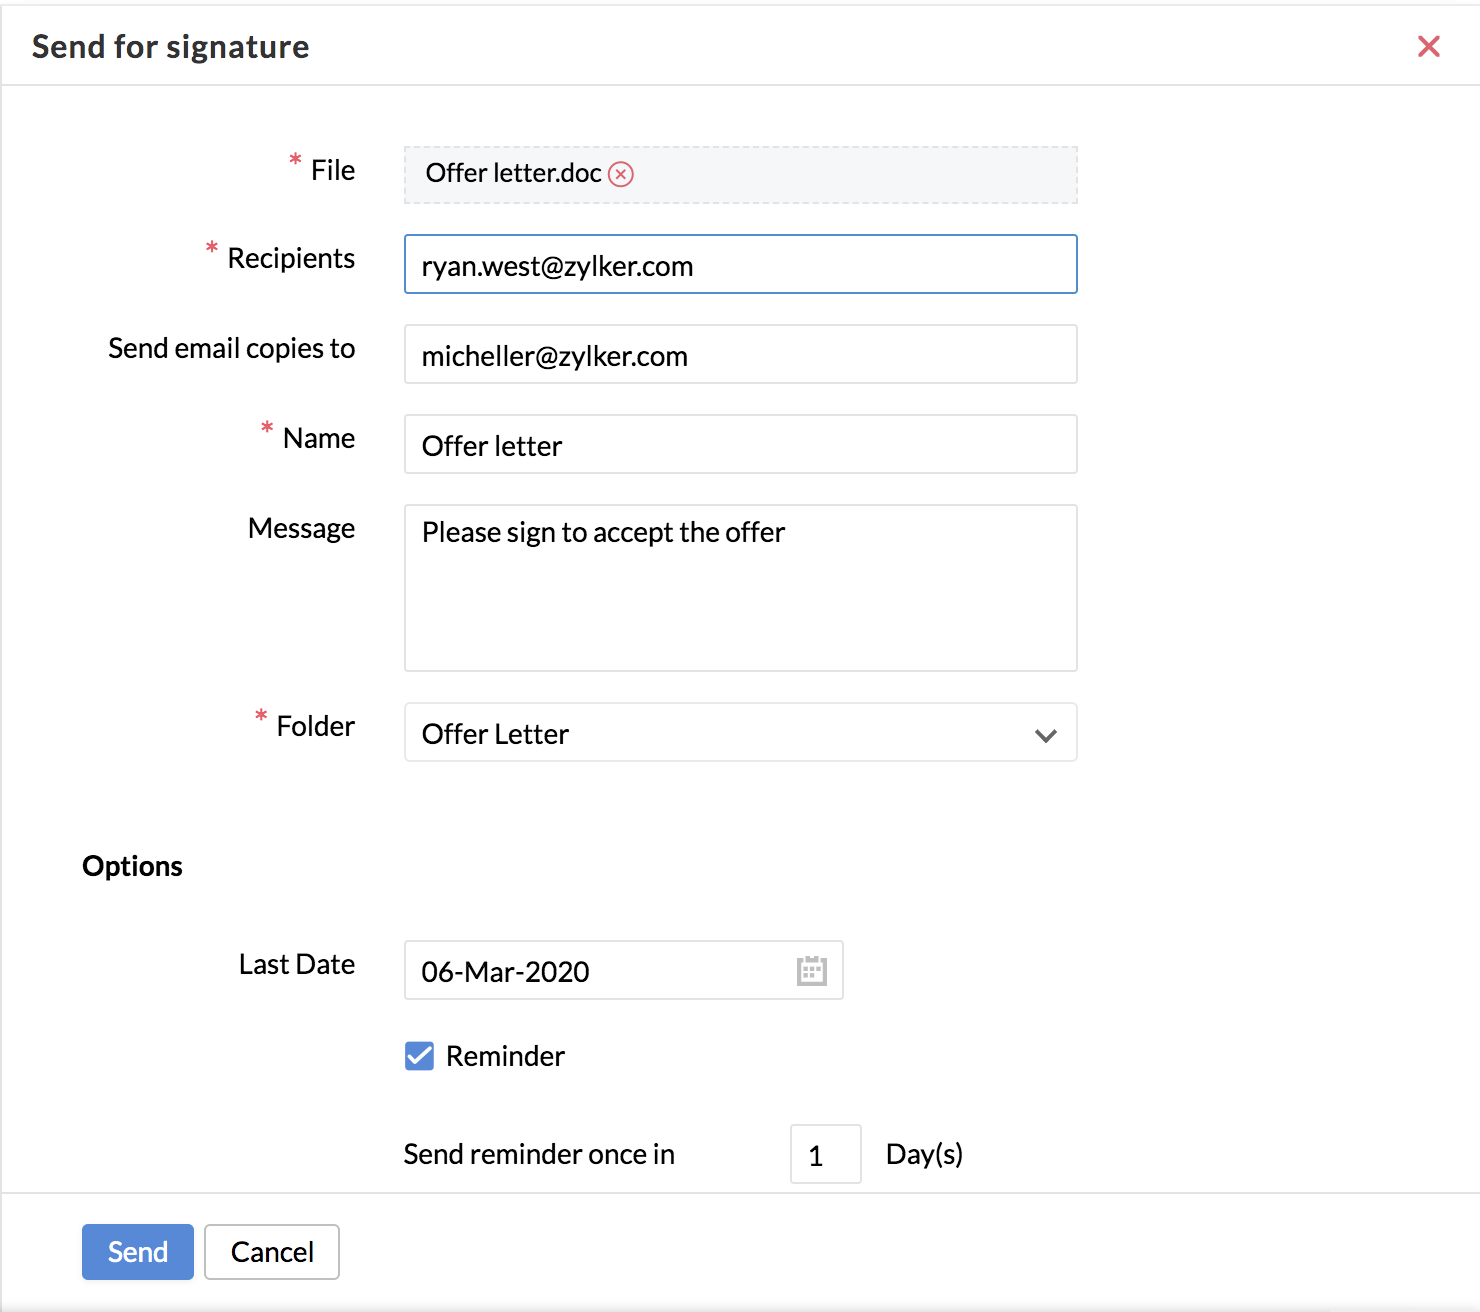
- Upload the respective file to be sent for e-signature.
- Type in the email address of the recipient under Recipients. In case of multiple recipients, enter the email addresses separated by commas.
- Provide the email addresses of those, to whom you would like to send a copy of the document under Send email copies to.
- Give a name for the document to be sent.
- Enter a message if you would like to have a note to be added along with the document.
- Select the folder under which you would like to store the signed copies.
- Check the Reminder box, if you would like to have a reminder sent.
- Set the last date after which the document would expire.
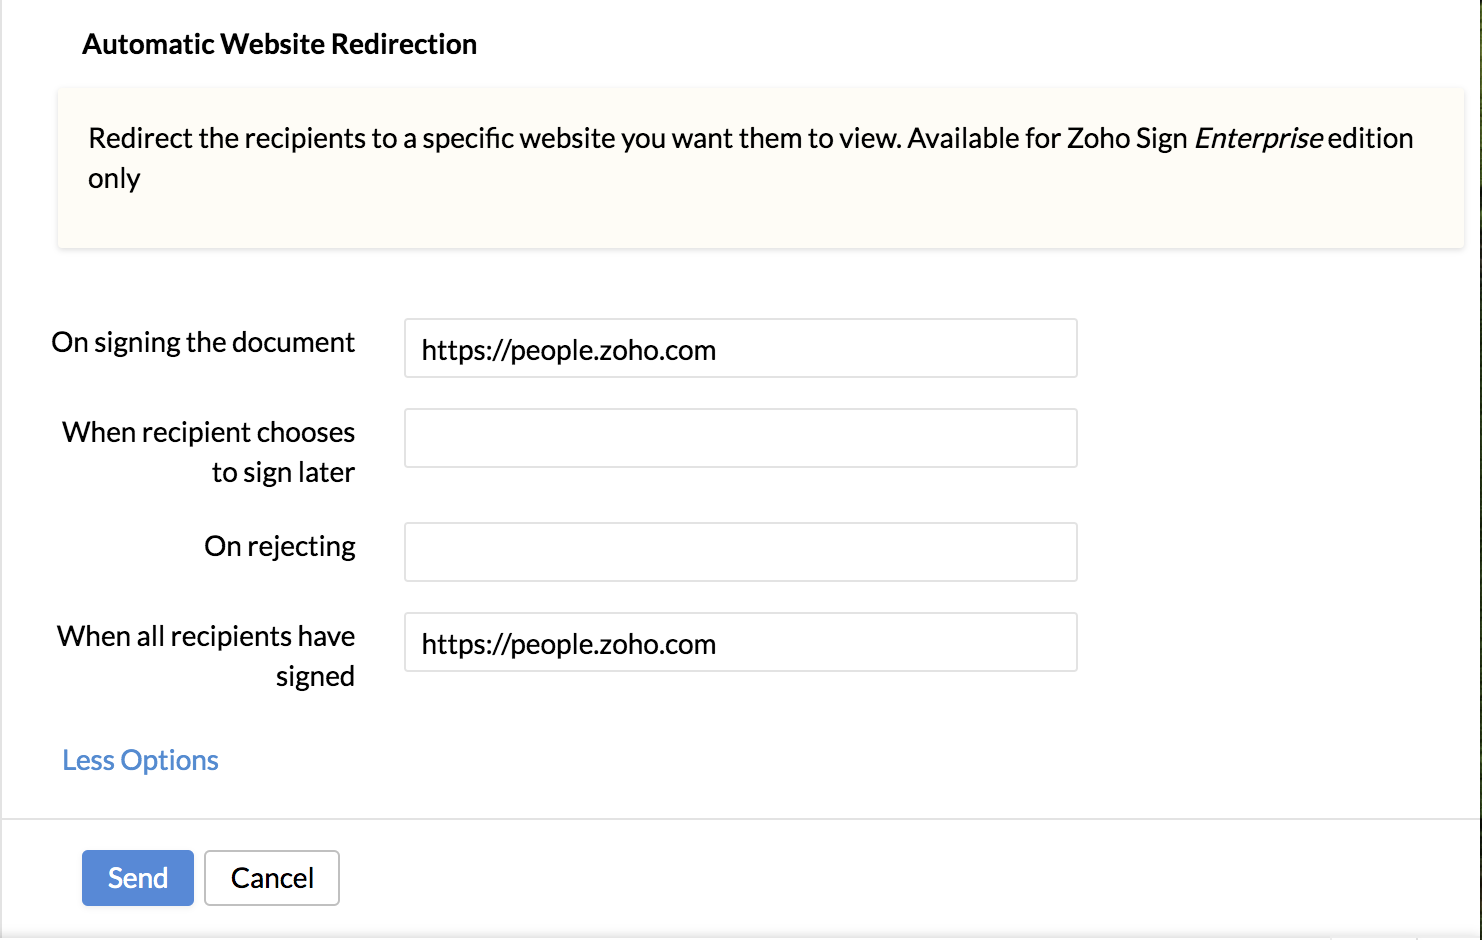
- Under Automatic Website Redirection, enter the pages you want to redirect your recipients to, for the applicable scenarios: On signing the document, When recipient chooses to sign later, On rejecting, When all recipients have signed.
- Click Send.
A new Zoho Sign panel will open, wherein you can view, edit and add the recipients, document name and all other details listed.
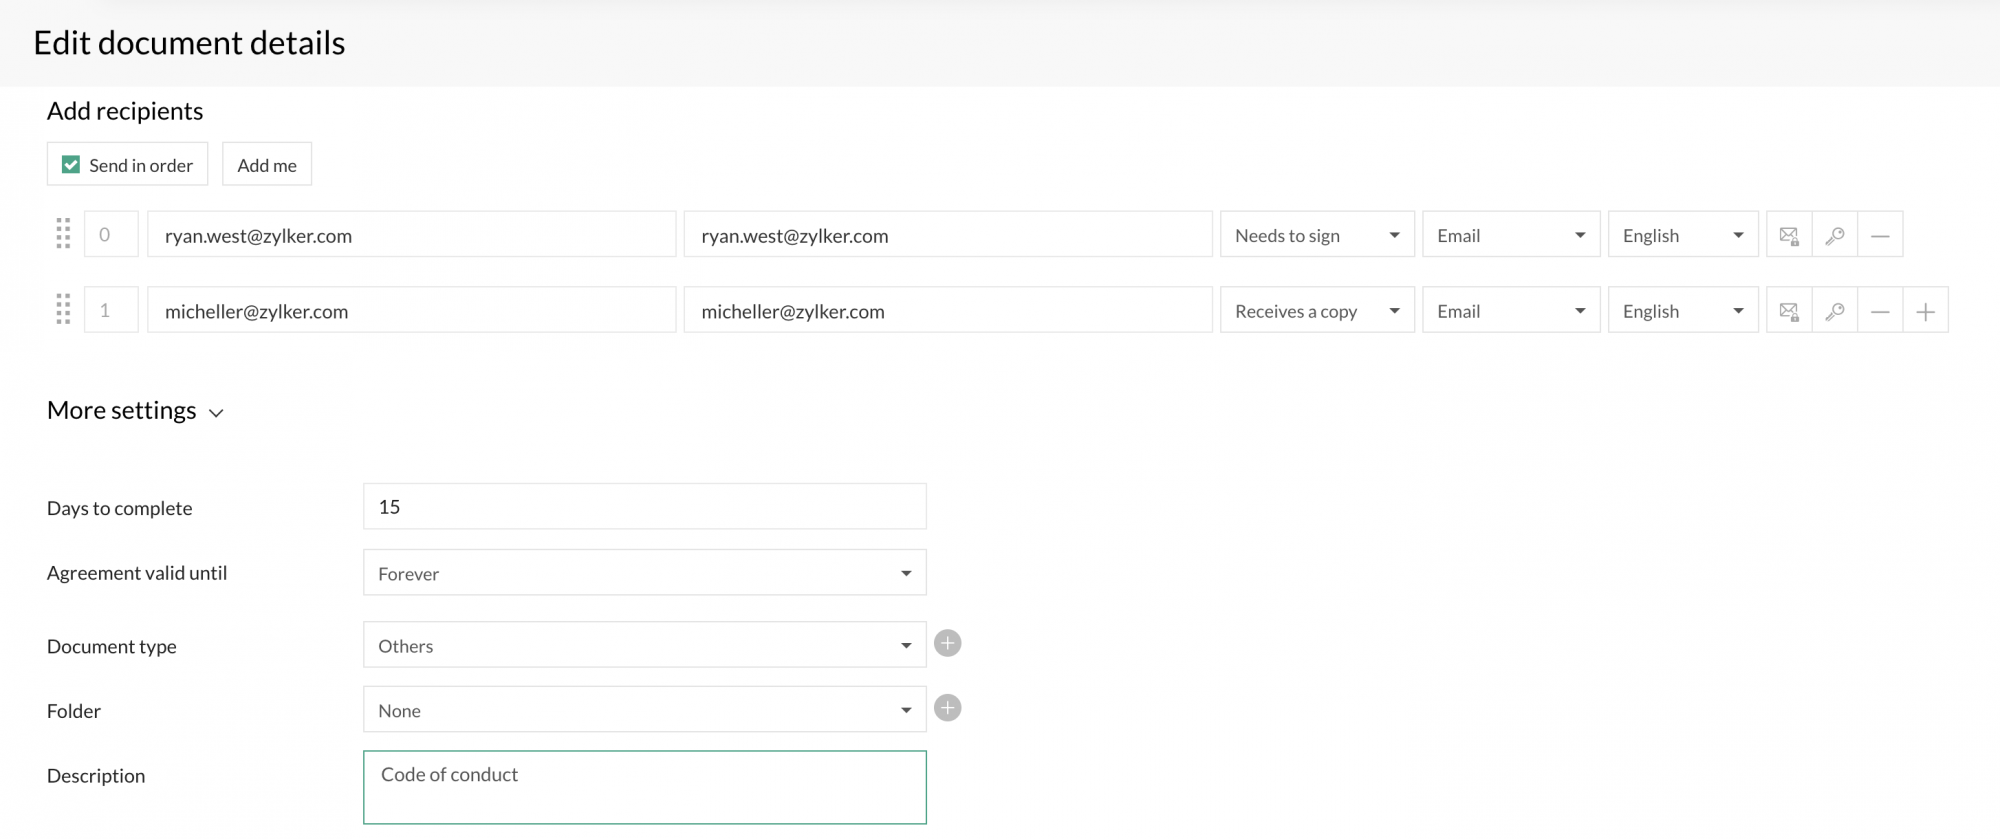
Note: It is not possible to interchange the sender of the document and the viewer of the marked copy in the Zoho Sign panel. In Zoho People the admin, location admin, files data admin and forms admin can send files for signing
The Zoho Sign panel with the uploaded document will open
- Drag and place the signature field in the document that needs to be sent. Drag and drop other required fields from the right side.
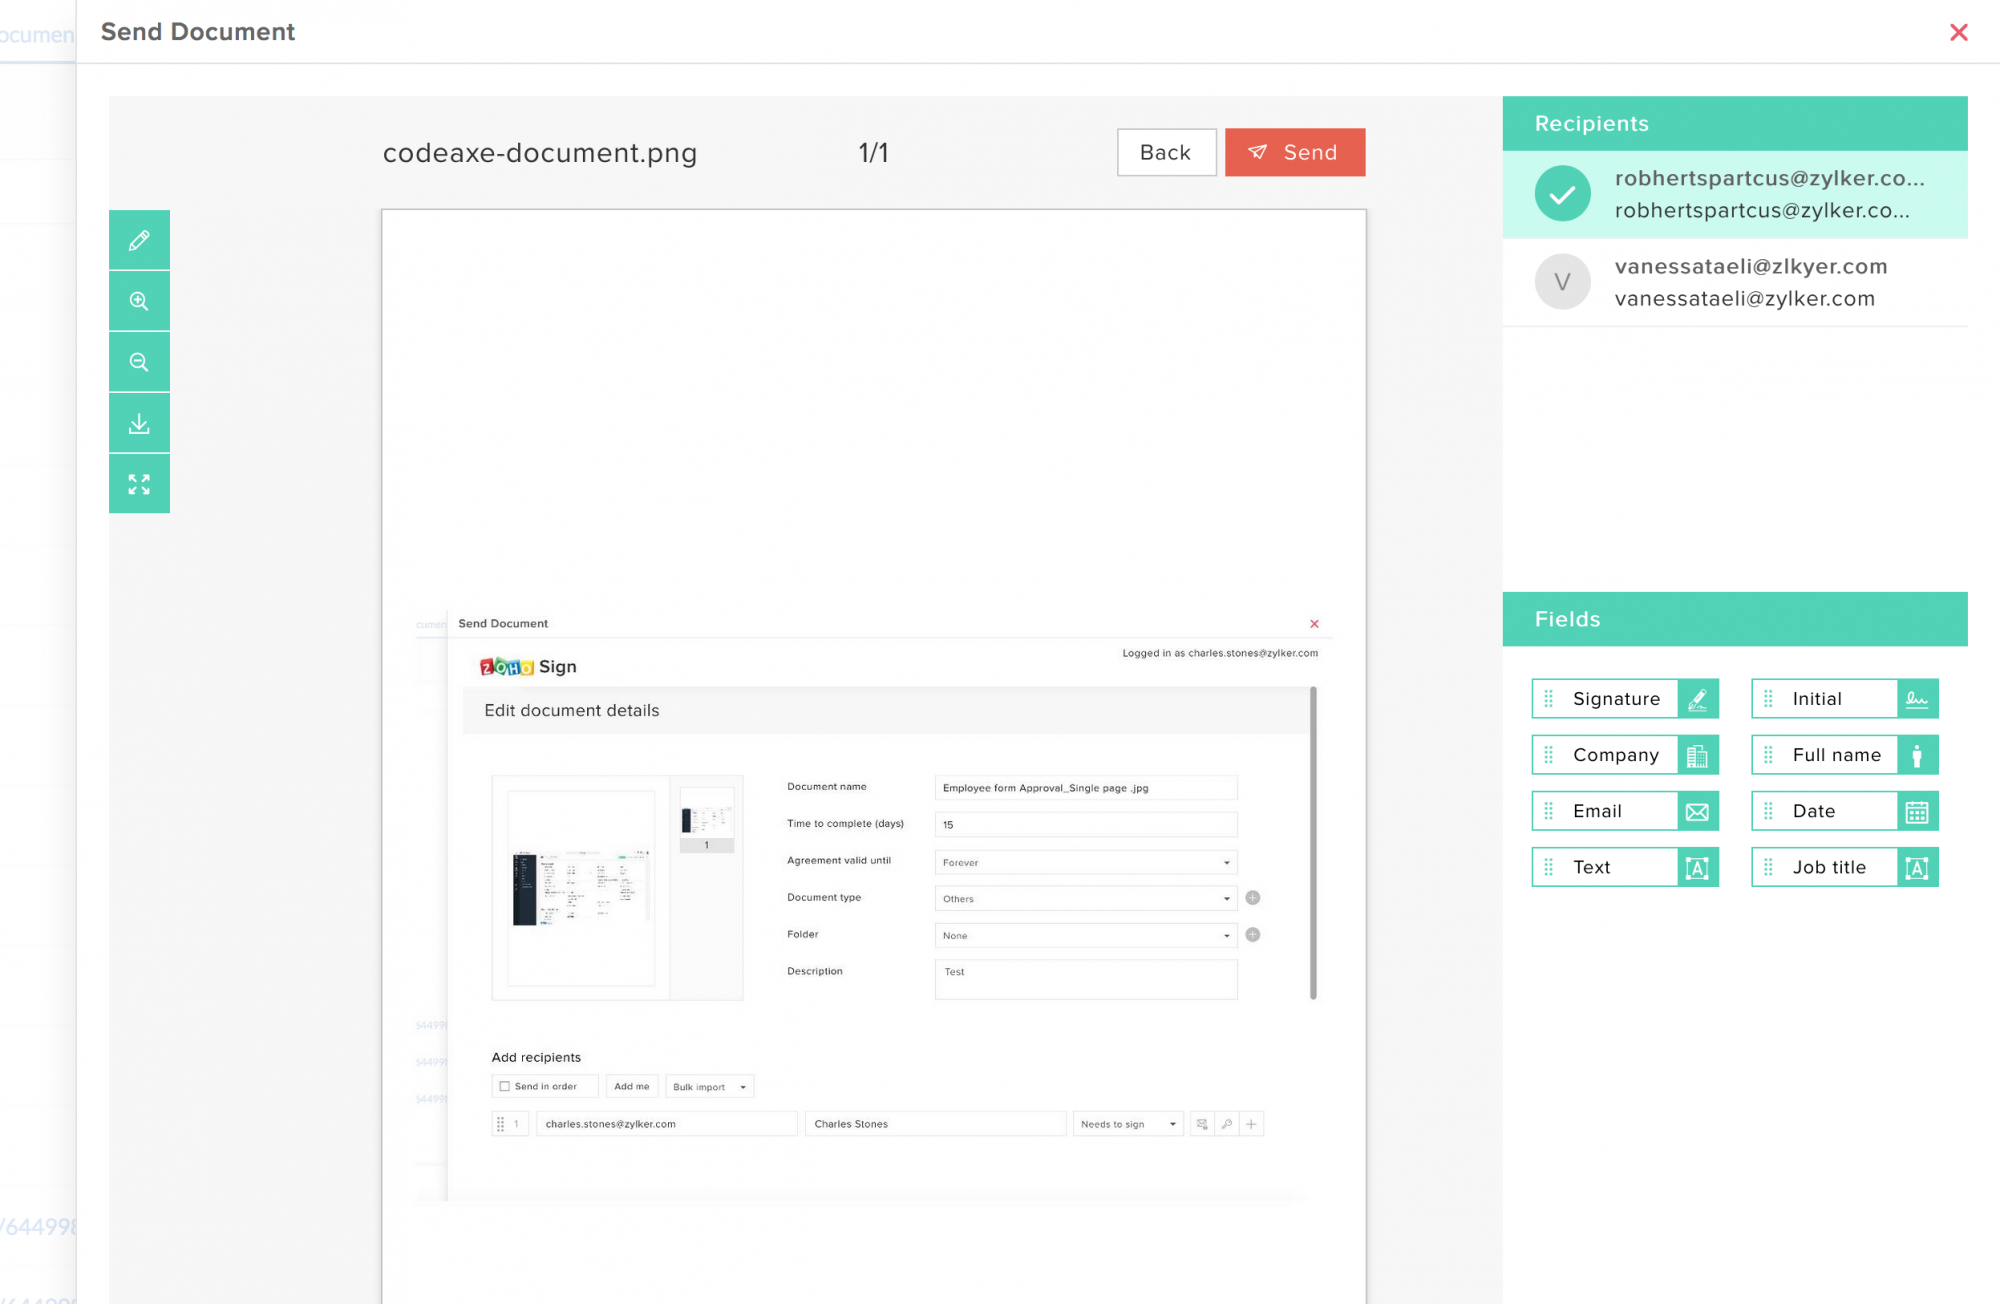
- Click Send (top-right).
- Confirm the details to be sent by clicking on Confirm.
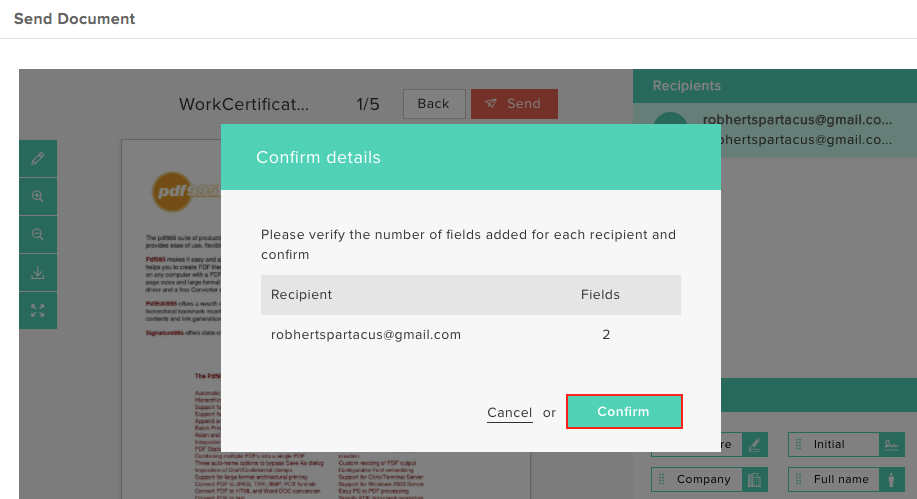
You have successfully sent the document for e-signature using Zoho Sign.
Supported Formats
Zoho Sign is supportive of the following file formats:
- jpg
- jpeg
- doc
- docx
- png
- off
- rtf
- dots
- txt
- tex
- saw
Please ensure that the document you upload is any one of these file formats.
E-Sign related actions
You can send a reminder, recall a document and modify the expiration date for your e-sign document. To perform these related actions,
- Go to Files > E-Signature Documents.
- Click the document you want to perform related actions to.
- Click the drop-down on the right top corner.
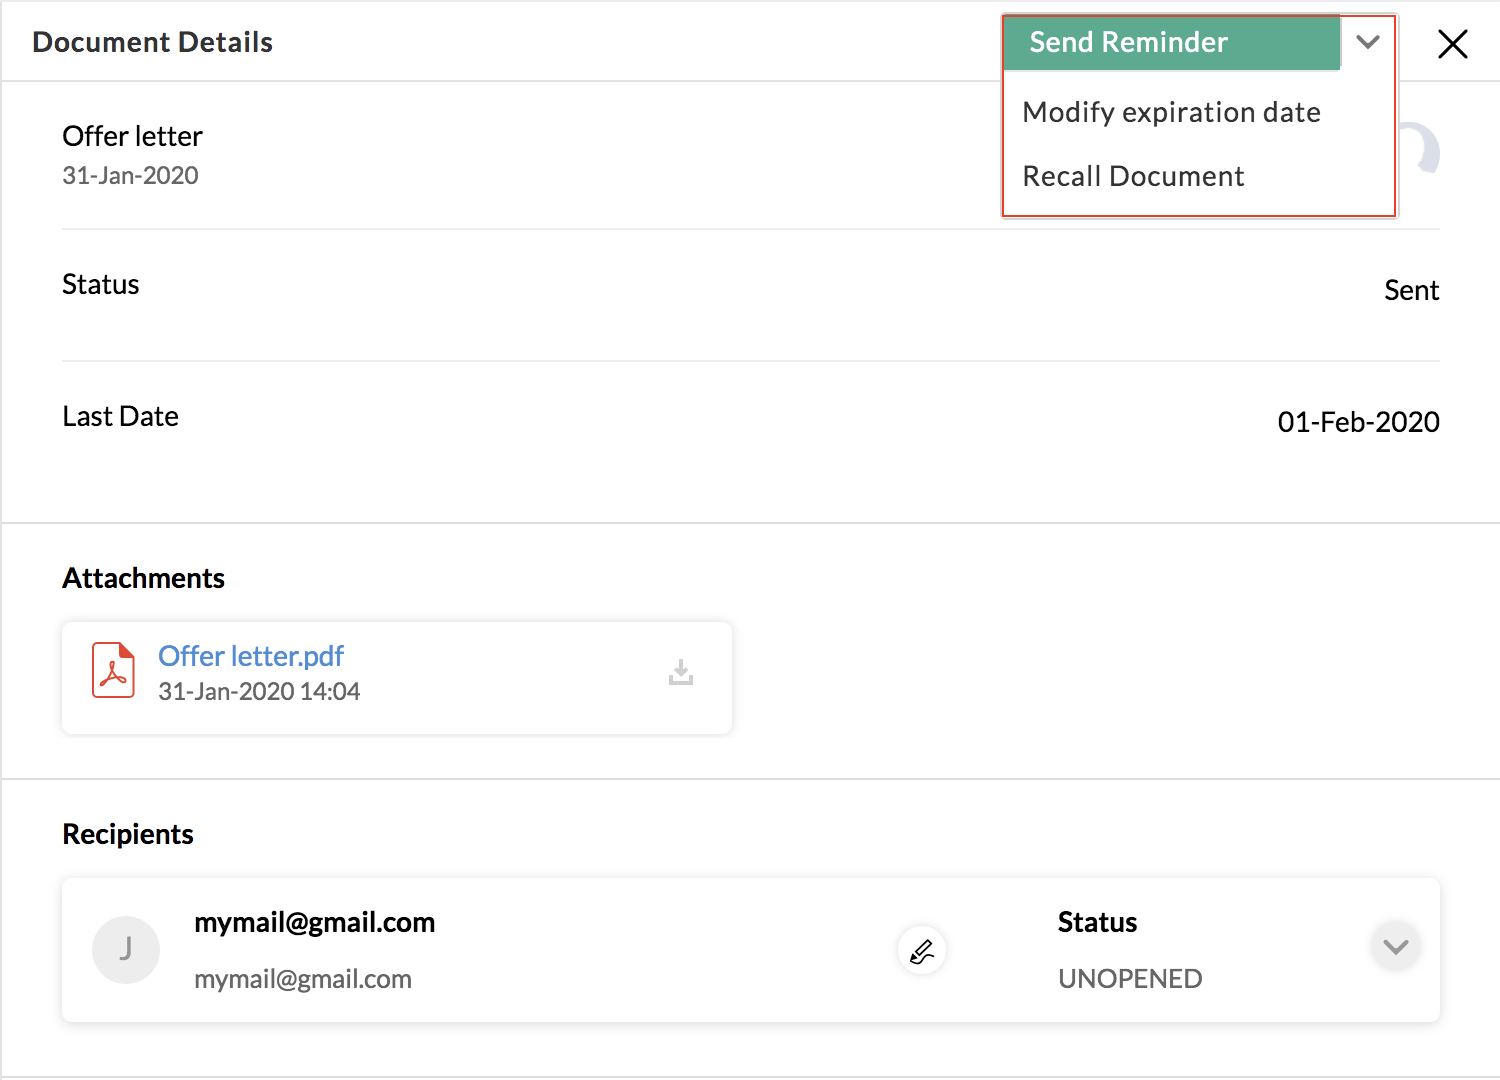
- If you want to Recall Document or Send Reminder, click the respective option and click Confirm.
- If you want to alter the expiration date of the document, click Modify expiration date, enter the New expiration date, and click Modify.
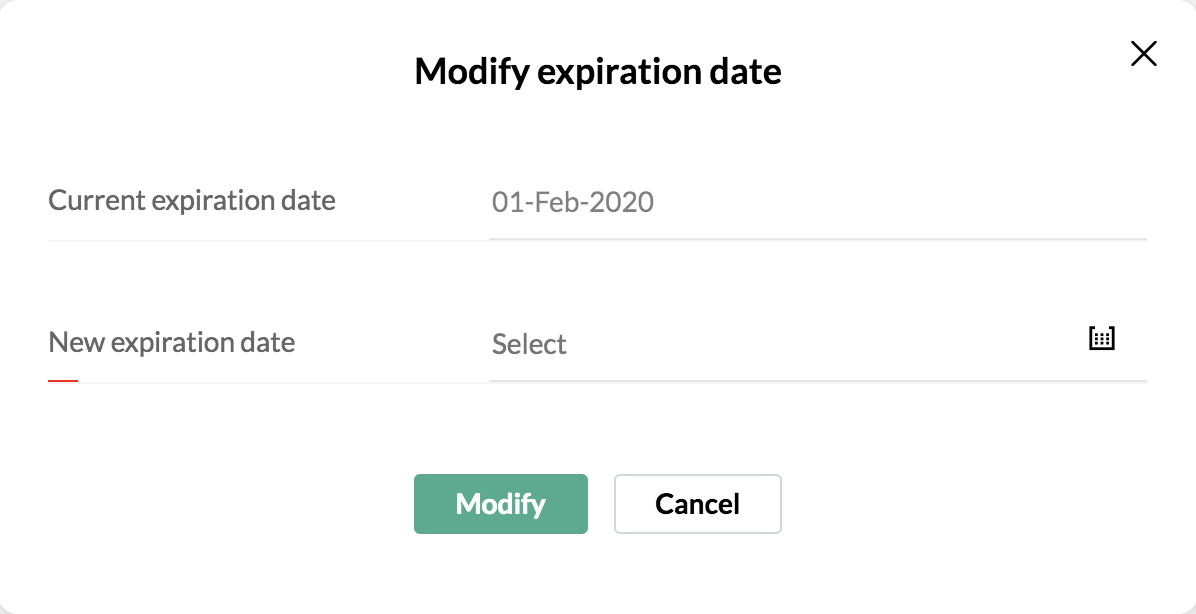
You can advance or extend the expiration date using this option. These options can also be accessed under Relation Forms in the Record View of the applicable form.
Relative Use cases
In this section, we are covering steps to get done some of the most common HR tasks like sending probation confirmation letters and offer letters for e-signing.
Sending Probation Confirmation Letter
To send a probation confirmation letter to employees for e-signature using Zoho Sign, follow the steps below.
To do this, the e-signature field should have been enabled in the respective form here the Employee form
- From your home page, go to Settings (gear icon) > Customization > Forms
- Go to the respective form - In this case, Employee form
- Under Form Properties check Enable Zoho Sign
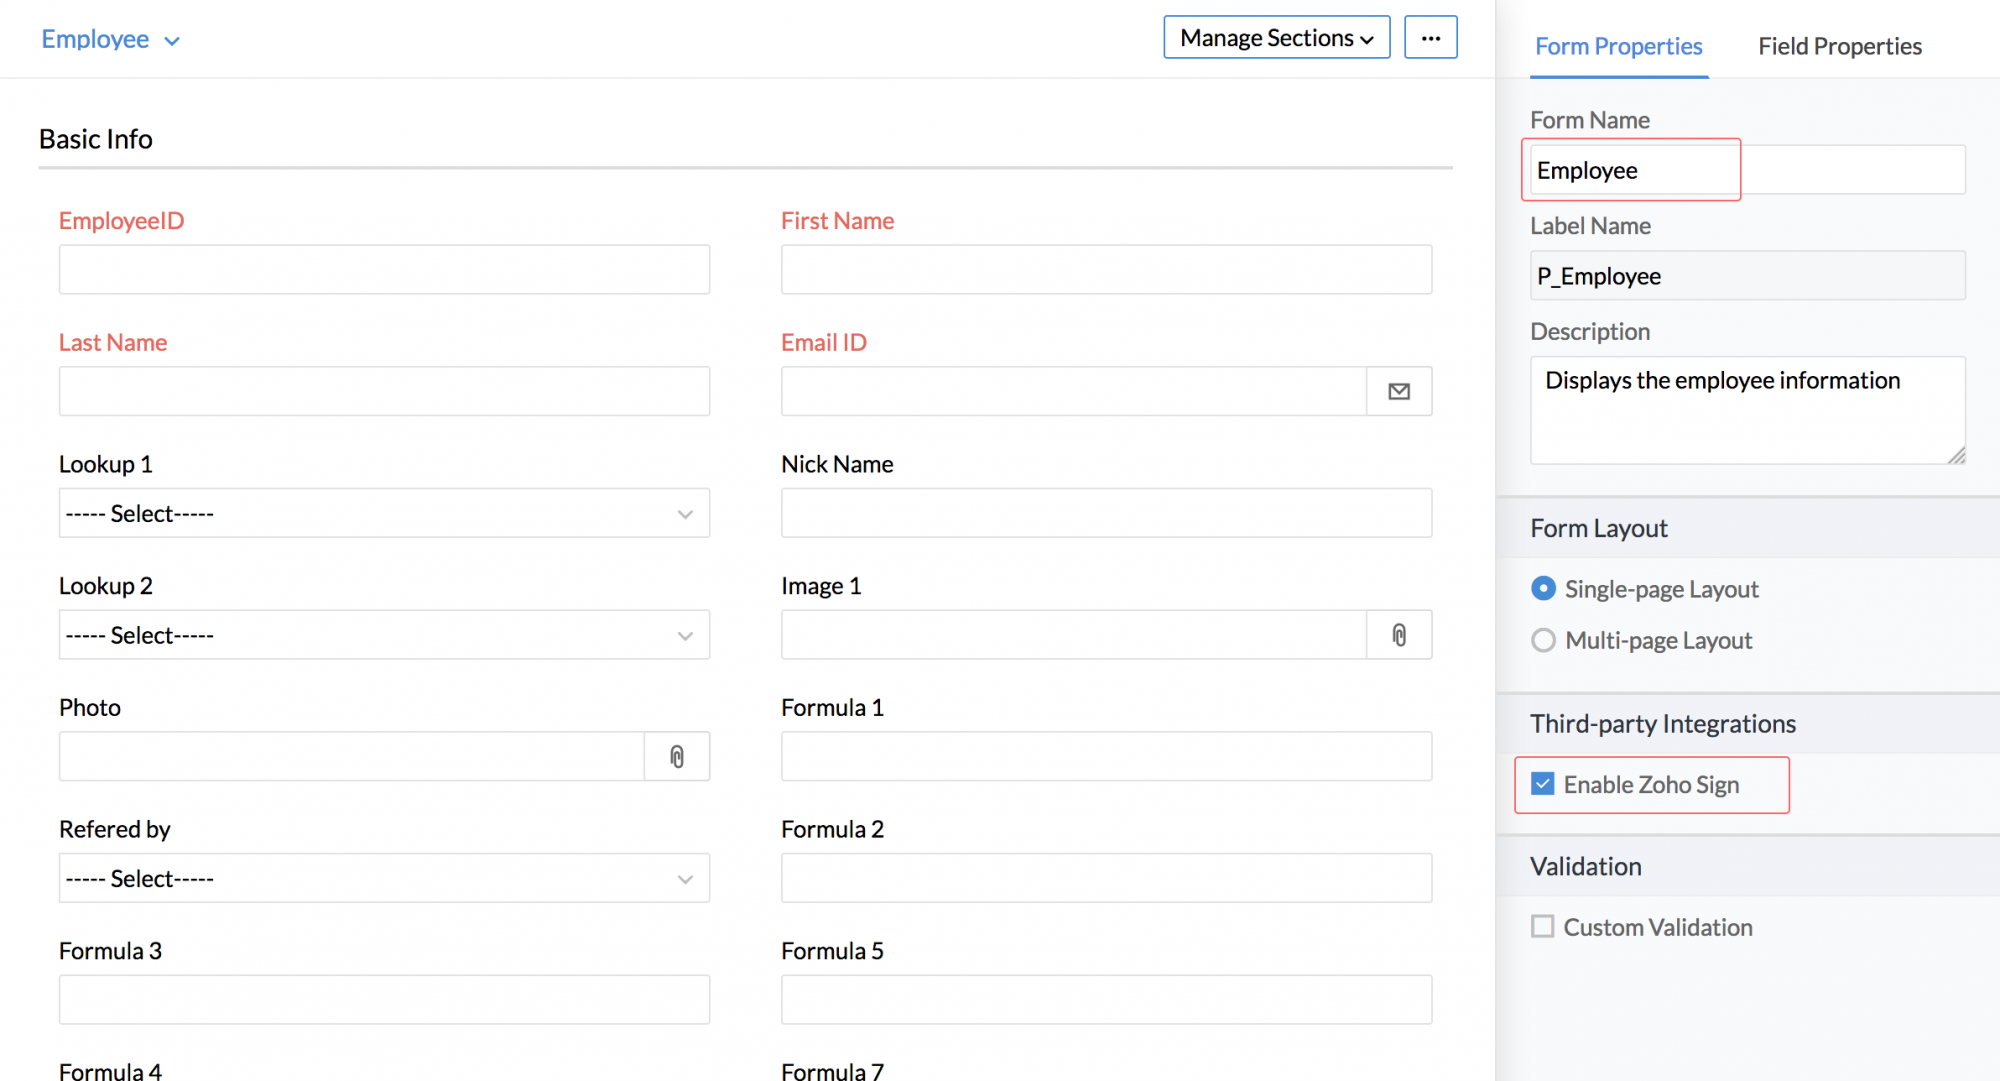
Note: The form should have a 'File upload' and Email ID field to enable the e-signature option
To send the letter to the respective employees,
- From your home page, go to Organization > Employee
- Select the employees for whom the Probation confirmation letter should be sent for e-signature
- Click on Send for signature to the selected recipients for e-signature
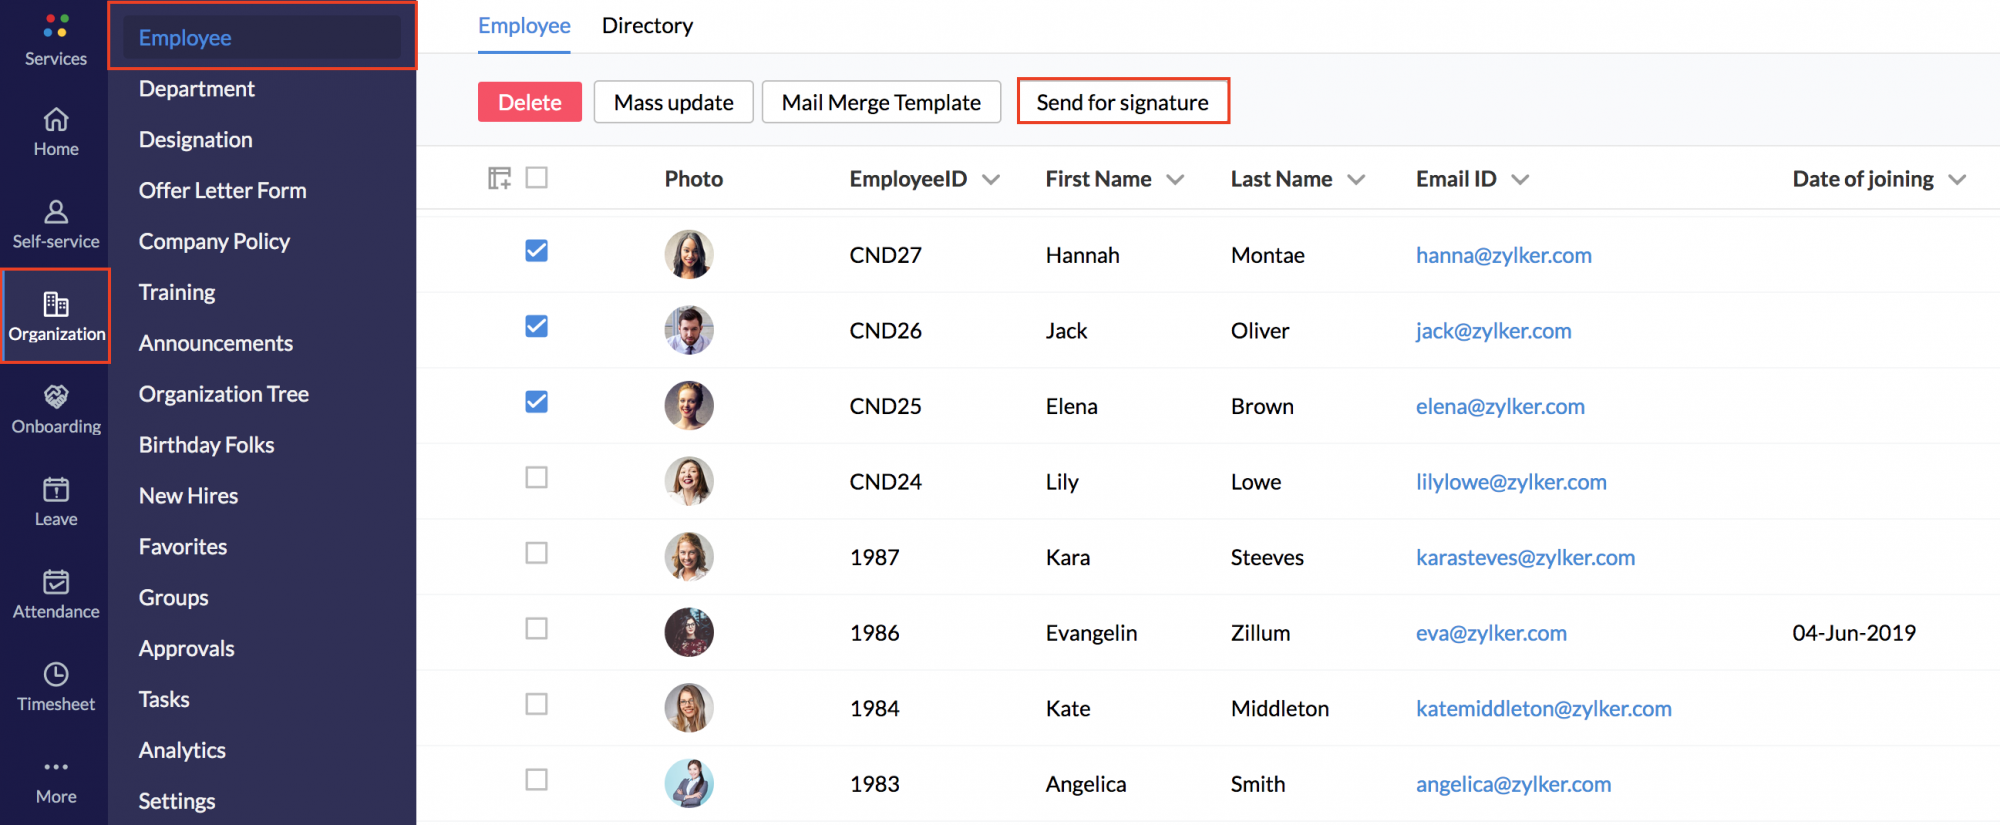
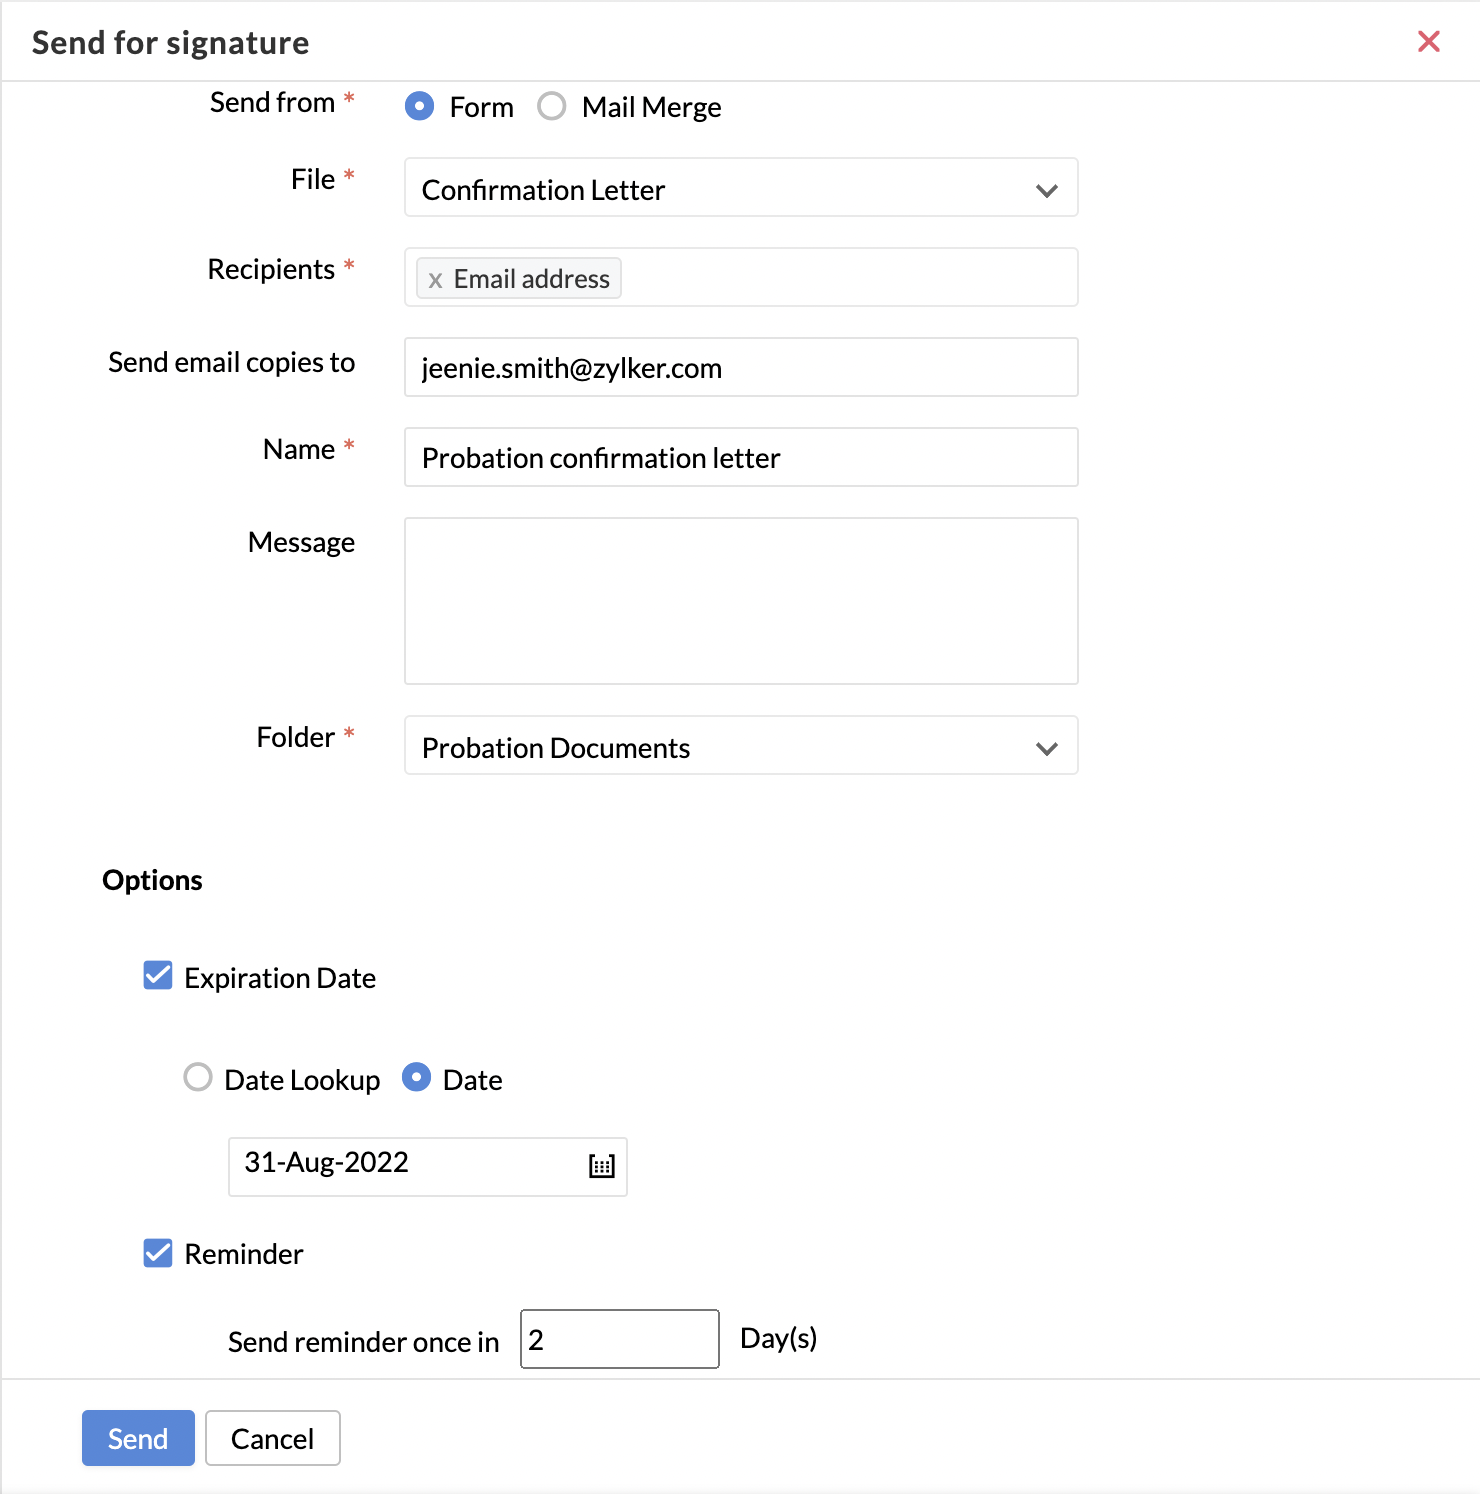
- Select the File to be sent. The drop-down contains files from the file upload field of the employee form.
- Under Recipients, select the email ID field of the form. This means the file will be sent to the email ID present in the employee form of the selected employee. You can also select other email ID fields present in the form.
- Fill in details like Send email copies to.
- Give a name for the document to be sent and add a message if required.
- Select the last date after which the document will expire.
- Select the folder from the dropdown under which the signed copy has to be stored.
- Check the Reminder box, if you would like to have a reminder sent.
- Under Automatic Website Redirection, enter the pages you want to redirect your recipients to, for the applicable scenarios: On signing the document, When recipient chooses to sign later, On rejecting, When all recipients have signed.
- Click Send.
The Probation confirmation letter with e-signature option enabled will be sent to the selected set of employees.
Sending Work Certificate
You can have your employee conduct certificate/work certificate stored under Employee Files in the files module.
To send the conduct certificate/work certificate from Employee Files,
- Go to Files > Employee Files and click All Files
- To send the document for e-signature, click on the ellipsis icon > Send for signature.
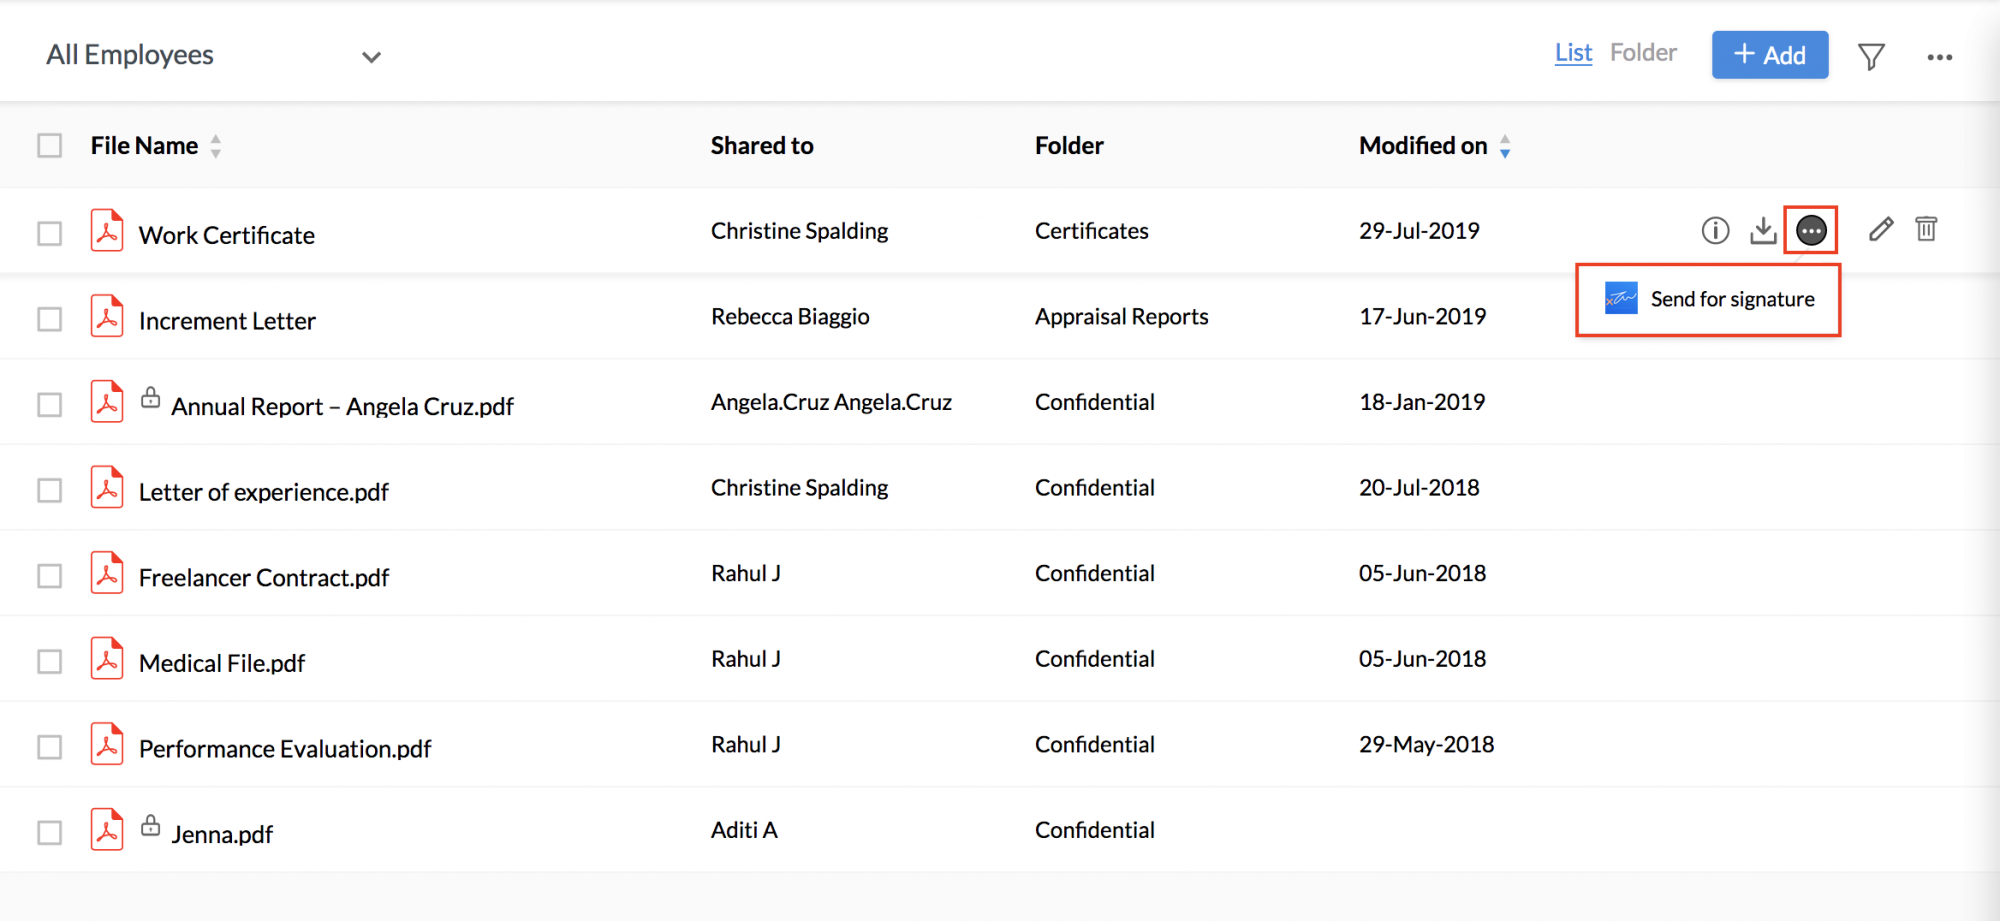
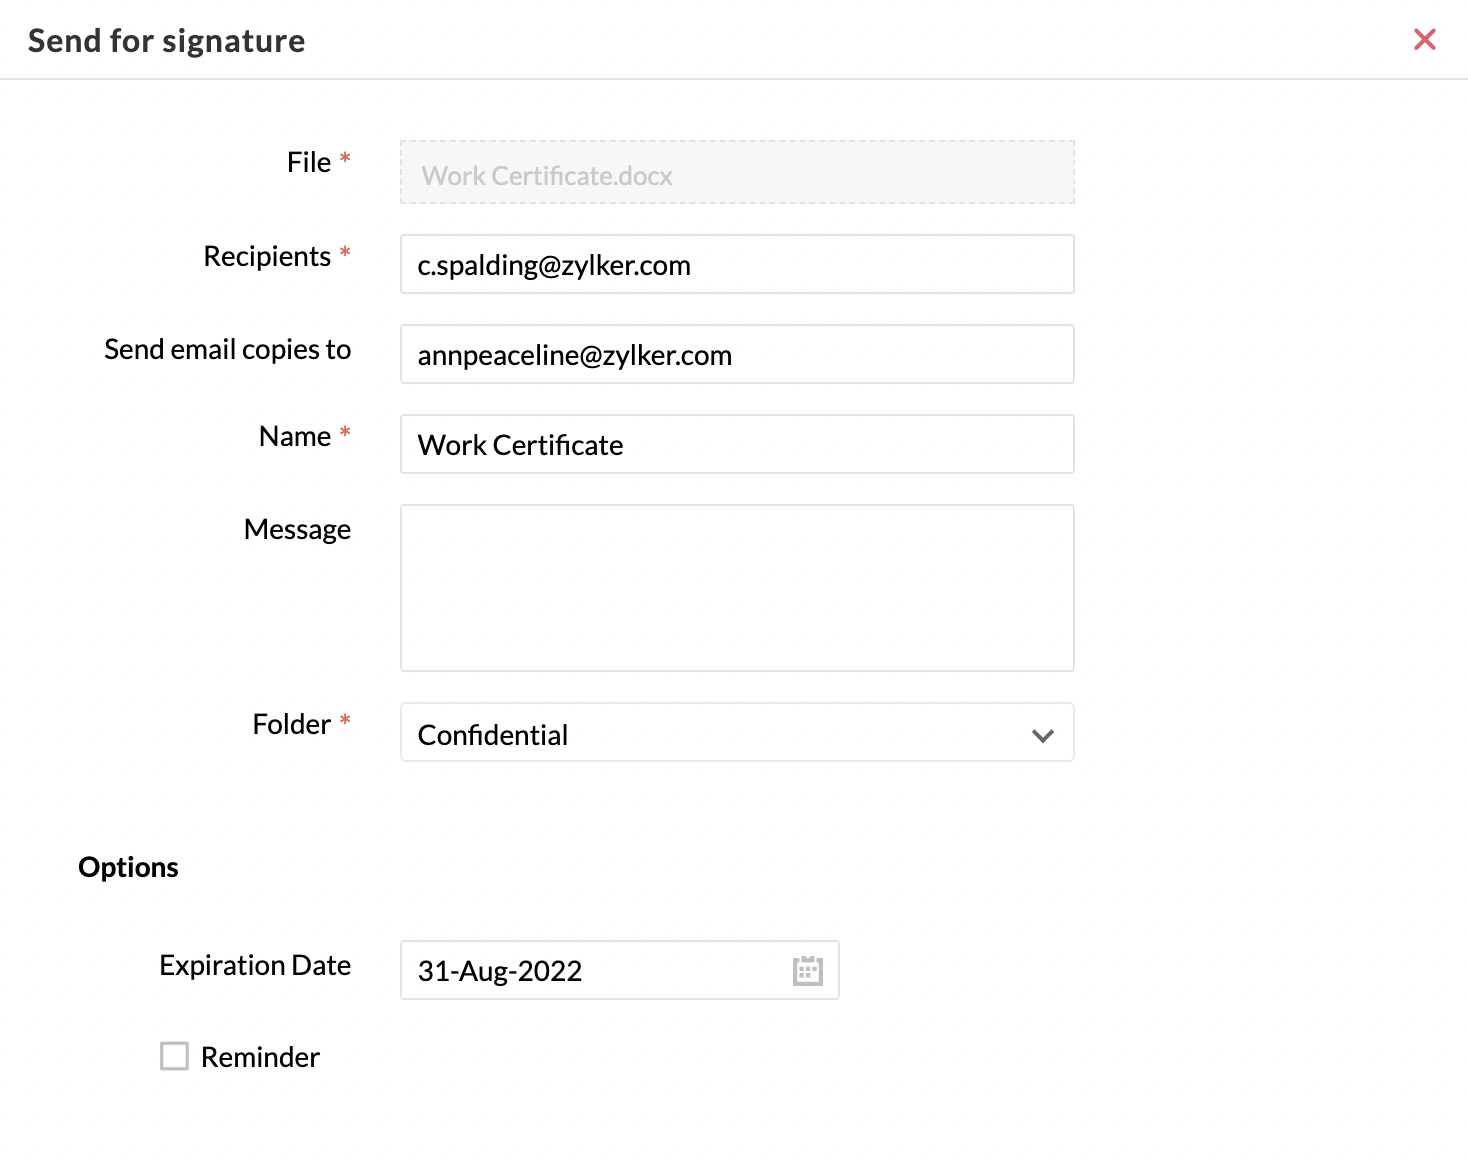
- You will find the document to be selected automatically. Under recipients, enter the mail address of the employee who needs to sign the document
- Fill in other details like subject, message, etc
- Pick a folder or create a new folder if required. The signed copy will be stored under this folder.
- Set an expiration date and reminder, if necessary.
- Enter the required URLs under Automatic Website Redirection.
- Click Send.
A new Zoho Sign panel will open, wherein you can view, add and edit the recipients, document name and all other details listed.
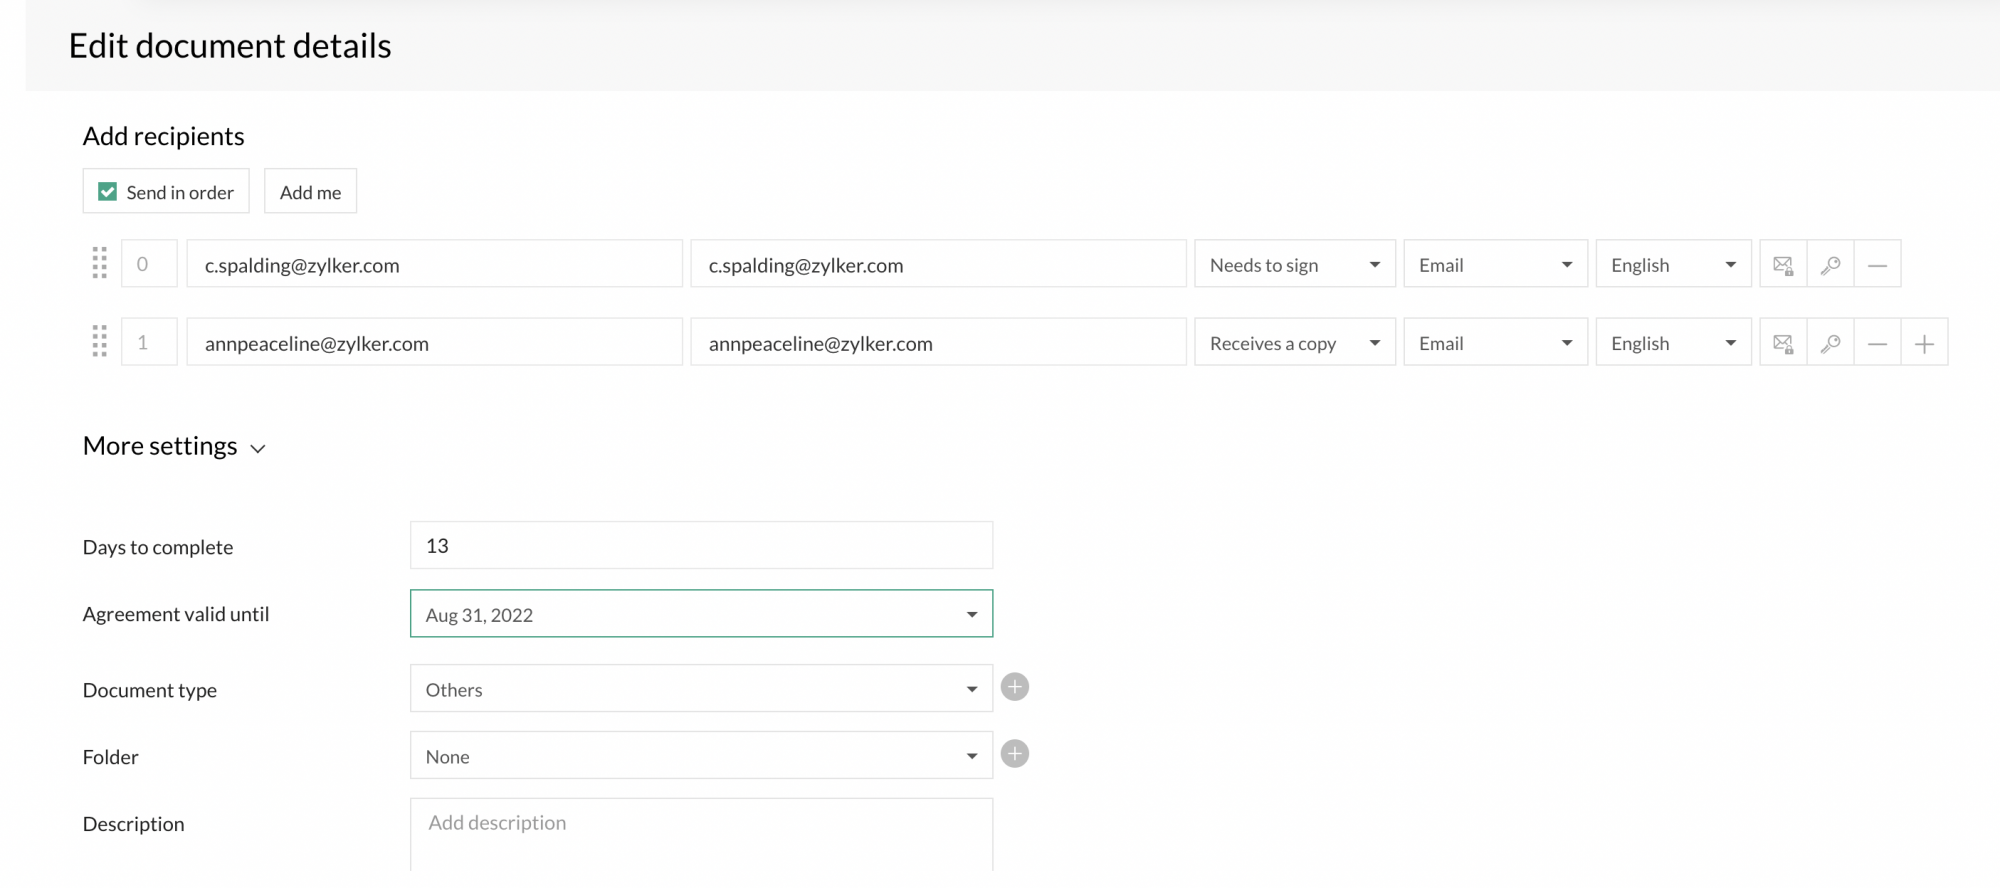
- Click Continue.
The Zoho Sign panel with the uploaded document will open.
- Drag and place the signature field in the document that needs to be sent
- Drag and drop other required fields from the right side
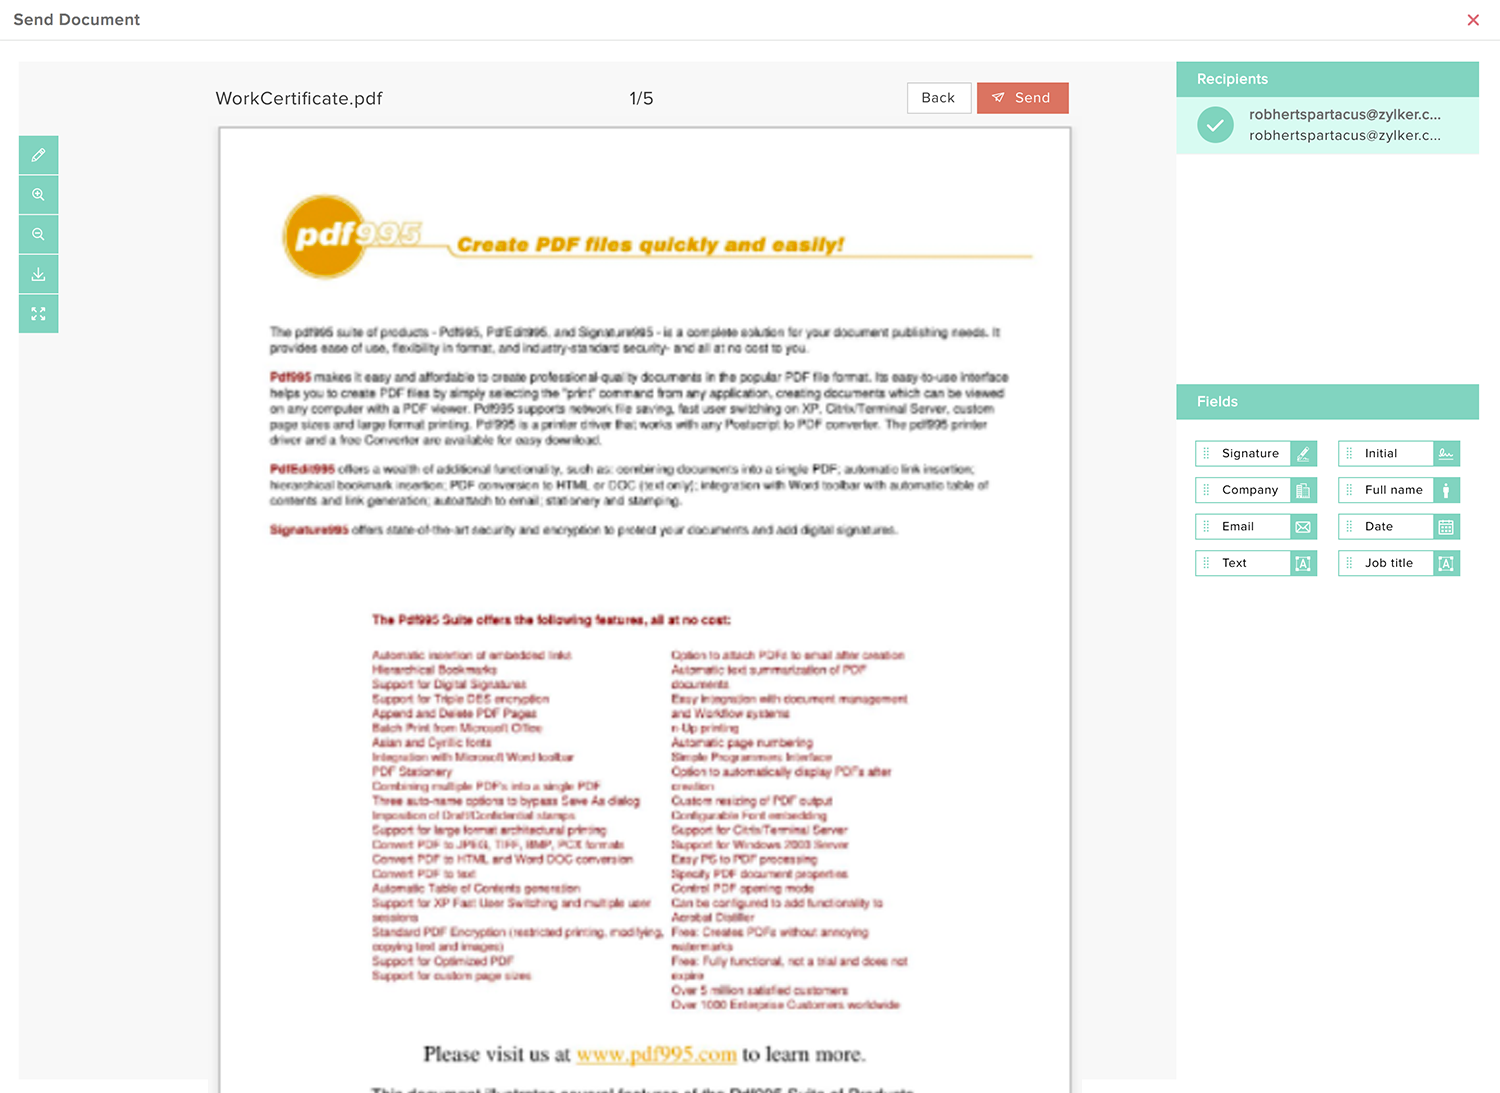
- Click on Send (top-right).
- Confirm the details to be sent by clicking on Confirm.

You have successfully sent the employee's work certificate file for e-signing using Zoho Sign.
Sending a letter generated from Mail Merge for e-signing
Mail merge templates help you send standard HR letters to multiple people at once, with dynamic fields. A mail merge template fetches details from the employee form and generates dynamic letters and it can be sent out for e-signing as well using Zoho Sign.
Follow the steps given below to send a mail merge template for e-signing.
- From your home page, go to Organization > Employee
- Select the employees to whom you need to send the letter for e-sign
- Click on Send for signature
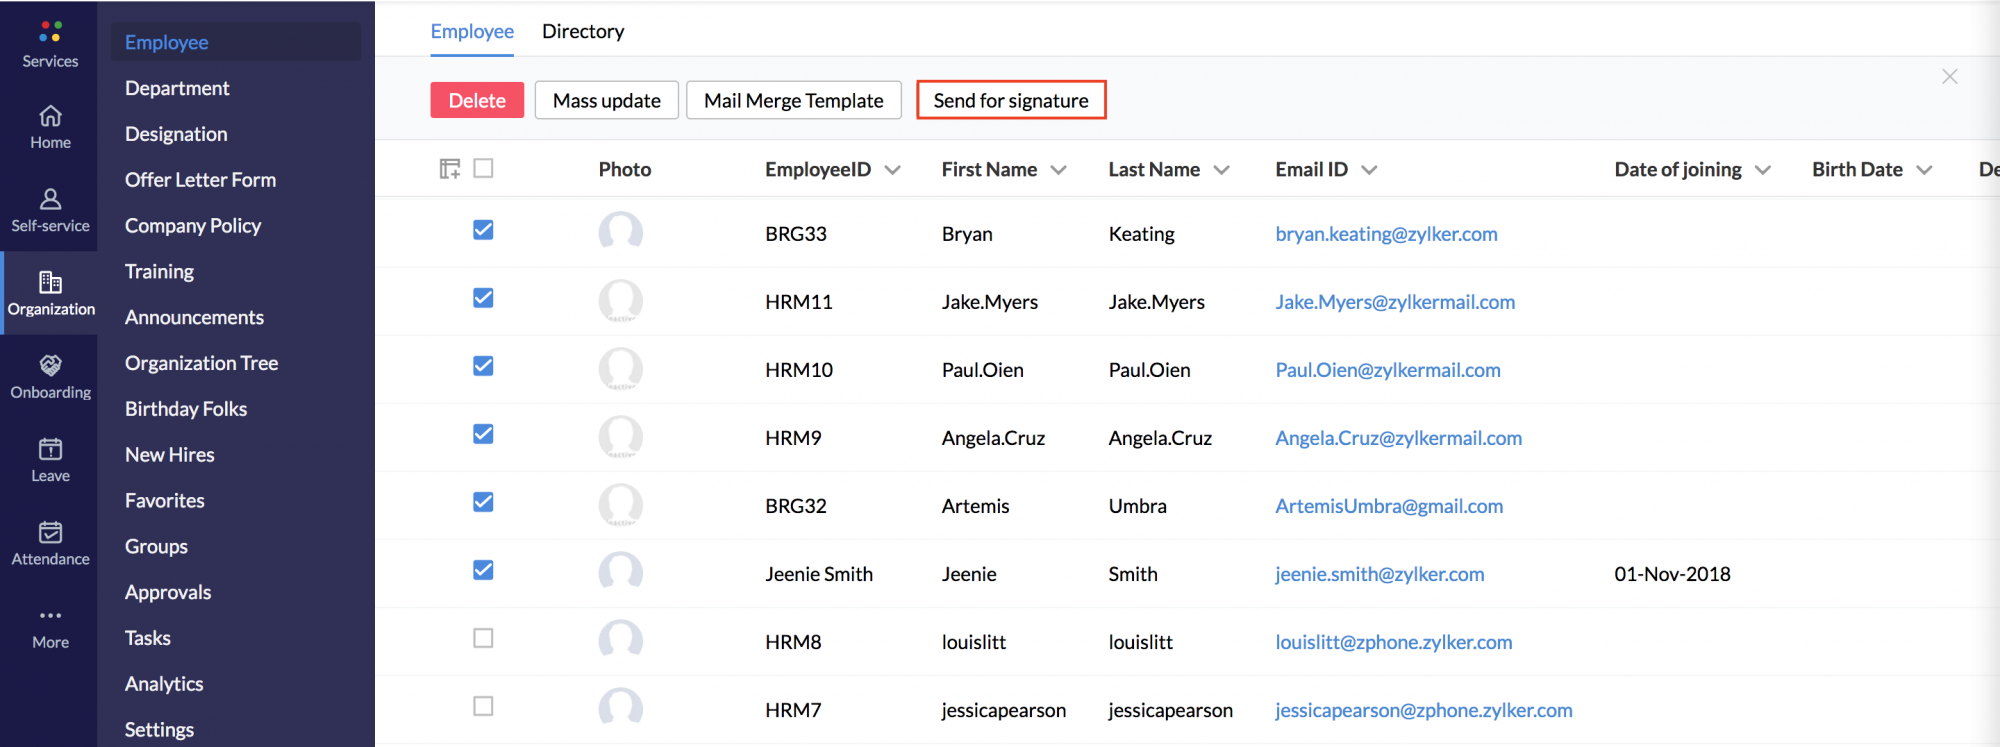
- Under Send From, select Mail Merge
- Select the respective template from the drop-down
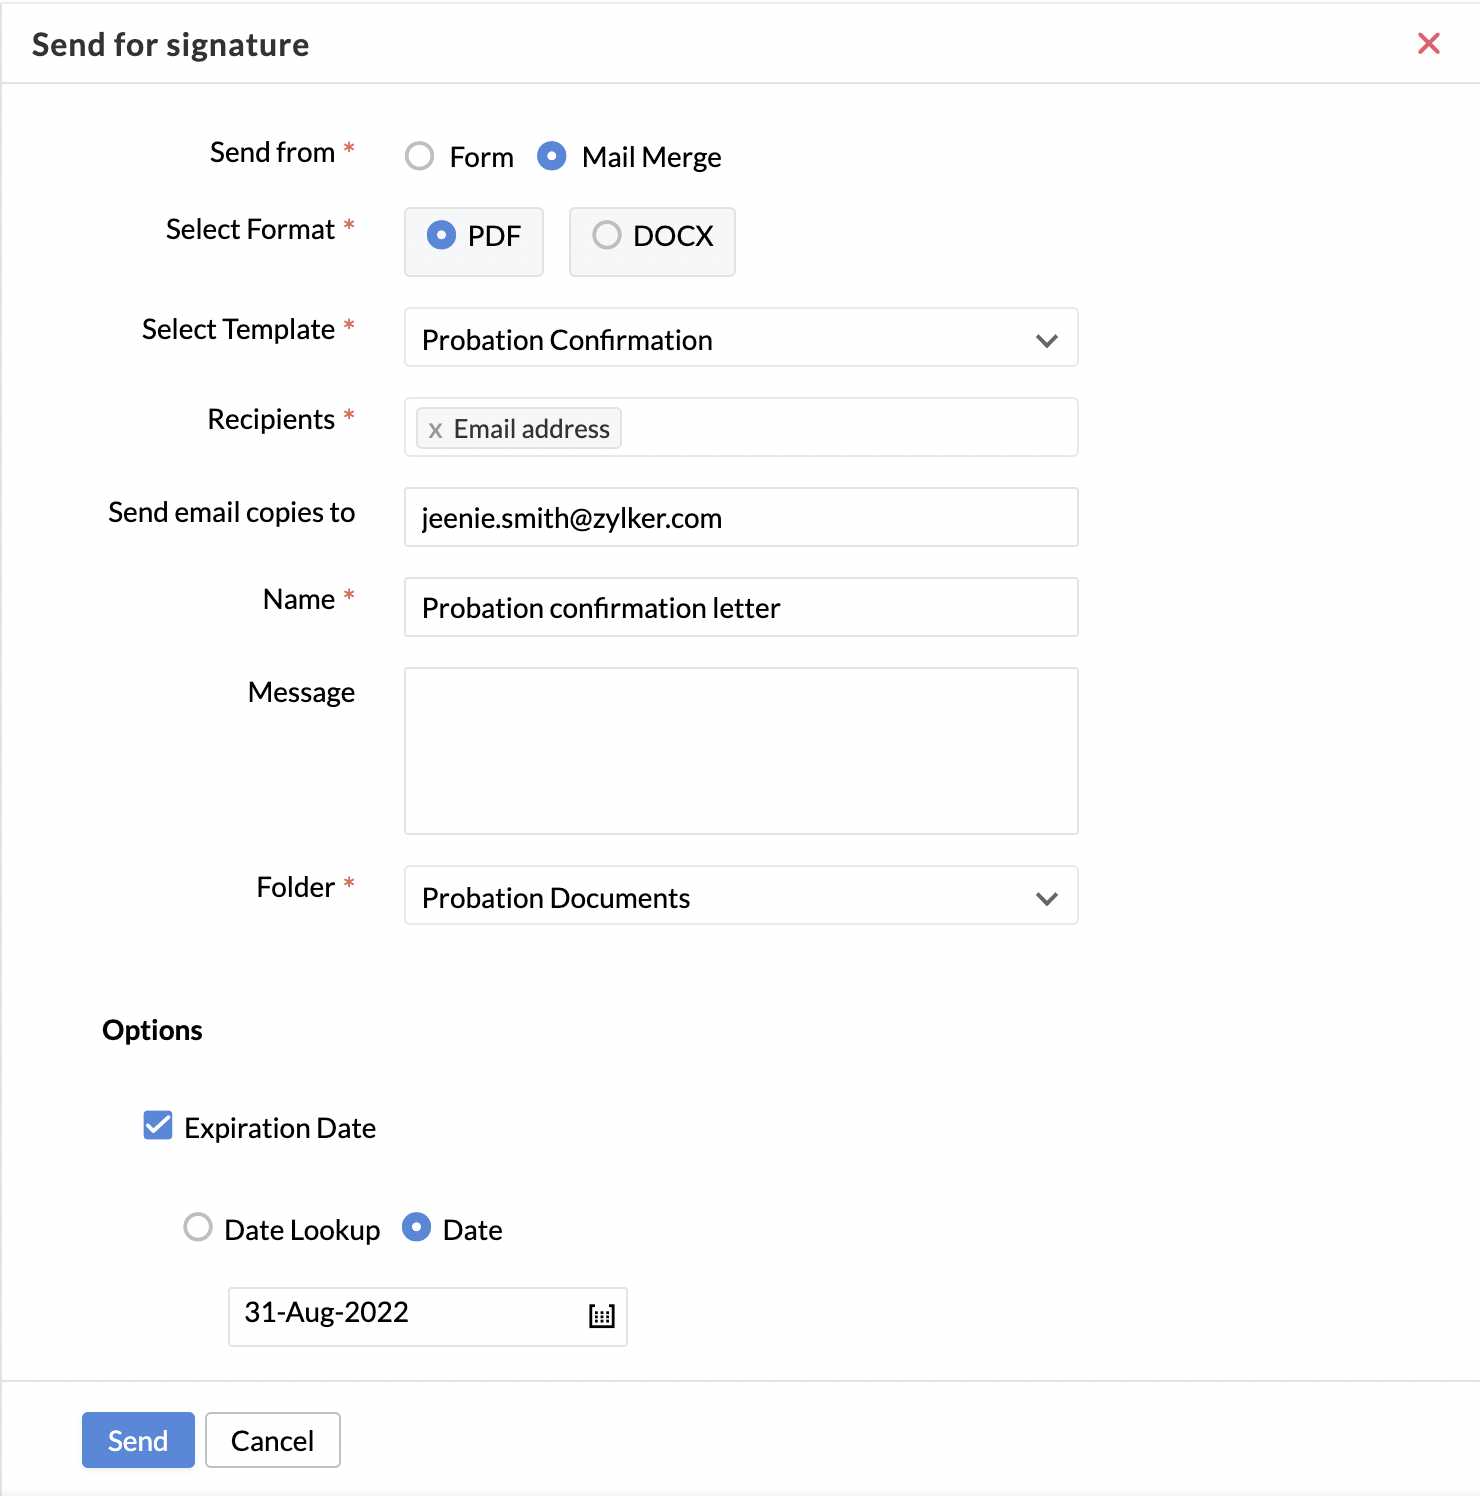
- Fill in other details. Click Send.
Click here to know more about Mail Merge Templates.
Configuring workflows for e-signature
Using Workflows in Zoho People, you can automate sending digital letters for e-signing. An e-signature template can be created and mapped to a workflow, so the entire process of getting letters signed digitally can be automated.
Learn more about configuring workflows for e-signature.
Revoking Integration with Zoho Sign
You can revoke the integration once done with Zoho Sign. Follow the steps below to do this.
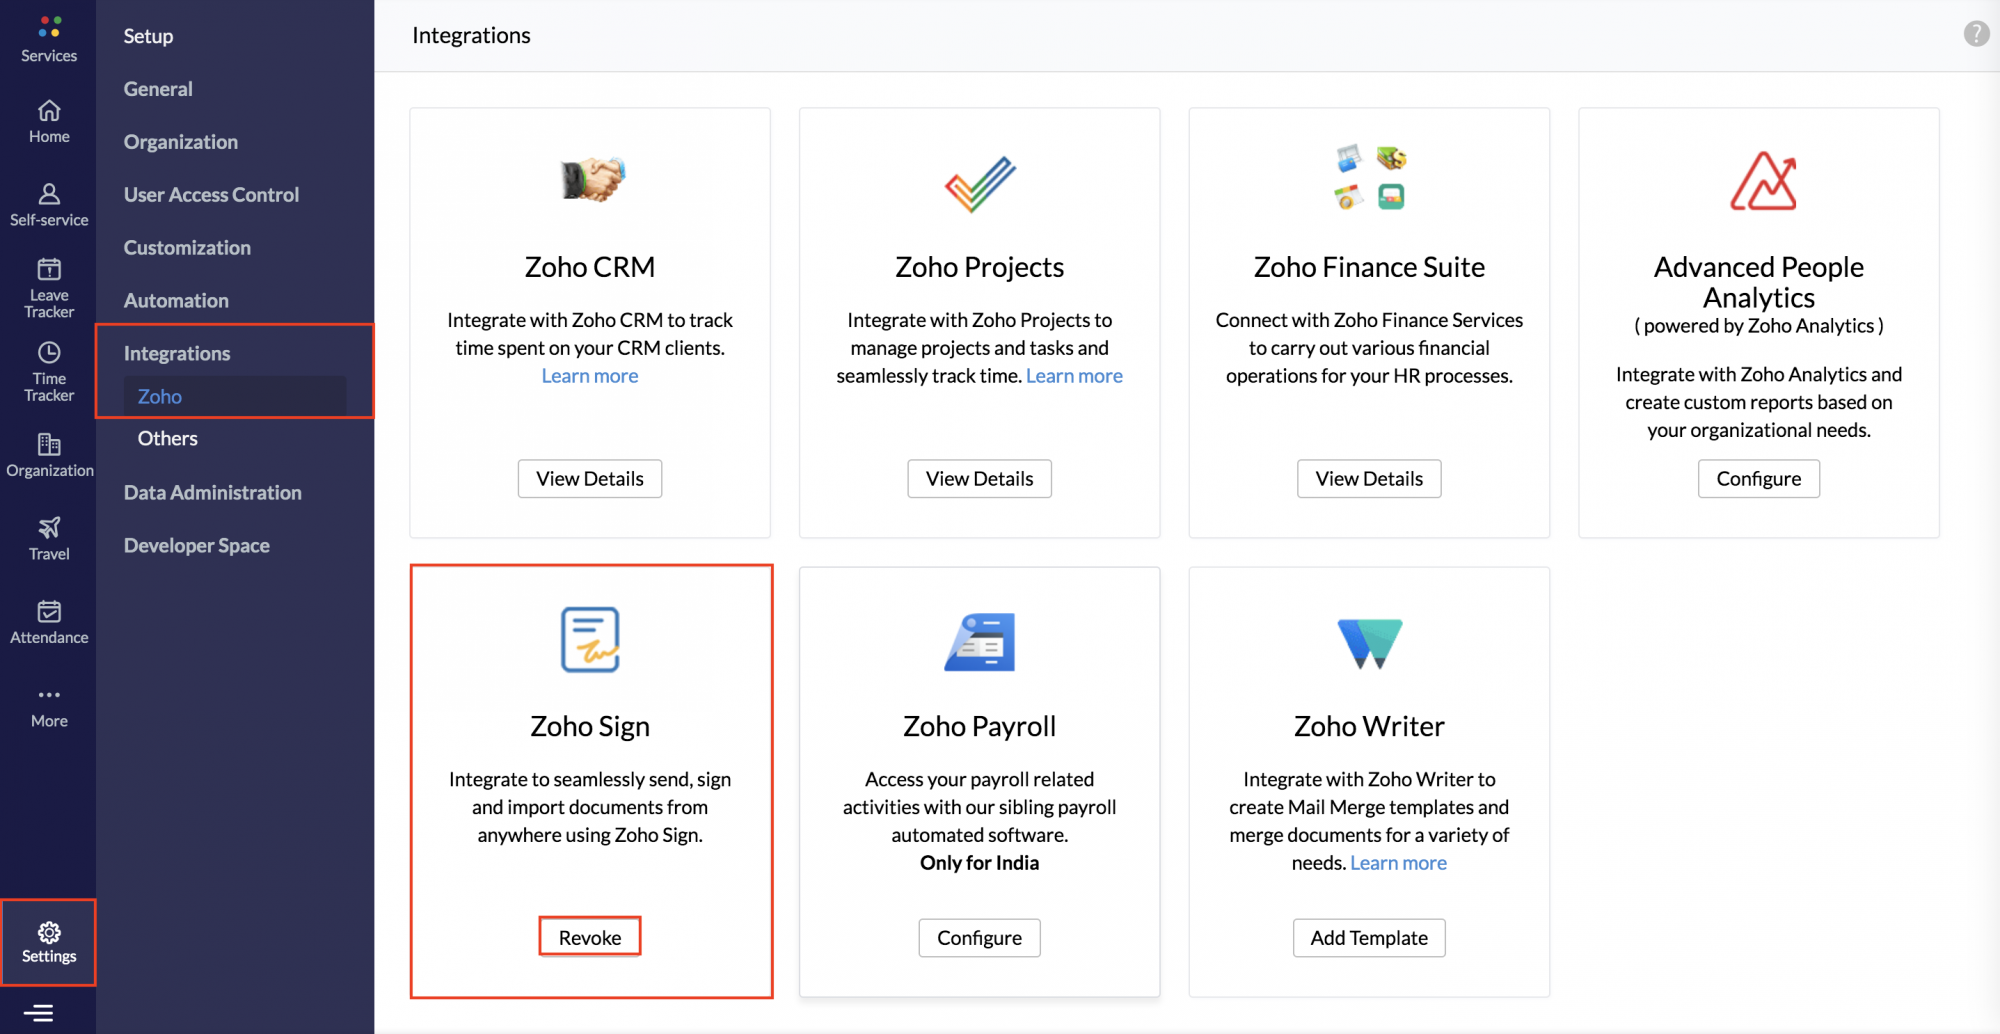
- From your home page, go to Settings > Integrations > Zoho. You will find the list of all integrations available with Zoho applications.
- Under Zoho Sign, click Revoke
Sending documents for e-signing from a form
Some HR documents like probation confirmation letters or experience certificates are specific to individual employees. In such cases, you can store the documents in the employee form in Zoho People for each employee or create readymade templates and send them for e-signature. Using the 'File upload' field in Forms or using Mail Merge templates, you can upload the document and send it for e-signature.
Note: The e-signature software should be enabled in the form, under Form Properties > Third-party Integrations.
Once the e-signature option is enabled for a particular form, you can find 'E-signature Documents' under 'Related Forms'. Here, all file upload fields of the form and the mail merge templates created for the form will be listed.You can select the document to be e-signed from this list and send it for e-signing.
Let us consider sending a probation confirmation letter to certain employees. This can be achieved with a file upload field in the employee form or a mail merge template created for the employee form.
To enable E-Signature service for the employee form,
- From your home page, go to Settings > Customization > Forms.
- Click on the Employee form to enable e-signature.
- Under Form Properties > Third-party integrations, enable Zoho Sign or any e-signature software that you have integrated with.
To send the document for e-signature from the form,
- From your home page, go to Organization > Employee. You will find all employee records listed.
- Click on the employee record to whom who would like to send the probation confirmation letter.
- At the bottom of the form, you will find the Related Forms > E-signature Documents.
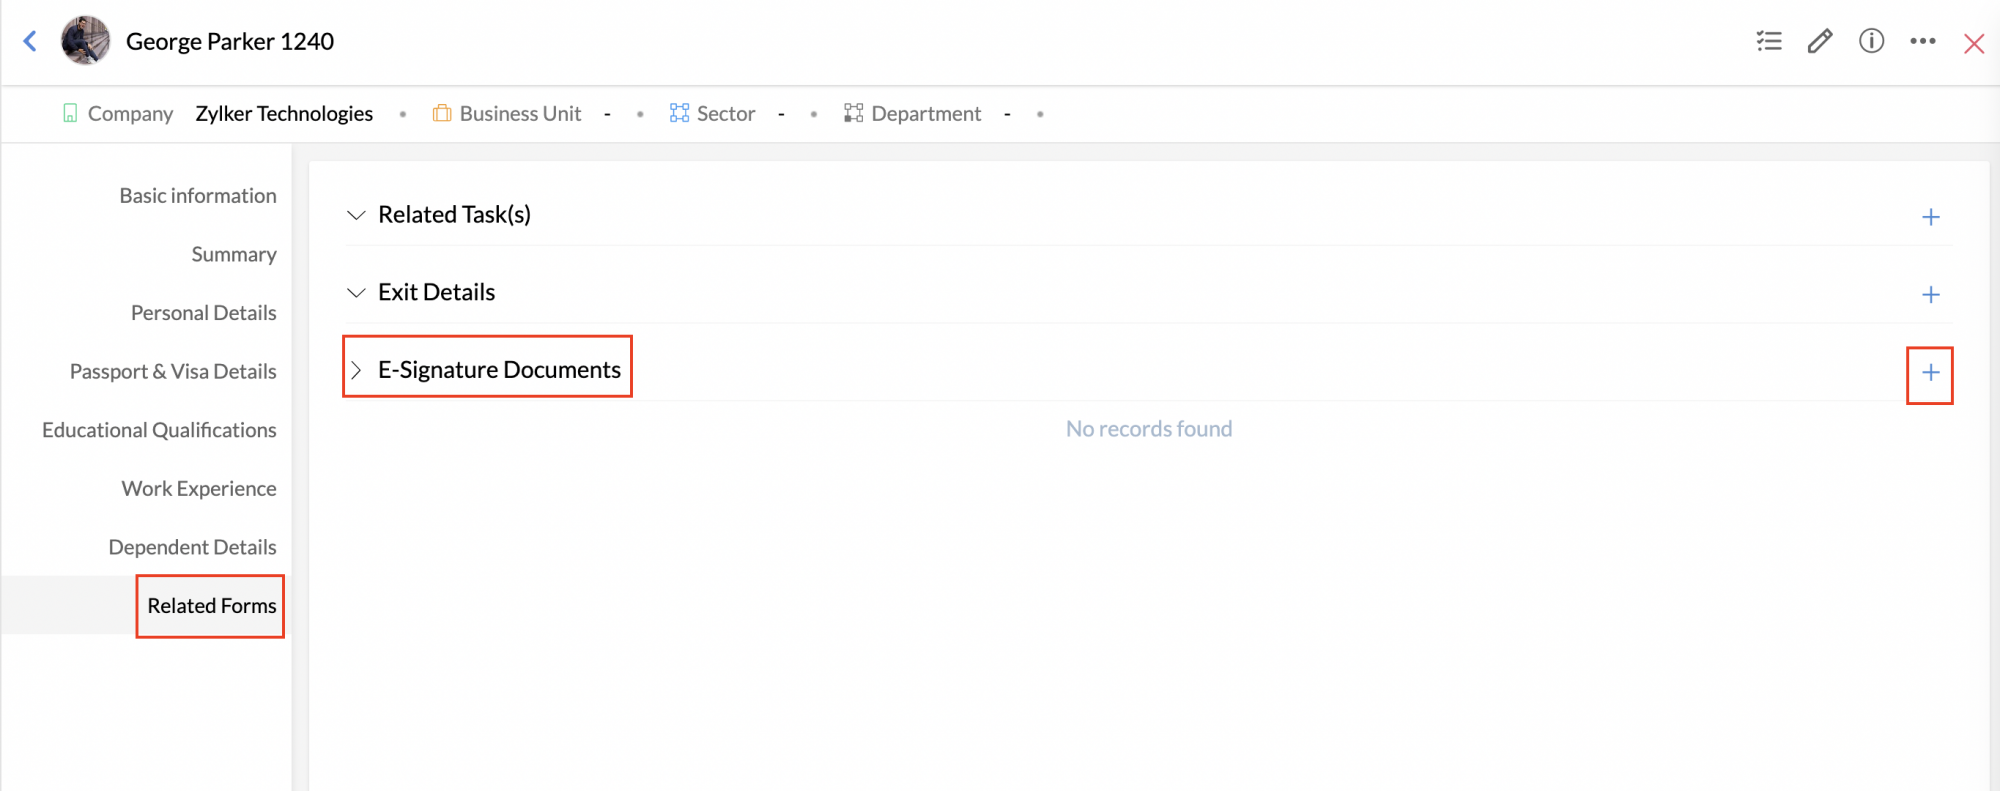
- Click on the '+' icon to add the document to be sent for e-signature.
- Select the document source from 'Form'- all file upload fields of the employee form or 'Mail Merge'- All mail merge templates created for the employee form.
- For 'Form', you can have a file upload field named 'Probation Confirmation' in the employee form and upload the probation letter of a particular employee. The file upload field of the form should be filled with the document to be sent for e-signing.
- In terms of 'Mail Merge', you can create a template named 'Probation Confirmation Letter' and add it for e-signature. Click here to know about creating Mail Merge Templates
- Under Recipients select the e-mail address. All the E-mail ID fields present in the employee form will be listed here.
- Enter the name of the document and fill in other details like message and last date
- Select the folder under which you would like the signed copies to be stored
- Set a reminder if required
A new Zoho Sign panel will open, wherein you can view the recipients, document name and all other details listed. The message in case if you have typed any would be automatically populated as 'Notes', and the given subject as 'Description'.
- Click Continue.
The Zoho Sign panel with the uploaded document will open
- Drag and place the signature field in the document that needs to be sent. Drag and drop other required fields from the right side
- Click on 'Send'(top-right)
- Confirm the details to be sent by clicking on 'Confirm'
You have successfully sent the document for e-signature using Zoho Sign.


