Holidays
Setting up the holiday calendar is one of the important tasks for HRs at the beginning of the year. This is more important if you operate out of multiple locations or multiple shifts. An updated holiday list helps employees plan their leave much ahead of time. This, in turn, helps in work allocation. Having the option to see the official holiday calendar along with the personal calendar is an added advantage. With Zoho People, you will be able to achieve all of this.
- Location and Shift based holidays
- Restricted Holidays
- Holiday Reminders
- Viewing holiday list
- Importing and Exporting Holidays
- Sync and revoke holiday and leave calendar
- Sync holidays and leave with Google Calendar
Location and Shift based holidays
Follow the steps given below to add location or shift based holidays.
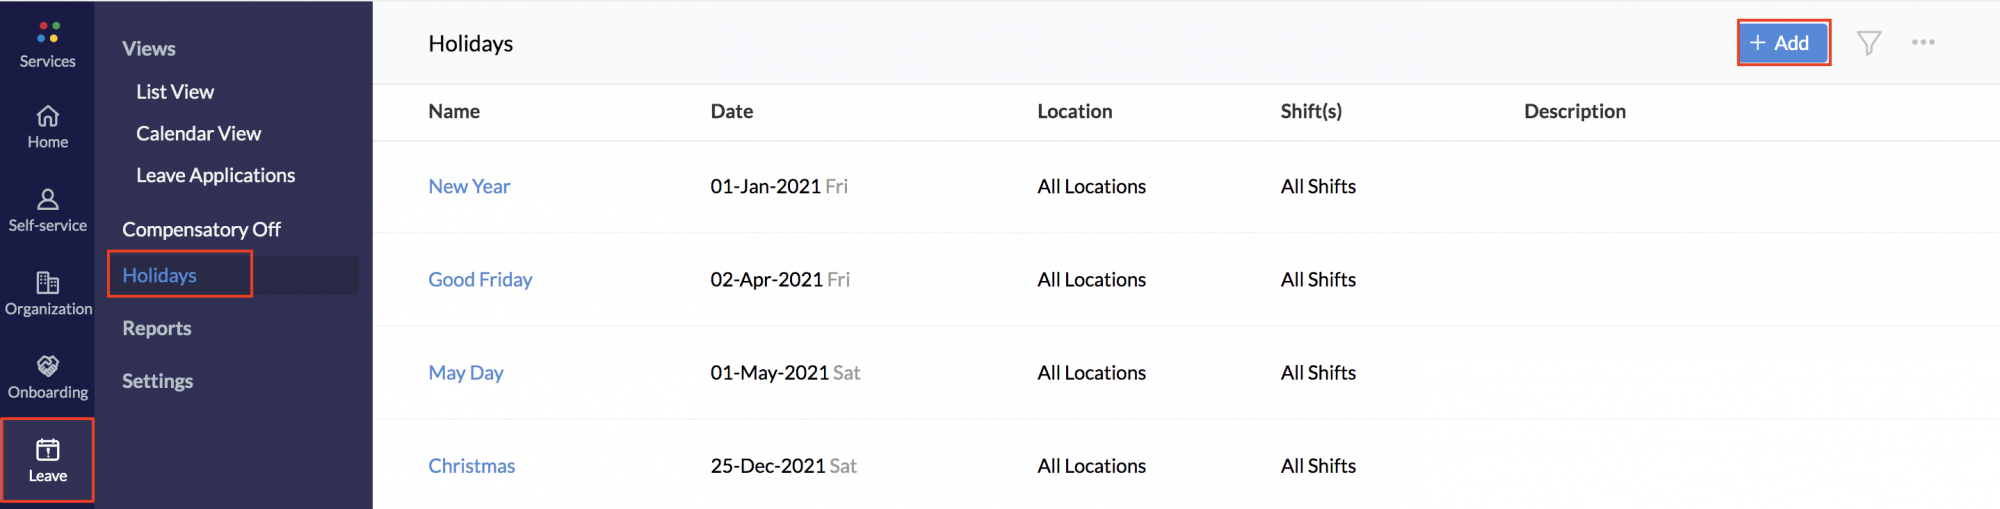
- From your home page, go to Leave > Holidays > Add
- Enter the name and date
- Check the 'Restricted holiday' box to add a restricted holiday
- Under Applicable for, click the list icon and select the location and shifts
- Give a description if needed
- If you want a reminder to be sent, select how many days in advance it should be sent from the drop-down
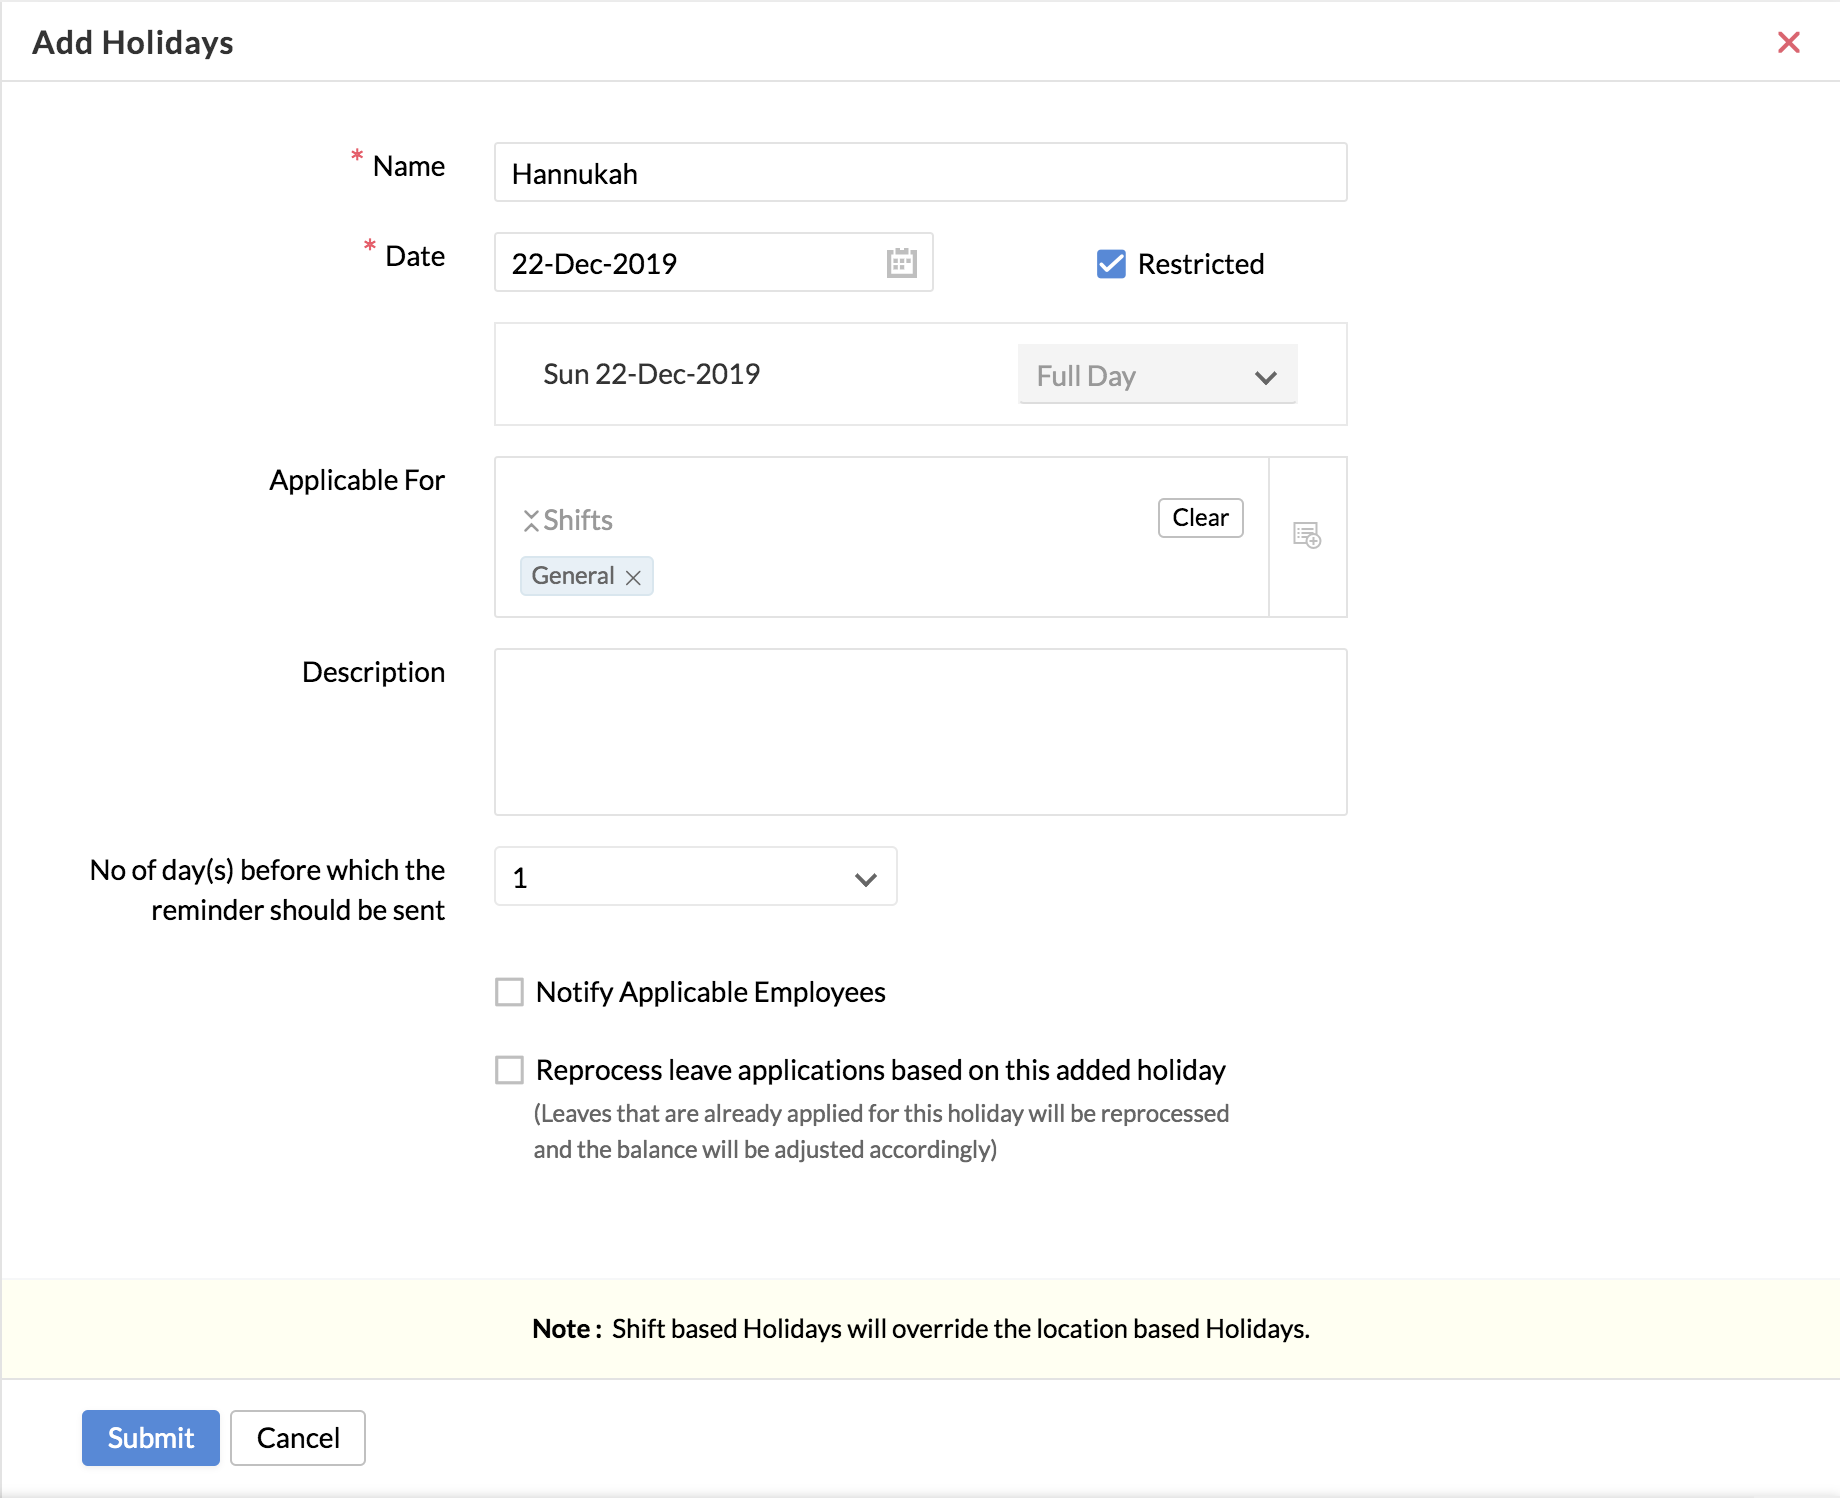
- Check Notify Applicable Employees if required
- Check Reprocess leave applications based on this added holiday if you want to reprocess leave applications that have been applied on this specified holiday. The leave balance will be adjusted accordingly.
The reprocess option can be used while editing or deleting holidays as well. While editing, the leave applications before and after editing will be reprocessed. Let's say June 5th is set for Ramzan initially but then it is edited to June 6th. In this case, the leaves applications for June 5th and 6th will be reprocessed.
When you add a holiday to a location or for a shift, the employees who are mapped to that location/shift will be eligible for the holiday. If you do not select any location or shift here, then the added holiday will be applicable to everyone in the organization.
Note: In cases where both location and shift based holidays are present, shift based holidays will only take effect.
Restricted Holidays
To add a Restricted Holiday for your organization,
- From your home page,go to Leave > Holidays > Add
- Enter the name and date
- You will see that there is an option called 'Restricted Holiday'. Check this box to show a holiday as a Restricted holiday
- Select the locations and shifts for which this holiday is applicable
- If you would like to set a reminder to inform employees of an upcoming holiday(via email), you can enter the required value in 'No of day(s) before which the reminder should be sent
- Check the 'Notify Applicable Employees' if you would like the employees (of the selected location or shifts) to be notified via feeds
- Check Reprocess leave applications based on this added holiday if you want to reprocess leave applications that have been applied on the specified holidays. The leave balance will be adjusted accordingly.
- Click Submit.
Now a holiday has been added as a restricted holiday for your organization. For your employees to avail of the restricted holiday, a leave type called 'Restricted Holiday' has to be added. To add this,
- From your home page, go to Leave > Settings > Leave Type > Add
- Enter leave name, entitlement and other details as required.
- Under Type, select Restricted Holiday.
- Click Submit.
Now a new leave type called Restricted Holiday has been configured for your organization.
Holiday Reminders
Automated reminders to remind your employees of upcoming holidays can be configured in Zoho People. Follow the steps below to set holiday reminders.
- From your home page, go to Leave > Holidays > + Add
- Enter the holiday name, date, applicable for and other details
- Set the number of days before which you want the reminder for holiday to be sent

- Check Notify Applicable Employees if required
- Check Reprocess leave applications based on this added holiday to reprocess holiday applications that have been applied on this specified holiday. The leave balance will be adjusted accordingly.
- Click Submit
Now a reminder will be sent to the applicable employees notifying of the upcoming holidays based on the days selected.
To customize the reminder email, click Customize email reminder under the Holidays list view > ellipsis icon.
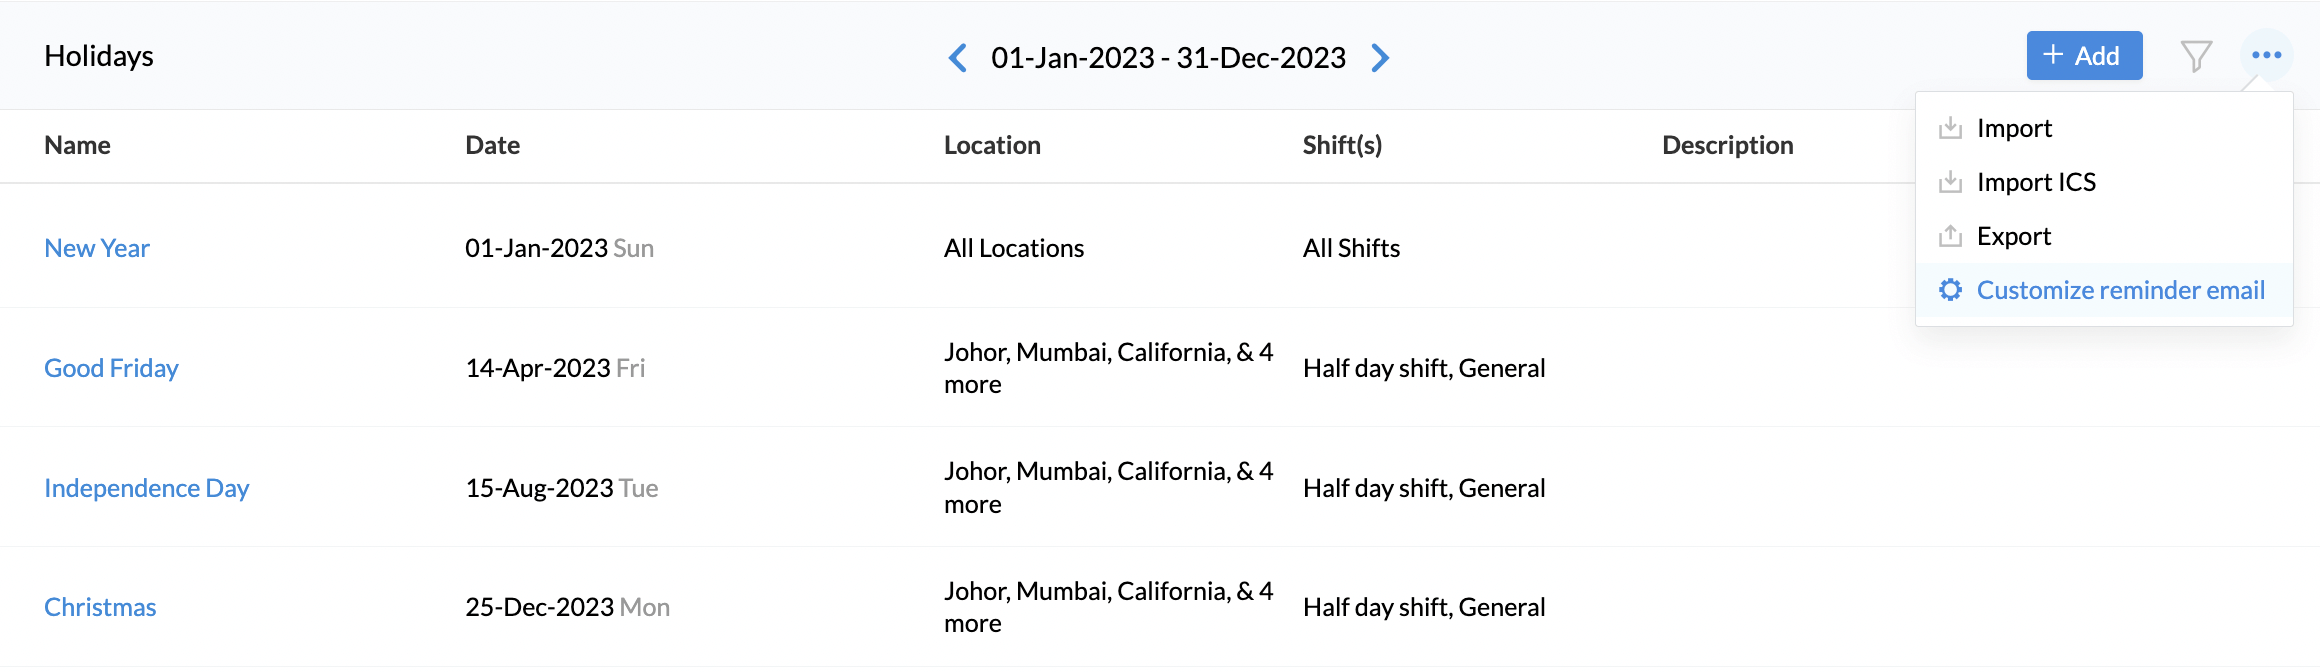
You will be redirected to General Settings. Under Holiday Settings , click Customize email template beside Reminder email.
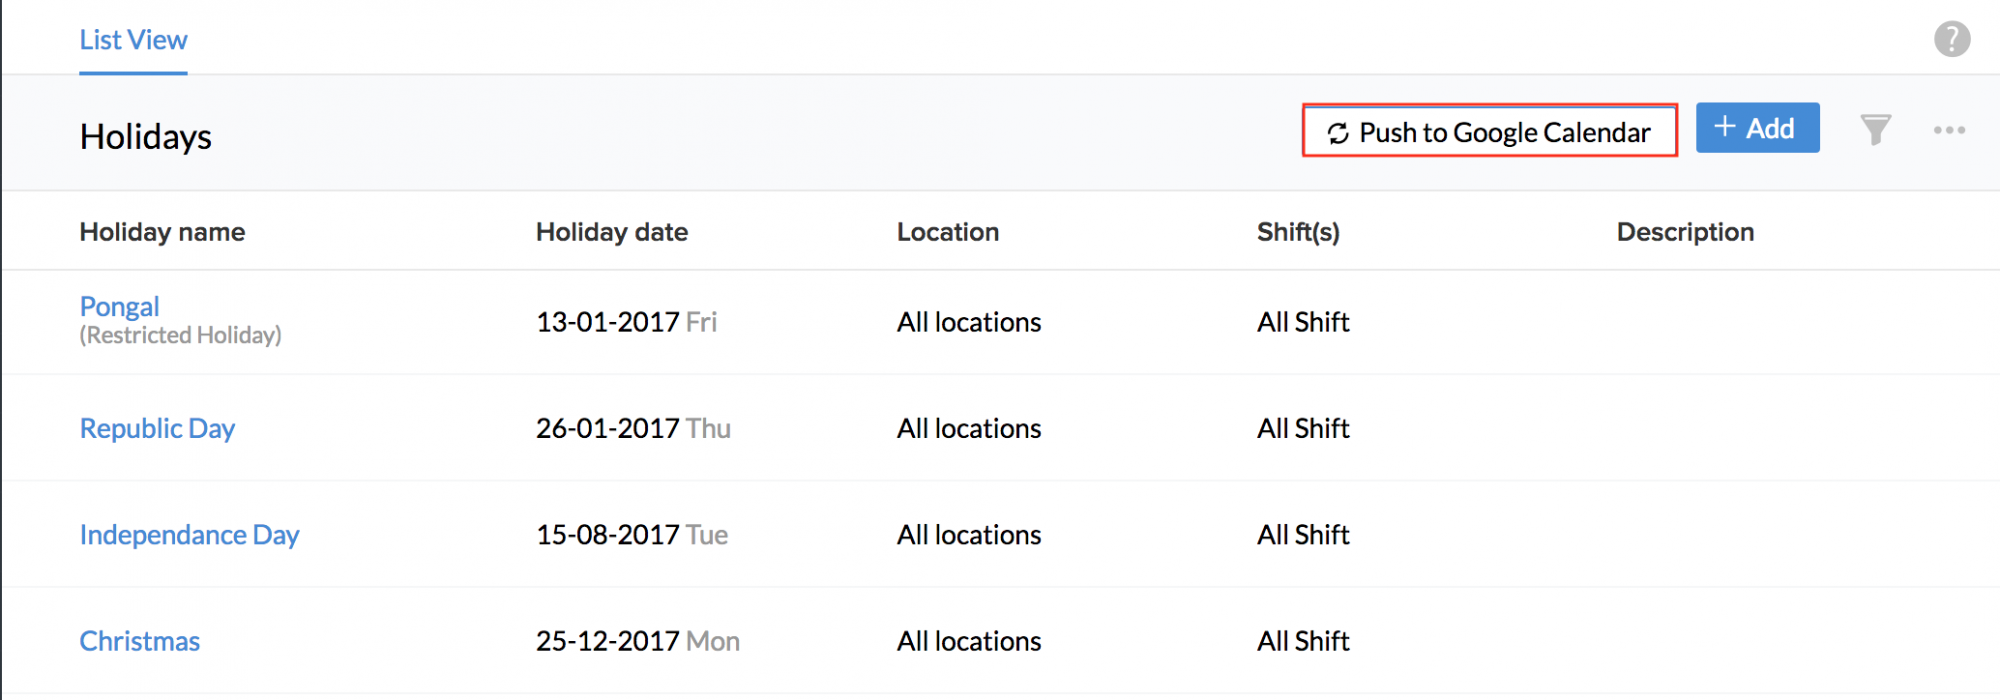
Viewing holiday list
From your home page, go to Leave > Holidays.
Importing and Exporting Holidays
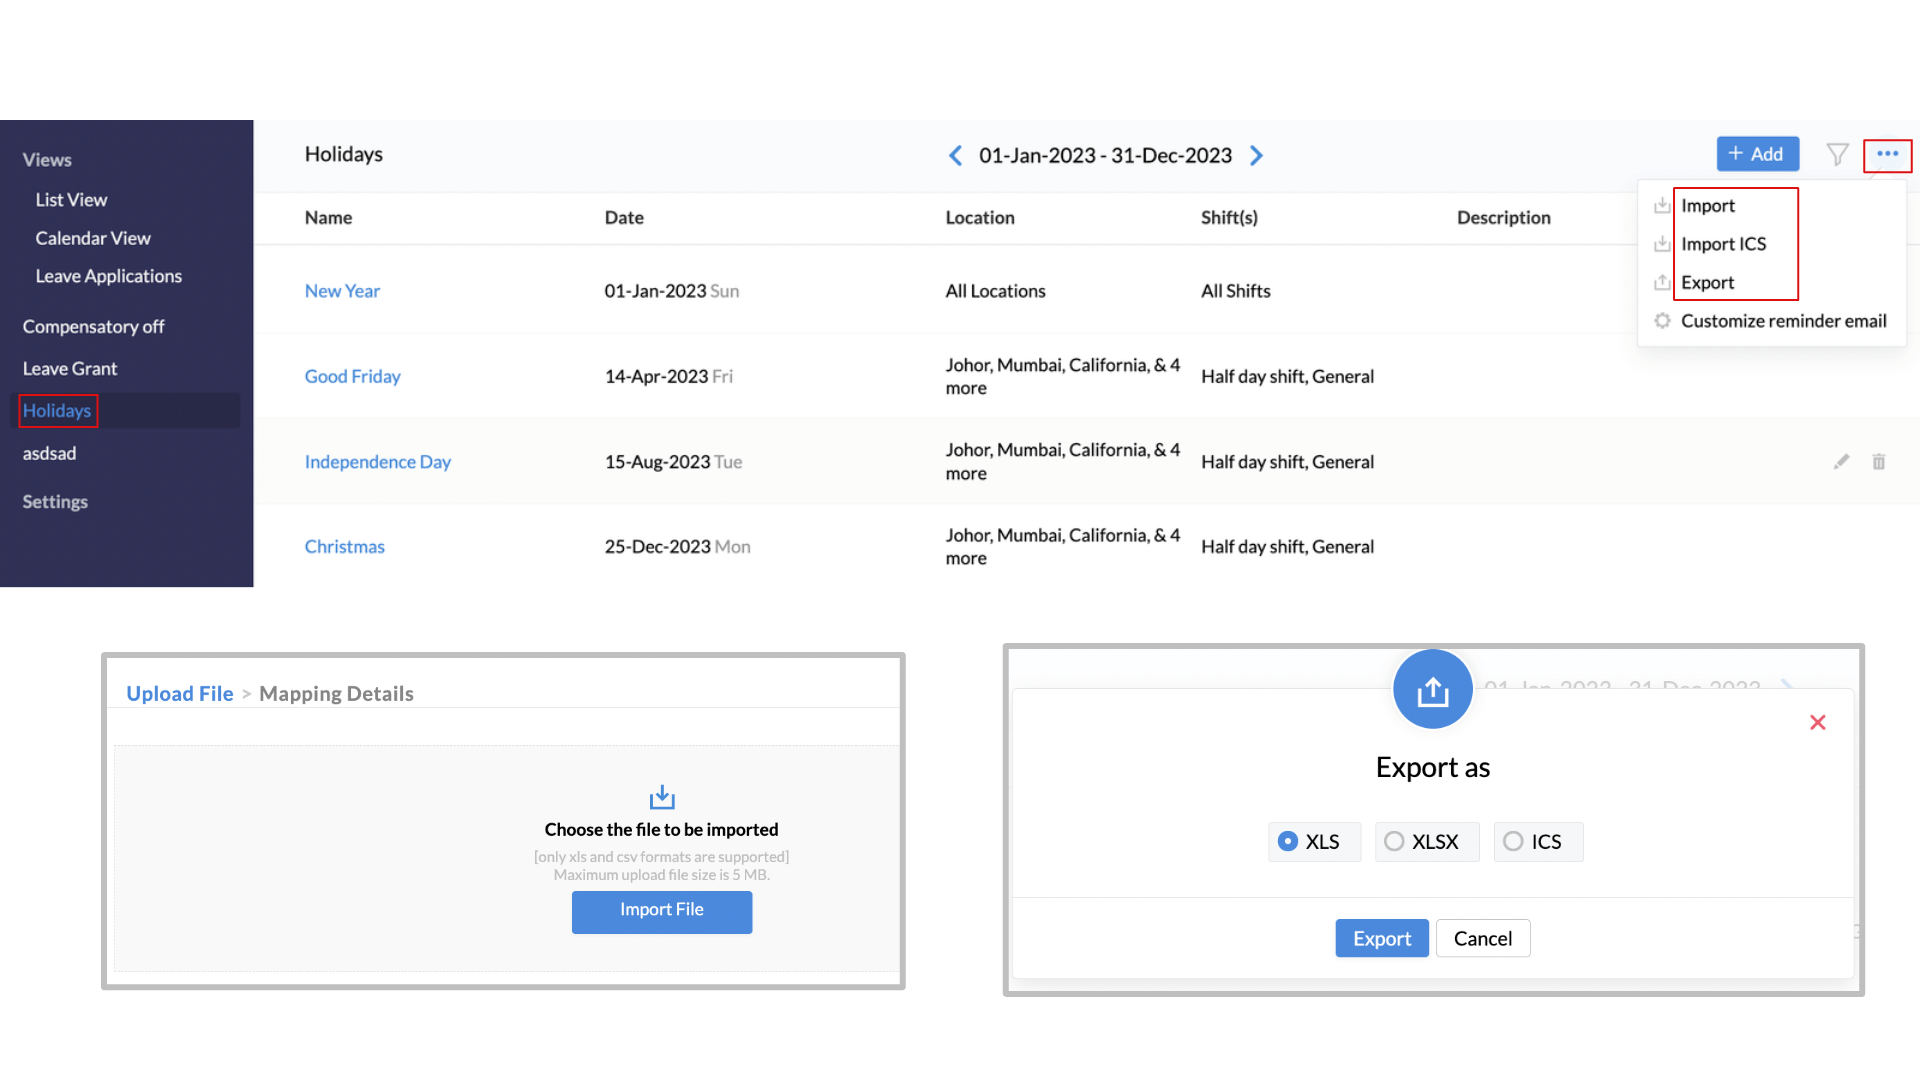
You can import holidays into Zoho People by uploading .XLS, .CV, or .ICS files directly. It is also possible to export holiday lists in .XLS, .XLSX, .ICS formats. These options are available within the ellipses menu (Holidays > Leave > Ellipses icon > Import / Import ICS / Export)
Sync and revoke Holiday and Leave calendar
Your leave and holiday calendar can be synced with either Google calendar or Office365 calendar.
To select the calendar you want,
- Navigate to Leave, then select List View.
- Click the ellipsis icon and select Calendar Sync.
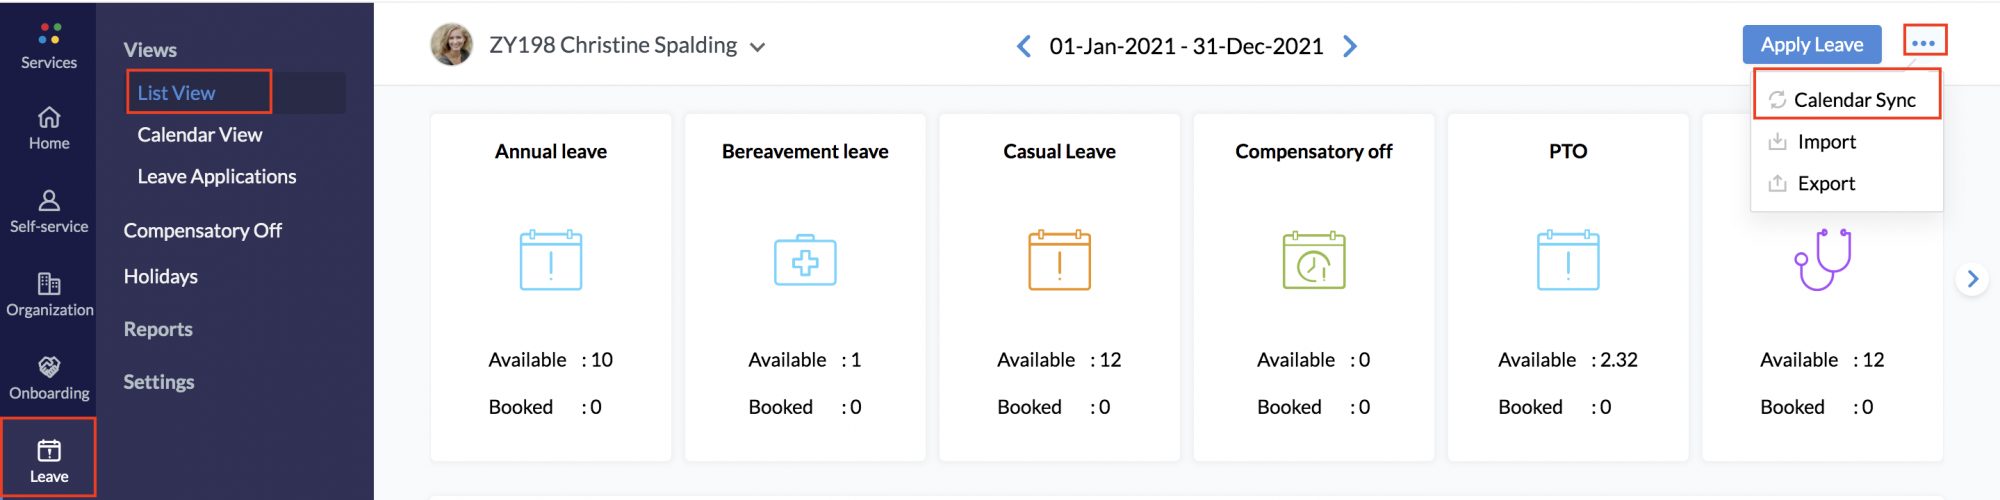
- Select either Google calendar or Office365.
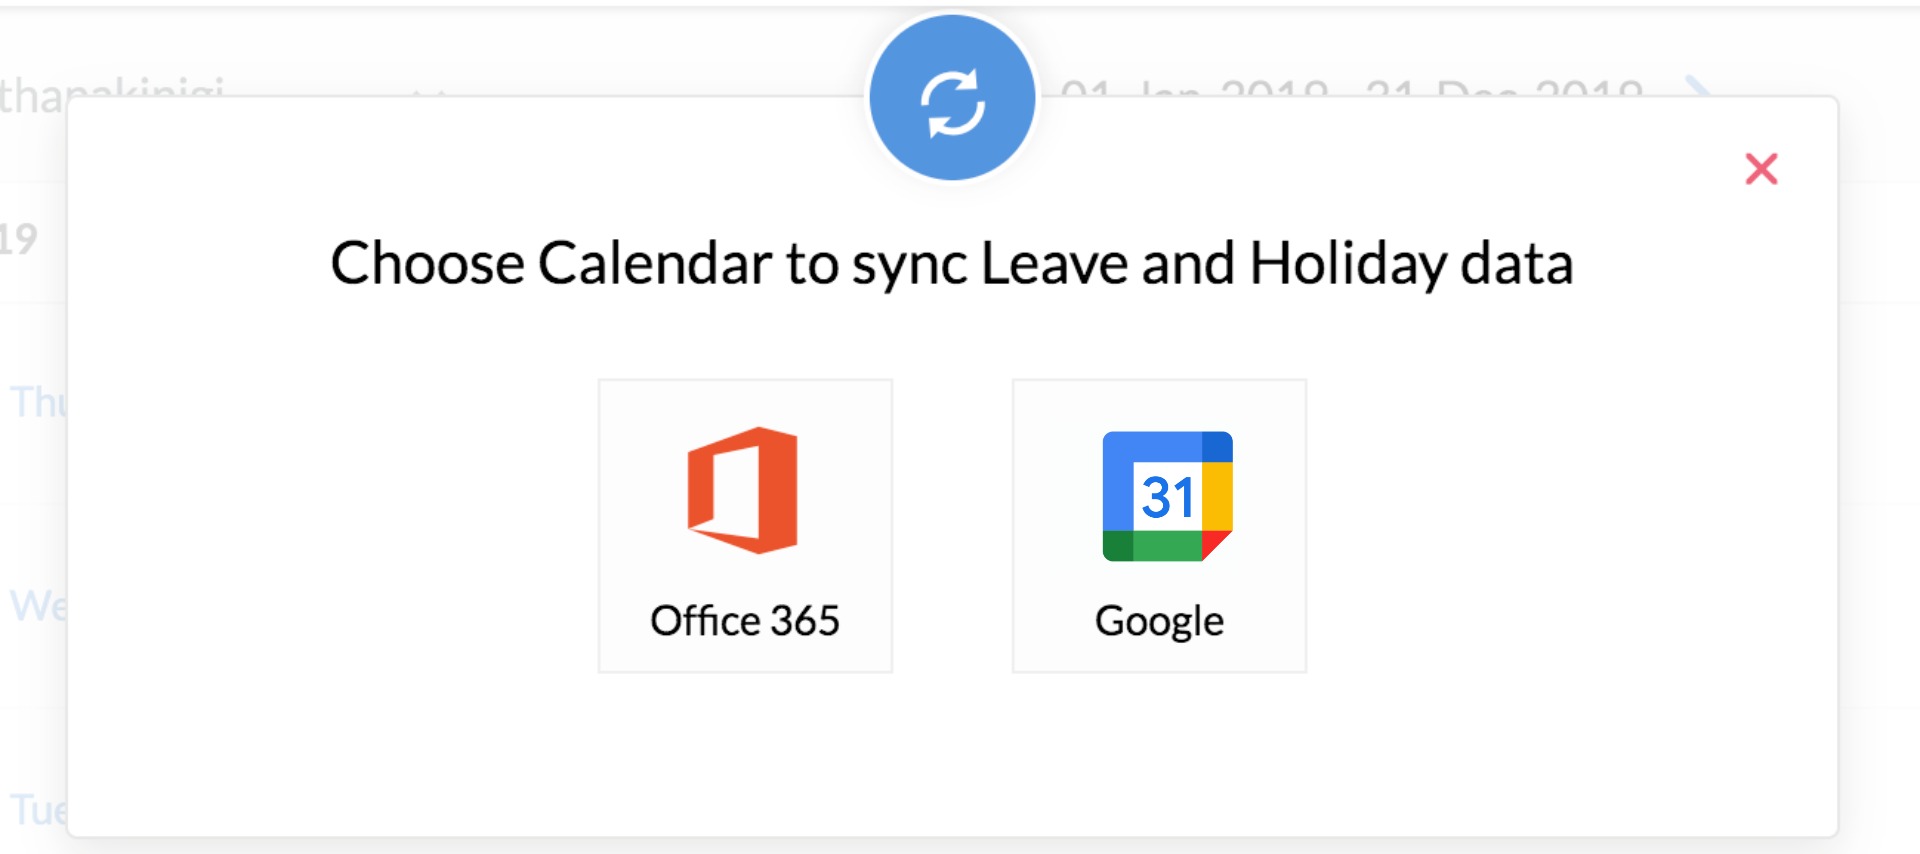
Once you have selected one of these calendars, holidays and leaves will be synced only to this calendar.
1. Push data to Office365
You can push your leave and holiday details from Zoho People into Office 365's calendar. This helps you keep track of all upcoming holidays and events seamlessly, without the need to switch between the two accounts.
The Office 365 account has to be authorized before the details can be pushed and synced. Once you have chosen Office365 to sync your holiday and leave data,to authorize your Office 365 account in Zoho People:
- Click Authorize. This will take you to the authorization page.
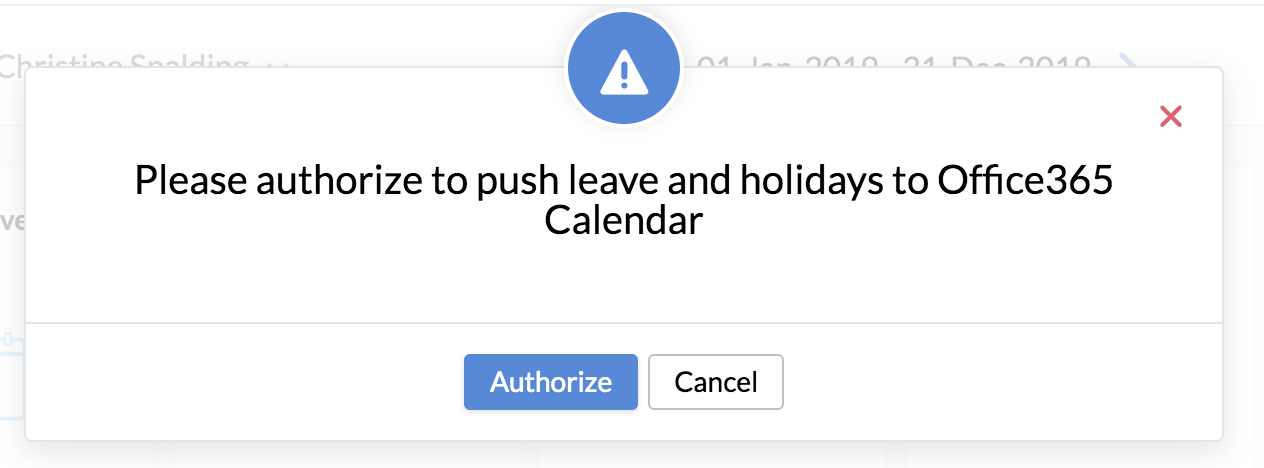
- Enter your Office 365 credentials, then click Next. Your account will be authorized.
- If you are already signed into your Office 365 account, click Use this account.
Your account will now be successfully authorized. You can push your leave and holiday calendar into your Office 365 calendar.
After authorization, the first push from Zoho People has to be done manually. All leave and holidays added after the manual push will be synchronized with Office 365 calendar automatically.
To push your holiday and leave details to Office 365 Calendar:
- From the list view page of your Leave portal, select the group from your Office 365 account. Your holiday and leave details will be pushed to the group selected here.
- Select the particular calendar as present under the group selected, and click Push.
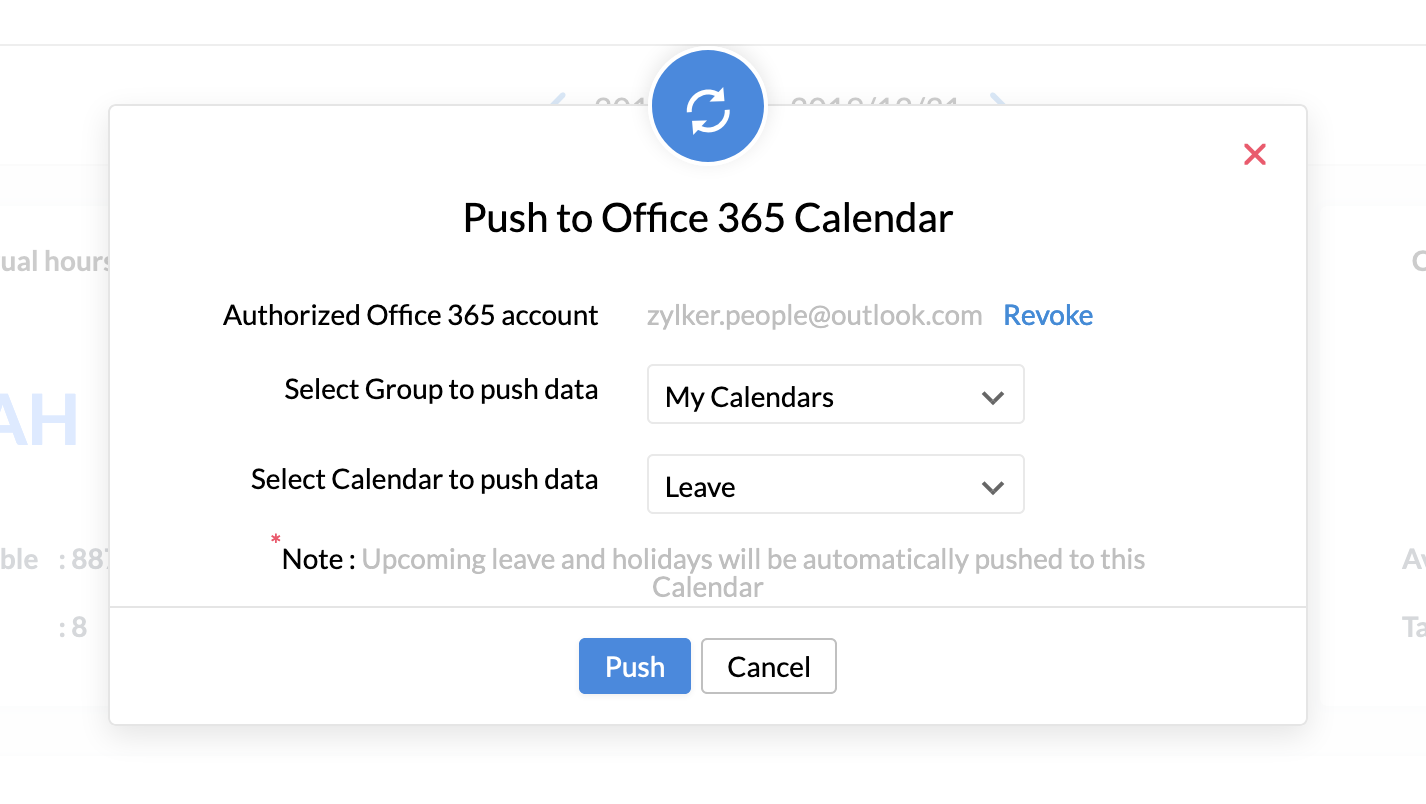
Your leave and holiday details will now be pushed to your Office 365 Calendar. If approvals are set for leave, then only approved leave will be pushed into your Office 365 Calendar. If no approvals are configured for leave, then leave will be pushed when it is applied in Zoho People. The pushed leave, events, and holidays will be viewable in your Office 365 account, under Calendars.
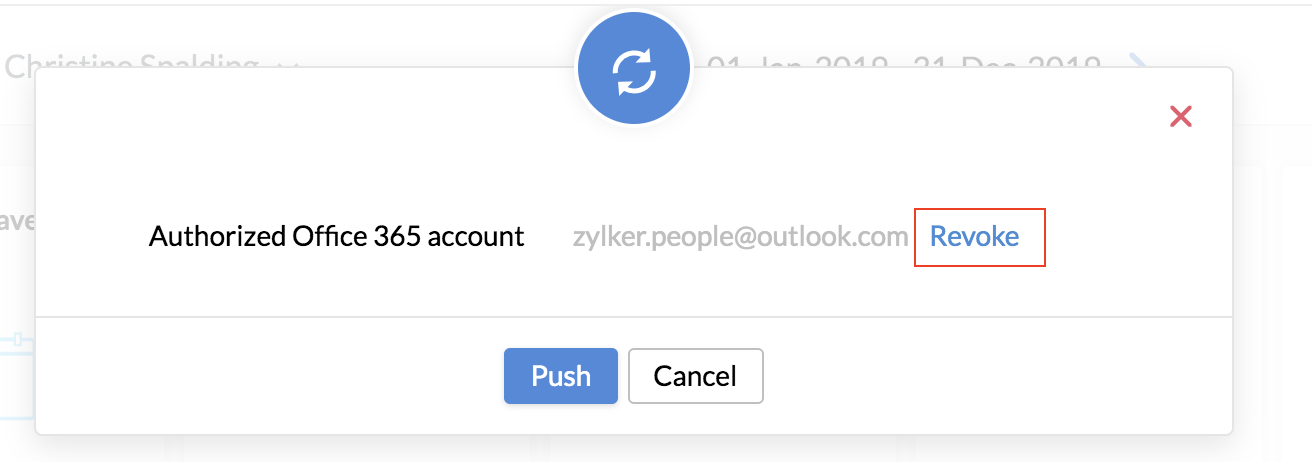
Revoke Office365 calendar sync
If you want to revoke Office 365 calendar sync, follow these steps:
- Navigate to Leave, then select List View
- Click the ellipsis icon on the top right and select Office365 calendar options
- Click Revoke beside the authorized account
Points to remember:
- Authorization is not applicable to users who use the single sign-on method (signing into Zoho People directly from their Office 365 accounts), as their accounts are already authorized.
- The push from Zoho People can occur only after the authorization is successful.
- The first push from Zoho People has to be done manually. All leave and holidays updated after the push will be synced automatically.
- The time zone set in your Office 365 account should be the same as your Zoho People account.
- If no leave or holiday is added to Zoho People within 90 days from the date of the first push, reauthorization will occur.
2.Push data to Google Calendar
You can push your leave and holiday details from Zoho People into Google calendar. This helps you keep track of all upcoming holidays and events seamlessly, without the need to switch between the two accounts.
The Google Calendar account has to be authorized before the details can be pushed and synced. Once you have chosen Google Calendar to sync your holiday and leave data, authorize your Google Calendar account in Zoho People:
- Click Authorize. This will take you to the authorization page.
- Enter your Google calendar credentials, then click Next. Your account will be authorized.
- If you are already signed into your Google Calendar account, click Use this Account.
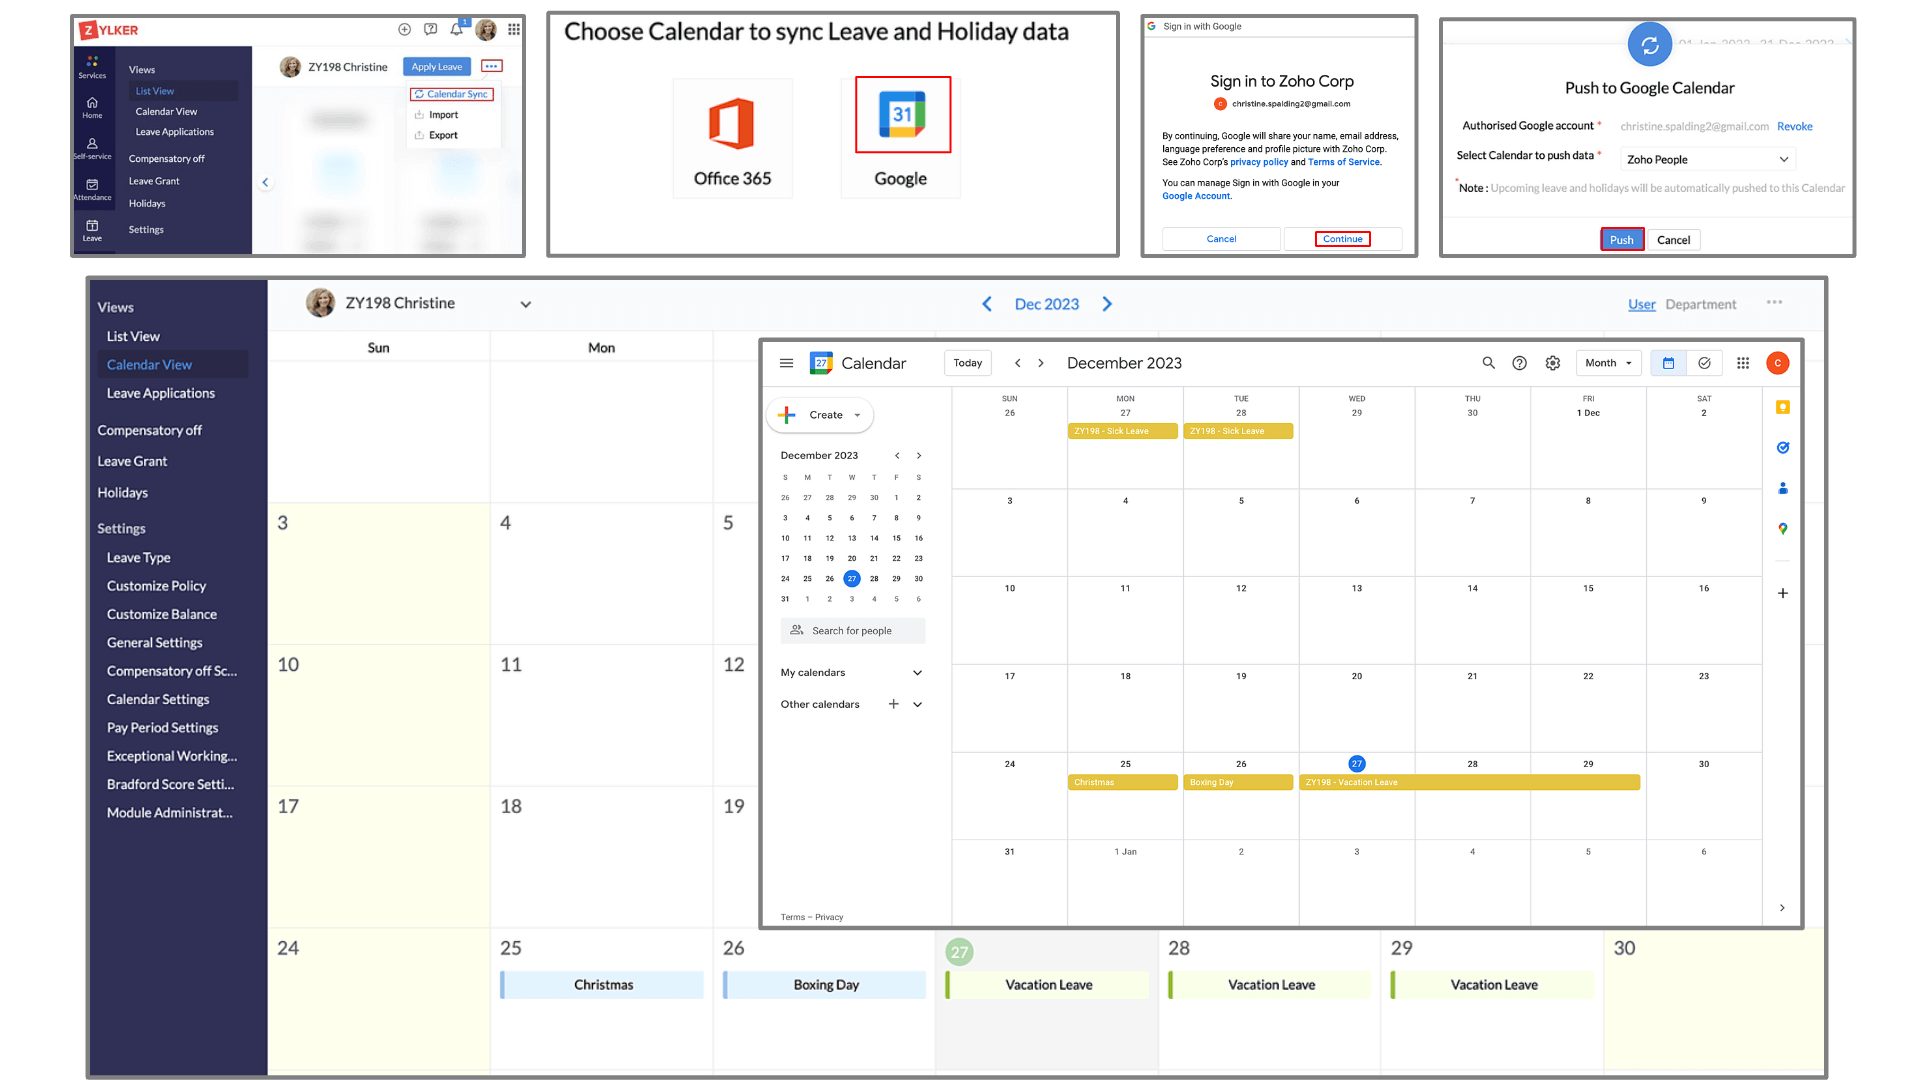
Your account is now successfully authorized. You can push your leave or holiday calendar into your Google calendar.
After authorization, the first push from Zoho People has to be done manually. All holidays and leaves added after the manual push will be synchronized with Google calendar automatically.
To push your holiday and leave details to Google Calendar, go to the List View page of Leave and select the calendar from your Google account.
Your leave and holiday details will now be pushed to your Office Google Calendar. If approvals are set for leave, then only approved leave will be pushed into your Google Calendar. If no approvals are configured for leave, then leave will be pushed when it is applied in Zoho People. The pushed leave, events, and holidays will be viewable in your Google calendar account, under Calendars.
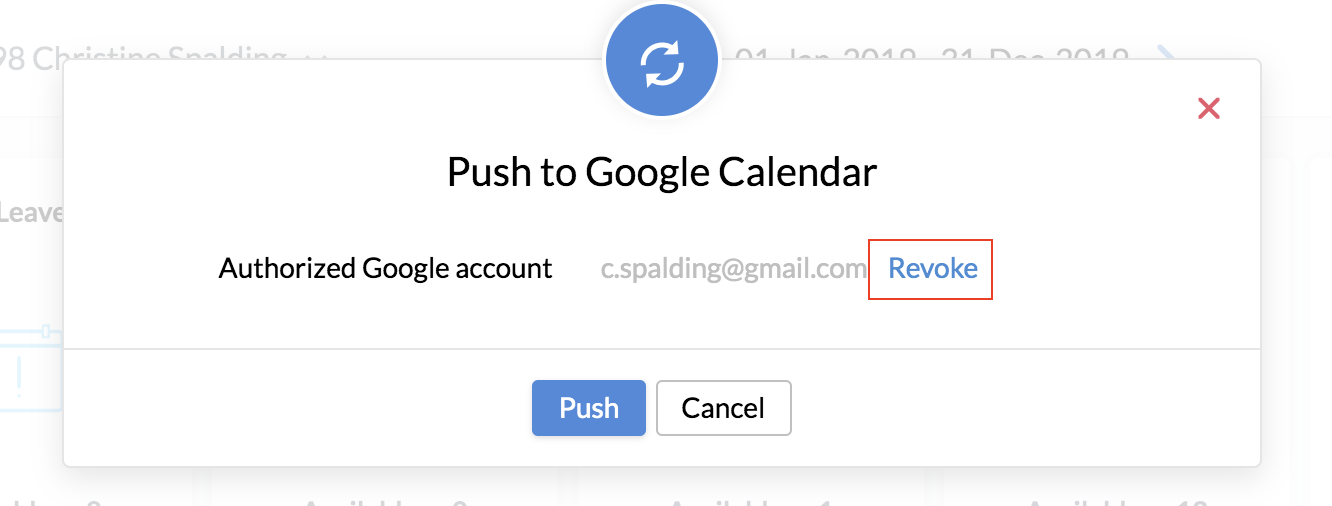
Revoke Google calendar sync
If you want to revoke Google calendar sync, follow these steps:
- Navigate to Leave, then select List View
- Click the ellipsis icon on the top right and select Google calendar options
- Click Revoke beside the authorized account
Points to remember:
- Authorization is not applicable to users who use the single sign-on method (signing into Zoho People directly from their Google calendar accounts), as their accounts are already authorized.
- The push from Zoho People can occur only after the authorization is successful.
- The first push from Zoho People has to be done manually. All leave and holidays updated after the push will be synced automatically.
- The time zone set in your Google Calendar account should be the same as your Zoho People account.
- If no leave or holiday is added to Zoho People within 180 days from the date of the first push, reauthorization will occur.
Note:
1. If Google calendar is already synced for holidays, this prompt will appear to sync leave data as well:
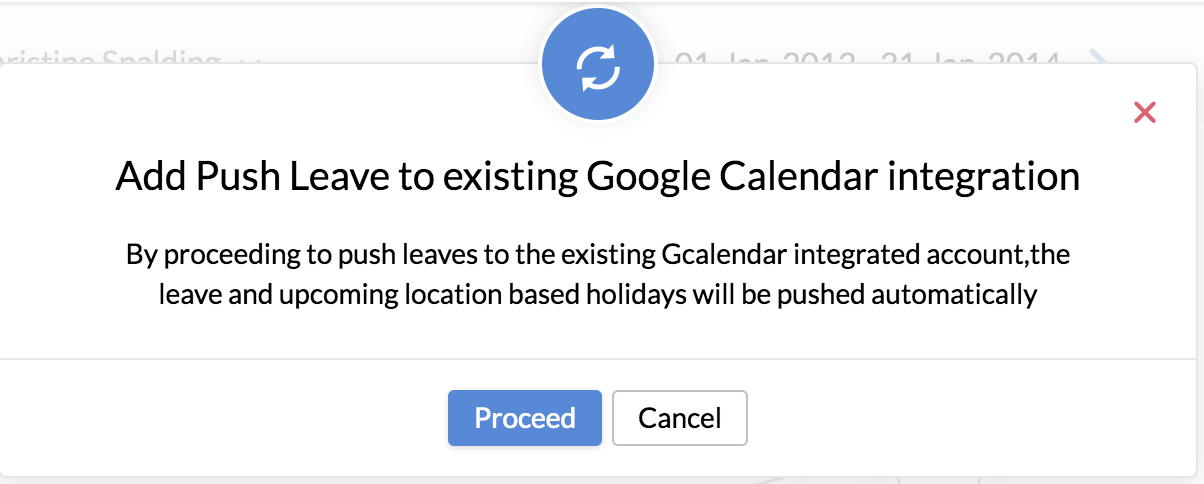
2. For accounts where Google Calendar is already synced for holidays but not synced for leave, Push to Google Calendar will appear in the list view: