Journal Credits
Zoho Books lets you create credits for both your customers and vendors using Manual Journals in a single entry. It is useful when you record credits for a customer, who is also a vendor for your business, which allows you manage the credits without needing to create separate transactions.
Create Customer and Vendor Credits
To create credits for a customer:
- Go to Accountant on the left sidebar and select Manual Journals.
- Click + New Journal at the top of the page.
- In the New Journal page, enter the required details:
- Enter the Date and Notes for the journal.
- In the journal table:
- Select Accounts Receivables in the Account column.
- Select the required customer you want to associate with the journal in the Contact column.
- Enter the required amount in the Credits column.
- Similarly, select the debit account in the next line entry and enter the amount to be debited in the Debits column.
- Click Save and Publish.
The customer credits will be created using journals.
To create credits for a vendor:
- Go to Accountant on the left sidebar and select Manual Journals.
- Click + New Journal at the top of the page.
- In the New Journal page, enter the required details:
- Enter the Date and Notes for the journal.
- In the journal table:
- Select Accounts Payable in the Account column.
- Select the required vendor you want to associate with the journal in the Contact column.
- Enter the required amount in the Debits column.
- Similarly, select the credit account in the next line entry and enter the amount to be debited in the Credits column.
- Click Save and Publish.
The vendor credits will be created using journals.
Similarly, you can also create multiple entries of customer or vendor credits in the journal and record the debit entries.
You can also create credits using journals for the customer, who also is a vendor for your business. To do this:
- Go to Accountant on the left sidebar and select Manual Journals.
- Click + New Journal at the top of the page.
- In the New Journal page, enter the required details:
- Enter the Date and Notes for the journal.
- In the journal table:
- Select Accounts Receivables in the Account column.
- Select the required customer you want to associate with the journal in the Contact column.
- Enter the required amount in the Credits column.
- In the next line entry, select Accounts Payable in the Account column.
- Select the required vendor you want to associate with the journal in the Contact column.
- Enter the required amount in the Debits column.
- Click Save and Publish.
The credits will be created in the journal accordingly.
Apply Credits to Transactions
Once you create the journal, you can apply these credits to the respective customer’s invoices or the vendor’s bills. Here’s how:
- Go to Accountant on the left sidebar and select Manual Journals.
- Select the journal that you want to apply credits to the invoices or bills.
- Click Apply near Customer Credits to apply the credits to the customer’s invoices, or click Apply near Vendor Credits to apply the credits to the vendor’s bills at the top of the transaction document in the journal’s Details page.
- In the pop-up that appears, click Apply to Invoices, or Apply to Bills.
- To apply credits to the customer’s invoices:
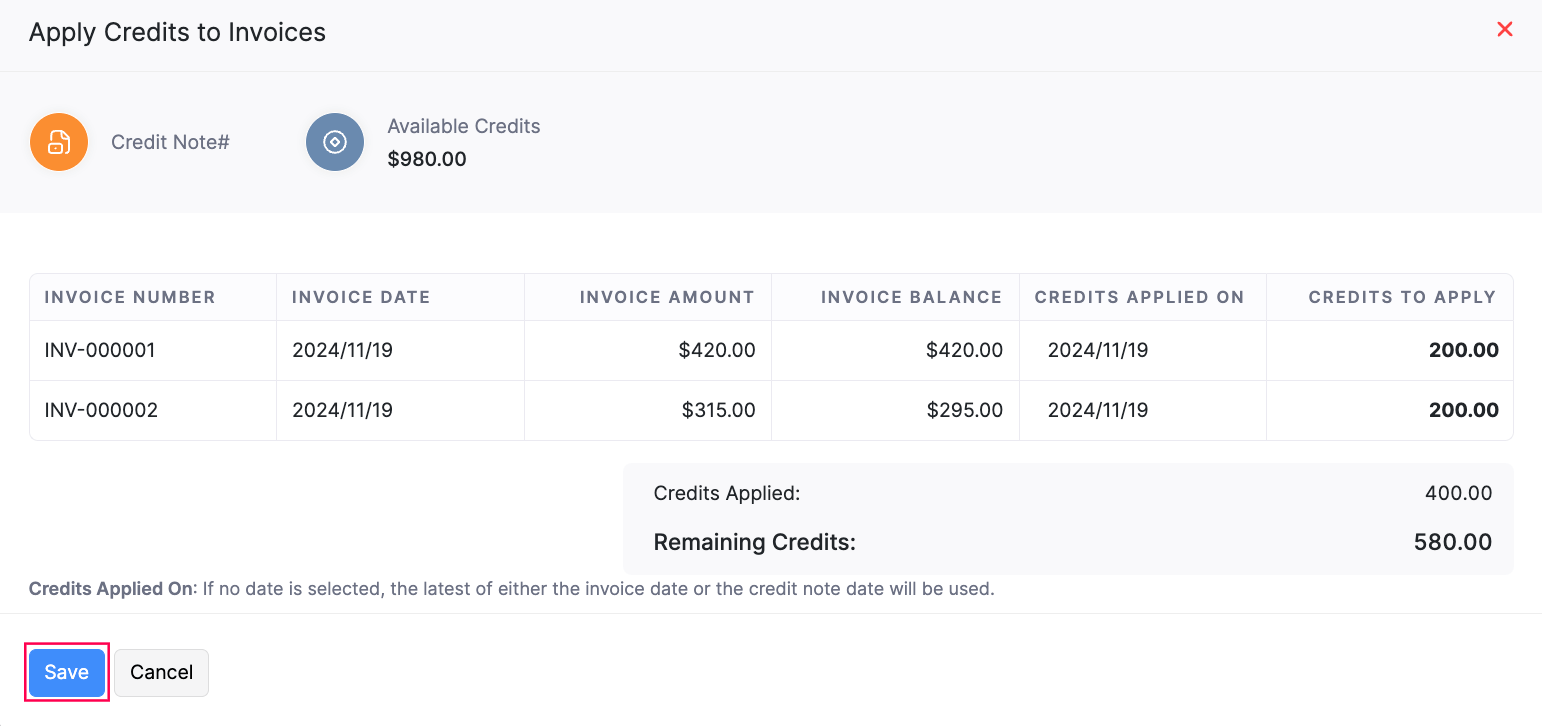
In the Apply Credits to Invoices pop-up, enter the date in the Credits Applied On column.
Enter the required amount in the Credits to Apply column.
Click Save.

Similarly, you can also apply credits to your vendor’s bills by clicking Apply next to Vendor Credits in the journal’s Details page.
The credits will be applied to the transactions based on chosen preferences. To delete the credits applied to the transactions:
Go to Accountant on the left sidebar and select Manual Journals.
Select the journal for which you want to delete the applied credits.
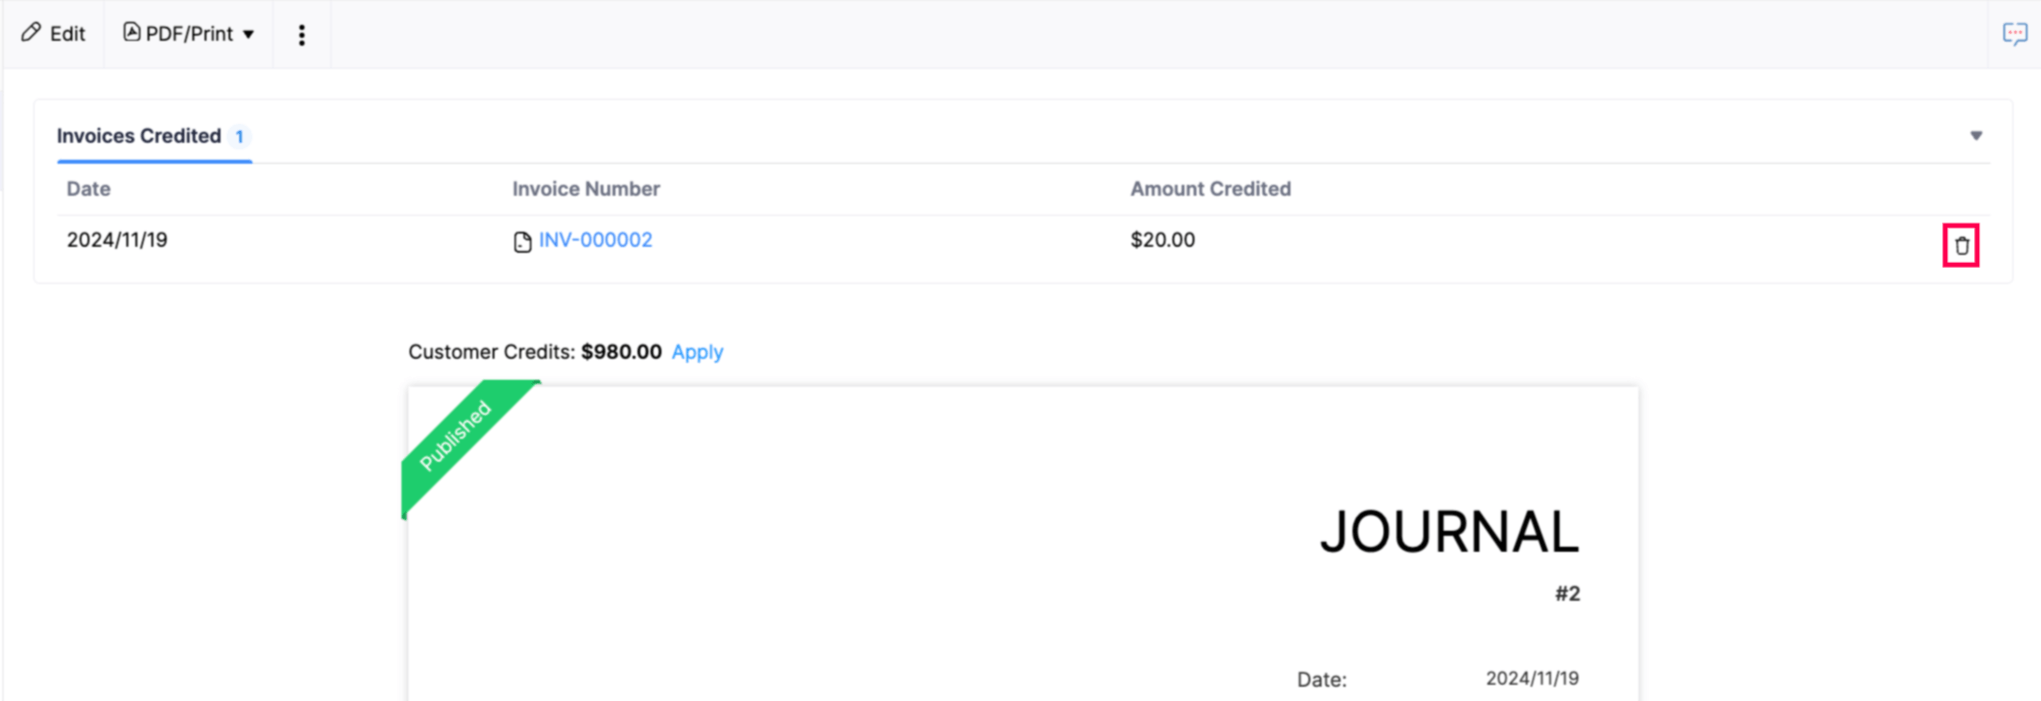
Click Invoices Credited at the top of the journal PDF.
Hover over the required credit and click the Delete icon next to it.

In the pop-up that appears, click Ok to confirm.
The credits applied to the invoices will be deleted. Similarly, you can also delete the credits applied to a vendor’s bills.
Note: You can apply credits only on the invoices or bills that are in Open status.
Import Applied Customer or Vendor Credits
Prerequisite: You can import customer or vendor credits only if the journals and transactions in Zoho Books match the transaction numbers in the import file.
To import applied customer or vendor credits:
- Go to Accountant on the left sidebar and select Manual Journals.
- Click the More icon in the top right corner and select Import Applied Customer Credits to import credits for customers, or select Import Applied Vendor Credits to import credits for vendors.
- In the next page, click Choose File to upload the import file. You can also download a sample file for your reference.
- Choose the Character Encoding and File Delimiter for your import file.
- Click Next.
- In the Map Fields page, check if the fields are correctly mapped to the headers in the import file.
- Check the option Save these selections for use during future imports if you want to use the same field mapping for all the files you import in this module.
- Click Next.
- In the Preview page, click Import.
The customer or vendor credits will be imported based on the chosen preferences and applied to the respective transactions.
Export Applied Customer or Vendor Credits
To export applied customer or vendor credits:
- Go to Accountant on the left sidebar and select Manual Journals.
- Click the More icon in the top right corner and select Export Applied Customer Credits to export customer credits, or select Export Applied Vendor Credits to export vendor credits.
- In the Export pop-up, enter the required details:
- Select the required Export Template. If you do not have an export template, click + New Template in the dropdown.
- In the New Export Template pop-up:
- Enter the Template Name.
- Select the fields you want to include in the template. Click + Add a New Field to add more fields in the export template.
- Click Save and Select.
- Select the required Export File Format. You can export the file in CSV, XLS, and XLSX formats.
- Enter a Password to protect your file, if required.
- Click Export.
The applied customer or vendor credits will be exported in the required file format.

