 Inventory
Zoho Inventory - Amazon IN Integration
IN THIS PAGE…
Prerequisites
- Make sure that the base currency in Zoho Inventory matches that of your Amazon Seller account.
- Enable tax rates in Zoho Inventory.
How-to Video
Integrating with Amazon
To integrate your Amazon account with your Zoho Inventory organization:
- Go to Integrations on the left sidebar.
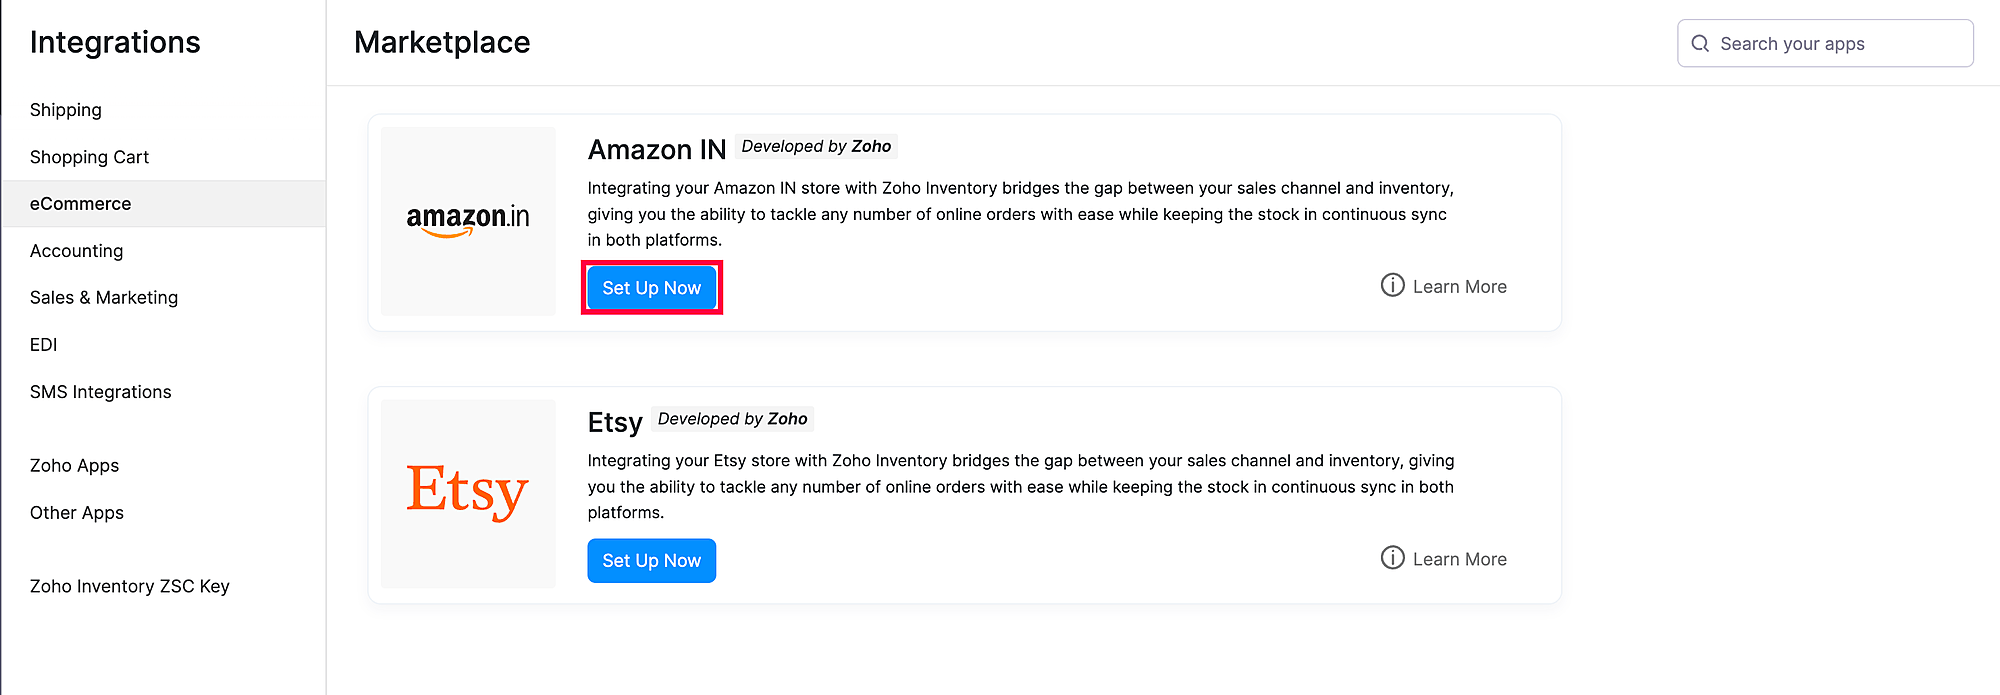
- Select the eCommerce section and click the Set Up Now button under Amazon.
- You’ll be redirected to Amazon’s website. If you haven’t logged in, enter your credentials and click Sign in.
- If you’re already logged in, you’ll be taken to the authorization page where you have to consent to share your Seller Partner Account data with Zoho Inventory by checking the checkbox at the bottom of the page.
- Click Confirm.
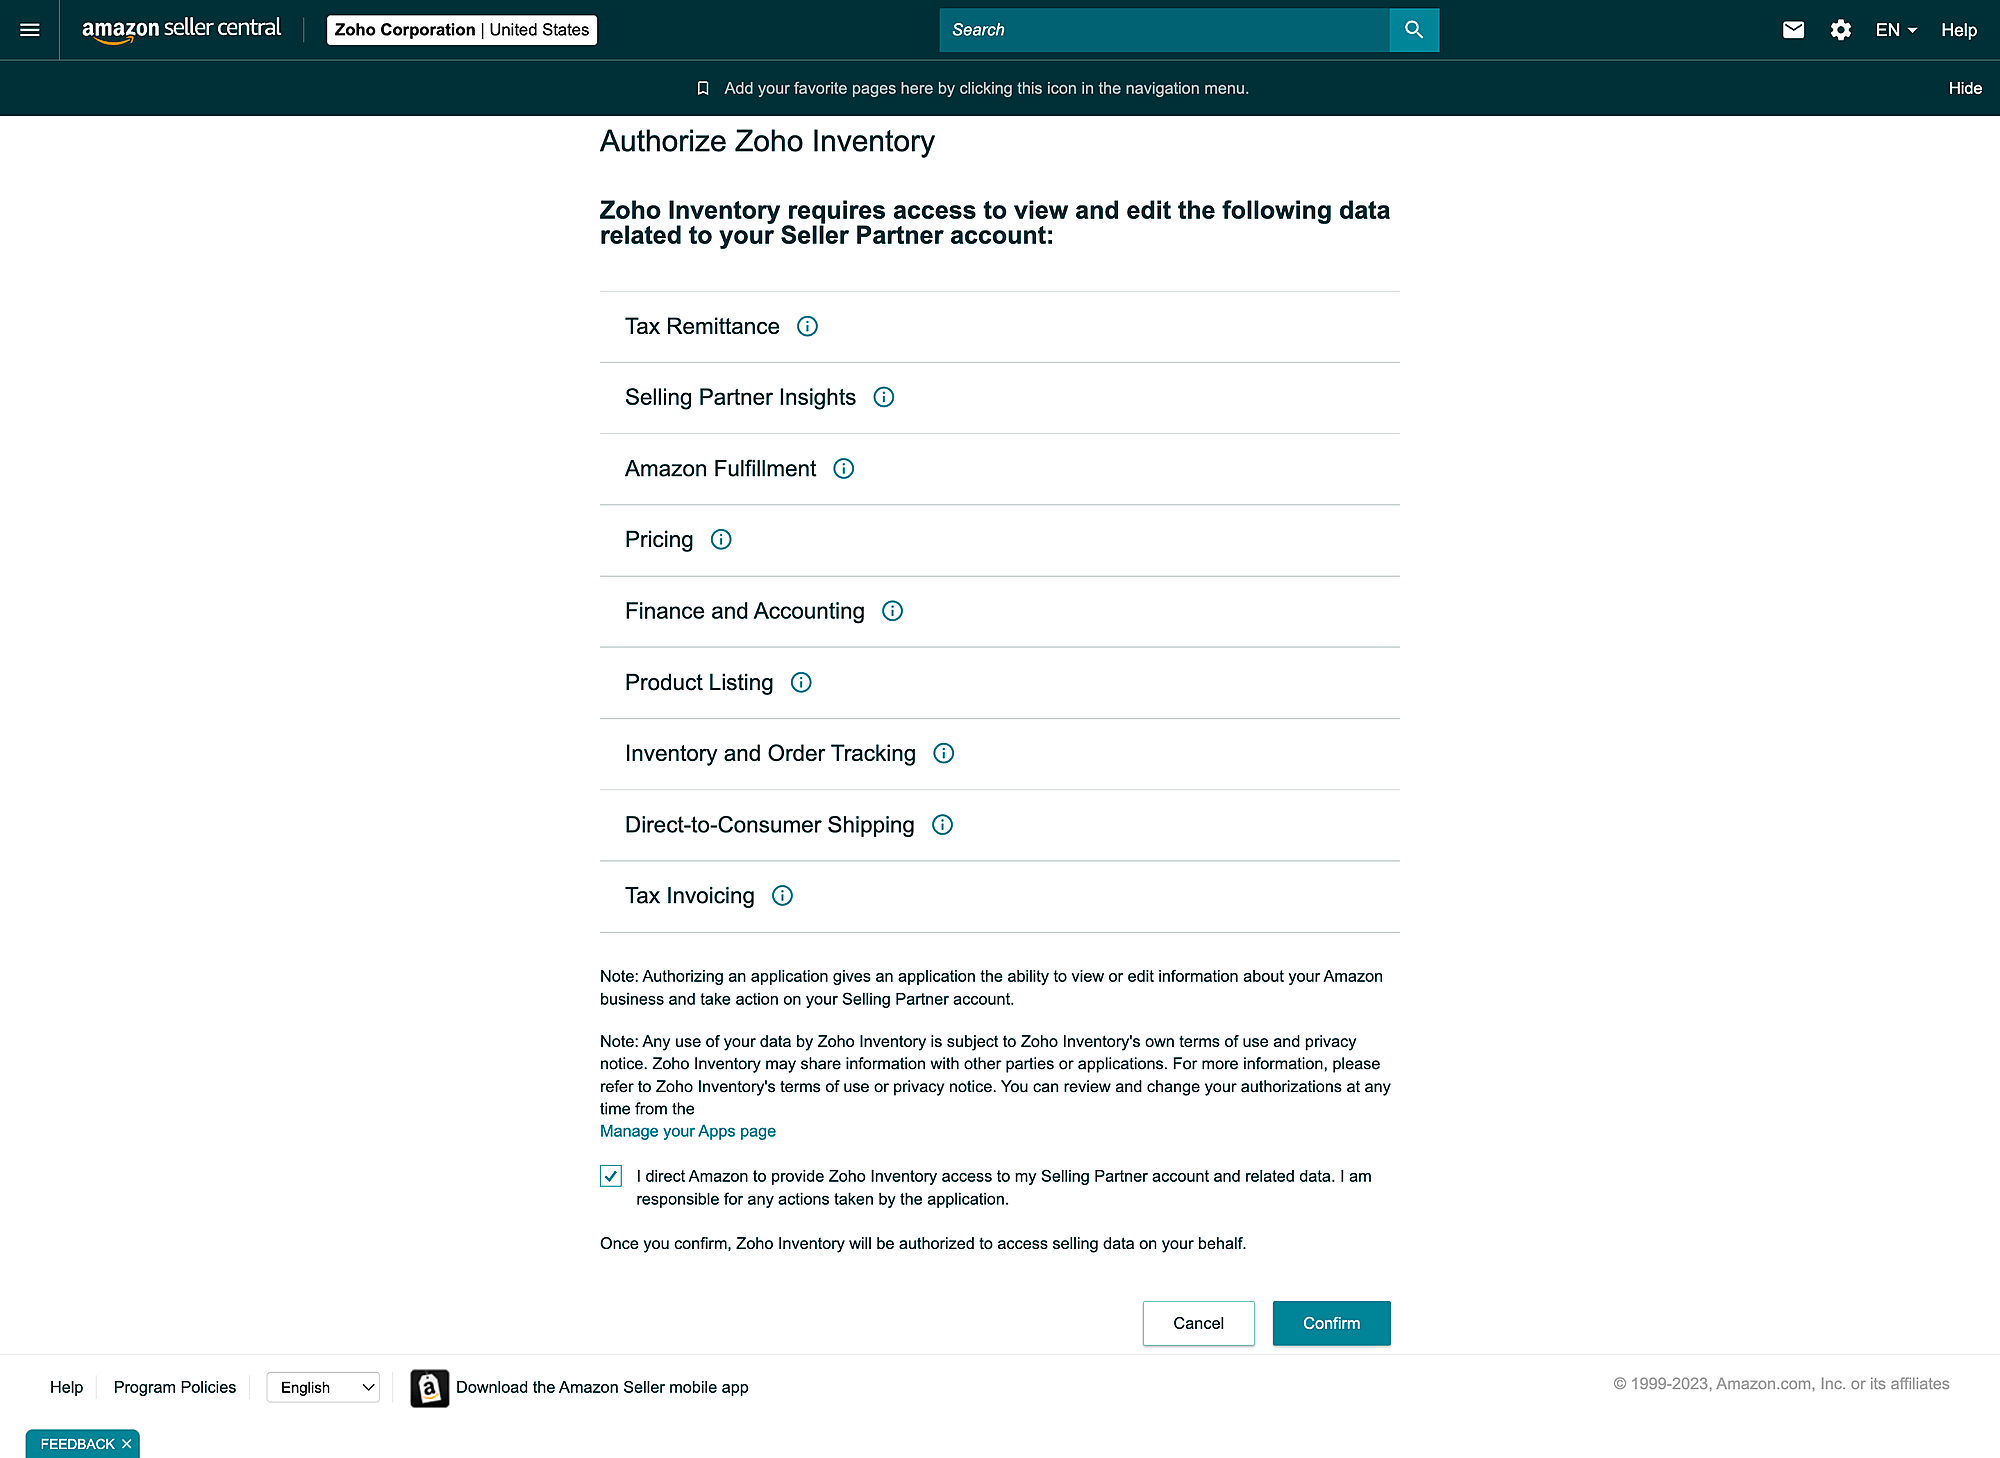
Your Amazon Seller Central account will be integrated with your Zoho Inventory account.
Modules in Sync
After the initial sync is completed, a scheduled sync is set to take place every four hours to keep your organisation up to date with your amazon marketplace. You can change your sync preferences any time from the Amazon integration page.
To change your sync preferences:
-
Go to Settings, then Integrations.
-
Open the eCommerce tab.
-
Click the Show Details button under Amazon.

A page with all details associated with the integration opens up. Lets take a look at the individual options below.
Items
-
New items from Amazon will be created and added in your Zoho Inventory organisation automatically. This way, your inventory is kept in sync with your store.
-
Item groups in amazon that have more than three attributes will not be synced as Zoho Inventory supports only up to three attributes.
-
You can click the Sync Manually button to trigger a manual sync at any time in-between the scheduled syncs.

Insight: Initiating a manual sync in one marketplace will trigger a sync for the same module in the other integrated marketplaces as well.
Sales Orders
-
When a customer purchases your product from amazon, a sales order is generated for you automatically inside Zoho Inventory.
-
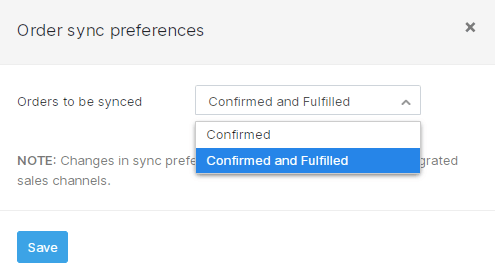
You can either choose to sync only the Confirmed orders or Confirmed and Fulfilled orders from Amazon. To do so:
-
Go to the Modules in Sync section.
-
Click the Pencil icon under Orders.

-
Select your sync preferences from the drop-down.
-
Click Save.
-
Insight: Sync preferences changed in one sales channel will be applied across all other integrated sales channels as well.
-
You can click the Sync Manually button to trigger a manual sync at any time in-between scheduled syncs.

Tax Handling
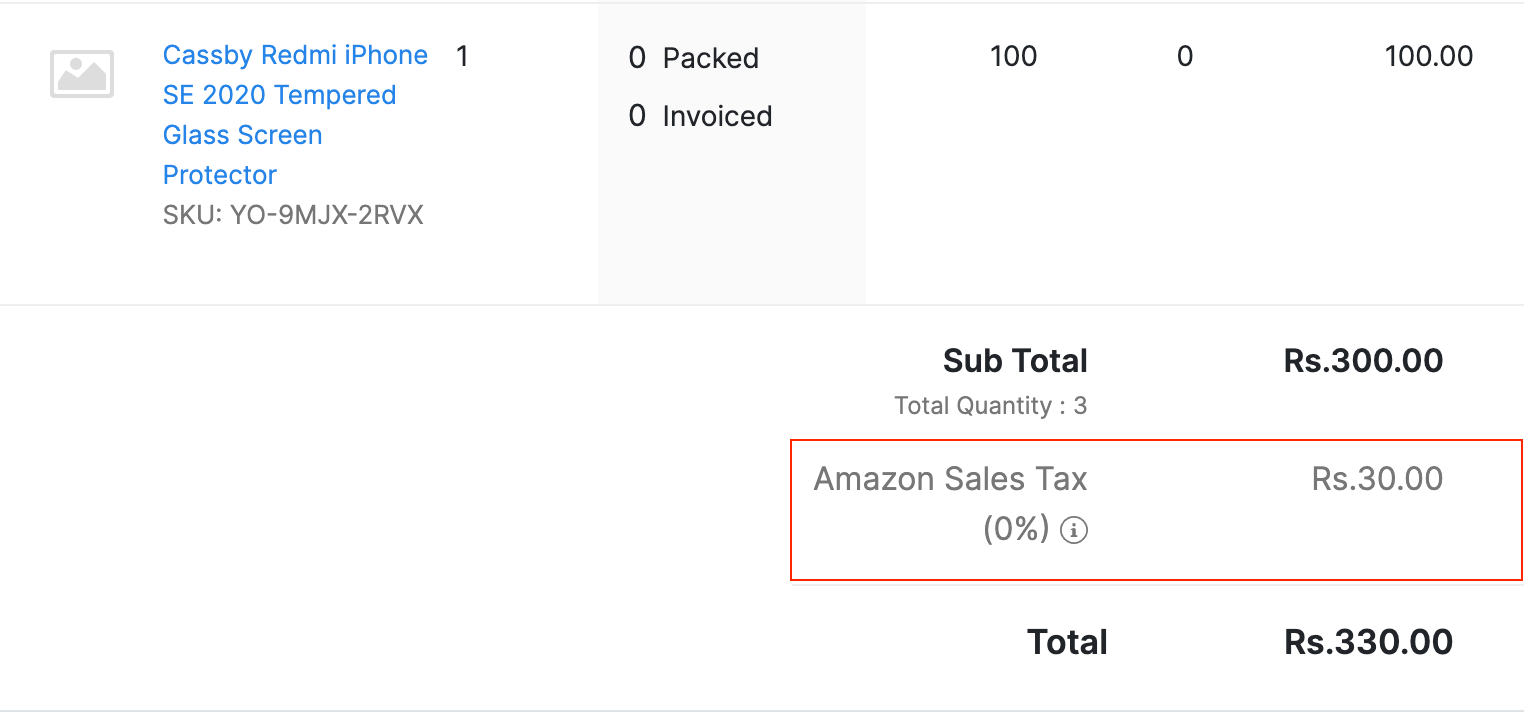
Amazon only sends the tax amount and not the tax percentage. Hence, Zoho Inventory associates the tax amount with a zero percent tax by default. Let’s take a look at how tax is handled for inter-state and intra-state orders from Amazon.
Inter-State Orders
-
The received tax amount is associated with the Zero percent tax rate.
Intra-State Orders
-
The tax amount received is split into two equal parts and each part is associated with the individual intra-state tax components CGST0 and SGST0.
-
If the home state of the business is a union territory, the tax components would be CGST0 and UTGST0.
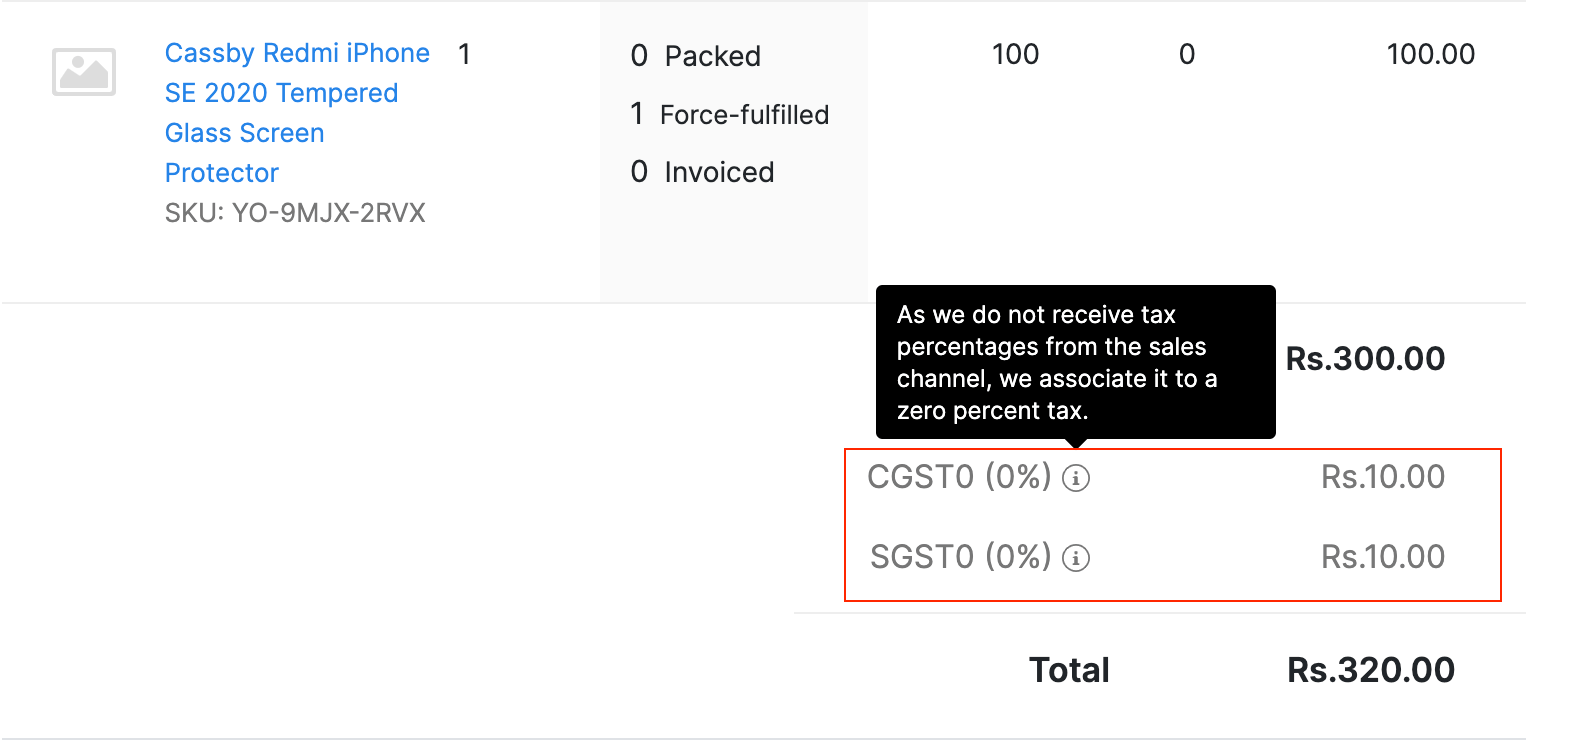
Warning: If required, you can edit the sales order to apply the appropriate tax rates. However, make sure to do it for all the line items. Otherwise, the tax amount will be recalculated with 0% tax rate for the line items associated with the default tax.
Stock Sync
-
The current stock of your items will be pushed to Amazon automatically whenever there is a change in your items’ stock levels.
-
If you disable automatic stock sync, then the current stock in Zoho Inventory will no longer get reflected in your marketplace.

Customers
Guests or registered users who purchase your products from amazon will be added as a Customer inside Zoho Inventory. The GST treatment of a customer is set based on the ‘Place of Supply’ which is identified from their shipping address.
- If the Place of Supply is outside India, then they’re identified as an Overseas Customer.
- If the Place of Supply is within India without a GSTIN, then they’re identified as a Consumer.
- If the order comes with a GSTIN, then the customer is identified as a Registered Business.
Shipments
- When you create shipments for your Amazon orders, the shipping information you have in Zoho Inventory will be pushed to your amazon account immediately.
Payments
- The payment status under the sales order would be indicated by a comment as Paid, as amazon supports only paid orders.
Fulfilment by Amazon
Fulfilment by Amazon (FBA) facilitates sellers to rent Amazon’s storage space to keep their goods, while also fulfiling online orders and handling customer services.
How FBA works
- The seller ships his goods to Amazon’s storage facility where they sort and store the products.
- When a customer orders an item, Amazon picks and packs it from their nearest warehouse.
- They ship the packages and share the tracking information with the seller.
- Post delivery, Amazon handles customer feedbacks and services.
- On a biweekly basis, Amazon deposits the seller’s share of profit in their bank account after deduction.
Advantages of using FBA:
- Access to unlimited storage space.
- Your products will be showcased to Prime customers.
- You only have to pay the holding cost and shipping fees.
Setting up FBA in Zoho Inventory
In Zoho Inventory, you can designate a warehouse to track your FBA goods and orders.
Note: The FBA tracking and warehouse mapping are mutually exclusive features i.e., at a given time, you can enable only one of them.
To designate an FBA warehouse:
-
Go to Settings, then Integrations.
-
Open Marketplaces.
-
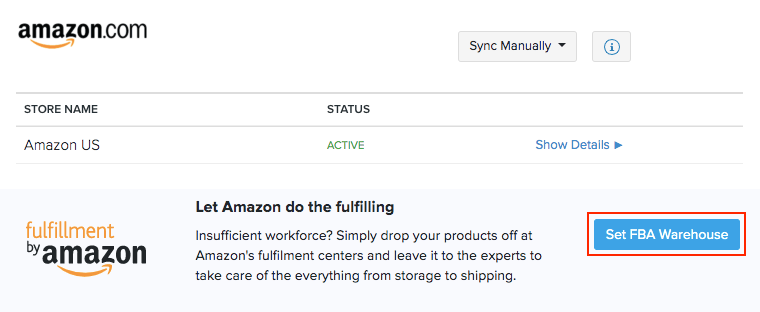
If you’ve already integrated with Amazon, click Set FBA Warehouse. Otherwise, you can set up FBA during integration.
-
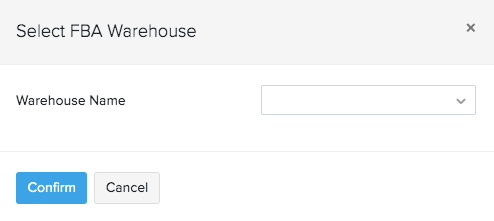
In the pop-up, select the warehouse and click Confirm.
Note: Cross-border feature is not supported as of yet, i.e., your business location in Zoho Inventory must be set as U.S.A in order to enable FBA for your organisation.
Marking FBA Items
Products that are handled by Amazon can be marked as FBA items in Zoho Inventory. Also, ensure that you have actively listed them on Amazon.
To mark FBA item:
-
Go to the Items module on the left sidebar.
-
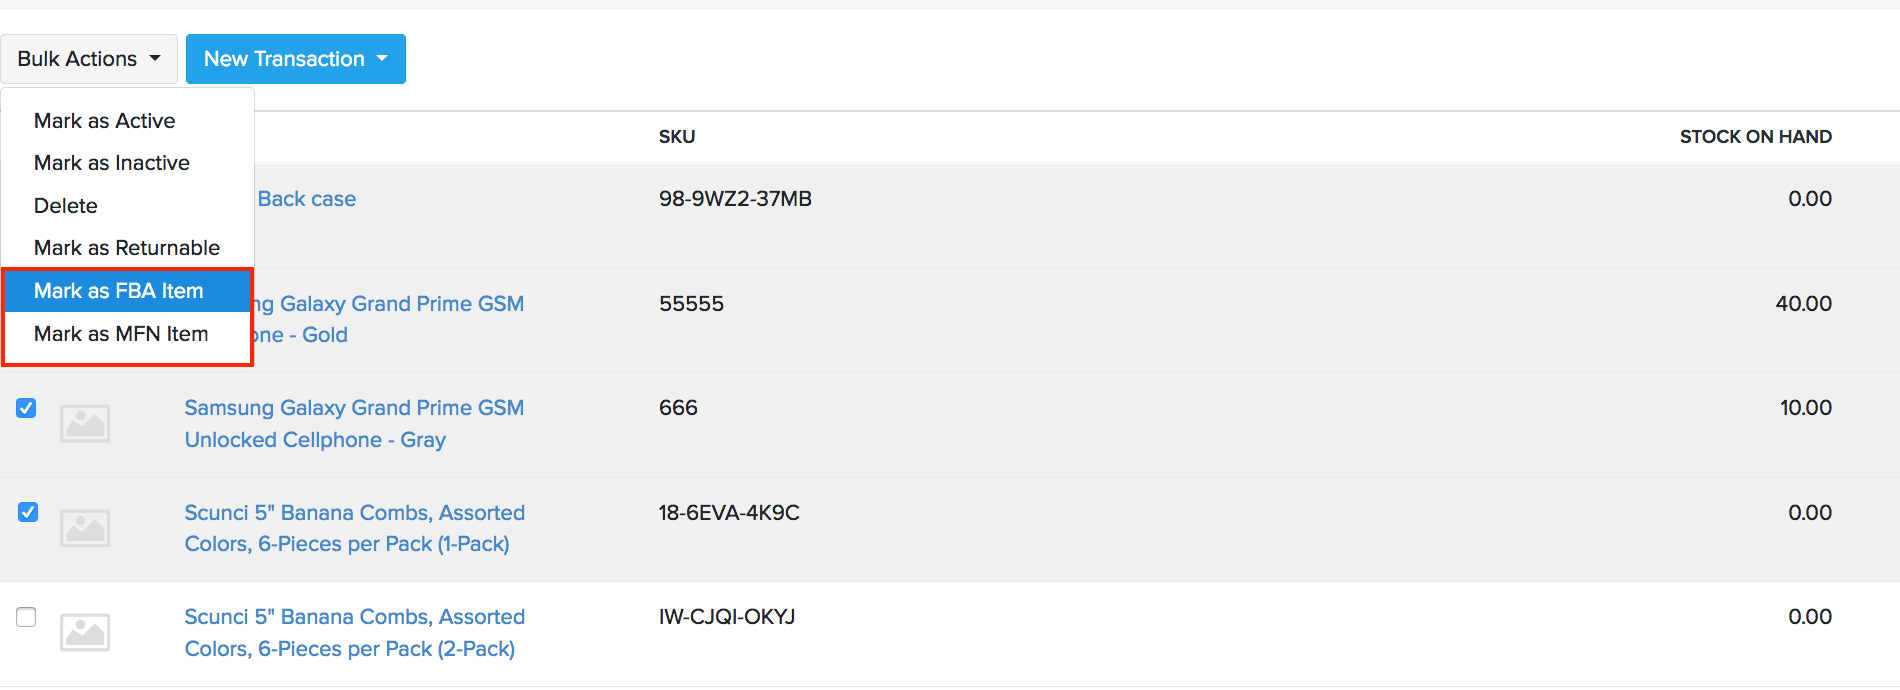
Select the items you want to mark as as FBA.
-
Click on the Bulk Actions button at the top.
-
Select Mark as FBA Item option from the drop-down.
Alternatively,
- Go to the Items module on the left sidebar.
- Open the item you want to mark as as FBA.
- Click on More and select Mark as FBA Item from the drop-down.
If you no longer want the item to be FBA tracked, follow the steps above and select Mark as MFN item from the drop-down.
Link FBA and MFN items
Some sellers project one item as several items on amazon(Amazon fulfilled and seller fulfilled). If you are one of those sellers, then you can link multiple FBA and MFN items to a single Zoho Inventory item. This not only helps maintain a master stock for multiple online items but also allows you to dispatch shipment from the nearest warehouse while cutting down on the FBA processing charges.
To link an FBA/MFN item to a Zoho Inventory item:
- Go to the Zoho Inventory Dashboard.
- Under the Product Details section click on Unconfirmed Items.
- Click on an amazon item to view its details.
- Click the Link to existing item button in the item details page.
- Select an item in Zoho Inventory to which you want to link this sales channel item.
- Click Merge.
Stock Sync
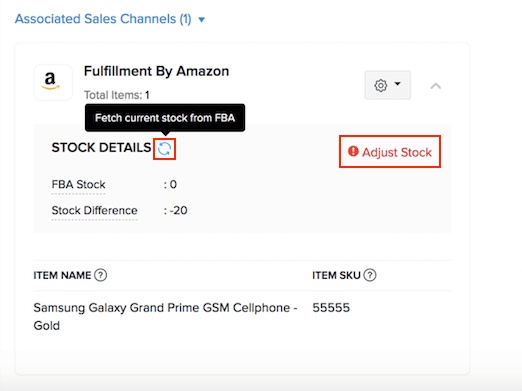
When you mark an item as FBA, its current stock in Amazon gets fetched into Zoho Inventory. If there is a mismatch, you can record the difference as an adjustment.
To view the FBA stock for an item,
-
Go to Items in the left sidebar
-
Click on the FBA item to view its details.
-
Go to the Associated Sales Channels section.
-
Click the sync icon next to Stock Details to fetch the current stock from Amazon. If there is a difference in stock between the two platforms, it’s indicated as Mismatch.
-
Click on Mismatch to drill-down the details.
-
Click Adjust Stock to update the stock difference in your FBA warehouse.
Inbound Shipment
An Inbound Shipment is Amazon’s term for sending your items from your warehouse to an Amazon Fulfillment Center, where it will be stored and delivered to your customer by Amazon.
FBA Orders
When a customer places an order for an FBA item on Amazon, it gets recorded as a force-fulfilled order in Zoho Inventory. You will not be able to edit the order or change its shipping status, since it is shipped and tracked by Amazon.
Outbound Shipment
If you sell an FBA item offline or on other marketplaces, you must create an outbound shipment for that item.
Scenario: Mark runs a handicraft business which he sells offline, as well as on Amazon. He cannot afford a warehouse or hire workforce, so he avails the FBA service from Amazon. In Zoho Inventory, he adds a warehouse to track his FBA stock and orders. Whenever he receives an offline quote, he records a sales order with the FBA item and creates an outbound shipment. Amazon ships the consignment from their warehouse and periodically updates the status of the order in Zoho Inventory.
To create an outbound shipment:
- Log in to your Zoho Inventory organisation.
- Open the sales order with the FBA item.
- Click Create, then click Outbound Shipment from the drop-down.
- A fulfilment request is sent to Amazon for the FBA items in the order.
- Amazon picks, packs and ships the consignments and updates the shipping status in Zoho Inventory. You can also fetch the status manually.
The non-FBA items in the order must be shipped separately by you.
Change FBA Warehouse
To change your FBA warehouse in Zoho Inventory:
-
Go to Integrations, then Marketplaces.
-
Click the Show Details option under Amazon.
-
Scroll down to the Stock Syncing section.
-
Click Change and select the new warehouse under which you want to track your FBA goods and orders.

Disable FBA
To disable FBA in Zoho Inventory:
-
Go to Integrations in the left sidebar, then Marketplaces.
-
Under Amazon, click Disable FBA
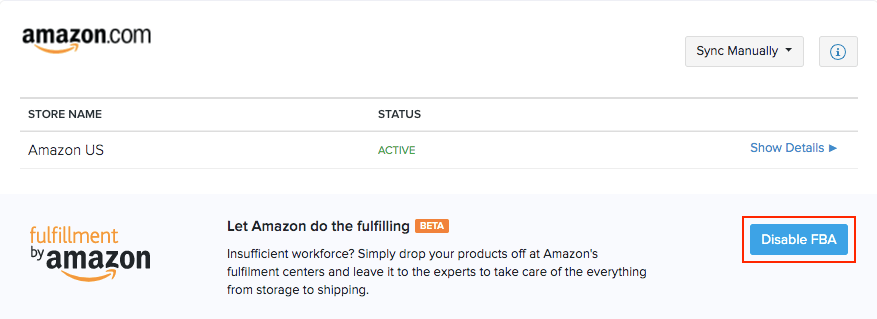
You will no longer be able to track your FBA items or create outbound shipments in Zoho Inventory.
Sync History
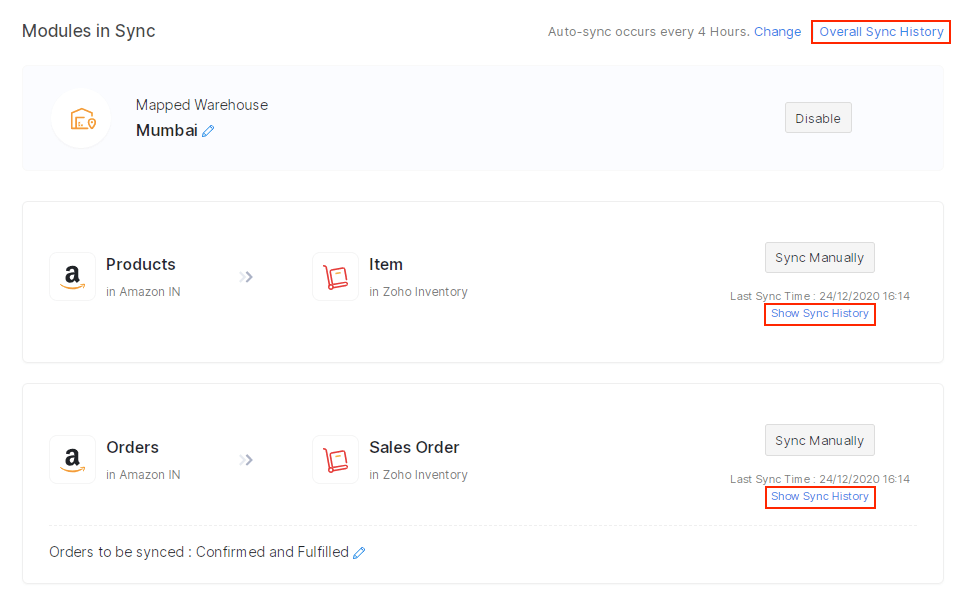
The sync history page logs the periodic syncing of items and sales orders from Amazon. Across each timestamp, you can view the the number of items and sales orders that were successfully synced and not synced into Zoho Inventory.
To view the sync history from Amazon IN:
-
Go to Settings, Integrations, then eCommerce.
-
Click the Show details button under Amazon.
-
Click the Overall Sync History option. You can also click the Show Sync History option for the individual modules to view their respective sync history.
-
Click on a record to view the sync details of the particular timestamp.
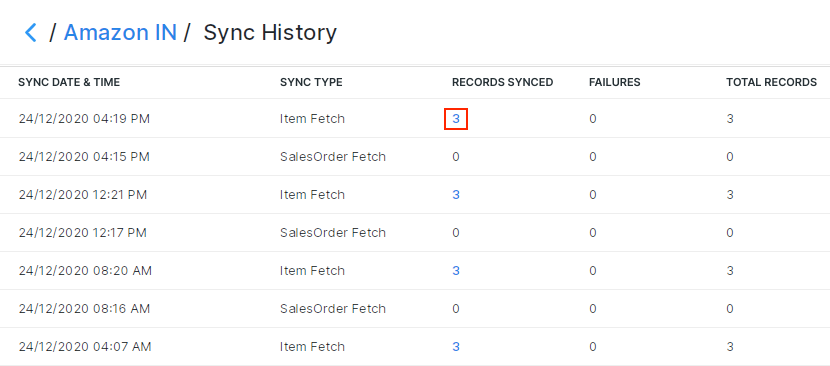
Insight: The successfully synced record histories that are older than a month and failed sync histories that are older than two months will be deleted automatically i.e., you’ll no longer be able to view the sync details of those records.
Re-sync a Task
The Resync feature helps to fetch items and sales orders which were already synced or failed to sync into Zoho Inventory during a particular timestamp.
To re-sync a task in Zoho Inventory:
-
Navigate to Settings, Integrations, then eCommerce.
-
Click Show Details under Amazon.
-
Click Overall Sync History.

-
Place your cursor over the task which you want to re-sync and click the Resync button.

The items or sales orders that were synced during the particular timestamp will be fetched once again from Amazon into Zoho Inventory.
Sync Orders and Items from a Custom Timeframe
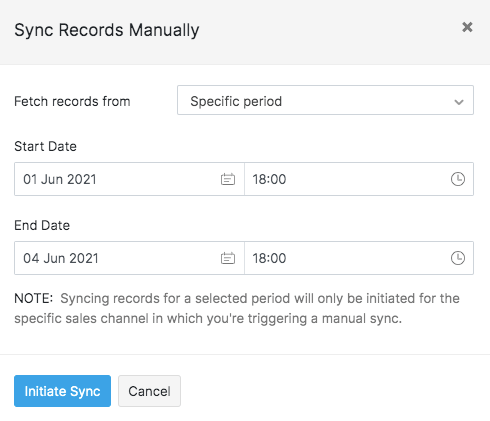
You can also resync orders and items from a custom date range from amazon. To do so:
-
Go to the Integrations module on the left sidebar.
-
Click the eCommerce tab.
-
Under Amazon integration, click the Sync Manually button.
-
Choose whether you want to sync Items or Orders from the drop-down.
-
Choose the Specific Period option from the ‘Fetch records from’ drop-down.
-
Select the Start Date and the End Date.
-
Click Initiate Sync to pull your orders or items from Amazon.
Warehouse Mapping
If you have set up warehouses in your organisation, orders from Amazon are tracked in the primary warehouse and stock updates take place in the organisation level. You can choose a specific warehouse from which you want to update the stock to your sales channel.
To map a warehouse with your Amazon account:
-
Log in to Zoho Inventory.
-
Go to Settings > Integrations > eCommerce.
-
Go to Amazon and click Show Details.
-
Under Modules in Sync, click the toggle button to enable warehouse mapping.

-
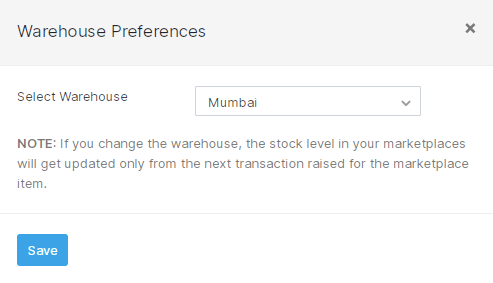
In the following pop-up, choose the warehouse you want to map with your Amazon marketplace.
-
Click Save.
All stock updates and orders received henceforth from this sales channel will be tracked in this warehouse.
-
To change your warehouse mapping, click the Pencil icon near the warehouse name and select another warehouse.
-
To disable warehouse mapping, click on the toggle button and in the following pop-up click Disable. On doing so, your orders from this sales channel will go back to being tracked in the primary warehouse, and the stock update will take place in the organisation level.

Disable Amazon Integration
To temporarily disable your Amazon integration in Zoho Inventory:
-
Go to Settings, Integrations, then eCommerce.
-
Click Show Details under Amazon.
-
Click the Disable Integration button on the top-right corner.

-
Click Ok to confirm your action.
On disabling the integration, your Amazon integration status will be moved to an Inactive state
- The integration will be put on hold temporarily without affecting the Amazon related information.
- During this time, stock update and shipment update to Amazon will not be triggered.
- On resuming the integration, all products and orders created in the interval between the last sync time and the reactivation time will be synced into Zoho Inventory.
To reactivate your amazon integration, click the Enable Integration button available on the top-right corner.
Note: To remove the integration and all its details permanently, click the Disconnect option.
Data Protection
Amazon’s Data Protection Policy enforces strict standards to protect sensitive information from any unlawful forms of processing. We at Zoho Inventory have implemented the following security features to protect customer data:
-
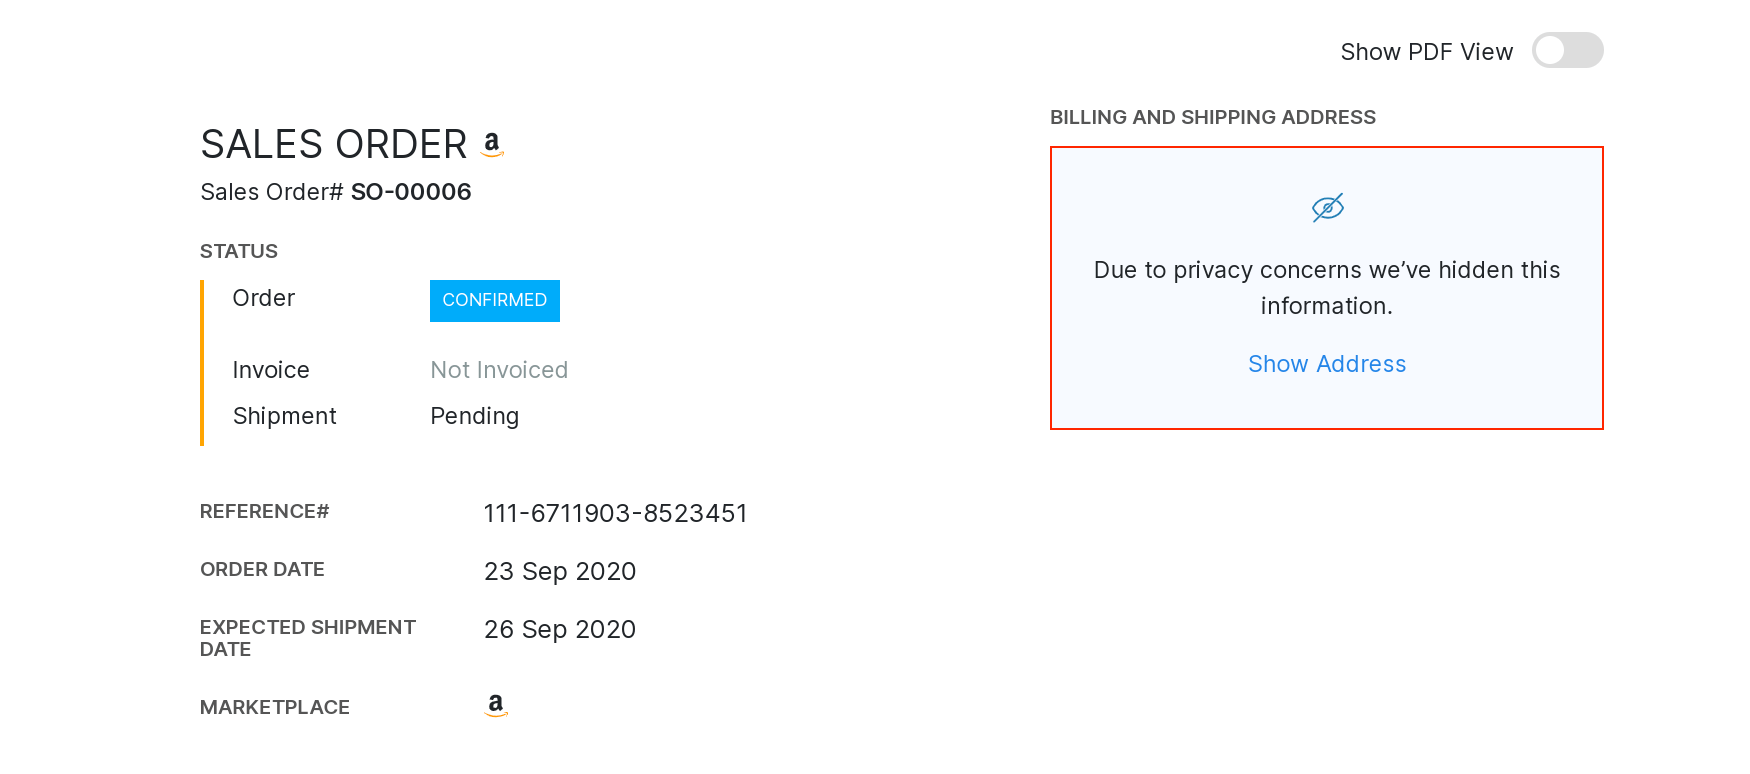
The customer’s name on the Amazon order will be replaced and saved with a default name (Amazon IN - Customer) in Zoho Inventory. The original customer details will be concealed at application sections where contact information is displayed and will be revealed only on demand.
-
The PII (Personally Identifiable Information) of customers will be deleted 30 days post fulfilment. This applies to void orders as well.
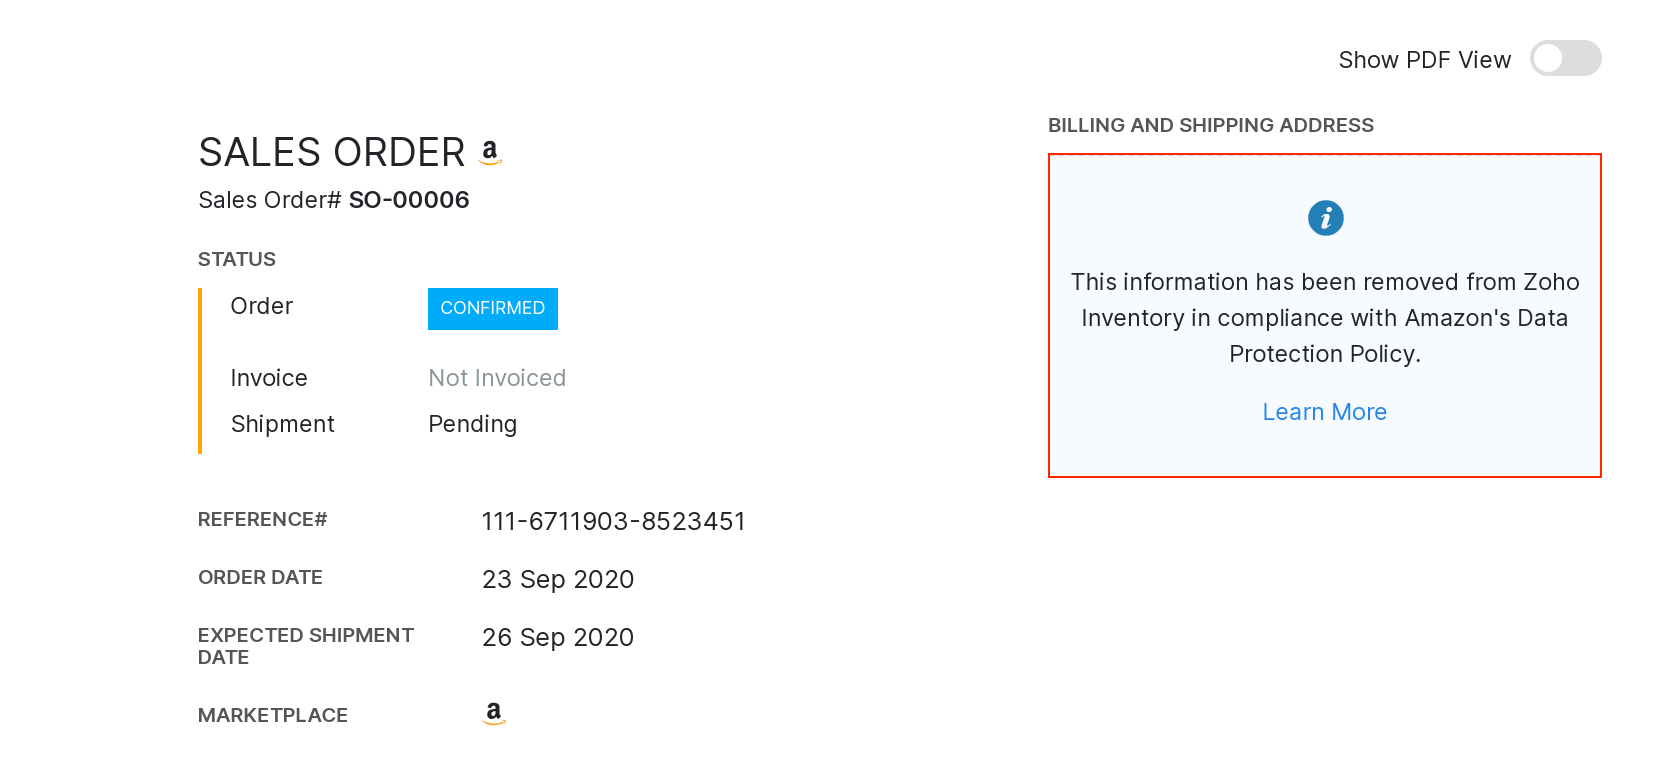
-
When an unfulfiled order is fulfiled again, the PII expiration time will be reset based on the new date of fulfillment.
-
Cases where we have restricted PII sharing:
- When you clone customer contacts or Amazon sales orders, its associated PII will not be carried forward.
- Export files, Sales Order PDFs, existing GET APIs of sales order, packages and shipments will not contain PII. However, the contact information will be displayed on package PDFs and shipment PDFs for fulfilment purposes.
- The PII will not be shared with other integrated applications except shipping carriers as they require them for shipment creation.


