 Inventory
Integrate Zoho Inventory With HSBC
IN THIS PAGE…
Zoho Inventory has partnered with HSBC to enable you to perform banking functions from within Zoho Inventory. With this integration, you can pay your vendors directly from Zoho Inventory.
Set Up the HSBC Integration
Note: This integration is available only for the organisations in the India edition created under the zoho.in domain.
To set up the HSBC integration in Zoho Inventory:
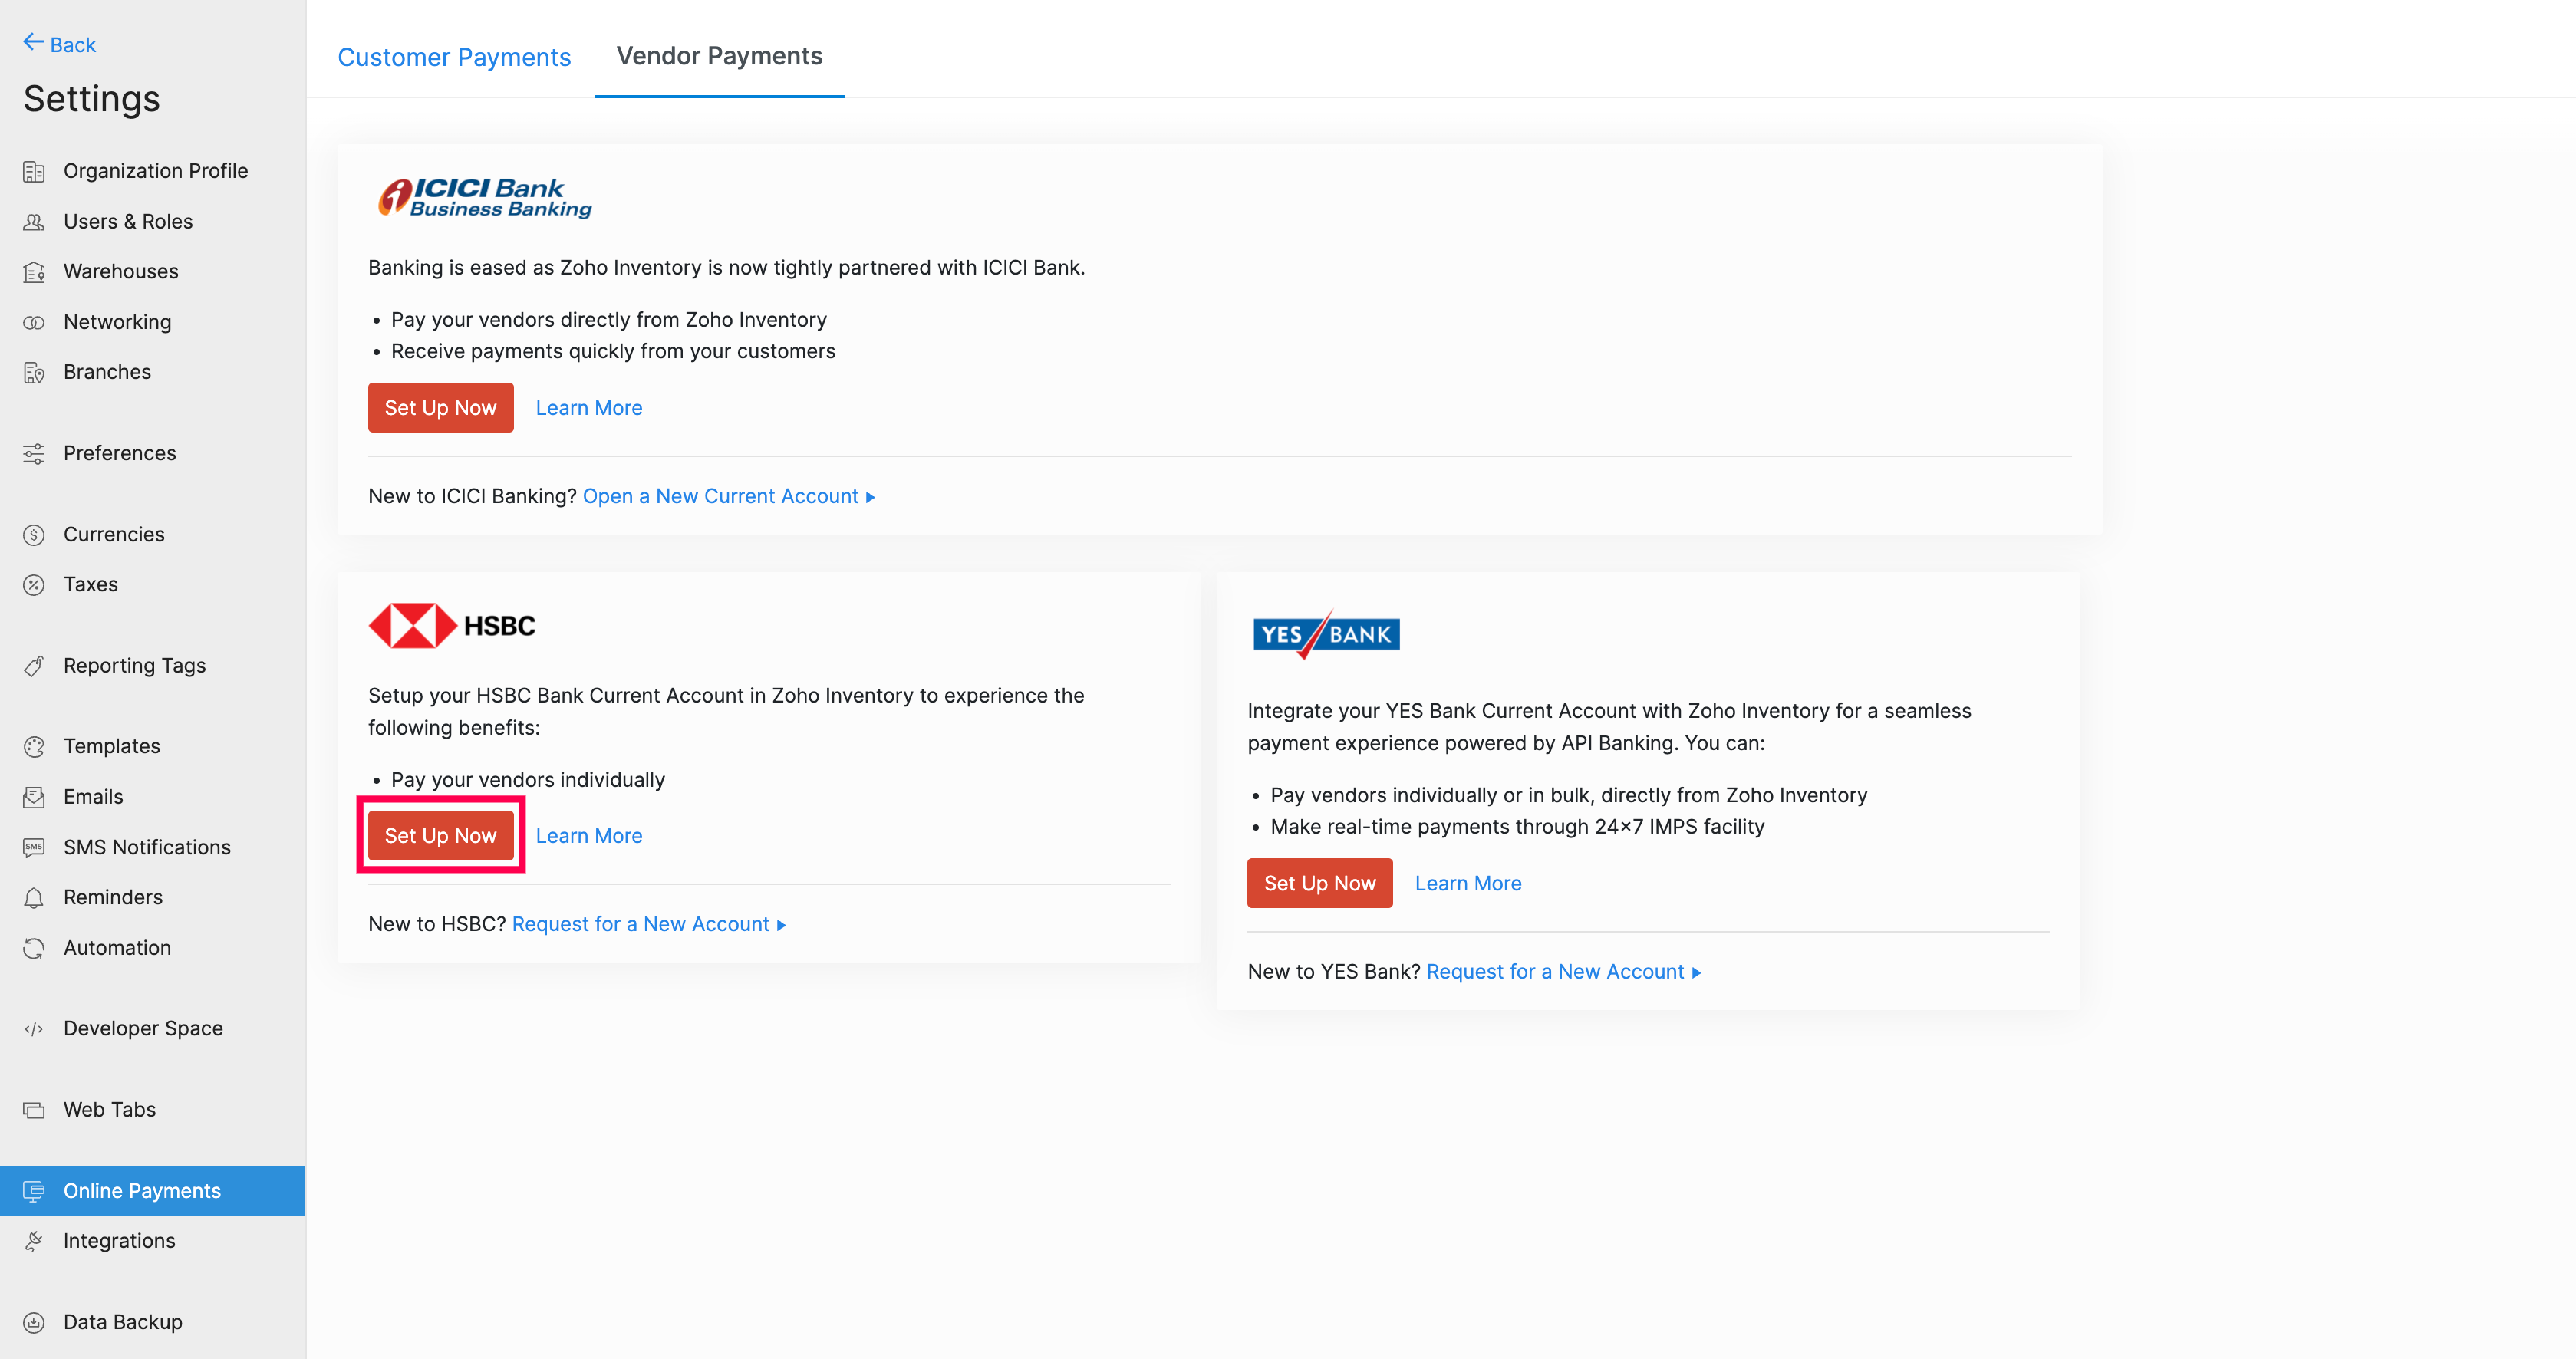
- Go to Settings > Online Payments.
- Select the Vendor Payments tab.
- Click Set up Now on the HSBC tile.
- If you don’t have the credentials to integrate Zoho Inventory with HSBC, select No and click the Open HSBC Contact Form link to provide your details to HSBC .
The link will open in a new tab where you can enter your organisation and contact details. The HSBC team will get in touch with you and help you create a new HSBC account (if you don’t have one already), or help you get the required credentials for your existing account.
- If you have the credentials to integrate Zoho Inventory with HSBC, you can use them to fill in the following information:
| Field | Description |
|---|---|
| Profile ID | The HSBC team would have sent you the Profile ID via email. |
| Client ID | The HSBC team would have sent you this Client ID via email. |
| Client Secret | The HSBC team would have sent you this Client Secret via email. |
| HSBC Public Key | The HSBC team would have shared this file with you via email and you will have to upload it. This field will only support formats such as pem, crt, txt, doc, and docx. |
| HSBC Account | You can select one of the bank accounts that was created in the Banking module, or add a new bank account and select it. |
| Secret PIN | Set a secure PIN that you will remember as you will use it to initiate payments in Zoho Inventory. |
- Agree to the Terms and Conditions and click Set up Now.
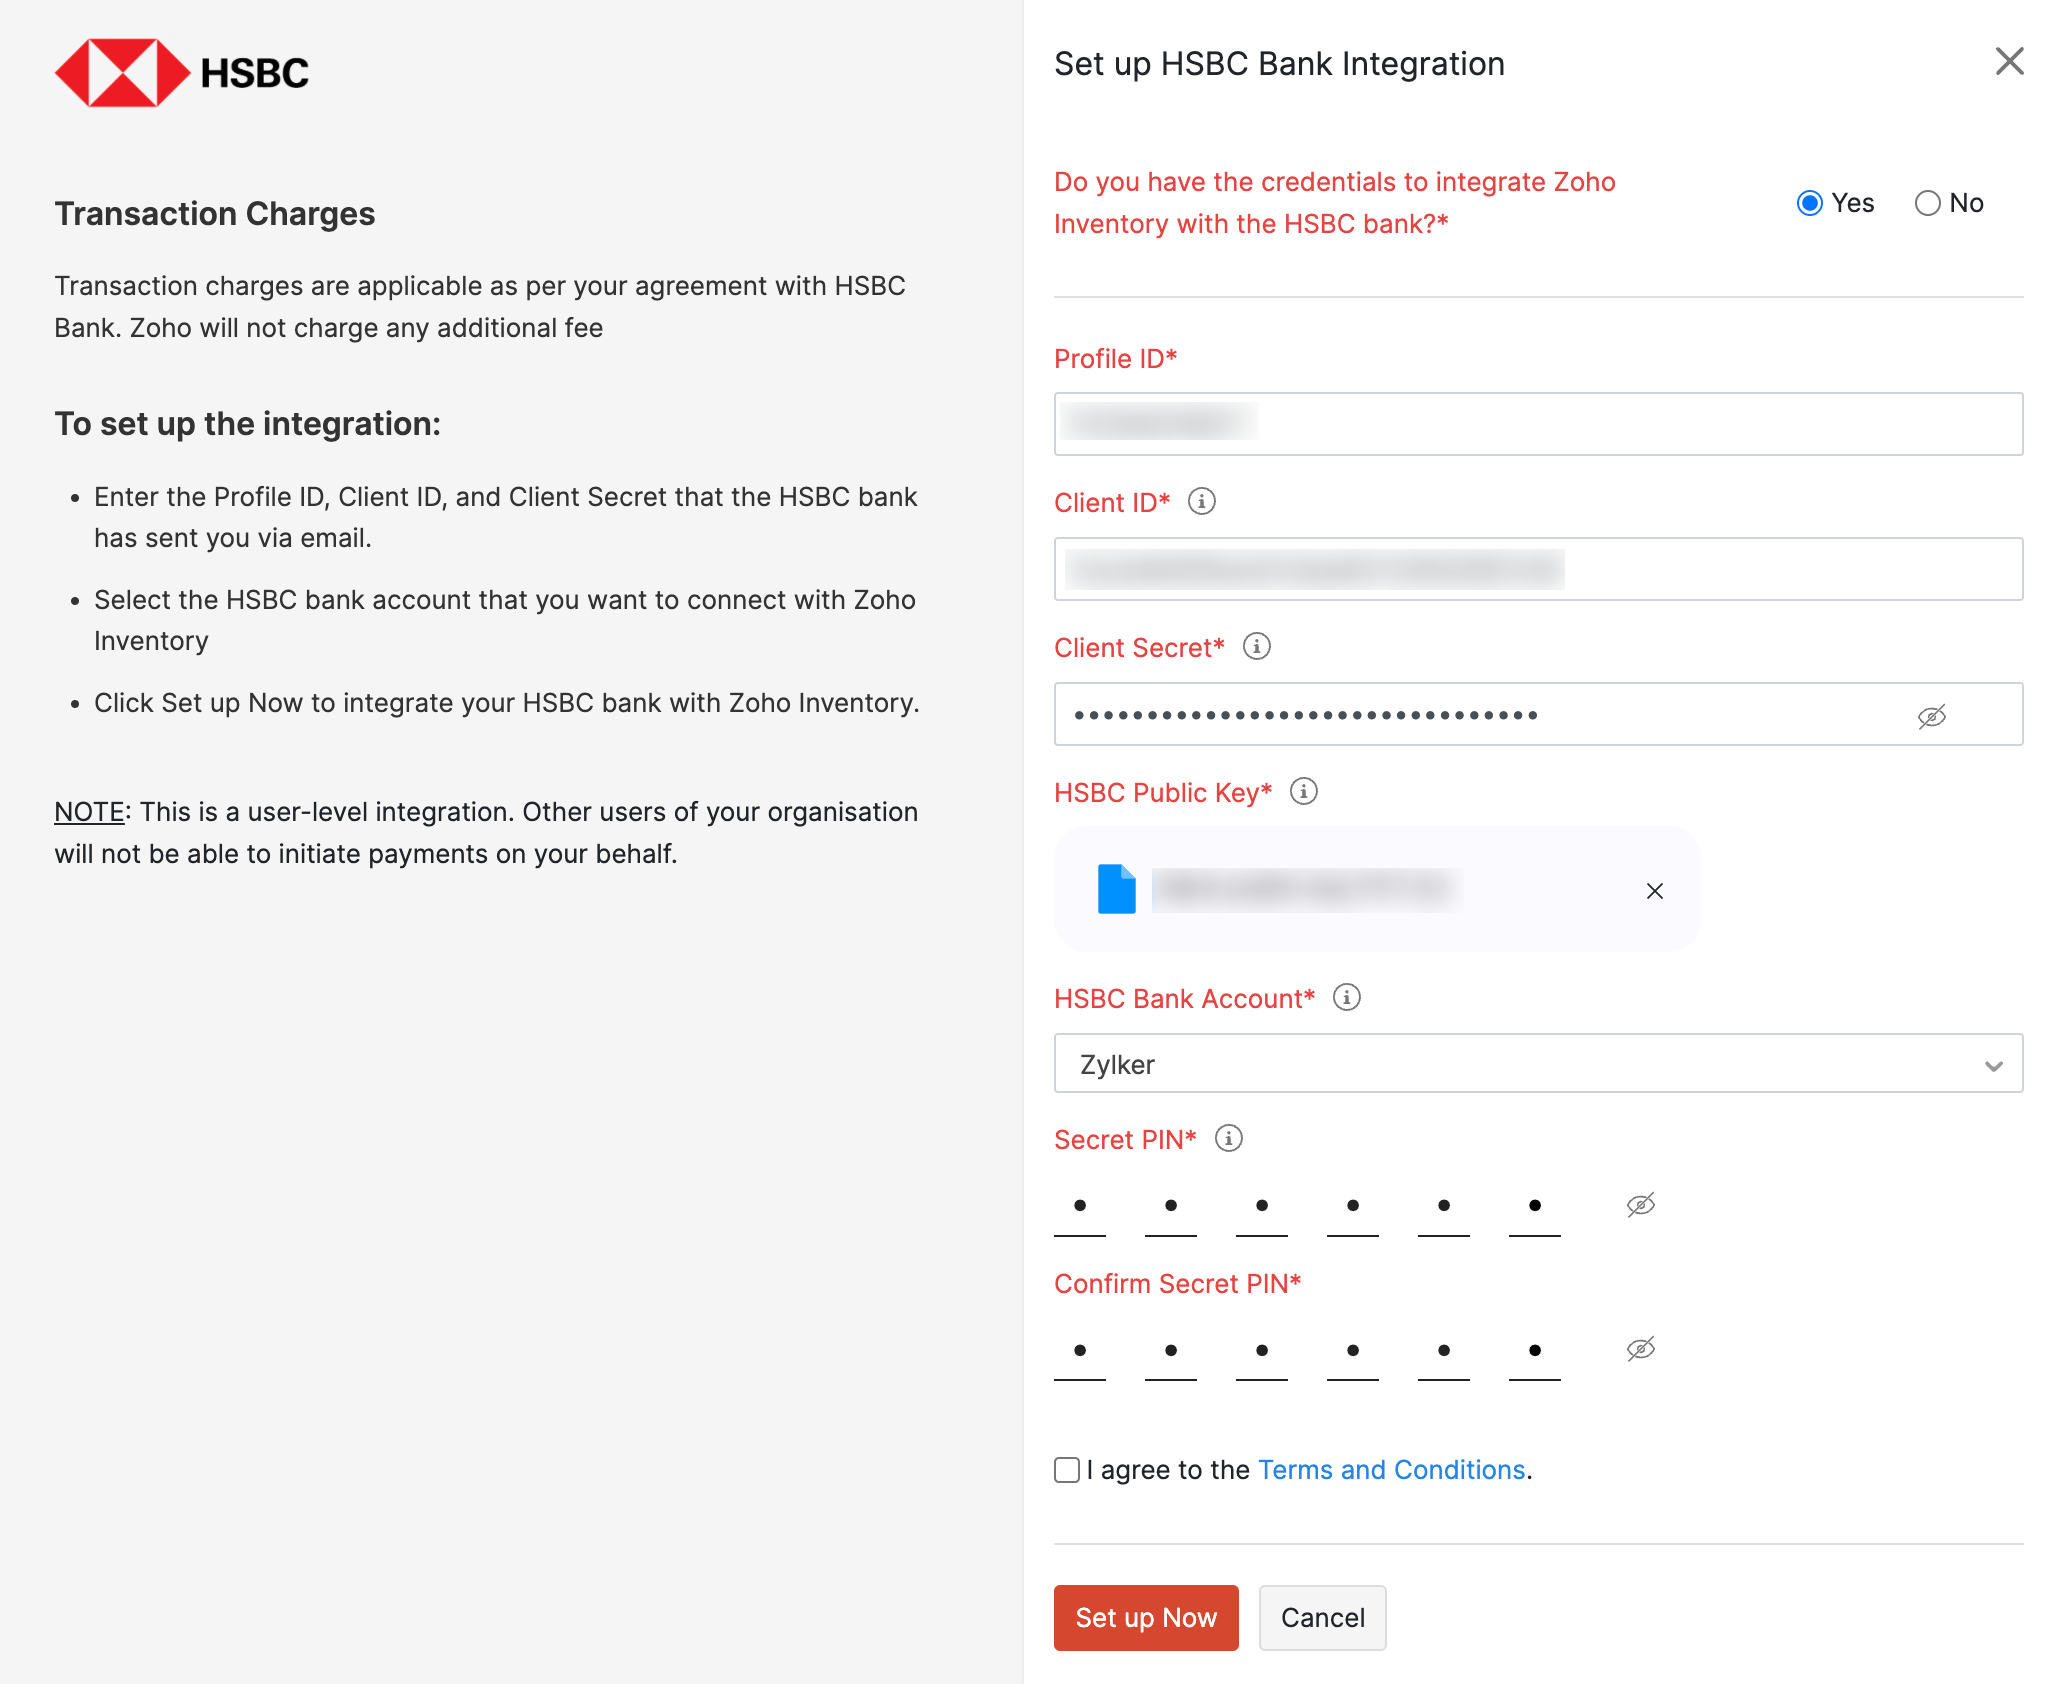
Zoho Inventory and HSBC will be integrated.
Note: This integration is a user-level integration, that means that other admins or users will not be able to initiate payments on your behalf.
Make Payments to Vendors
1. Add Vendor’s Bank Account Details
The first step in making payments towards a vendor is adding the vendor’s bank account details to the contact. To add vendor’s bank account details:
- Go to the Vendors module under Purchases from the left sidebar.
- Select the vendor whose bank details you’re gonna enter.
- Click the More dropdown and select Add Bank Account.
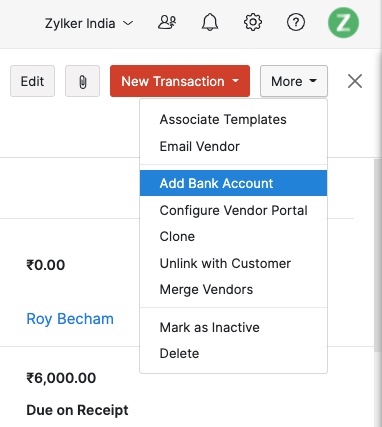
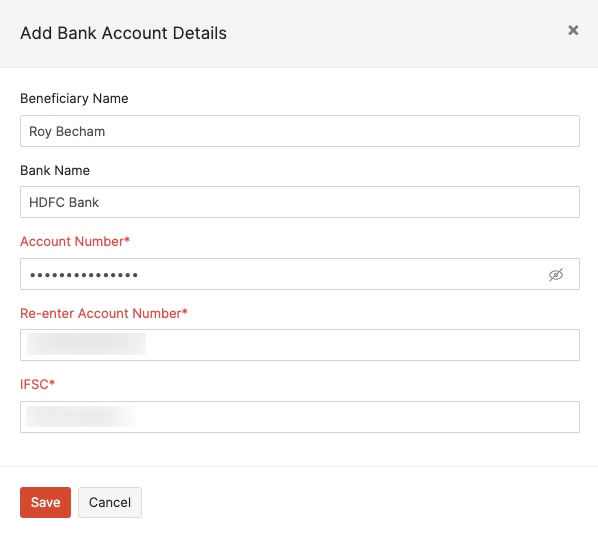
- Enter the vendor’s bank account details in the pop-up and click Save.
2. Initiate Payments
Once you’ve added your vendor’s bank account details, you can initiate payments from Zoho Inventory in three ways:
Pay Bills
You can initiate a payment via HSBC for a bill in Zoho Inventory. To initiate payment:
- Go to the Bills module under Purchases from the left sidebar.
- Select the bill for which you need to make the payment.
- Click the Pay via HSBC button in the options on the top bar.

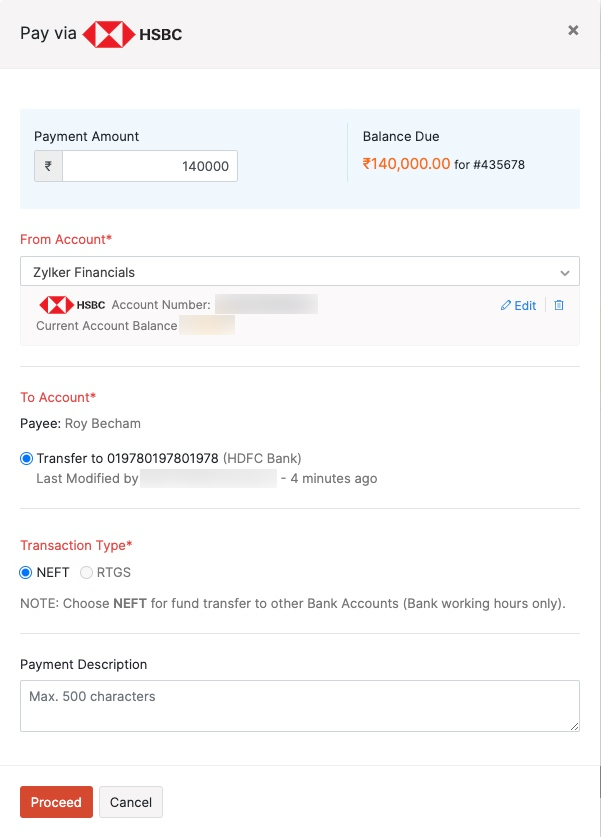
- Enter the payment details in the pop-up that appears.
| Fields | Description |
|---|---|
| Balance Due | The total sum of the money due for payment for a particular bill. |
| Amount | Enter the amount you would like to pay. You can make a complete or a partial payment towards the bill. |
| From Account | Select the From Account from the list of HSBC accounts from which you can initiate a payment. |
| To Account | Select the account to which you would like to make the payment. |
| Transaction Type | Select the Transaction Type from the available fund transfer options. The modes of fund transfer available are NEFT and RTGS. |
- Click Proceed and a pop-up will appear.
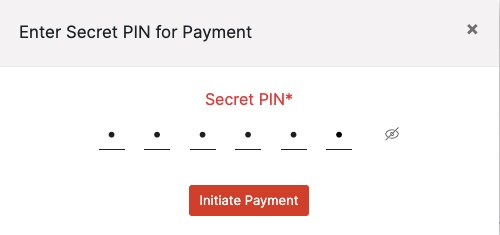
- Enter the Secret PIN that you configured while setting up the integration and click Initiate Payment.
Warning: If you enter the Secret PIN incorrectly multiple times, the HSBC integration will be deactivated. You will have to disable the integration and set up the integration again to initiate payments via HSBC.
The payment will be initiated from within Zoho Inventory and you will have to authorise the payment from the HSBCnet.
Pay Vendors in Advance
You can make advance payments to vendors directly. To initiate an advance vendor payment:
- Go to the Payments Made module under Purchases on the left sidebar.
- Click + New at the top right corner.
- Select the Vendor Advance tab at the top bar.
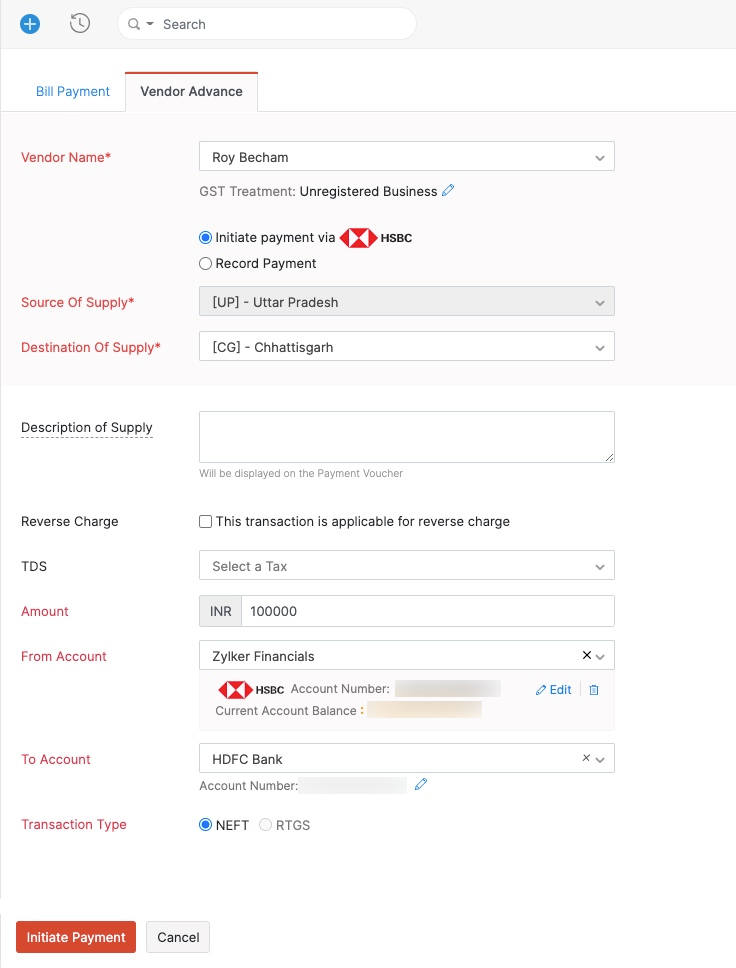
- Select the vendor for whom you want to make the advance payment.
- Select the Initiate payment via HSBC option.
- Enter all the tax related details such as the Source and Destination of Supply, Reverse Charge and TDS.
- Enter the Amount to be paid.
- Select the account from which you want to make the payment in the From Account option.
- Select the To Account and the Transaction Type.
- Verify your details and click Initiate Payment.
- Enter the Secret PIN that you configured while setting up the integration and click Initiate Payment.

Warning: If you enter the Secret PIN incorrectly multiple times, the HSBC integration will be deactivated. You will have to disable the integration and set up the integration again to initiate payments via HSBC.
The payment will be initiated and you will have to authorise the payment from the HSBCnet.
3. Authorise Payment in HSBCnet
If you had initiated a NEFT or RTGS payment from within Zoho Inventory, you will have to authorise that payment using File Level Authorisation (FLA). In FLA, you will have to authorise or reject a file which may contain one or multiple payments.
To authorise the payment from HSBCnet:
- Log in to HSBCnet using your credentials.
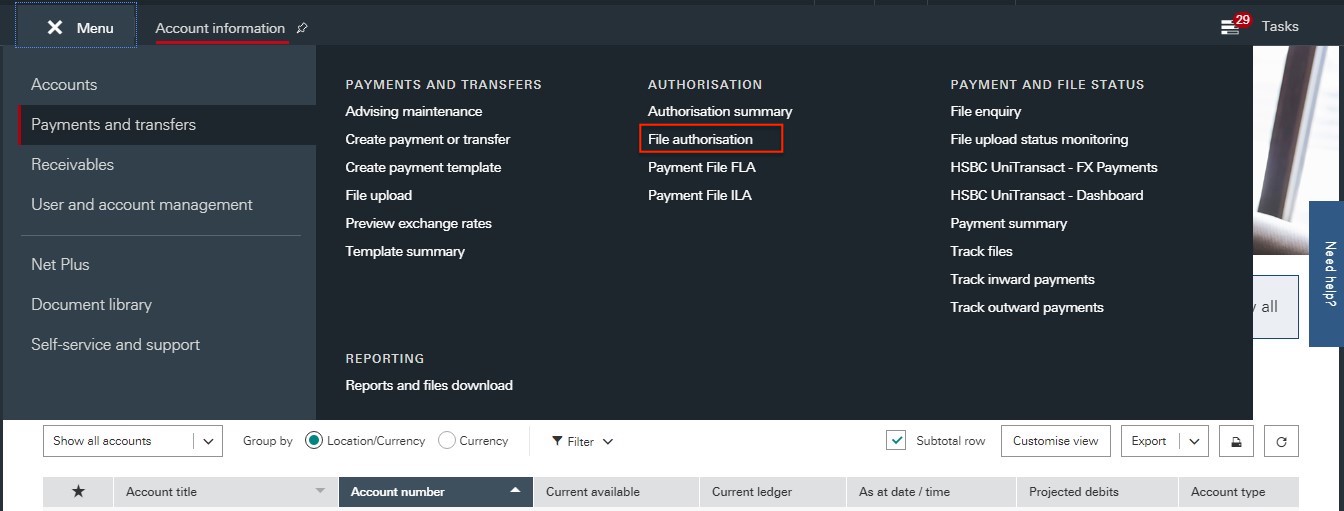
- Navigate to the Menu and select Payments and transfers.
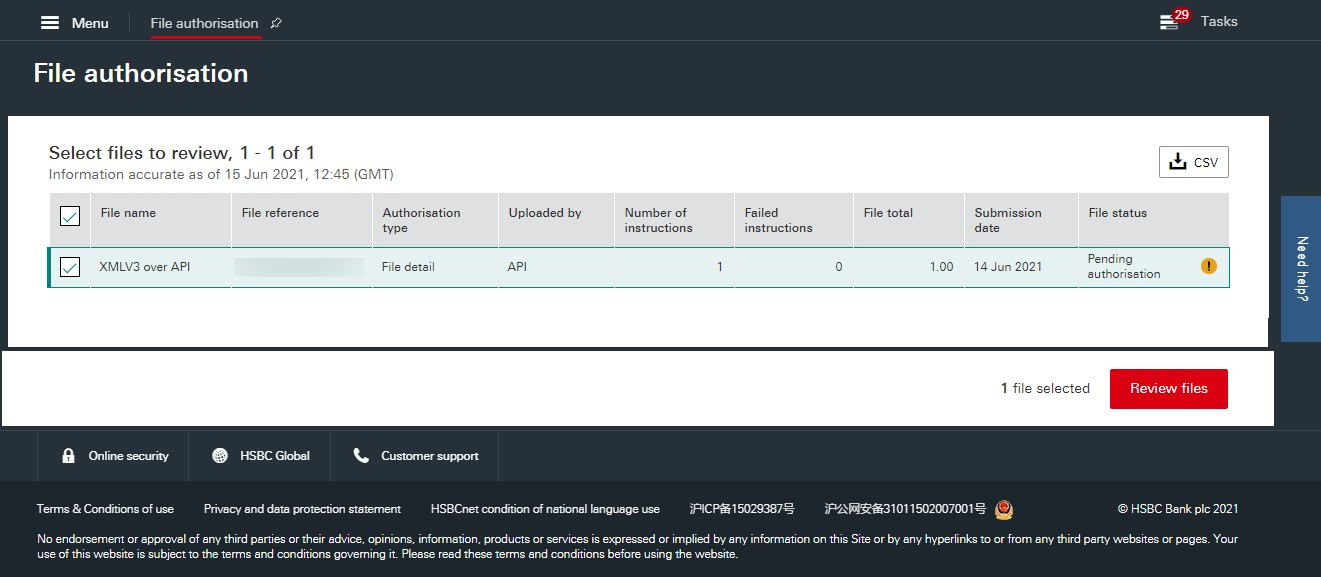
- Click File authorisation. In the following screen, you will see the files of the NEFT and RTGS payments that you had initiated from Zoho Inventory.
- Select the file and click Review files.
- Click Authorise file to authorise the payment. Or, you can click Reject file to reject the payment.
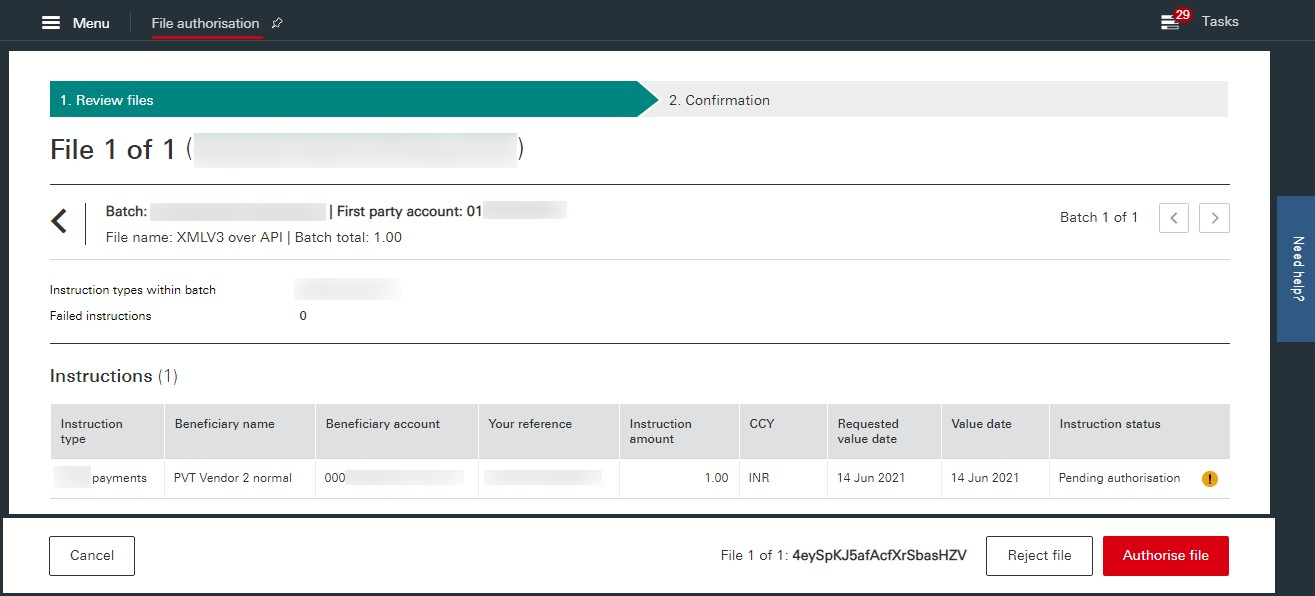
Once you authorise the file, you’ll see a confirmation screen with the payment status and the details. This payment may be sent for further authorisations based on the authorisation structure that is configured at HSBCnet for the account. Once the payment is made successfully, the corresponding bill’s status in Zoho Inventory will be updated to Paid automatically.
Disable the Integration
If you don’t want your Zoho Inventory account to be connected with HSBC, you can disable the integration.
Note: Disabling the integration will only remove the integration at Zoho Inventory’ end and you can set up the HSBC integration using the same HSBC credentials.
To disable:
- Go to Settings > Online Payments.
- Select the Vendor Payments tab.
- Under HSBC, click Disable. You will see a confirmation popup.

- Click I understand, disable my integration or you can contact Zoho Inventory support if you need any help with using the integration.
Note: If you have any queries regarding the HSBC Bank integration, write to us at hsbc-support@zohofinance.com.


