 Inventory
CRM Integrations
Summary:
Our powerful Integration feature does not stop with sales and shipping channels, it extends upto having tight synchronization with CRM platform - in our case Zoho CRM.
If you are an existing user of Zoho CRM, you can easily integrate, and synchronize them with Zoho Inventory and auto import contacts(aka. contact persons), accounts(aka. customer contacts), vendors and products(aka. items).
Overview
- Prerequisites
- Why integrate with Zoho CRM?
- The way it works
- Setting up an integration with Zoho CRM
- Phase 1 - Preparing your Zoho CRM account
- Creating views
- Assigning a primary contact for your Accounts.
- Phase 2 - Preparing your Zoho Inventory organization
- Adding the required custom fields to appropriate modules
- Phase 3 - Establishing the Integration
- Navigation
- Generating a ZSC Key
- Confirmation
- Phase 4 - Configuring the integrated modules
- Phase 1 - Preparing your Zoho CRM account
- Managing CRM Integration
- Operations
Prerequisites
- Must have an active Zoho CRM account.
- Must have a live Zoho Inventory organization.
- Your CRM account should not be integrated to another Zoho Inventory or Zoho Books organization. If that is the case, then please disable that integration before you start integrating with your current organization.
Why integrate with Zoho CRM?
- Zoho CRM is an On-demand Customer Relationship Management(CRM) software for managing your customer relations and streamlining your organization-wide sales, marketing, customer support, and inventory management functions.
- Zoho CRM is well integrated with many Zoho Apps and third party apps. Hence integrating your Zoho Inventory organization with your Zoho CRM account indirectly opens up more avenues of expansion for you.
- When a sale is made in an integrated online marketplace, a sales order and the new customer who made that purchase are automatically generated inside Zoho Inventory. Using the integration between Zoho Inventory and Zoho CRM, these customers are also added to your Zoho CRM database automatically.
- For Existing Zoho CRM Users: Your existing customer base, network of suppliers and the bulk of your products in Zoho CRM can easily be brought into Zoho inventory. This will save you the time and effort required to manually add each and every record individually.
Need I say more?
The way it works
-
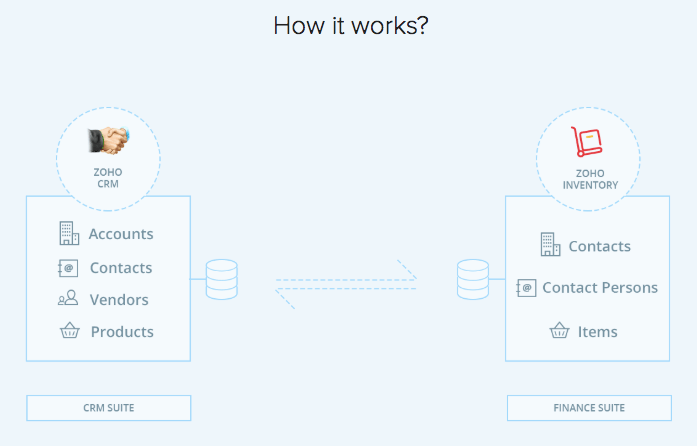
Once the integration is set up, your Accounts, Contacts and your Vendors in Zoho CRM can be synced with the Contacts module of Zoho Inventory. The Products in Zoho CRM can be synced with the Items in Zoho Inventory.
-
Please note that the products coming in from Zoho CRM will be imported as sales items in Zoho Inventory.(Non-inventory items without purchase information)
-
On integrating all the modules, when you open an integrated account inside Zoho CRM, you will also be able access the sales orders and invoices generated in Zoho Inventory for it. Because of this, even online orders for a customer will be visible inside Zoho CRM.
The integrated modules automatically sync once every 2 hours. You can also perform a manual sync to immediately get your data.
Zoho Inventory <-> Zoho CRM Integration Flow Diagram
Setting up an integration with Zoho CRM
You can sync your Zoho Inventory and Zoho CRM using the following method:
Phase 1 - Preparing your Zoho CRM account
Creating views for CRM modules
While integrating Zoho CRM and Zoho Inventory, you can also choose to sync only a specific view for the integrated modules(namely Accounts, Contacts, Vendors or Products). This helps you tune up the integration to only sync certain views and records between Zoho Inventory and Zoho CRM.
To learn how to create custom views in Zoho CRM, click here.
Assigning a primary contact for your Accounts
In Zoho Inventory for every contact(customer/vendor), you can have up to 20 contact persons under it. But there will always be one who is designated as the primary contact.
In this section, we are going to learn how to designate a primary contact for your Accounts in Zoho CRM, so that when you integrate them with Zoho Inventory, the primary contact information also gets automatically reflected here.
- Step 1 - Define a check box type custom field for the Contacts module of Zoho CRM and name it as Is Primary Contact?. To learn how to add a custom field in Zoho CRM, click here.
- Step 2 - Navigate to your Contacts module in Zoho CRM and create a new list view to also include Account Name.
- Step 3 - Sort your contacts in Zoho CRM based on Account Name and then perform a Mass Update.
- Inside the Mass Update pop-up, in the field to be specified, select and choose the custom field called Is Primary Contact?.
- Now assign primary contacts for each account by updating the check box type custom field called Is Primary Contact? and complete the update.
- Now you can map this particular field during the integration under Contact Persons inside Zoho Inventory.
Phase 2 - Preparing your Zoho Inventory organization
Adding the required custom fields to appropriate modules
- You may have recorded additional information of your Accounts, Contacts & Vendors in Zoho CRM using custom fields. In-order to bring in additional information from Zoho CRM, you are required to define similar type of custom fields in Zoho Inventory. These fields can then be mapped with their appropriate counterparts in Zoho CRM.
To add custom fields to Contacts module of Zoho Inventory.
- Open your Zoho Inventory.
- Click on the gear icon from the top-right corner.
- Select the More Settings option from the drop-down.
- You will be redirected to the Preferences module under Settings.
- Select the Contacts tab under preferences.
- Switch to the custom fields section.
- Click on the +New Custom Field button.
- Doing this will trigger a pop-up where you can define the required custom field and Save them.
- To learn more about contacts custom fields, click here
Note: Required custom fields can also be added in Zoho Inventory and mapped to Zoho CRM(by editing the integrated modules) at a later point of time after the integration.
Phase 3 - Establishing the Integration
- Open your Zoho Inventory organization.
- Navigate to Integrations.
- Select CRM.
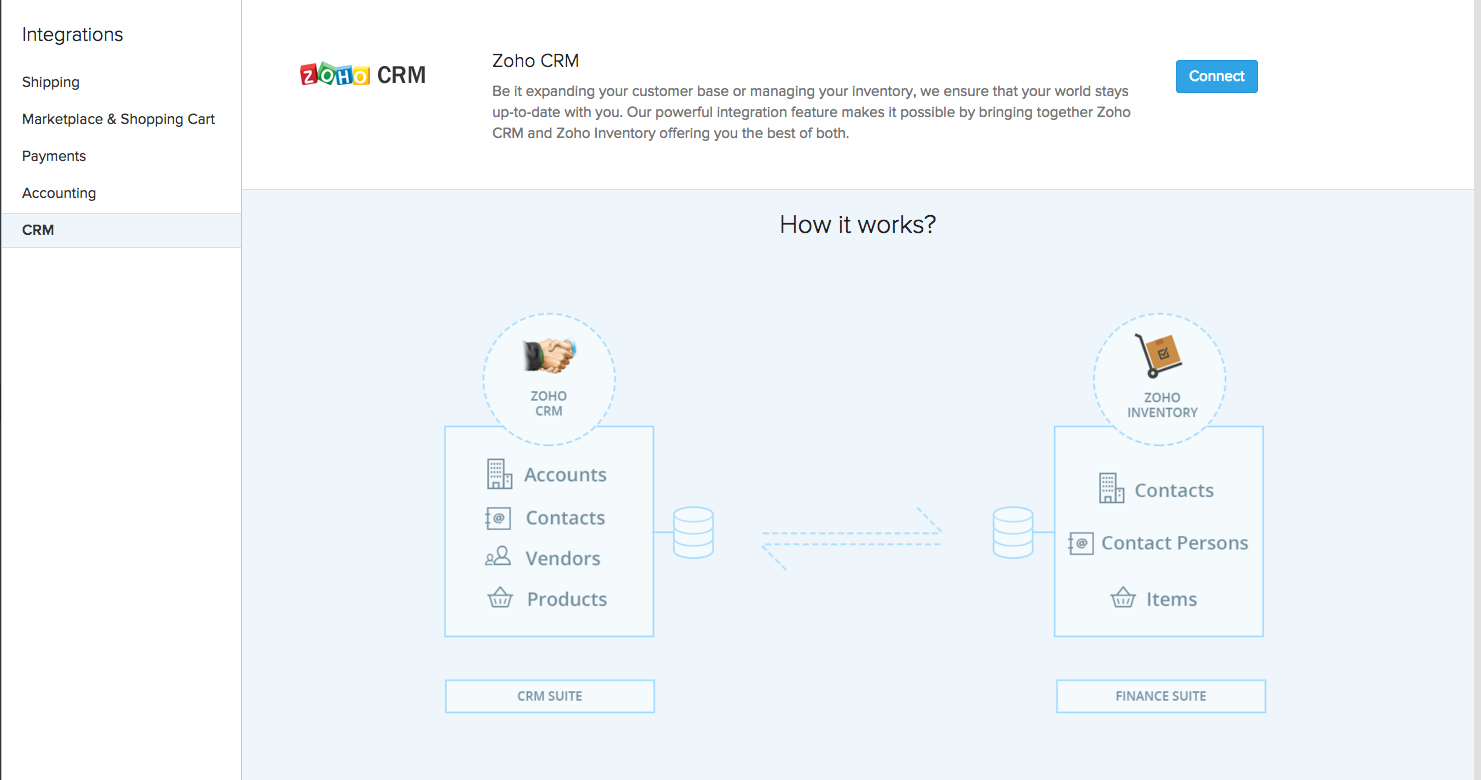
- Click on the Connect button on the right top corner.
- This will open up the CRM configuration page.
- Under section 1 - Zoho CRM Credentials, click on the Connect Zoho CRM button to proceed.
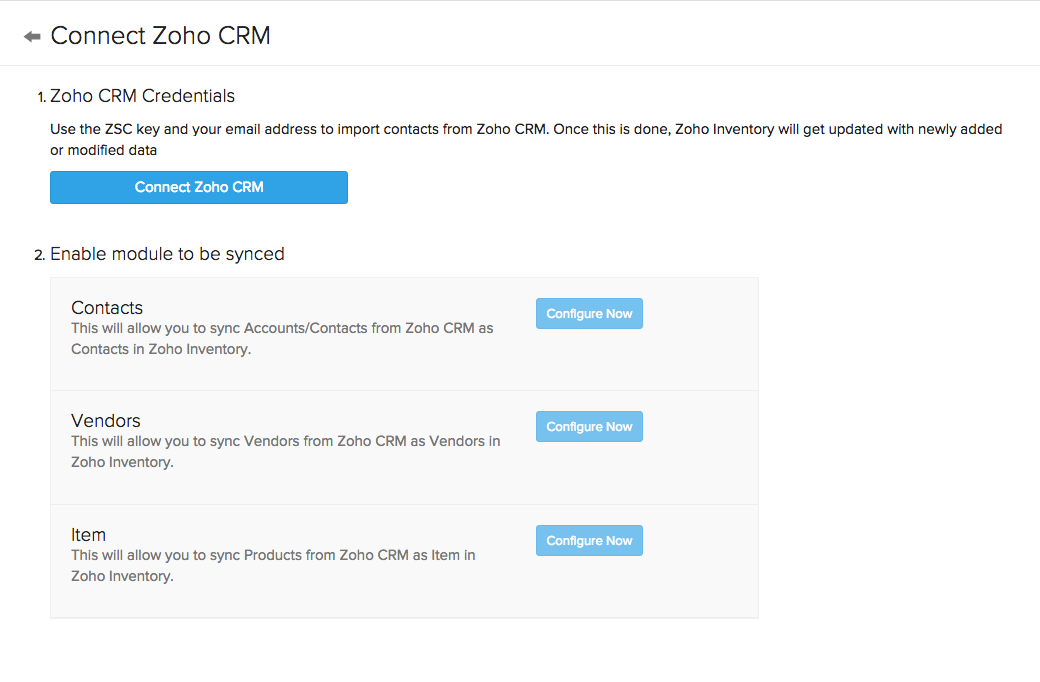
- This will trigger a pop-up(Connect Zoho CRM pop-up) asking for your email address and Zoho CRM ZSC key.
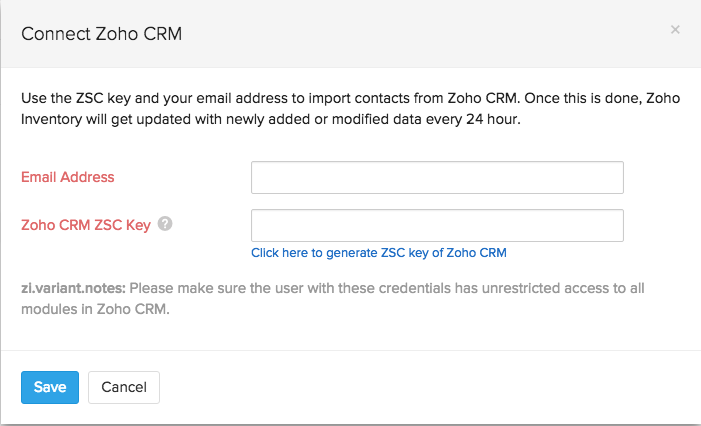
- You can generate a Zoho CRM ZSC key from the pop-up by pressing on the Click here to generate ZSC key of Zoho CRM option.
- Once you do, your Zoho CRM account will open itself on a new tab where, you can obtain your registered email address and ZSC key.
- If required, you can also regenerate a new ZSC key, by clicking on the Regenerate Key option.

- Copy the ZSC key from Zoho CRM, switch to the CRM integration tab of Zoho Inventory and paste it on the concerned field in the Connect Zoho CRM pop-up.
- Click on the Save button.
- If all checks out, you will be greeted by a vibrant success message on top of the details page.
- Now you can proceed to configure the different modules under this integration.
Phase 4 - Configuring the integrated modules
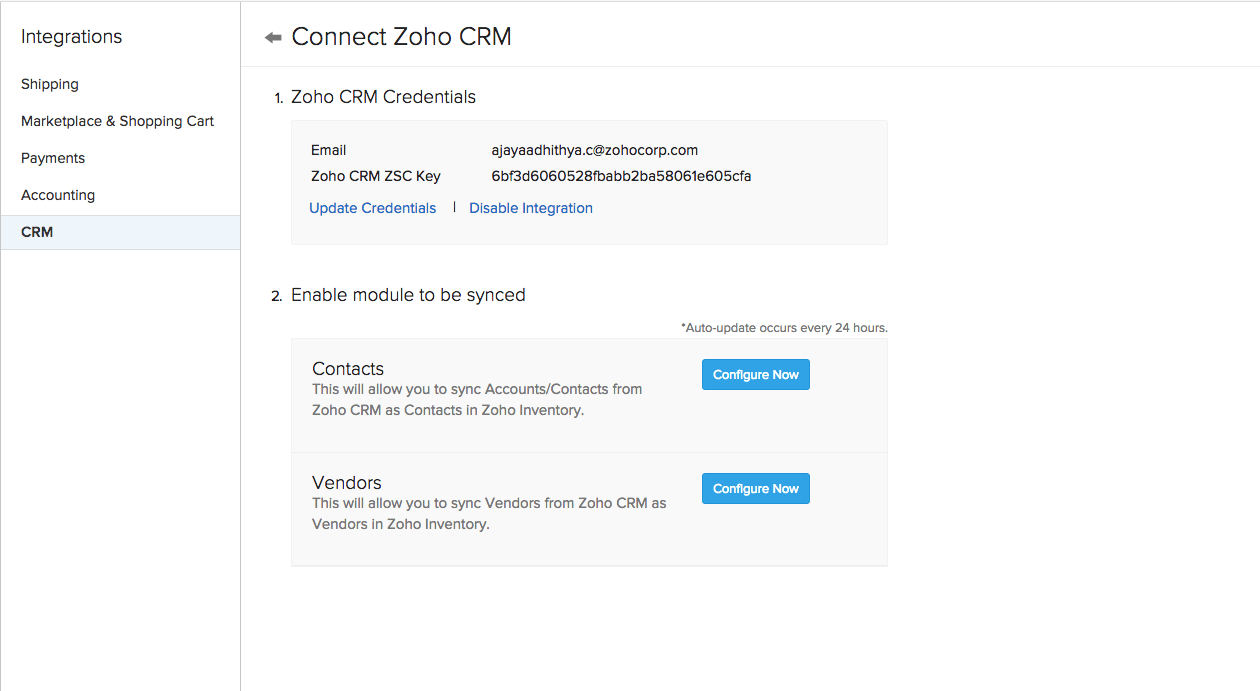
- You can configure your sync preferences for the contacts and vendors module by clicking on the Configure Now button under section 2.
Accounts & Contacts
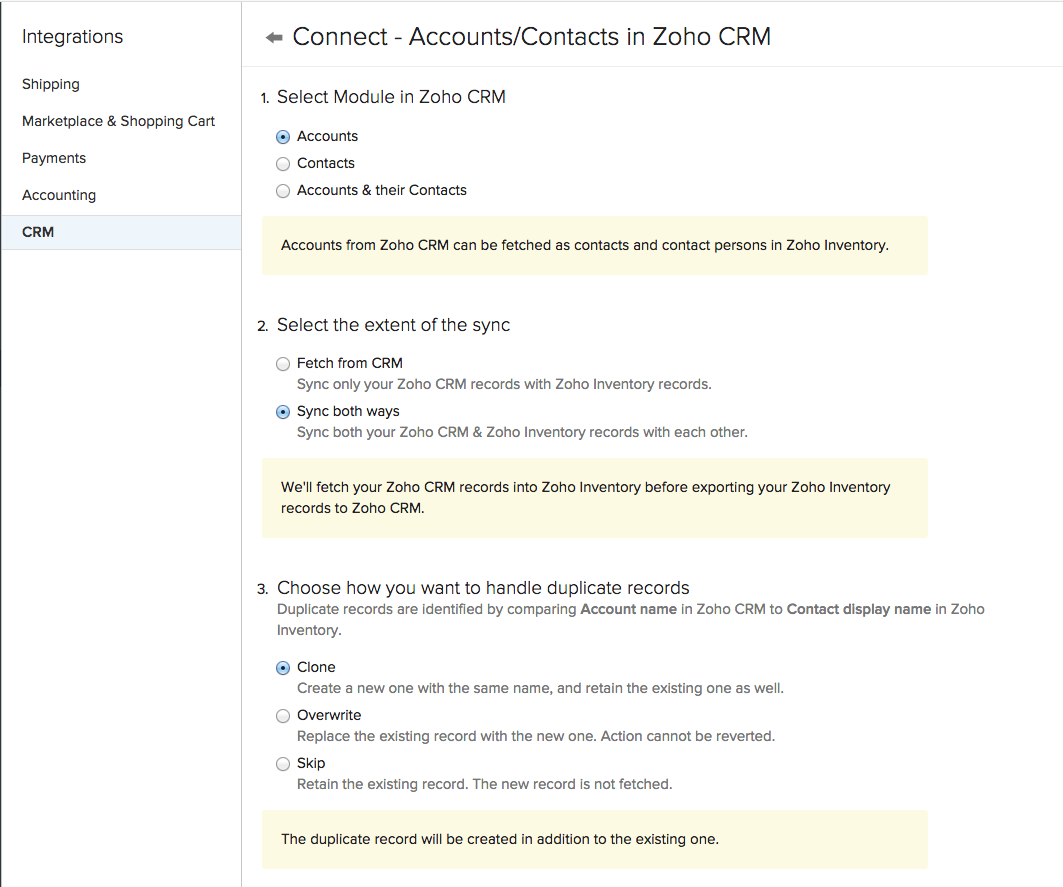
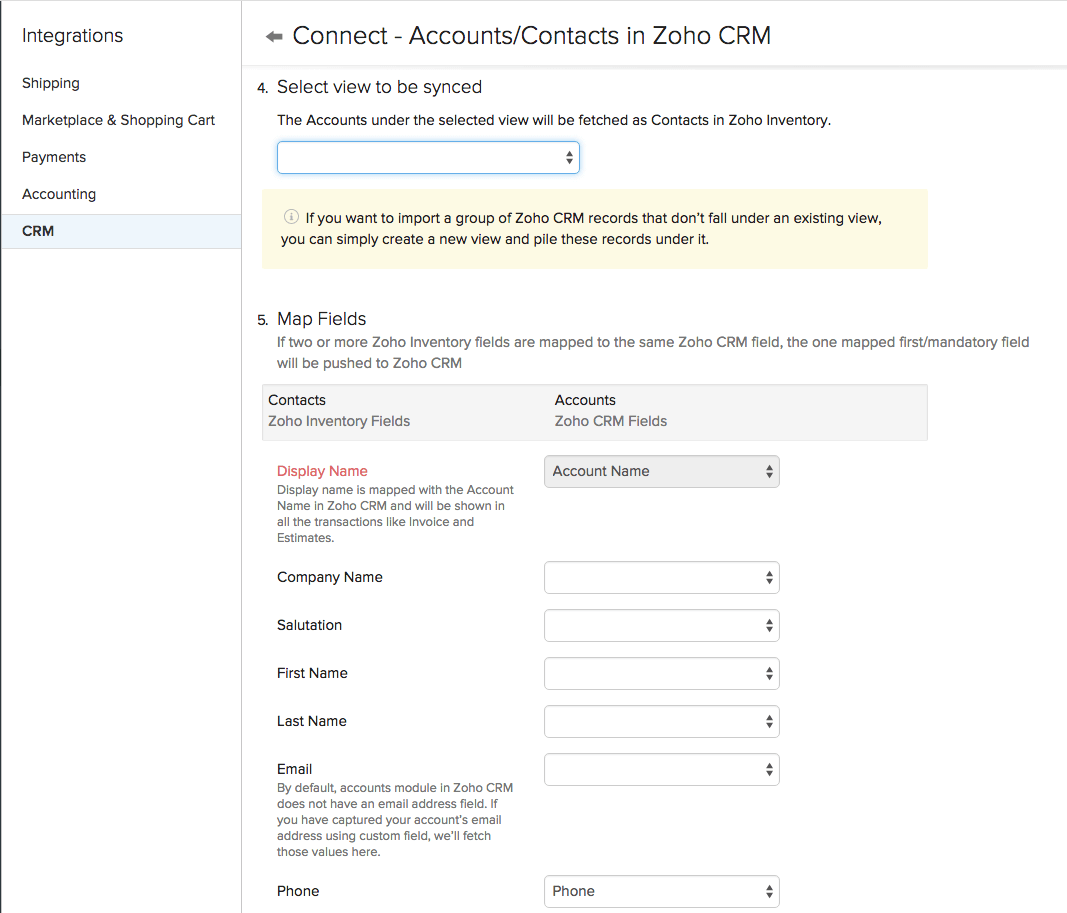
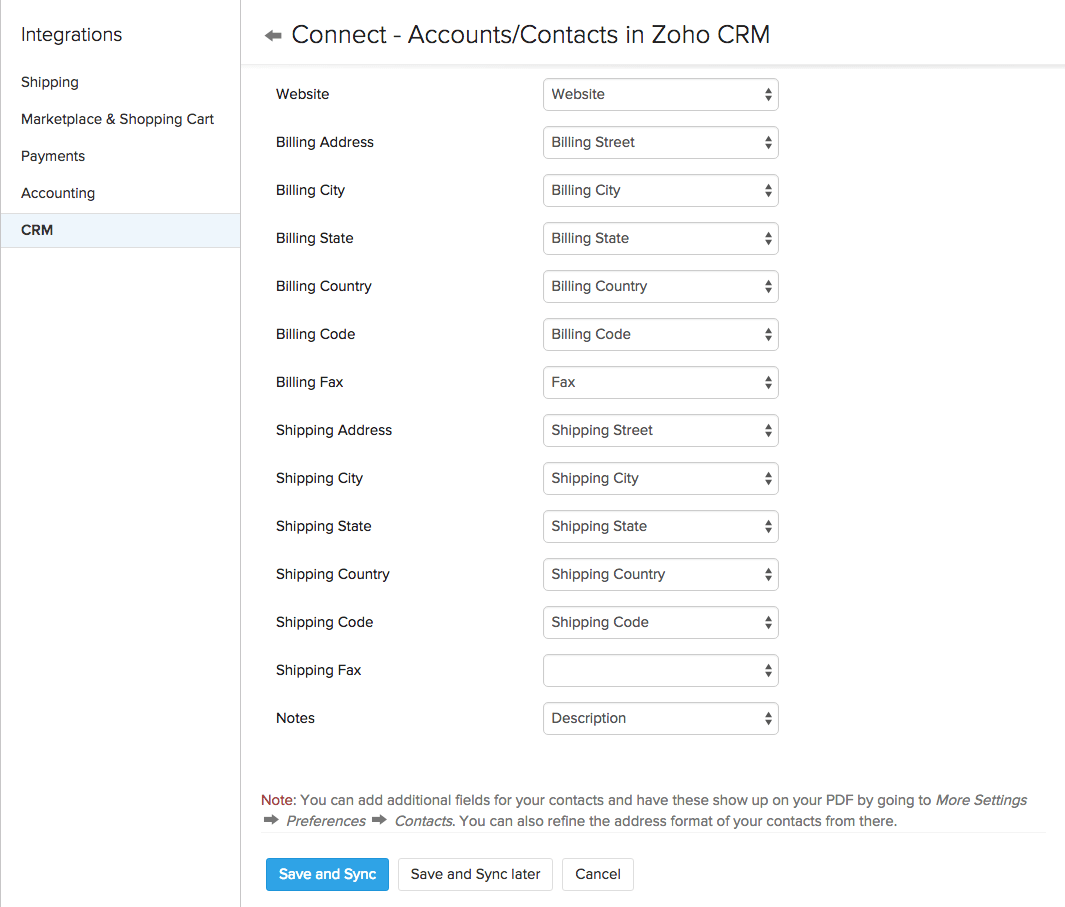
- On clicking the Configure Now button near Accounts module, the connect accounts & contacts page opens up. Here you have 5 different sections to calibrate.
- Select Module in Zoho CRM - here you can choose to sync only accounts, only contacts or both from Zoho CRM. Note : This is available only for the contacts module(not available in the vendors module).
- Select the extent of the sync - here you can choose the direction of your sync(data transfer direction).
- Choose how you want to handle duplicate records - here you can clone, overwrite or skip existing records when a sync is established between Zoho Inventory and Zoho CRM.
- Select view to be synced - Here you can add a perspective to the sync.
- Map fields - here you can map the different fields that wish to sync between Zoho Inventory and Zoho CRM.
- Once you are finished, you can either Save and Sync or you can Save and Sync later.
Vendors
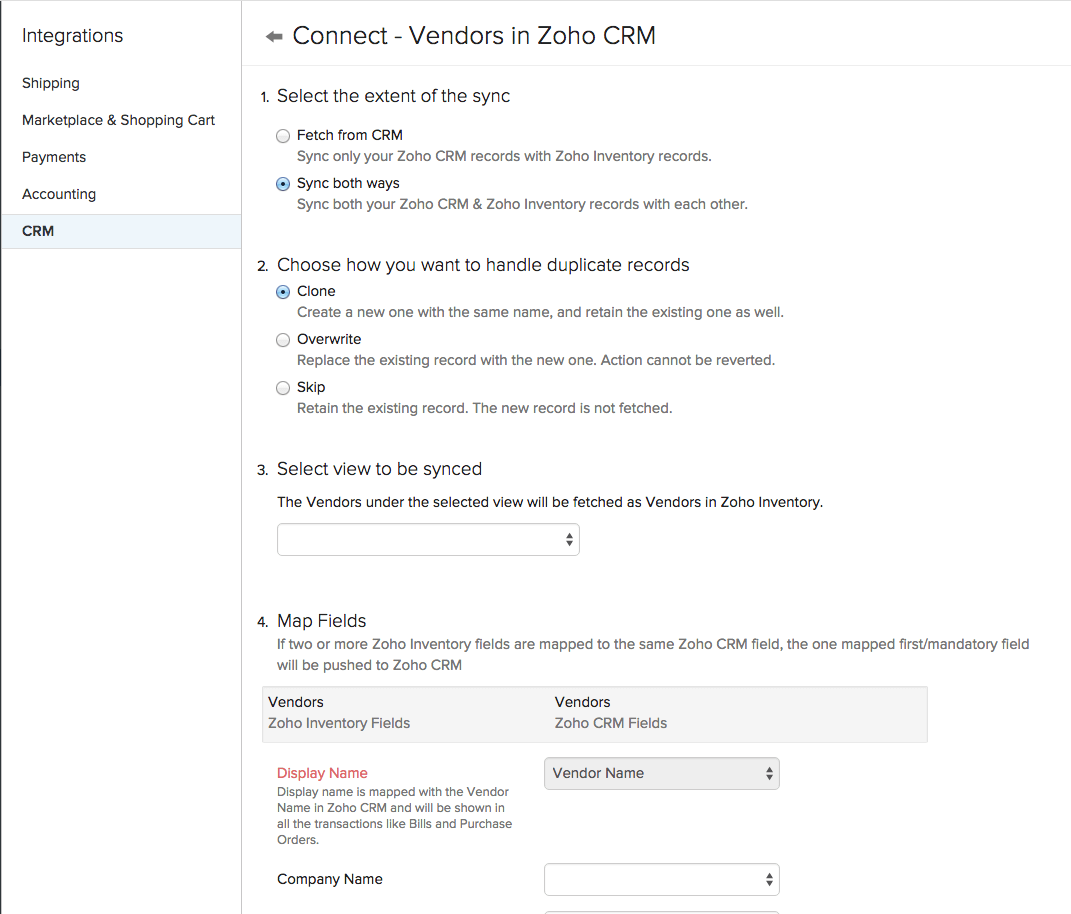
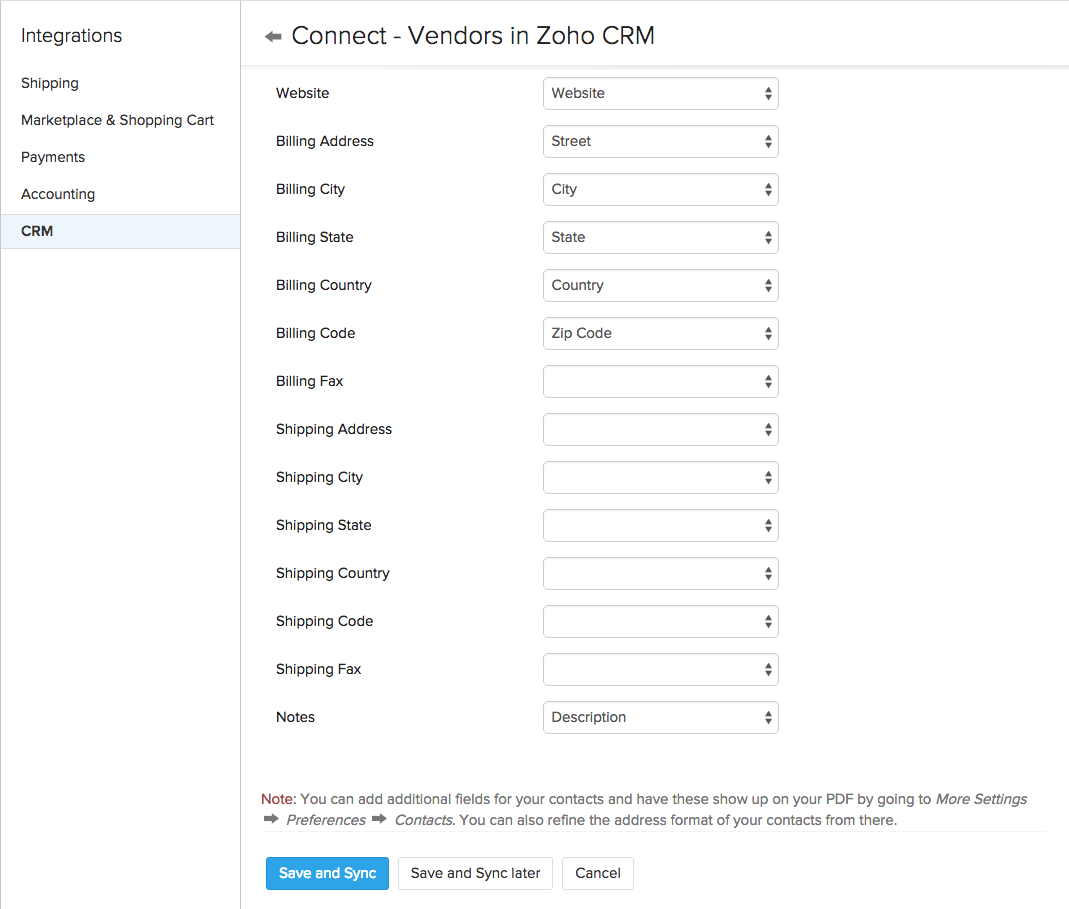
- On clicking the Configure Now button near the Vendors module, the connect vendors page opens up. Here you have 4 sections to calibrate. These are very similar to the last 4 sections of your accounts & contacts.
- Select the extent of the sync - here you can choose the direction of your sync(data transfer direction).
- Choose how you want to handle duplicate records - here you can clone, overwrite or skip existing records when a sync is established between Zoho Inventory and Zoho CRM.
- Select view to be synced - Here you can add a perspective to the sync.
- Map fields - here you can map the different fields that wish to sync between Zoho Inventory and Zoho CRM.
- Once you are finished, you can either Save and Sync or you can Save and Sync later.
Products
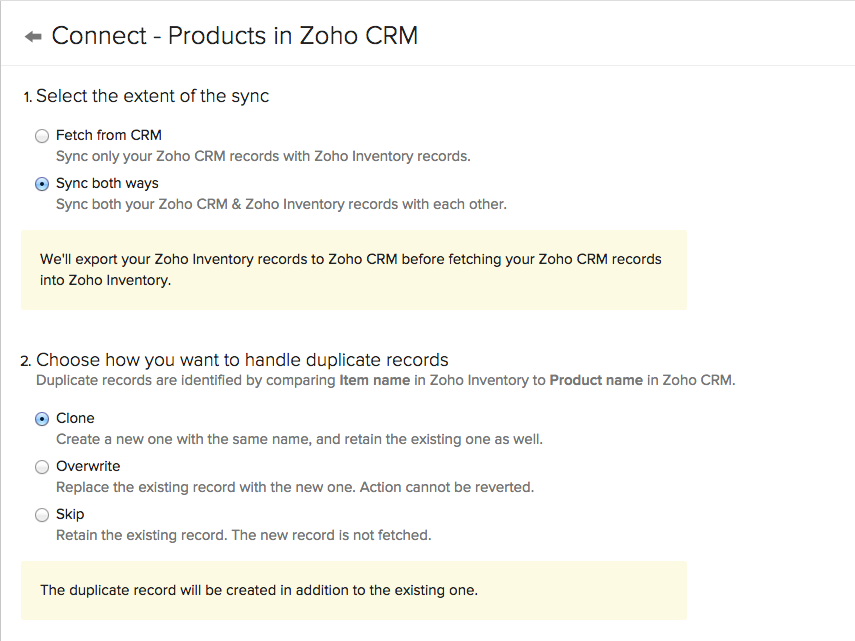
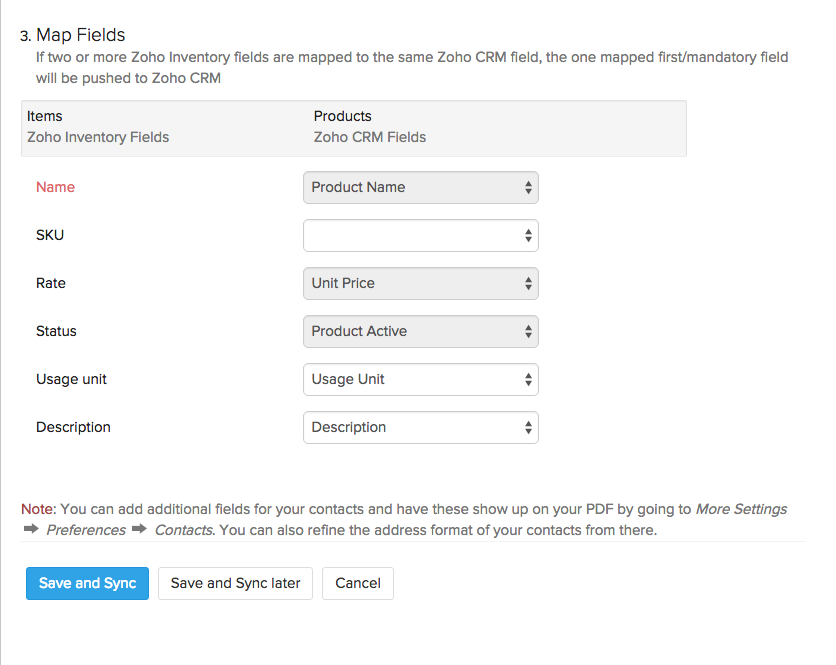
- On clicking the Configure Now button near the Items module, the connect Products page opens up. Here you have 3 sections to calibrate.
- Select the extent of the sync - here you can choose the direction of your sync(data transfer direction).
- Choose how you want to handle duplicate records - here you can clone, overwrite or skip existing records when a sync is established between Zoho Inventory and Zoho CRM.
- Map fields - here you can map the different fields that wish to sync between Zoho Inventory and Zoho CRM.
- Once you are finished, you can either Save and Sync or you can Save and Sync later.
Managing CRM Integration
Now that you have a tight integration up and running, you can always control the way, your integration works. Let’s see how we can do this, shall we?
Accessing CRM Integration controls
- Navigate to the Integrations tab.
- Select the CRM tab.
- Click on the Show Details button.
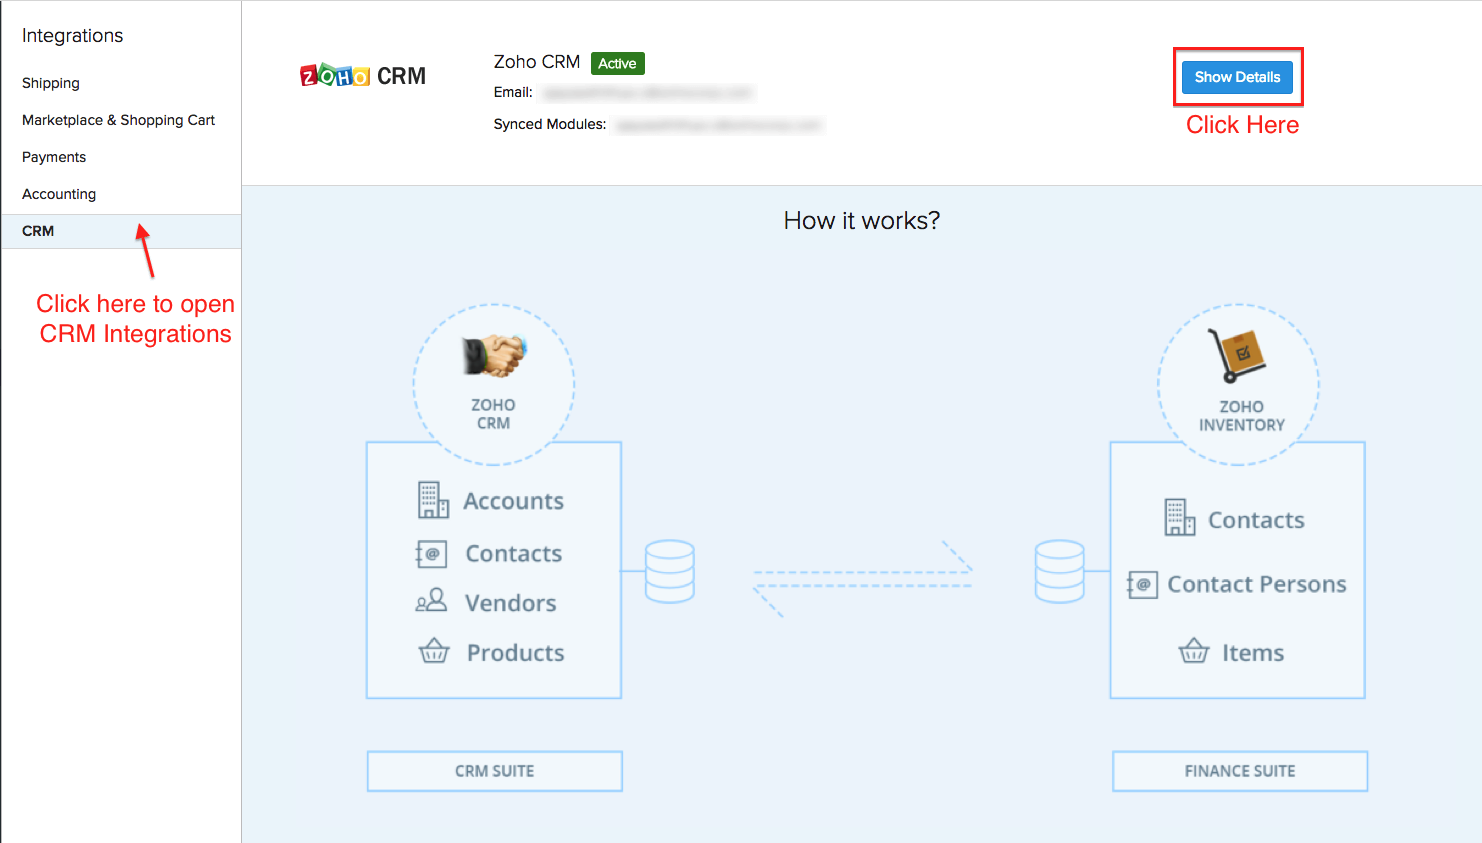
- This will open up the page that will allow you to view, control and tailor this module according to your needs.
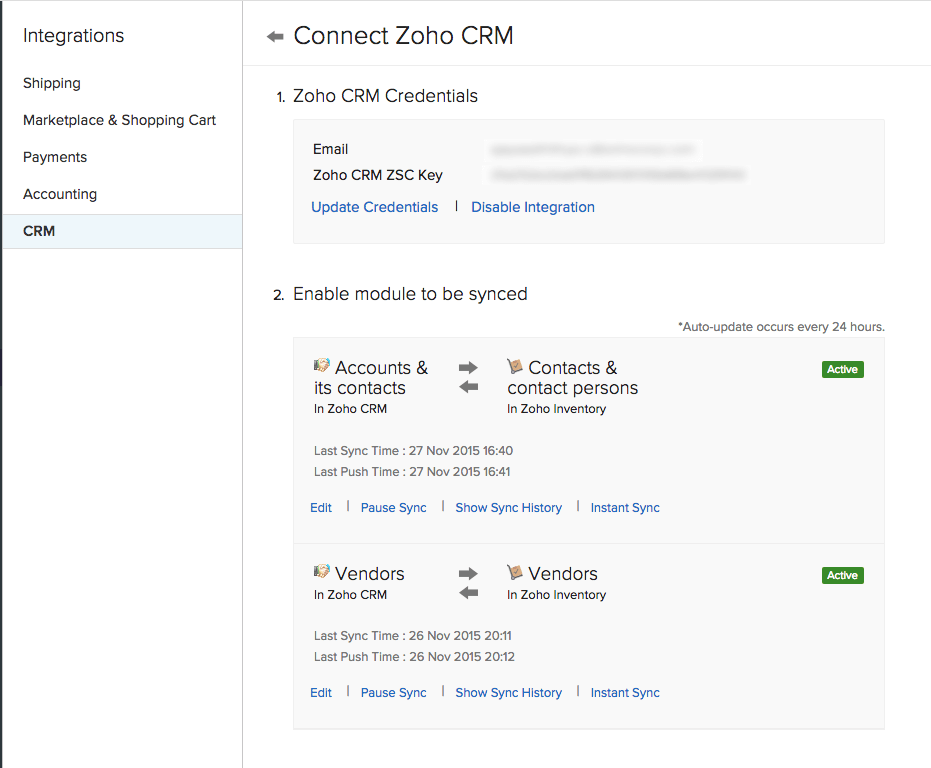
- The CRM details page a.k.a. control page will have 2 sections:
- Section 1 will contain your Zoho CRM Credentials. Under this section, you have two options - you can Update Credentials and Disable Integration.
- Section 2 will contain the modules that can be synced. Under each module, you will have the following options - Edit, Pause Sync, Show Sync History and Instant Sync.
Let’s discuss these options in detail
Section 1 - Zoho CRM Credentials
Update Credentials
- Navigate to the Integrations tab.
- Select the CRM tab.
- Click on the Show Details button.
- Under Section 1 - Click on the Update Credentials option.
- The connect to CRM pop-up opens up.
- From here onwards, the process is very similar to the way, you established the integration.
Disable Integration
- Navigate to the Integrations tab.
- Select the CRM tab.
- Click on the Show Details button.
- Under Section 1 - Click on the Disable Integration option.
- A pop-up asking you to confirm the choice appears.
- Click on the Confirm button to disable the integration.
Section 2 - Zoho CRM synced modules
These options are common for both contacts and vendors modules.
Edit
- Navigate to the Integrations tab.
- Select the CRM tab.
- Click on the Show Details button.
- Under Section 2 - Click on the Edit option below the preferred module.
- This will open up the edit page(this page is similar to the configuring page).
- Here you can configure and control different facets of the integration of this module:
- Select Module in Zoho CRM - here you can choose to sync only accounts, only contacts or both from Zoho CRM. Note : This is available only for the accounts & contacts module(not available in the vendors module).
- Select the extent of the sync - here you can choose the direction of your sync(data transfer direction).
- Choose how you want to handle duplicate records - here you can clone, overwrite or skip existing records when a sync is established between Zoho Inventory and Zoho CRM.
- Select view to be synced - Here you can add a perspective to the sync.
- Map fields - here you can map the different fields that wish to sync between Zoho Inventory and Zoho CRM.
- Once you are finished, you can either Save and Sync or you can Save and Sync later.
Pause Sync
- Navigate to the Integrations tab.
- Select the CRM tab.
- Click on the Show Details button.
- Under Section 2 - Click on the Pause Sync option below the preferred module.
- You will receive a success message.
- The sync process for this module will be halted for this module until you click on the Resume Sync option.
Show Sync History
- Navigate to the Integrations tab.
- Select the CRM tab.
- Click on the Show Details button.
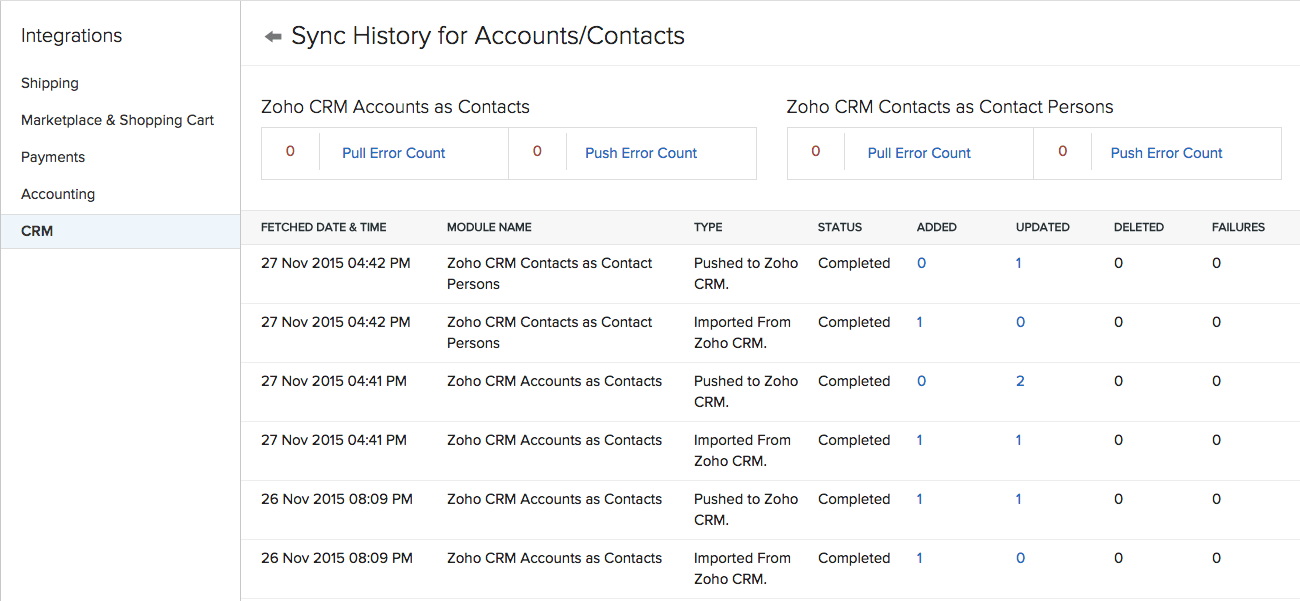
- Under Section 2 - Click on the Show Sync History option below the preferred module.
- You will be directed to the sync history page.
Instant Sync
- Navigate to the Integrations tab.
- Select the CRM tab.
- Click on the Show Details button.
- Under Section 2 - Click on the Instant Sync option below the preferred module.
- The selected module will be synced with Zoho CRM right away.
Operations
Accessing Zoho Inventory based Sales Orders & Invoices for an Account in Zoho CRM
To gain access to Zoho Inventory Sales Orders and Invoices inside Zoho CRM, you require two things:
- Integration of all available modules - Accounts, Contacts, Vendors & Products in Zoho CRM with Contacts & Items in Zoho Inventory.
- Integration of Zoho Inventory with the same organization in Zoho Books.
On fulfilling the above said requirements, you will be able to access sales orders and invoices in Zoho Inventory for all the integrated accounts in Zoho CRM.
To access the orders and invoices associated to an integrated CRM account:
- Open your Zoho CRM.
- Navigate to the Accounts module.
- Open a preferred account.
- Scroll down to access the Zoho Books section inside an account. Note: Zoho Books and Zoho Inventory have the same core, so the data in one will be reflected on the other.
- Under the Zoho Books section of an account, you have 3 sub-sections where the estimates, sales orders and invoices created for this account in Zoho Books/Zoho Inventory can be accessed.
- Here you will be able to not only view existing orders and invoices for that account but also create new transactions which are instantaneously reflected inside Zoho Inventory/Zoho Books.


