 Inventory
Transaction Approval
The Transaction Approval feature allows you to verify and approve transactions which your users create in Zoho Inventory before they reflect in your accounts and reports. This process helps in identifying mistakes and preventing needless losses to the company. In Zoho Inventory, you can set up approval workflow for sales transactions, purchase transactions, stock adjustments and transfer orders. Let’s understand this better with a scenario.
Scenario: James is a business owner and has employees working for him in various departments. A newly appointed staff in the purchase department accidentally sent out a purchase order with the wrong product. James finds out about this and wonders how he could have prevented it in the first place. Immediately, he sets up an approval workflow to ensure that all purchase orders are approved by the respective managers before they’re sent out.
IN THIS PAGE…
Enable Transaction Approval
If you require approval workflow for your organization, you can enable it under preferences.
To enable approval:
- Go to Settings, Preferences, then Approvals.
- Go to the Sales Approval, Purchase Approval, or Inventory Approval tab.
- Click on the Enable button to activate approval workflow for the respective module.
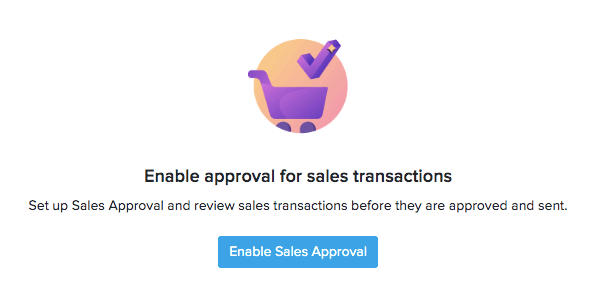
Note: If you have an integrated Zoho Books account, you will have to enable this feature through your Zoho Books organization.
Add Approvers
Admins can approve all transactions by default. They can also extend the privilege to other users.
To provide approval permission for a user:
Step - 1 : Create a role
- Go to Settings, then Users & Roles.
- Navigate to the Roles tab.
- Click the New Role button and create a role. Alternatively, you can also duplicate an existing role by clicking the clone button.

- Enter an appropriate role name.
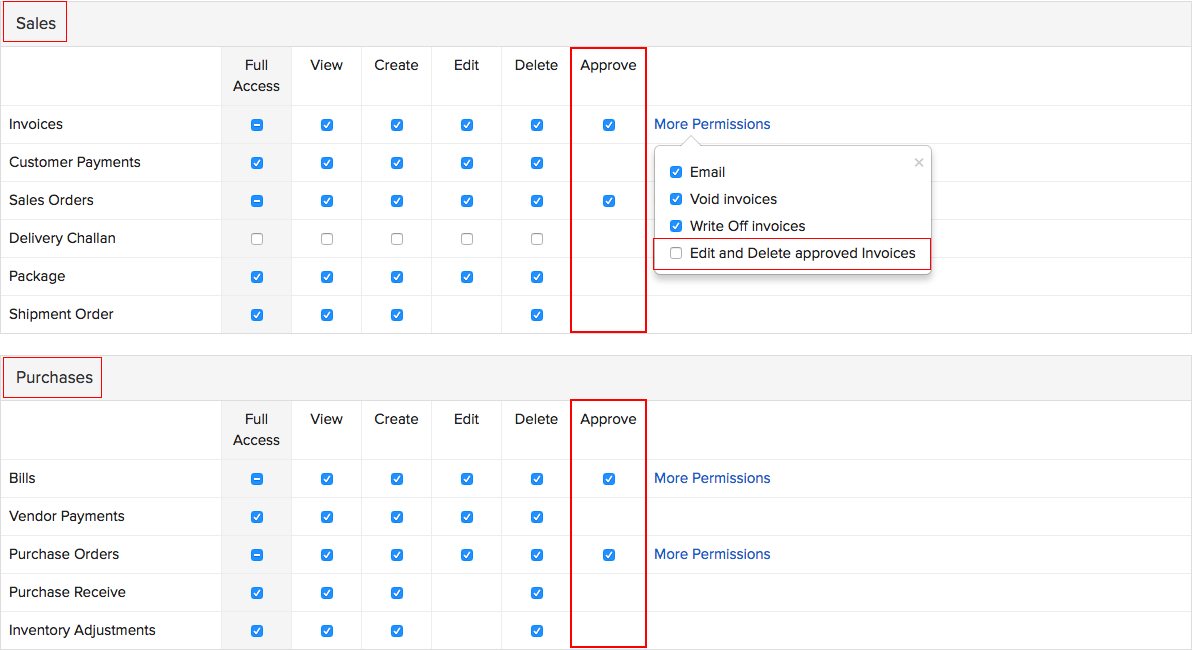
- Navigate to Purchases, Sales or Items section.
- Click the checkbox under Approve to enable approval access for the specific module. For example, if the role is a sales manager, you can provide approval access to all sales modules.
- Click on More Permissions to explore more options.
- Click Save.
Step - 2 : Invite new users
Once you have enabled permissions, you can invite new users to the organization as approvers. To invite new users:
- Navigate to the Users tab and click Invite User.
- Enter the details in the pop-up and select a Role you would like to assign to the user and click Send. Immediately, an email will be sent to the prospective user.
- The user needs to click the Join Account link sent to them via email to start using Zoho Inventory.
Pro Tip: You can also turn existing users into approvers. To do so, go to the Users tab > click the Gear icon next to the user > click Edit and then assign a role with approval permission.
Learn more about Users and Roles.
Approval Preferences
Once you have enabled approval, you can configure your approval preferences. This will help you to restrict and define the role you would like to offer your approvers.
- Don’t configure sales/purchase/transaction approval: Transaction approval will not be configured for the Sales/Purchase/Inventory module.
- All the approvers can approve: Users who have the approval permission can approve or reject the sales/purchase/inventory transactions.
Pro Tip: Click the Show Approvers option to view the list of all the users who have the permission to approve or reject the transactions. You can contact the Admin of your Zoho Inventory organization to get approval access.

- Configure multi-level approval with specific approvers: Set up a multi-level approval process where the transactions will be submitted and approved based on the reporting hierarchy of the company.
Multilevel Approval
You can also set up a multi-level approval process for the transactions that should be verified two or more approvers before they’re finally approved and sent to the intended recipient. To set up an approval hierarchy for your organization:
- Go to Settings, Preferences, then Approval.
- Click the Sales Approval, Purchase Approval or Inventory Approval tab.
- Choose the Configure multi-level approval with specific approvers option.
- Select the approvers from the drop-down.
- Click + Add New Level to add more approvers, if needed. Note: You can only add up to 10 approvers.
- Click Save at the bottom of the page.
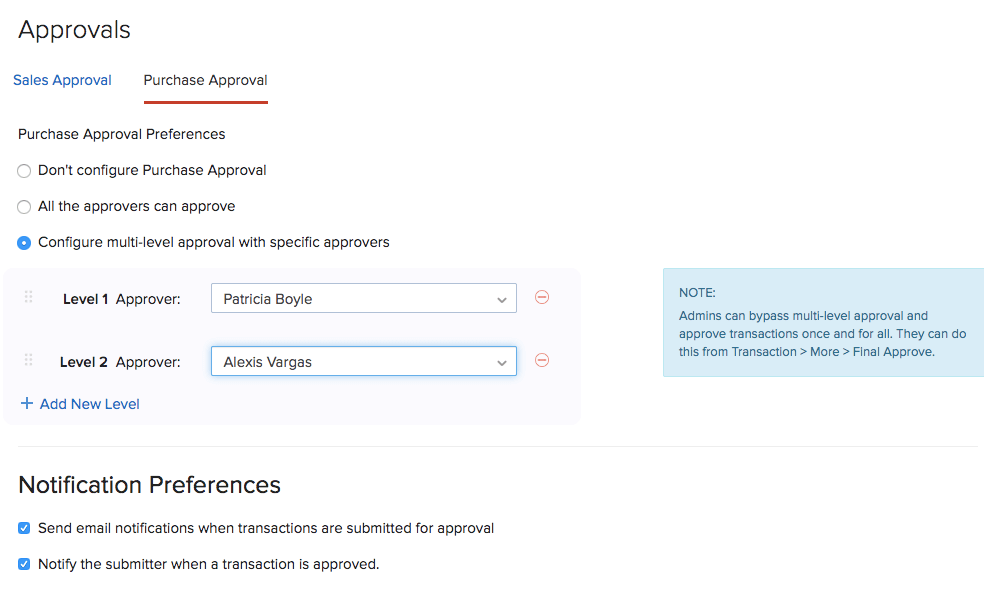
Any transaction created henceforth must be verified and approved by approvers of all levels to proceed further. A transaction becomes invalid if any one of them rejects it.
Insight: In multi-level approval, the Level 1 approver will be notified first. If the transaction passes their approval, the next approver in line (Level 2) will receive an email and in-app notification to verify the transaction. Likewise, all the subsequent approvers who are a part of the multi-level approval process will be notified when it’s their turn.
Notification Preferences
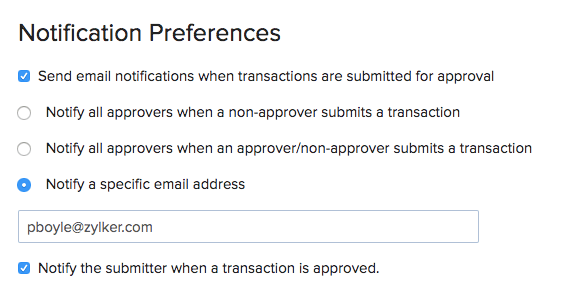
Select the notification preferences for your approvers and submitters
-
Send email notifications when transactions are submitted for approval: Enable this option to send email notification to alert the approvers of a transaction that has been submitted. You can further choose from the options below to refine your approvers list:
- Notify all approvers when a non-approver submits a transaction: An email notification will be sent to all approvers, whenever a non-approver submits a transaction.
- Notify all approvers when an approver/non-approver submits a transaction: An email notification will be sent to all approvers, whenever an approver or a non-approver submits a transaction.
- Notify a specific email address: Enter the email address of a specific person you want to notify whenever a transaction submitted for approval.
-
Notify the submitter when a transaction is approved: The submitter will be notified whenever a transaction they’ve submitted has been approved.
