Invoices
An Invoice is a document sent to your client that indicates the products/services sold by you with the payment information that the client has to make.
Learn everything about invoices in Zoho Inventory from here.
Invoices
- Status of Invoices
- Invoice Workflow Diagram
- Creating an Invoice
- GST Treatment
- Creating a Shipping Bill
- Creating invoices for items with serial numbers
- Raising an invoice for batch tracked items
- Raising an invoice for multiple sales orders
- Link Invoices to Sales Orders
- Importing Invoices
- Exporting Invoices
- Send Invoices to Customers
- More Actions with Invoices
- Multi-warehouse operations related to Invoices
Invoice payments
- Recording Payments
- Payments Received
- Details on a payment receipt
- Managing your payment receipts
- Importing and exporting invoice payments
Status of Invoices
| Status | Description |
|---|---|
| Draft | Invoices when created will be in Draft status before being sent to the customer. |
| Sent | Invoices once sent to the customer with a due date for payment, will be shown as Sent. |
| Overdue | Once the due date for payment is exceeded, it will be shown as Overdue. |
| Partially Paid | When the payment is made for a part of the items in the invoice, it will be shown as Partially Paid. |
| Paid | Once the payment is made by your customer for the invoice raised, it will be shown as Paid. |
| Void | The status of an invoice becomes Void when you have chosen to void it. This comes in handy when you wish to freeze an invoice due to any errors in it and create a fresh one. |
Invoice Workflow Diagram

Creating a new Invoice
To create a new invoice:
Method 1: Direct invoicing
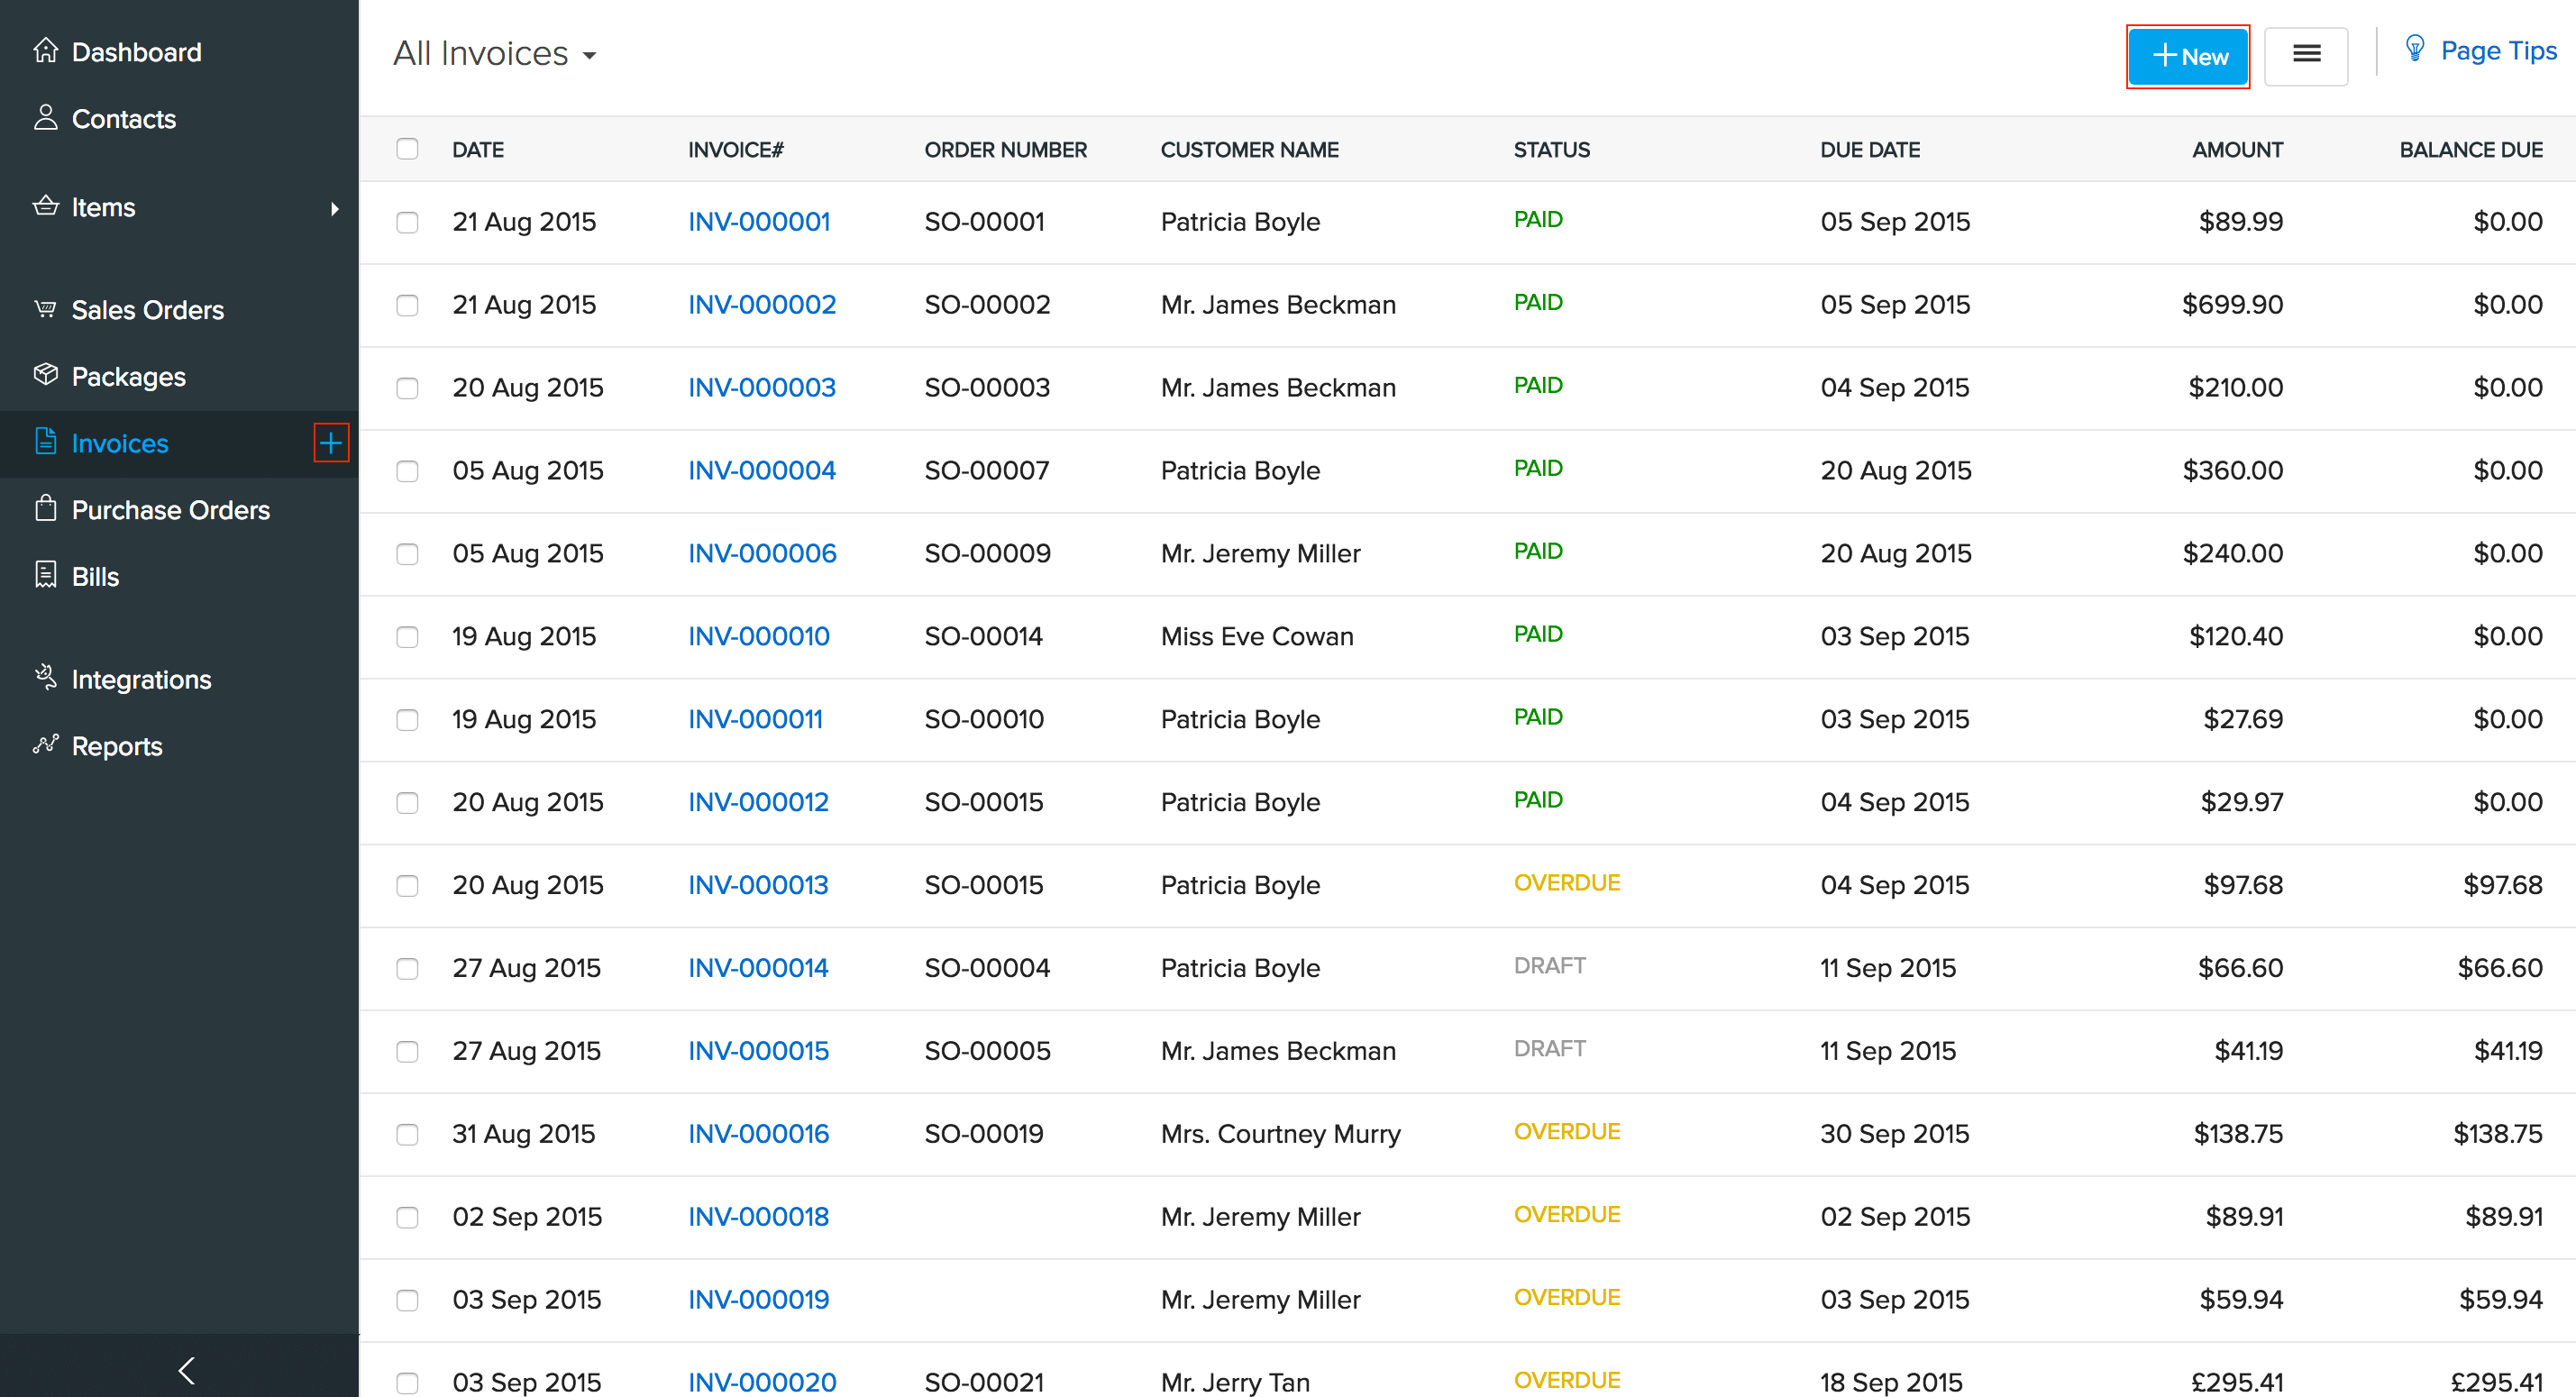
- Navigate to the Invoices tab.
- Click on the +(quick create button)on the left hand sidebar or +New button on the right top corner.
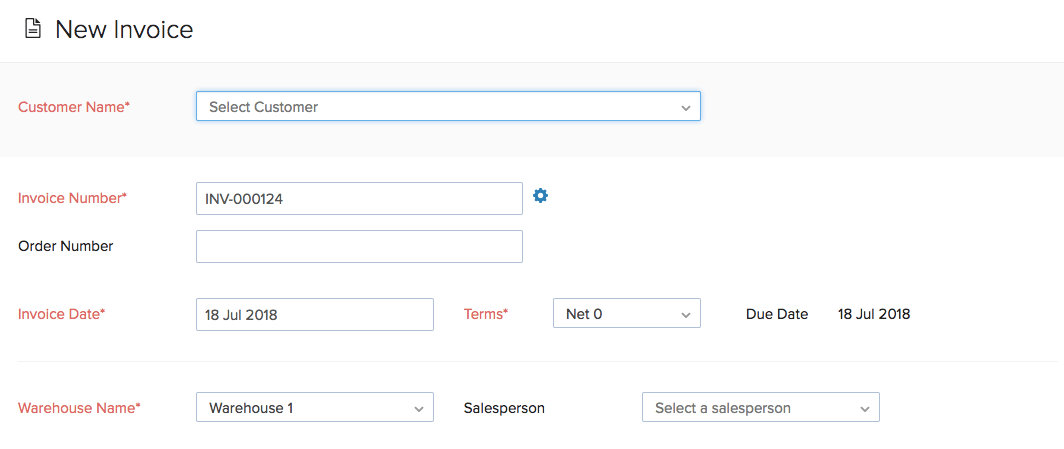
- A new Invoice page opens up.
- The Customer Name field will help you choose the customer for who, you wish to raise an invoice. You can also add a new customer from an invoice.
- Place of Supply is the registered place of business of the selected customer. Select a State or Union Territory from the dropdown.
- Invoice Number can be auto generated or you can manually enter it by clicking on the gear icon on the Invoice Number tab and configuring it.
- If you have a physical sales order or say a purchase order from your customer in hand, using the Order number field, you can record the order number of the sales order associated with the invoice.
- By default the Invoice Date will be the date on which you create the invoice. But you can change it if you wish.
- You can set the due date for the invoice by choosing one of the standard options in the Terms tab or by mentioning your own date.
- If you want to apply a price list to an invoice, you can select one from the Price List dropdown at the transaction level or at the line item level.
- If you have enabled associating a Sales person in the settings, you can add a sales person in the Sales person tab.
- In the Items & Description section, you can manually add the items being sold to this customer or scan the barcode of the item.
- To add another item to your sales order, click the Add another line option.
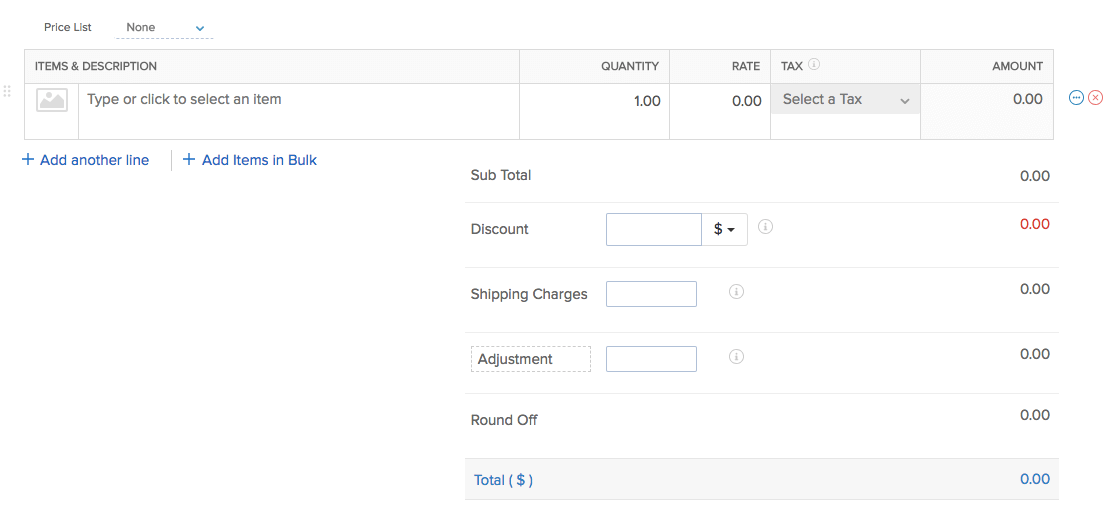
- Alternatively, you can also click the Add items in bulk option to add several items at once to your sales order.
Pro Tip: Instead of searching for the items from the list, you can select an item by scanning its barcode. When you scan the same barcode more than once, the quantity of the item gets incremented automatically.
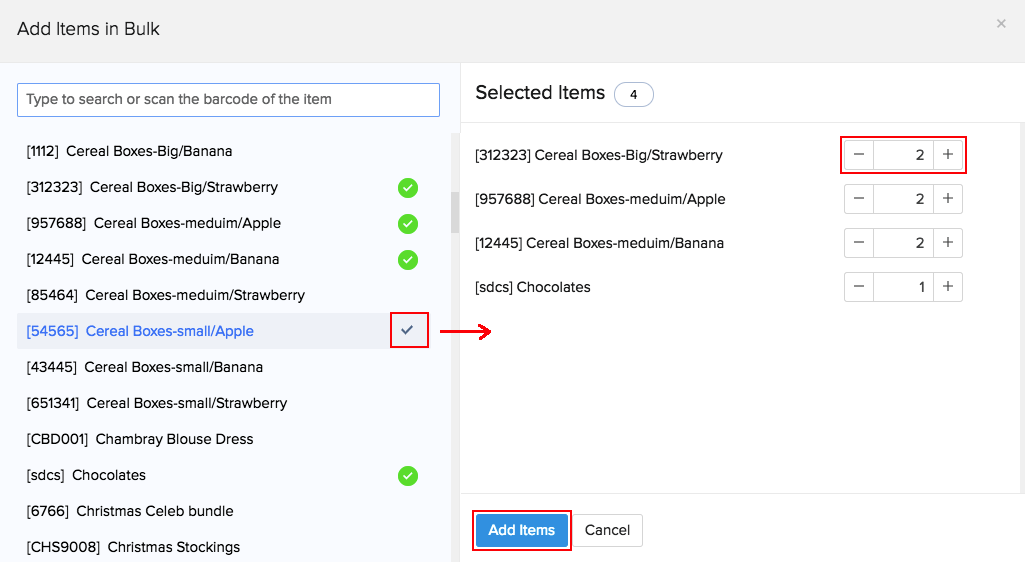
Configure all the charges and taxes involved.
In the Payment Options tab, you can choose how you want to be paid by the customer by enabling payment gateways that you are integrated with.
You can also allow your customer to make partial payments to your invoice by checking on the box near the option Allow customer to make partial payments for this invoice.
You can record Customer Notes of up to 5000 characters and Terms & Conditions of up to 10000 characters for the invoice.
Include Shipping Charges, add Adjustments (such as packing or other charges) in the total section.
Select the TCS Rate as per 206C - 1H, if applicable for the sale. This will be calculated on the total amount incuding all charges and taxes. Learn how to add TCS Rates.
Insight: The new TCS rates will be applicable only on the amount received after 1 October 2020. You would be required to collect TCS only if your turnover has exceeded ₹10 crore in the last financial year and the sale of goods to a customer that exceeds ₹50 lakh in the current financial year.
- You can directly email the customer by checking the Email To option where your customer’s registered email ID is displayed.
- Attach any reference files if you wish to, in the Attach Reference file tab.
- Click on the Save button, if you wish to save it as a draft. Click on the Save and Send button if you wish to send the invoice to the customer as soon as it is created.

Method 2: From a sales order
- Navigate to the Sales Order that you wish to be invoiced.
- Click on the Create button on the top of the page.
- Select the Invoice option from the drop down.
- You can also create invoices by clicking on the Invoices tab of the Sales Orders page and choose the option called New Invoice.
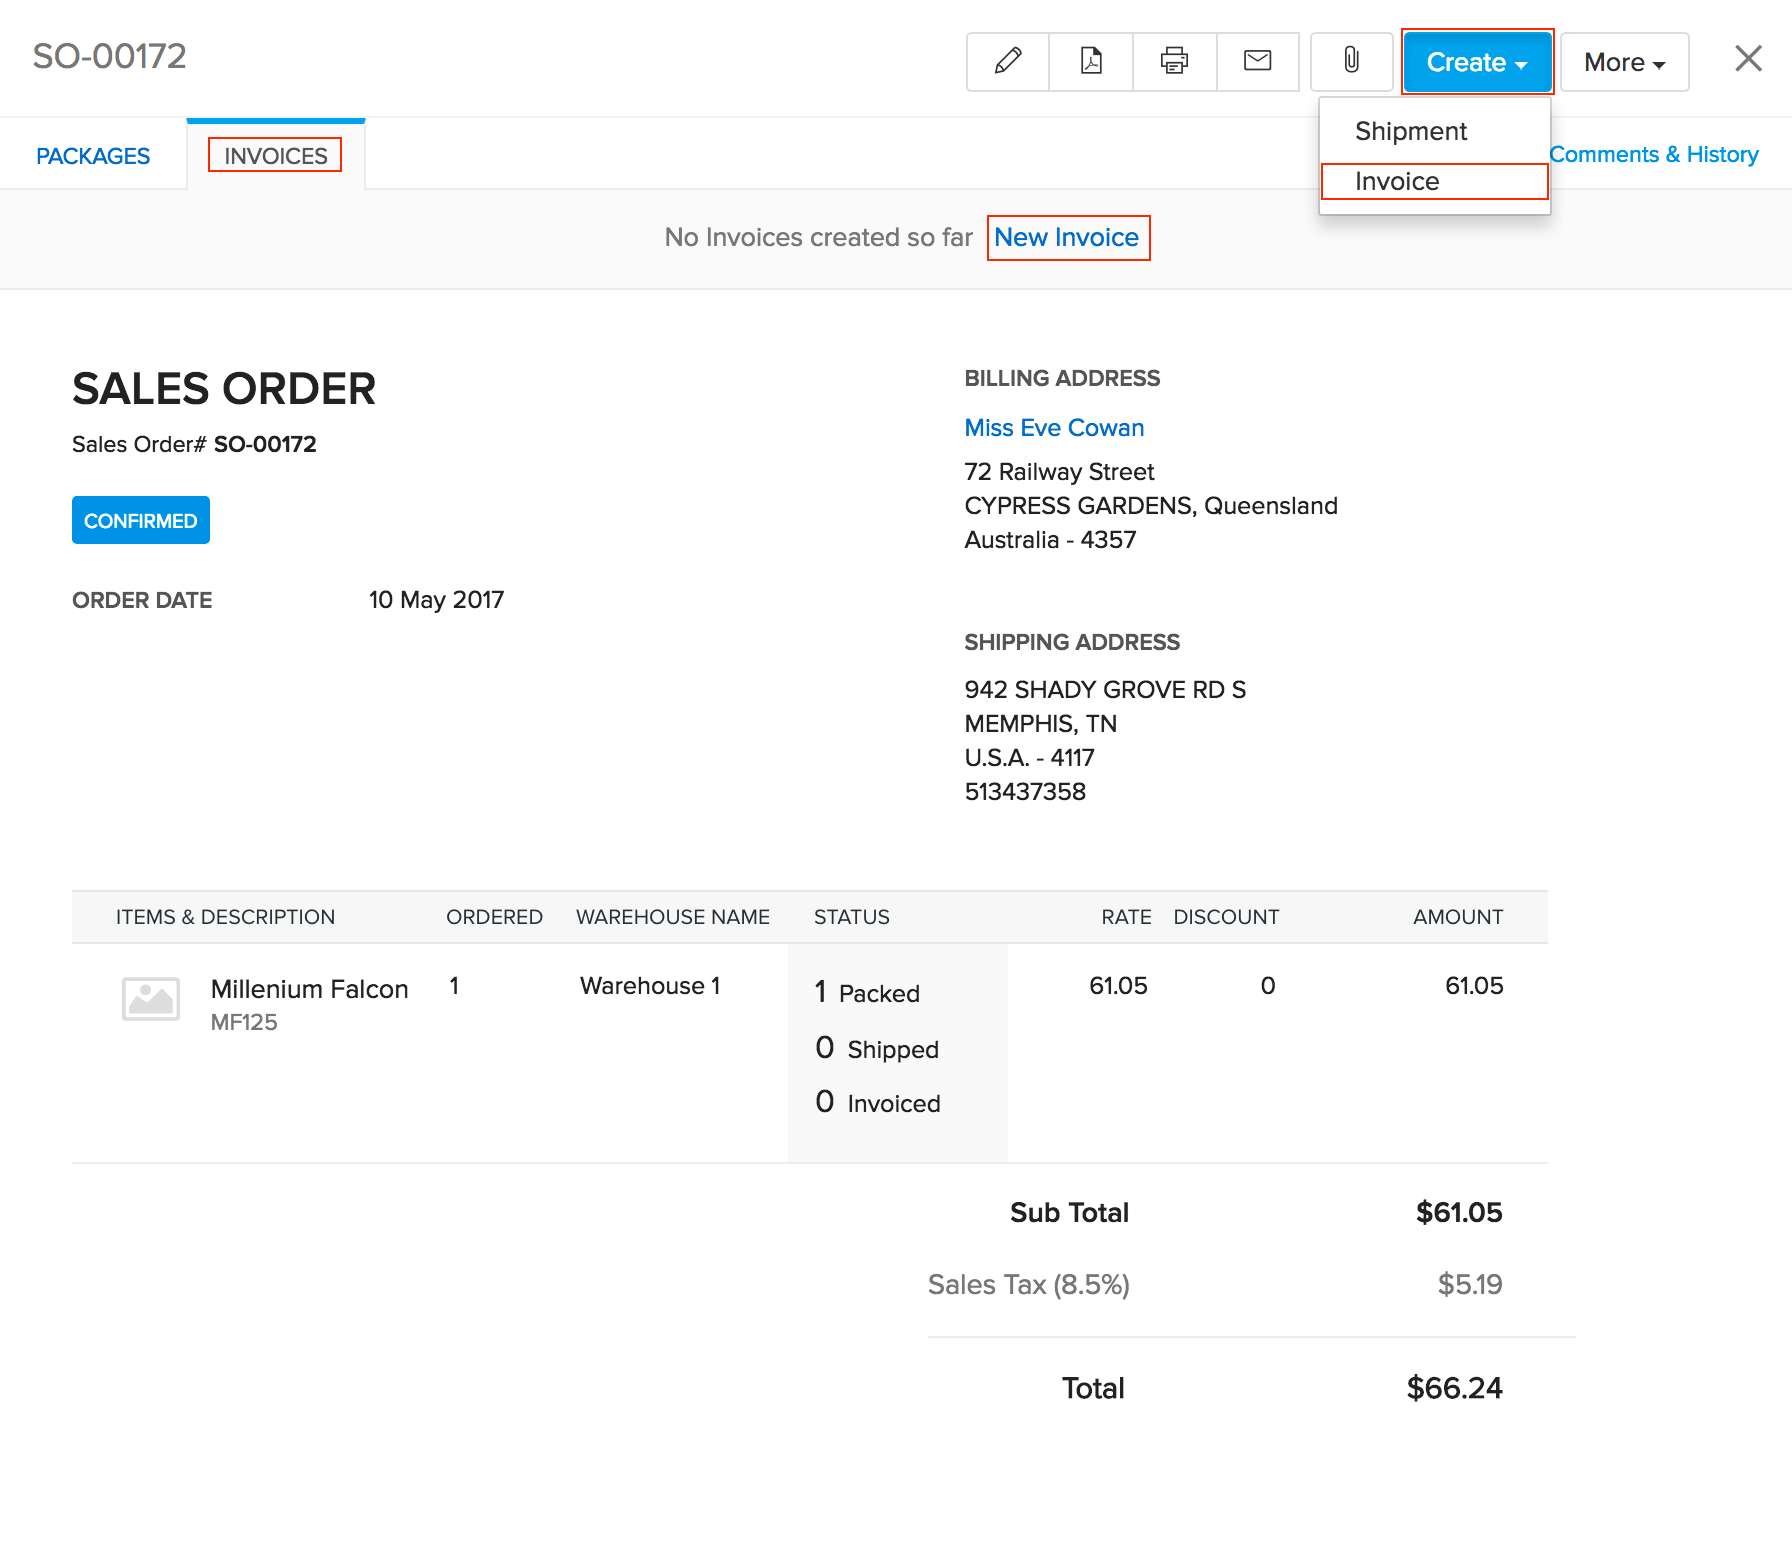
A new invoice creation form will open up for entering the details for creating a new invoice
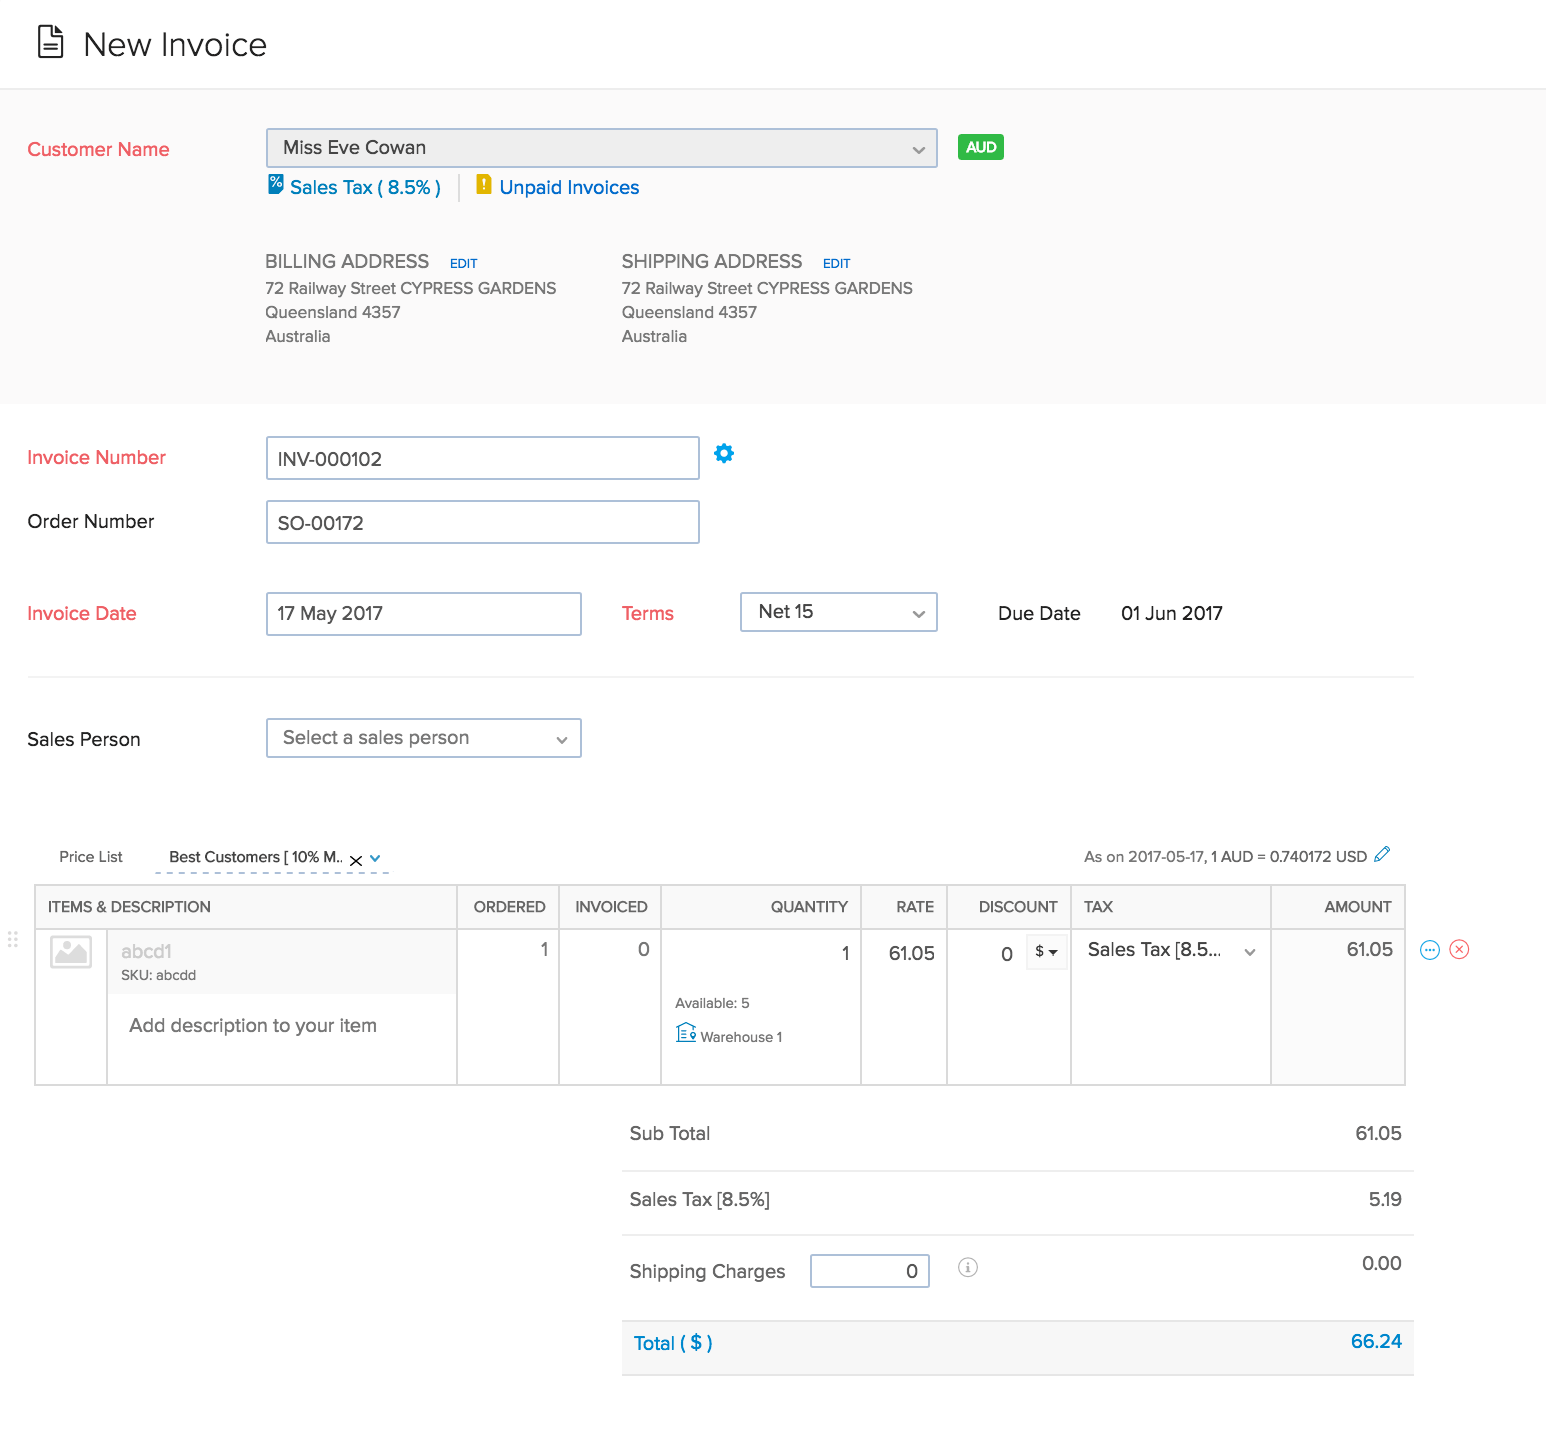
- The Customer Name cannot be edited as the invoices are created from sales orders in Zoho Inventory. but you can edit the billing and shipping address.
- Place of Supply is the registered place of business of the selected customer. Select a State or Union Territory from the dropdown.
- Invoice Number can be auto generated or you can manually enter it by clicking on the gear icon on the Invoice Number tab and configuring it.
- By default the Invoice Date will be the date on which you create the invoice. But you can change it if you wish.
- You can set the due date for the invoice by choosing one of the standard options in the Terms tab or by mentioning your own date.
- If you have already associated a price list with the concerned sales order then it will be displayed here in the Price List tab. you can wish to keep it or change it. Any changes to this will also be reflected in the sales order.
- If you have enabled associating a Sales person in the settings, you can add a sales person in the Sales person tab.
- All the Items and their details present in your Sales order is reflected here. you can control which items and how much quantity to be invoiced. This will be reflected in your sales order status.
- Configure all the charges and taxes involved.
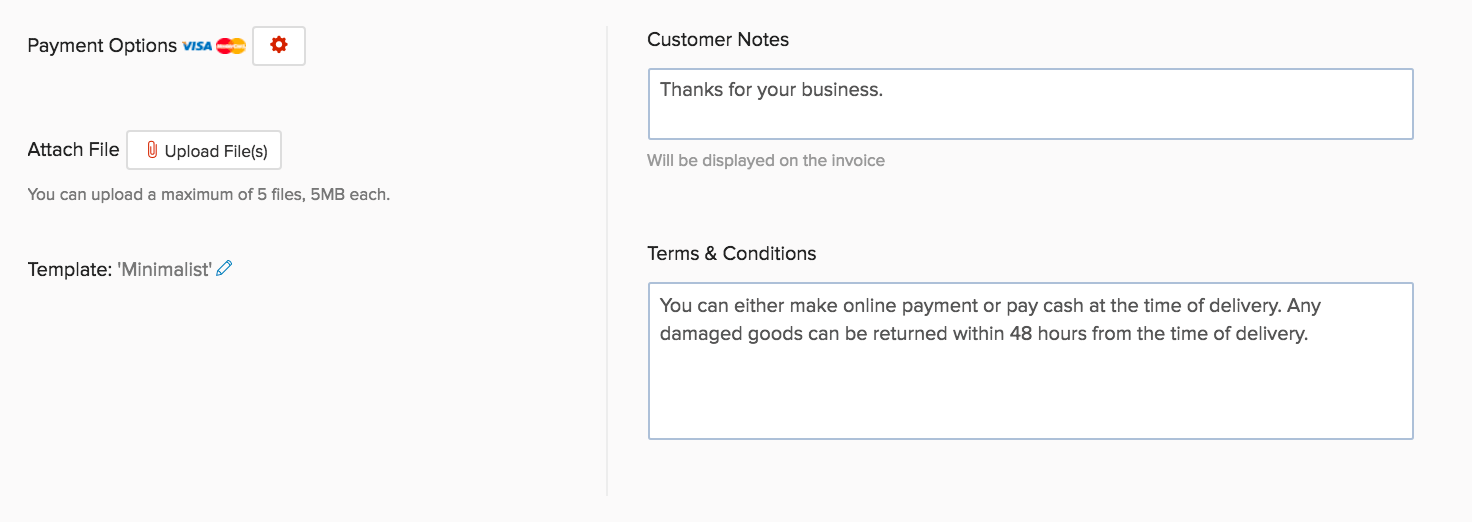
- You can record Customer Notes of up to 5000 characters and Terms & Conditions of upto 10000 characters for the invoice.
- In the Payment Options tab, you can choose how you want to be paid by the customer by enabling payment gateways that you are integrated with.
- You can directly email the customer by checking the Email To option where your customer’s registered email ID is displayed.
- Attach any reference files if you wish to, in the Attach Reference file tab.
- Click on the Save button, if you wish to save it as a draft. Click on the Save and Send button if you wish to send the invoice to the customer as soon as it is created.
Pro Tip: If you want to save time and quickly convert the sales order to an invoice, you can click the Instant Invoice option under the Invoice tab of the Sales Order. This will skip the edit page and create an invoice instantly. As of now, you cannot create an instant invoice for marketplace orders as well as for serial/batch tracked orders.

GST Treatment
As soon as you select the customer, Zoho Inventory will display a link mentioning the GST Treatment that you’ve selected for the contact while creating it. If you had not configured it while creating the contact, you can set it up or update it by clicking the link.
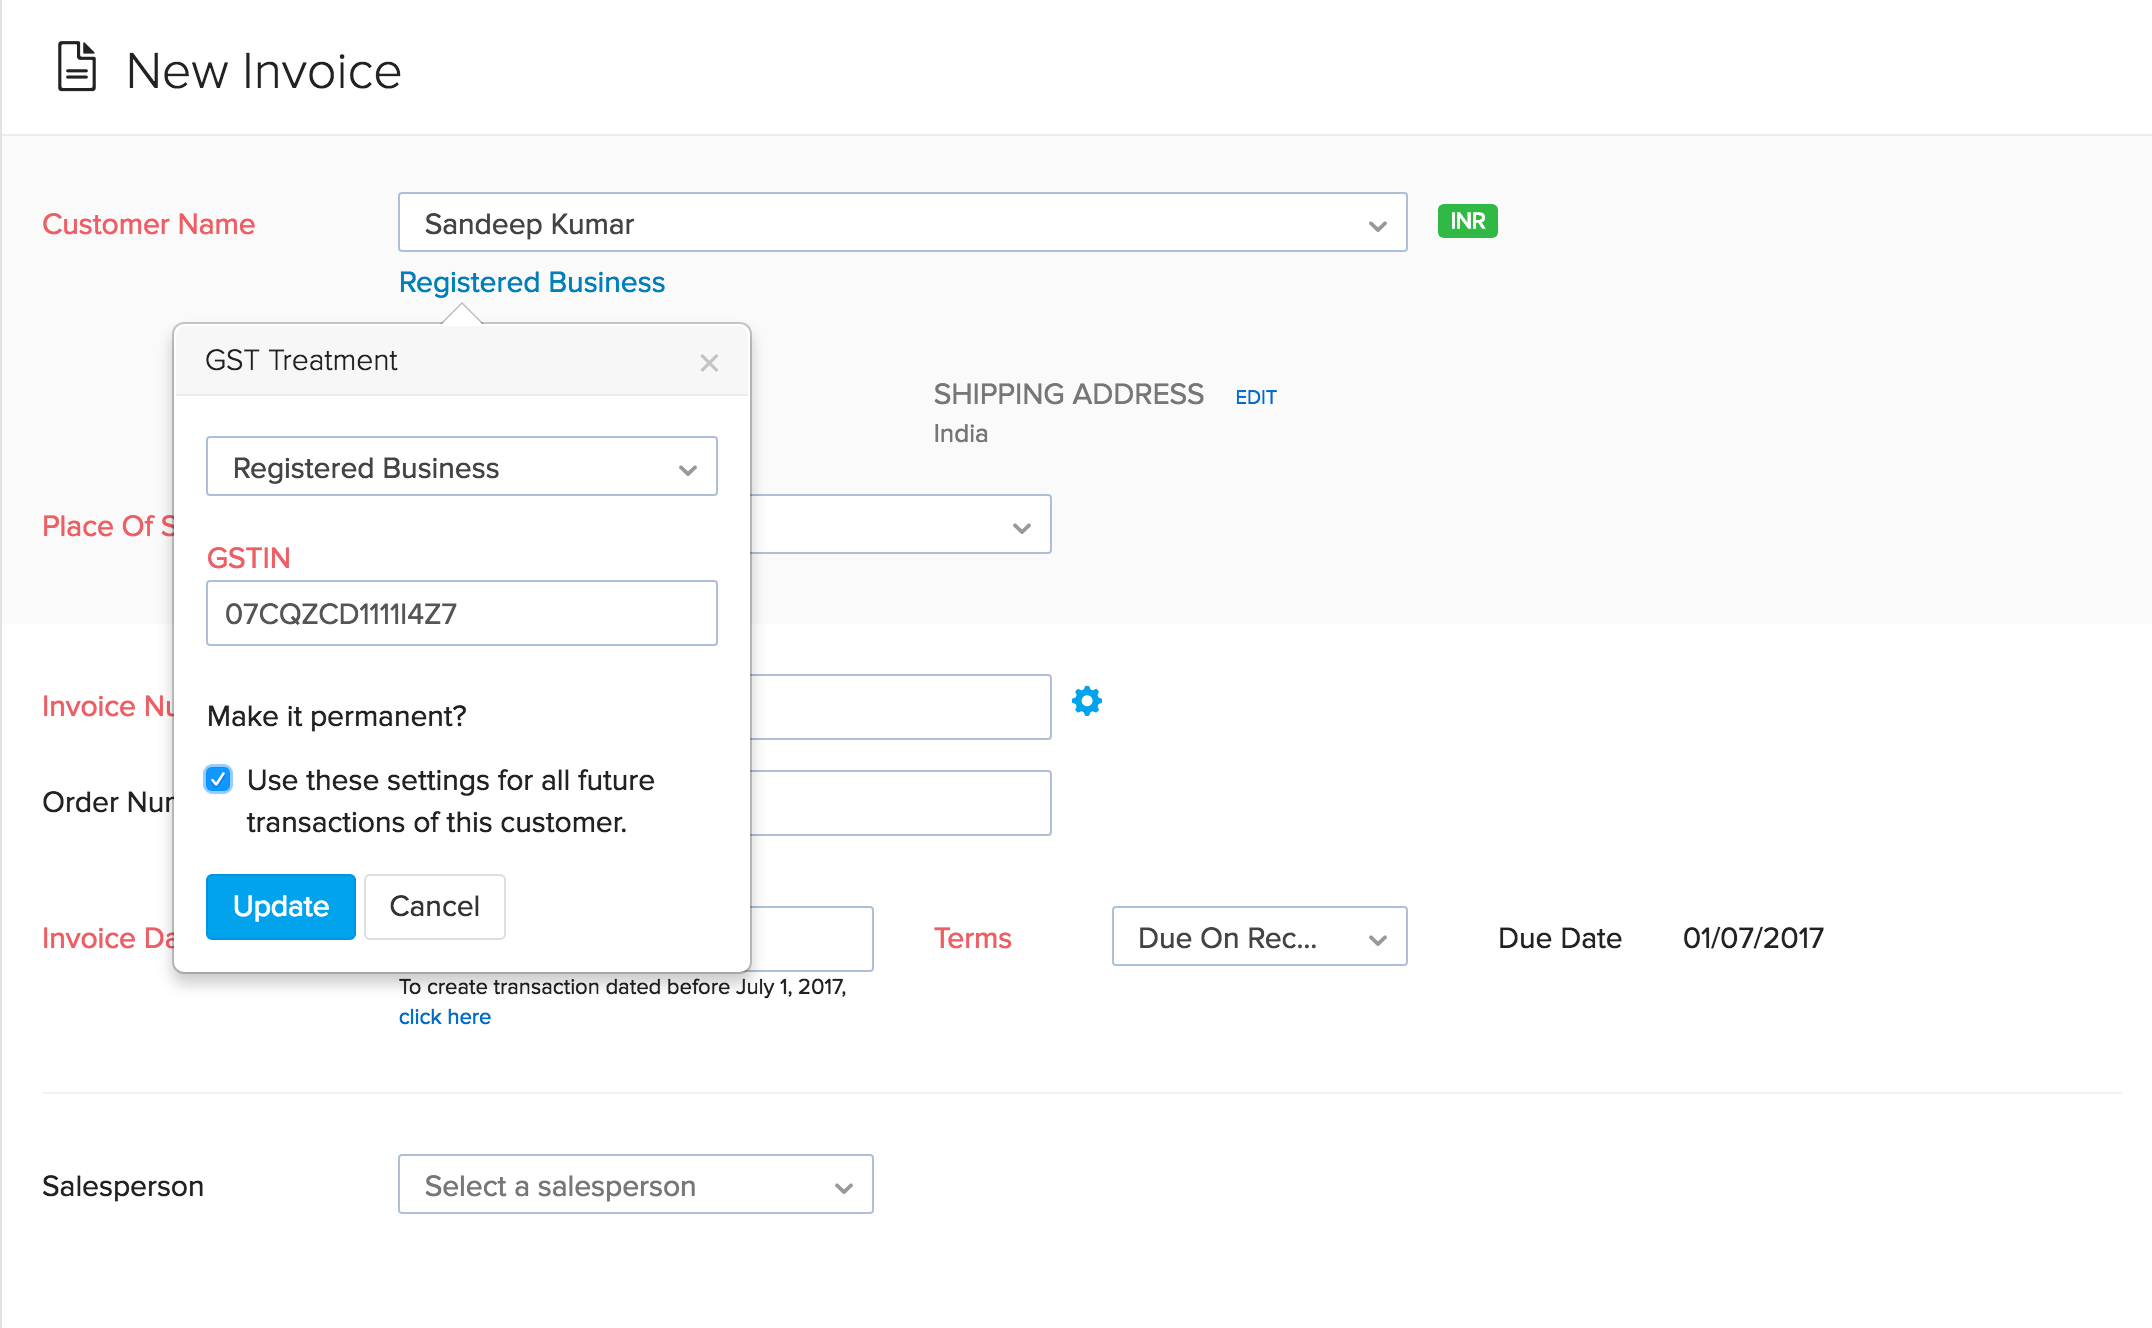
Select the appropriate GST Treatment for the contact and update the details.
Check Use these settings for all future transactions of this customer. if you wish to use the same GST Treatment in all future transactions.
Creating a Shipping Bill
Shipping bill lets you record custom duty and other charges involved with the export of goods to customers outside India or in SEZs(Special Economic Zones). A shipping bill can be created for an invoice which is in Sent status.
A shipping bill will reflect on your GSTR-3B and GSTR-1 return. This is to update the GSTN with custom duty and other charges that you had incurred during the import of your goods.
Note: Shipping bill can be generated only for customers who are in SEZ or overseas.
Enabling Shipping bill:
In order to create a shipping bill in Zoho Inventory you will have to enable Does your business involve overseas trading? under GST settings. Follow the below mentioned steps to get started.
- Click the Gear icon(Settings) and select Taxes.
- Select GST Settings.
- Check the Do you want to enable overseas trading option for Overseas Trading.
- Select an account to track overseas trading.
- Click Save.
Note: If you haven’t configured GST settings in Zoho Inventory, click here to know more.
To create a shipping bill, follow the below mentioned steps:
- Go to Invoices on the side bar.
- Select the invoice for which you wish to create a shipping bill.
- Click the More button and select Create Shipping Bill from the drop-down.
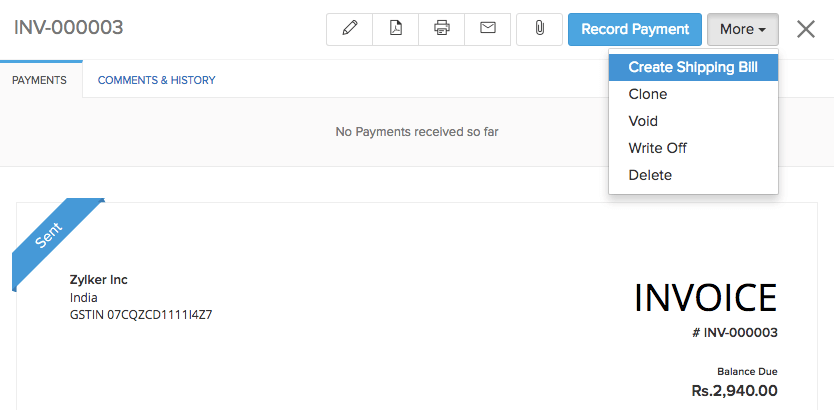
- In the following shipping bill creation page, enter the details of the shipping bill, custom duty charges and other additional charges that you incurred for that transaction.
- Click on Save to proceed.
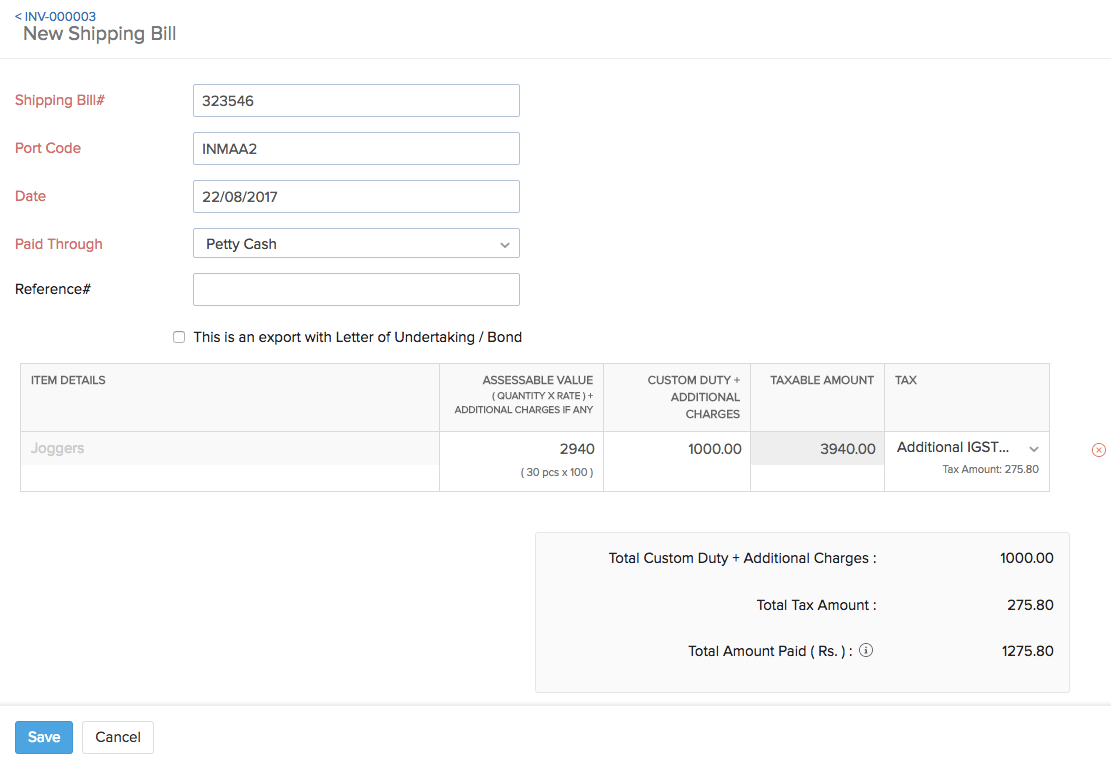
| Fields | Description |
|---|---|
| Shipping Bill# | The shipping bill number is the unique ID for a shipping bill created. |
| Port Code | Provide the custom Port code for the transaction. |
| Date | Date on which the shipping bill is generated. |
| Paid Through | The account from which the payment was made. |
| Reference# | Any number that you would like to link to the shipping bill for reference purpose. |
| This is an export with Letter of Undertaking / Bond | You can check this option if you are exporting with a letter of undertaking or bond. |
| Assessable Value | The amount for a line item will be fetched from the invoice, you can add additional charges like landing charges (if any) to this field. |
| Custom Duty + Additional Charges | You can record charges like custom duty, education cess and higher education cess involved with that transaction. |
| Taxable Amount | Taxable amount includes Assessable Value + Custom Duty + Additional Charges. |
| Tax | Select the tax group with all the taxes associated to that transaction. |
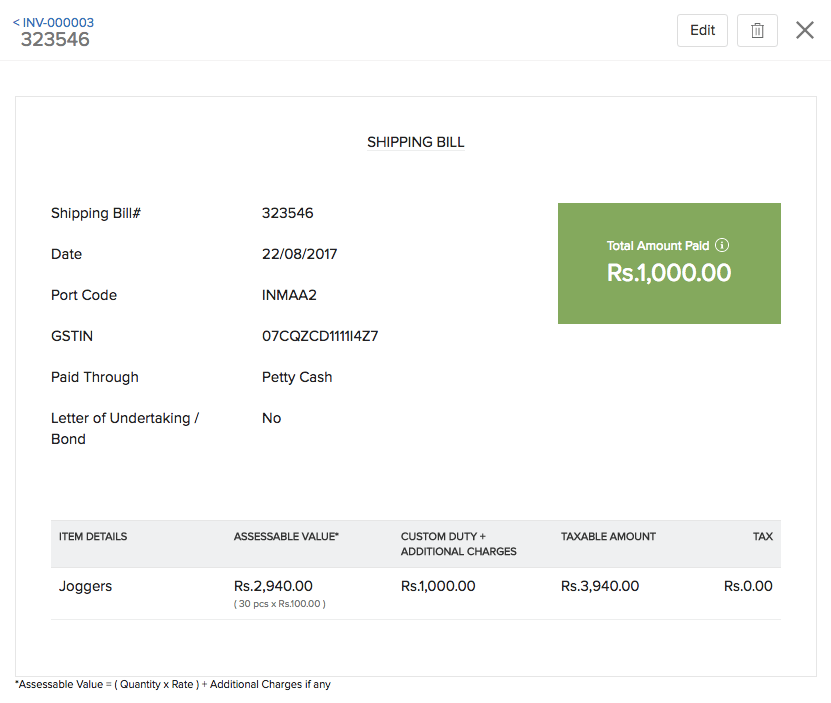
- Under the Shipping Bill section, you can find the associated shipping bill number for the invoice.
Creating invoices for items with serial numbers
If you’re raising a invoice for items which have serial numbers, there are few additional steps that need to be done.
- The moment you add a line item with serial numbers enabled, you’ll be getting an option to select the new serial numbers for the units that are being added to your inventory.

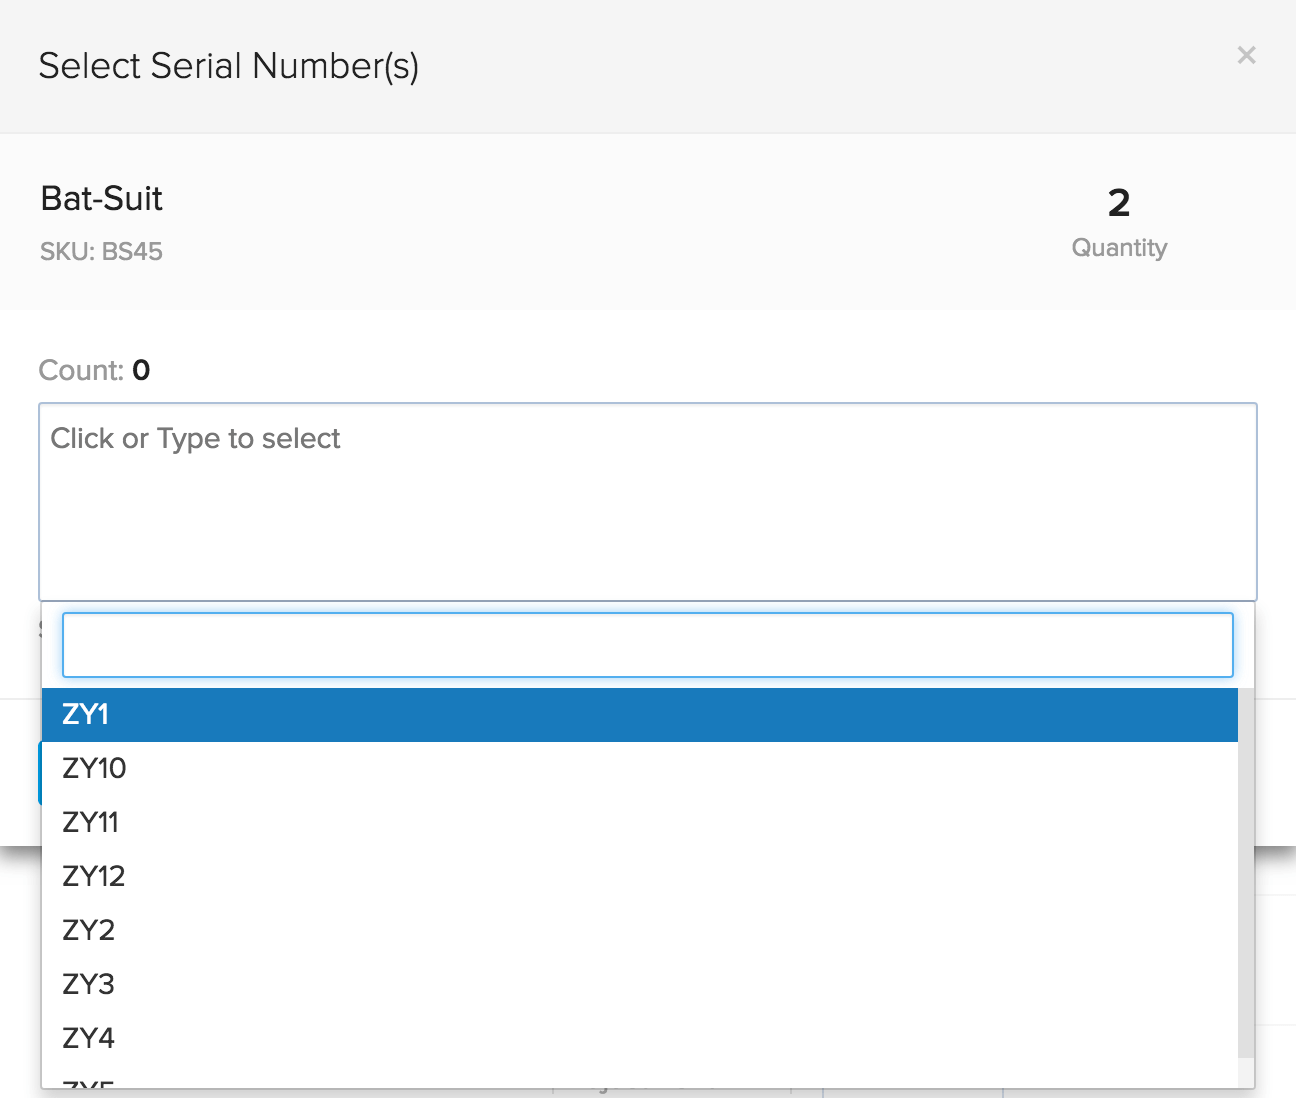
- Selecting the option will open a dialog box where you can either manually select the serial numbers or place the cursor on the empty field and scan the serial number of the item using a barcode scanner for the quantity specified.
Note: You can enter up to 1000 serial numbers in a transaction.
- You’ll see that the serial number will be automatically added to your transaction.
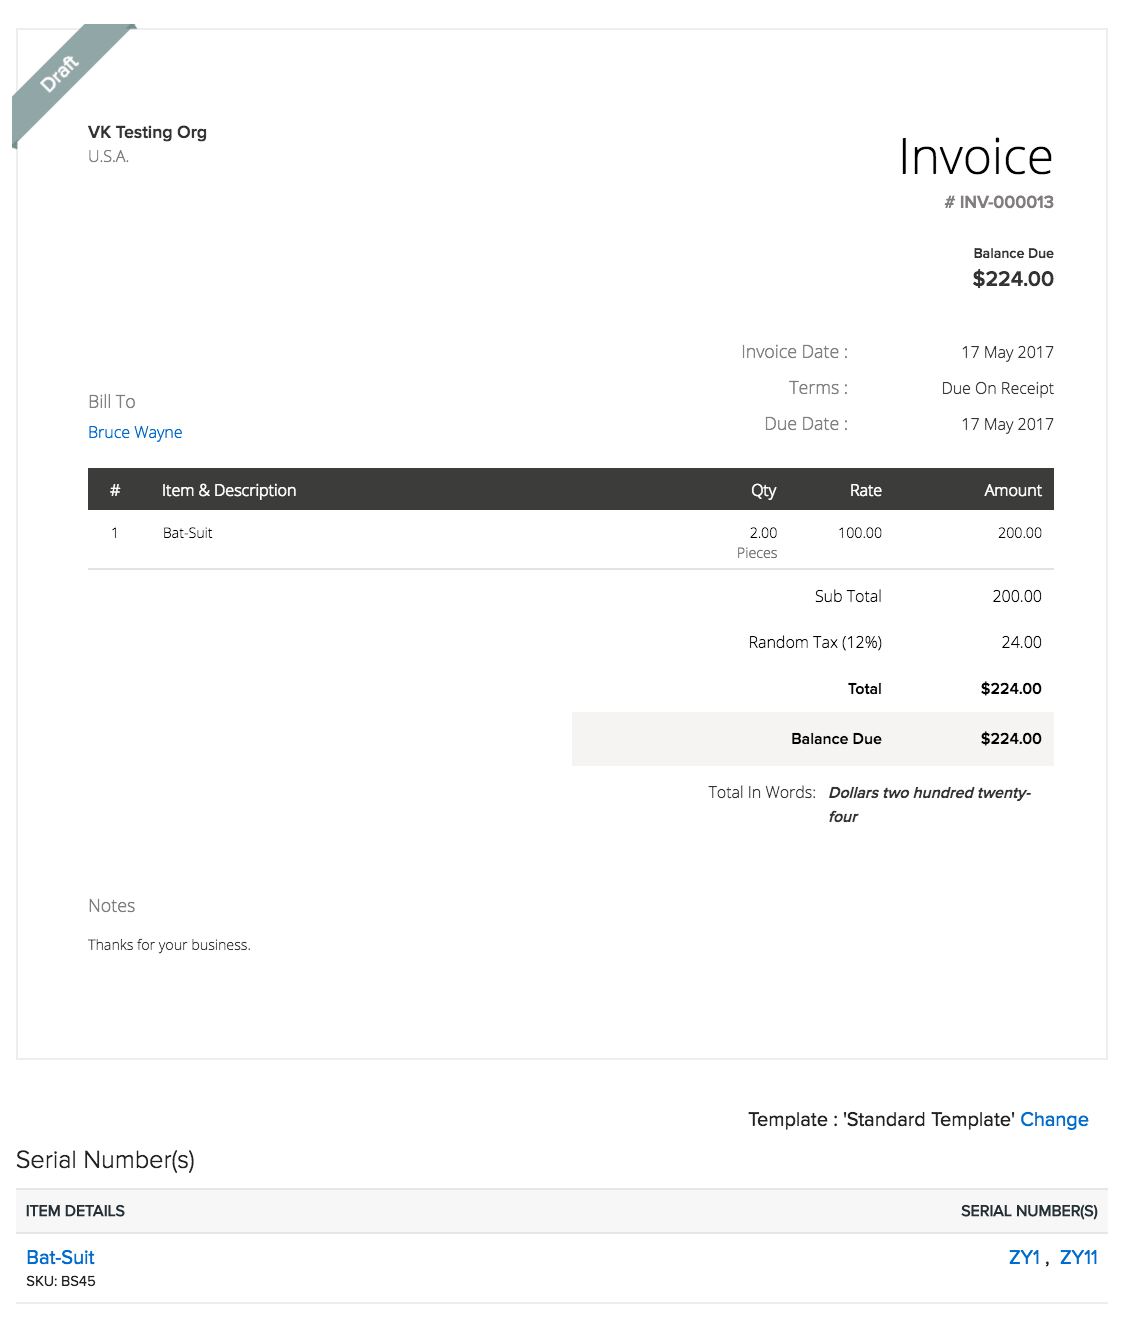
- After creating the Invoice, you’ll be able to see the serial numbers associated with it at the bottom of the Invoice details page.
Insight: If you prefer to track serial/batch numbers in packages, purchase receives and sales return receipts, go to Settings > Preferences > Items. Under Advanced Inventory Tracking, choose Track in packages, purchase receives and return receipts option.
Raising an invoice for multiple sales orders
If you have several sales orders that haven’t been invoiced yet, you can put them all in the same invoice.
Prerequisite: Sales orders that are invoiced together must be associated to the same customer and all sales orders that need to be invoiced must be in Confirmed state.
- Open a New Invoice page.
- Select the customer to whom you wish to raise an invoice.
- If there are existing sales orders with no associated invoices for that customer, then you can find a message that says Include N Confirmed Sales Orders right beneath the Items & Description section.
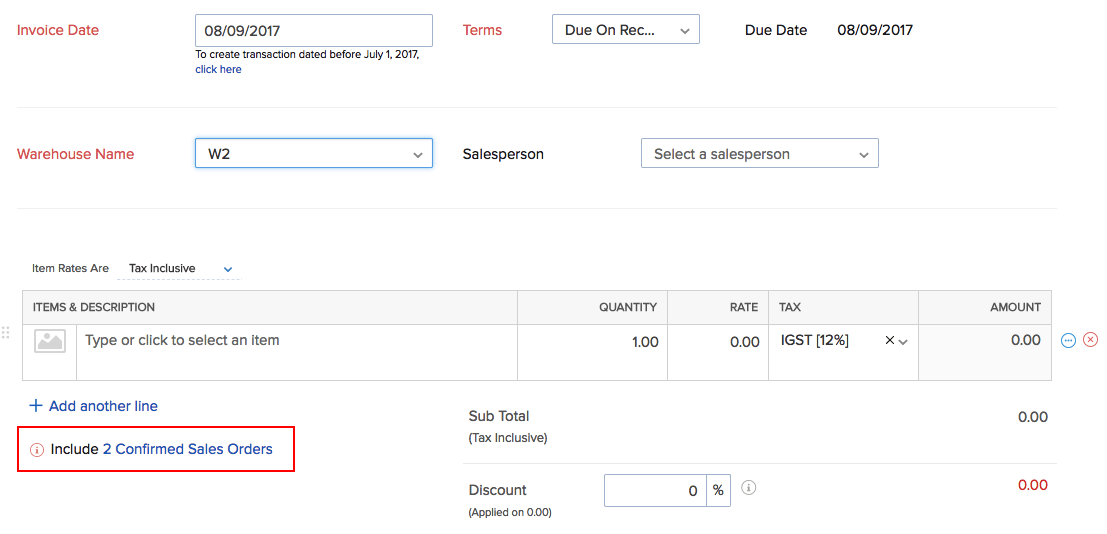
- Click on it and select all those sales orders that you wish to add to the invoice.
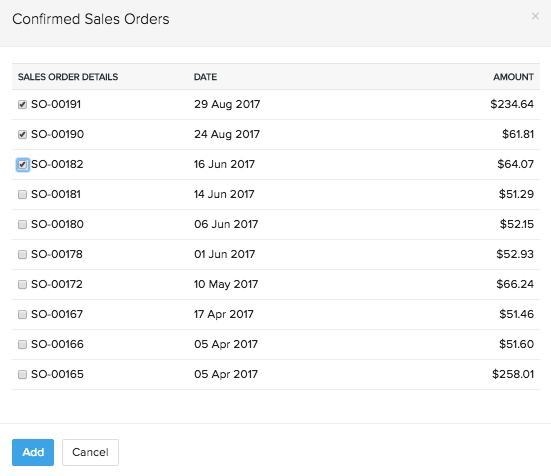
The items of the selected sales orders will be listed out in the Items & Description section of the invoice. * Fill up any additional details and then click Save to create a invoice for multiple sales orders.
Important Note: * This process is applicable only for direct invoicing. * Sales orders that are marked for drop-shipment/backorder or already have an invoice associated, cannot be included.
Raising an invoice for batch tracked items
Raising a invoice for batch tracked items is just a few additional steps away.
- The moment you add a line item with batch tracking enabled, you’ll be getting an option to select the batches for the units that are leaving your inventory.
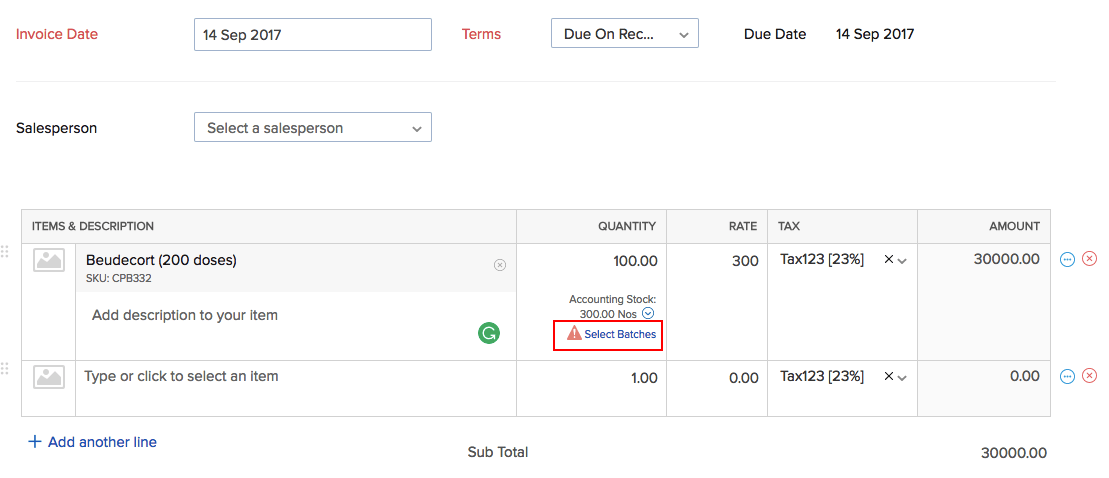
Note: You can enter up to 100 batch numbers for each line item, and a total of 5000 batches per transaction.
- In the following dialog box, you’ll be able to select the batch number from the drop-down and enter the quantity that goes out. The aggregate of the quantity taken from each of those batches has to match the invoice quantity of that line item.
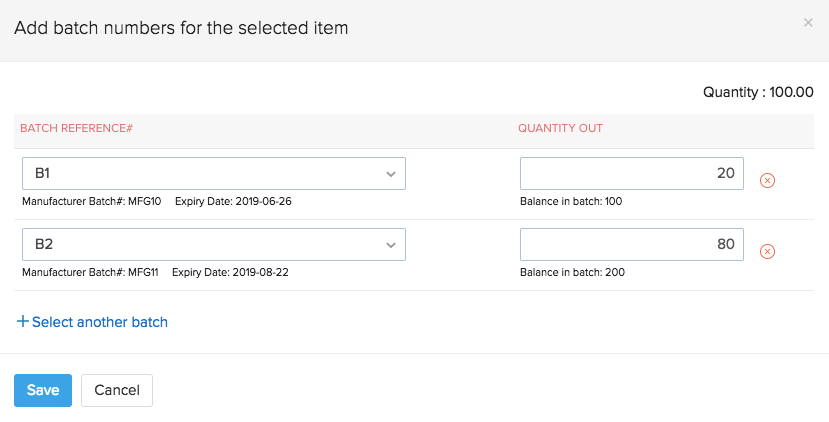
Mandatory Fields in the dialog box:
- Batch Reference# : Reference number of the existing batches.
- Quantity out: Quantity that will be taken from each batch.
After creating the invoice, you’ll be able to view the selected batches and the quantity taken from each of those batches at the bottom of the Invoice details page.
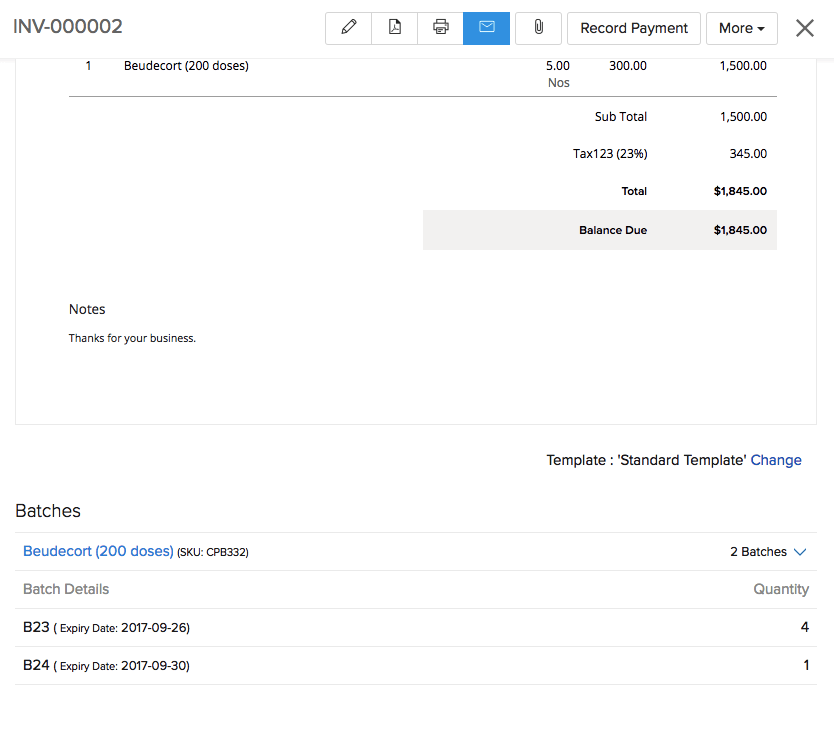
Insight: If you prefer to track serial/batch numbers in packages, purchase receives and sales return receipts, go to Settings > Preferences > Items. Under Advanced Inventory Tracking, choose Track in packages, purchase receives and return receipts option.
Link Invoices to Sales Orders
You can associate invoices with sales orders that were created separately in Zoho Inventory.
To do so:
- Go to the Invoices module in Zoho Inventory.
- Click on an invoice to open it.
- Click the
 icon at the top to edit the invoice details.
 - Enter the sales order number that you wish to link it to in the Order Number field.
Warning:
- The customer addressed to must be the same in both documents.
- The sales order date cannot fall after the bill date.
- The invoice must contain one or more of the items mentioned in the sales order. They cannot be linked in case of items mismatch.
- The sales order cannot be void, cancelled, closed, dropshipped or on hold.
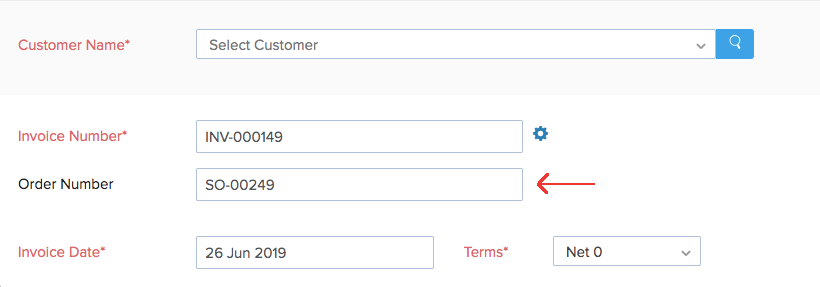
- Click Save.
- In the invoices list page, click the checkbox next to the invoice for which you’ve provided the sales order number. You can select more than one invoice.
- Click the Link to existing sales order button at the top.

The selected invoices will be linked to its respective sales order. The linked sales order will be moved to the ‘Confirmed’ status if it is still in draft.
Import Invoices
To import invoices into your Zoho Inventory account:

- Navigate to Invoices.
- Click on the Menu icon(Top right corner).
- Select Import Invoices option in the drop down.
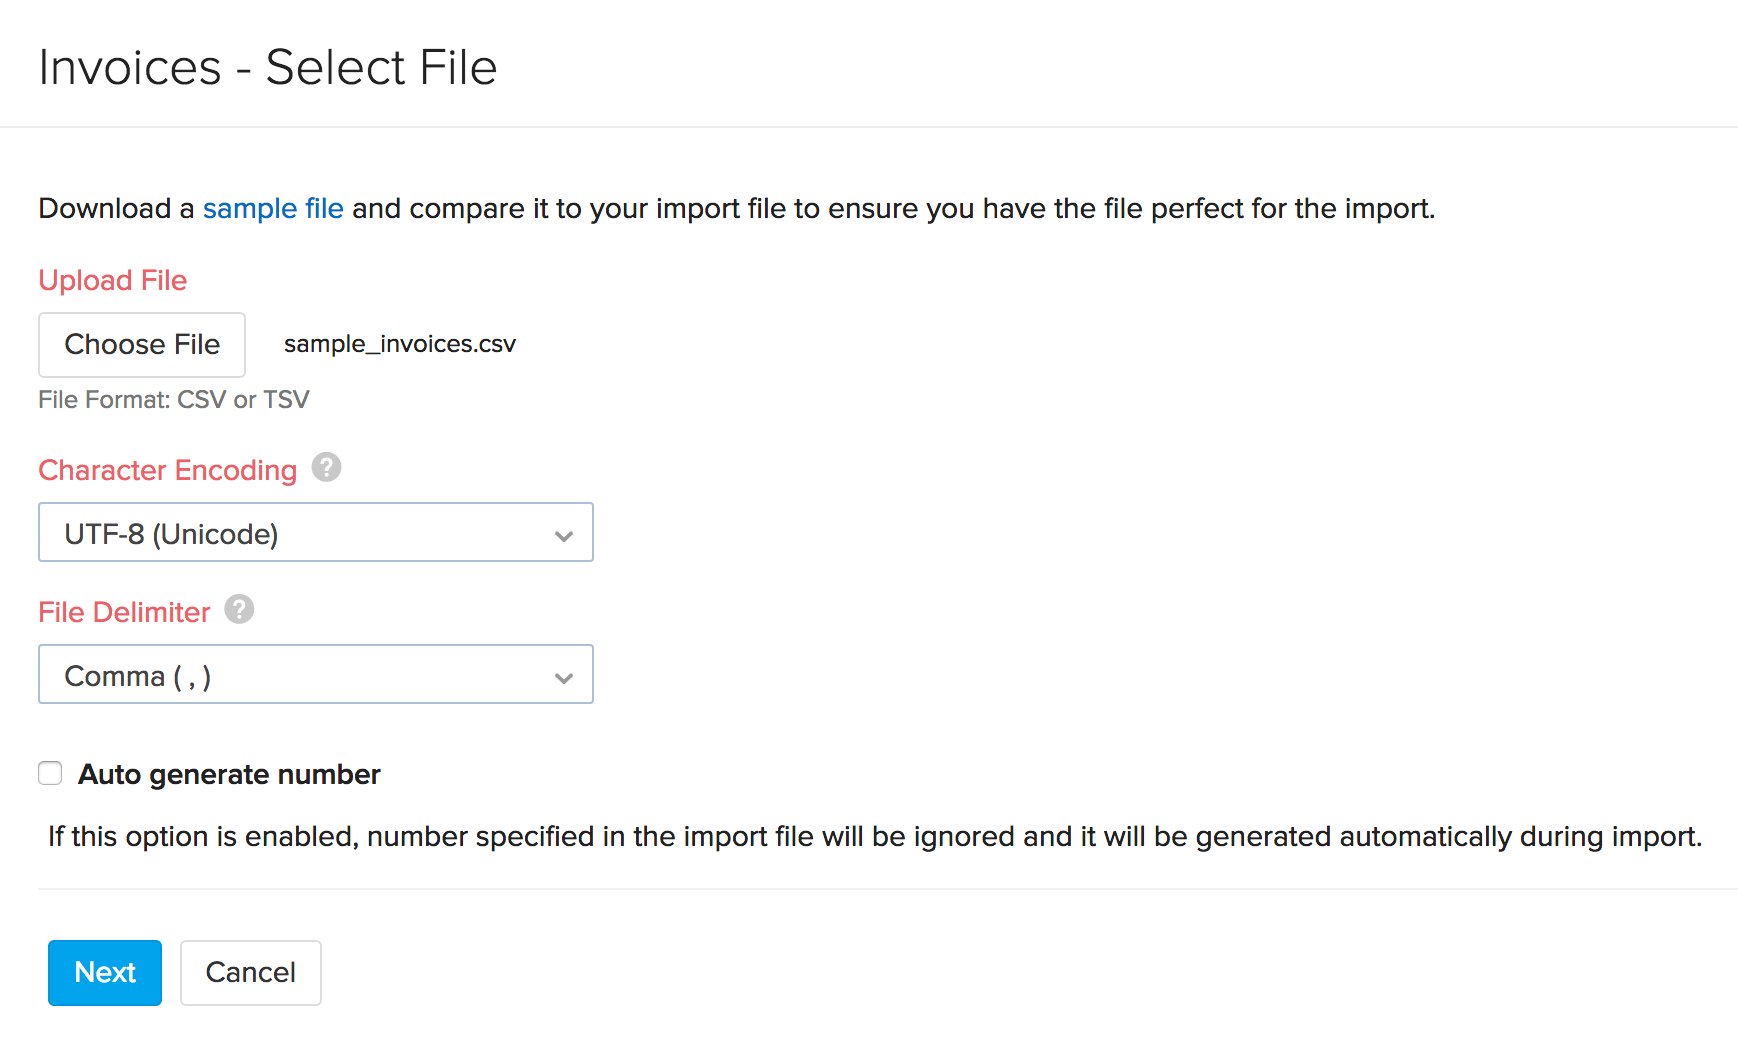
Learn in detail the steps to import a file in Zoho Inventory.
Note: You can enable auto generation of Invoice Number for the file you’re about to upload.
Link Invoices to Sales Orders During Import
You can link your invoices in to its corresponding sales orders in bulk while importing them. To do so,
- Go to the Invoices module.
- Click on the Menu icon - Import Invoices.
- Browse and upload the relevant file.
- Check the option - Link invoices to its corresponding sales orders.

- Click Next.
- Map the Sales Order Number field from Zoho Inventory with the appropriate column in your import file. This step is mandatory to successfully link the underlying items in the invoice to its respective sales order.
- Click Next, preview your changes and click Import if everything is ready.
Note: The sales orders that are in the Draft status will be moved to Confirmed status automatically when they are linked to invoices.
Exporting invoices
To export invoices from your Zoho Inventory account:
- Navigate to Invoices.
- Click on the Menu icon(Top right corner).
- Select Export Invoices option in the drop down.
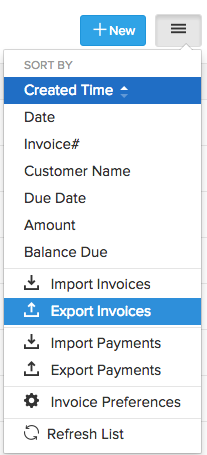
Learn in detail the steps to export data from Zoho Inventory.
Note: The files will be saved to your default downloads folder.
Send Invoices to Customers
To send invoices to your customers by email, select the Email button on top of your invoice page.
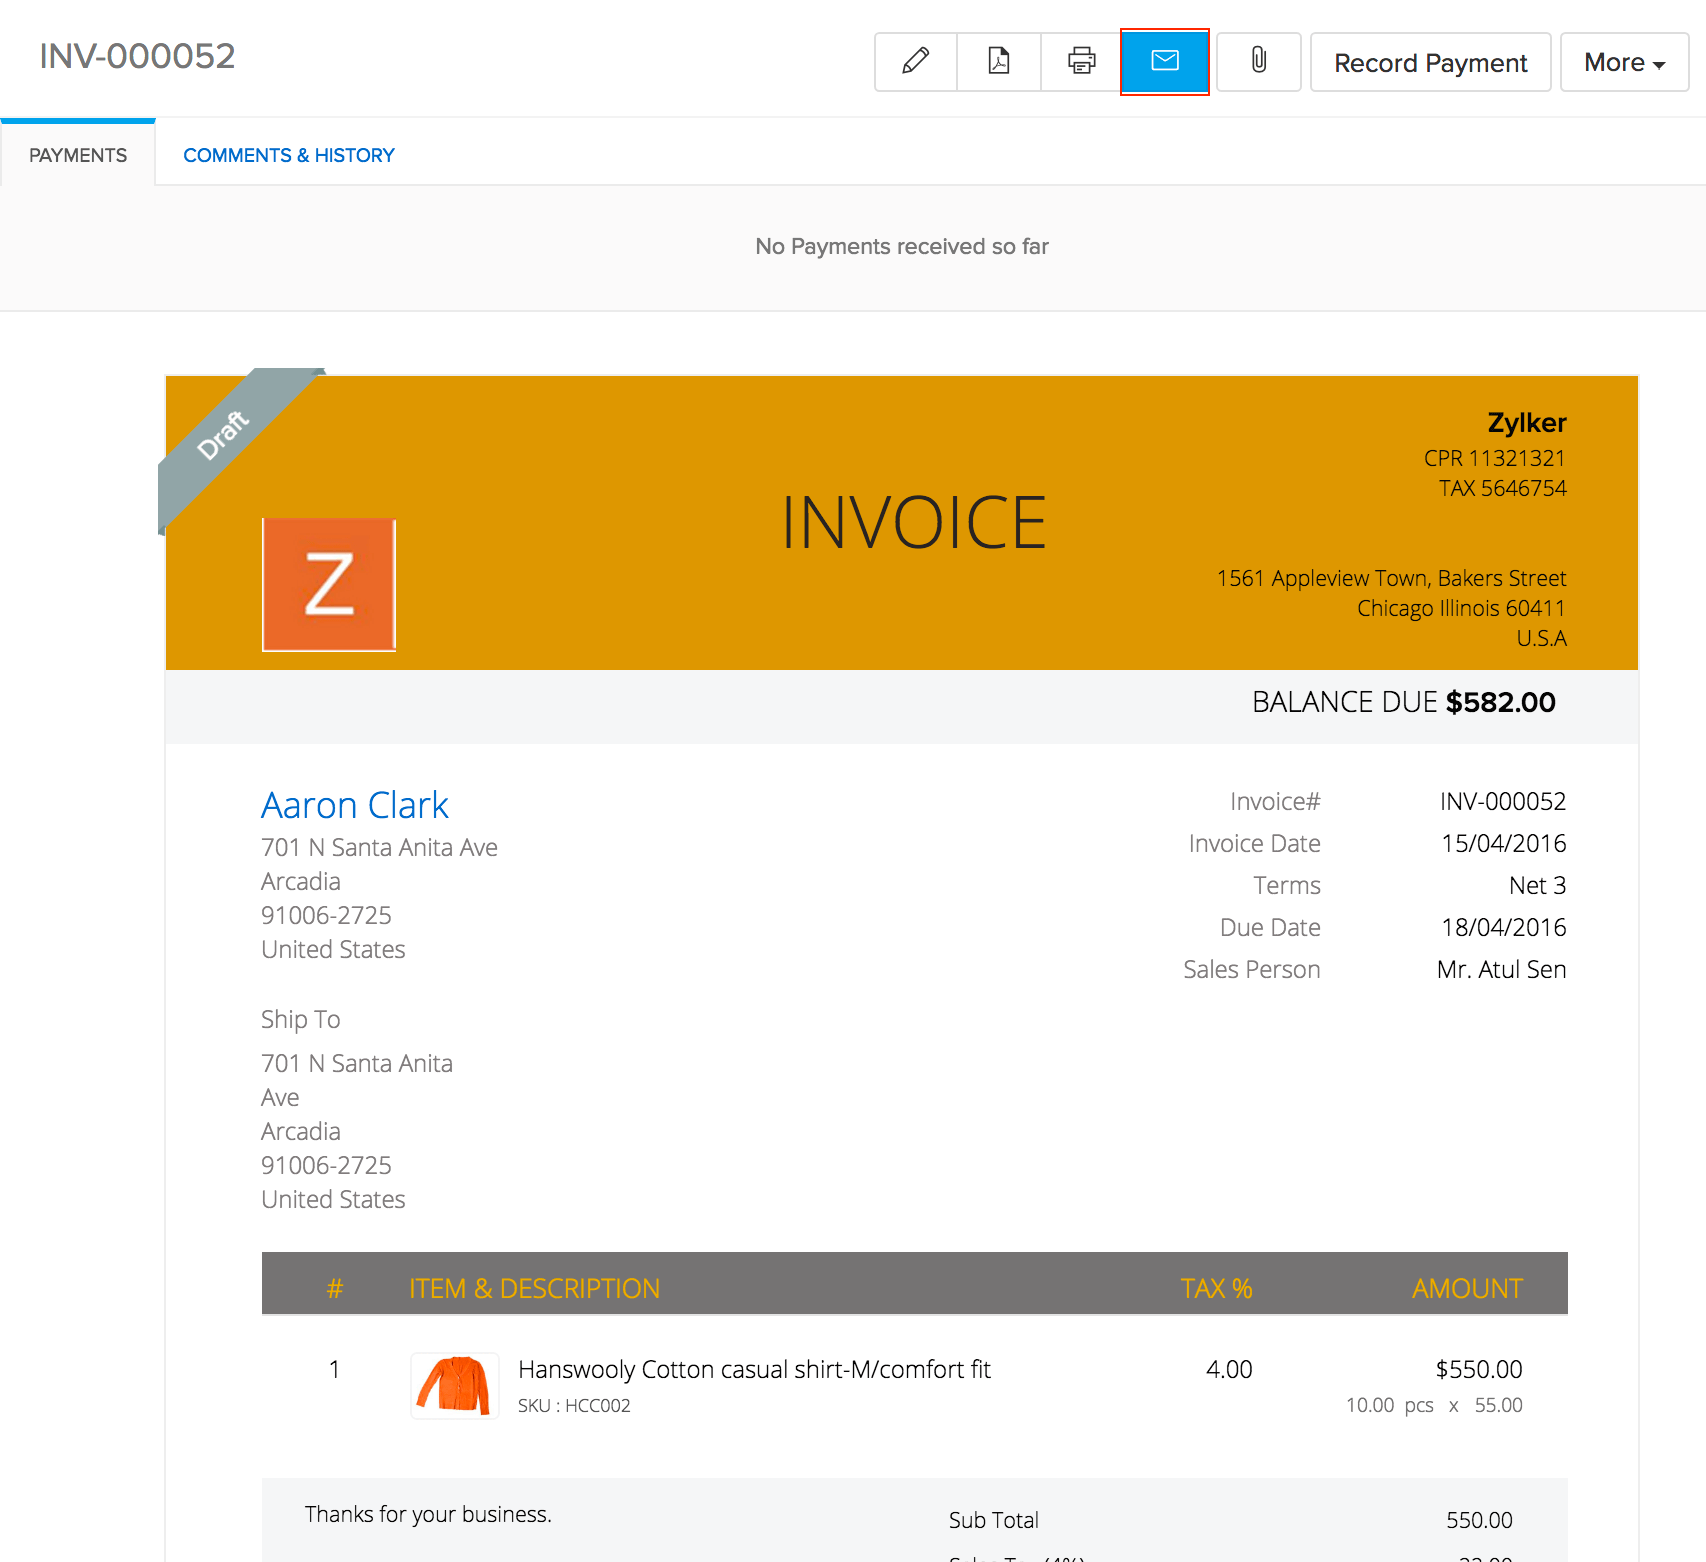
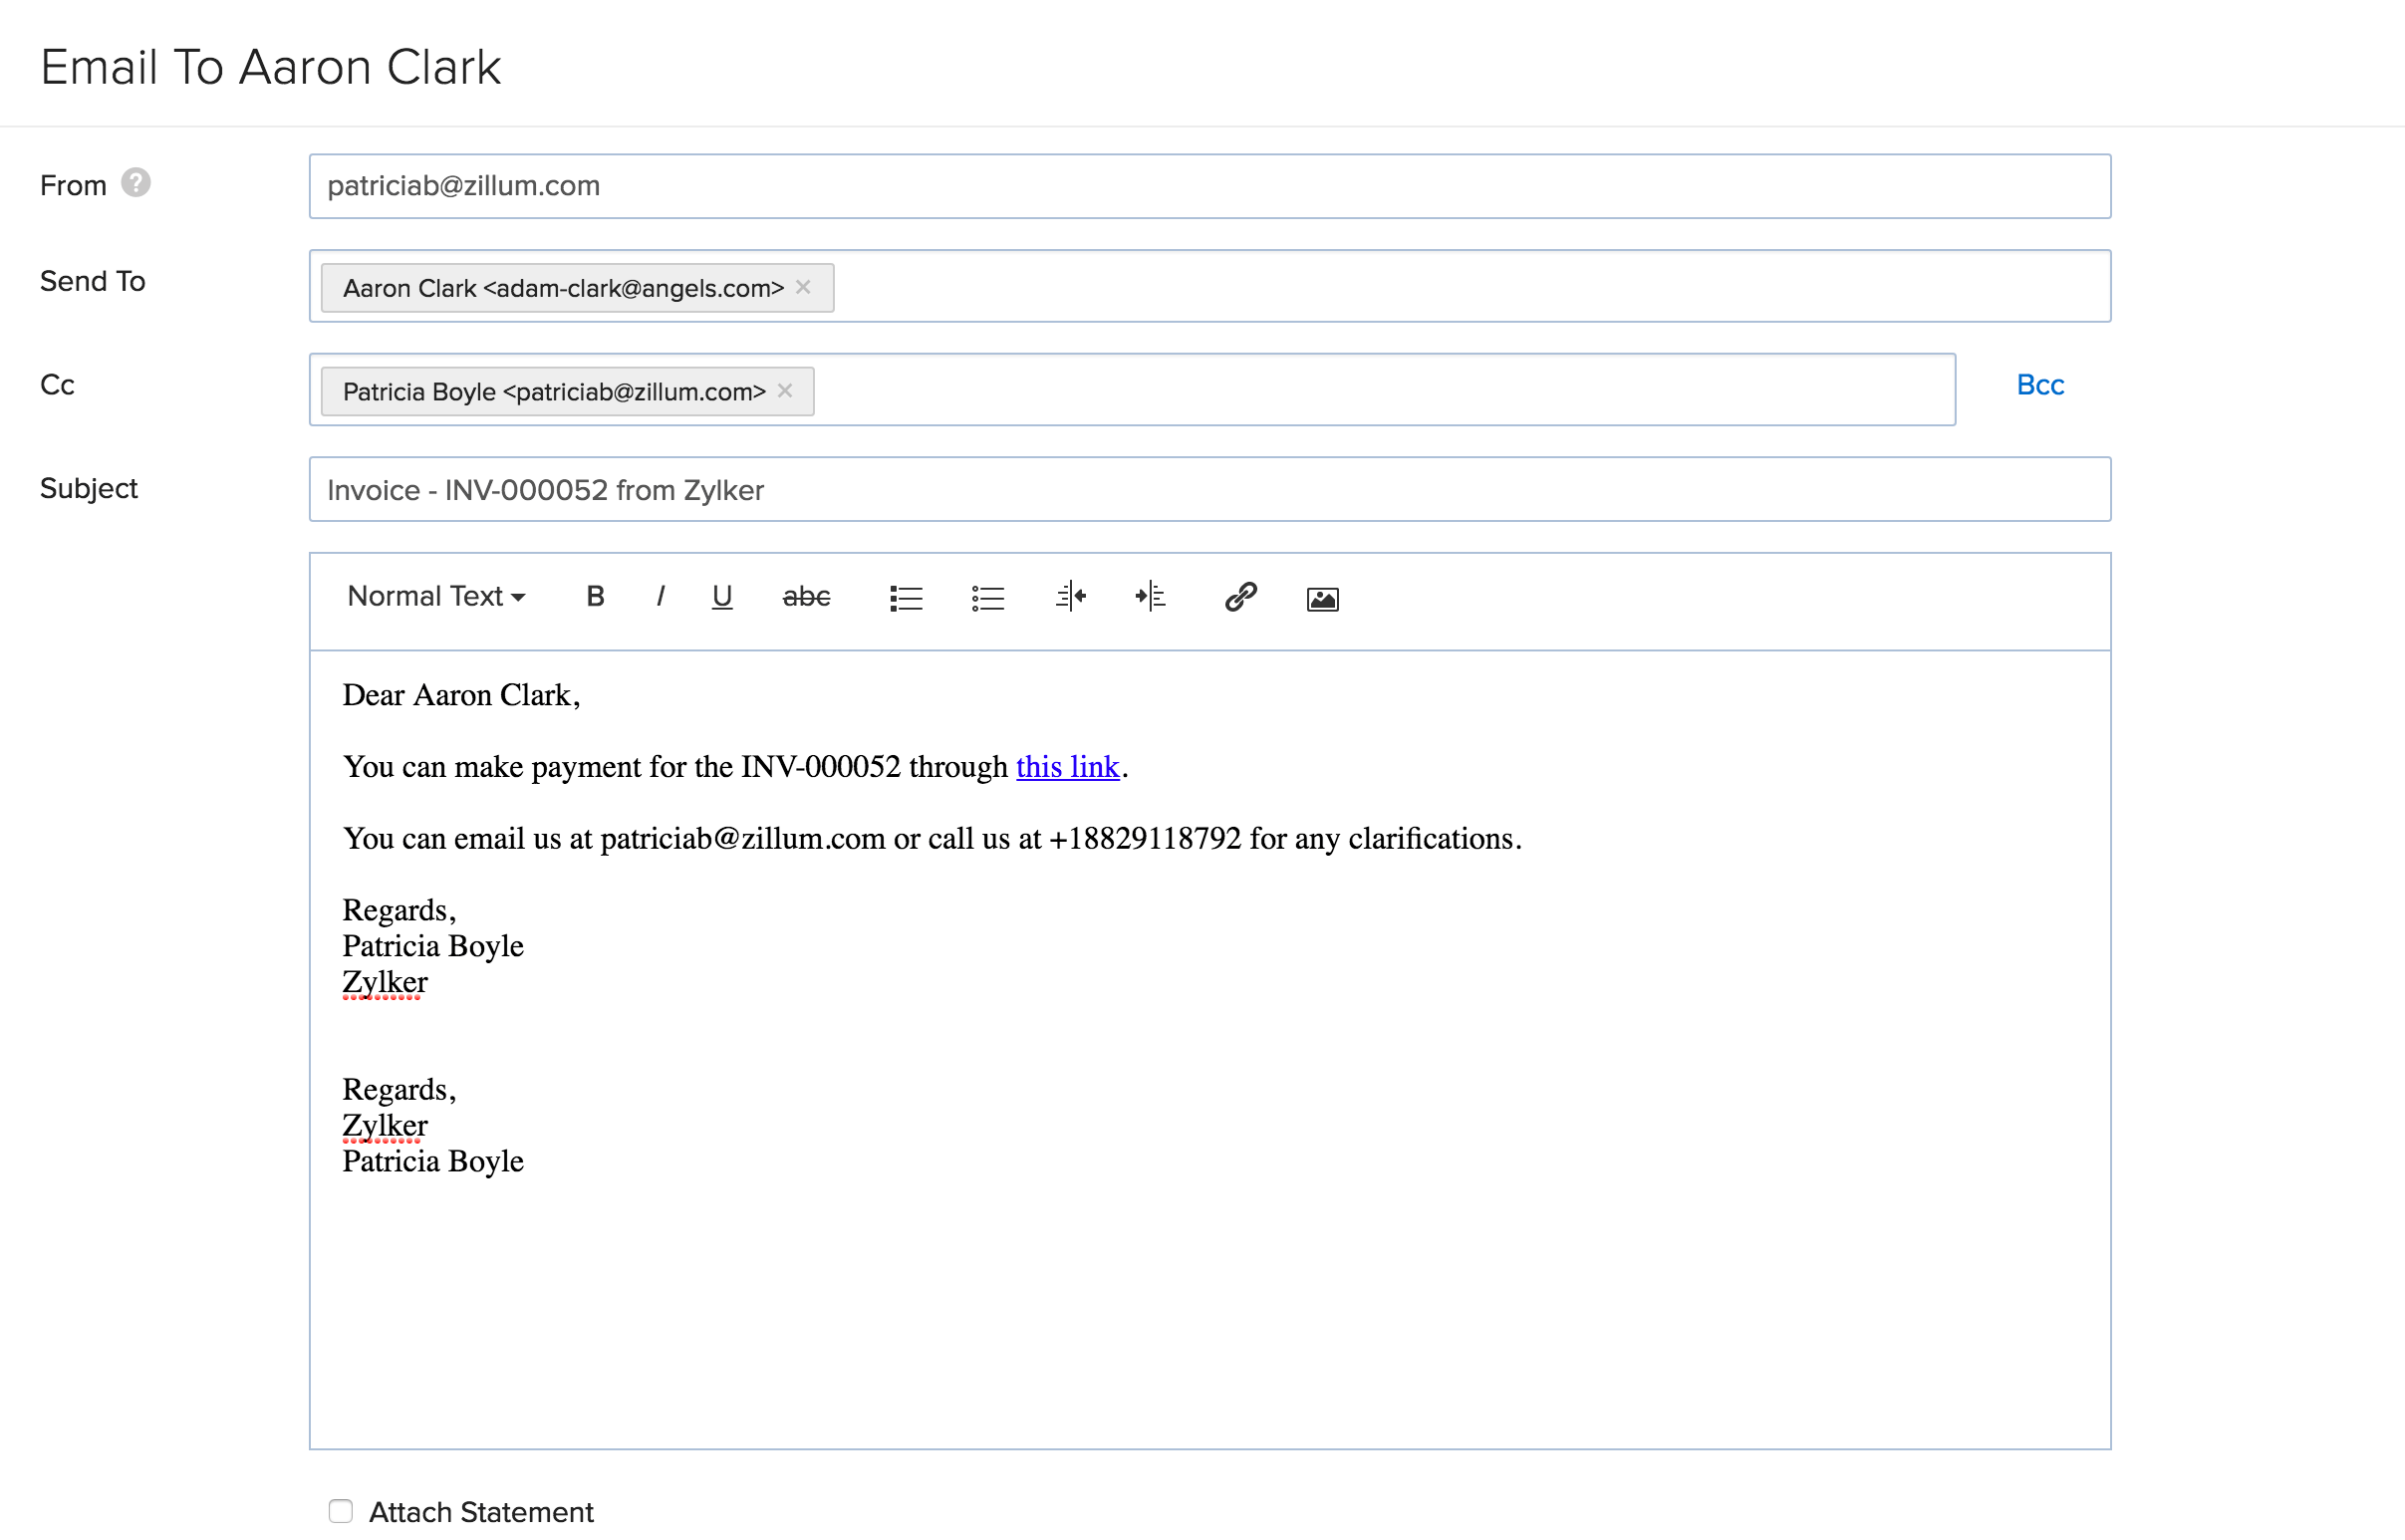
- Email can be sent to the contact persons added under the customer.
- If the contact person is not added, a new contact person can be added by clicking the Add Contact Person option.

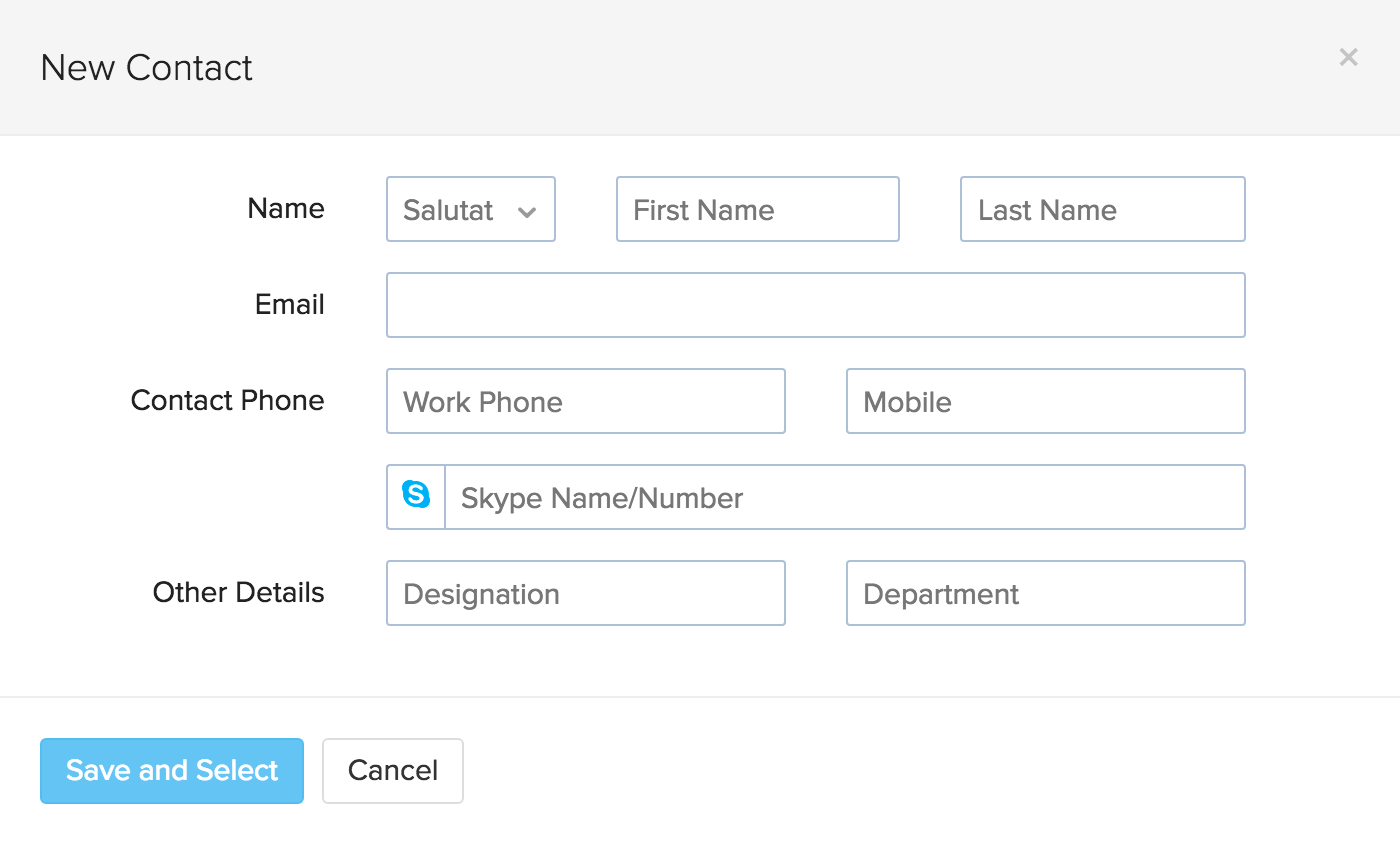
- Email address mentioned under CC will not be added as a contact person.
- You can also choose to attach a Customer Statement and an Invoice PDF with this email.
- Email template can be edited by navigating to Settings > Email Templates.
More Actions with Invoices
All these options can be found in the invoice section of the sales orders.
Prerequisite to perform other actions:
- To use these options, you have to first select and open the invoice you wish to operate.
Important Note:
- For actions like Void and Writing off, the invoice must neither be a draft nor paid(be it partially or fully).
- If a payment has been made against an invoice, it cannot be deleted.
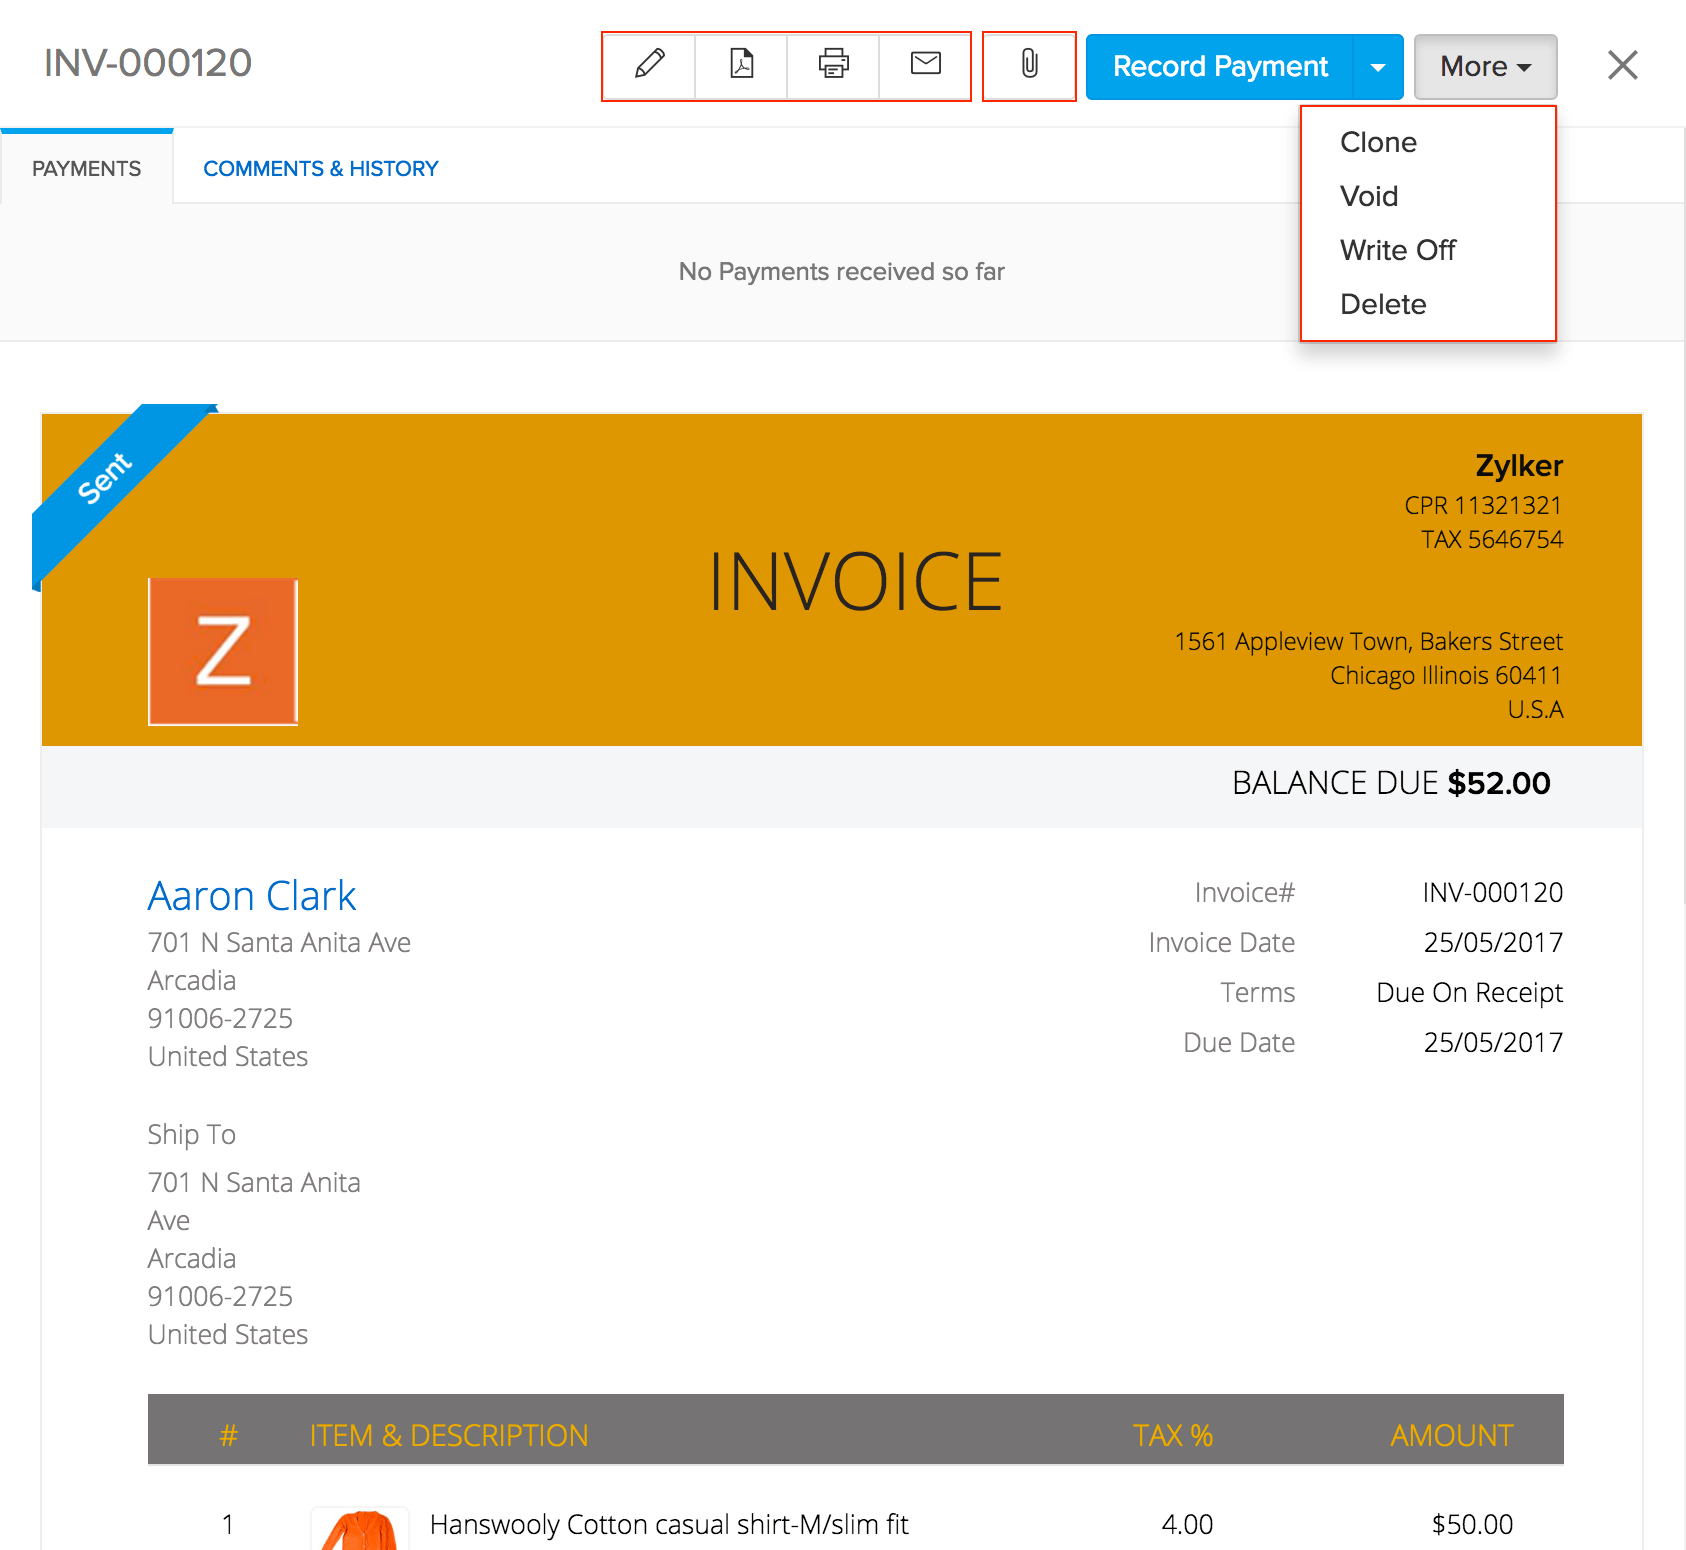
Editing an Invoice:
To edit an invoice:
- Click on the edit icon on top of the invoice page.
- Update the details you require.
- Click Save.
Saving an invoice as a PDF:
- Click on the PDF button to save a PDF copy of the invoice.
Printing an invoice:
- Use the Print button to take a print out of your invoice.
Voiding an invoice:
You can use this to nullify the invoice and the status changes to Void.
Note:You cannot void paid invoices. To do this:
- Click on the More button.
- Select the Void option.
- Fill out the reason for voiding the invoice and proceed to void the invoice.
Writing Off an invoice:
You can use this option when the money for a sale made cannot be recovered from a customer. To do this:
- Click on the More button.
- Select the Write off option in the drop down.
- A confirmation pop up will appear.
- Click on the Write Off button to proceed.
Attaching a file to an invoice:
To attach a file for reference to your invoice:
- Click on the More button.
- Select the Attach a File option in the drop down.
- Supported File Formats: .gif, .png, .jpeg, .jpg, .bmp, .pdf, .xls, .xlsx, .doc, .docx
- Max File size: 5mb
Deleting an invoice:
To delete an invoice:
- Click on the More button.
- Choose the Delete option.
- A pop up will appear to reconfirm your choice.
- Choose Delete to permanently delete it.
Multiwarehouse operations related to Invoices{mw-invoice}
If you’ve enabled multiple warehouse management for your organization, you’ll have additional capabilities when creating invoices. To know more, click here.
Recording Invoice Payments
You can record payments or charge your customer made manually.
Recording payments manually
To do so:
- Navigate to the preferred Invoice either directly from the Invoices tab on the left hand sidebar or from the Invoices section of the sales order associated.
- Open the invoice.
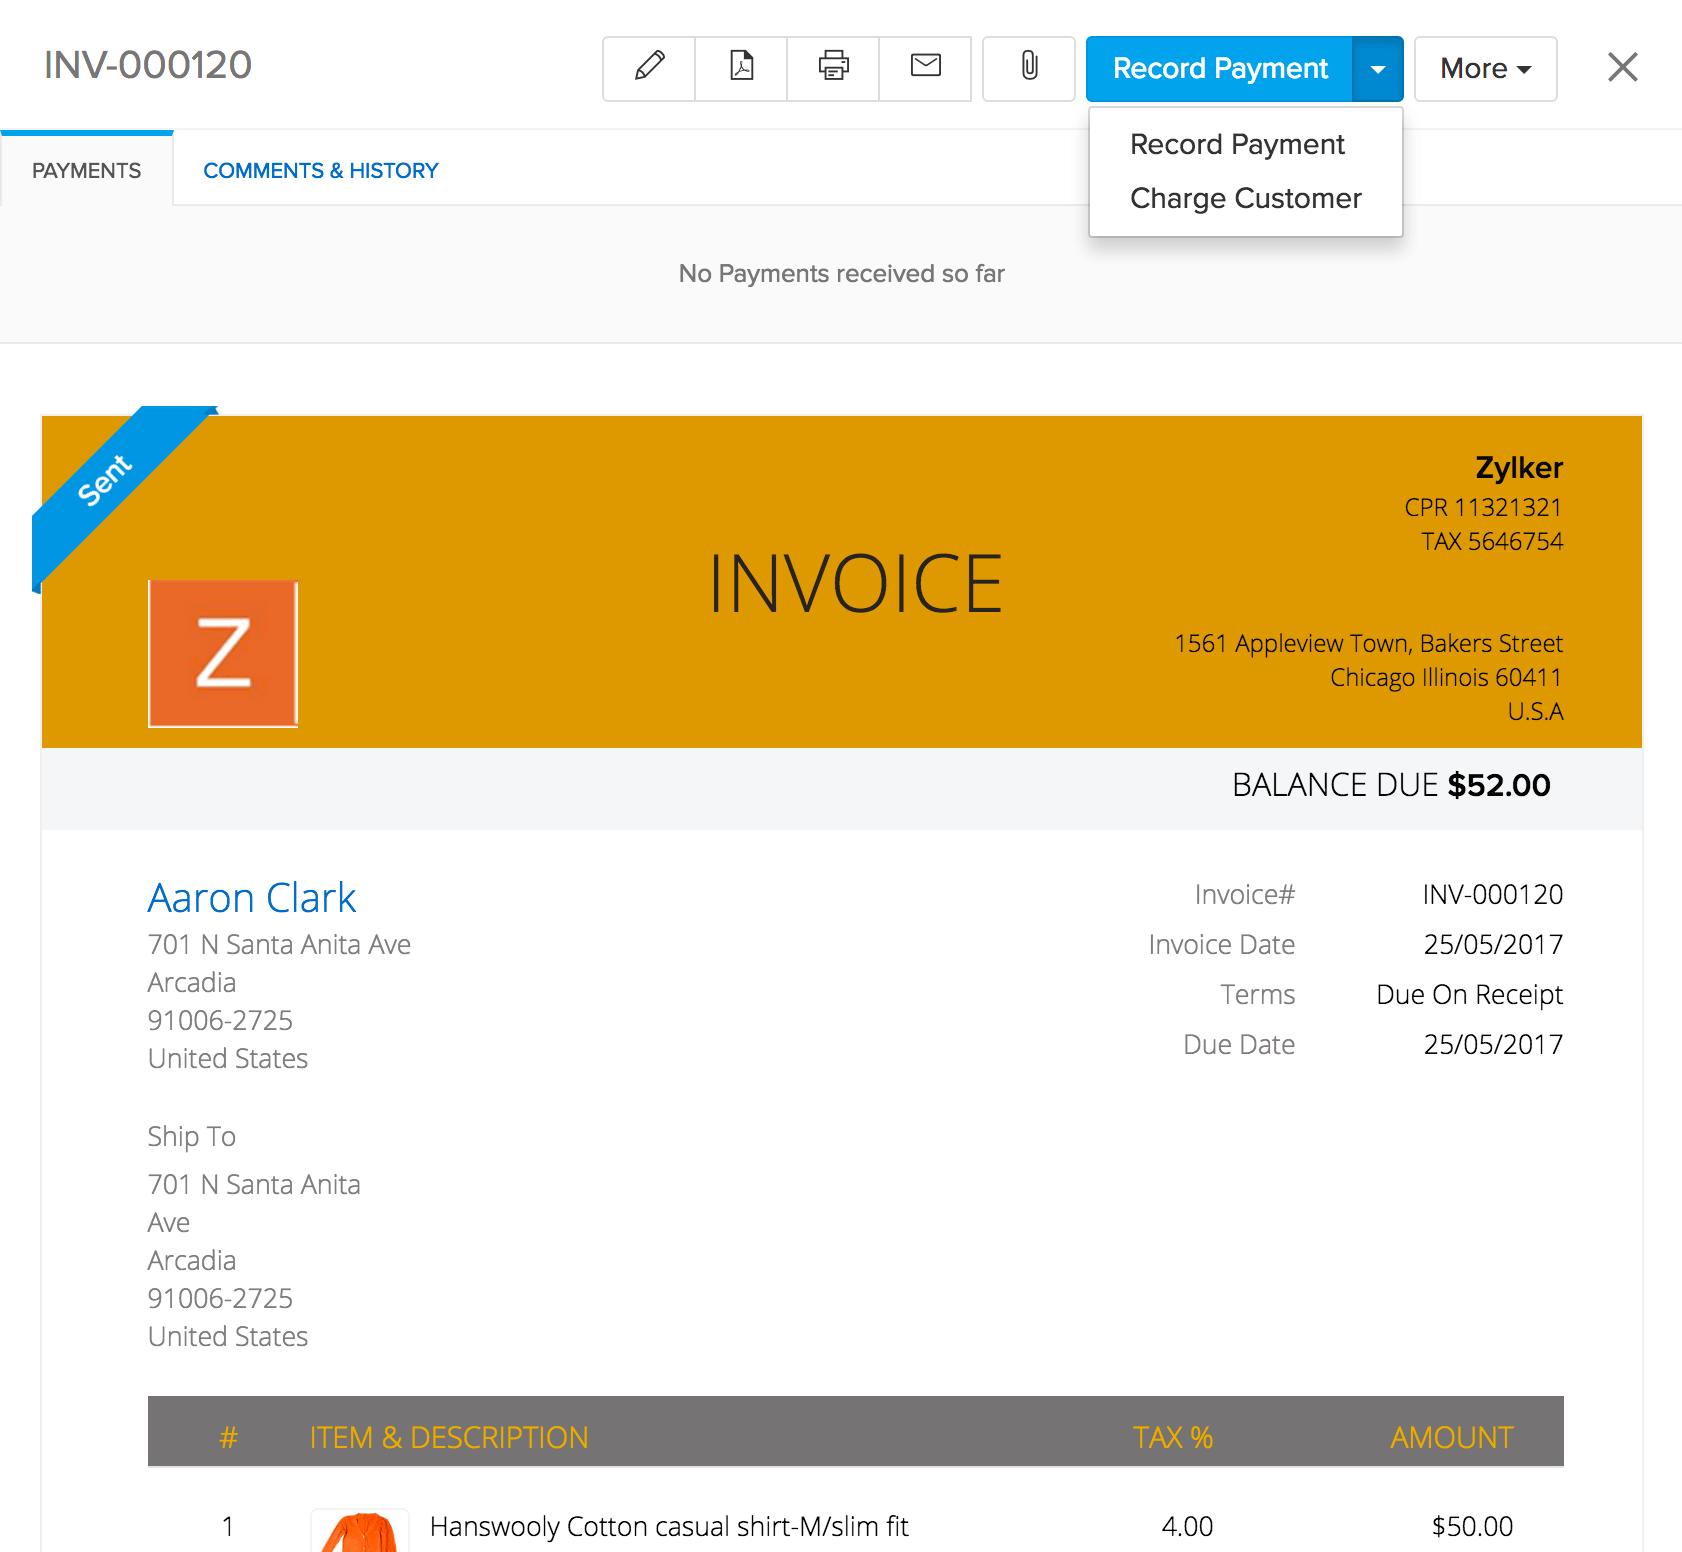
- Click on the Record Payment button
- Select the record payment option in the drop down.
- On doing so, a pop up for recording the payment opens up. Fill up all the details and click Save, to record it.
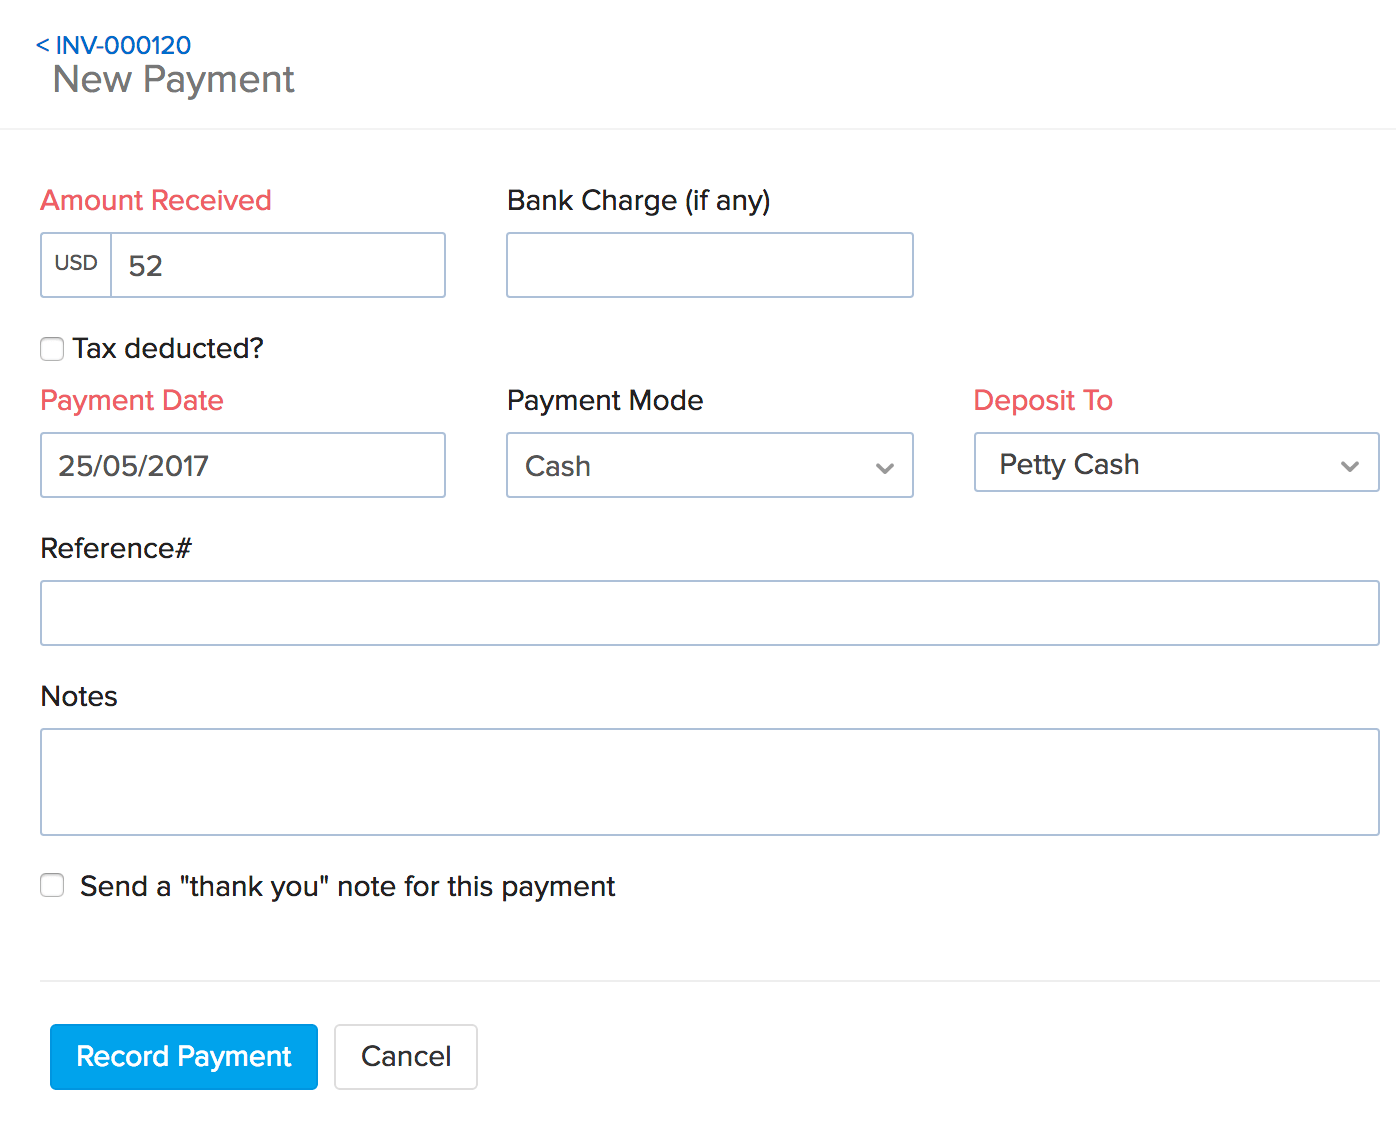
You can also choose to send an automated thank you note to the customer by checking on the box near the Send a “thank you” note for this payment field.
Charging a customer
To do so:
- Navigate to the preferred Invoice either directly from the Invoices tab on the left hand sidebar or from the Invoices section of the sales order associated.
- Open the invoice.
- Click on the Record Payment button
- Click on the charge customer option in the record payment drop down.
- A pop up to charge your customer appears. You can charge the customer through the payment gateway that you are integrated with.
- Click on Proceed to the interface to charge your customer.
- Review the items in order.
- Fill up the Billing Information.
- Choose the Payment Method and proceed.
- Incase you chose the option to save credit card information, this gets securely saved to the payment gateway you are integrated with. This data can be used for future transactions with your customer and the saved cards will be displayed on the contact page of that customer.
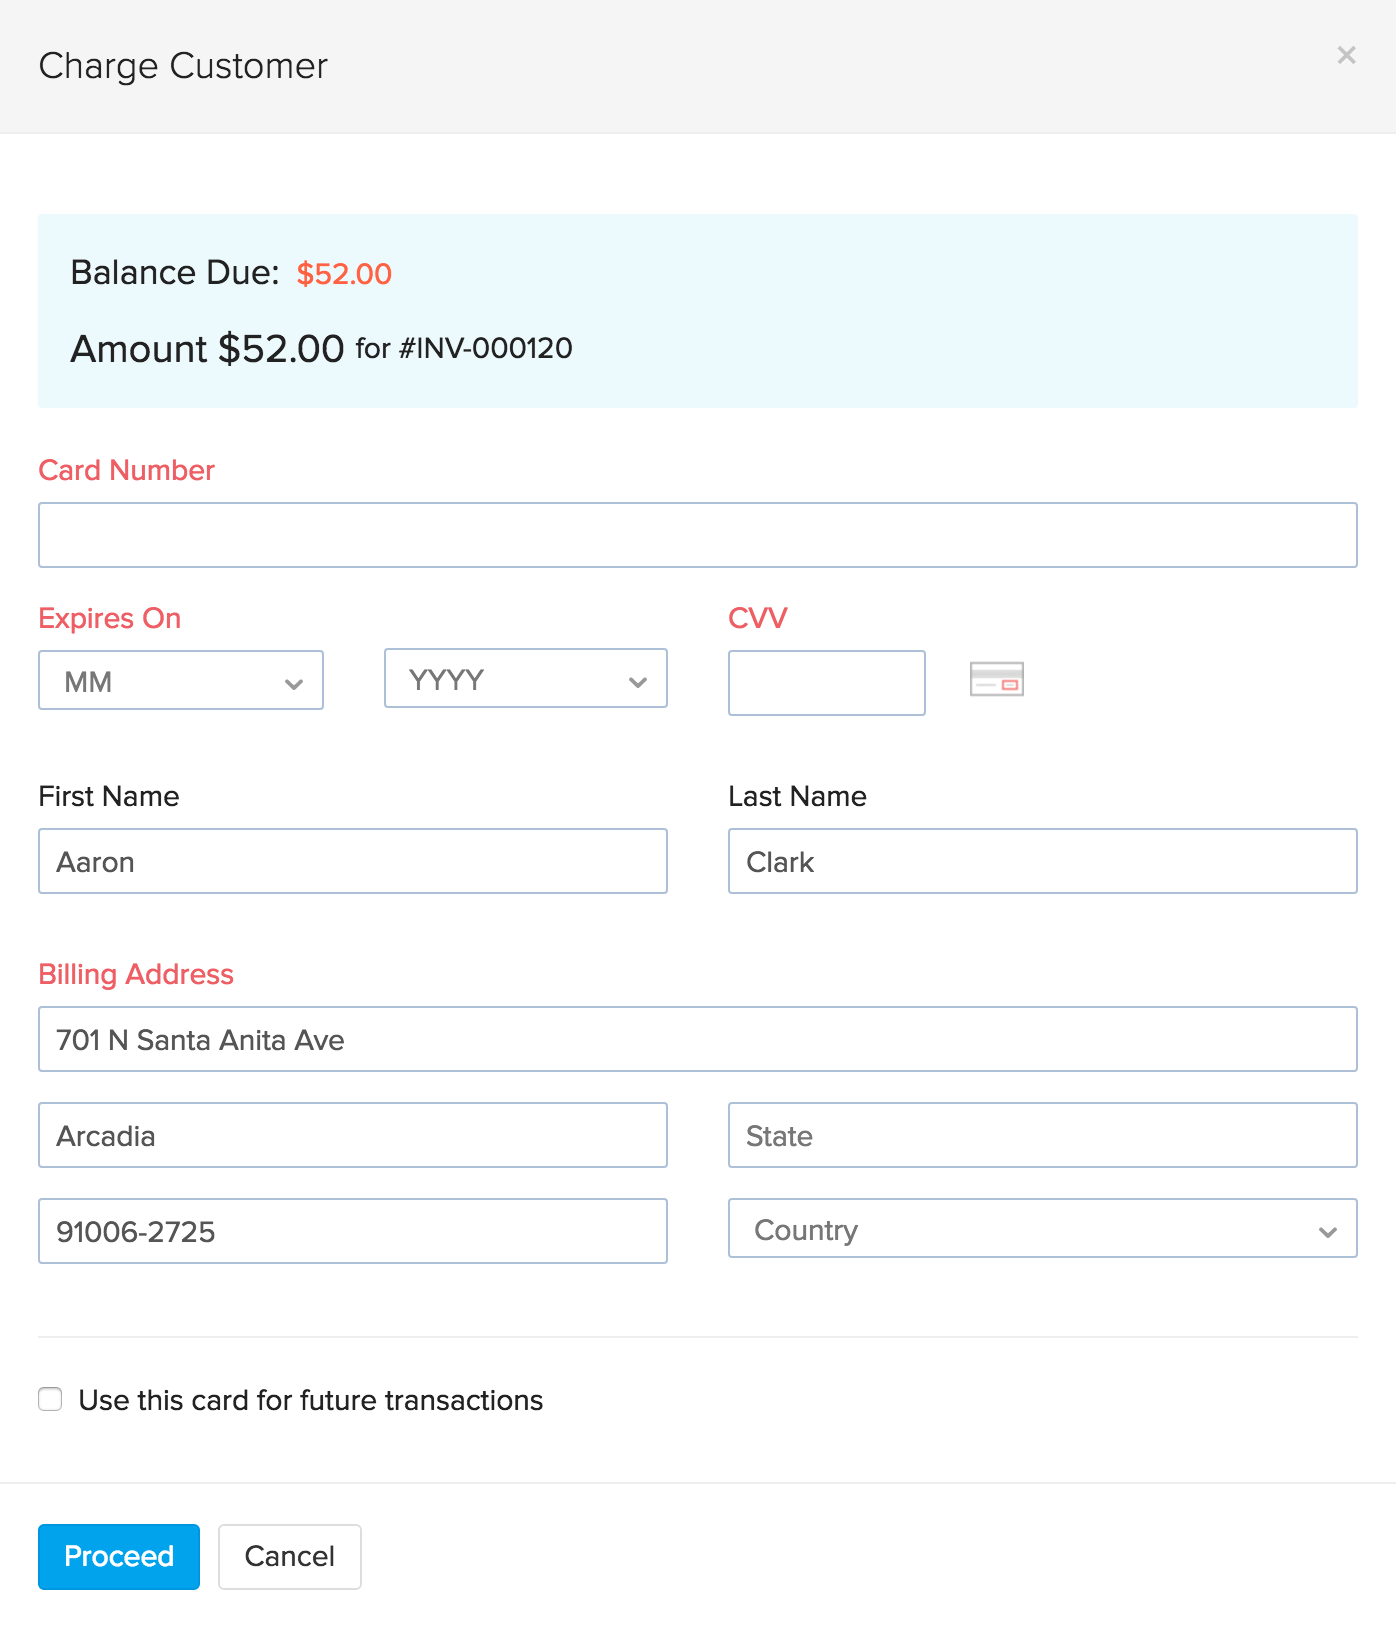
Important Note: The Charge customer option is available to you, only if you have integrated with the payment gateway that’s available in your customer’s country.
Payments Received
The payments you receive for your transactions in Zoho Inventory can be viewed below your invoice information when you select a particular invoice.

You can also view the payments received for a particular invoice by going to the Invoices tab. Open a Paid invoice and scroll down to view the payment details. These can also be edited or deleted from here. Clicking on the payment number # directly opens the receipt in the Payments Received tab.
Details on a payment receipt
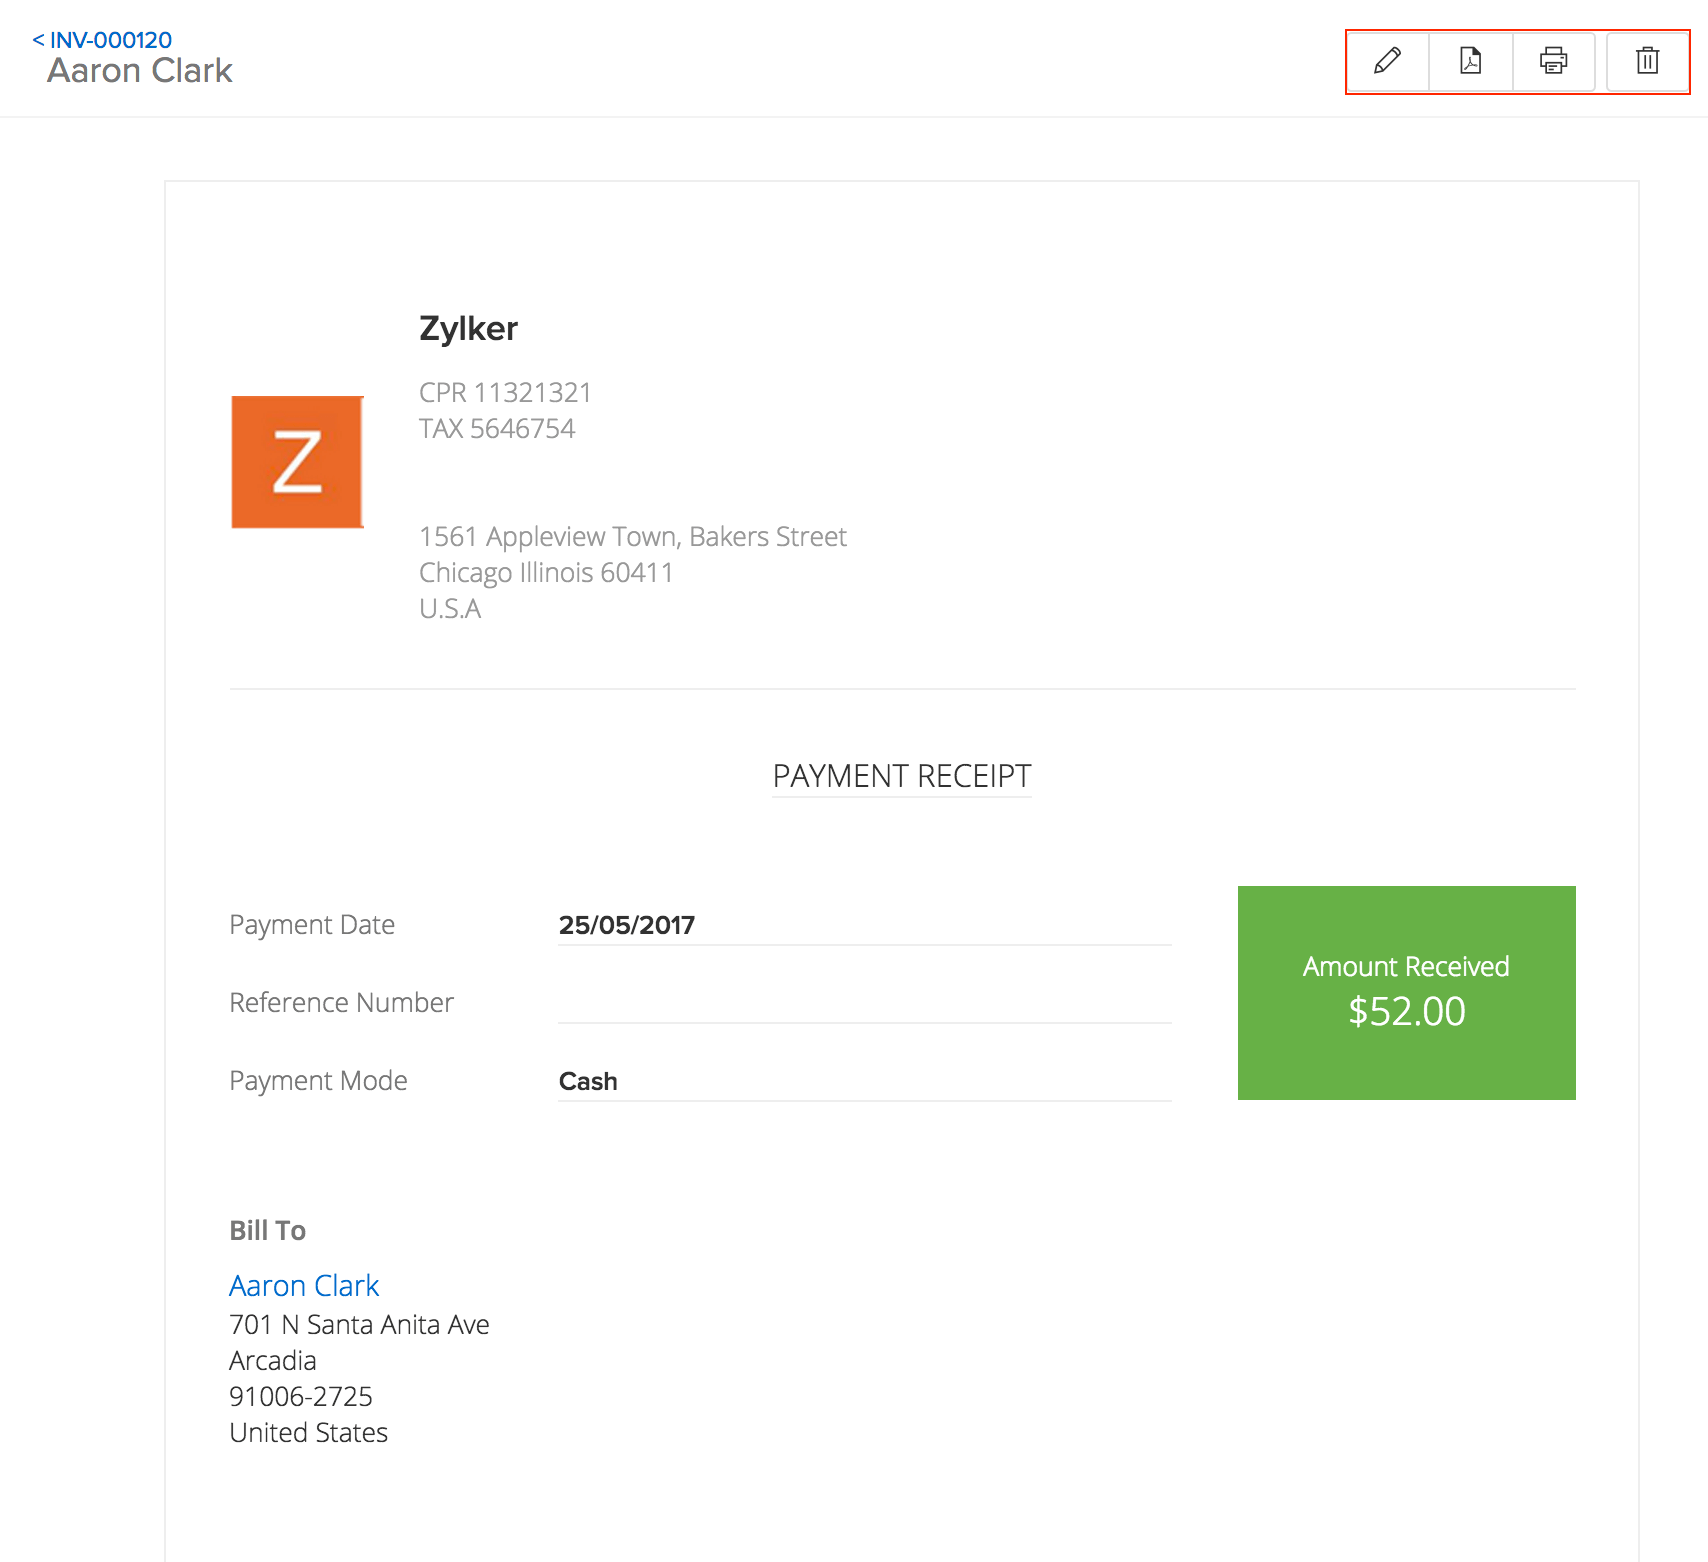
Whenever you receive an online payment or when you manually record a payment in Zoho Inventory, the corresponding receipt will be displayed as the Payments Received under the Invoice. You can also view them seperately inside your integrated Zoho Books organization.
The following details will be included,
- Date - The date on which the payment was recorded.
- Payment # - Unique payment ID number.
- Customer Name - The customer who has made the payment.
- Invoice # - The reference ID of the invoice on which the payment was recorded.
- Mode - The means through which the payment was received (Cash, check, online gateways etc).
- Amount - The amount paid.
Managing your payment receipts
- Edit - You can edit a payment yet to be matched in Zoho Inventory by navigating to a partially paid or paid invoice, opening the associated payment receipt and clicking on the Edit icon.
- Delete - A payment yet to be matched in Zoho Inventory can be deleted by navigating to a partially paid or paid invoice, opening the associated payment receipt and clicking on the Delete button.
- Print - You can print a copy of the payment receipt by navigating to a partially paid or paid invoice, opening the associated payment receipt and clicking on the Print icon in the top left corner.
- PDF - Download a payment receipt in portable form by simply y navigating to a partially paid or paid invoice, opening the associated payment receipt and selecting the PDF icon in the top left corner.
Importing and exporting invoice payments
Importing invoice payments
To import invoice payment receipts into your Zoho Inventory account:
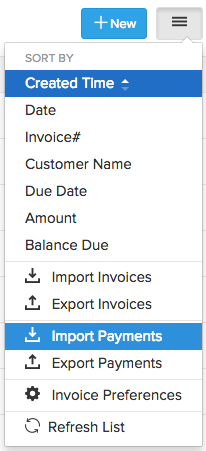
- Navigate to Invoices.
- Click on the Menu icon(Top right corner).
- Select Import Payments option in the drop down.
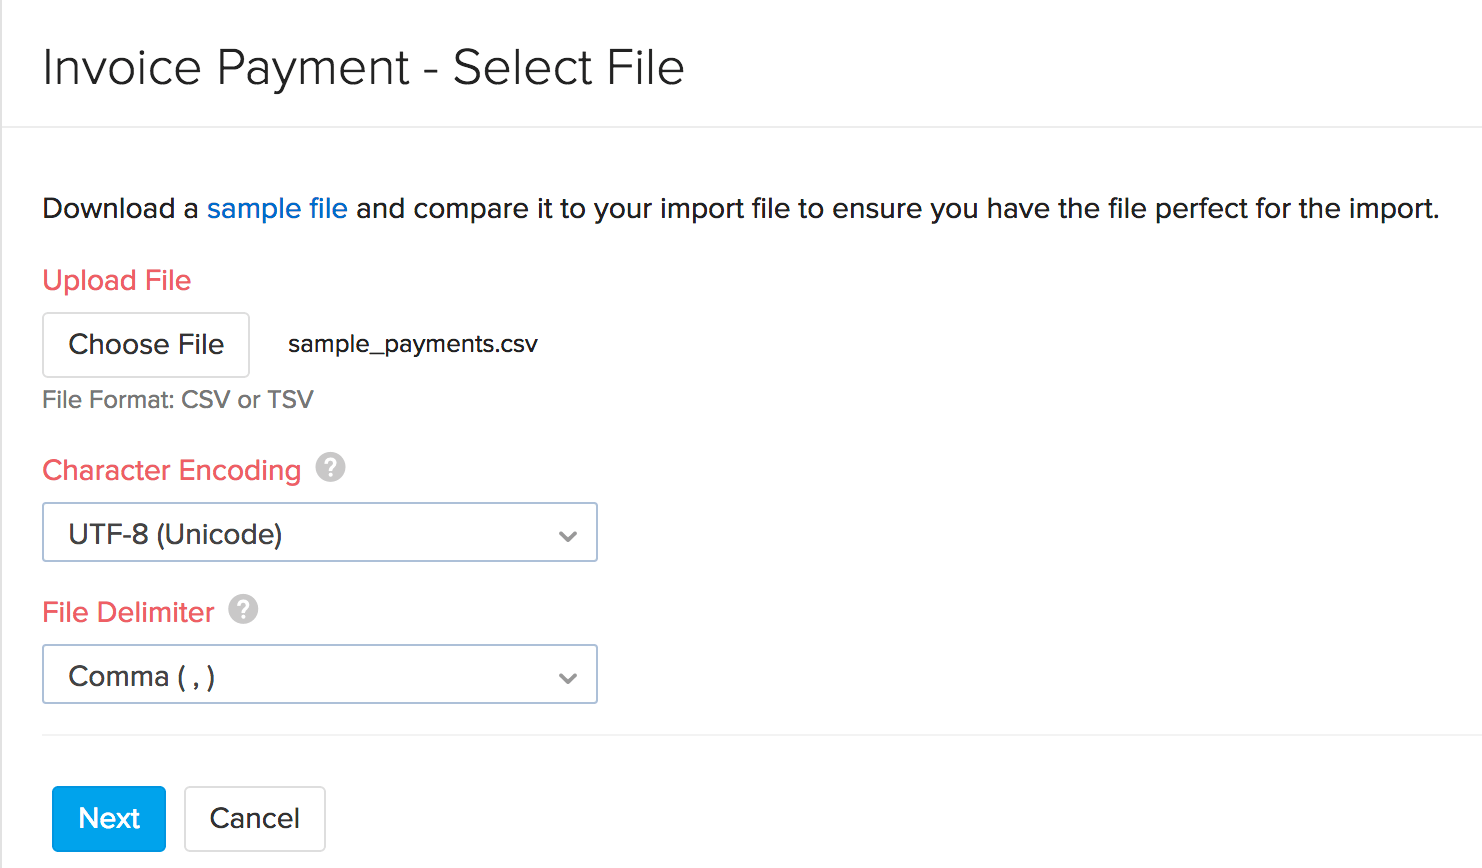
Learn in detail the steps to import a file in Zoho Inventory.
Exporting invoice payments
To export invoice payment receipts from your Zoho Inventory account:
- Navigate to Invoices.
- Click on the Menu icon on the top right corner.
- Select Export Payments option from the drop-down.
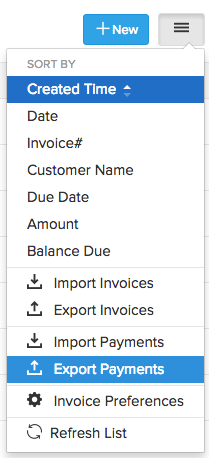
Learn in detail the steps to export data from Zoho Inventory.
Note: The file will be saved to your default downloads folder.


