Data Alerts
To keep ahead in business you need to know every vital change in your key business metrics. Whether a goal is met, or an unexpected event happened, Data Alert brings this to your immediate attention. This helps you quickly take the right action to address the changes in the key business metrics.
Data Alert - Basic
- What are Data Alerts?
- Who can use Data Alerts?
- On what views can I create a Data Alert over?
- How does the Data Alert work?
Create a Data Alert
- How do I create a Data Alert - Simple Flow?
- How do I create a Data Alert over Charts - Detailed flow?
- How do I create a Data Alert over Pivot Views - Detailed flow?
- How do I create a Data Alert over Summary Views?
- How do I create data alerts over Threshold?
- How do I create data alerts over Anomaly?
- Can I create multiple alerts over a report?
Set up a Workflow on Alert
- How do I set up a workflow on alert using Zoho flow?
- How to add a new action to the workflow setup (Zoho Flow) in Zoho Analytics?
- How can I manage the workflow setup for Zoho Flow in Zoho Analytics?
Data Alert Notification
- What are the different channels to send alert triggered notification?
- Who can be notified when the alert conditions are met?
- How do I create a Data Alert with Email Notification in Zoho Analytics?
- How do I configure the Email Notification settings for a Data Alert?
- How do I attach the filtered data that triggered the alert to the email?
- How do I set up an In-App notification for Data Alert?
- How do I set up a notification in the Slack channel for Data Alert?
- How do I set up a notification in the Microsoft Teams for Data Alert?
- How do I set up a webhook request for Data Alert?
- How do I set up a workflow in Zoho flow for Data Alert?
- How do I set up a workflow in Zapier for Data Alert?
Manage Data Alert
- How do I manage all the alerts in my Workspace?
- How can I edit the Data Alert?
- On what frequency the data alert will be verified?
- Can I see when the alerts that were triggered?
- Can I run the data alert instantly?
- Can I delete the Data Alert?
Data Alert - Basic
1. What are Data Alerts?
For informed business decisions, you need to know changes in your business data. When manually monitoring huge data which continues to grow everyday, you may miss vital information that needs your attention. Data alert helps you in this. This alerts you on important business changes, which you have set up as conditions, through E-mail or in-app notification. This enables you to take appropriate timely action to seize opportunities.
2. Who can use Data Alerts?
Users with a paid account (Standard Plan and above) can avail this feature. For more details refer to our Pricing Page.
The Account Administrator, Organization Administrators and Workspace Administrators of a workspace can create Data Alerts.
3. On what views can I create a Data Alert over?
You can create Data Alerts over the following views.
4. How does the Data Alert work?
The following lists basic Data Alert work flow.
- Select the report you want to track the key metrics of.
- Add alert by specifying the conditions to be verified.
- Specify how often the conditions need to be verified.
- Specify how need to be notified and the notification channel (E-mail or In-App notification).
- Zoho Analytics will alert you as and when the set conditions are met.
Create a Data Alert
1. How do I create a Data Alert - Simple Flow?
2. How do I create a Data Alert over Charts - Detailed flow?
3. How do I create a Data Alert over Pivot Views - Detailed flow?
4. How do I create a Data Alert over Summary Views?
Creating Data Alert over a summary view will be similar to that of a chart. The applied conditions will be matched over the data cell of the Summary View.

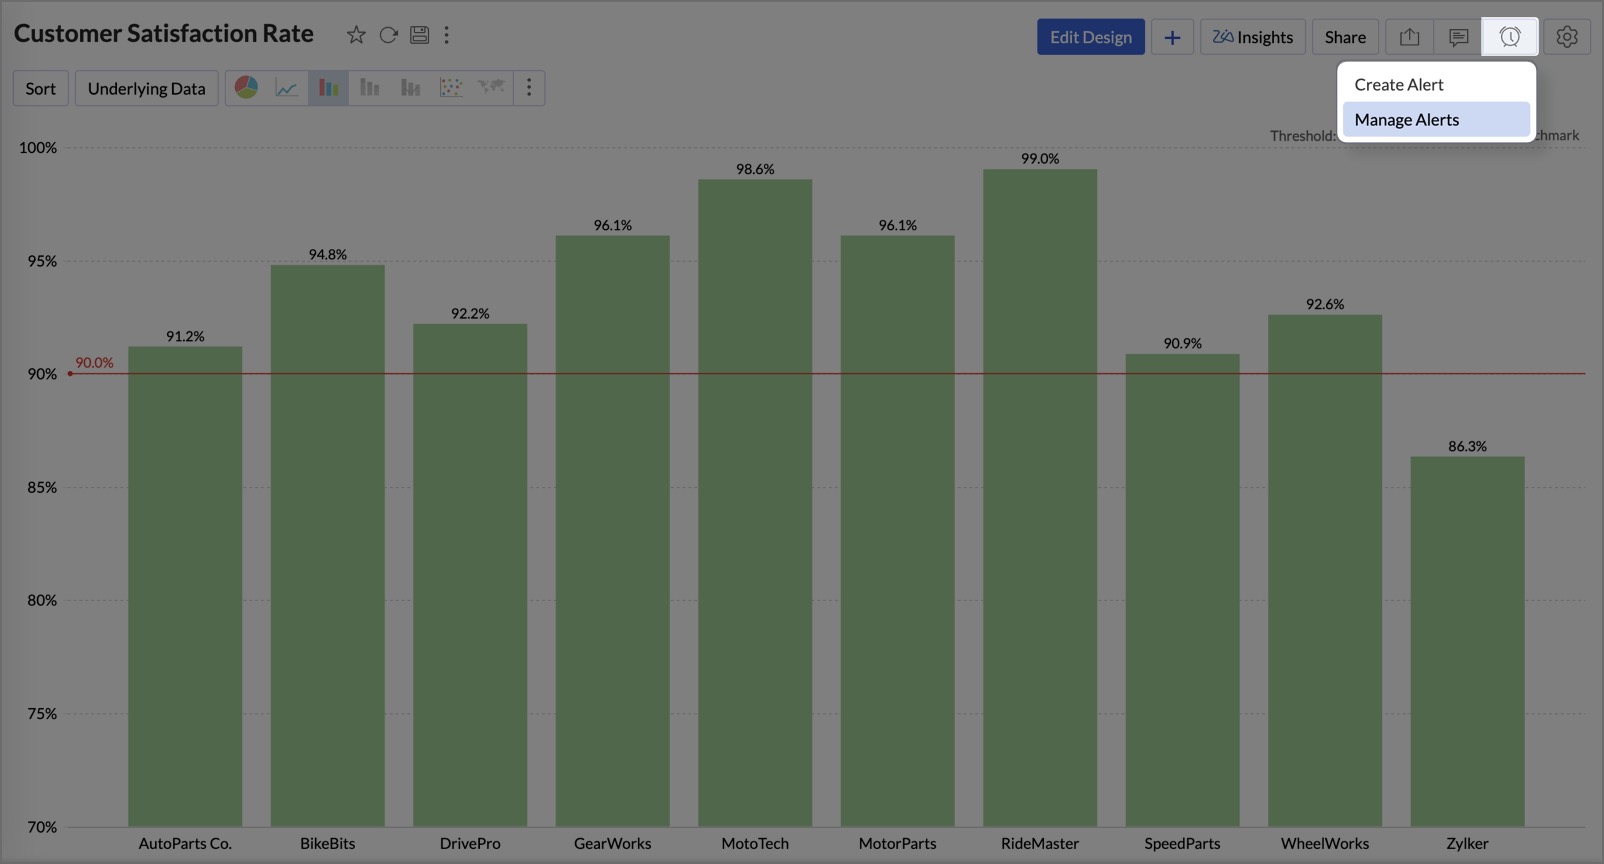
5. How do I create data alerts over Threshold?
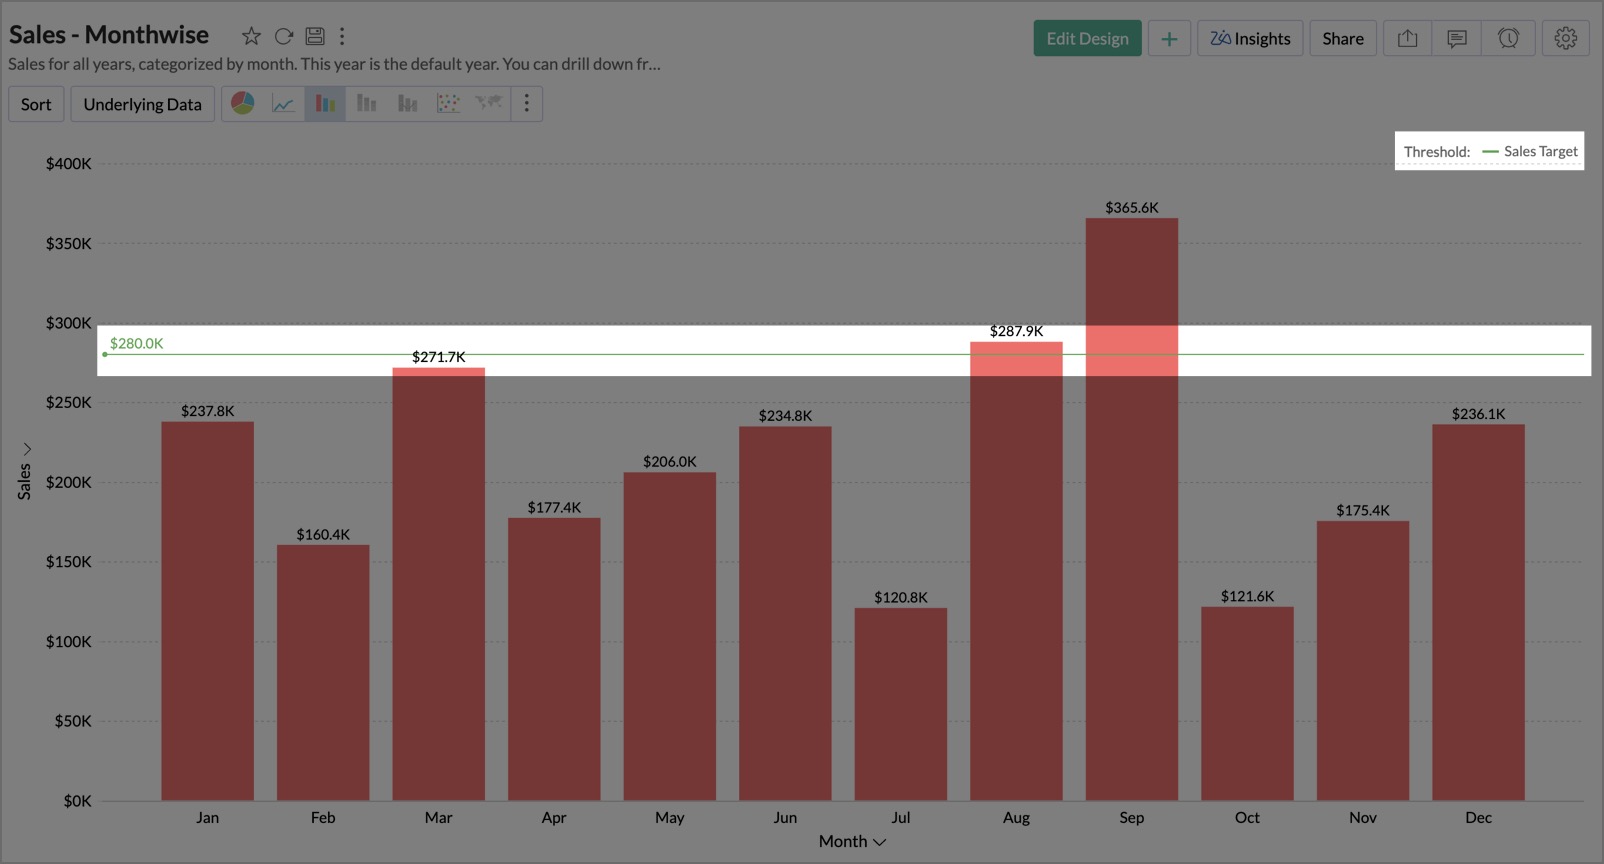
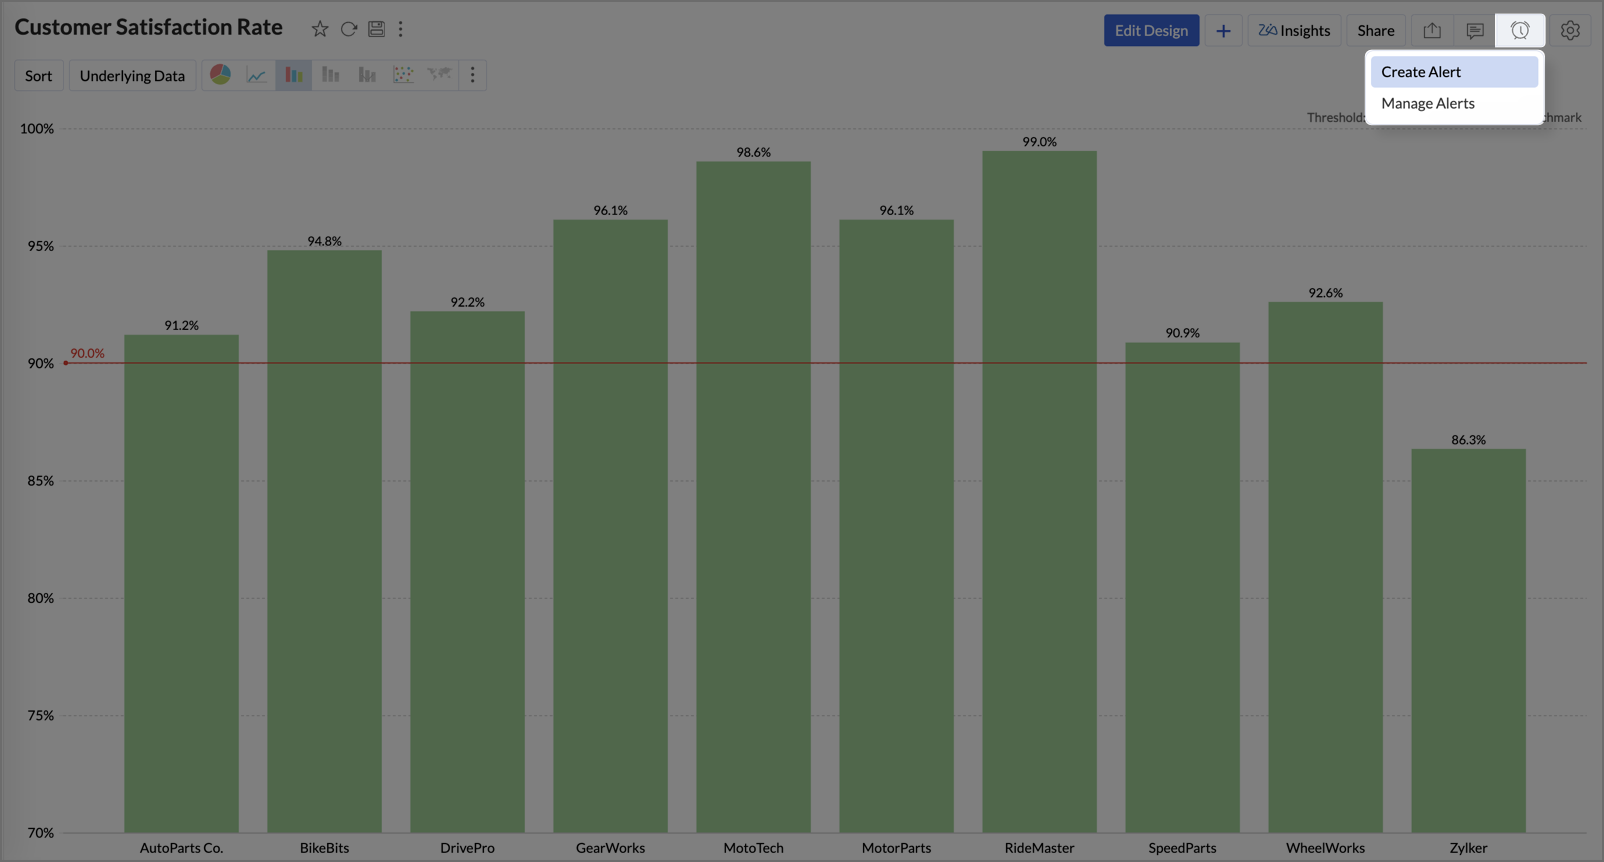
Zoho Analytics enables you to create alerts based on thresholds set for a specific view.
A threshold is a predefined value that serves as a benchmark or limit for data points. When data values cross this threshold, an alert can be triggered, making it easier to monitor and respond to significant changes.
To create alerts over thresholds:
- Open the View: Navigate to the view where you want to set an alert.
- Set a Threshold: Ensure the view has a threshold value. To learn about adding a threshold value, click here.
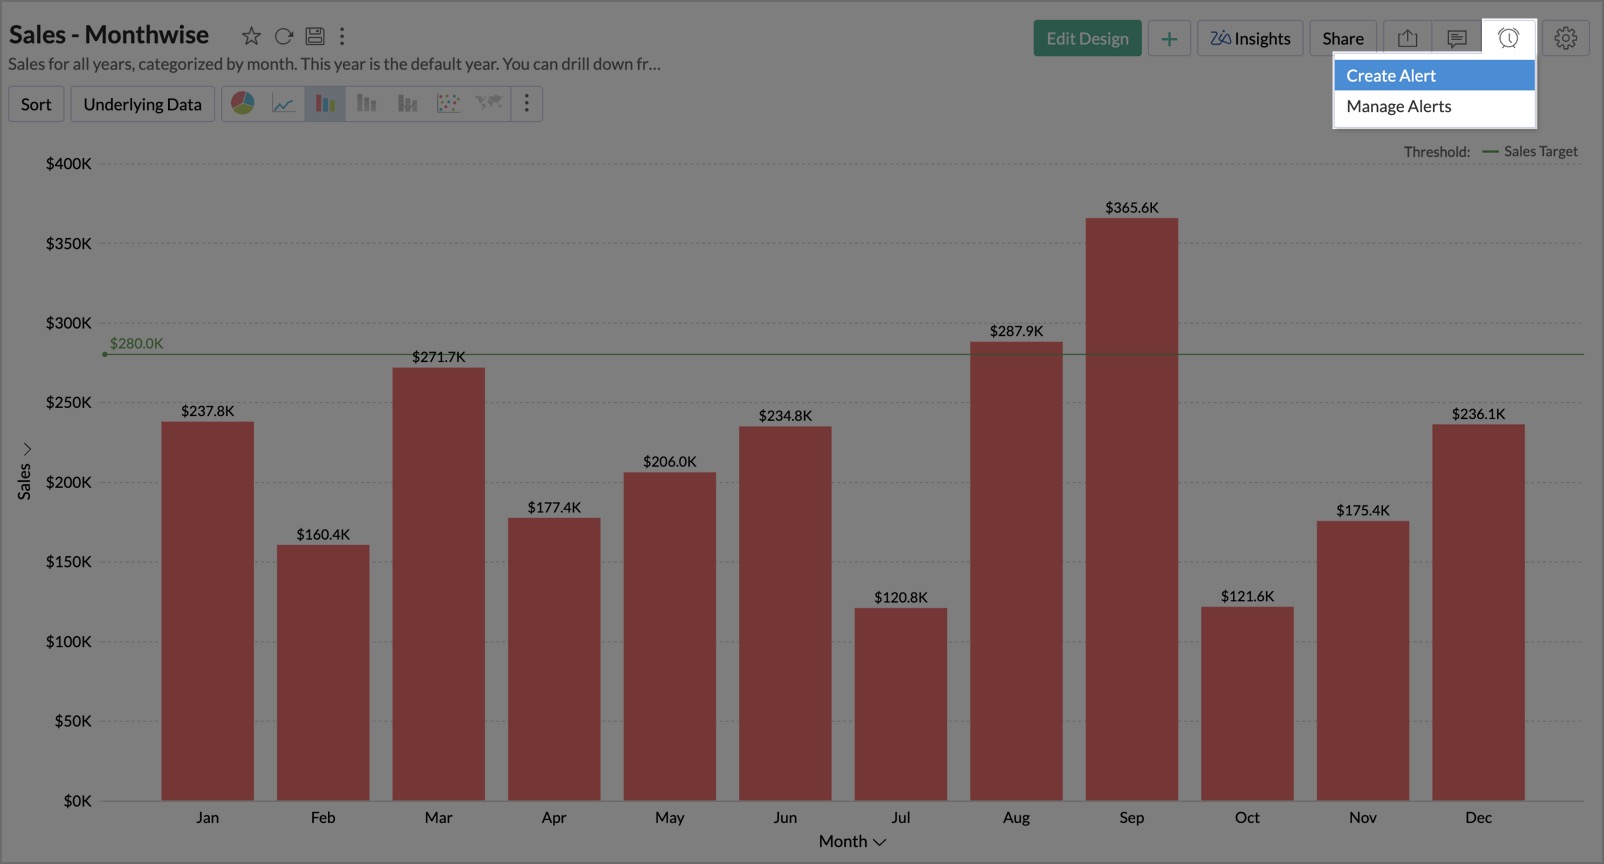
- Create an Alert:
- Click the Alerts icon at the top right corner.
- Select Create Alert.
- Configure the Alert:
- In the Create Alert dialog box that opens, specify the conditions.
- Select the appropriate options for Reference Axis, Operator, and Alert based on.
- Choose the Threshold option from the Alert based on drop-down menu.
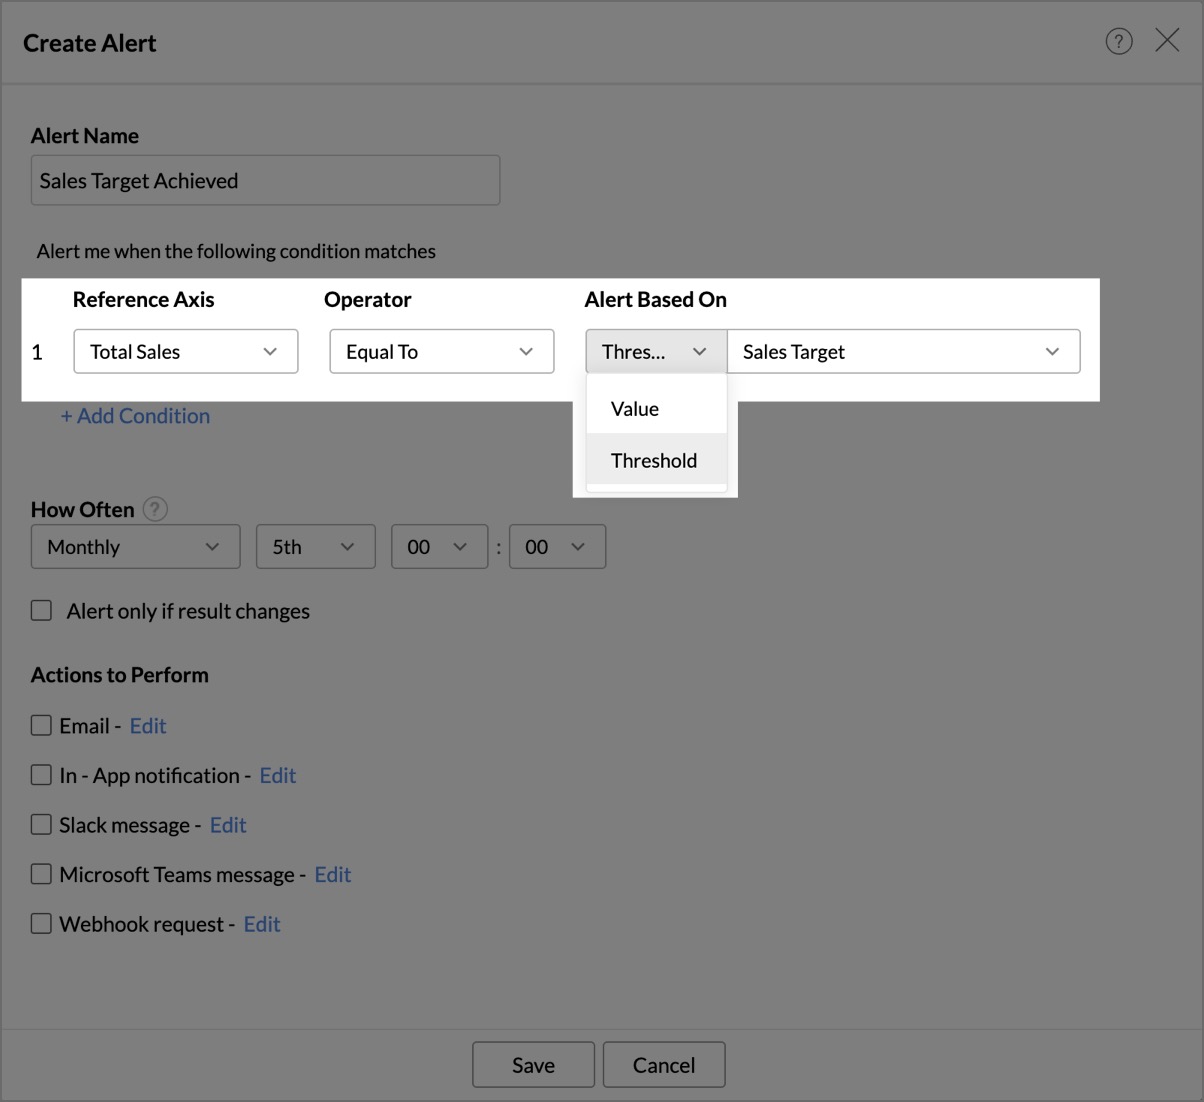
- Once the condition for an alert is set, follow the steps mentioned in the above presentation to finalize the alert creation.


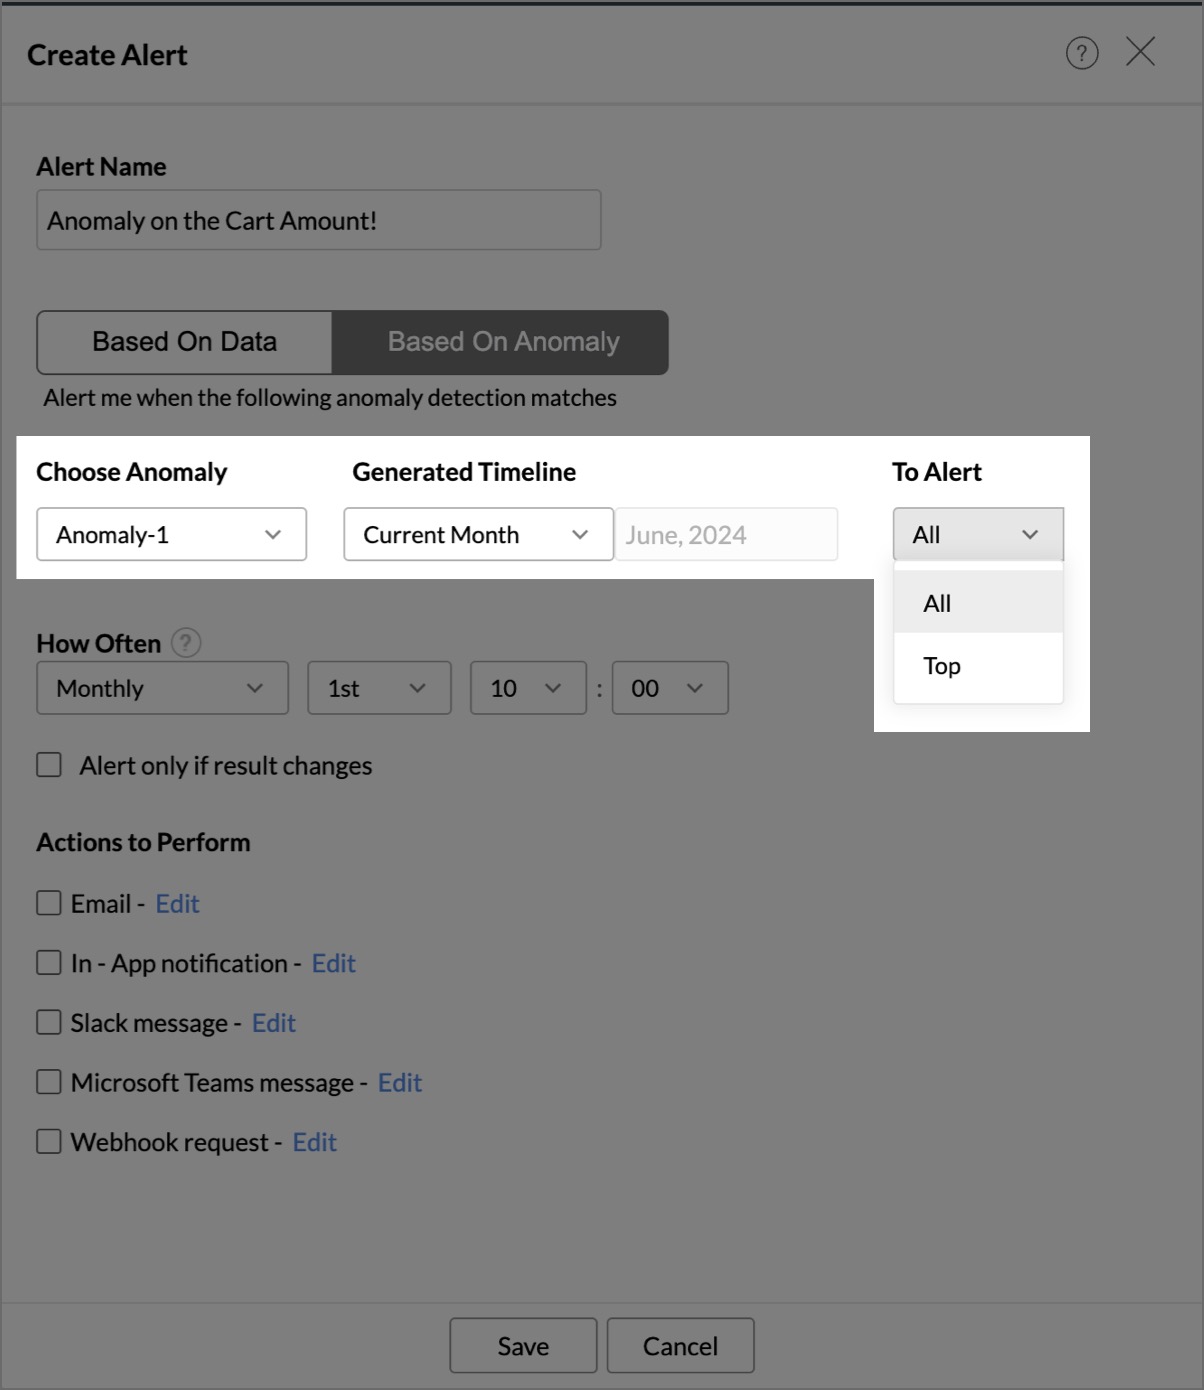
6. How do I create data alerts over Anomalies?
Zoho Analytics enables you to create alerts based on anomalies detected in a specific view.
Anomaly in reports denotes unexpected or unusual data patterns that diverge from typical behavior or norms. These anomalies often highlight errors, outliers, or noteworthy changes in data trends, prompting further scrutiny to understand their implications for accurate analysis and decision-making.
To create alerts over anomalies,
- Open the View: Navigate to the view where you want to set an alert.
- Set an Anomaly: Ensure the view has an anomaly detection setup. To learn about setting up an anomaly detection, click here.
- Create an Alert:
- Click the Alerts icon at the top right corner.
- Select Create Alert.
- Configure the Alert:
- Create Alert dialog box will open.
- Select the Based On Anomaly tab to create an alert when an anomaly is detected.
- Select the appropriate options for Choose Anomaly, Generated Timeline, and To Alert.
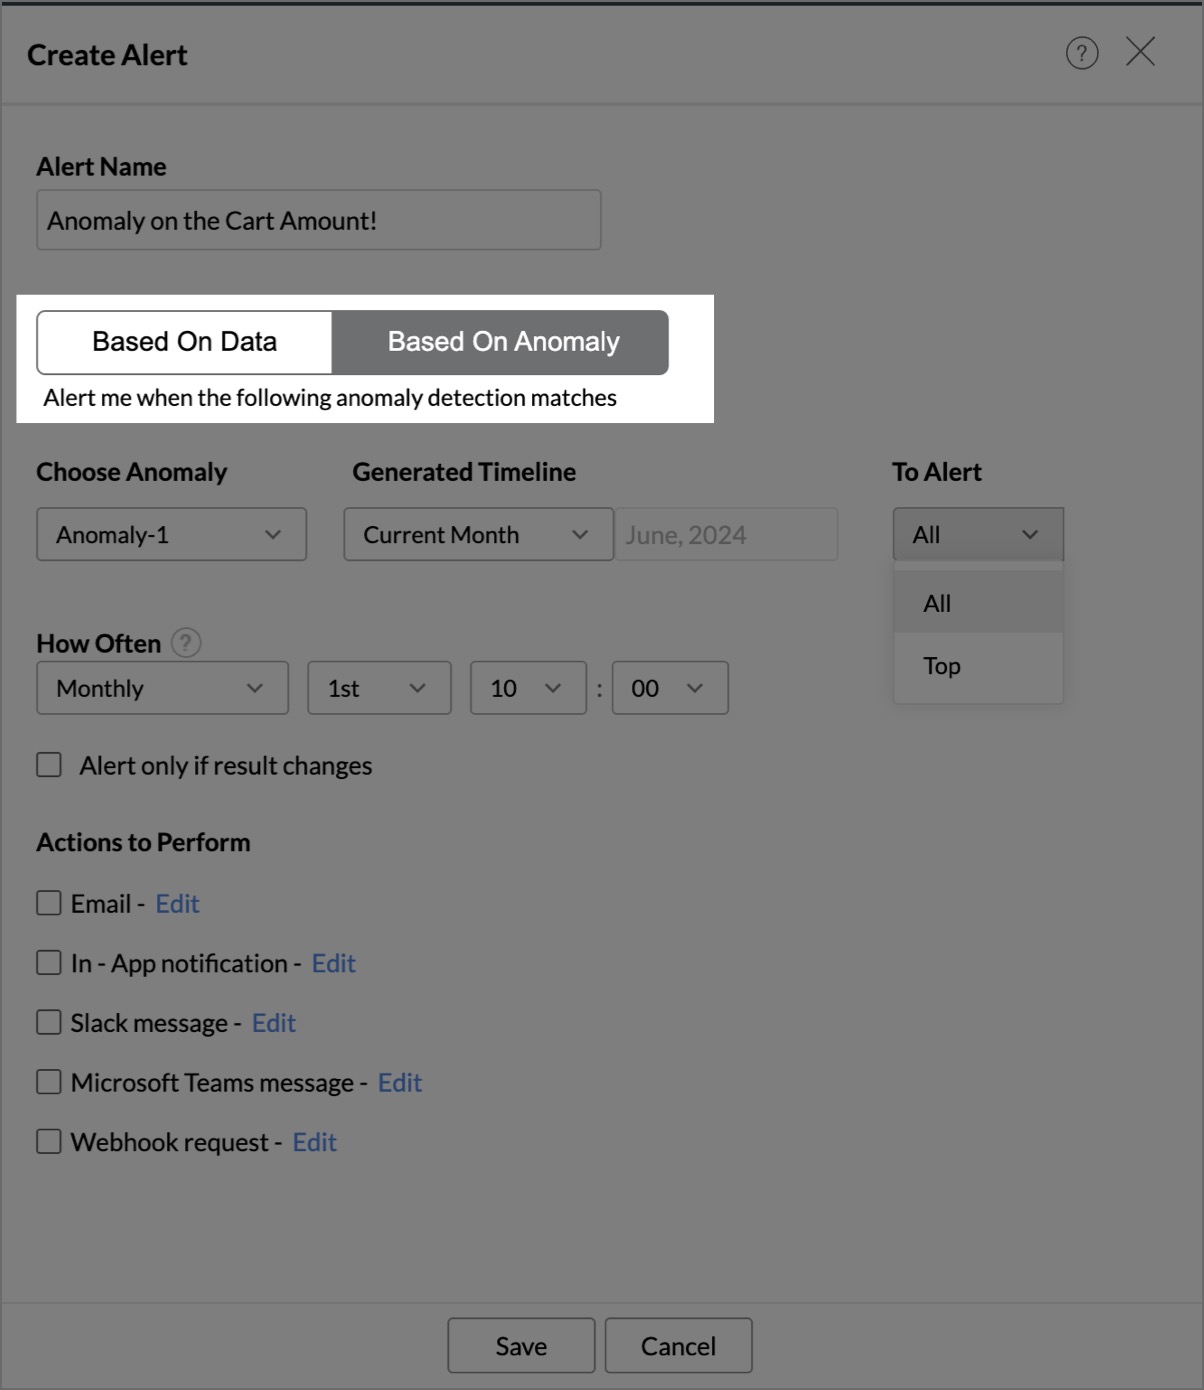
- Based on the data on the X-Axis, the options to create an alert based on anomalies vary.
- X-axis with date value:
- You can choose the Generated Timeline, based on the date values in the X-Axis.
- To Alert drop-down has All and Top anomalies options. Choosing the Top option allows you to generate an alert for Top 1 or 2 or 3 anomalies.
- X-axis without date value:
- Generated Timeline option by default will be selected as All and cannot be changed.
- To Alert option will also be selected as All by default and cannot be changed.
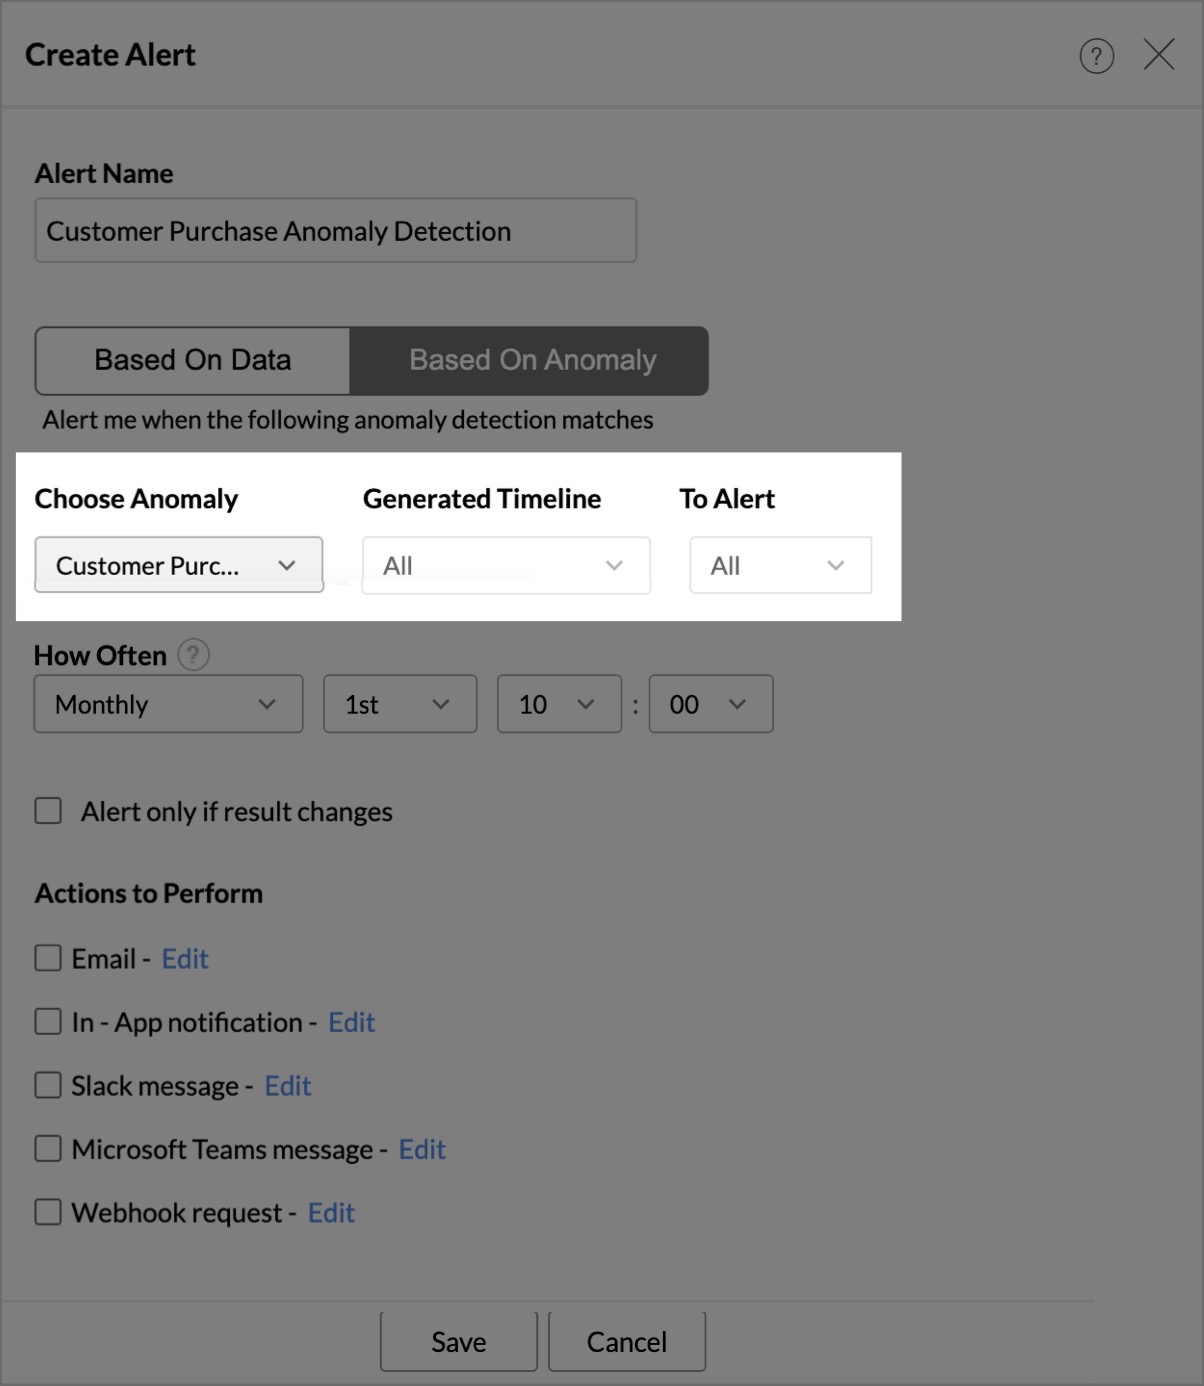
- X-axis with date value:
- Once the condition for an alert is set, follow the steps mentioned in the above presentation to finalize the alert creation.


7. Can I create multiple alerts over a report?
Yes, you can create multiple alerts over a report. You will be able to create as many alerts that your plan permits. For more details on this refer our Pricing Page.
Set up a Workflow on Alert
1. How do I set up a workflow on alert using Zoho flow?
Zoho Analytics allows you to create workflows using Zoho Flow that trigger actions in other applications when an alert is raised.
The essential components for configuring a workflow in Zoho Analytics with Zoho Flow are:
- Defining the conditions that trigger an alert.
- Specifying the actions to be executed.
- Setting up the connection between Zoho Analytics and the chosen application.
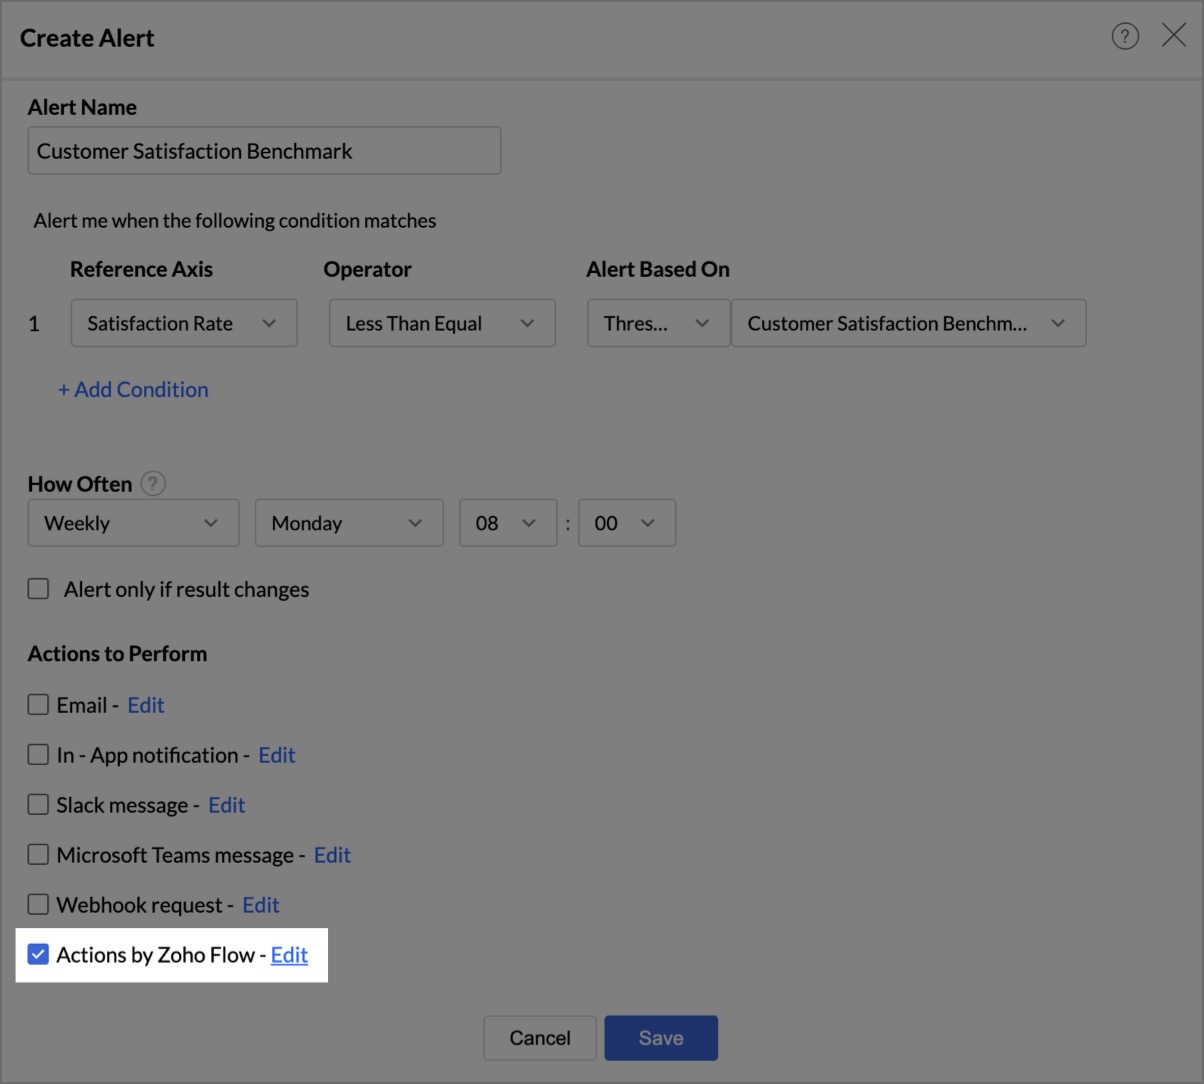
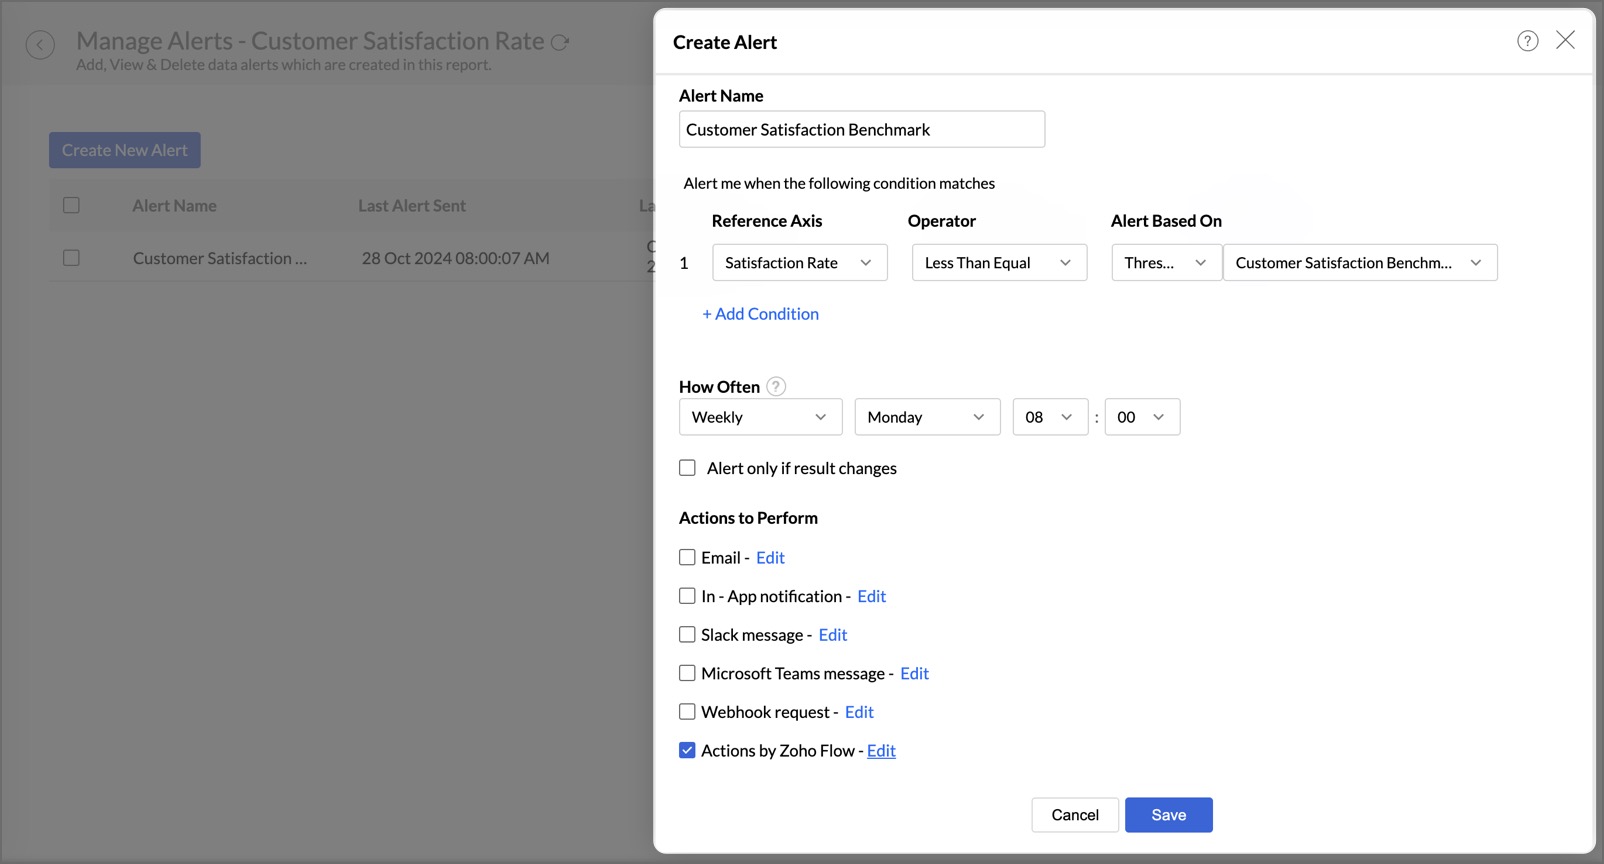
Let's consider a scenario where we want to create a workflow to create a ticket in Zendesk whenever the satisfaction rate falls below the threshold limit.
To setup workflow based on alerts,
- Navigate to the desired view where you want to set up an alert.
- Click the Alert icon on the top right corner and select Create Alert.
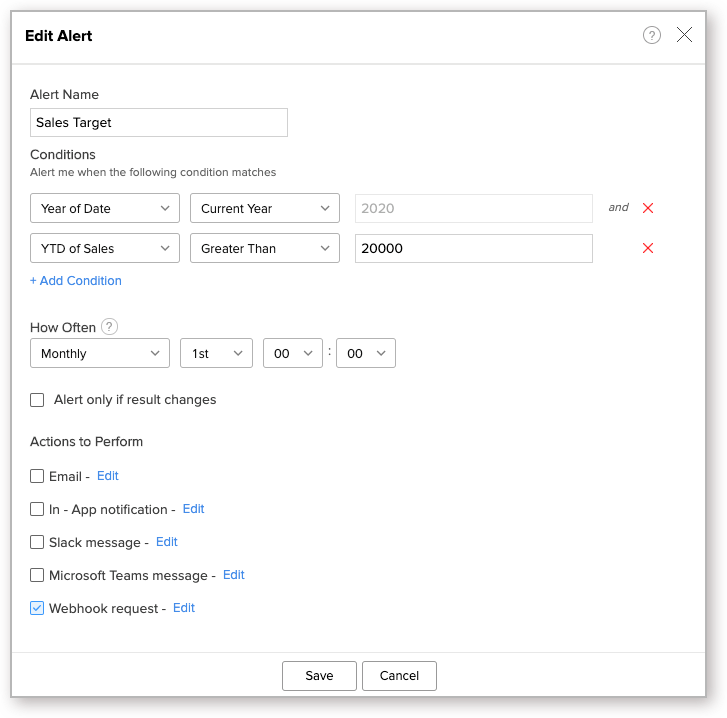
- Enter the Alert Name and define the Conditions under which the alert should trigger.
- Setup a schedule, over which the alert condition has to be verified.
- In the Actions to Perform section, enable Actions by Zoho Flow.
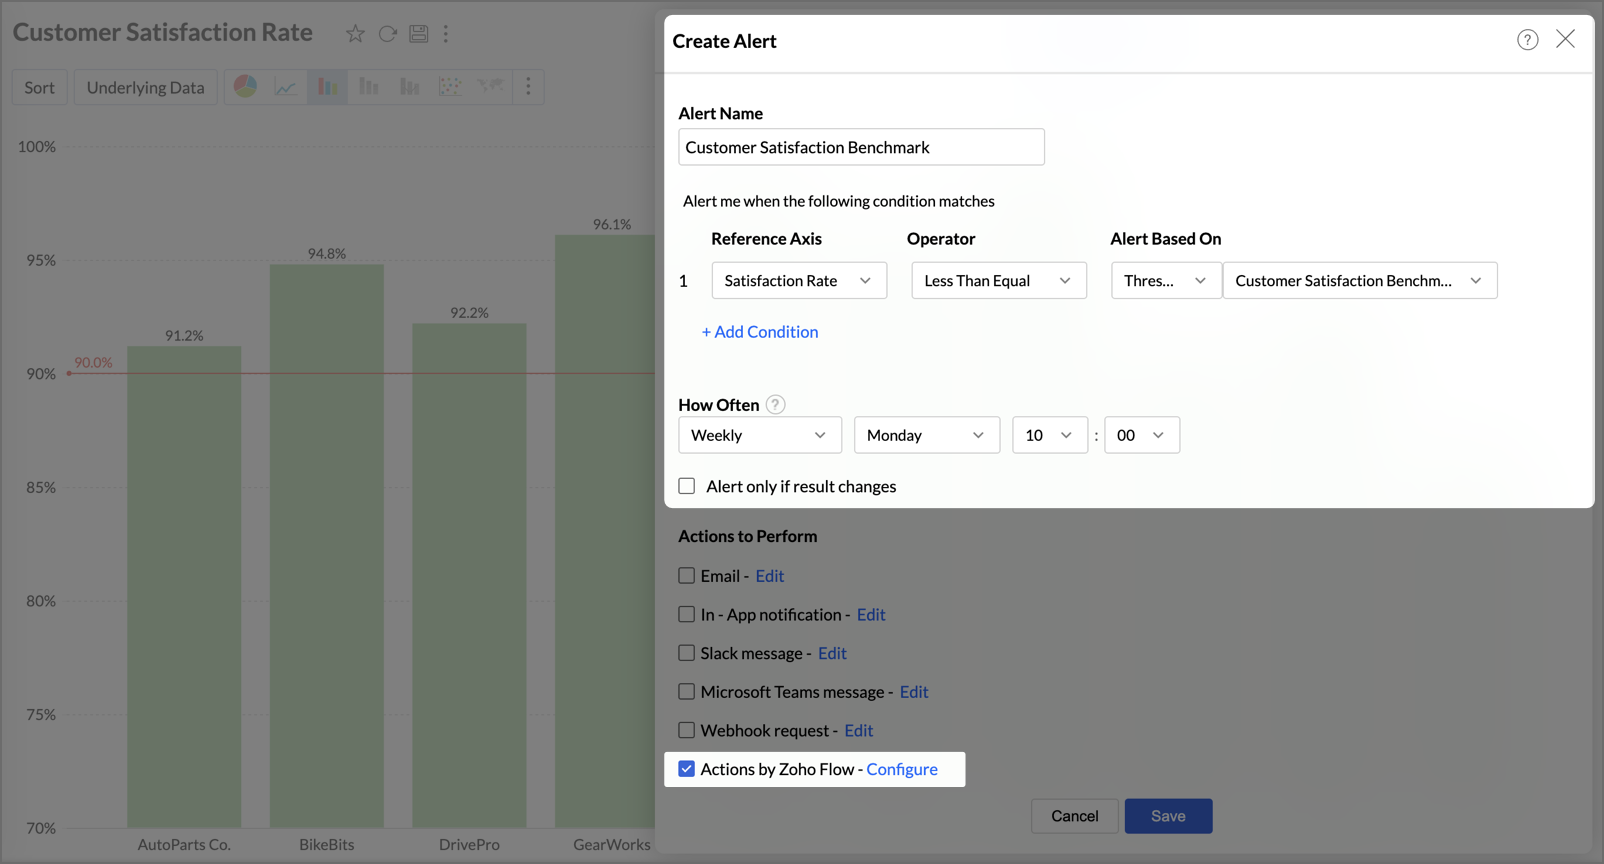
- Click the Configure, next to this option to specify the actions to be triggered.
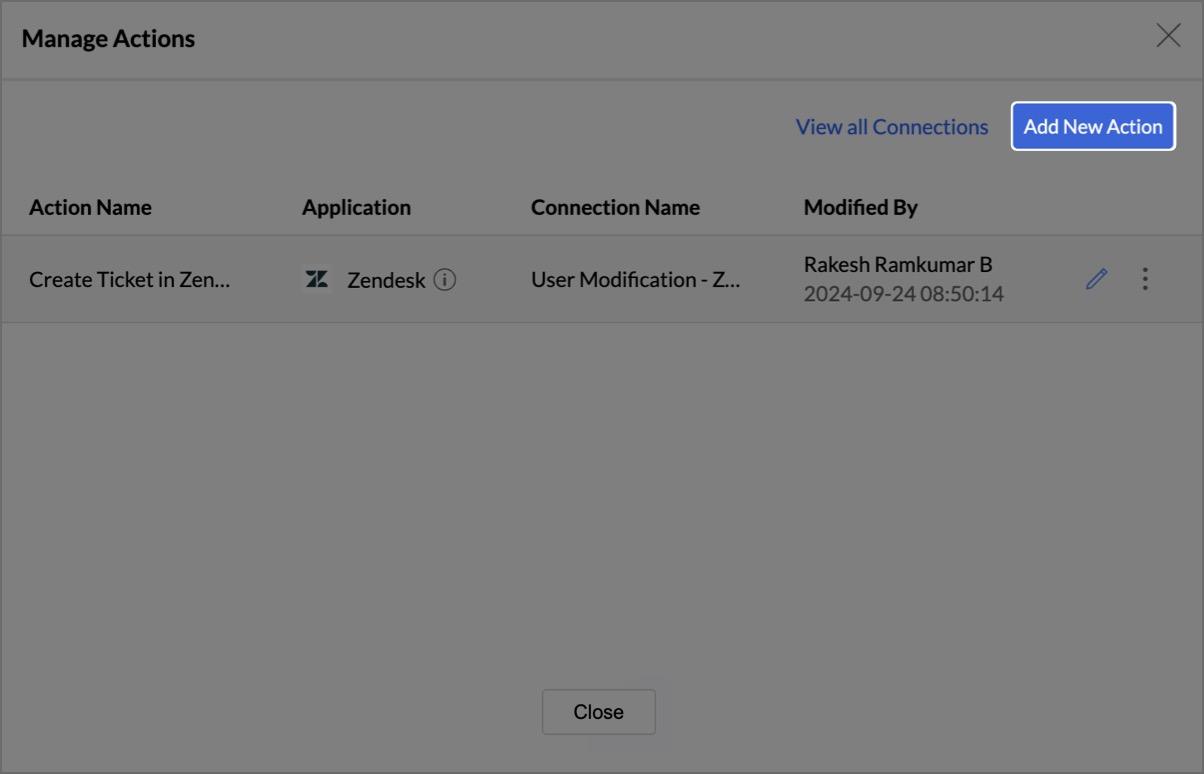
- In the Actions by Zoho Flow dialog box, enter the Action Name.
- In the Select Application section, select the application in which an action needs to be triggered.
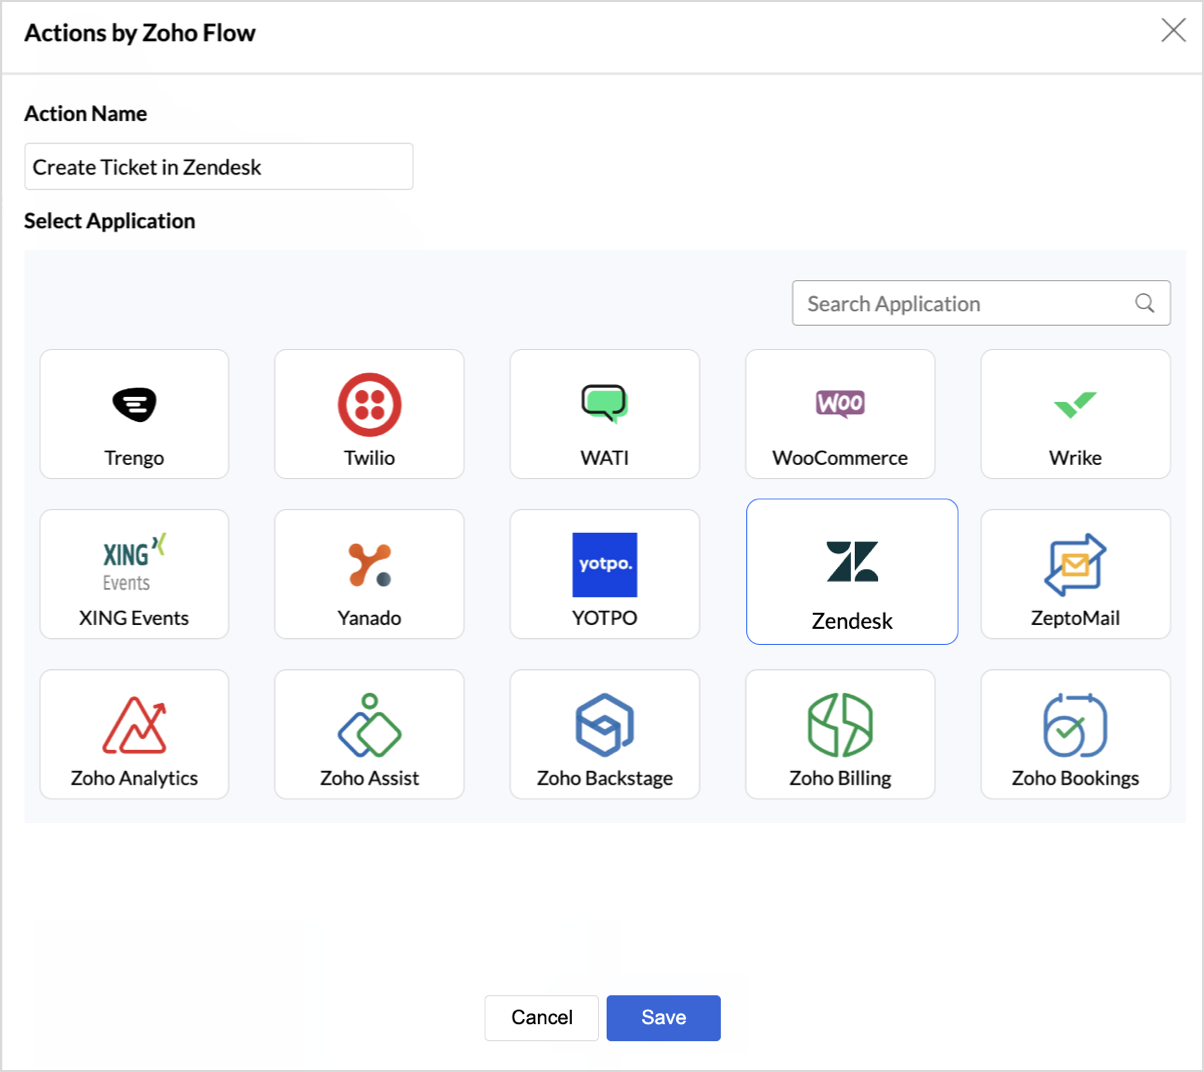
- Once an application is selected, the Select Action and Select Connection dropdowns will appear.
- Choose an action from the Select Action dropdown that corresponds to the tasks that can be performed in the chosen application.
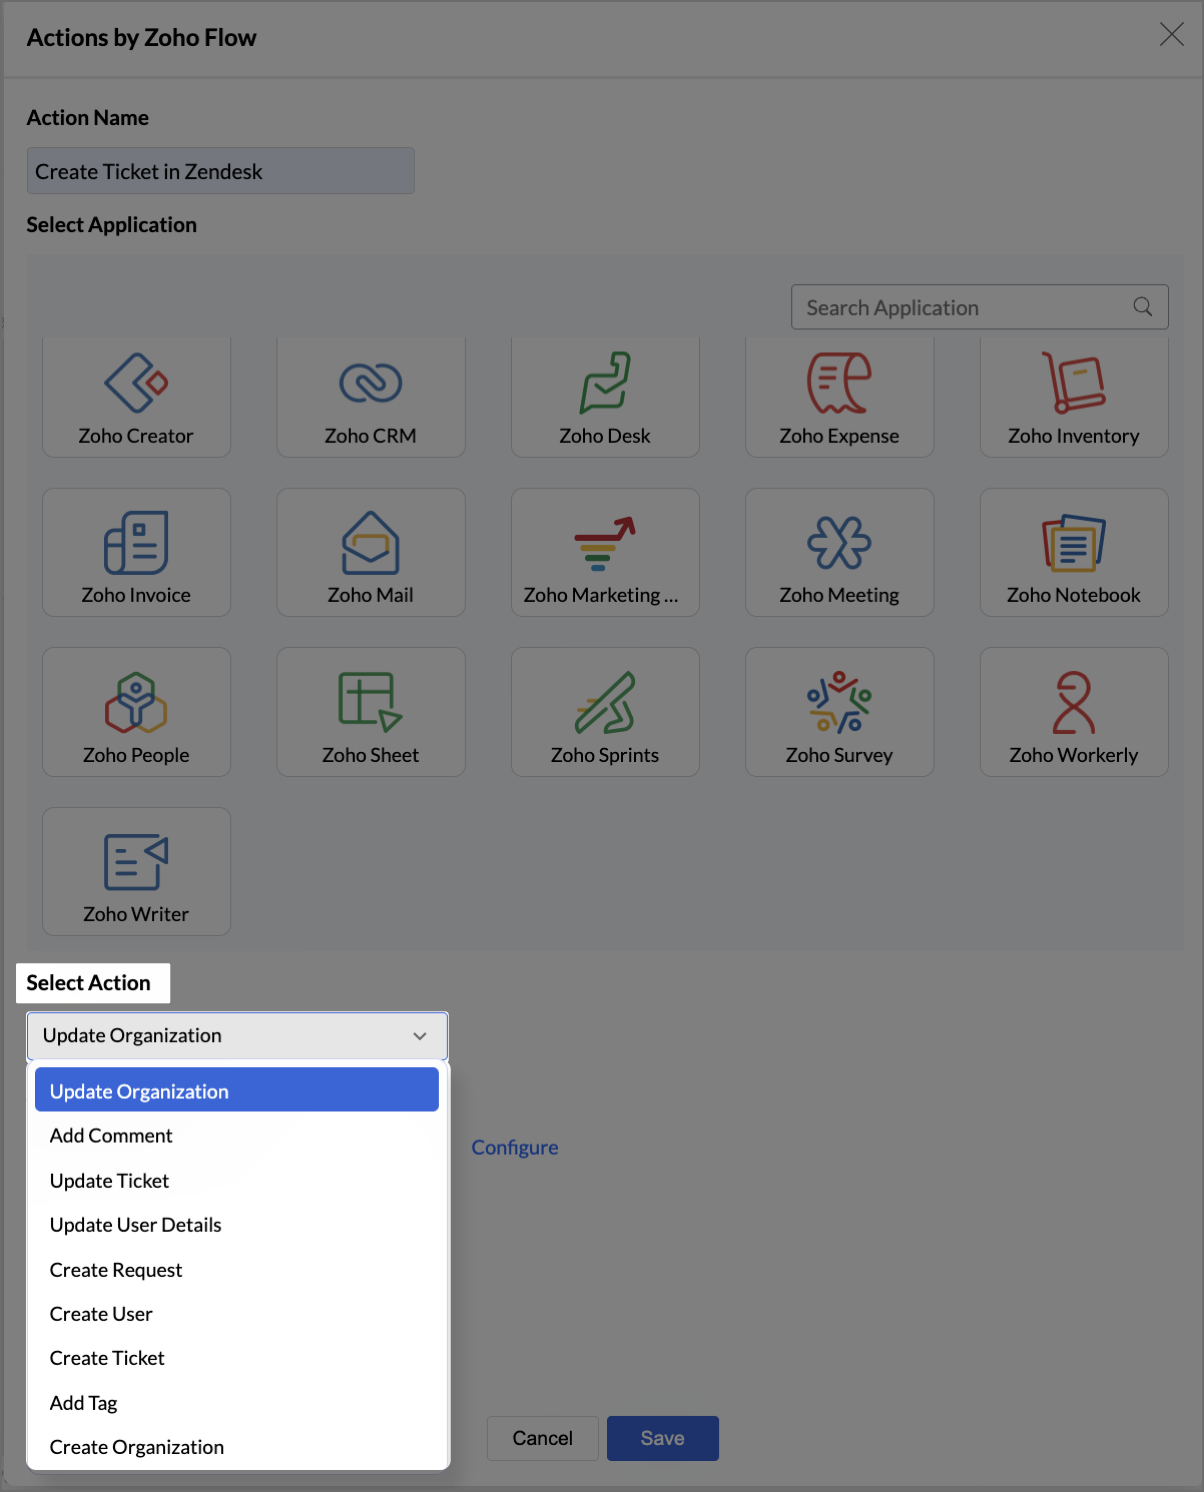
- In the Select Connection dropdown, either select an existing connection or create a new one.
- Connections are vital to trigger an action as they establish the relationship between Zoho Analytics and the selected application. Follow the below steps to create a new connection:
- Click +Create New Connection option from the Select Connection dropdown.
- In the Create New Connection dialog, enter the Connection Name and choose the allowed actions.
- Click Authorize to establish the connection.
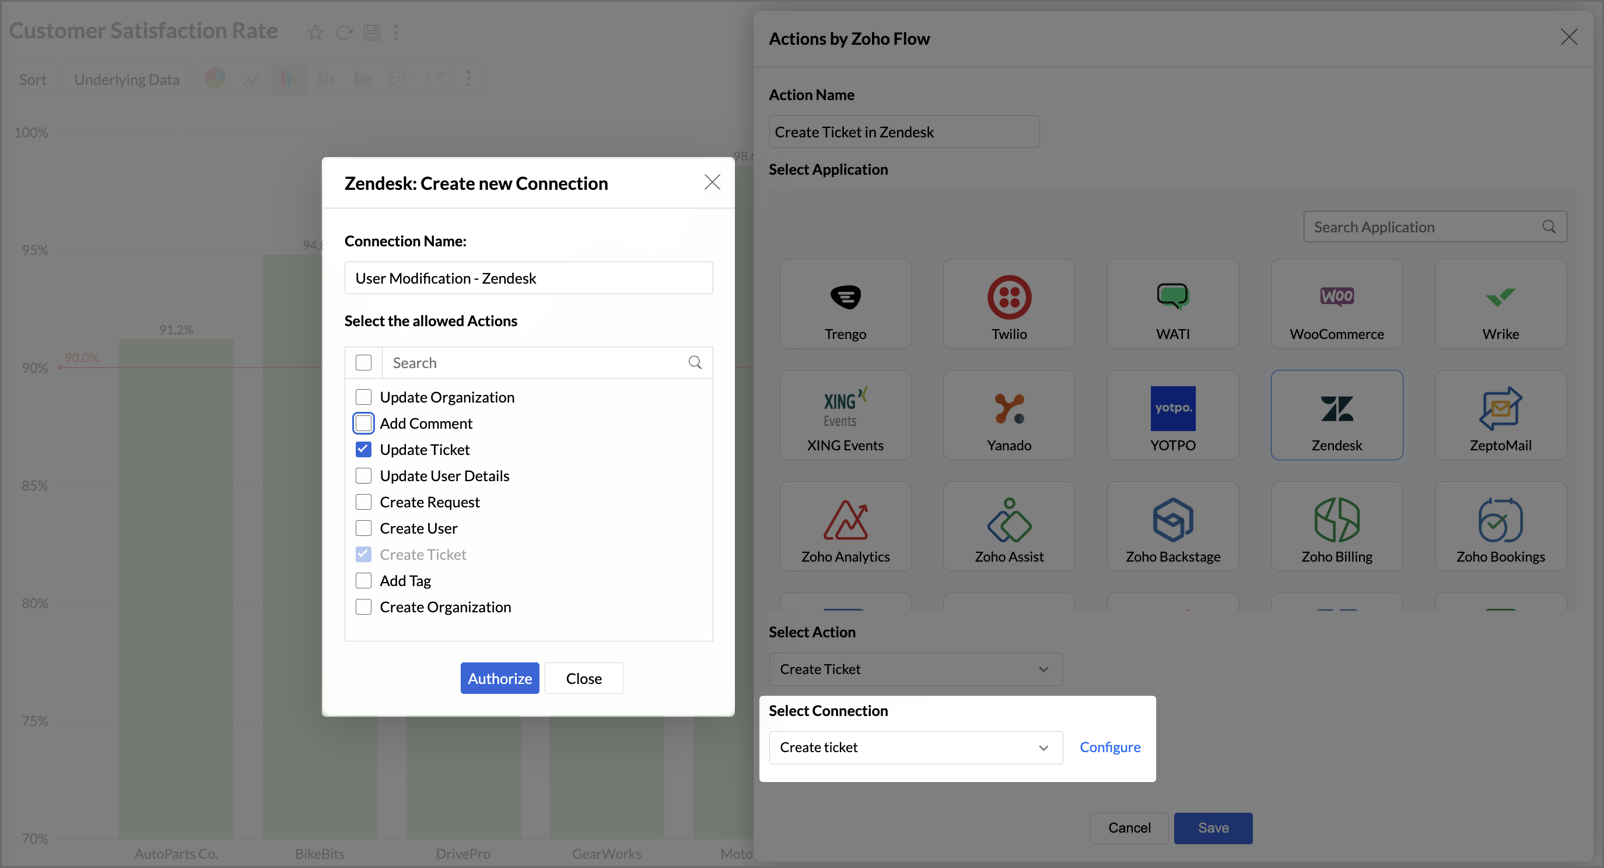
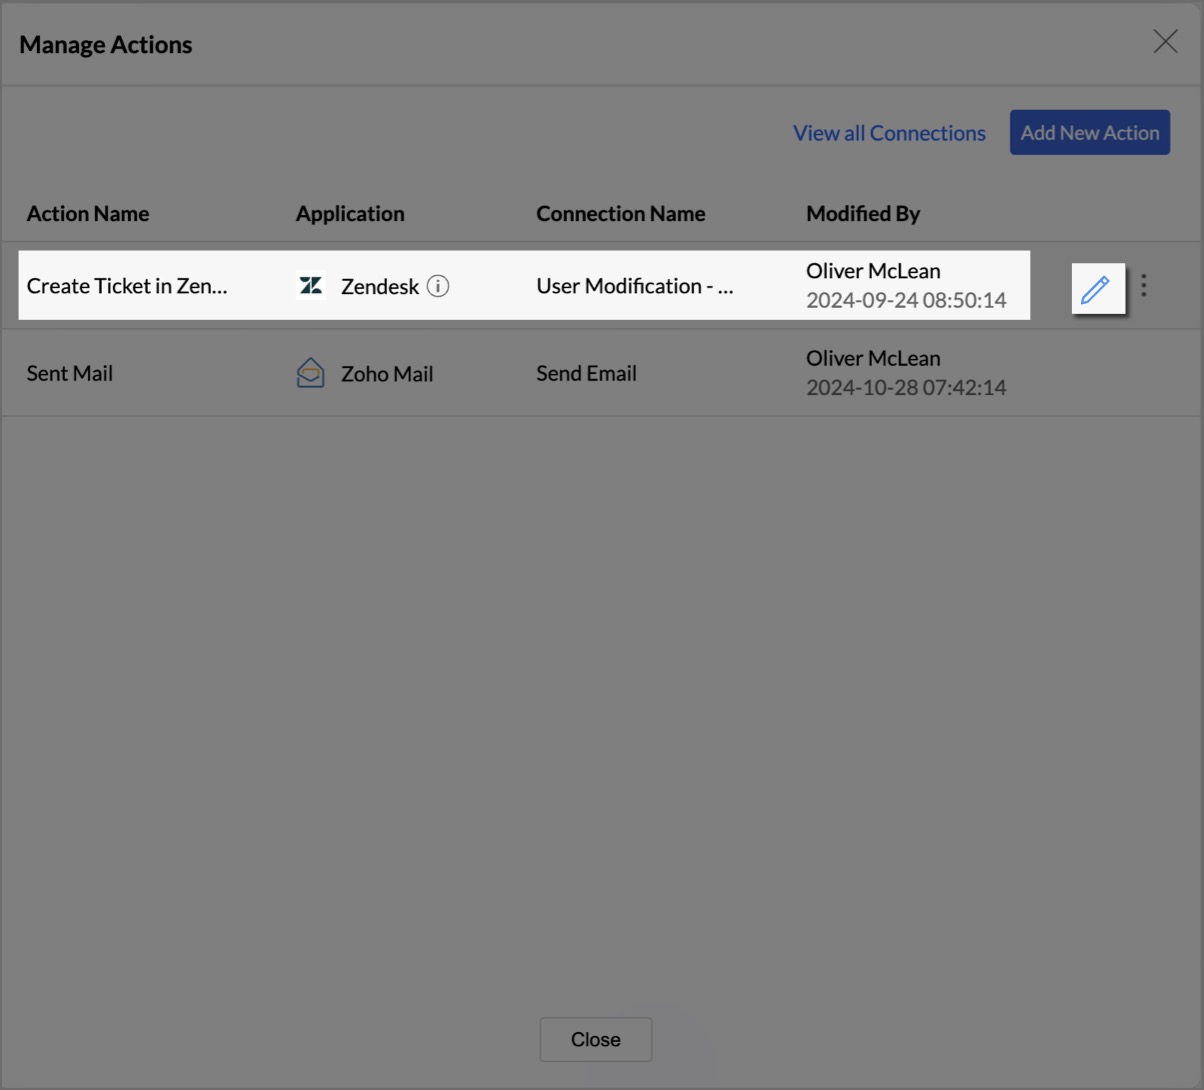
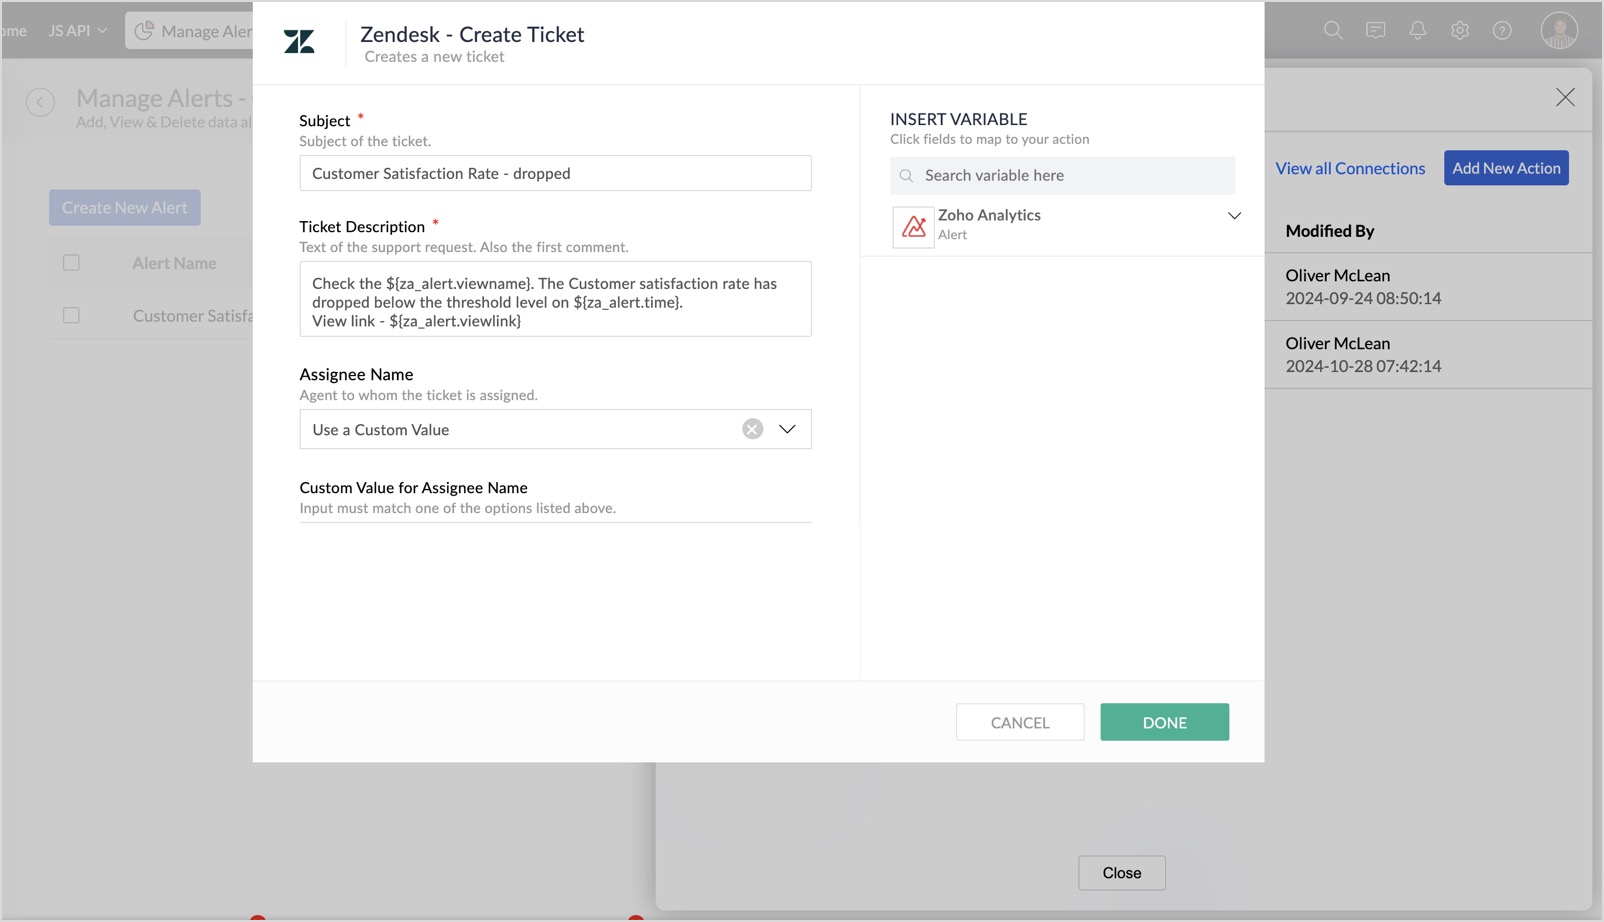
- After creating or selecting a connection, click Configure to add the specific details of the action that needs to be performed (e.g., creating a Zendesk ticket).
- In the configuration dialog box that opens, configure the details of the actions that need to be performed.
- You can also add variables to the actions as needed and click Done to finalize the configurations.
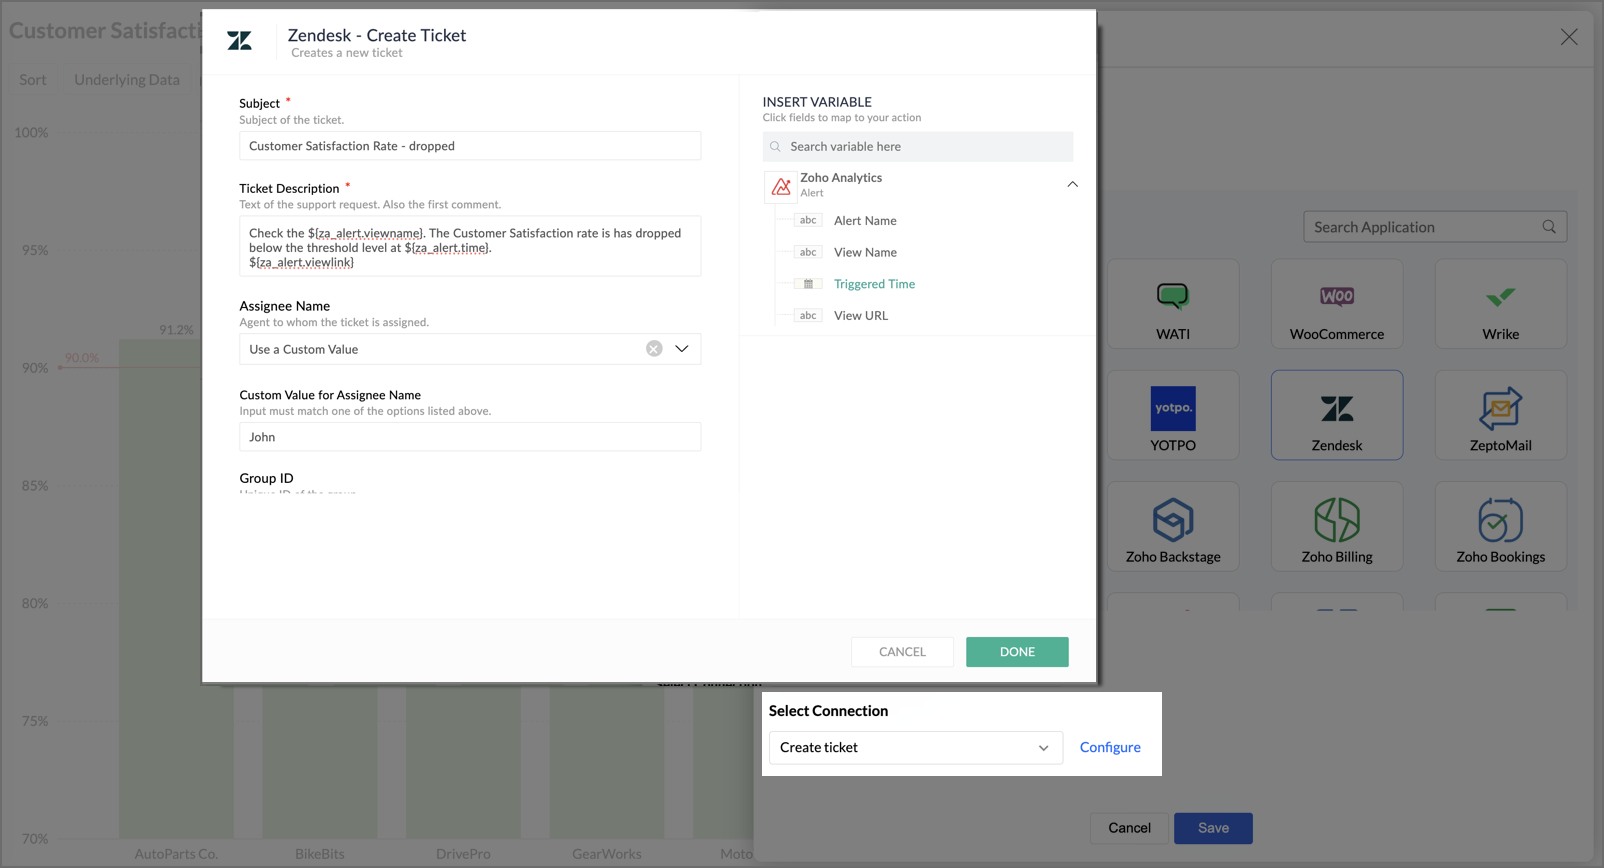
- Click Save to finalize your alert and workflow.


2. How to add a new action to the workflow setup (Zoho Flow) in Zoho Analytics?
To add new actions to an existing workflow in Zoho Flow, follow these steps:
- Open the report where alerts are set up to trigger the Zoho Flow workflow.
- Click the Alert icon at the top and select Manage Alerts.
- The Manage Alerts page will display the list of alerts created for the report.
- Locate the alert in the list and click the Edit Alert icon on the right.
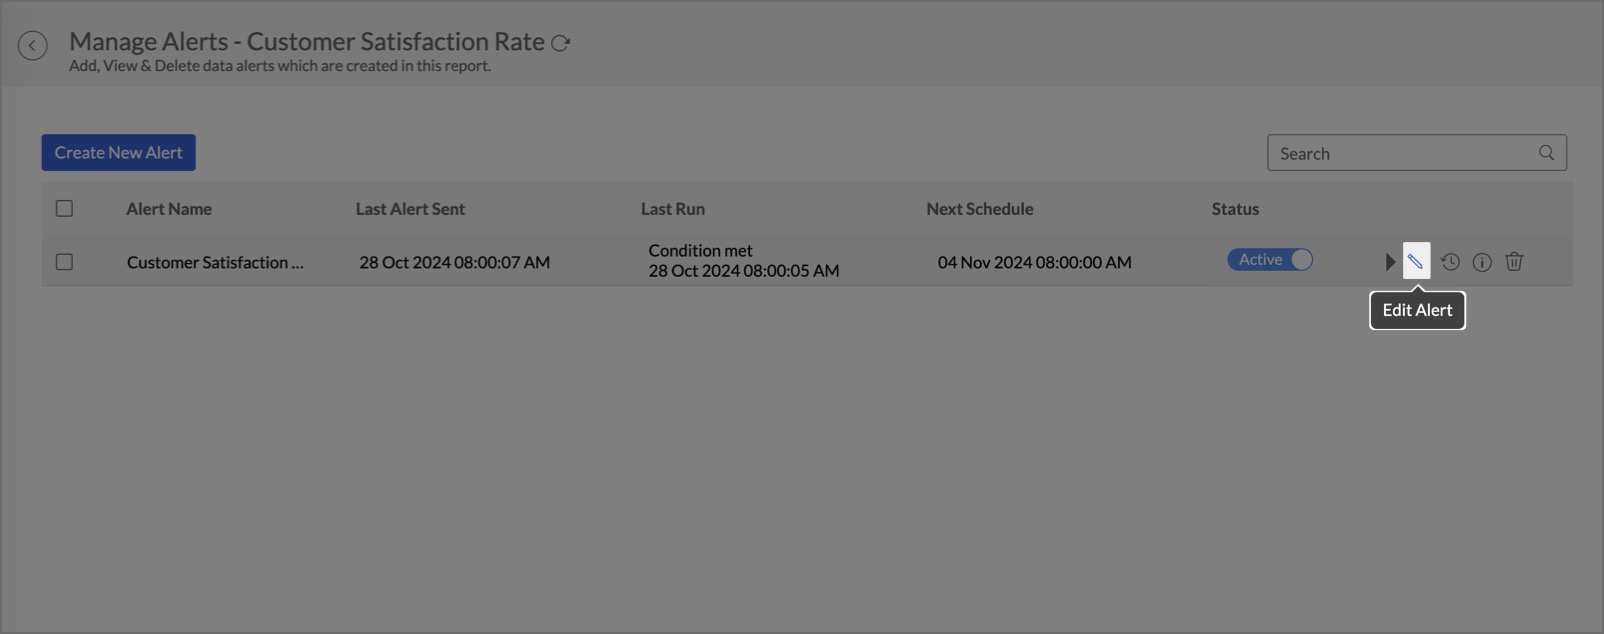
- The Create Alert page will appear, where you can update/modify the alert.
- In the Actions to Perform section, click the Edit option next to Actions by Zoho Flow.
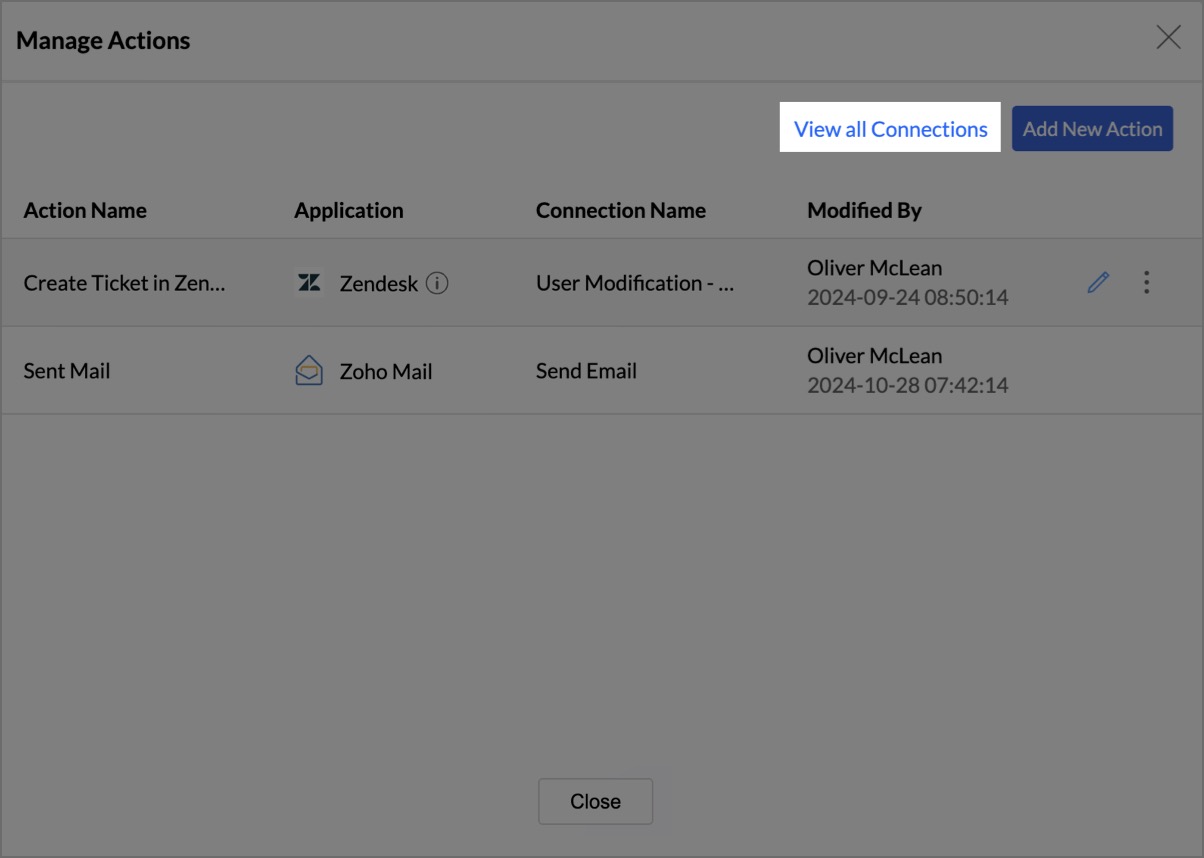
- The Manage Actions page will open. To add a new action, click the Add New Action button at the top right.
- On the Actions by Zoho Flow page, follow the steps outlined in the previous question to specify the new actions to be triggered when an alert is raised.


3. How can I manage the workflow setup for Zoho Flow in Zoho Analytics?
You can manage the workflow setup easily by managing the alert conditions, actions to be performed, and connection between Zoho Analytics and the chosen application.
Managing Alerts:
- Open the report with alerts set to trigger the Zoho Flow workflow.
- Click the Alert icon at the top and select Manage Alerts.
- On the Manage Alerts page, find the alert and click the Edit Alert icon.
- In the Create Alert page, add or modify conditions to trigger the Zoho Flow workflow.

Managing Actions:
- In the bottom of the Create Alert page, locate the Actions to Perform section.
- Click the Edit option next to Actions by Zoho Flow, in the Actions to Perform section.
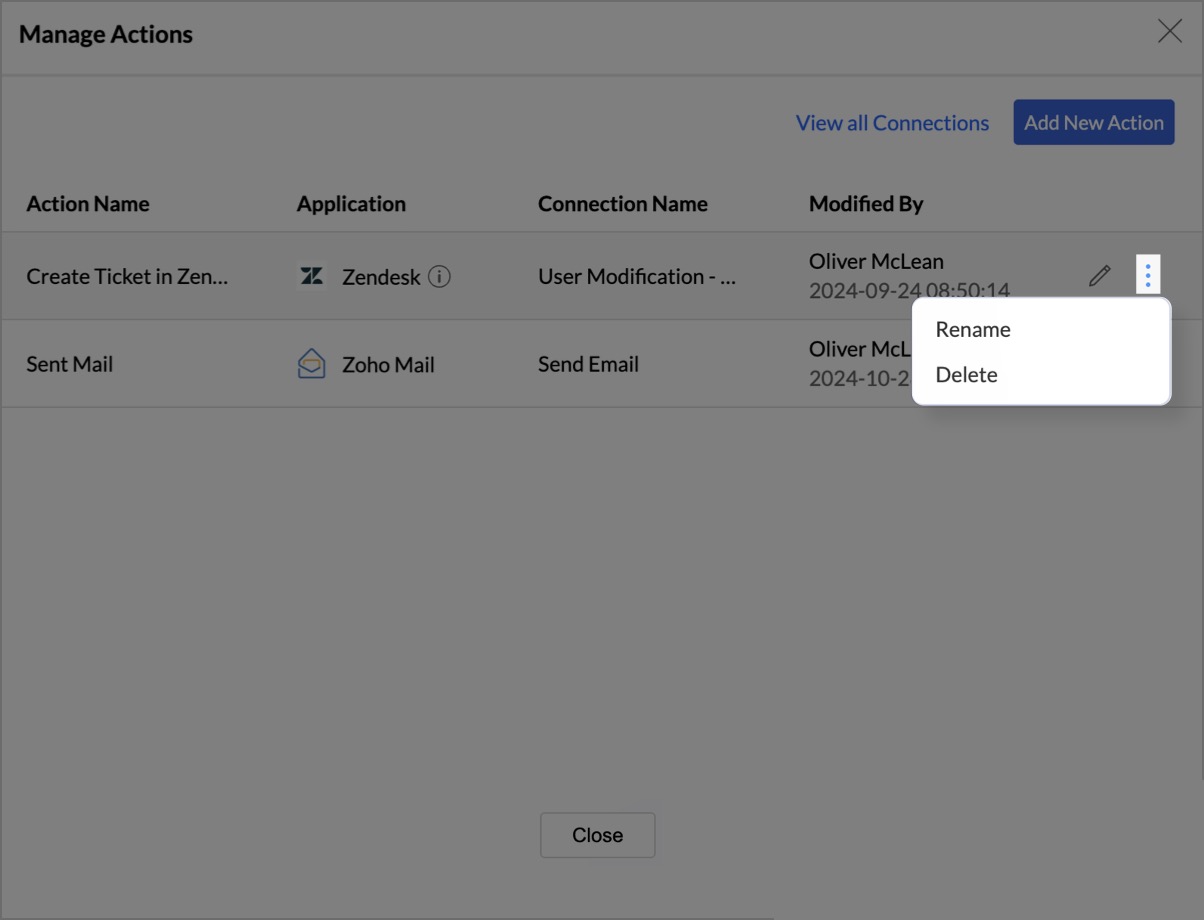
- The Manage Actions page will open. Click the Edit icon next to the action name.
- In the Action Configuration dialog box that opens, you can modify the specifics of the action performed.
- You can also Rename and Delete an action by clicking the More option.


Managing Connections:
- On the Manage Actions page, click View all Connections at the top.
- The Manage Connections page will display all connections in the workspace.
- Click Re-Authorize to reauthorize a connection or Delete to remove it.
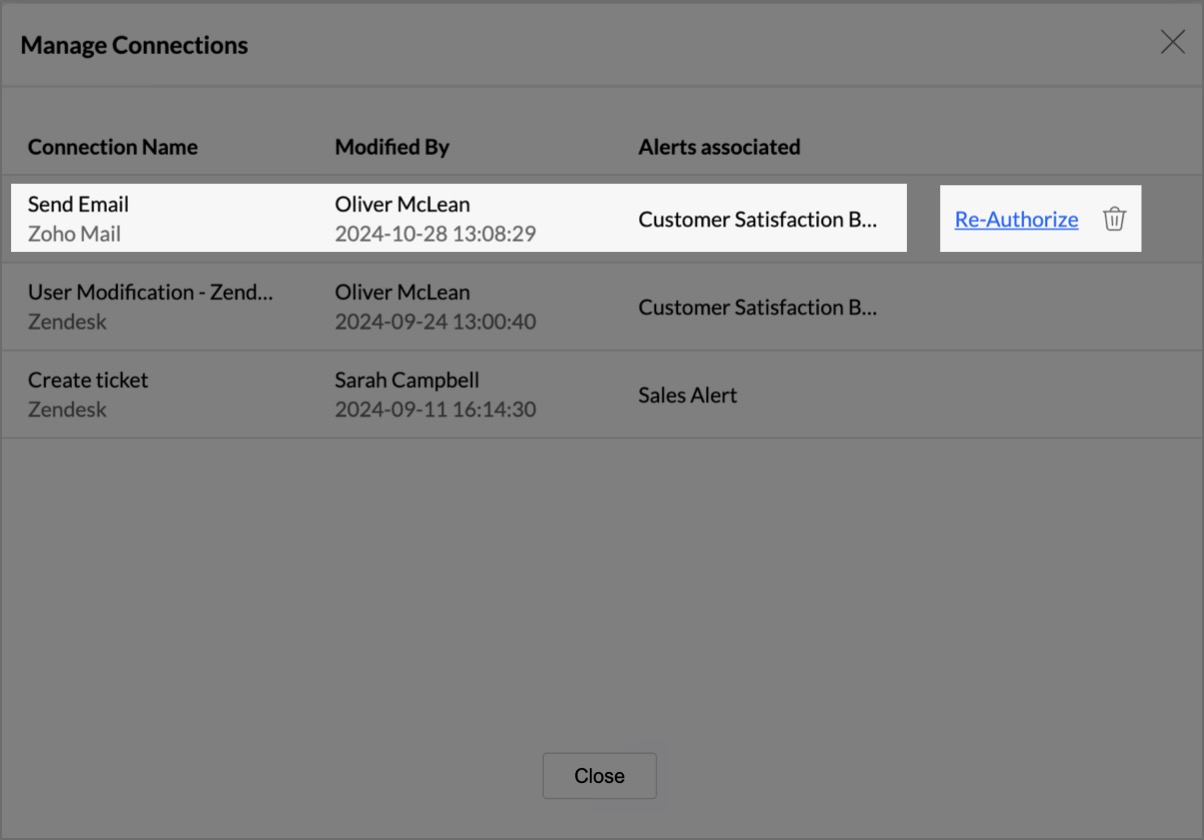


Note:
- A new connection can be established anytime to trigger an action.
- Connections cannot be modified once created.
- Connections can only be deleted if not used in alerts to trigger actions.
Data Alert Notification
1. What are the different channels to send alert triggered notification?
Zoho Analytics supports setting up alert notification in the following channels.
2. Who can be notified when alert conditions are met?
You can notify Account Administrator, Organization Administrators, and Workspace Administrators by email. You also send email notifications to any user by specifying their email address.
In-App notifications can be sent to Account Administrator, Organization Administrators, Workspace Administrators, and Shared Users.
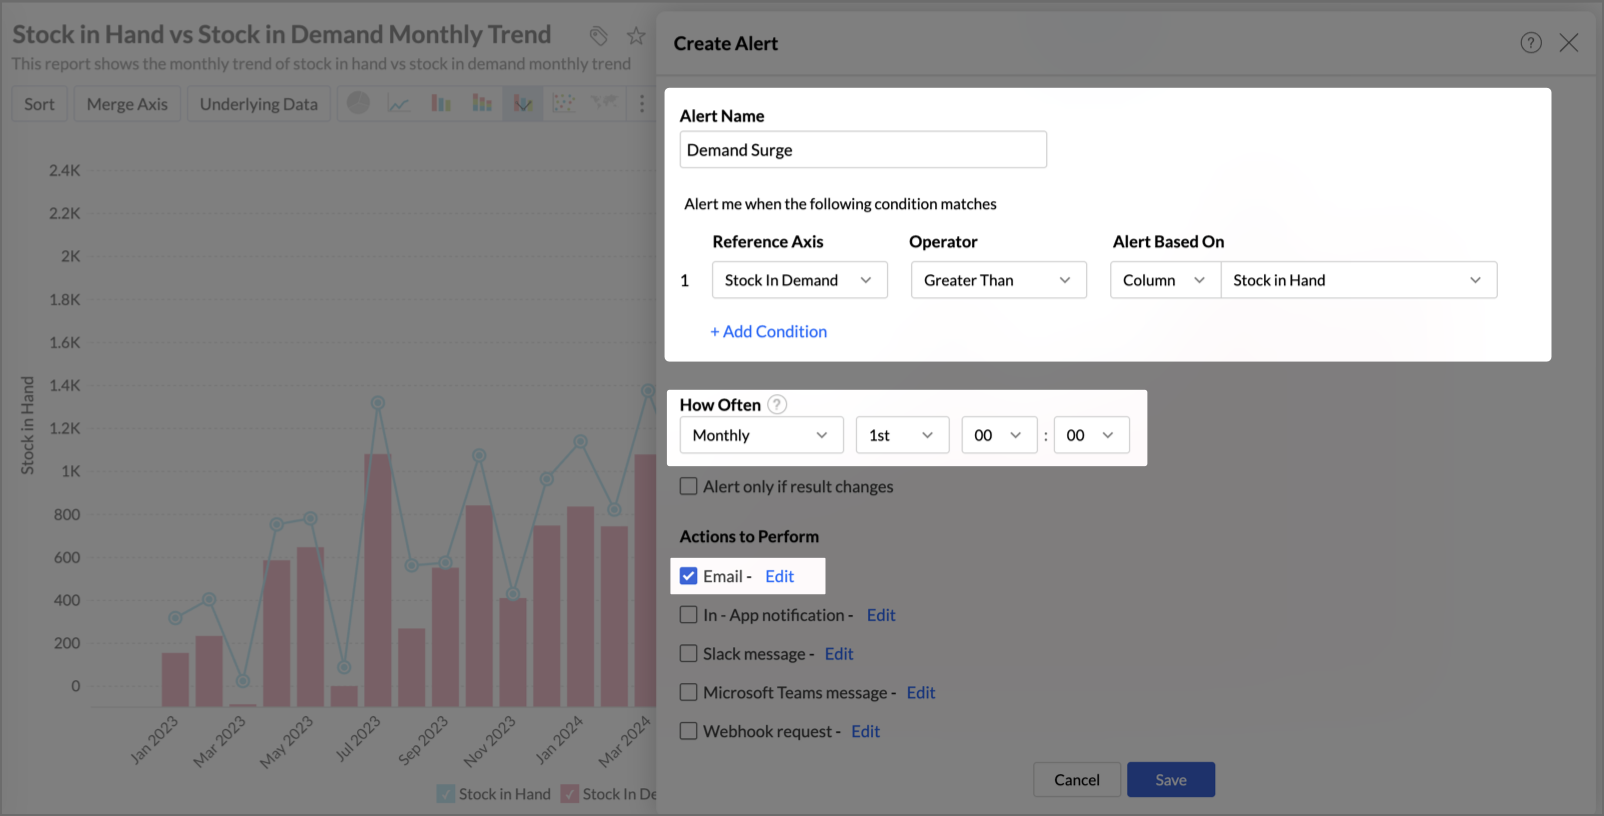
3. How do I create a Data Alert with Email Notification in Zoho Analytics?
- Navigate to the desired view where you want to set up an alert.
- Click the Alert icon on the top right corner and select Create Alert.
- Enter the Alert Name and define the Conditions under which the alert should trigger.
- Setup a schedule, over which the alert condition has to be verified.
- Under Actions to Perform, check Email and click Edit to configure the notification. Click Save when done.

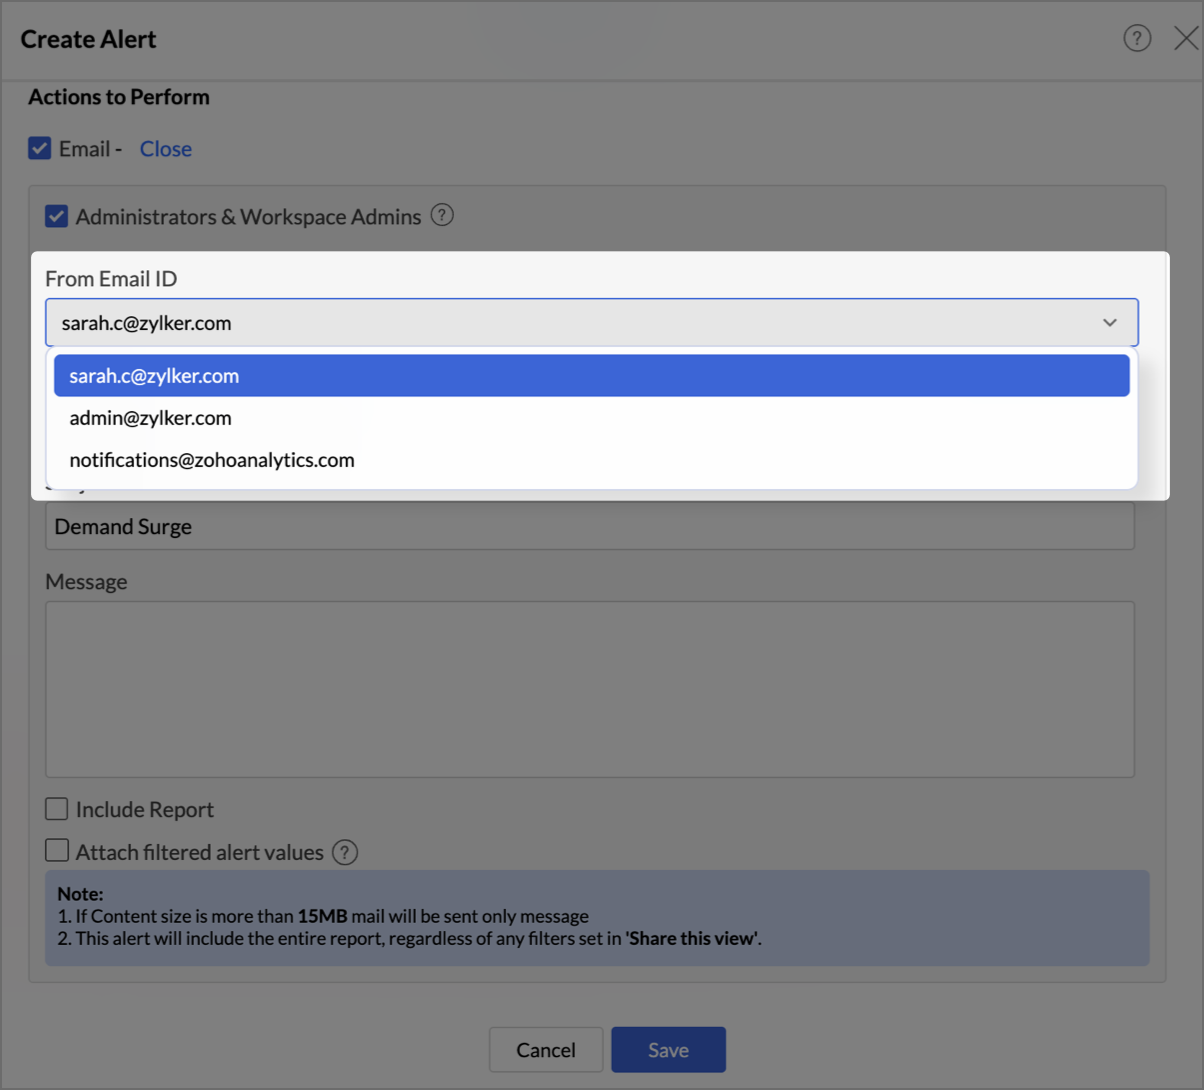
4. How do I configure the Email Notification settings for a Data Alert?
In the Email section under Actions to Perform, optionally check Account Admin & Workspace Admin to automatically include all admins as recipients.
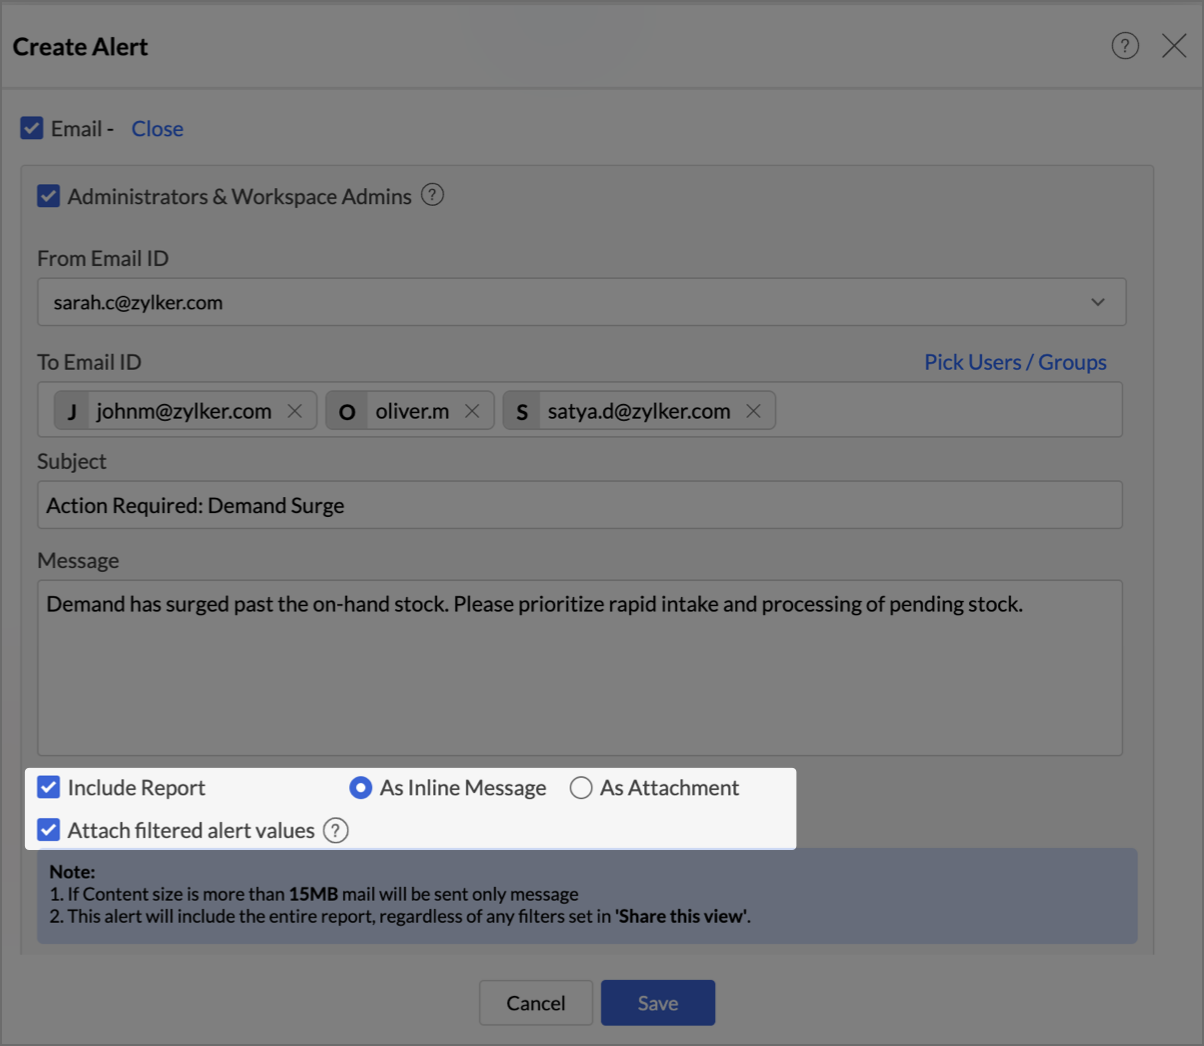
- To include the report in the email, check Include Report and choose:
- Enter the email Subject and Message body in the respective fields.
- Individual contacts show a photo or avatar with name and email.
- Groups show a group icon with the group name only.
- Click the X on any chip to remove a recipient.
- Each added recipient appears as a chip in the To Email ID field:
- Type directly - Enter an email address; suggestions appear as you type. Invalid addresses are highlighted in red and must be corrected before saving.
- Use the Contact Picker - Click "Pick Users / Groups" next to the To Email ID field. A slide-in panel opens showing contact sources in collapsible categories: Shared Contacts, Zoho Contacts, Google Contacts, Office 365 Contacts, Groups, and Organization Contacts. Each category shows the count of available items.
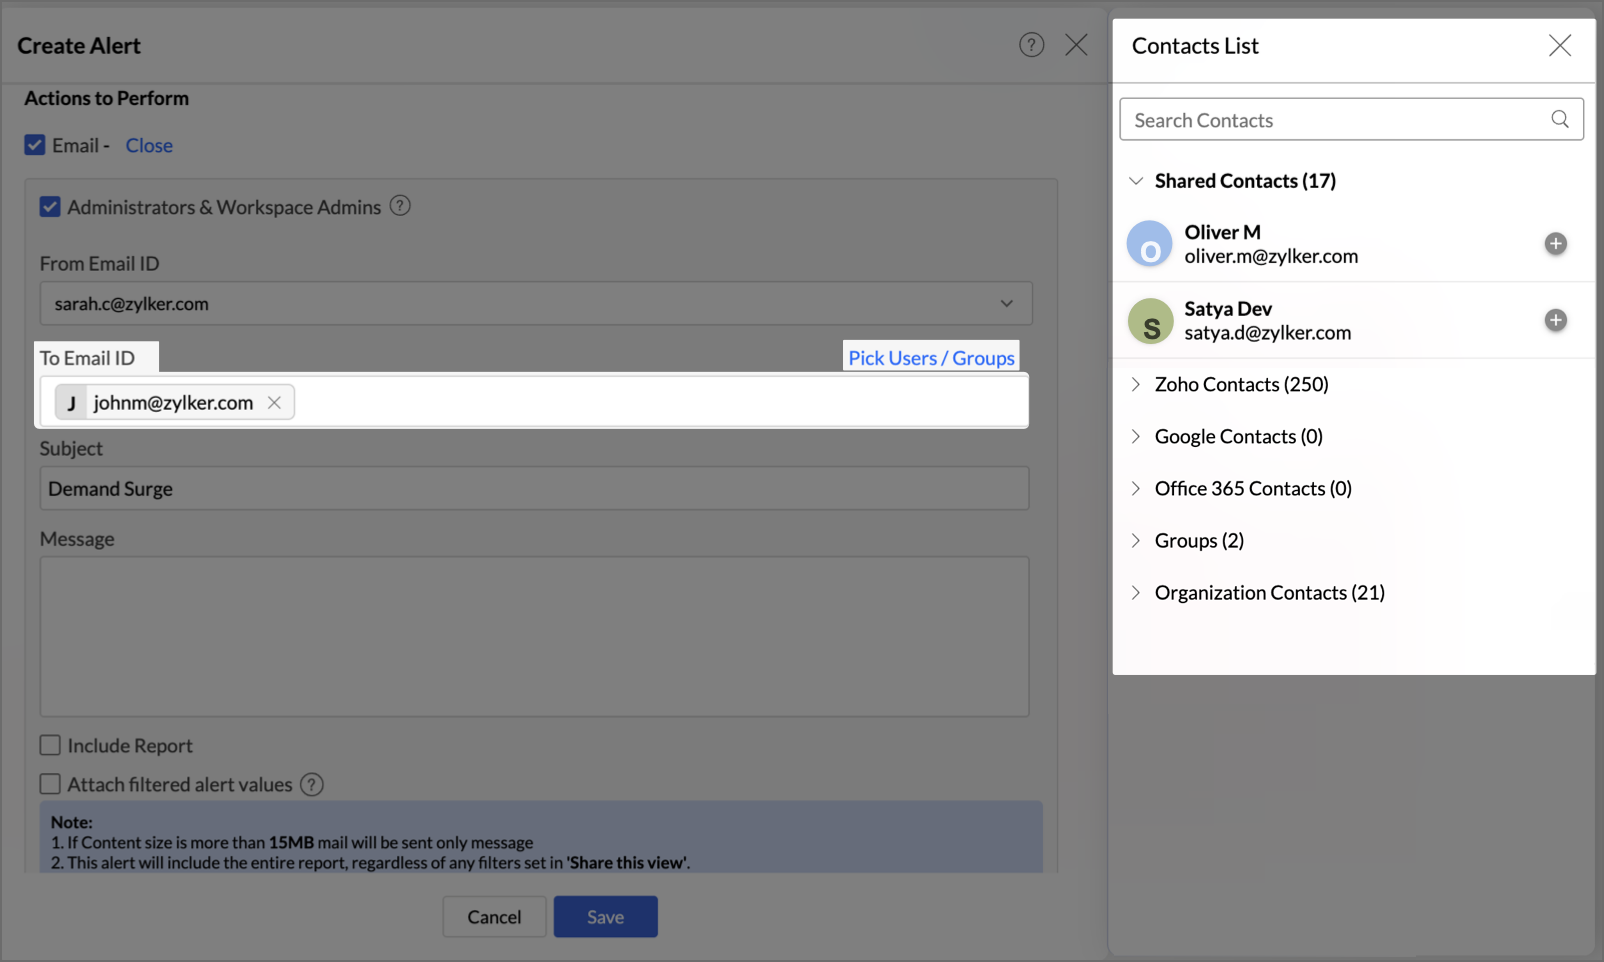
- Click a contact or group, use the + icon, or drag and drop them onto the To Email ID field.
- Use the dynamic search bar at the top to filter by name or email across all categories.
- Duplicate email addresses are blocked at the point of selection.
- If you have any unauthenticated sources (e.g., Google Contacts, Office 365) it will prompt you to authenticate.
- In the To Email ID field, you can add recipients in two ways:
- Your personal email address,
- Your organization's admin email address, or
- notifications@zohoanalytics.com, which is Zoho Analytics' shared sender address
Note: If your recipients have DMARC configured, you must validate Zoho Analytics as an authorized sender for your domain before using a personal or organization email address.
- Select the From Email ID, the address Zoho Analytics will use to send the alert:
- As Inline Message — embeds the report view in the email body.
- As Attachment — attaches the report as a file.
Note: If the total email content exceeds 15 MB, the email will be sent with the message only — without the report.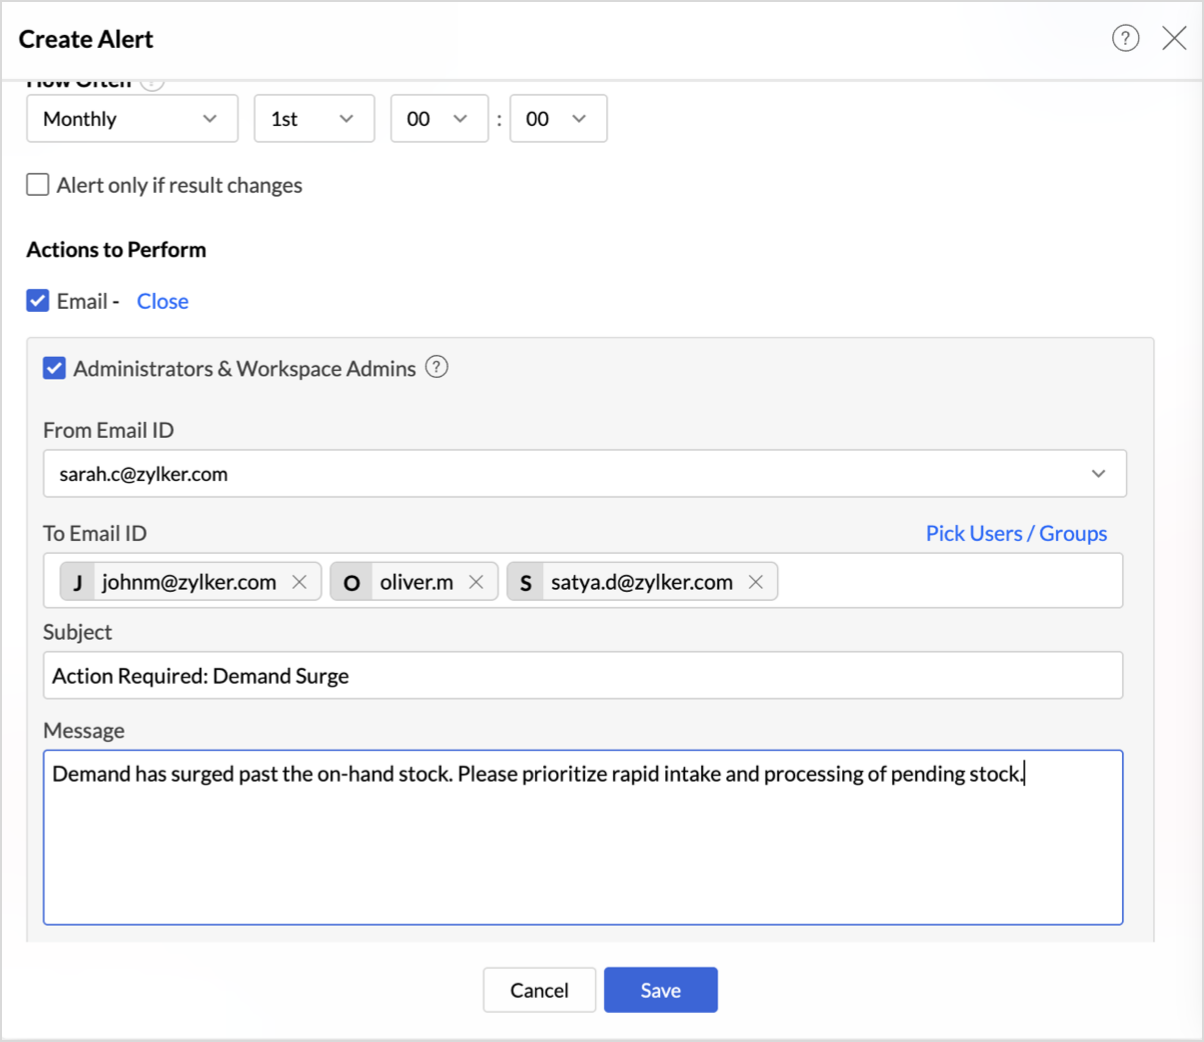
- Click Save or close the Email section to return to the main alert dialog.


Note: Group recipient behaviour
- All members of a selected group receive the alert.
- If a group is deleted from Workspace Settings, it is automatically removed from the recipient list.
- Changes to group membership (adding or removing members) do not affect the alert configuration, membership is resolved at the time the alert is sent.
5. How do I attach the filtered data that triggered the alert to the email?
- When the alert fires, the attached CSV will contain:
- This option works independently of Include Report - both can be active simultaneously, sending the report view and the filtered CSV in the same email.
- In the Email section, locate the Attach filtered values option listed below Include Report.
- Only the rows that matched the alert's conditions.
- The current view's columns with column headers included.
- This attachment is supported across all alert-compatible view types: Chart, Pivot Table, and Summary View.
- File size limit: If the CSV exceeds 15 MB, the attachment will not be included and only the email message is sent.

6. How do I set up an In-App notification for Data Alert?
7. How do I set up a notification in the Slack channel for Data Alert?
8. How do I set up a notification in the Microsoft Teams for Data Alert?
9. How do I set up a webhook request for Data Alert?
10. How do I set up a workflow in Zoho flow for Data Alert?
11. How do I set up a workflow in Zapier for Data Alert?
Manage Data Alert
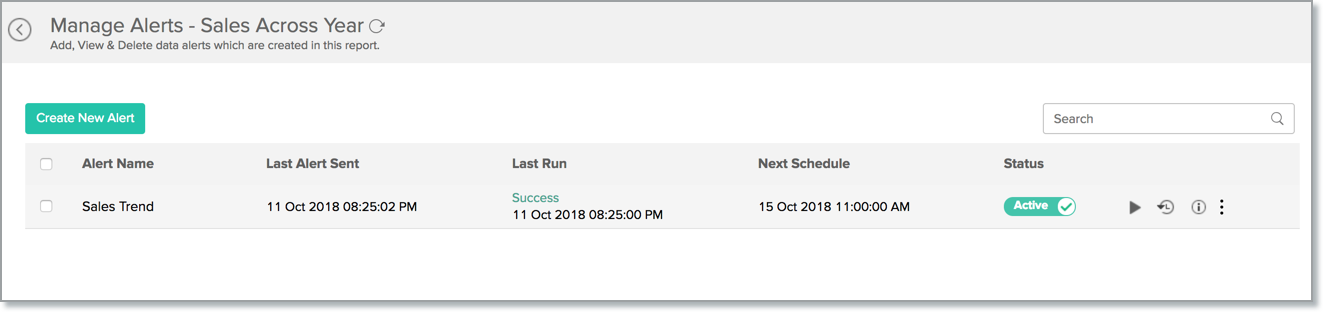
1. How do I manage all the alerts in my Workspace?
Zoho Analytics allows you to manage all Data Alert created in a Workspace on a single page for easy access.
Follow the steps to view and manage all the Alerts in your Workspace.
- Open the Workspace Setting page.
- Click the Alerts tab. This will list all alerts created in this workspace.
- When you mouse over an alert, a list of contextual options will appear. You can perform the below operations with these options.
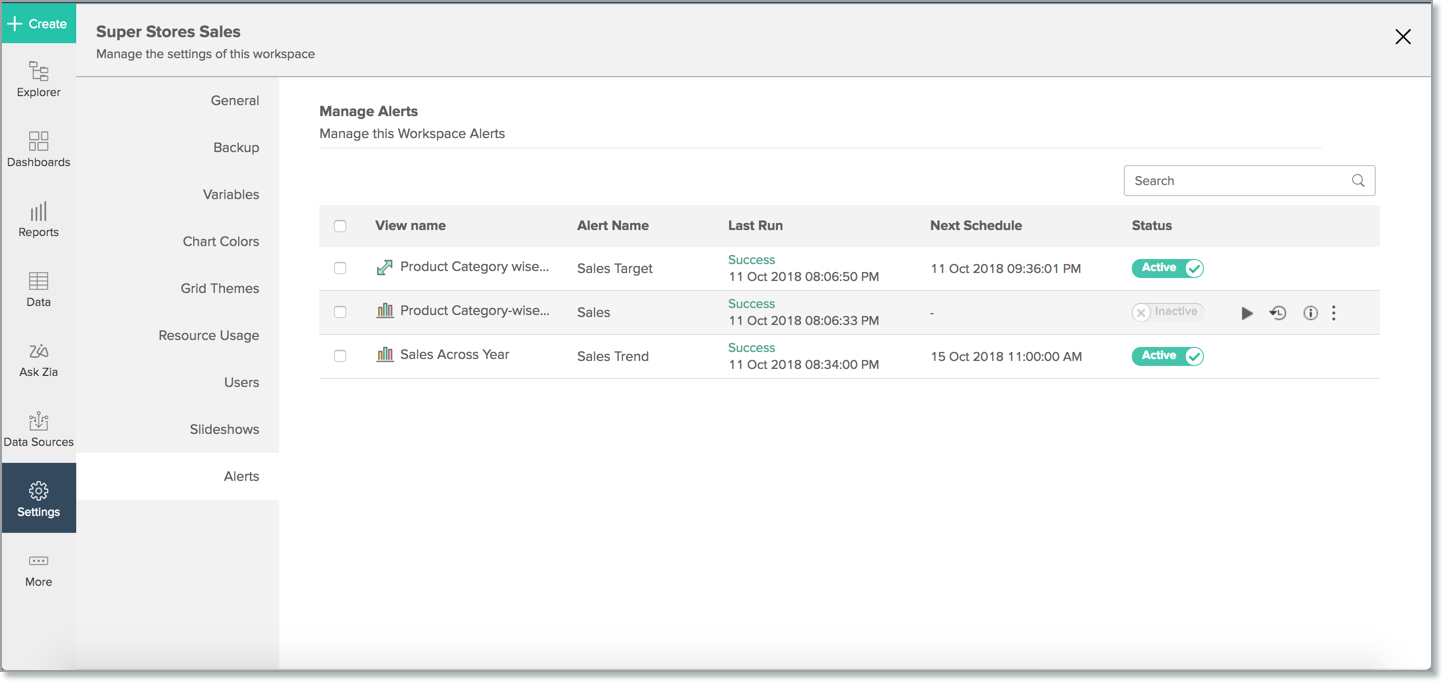
- Run - Click this to instantly run the alert verification.
- Edit - Click this to edit the Data Alert.
- Delete - Click this to delete the Data Alert.
- View History - Click this to view the alert triggered history.
- View Alert - Click this to view the Data Alert.
Alternatively, you can also manage all Alert created in a report. Follow the steps to view and manage all Alert in a report.
- Open the report over which the alert is created.
- Click the Alert icon and then choose Manage Alert.
- The Manage Alerts page will open listing all alert created over the report.
2. How can I edit the Data Alert?
Yes, you can edit the data alert when needed. Follow the below steps to do so.
- Open the report over which the alert is created.
- Click the alert icon and then select Manage Alert.
- The Manage Alert page will open. Mouse over the alert you want to edit. A set of action menu will appear.
Click the Edit icon.
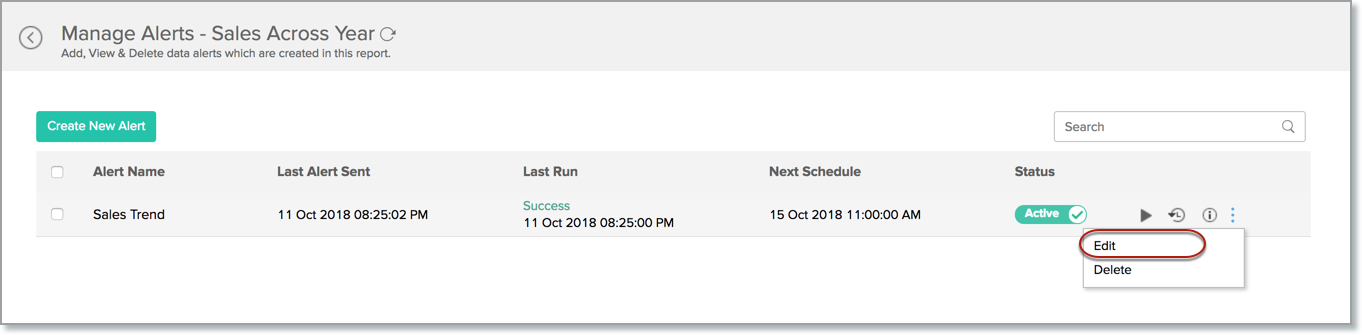
- The Edit Data alert section will open. You can modify this as needed.

3. On what frequency the data alert will be verified?
The Data alerts are verified in the interval you have set.
Available options are:
- Hourly
- Daily
- Weekly
- Monthly

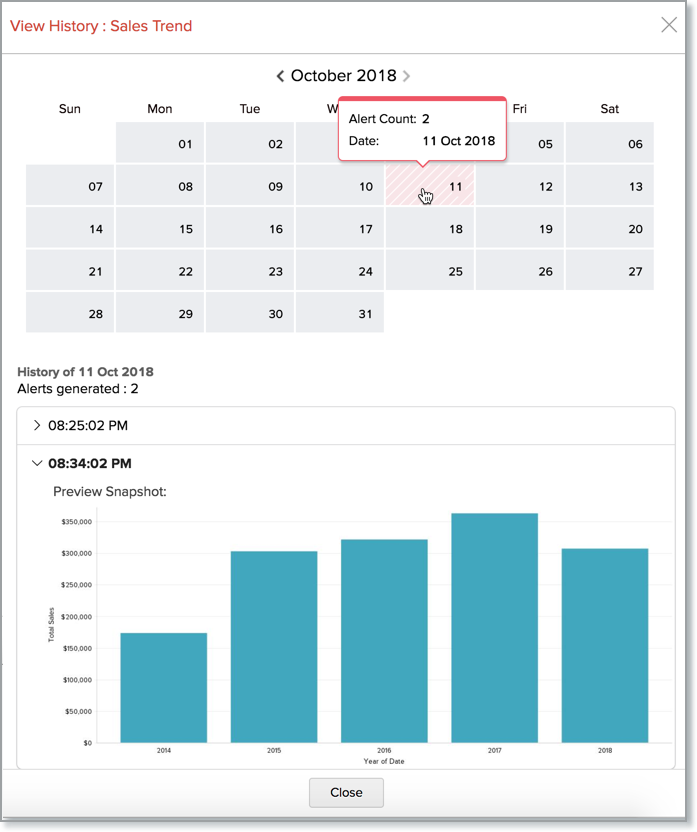
4. How can I see the Alert triggered History?
Yes, you can see the alert triggered history. Follow the below steps to do so.
- Open the report over which the alert is created.
- Click the alert
 icon and then select Manage Alert.
 The Manage Alert page will open. Mouse over the alert you want to edit. A set of action menu will appear.

- Click Alert History icon.
- A calendar view will open highlighting the days that the alerts were triggered in red. Clicking this will list the alert runtime, triggered time and the copy of the report when it is triggered.

5. Can I execute the data alert instantly?
Yes, you can run the data alert instantly. Follow the below steps to do so.
- Open the report over which the alert is created.
- Click the alert icon and then select Manage Alert.
The Manage Alert page will open. Mouse over the alert you want to edit. A set of action menu will appear.
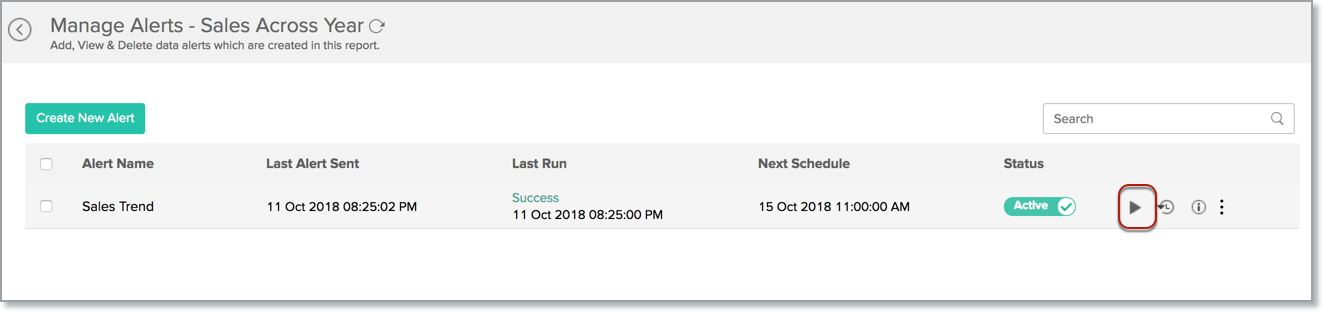
- Click the Run icon. The alert conditions will be verified instantly.

6. Can I delete the Data Alert?
Yes, you can delete the data alert instantly. Follow the below steps to do so.
- Open the report over which the alert is created.
- Click the alert icon and then select Manage Alert.
The Manage Alert page will open. Mouse over the alert you want to edit. A set of action menu will appear.
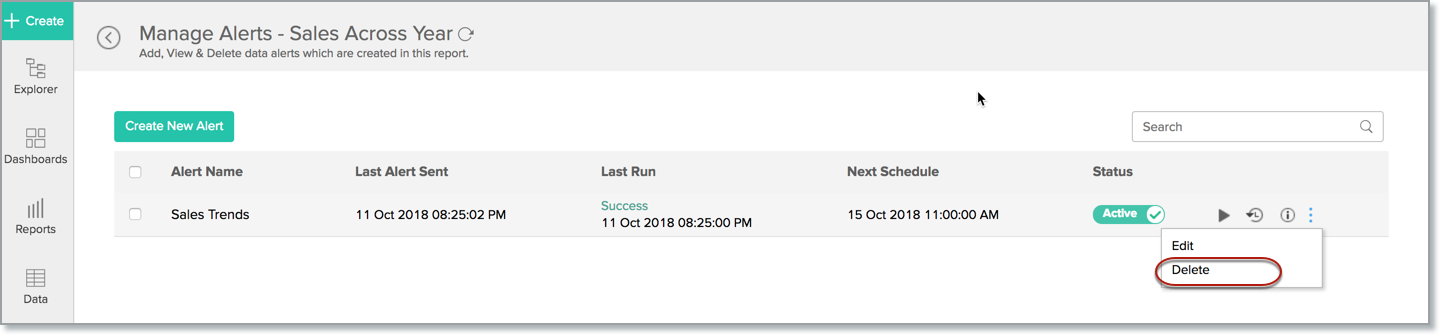
- Click more actions icon and then select the Delete.
You will be prompted to confirm the action. Click Yes to confirm.
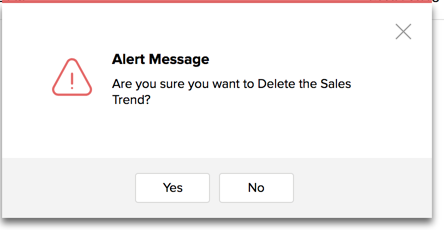
- The Data Alert will be deleted.

