Pay Runs
Pay run refers to the act of compensating your employees for the days they’ve worked in a month. Using Zoho Payroll, you can process pay runs for your employees effectively.
Before you run payroll, make sure that you have set up Zoho Payroll and added all your employees.
How to process a pay run?
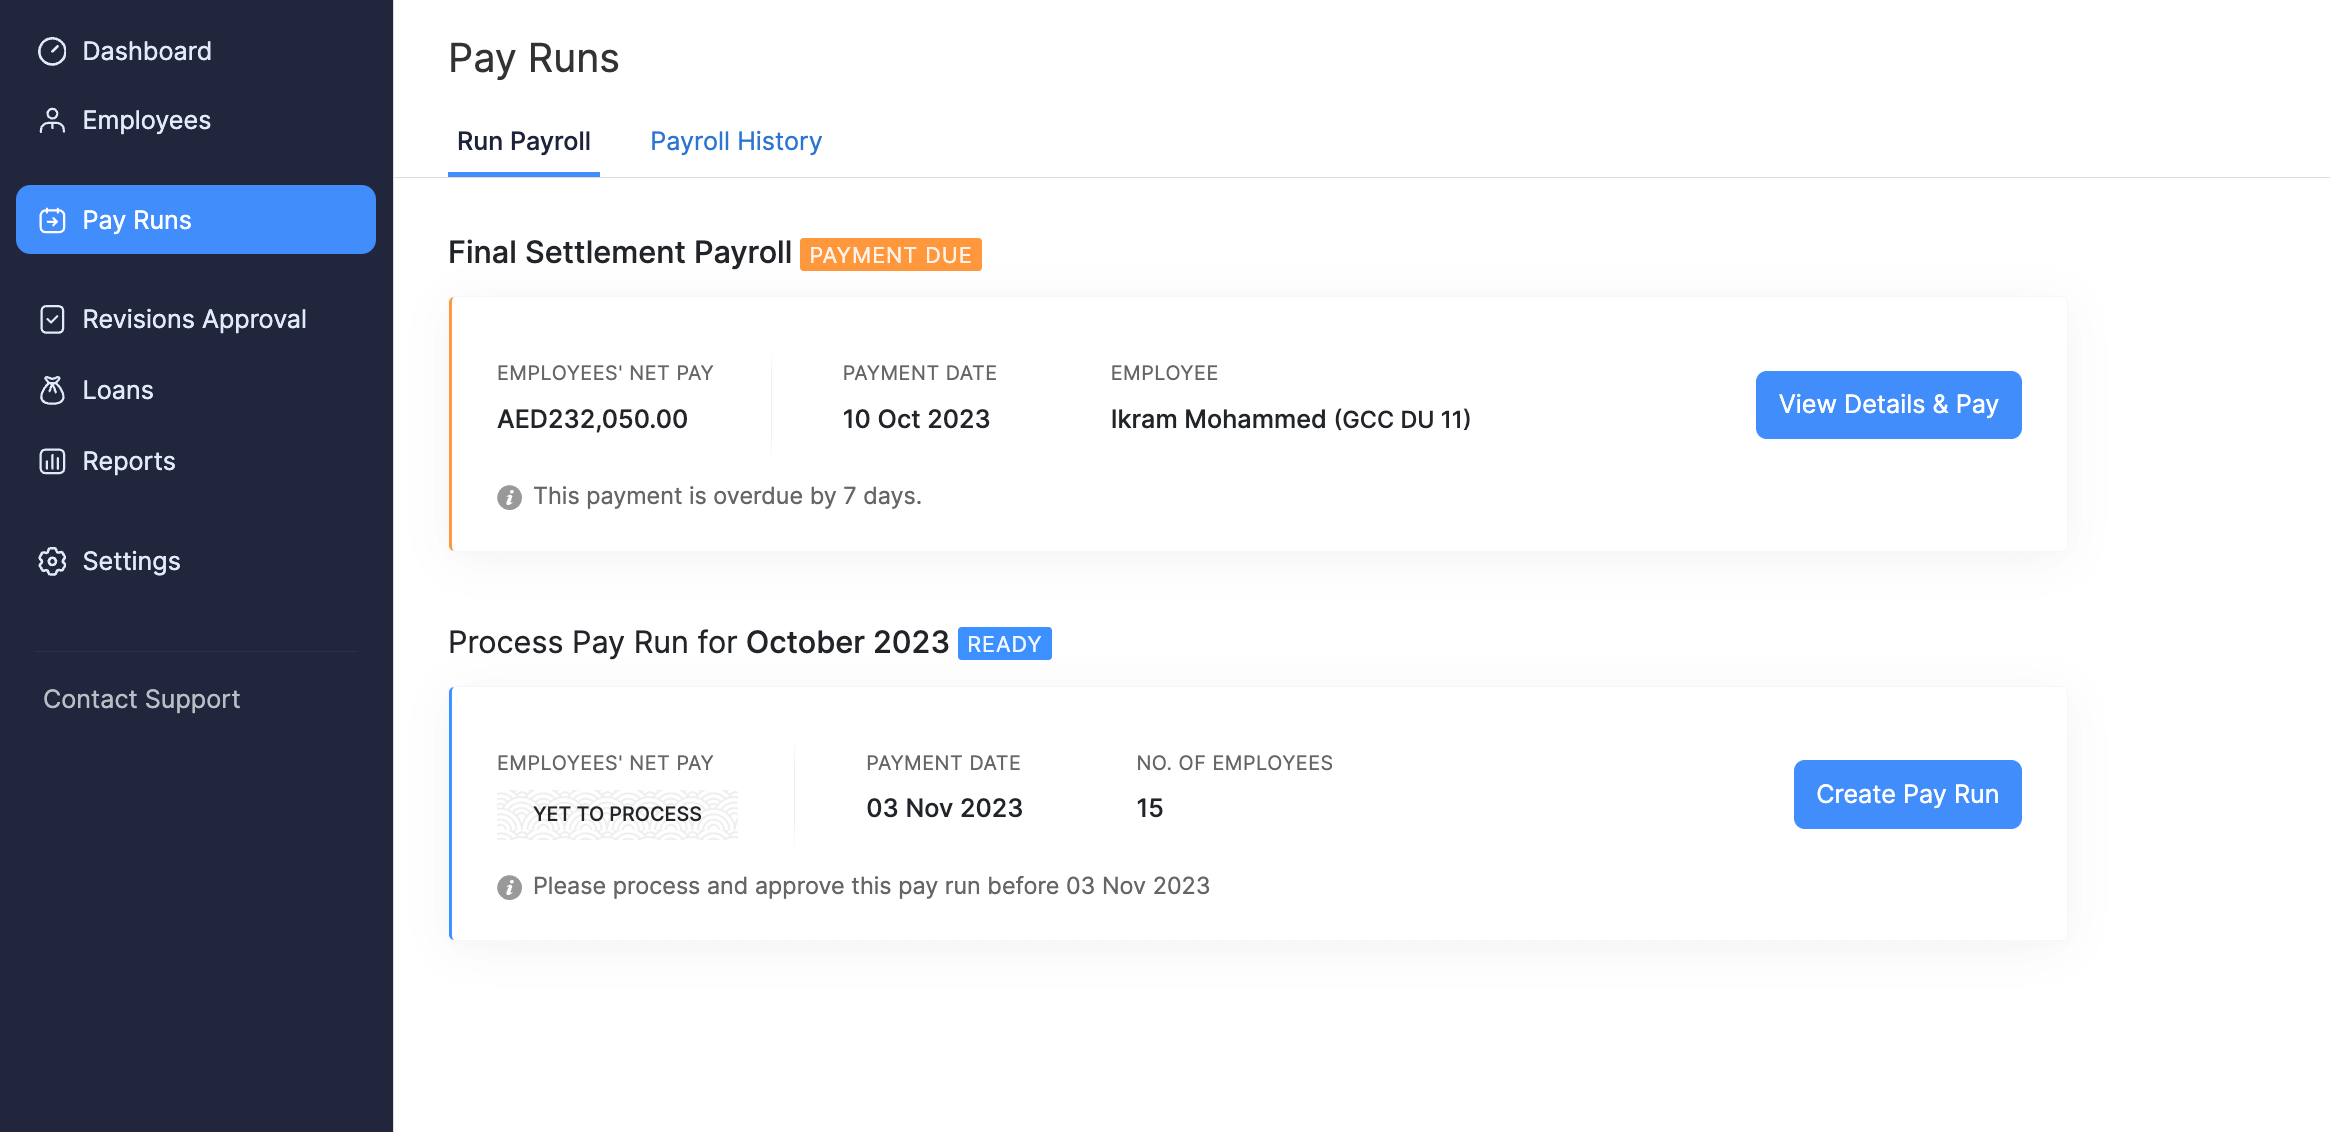
Based on your pay schedule, you will receive a reminder for the pending pay runs. You can create a pay run from Home or Pay Runs module by clicking the Create Pay Run button.
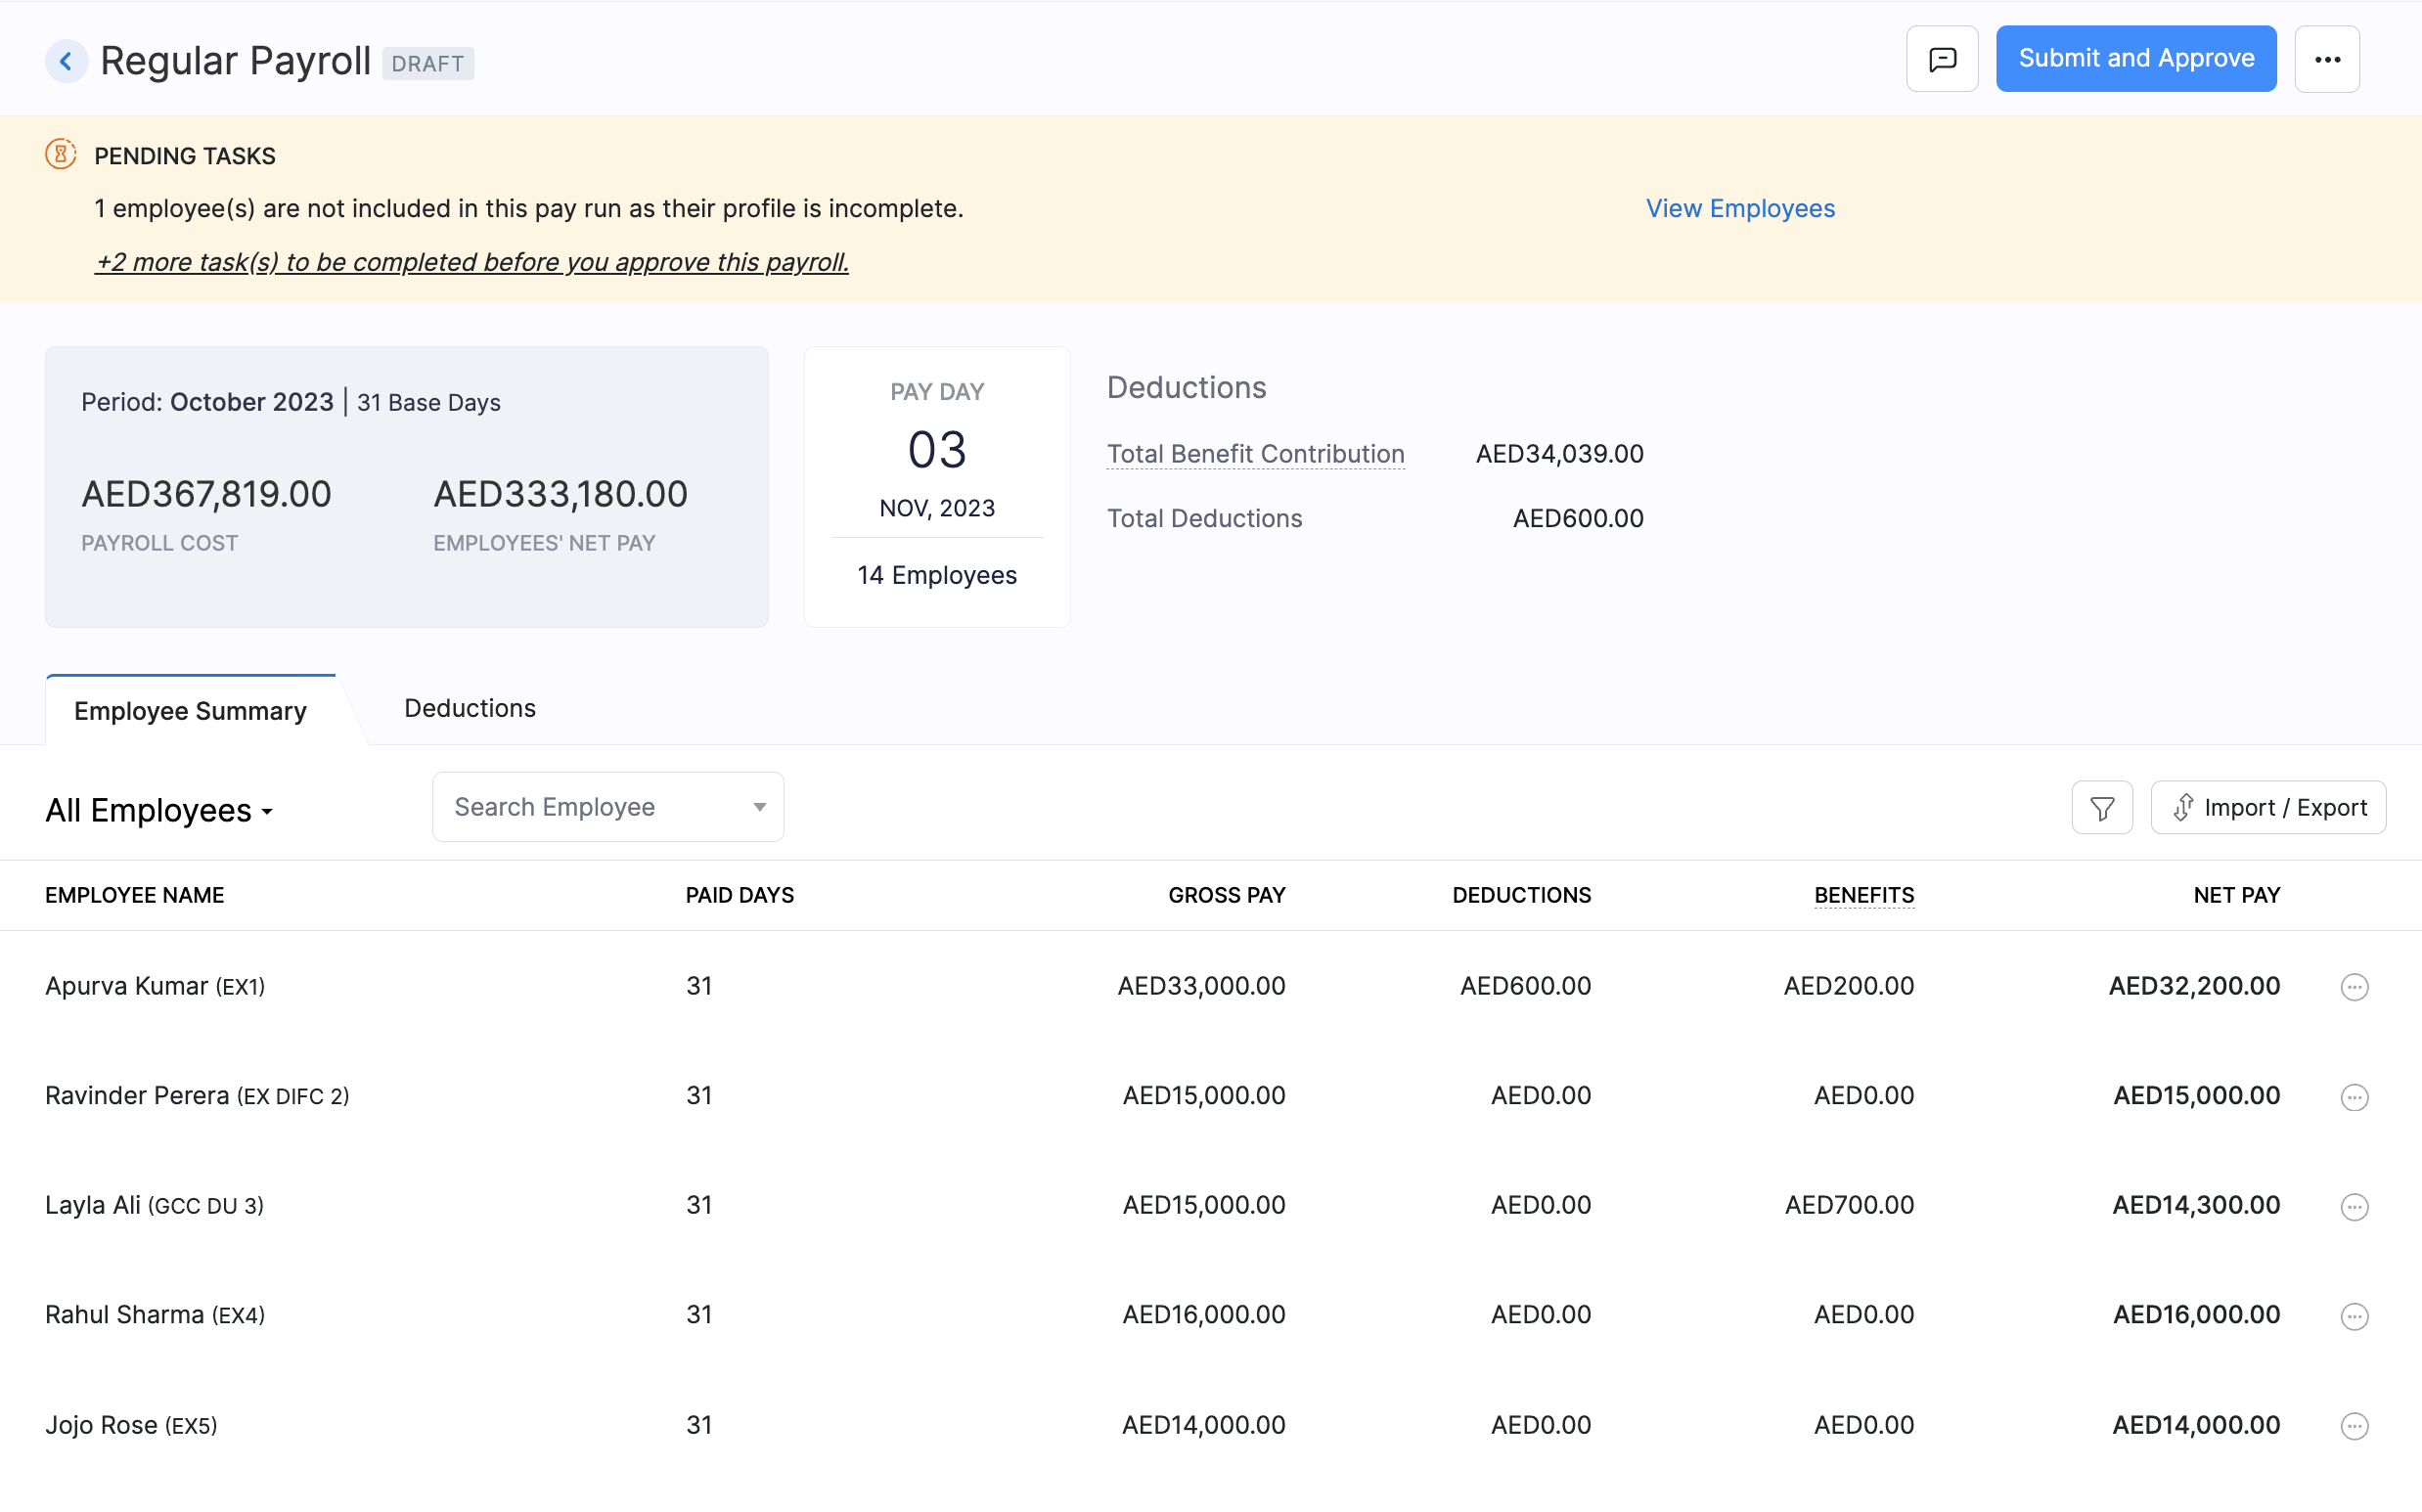
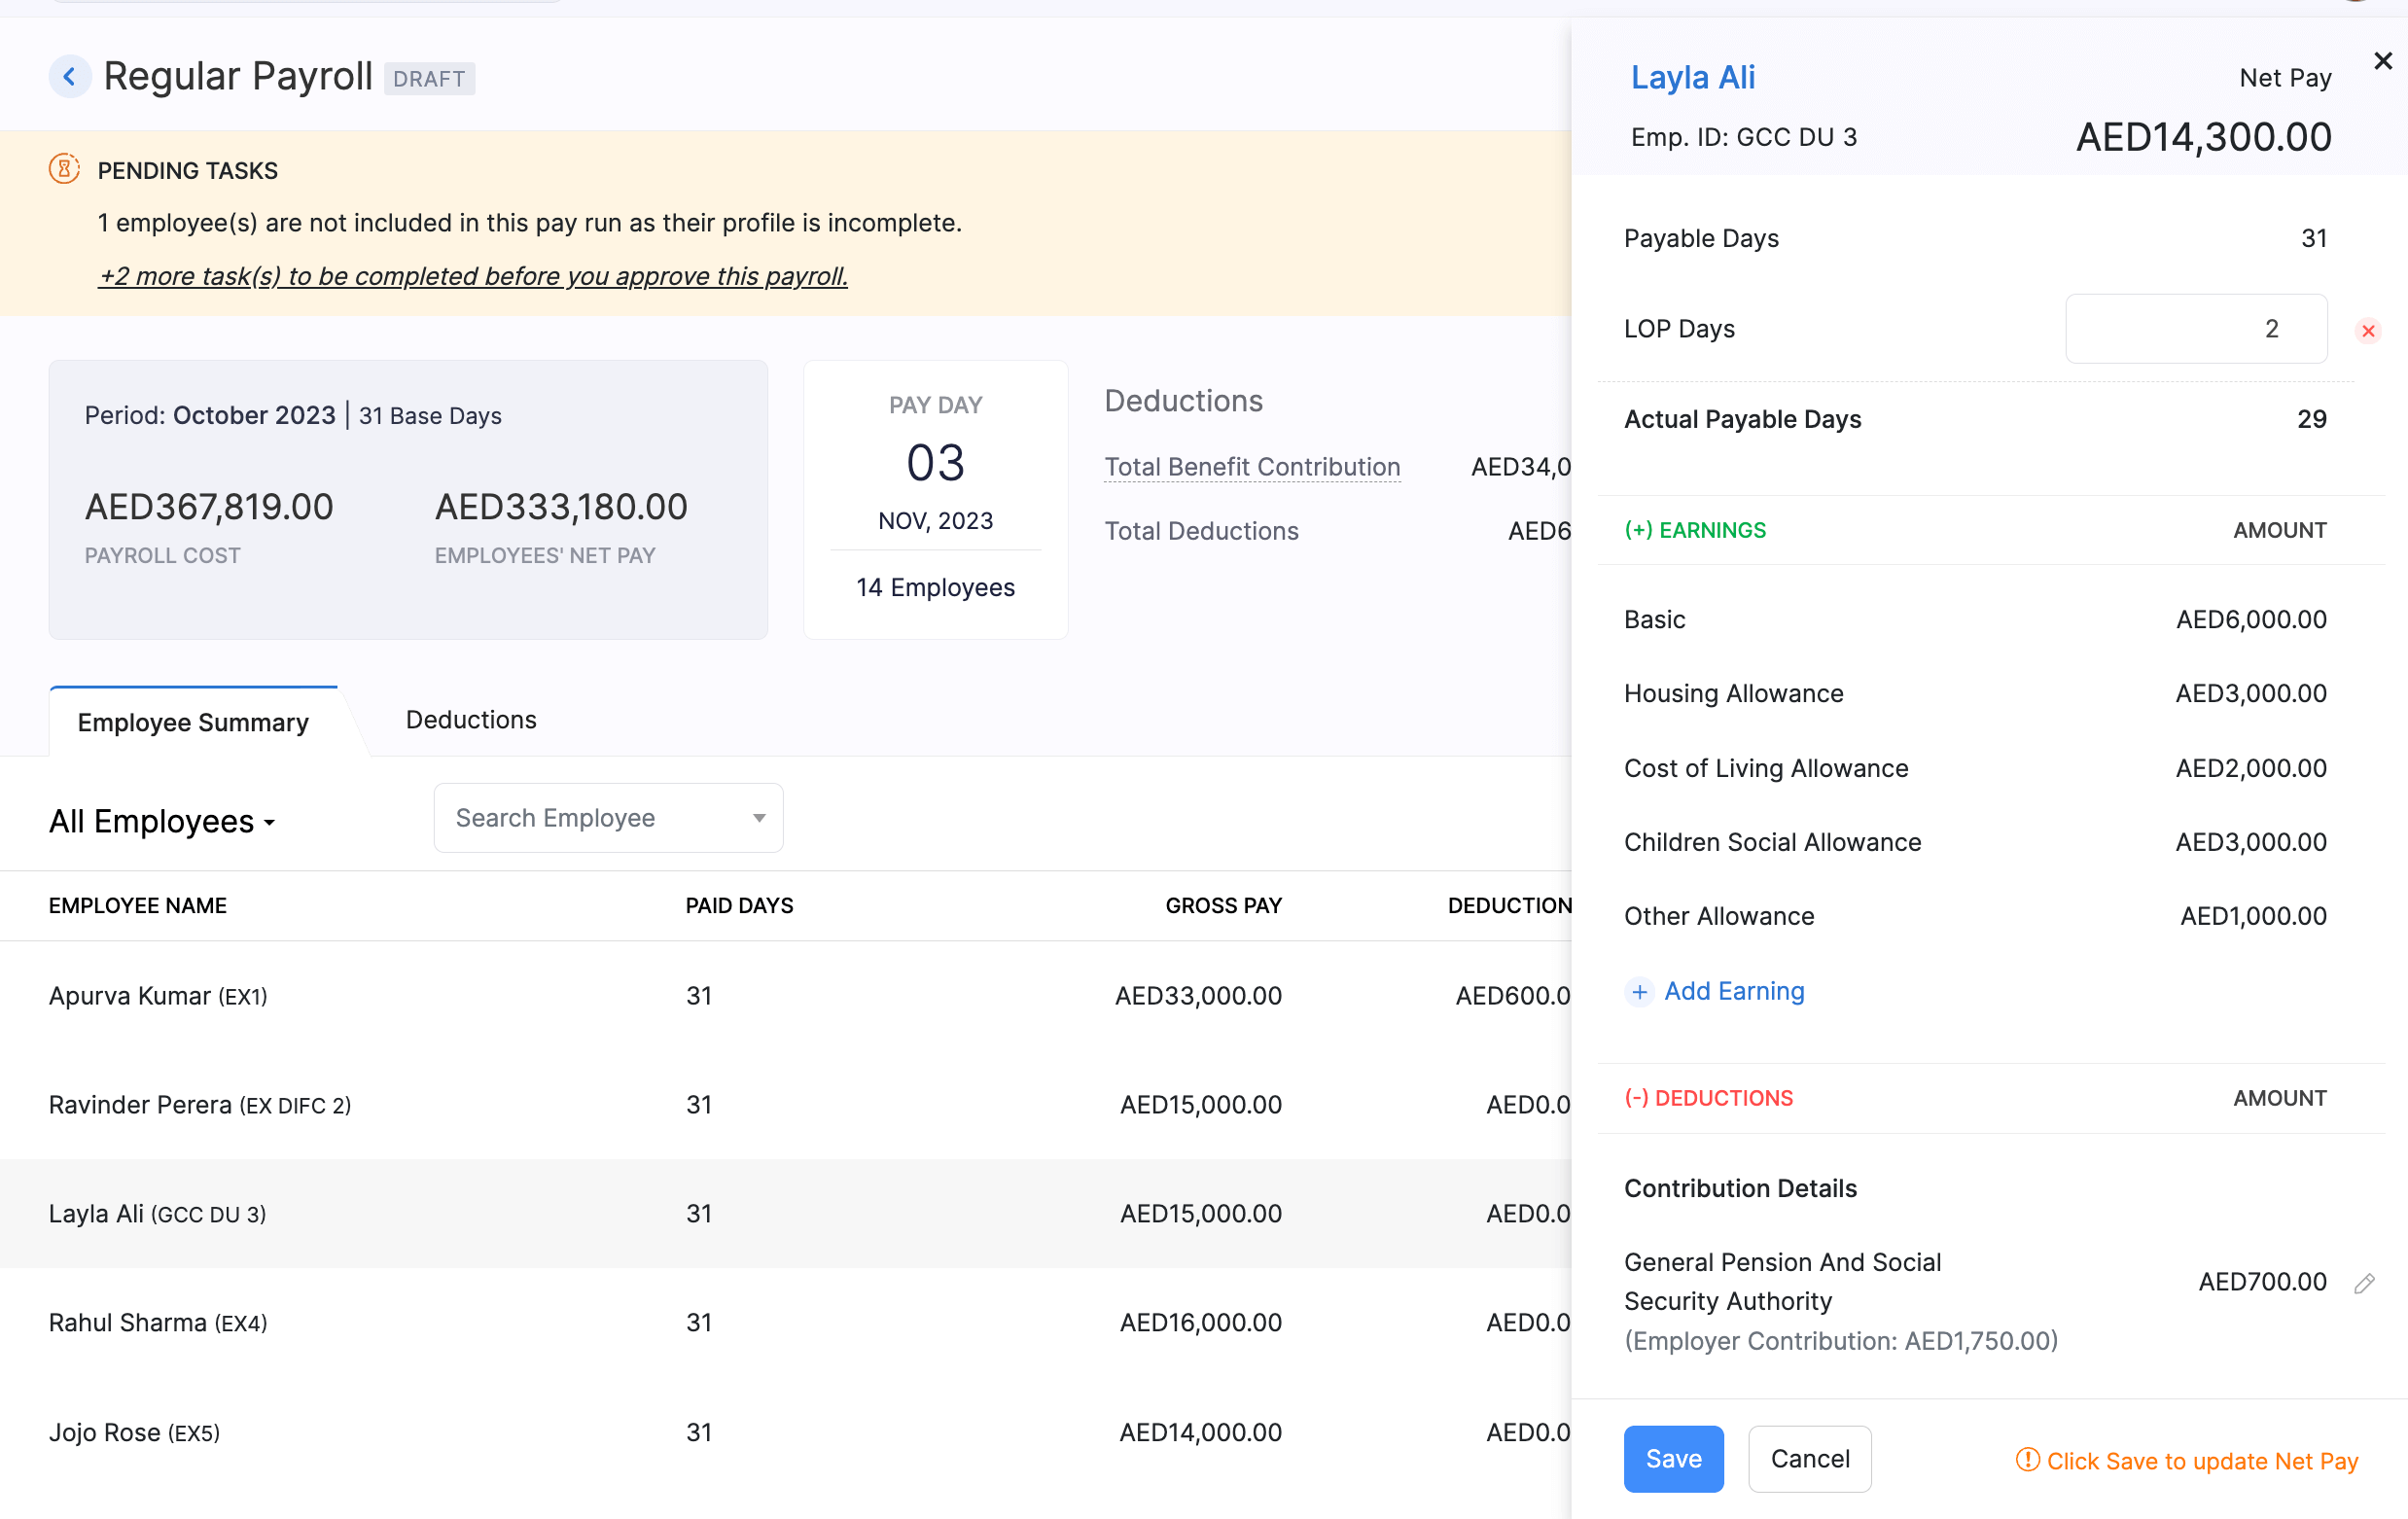
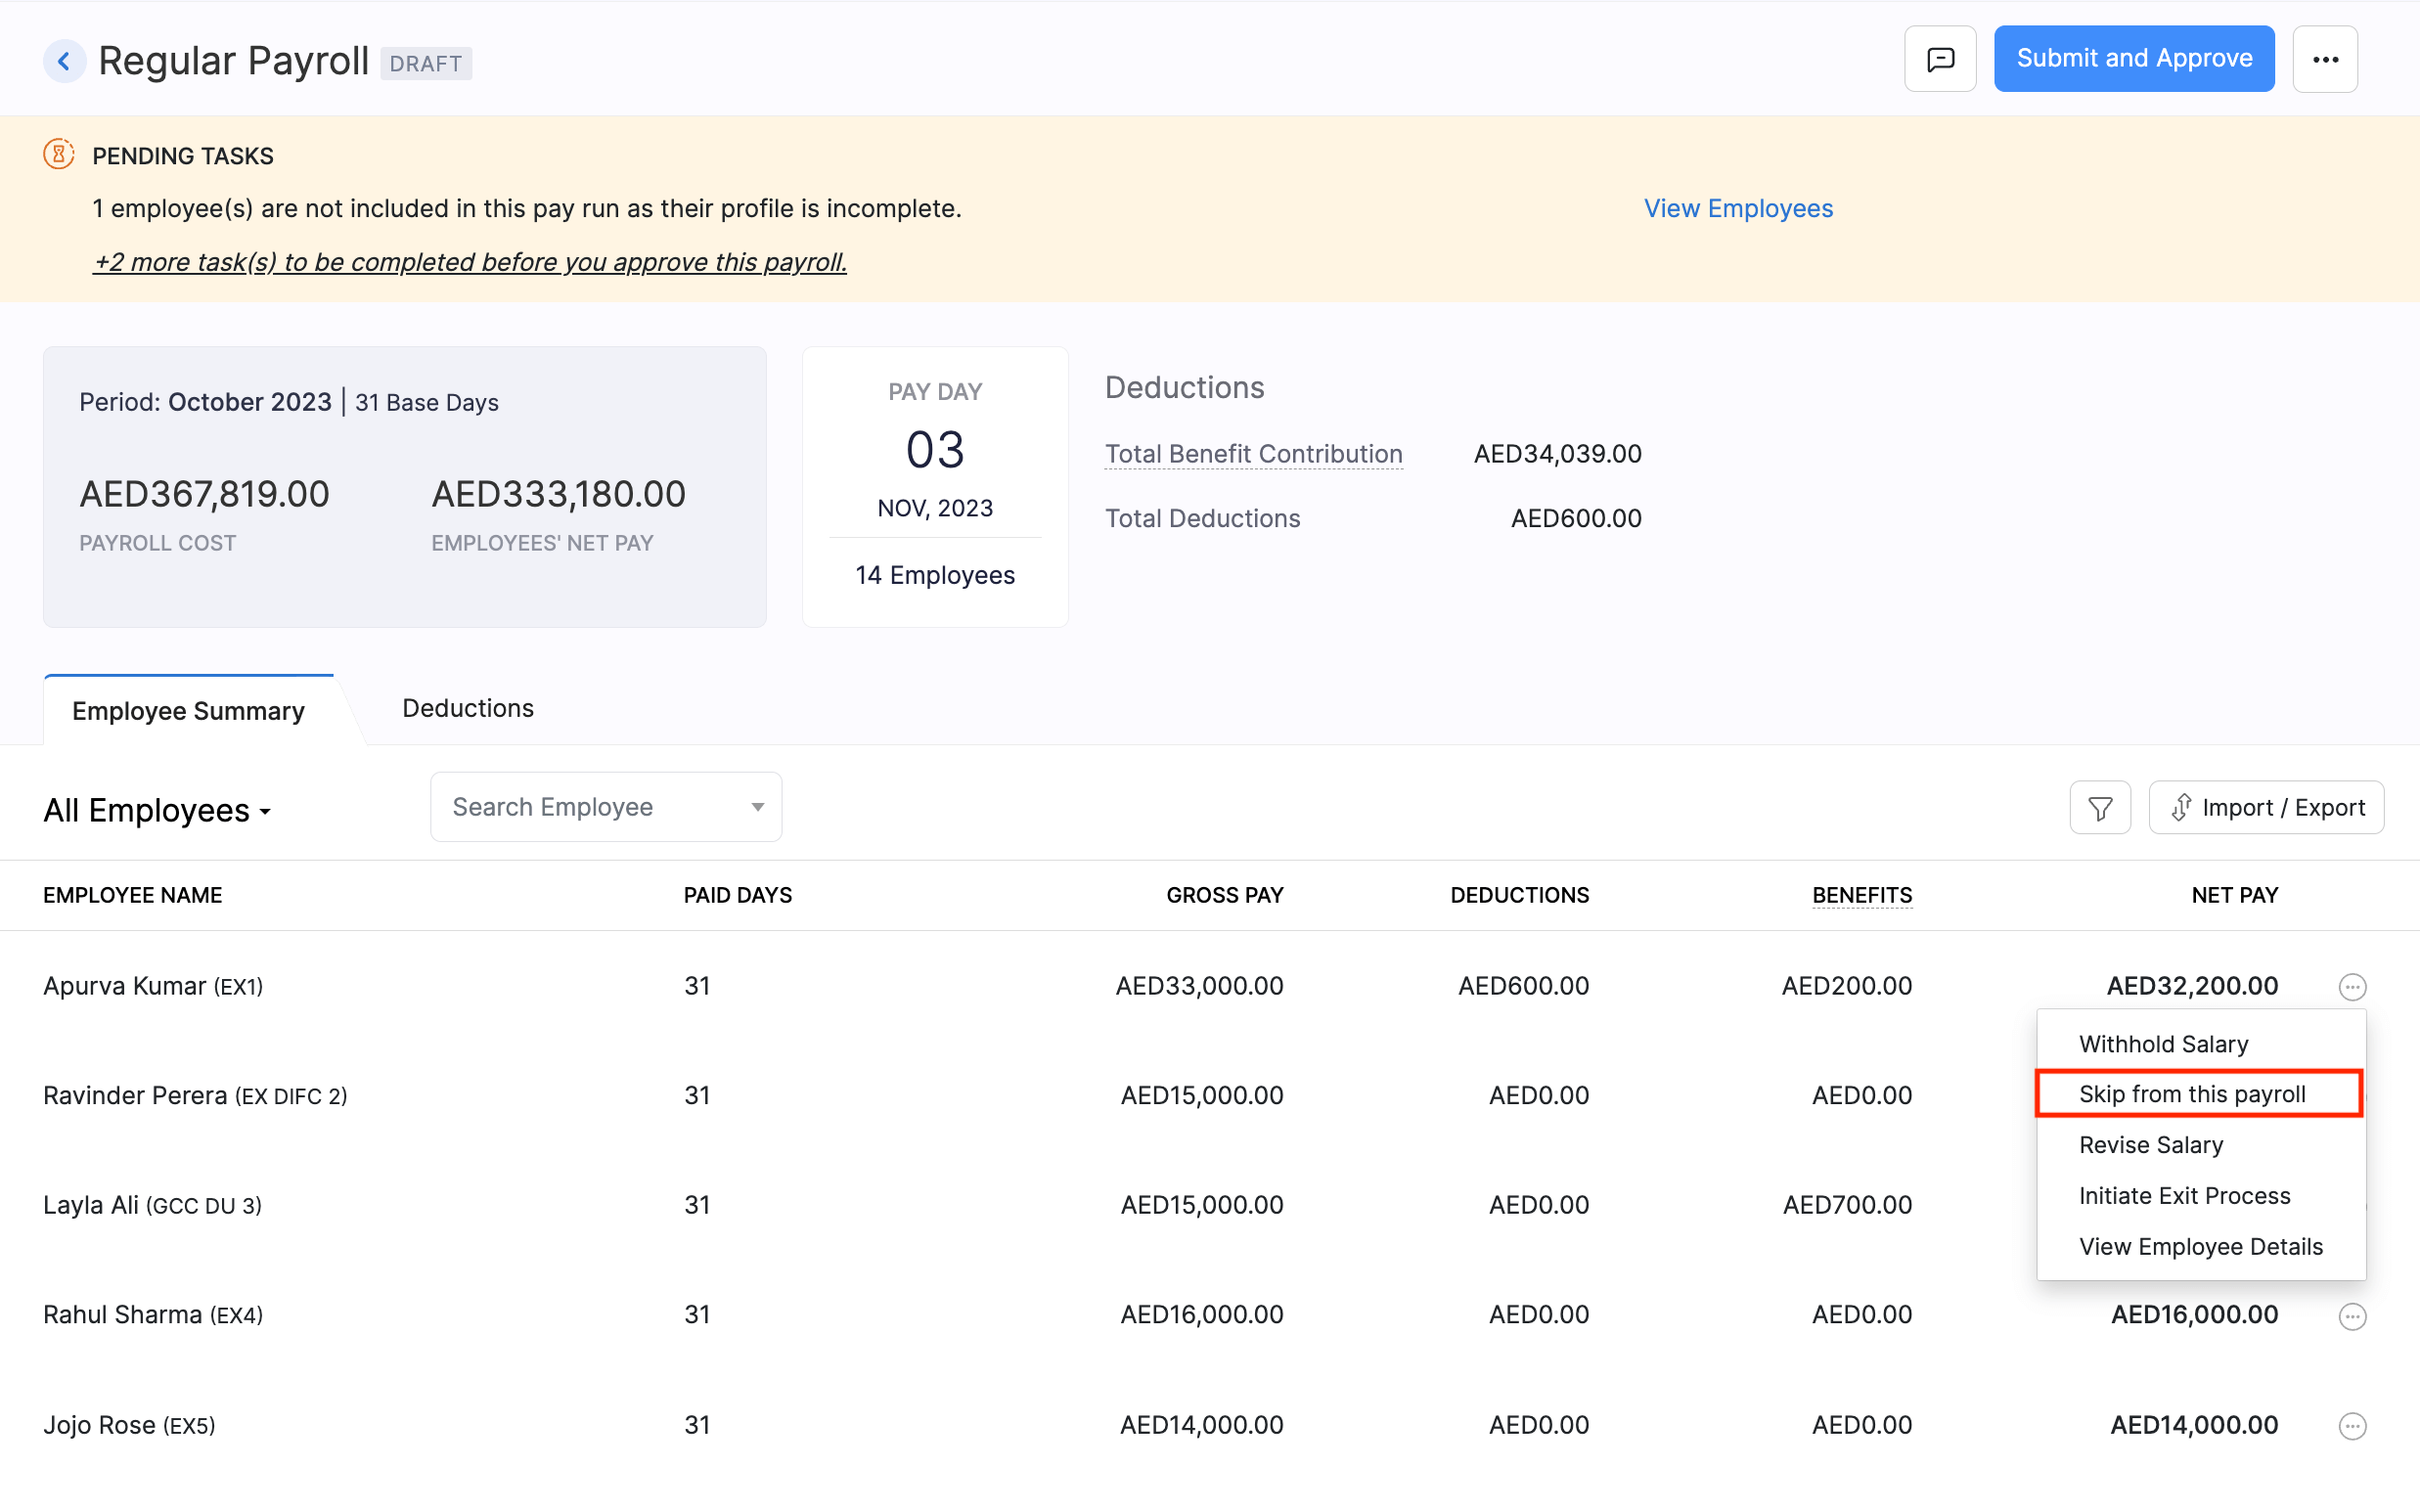
- Click each employee name to add Loss of Pay (LOP) days, LOP Reversal one-time earnings and one-time deductions.
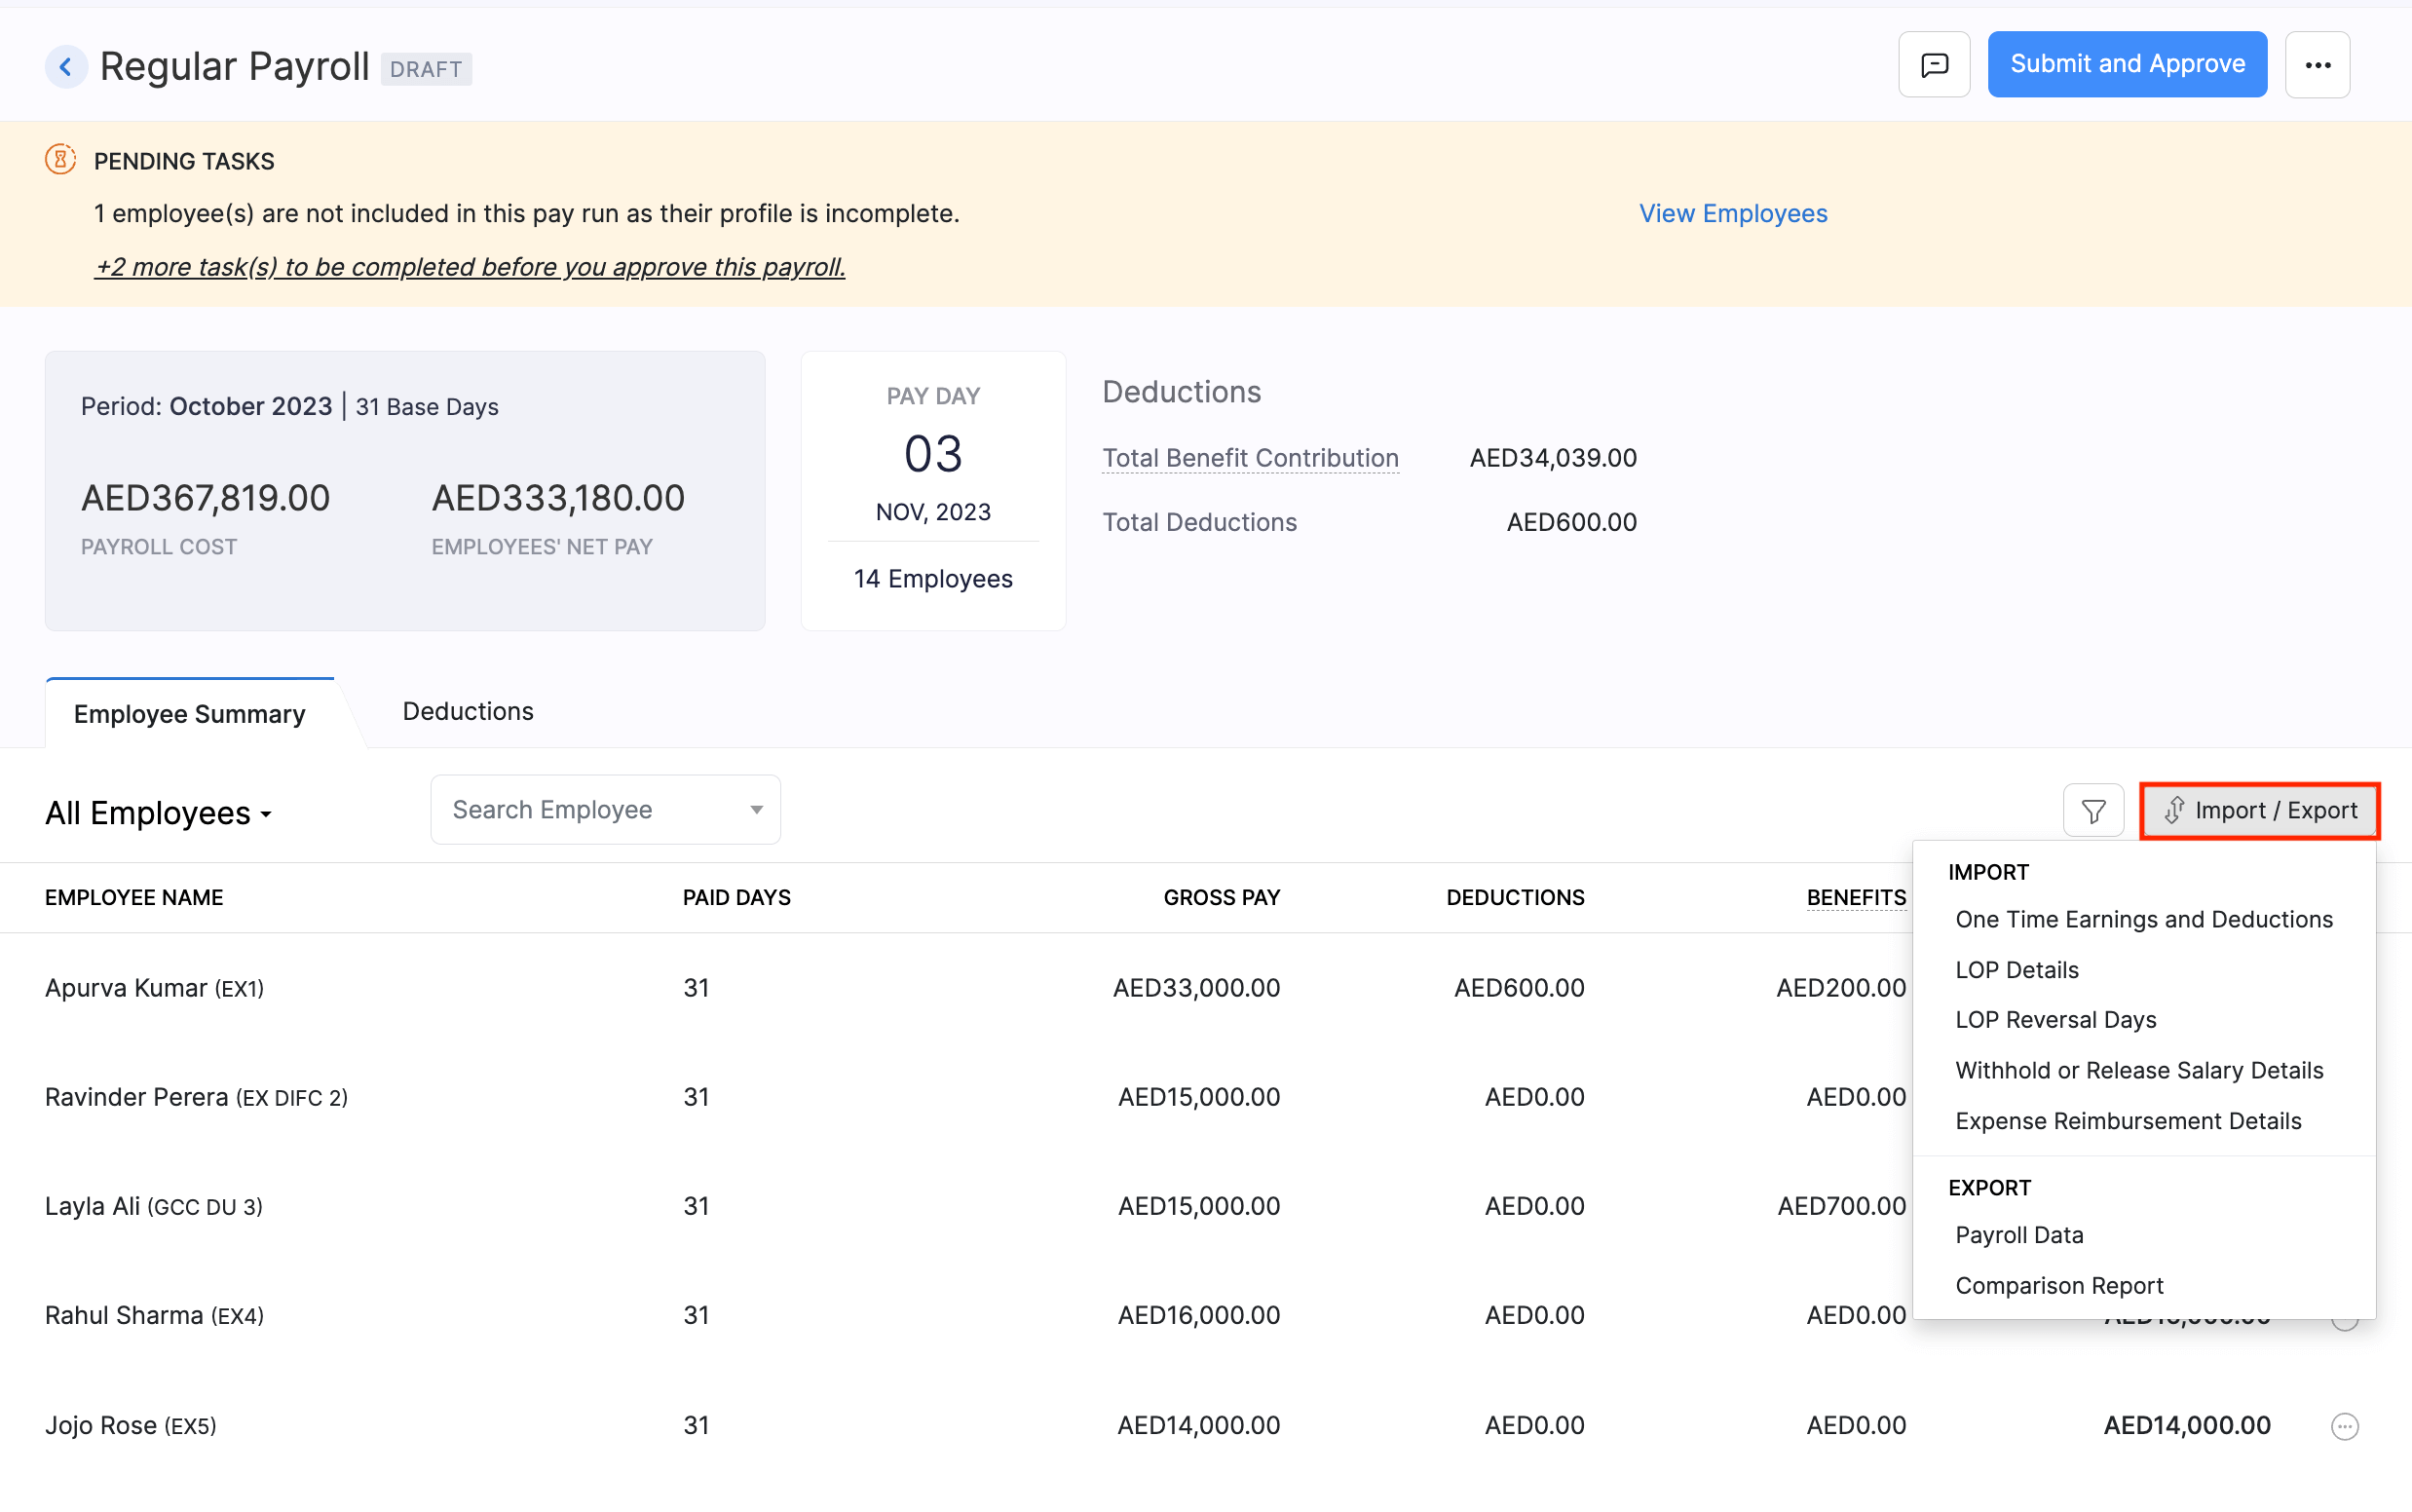
- You can also import the LOP details for all employees in a CSV file instead of entering them one at a time. click Import/Export > LOP Details or Import/Export > One-time Earnings and Deductions. You can also export the payroll details from here.
- You can also enter the overtime hours for the employee, if you’ve configured the Overtime Allowance component which has custom formula as the calculation type. However, if you have integrated with Zoho People, the overtime hours will be synced automatically if overtime hours sync is enabled.
- If an employee doesn’t belong to the pay run, you can remove them by clicking the … icon next to the employee and selecting Skip from Payroll.
- Add notes by clicking the Comments button in the top-right corner of the Pay Runs page..
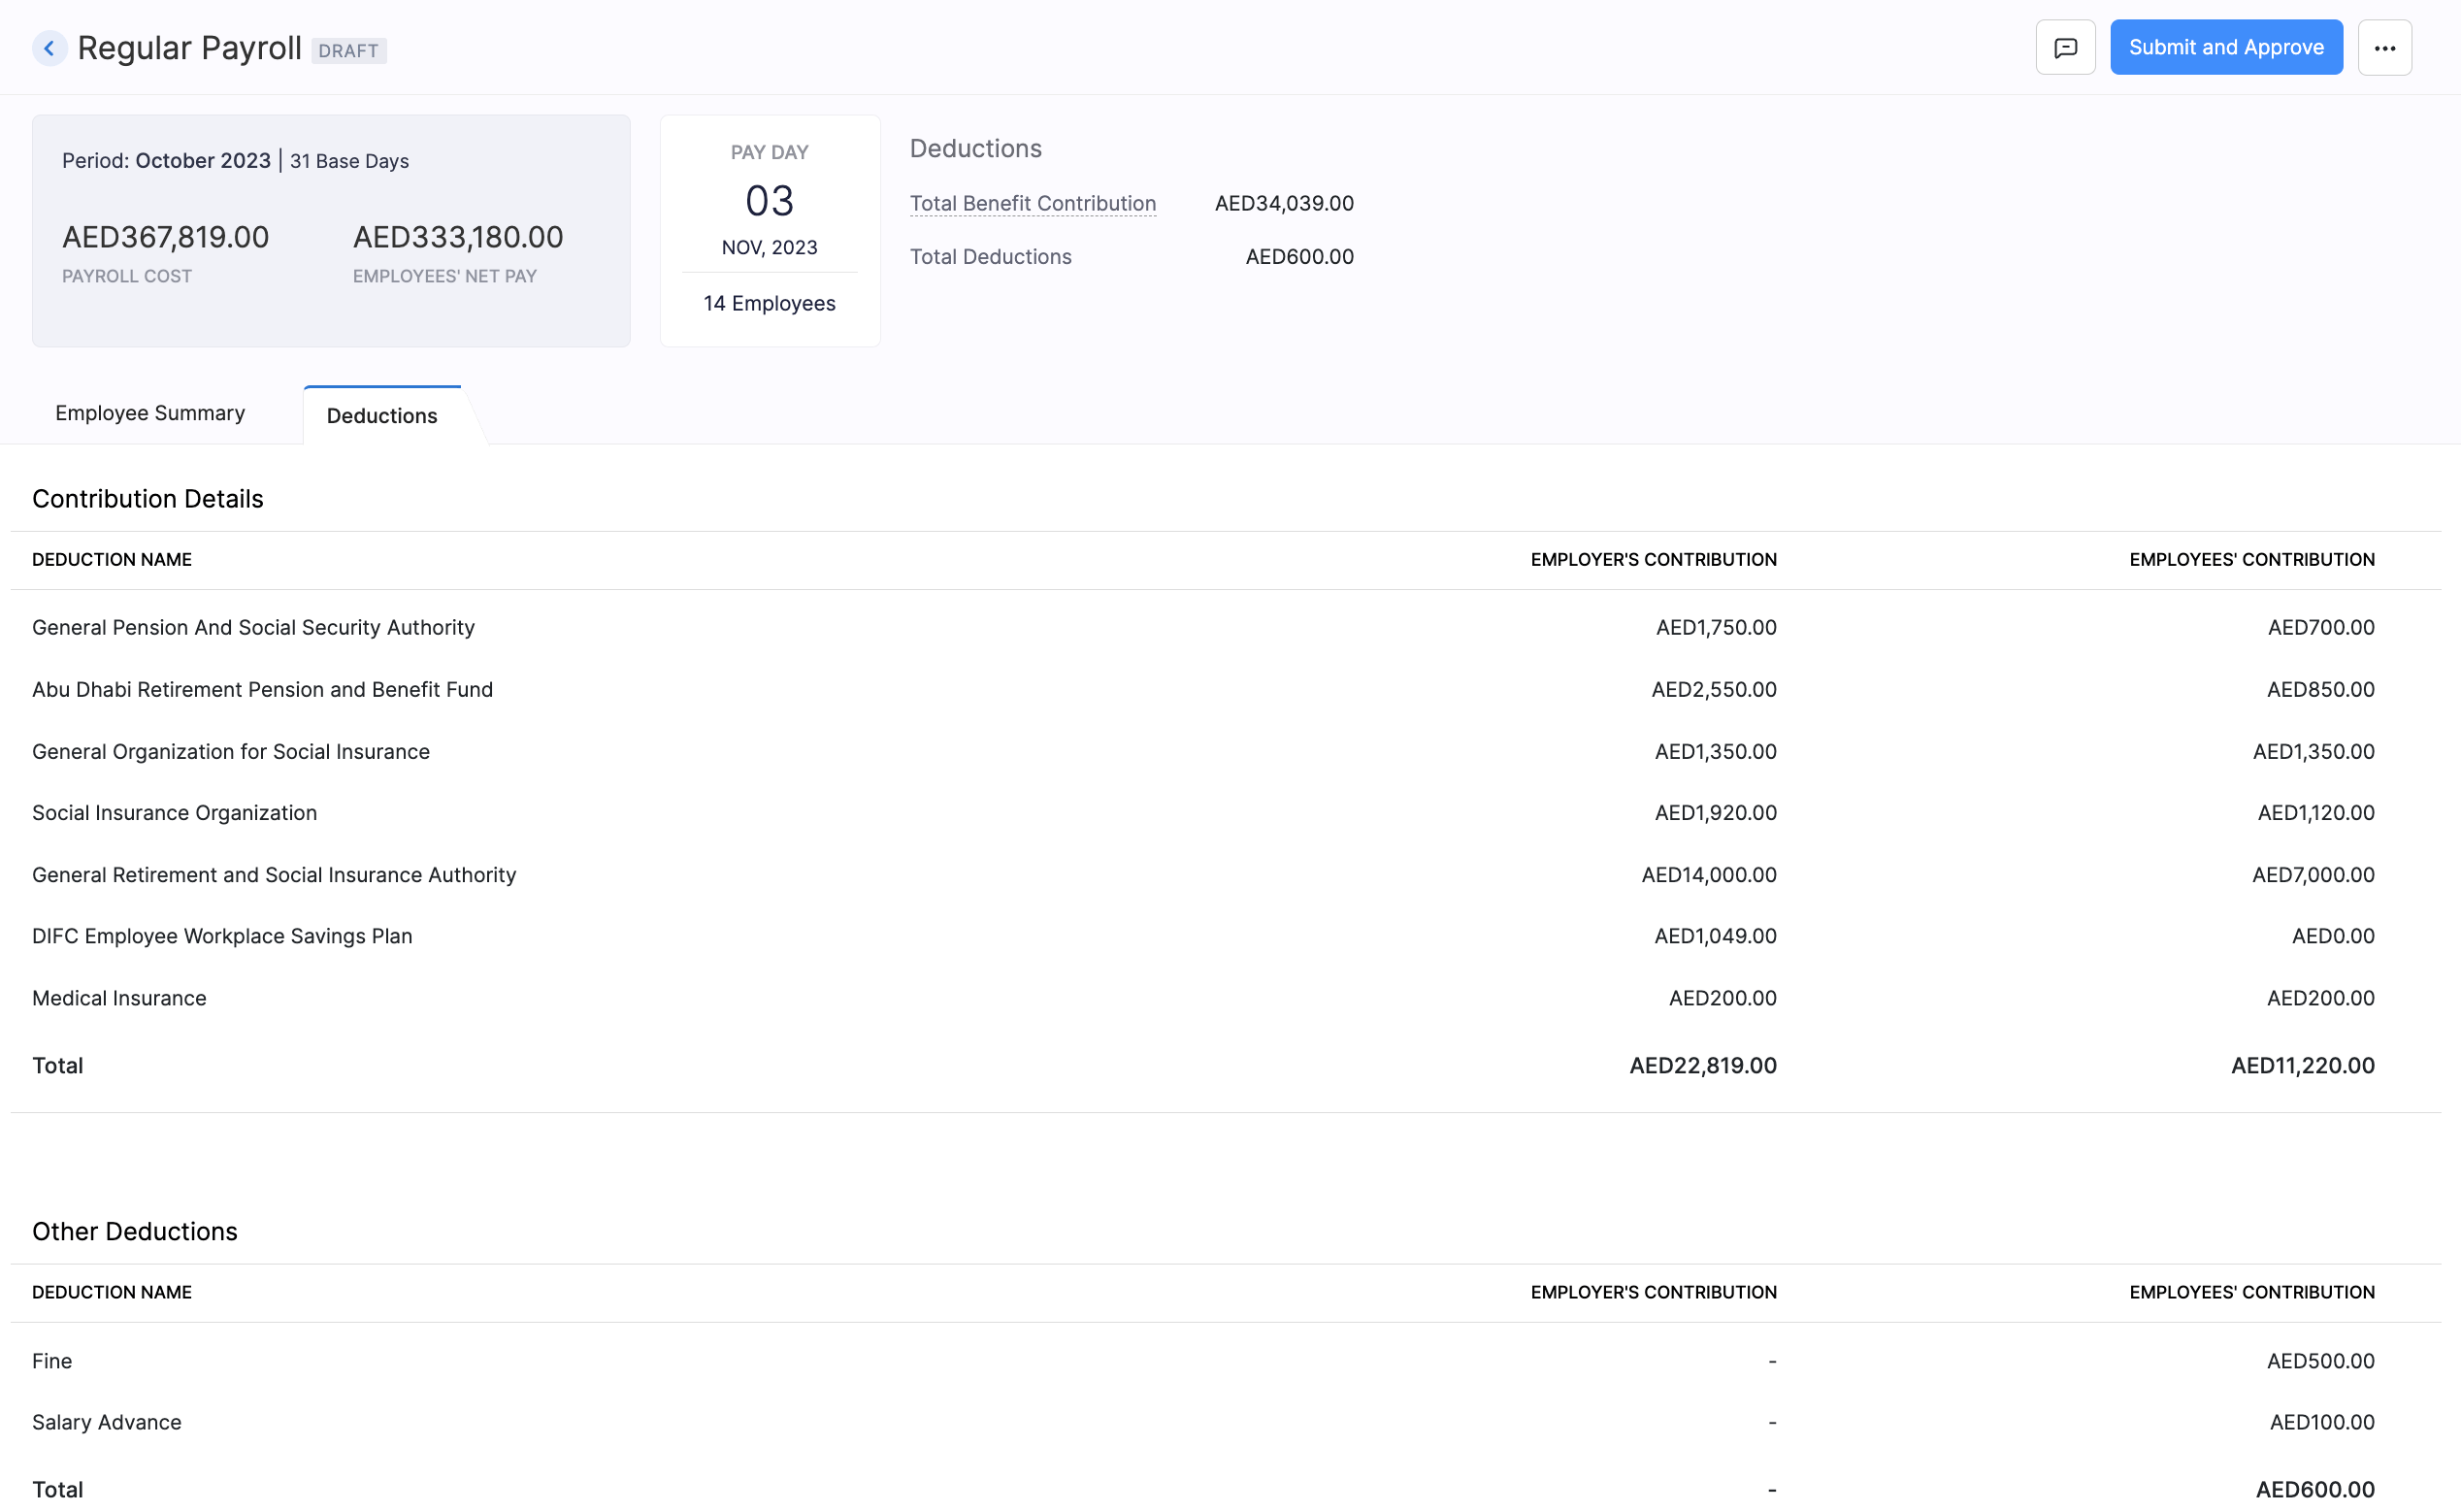
- Click the Deductions tab to view a summary of contributions made.
Withhold, Revert and Release Salary
There may be instances where you need to withhold your employee’s salary and disburse it in the following month or later. Zoho Payroll supports withholding of employees’ pay for a certain period using the Salary Withhold option in the Pay Runs module.
When can your employee’s salary be withheld?
Salary withhold can be applied when you have:
- New employees who’ve joined at the end of a month.
- Employees who are serving the notice period.
Withhold Salary
Here’s how you can withhold and release an employee’s salary in Zoho Payroll:
- Go to the Pay Runs module.
- Click Create Pay Run.
- In the pay run draft, click the More icon (…) next to the employee’s name and click Withhold Salary.
- Enter the reason for withholding the salary and click Proceed.
- If you have enabled Zoho Books integration, you can choose to post the journal entry for the payroll transaction in Zoho Books. The transaction will be recorded under the account you had configured while setting up the integration.
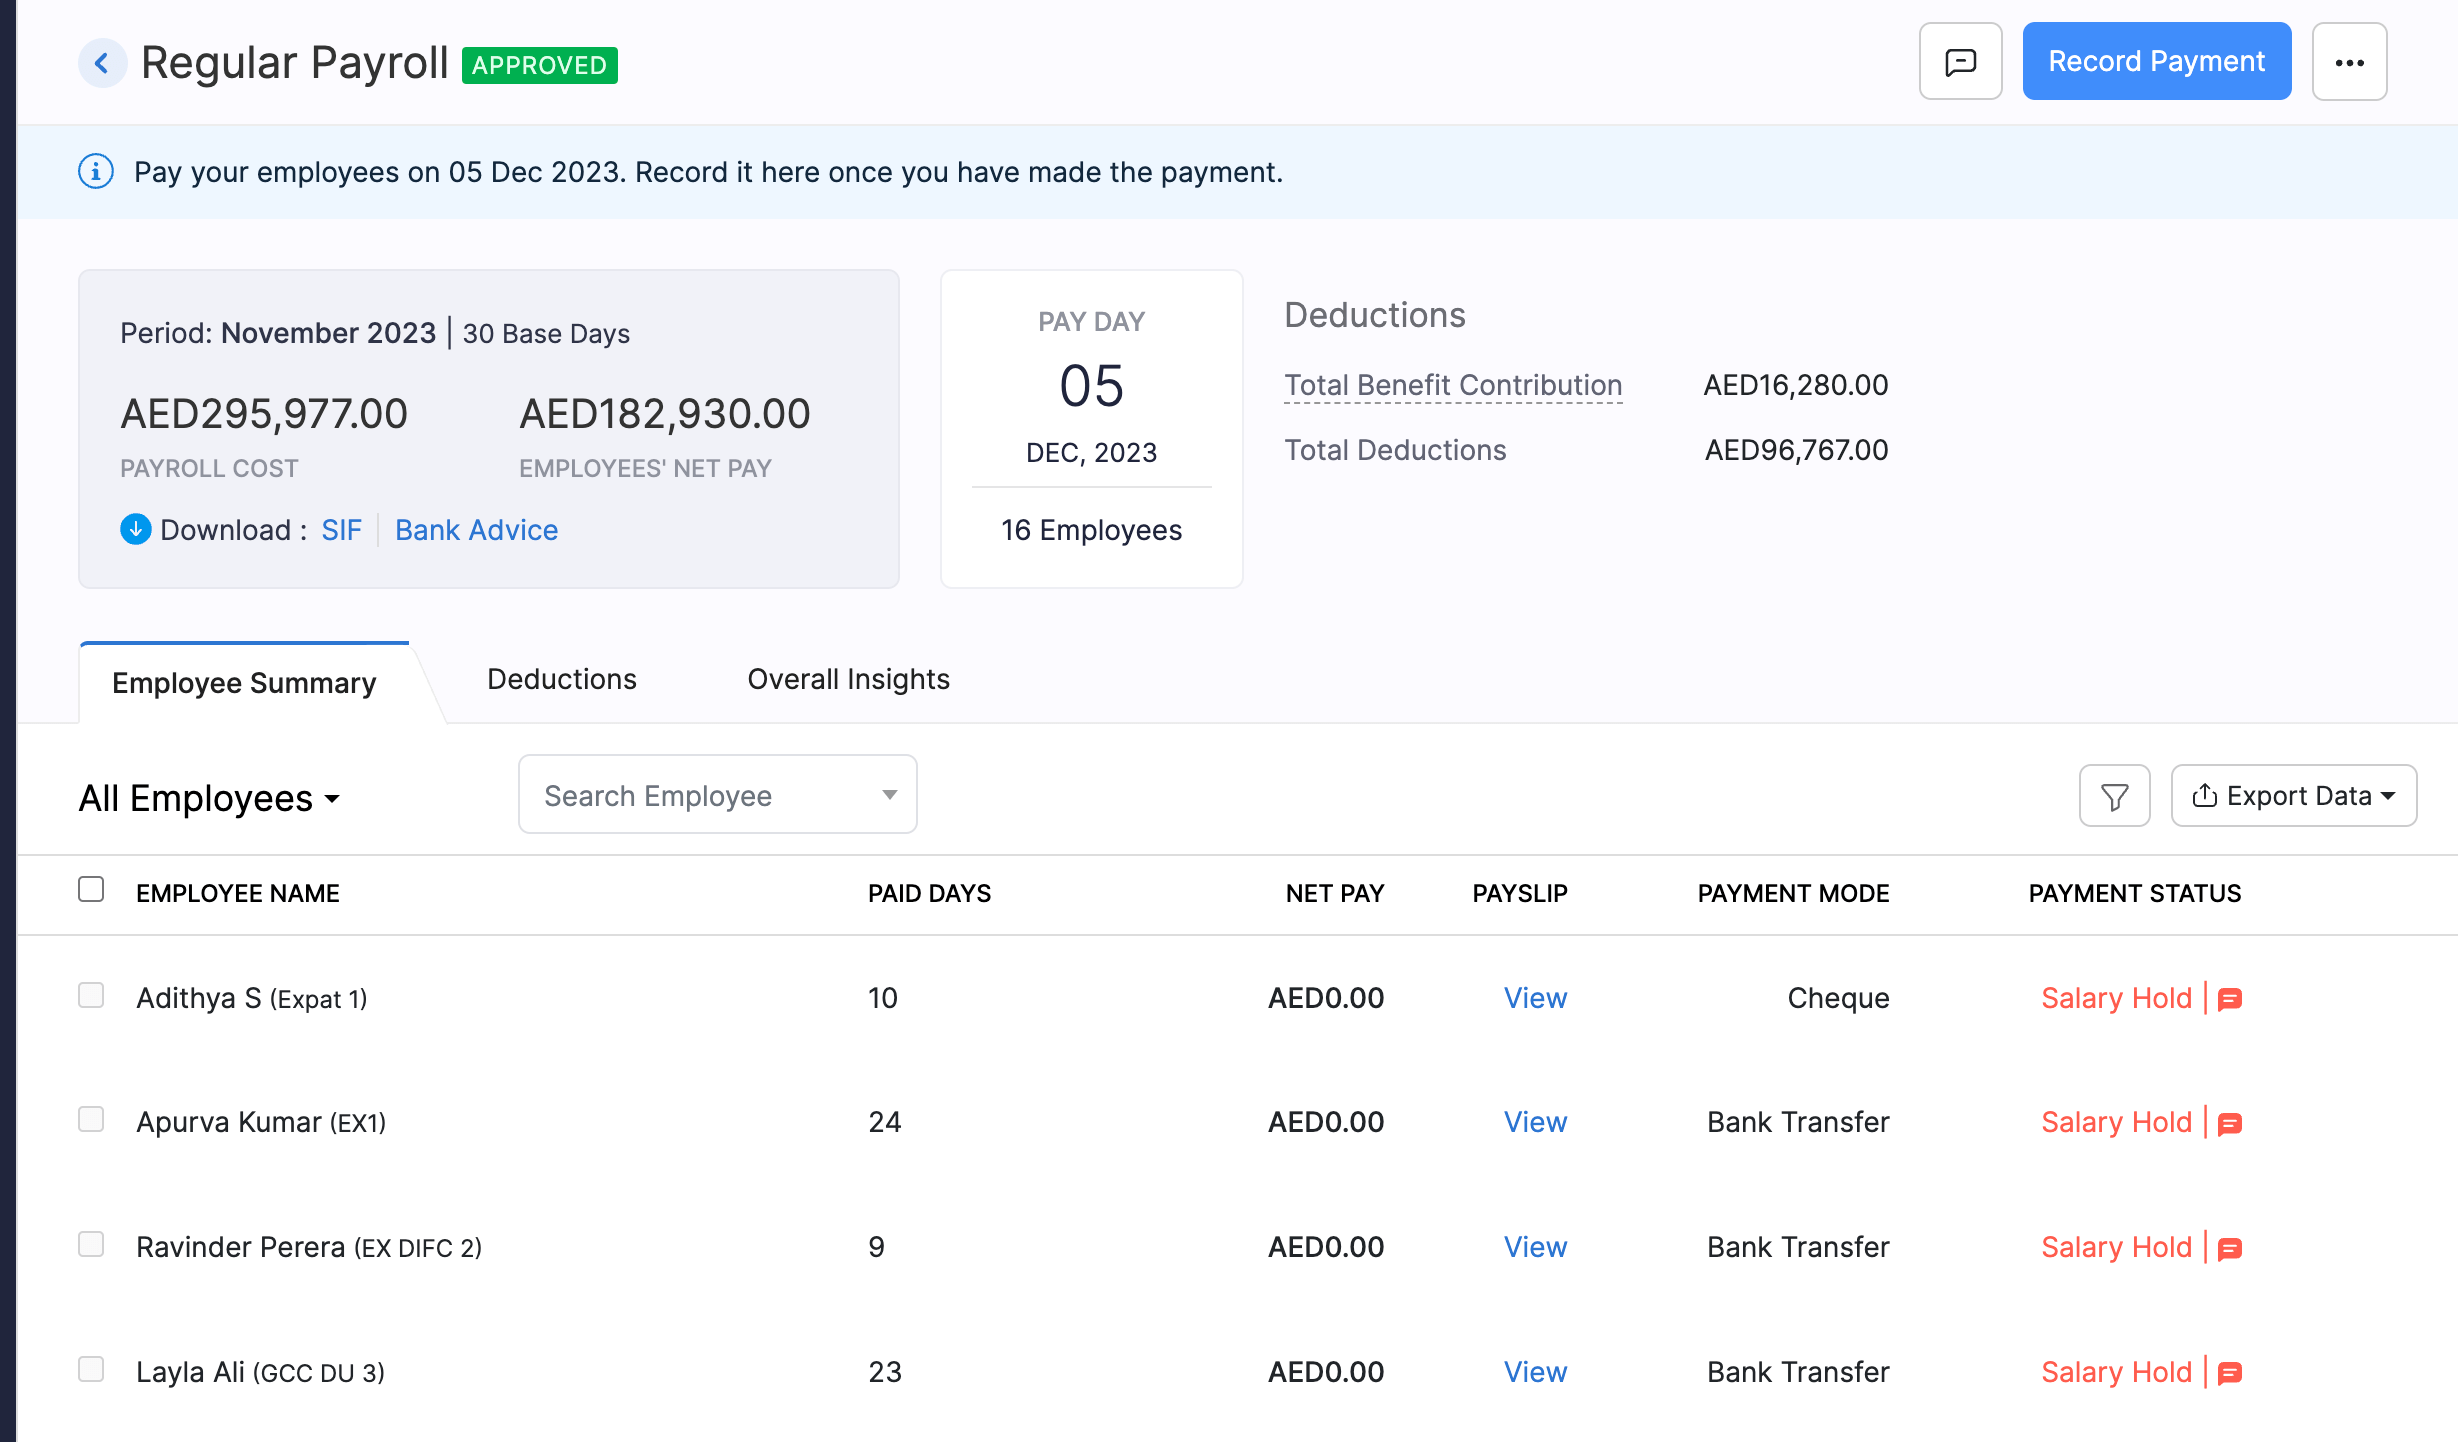
- After the pay run is approved, you can record payment on or after the payday.
Note The social security benefits applicable to employee will be calculated and deducted from the employee’s salary when the salary is withheld. Only the Net Pay will be withheld when you apply salary withhold.
The withheld salary (only the net pay) can be released in the subsequent pay runs.
Releasing Withheld Salary
Let’s say you want to release the withheld salary along with the following month’s salary. Here’s how you can do it:
- Go to the Pay Runs module.
- Click Create Pay Run.
- In the pay run draft, click the More icon (…) next to the employee’s name and click Release Withheld Salary.
- You will be prompted to select the months for which the salary needs to be released. Once you’ve selected the months, the total payable amount will be displayed.
- Click Proceed.
The withheld net pay will be released and added to the current month’s net pay.
Note You cannot release a previously withheld salary if the current month’s salary is put on hold.
Reverting Salary Withhold
If you want to process a withheld salary in the same pay run, you will have to revert the salary withheld. Here’s how:
- Go to the Pay Runs module.
- Click View Details to view the pay run draft.
- Click the More icon (…) next to the employee’s name and click Revert Salary Withhold.
- You will be prompted to confirm your actions. Click Yes to confirm.
The employee’s salary will be processed in the current month’s pay run.
- Once you’ve added all the inputs, click the Submit and Approve button in the top-right corner of the page. If the user doesn’t have approval permission, they can simply submit the pay run. It will be approved or rejected post review by a user with approval access.
- If you have enabled Zoho Books integration, you can choose to post the journal entry for the payroll transaction in Books. The transaction will be recorded under the account you had configured while setting up the integration.
- After the pay run is approved, you can record payment on or after the payday.
- Click Download Bank Advice to download the bank advice, which helps you manually transfer the salaries to your employees’ bank accounts.
- Click Download SIF file to download the SIF file and submit it to the Wages Protection System (WPS) manually.
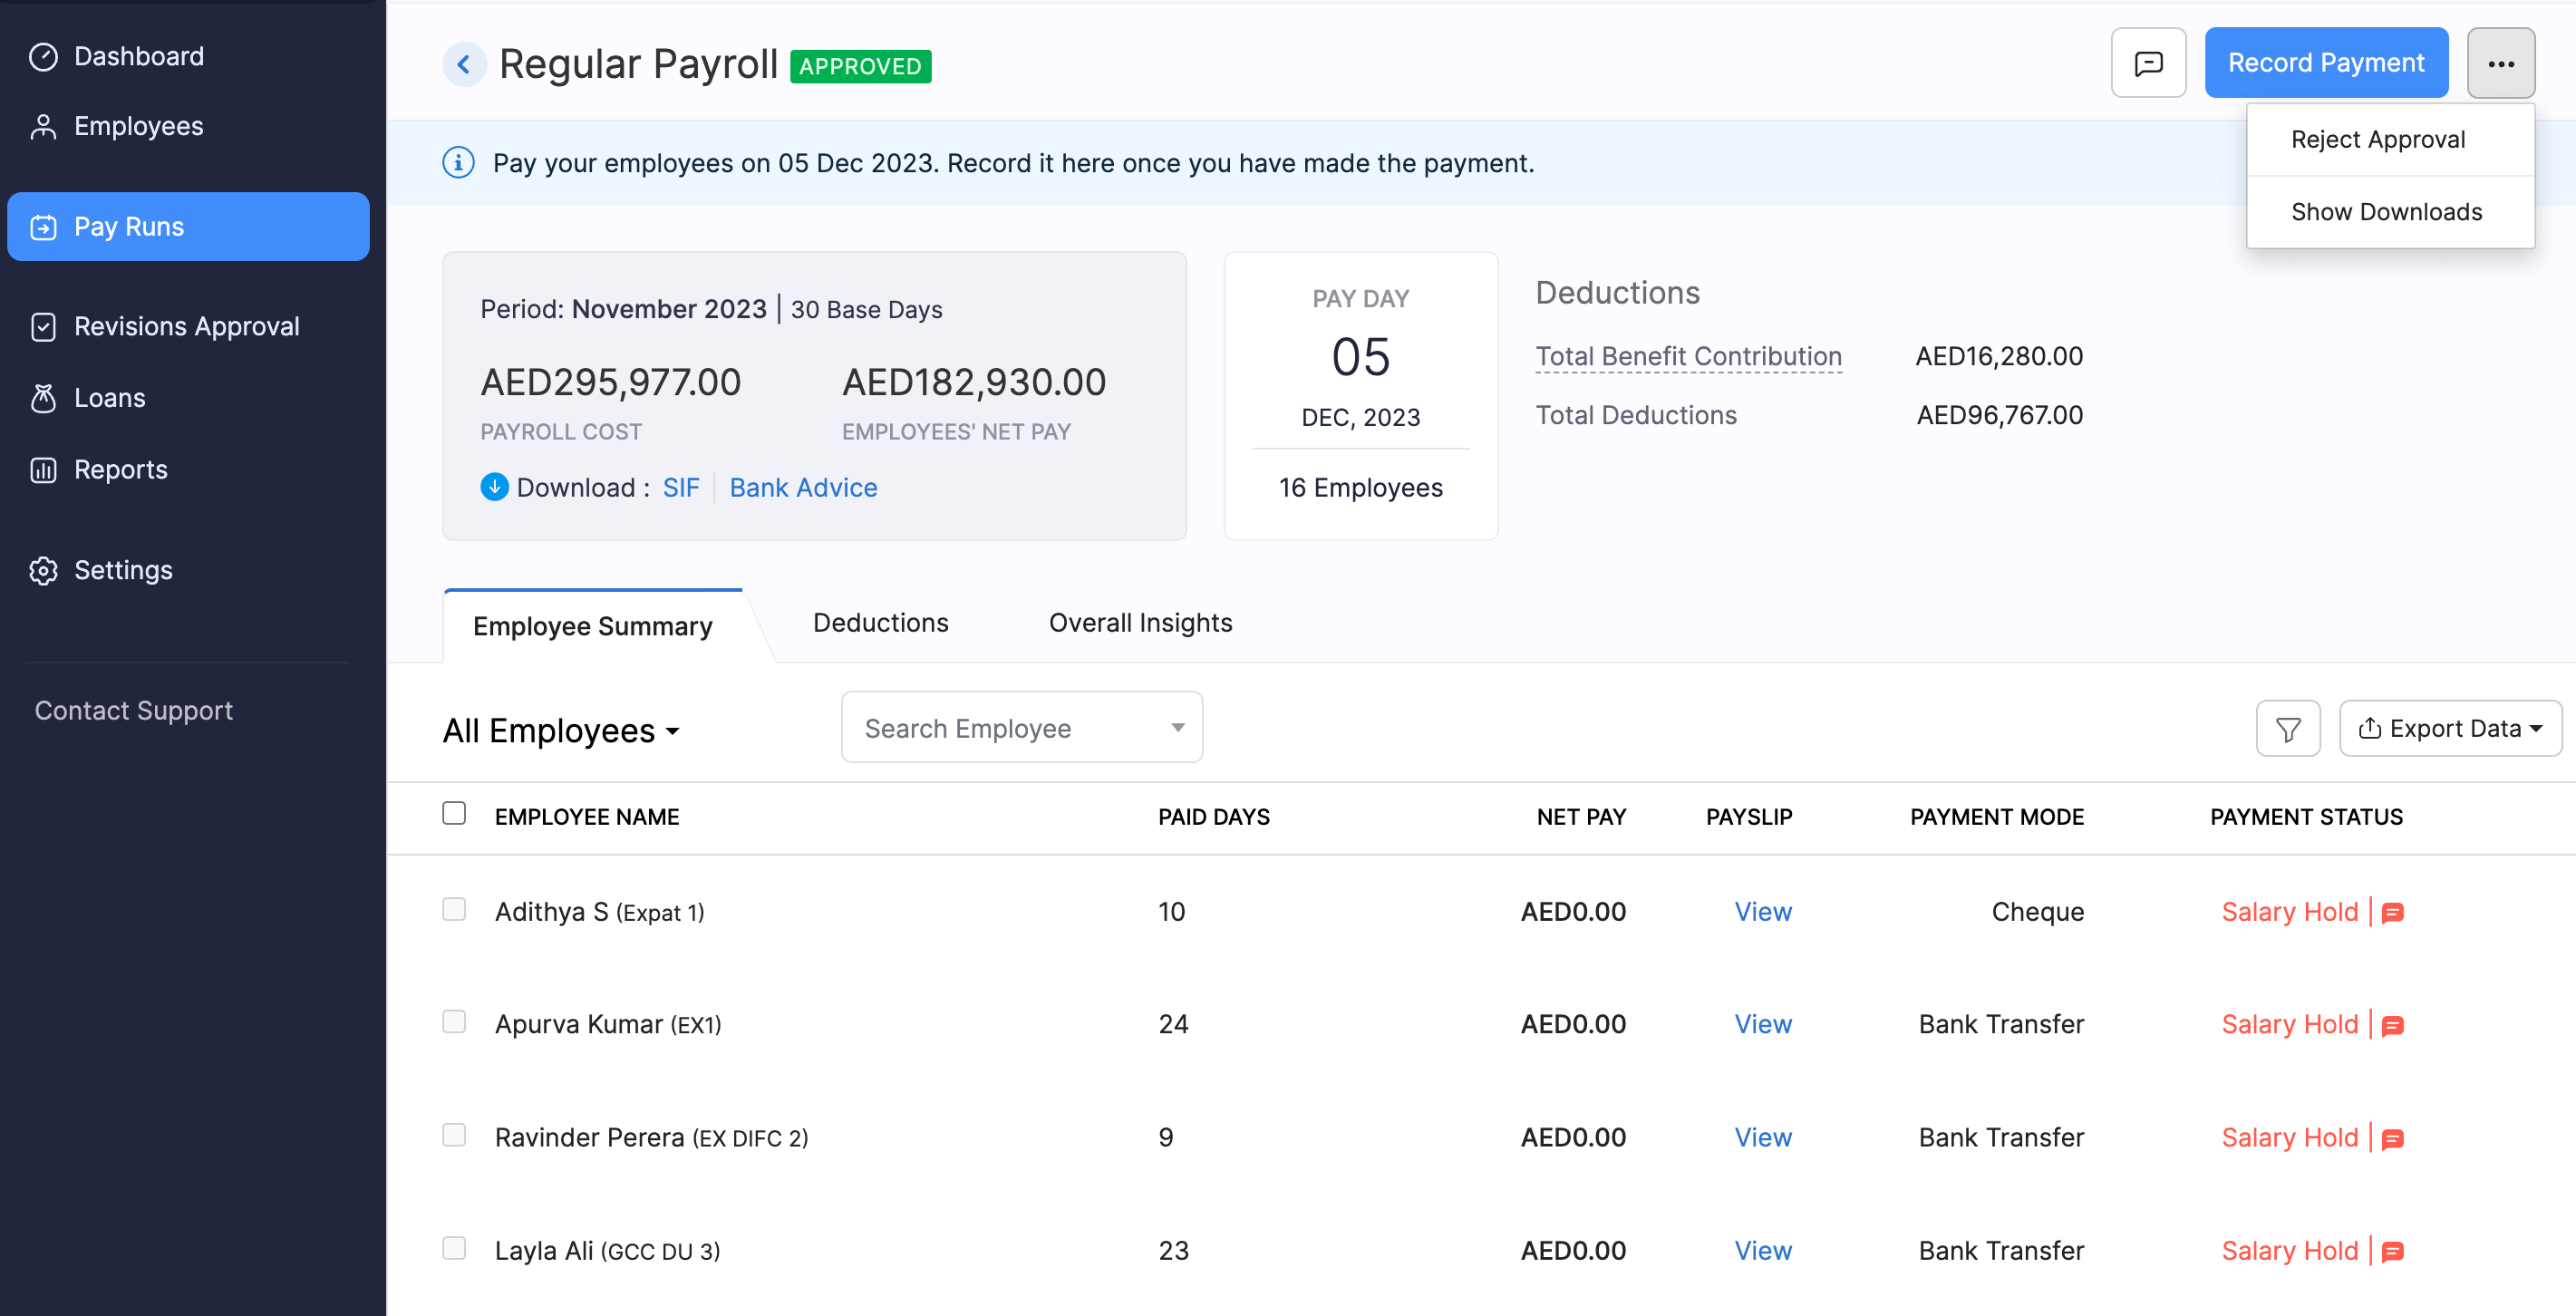
- If you’ve made mistakes in an approved pay run, you can reject the approval and recall the pay run, provided you haven’t recorded payment for it.
Note If you haven’t recorded payment for the pay run of a particular month, you can still create and process the pay run for the next month. However, you can only record payments for a payroll when all payments have been recorded for all past pay runs.
The journal entry posted in Zoho Books will be reversed and the transactions will be removed from the respective accounts.
How to make selective payments?
Pay Runs module supports making payments for selective employees. You can make payments for a few of your employees on a certain date and pay the rest of your employees later.
To pay a few selected employees:
- Go to the Pay Runs module.
- Click Create Pay Run.
- Once you’ve added deductions, LOP details, etc., click Submit and Approve.
- In the approved pay run, select the boxes next to the name of the employees’ for whom you want to make the payment. Make sure that these employees have the same payment mode.
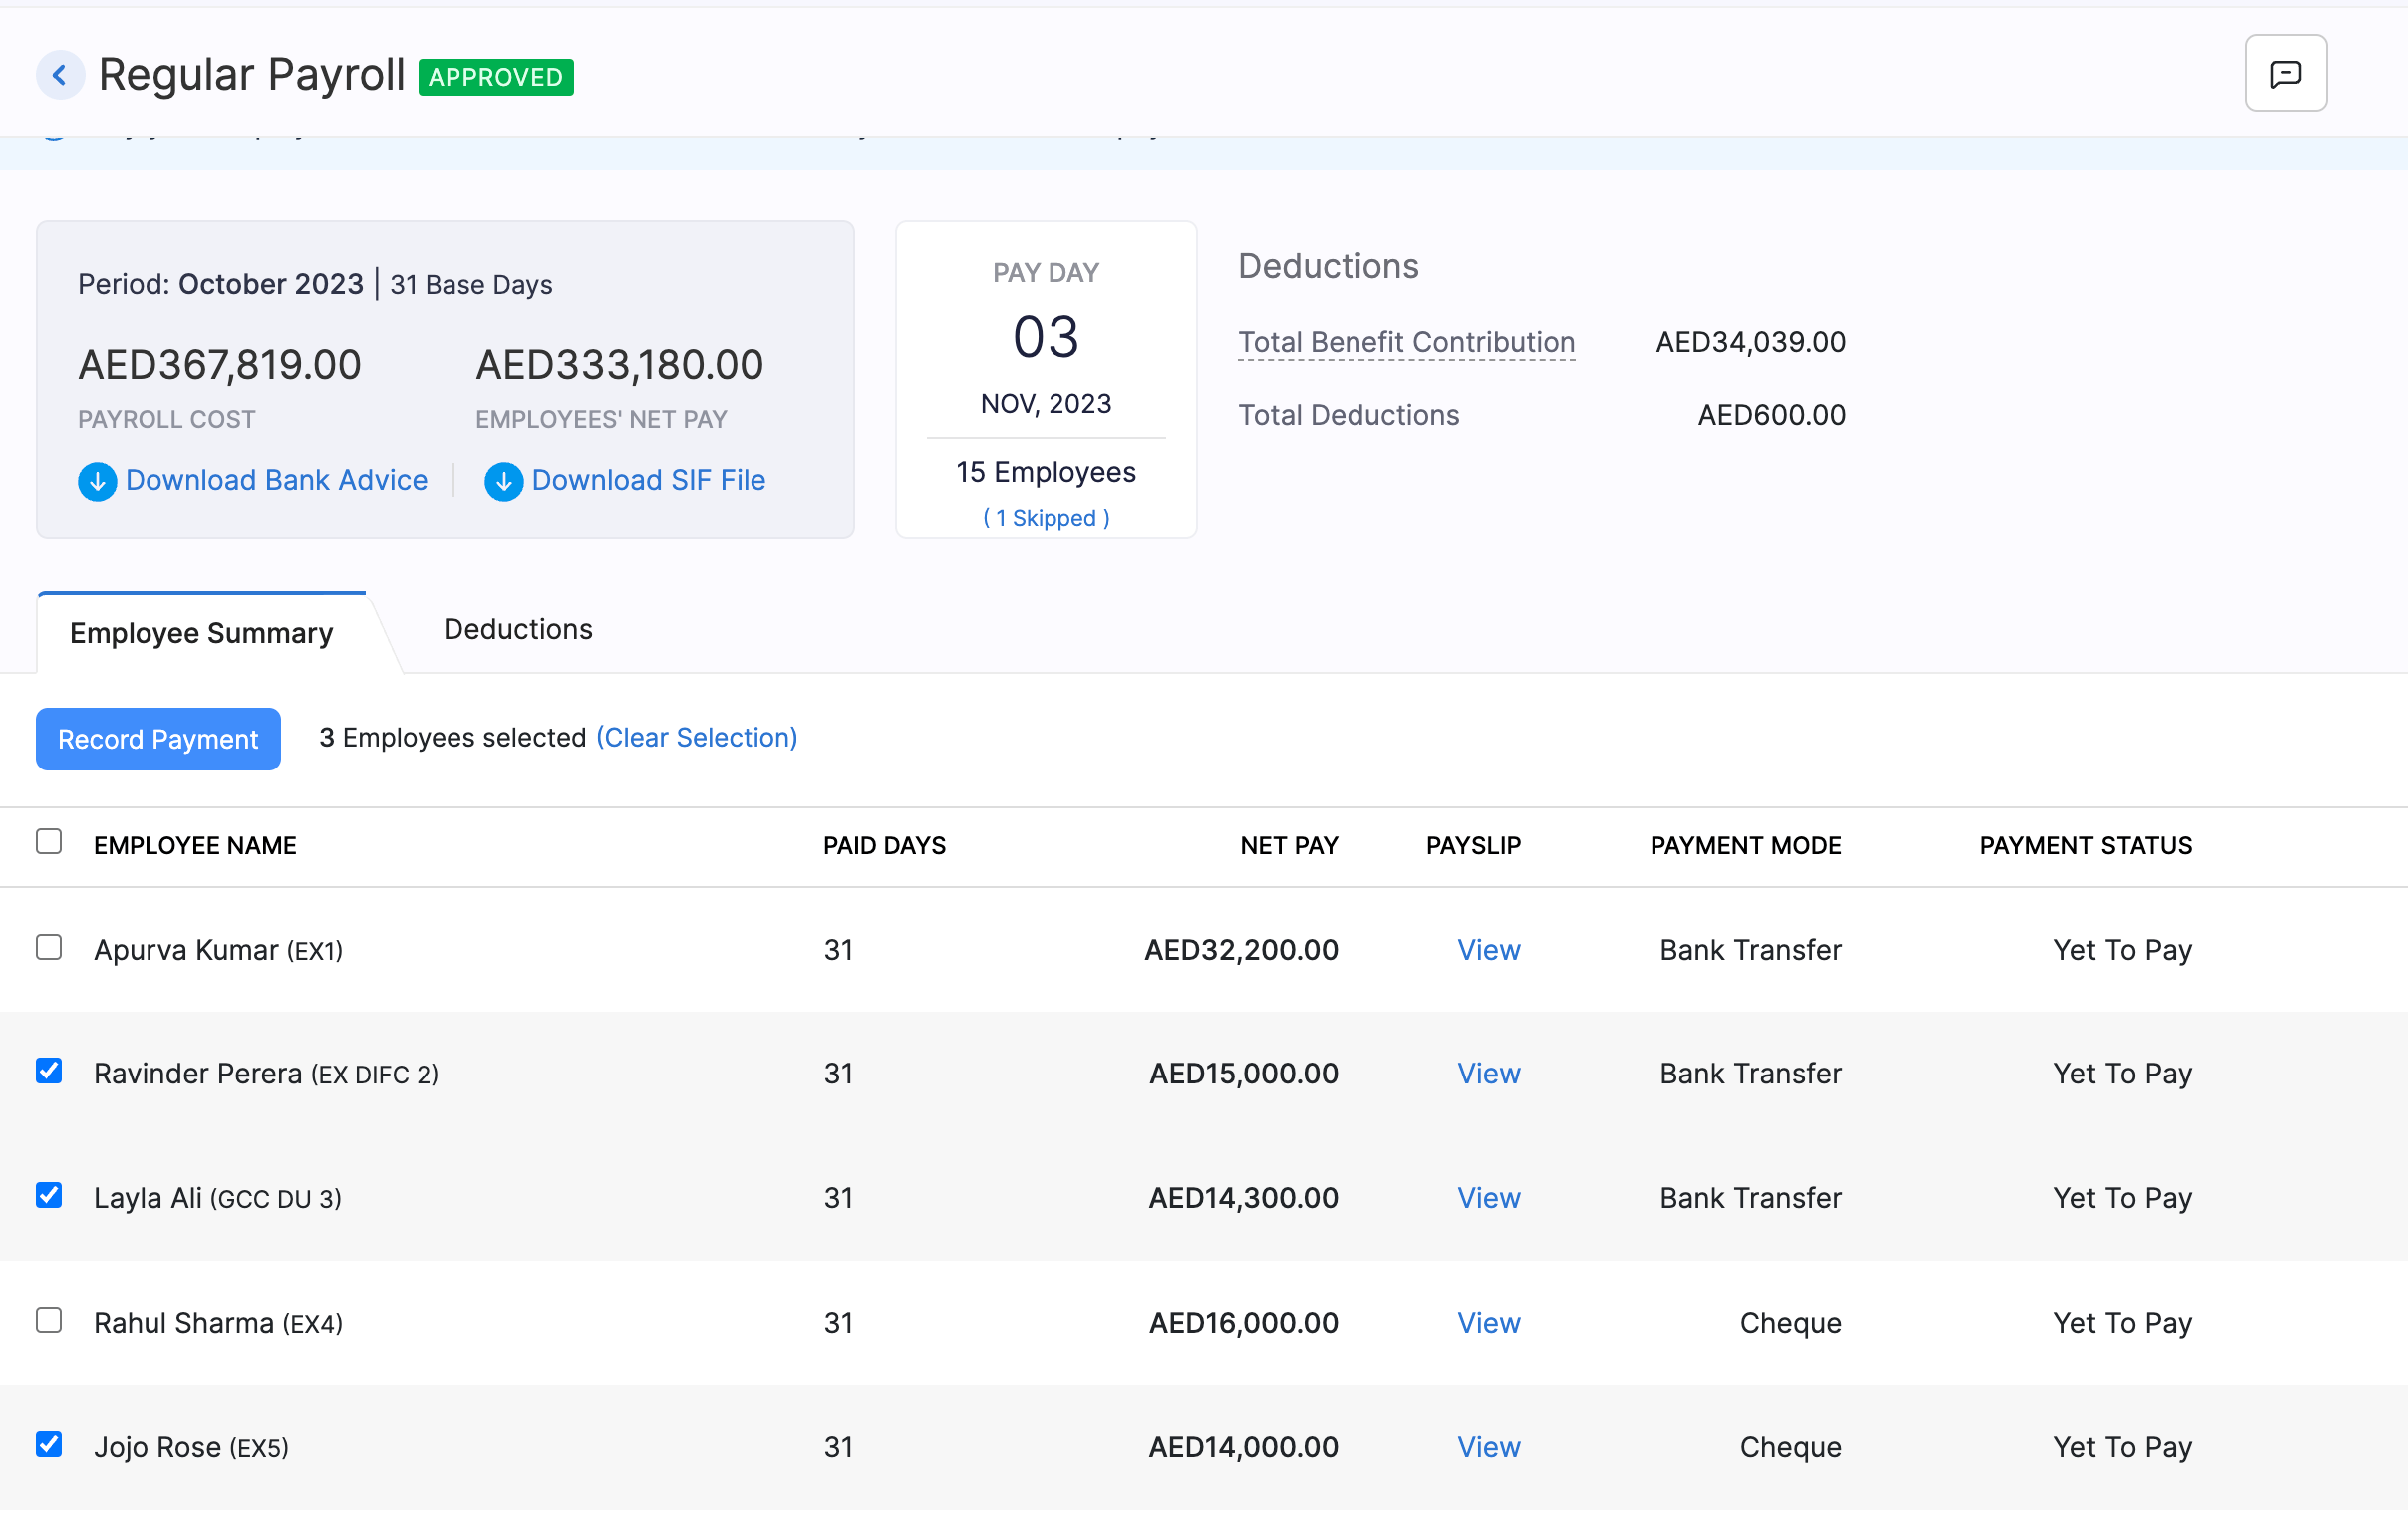
- Choose Record Payment for selected employees .
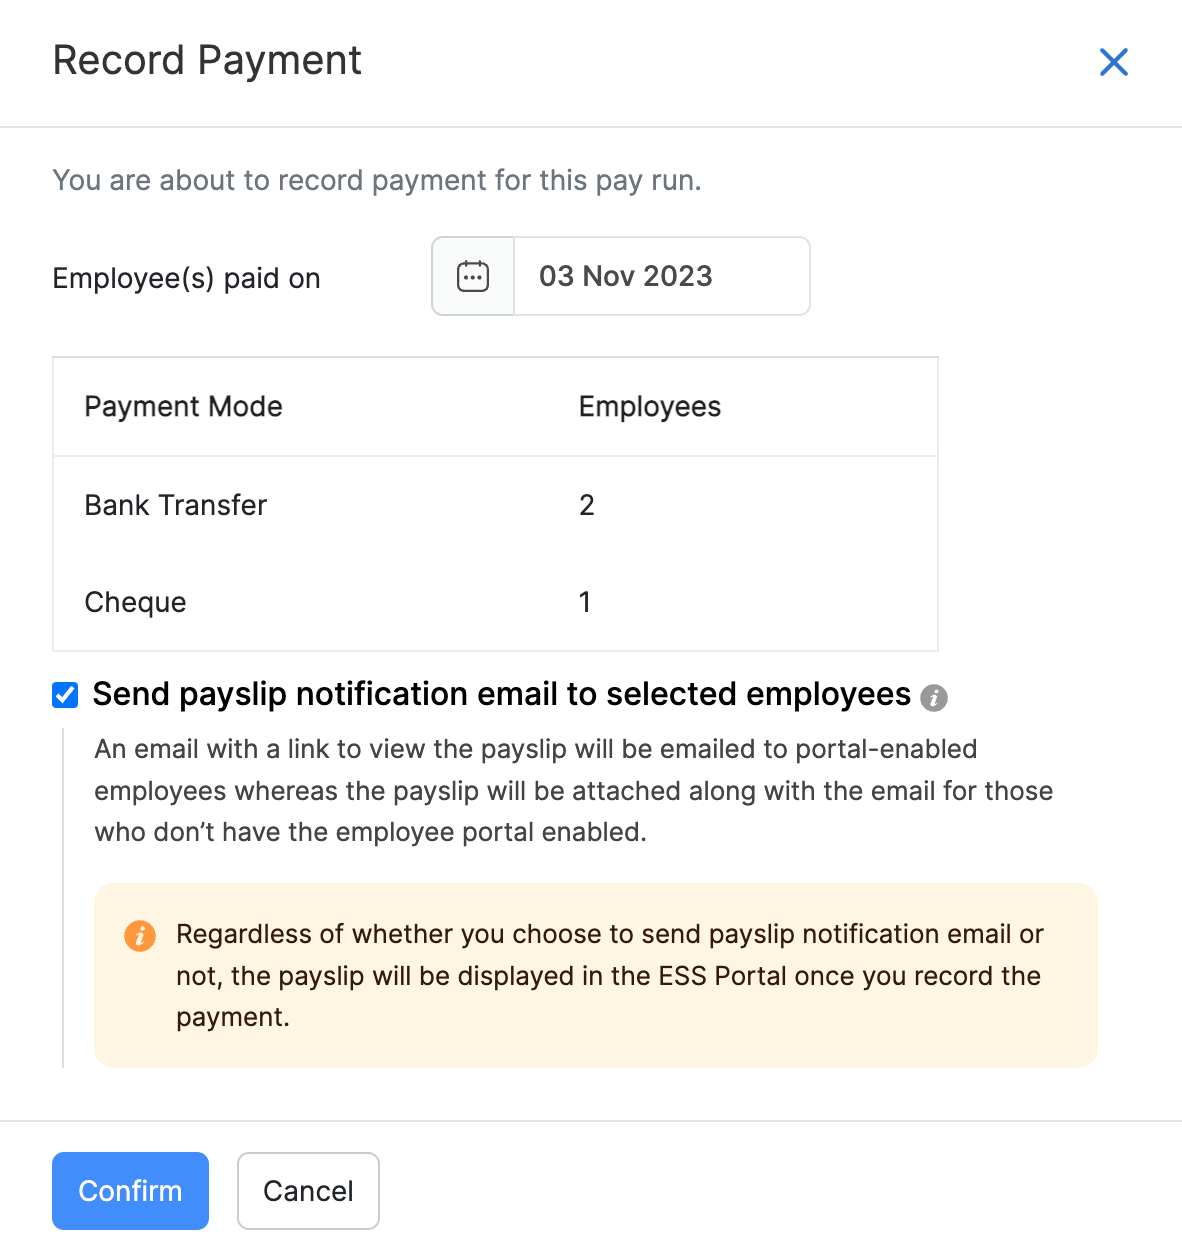
- You can select the payment date and click Confirm.
The selected employees will be marked as paid. You can make payments to the other employees on a different date and record the payment. Journal entries corresponding to each payment will be posted automatically in Zoho Books along with the payment date.
Download payslips?
Once you’ve processed the payroll, you can download all the related payslips.
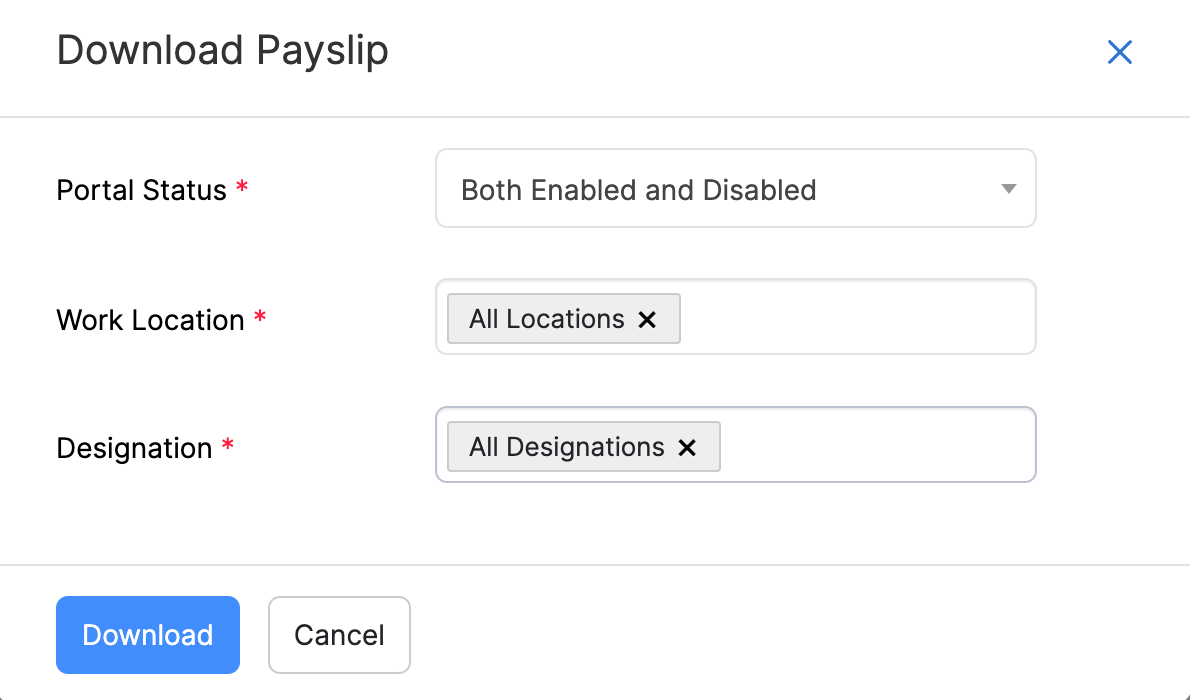
- To download the payroll documents, click More > Download all Payslips.

- Select the filters of your choice. Zoho Payroll enables you to download payslips based on the portal status, work location and designation
The link to initiate download will be generated and you will be notified once it is ready.
To download the file, click More > Show Downloads > Download and choose a location to store the documents.
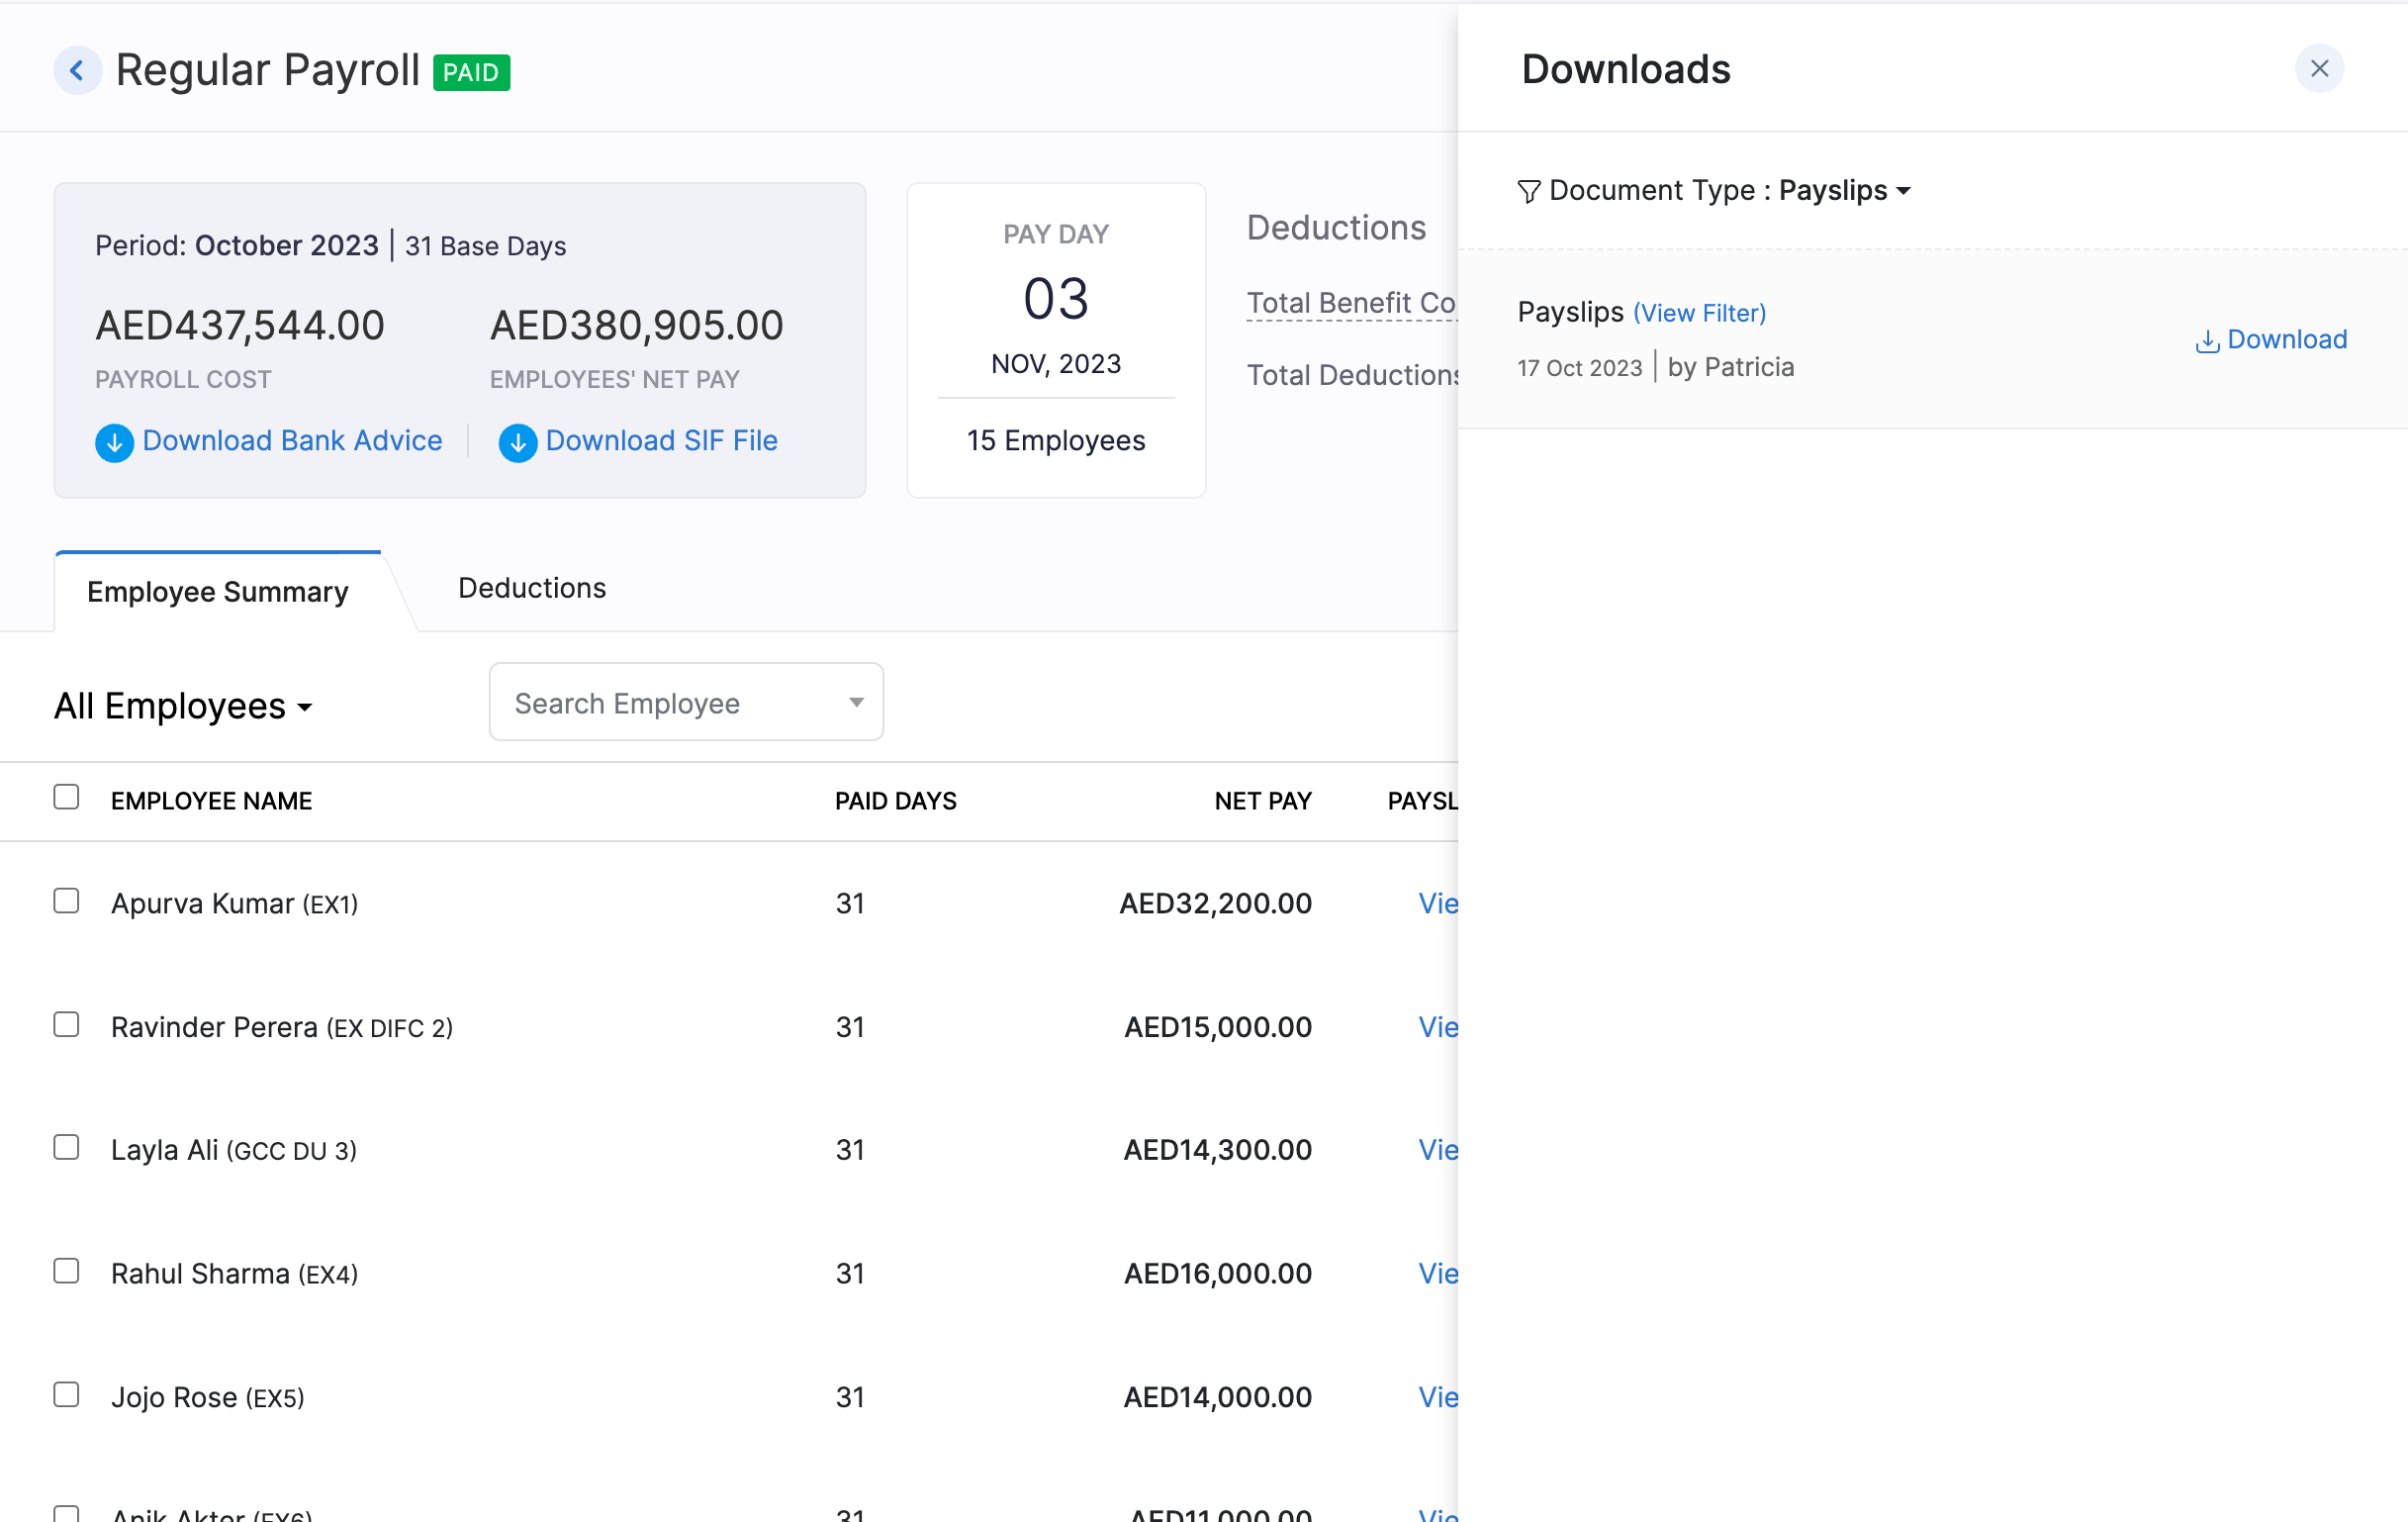
If you make any changes to the pay run after you download these documents, the existing link will expire and you will not be able to use it. You need to re-initiate the file generation and then download the modified pay run details.
New Joinee Arrears
New Joinee Arrear is the amount the employee has earned but has not yet been paid because they joined the company right after the pay run has been processed for a given pay period.
When the employer marks an employee as a New Joinee, Zoho Payroll calculates the arrears using the employee’s date of joining and the company’s pay period. Zoho Payroll takes into account the number of days a new employee has worked and calculates their salary or wages accordingly. This amount is then added to the first regular payroll of the new employee.
For example, if an employee joins a company on the 15th of the month, and the pay period is from the 1st to the 30th of the month, Zoho Payroll will calculate the salary for the 15th to the 30th of the month as a new joinee arrear and add it to the first regular of the new employee.
Processing New Joinee Arrears in Zoho Payroll
When a new employee joins the organization, their compensation package might take time to finalise. The HR or payroll administrator can update this information in Zoho Payroll to calculate the correct salary and track the arrears.
You can select employees who have new joinee arrears in Zoho Payroll while:
- Creating or editing an employee
- Processing the pay run for an employee
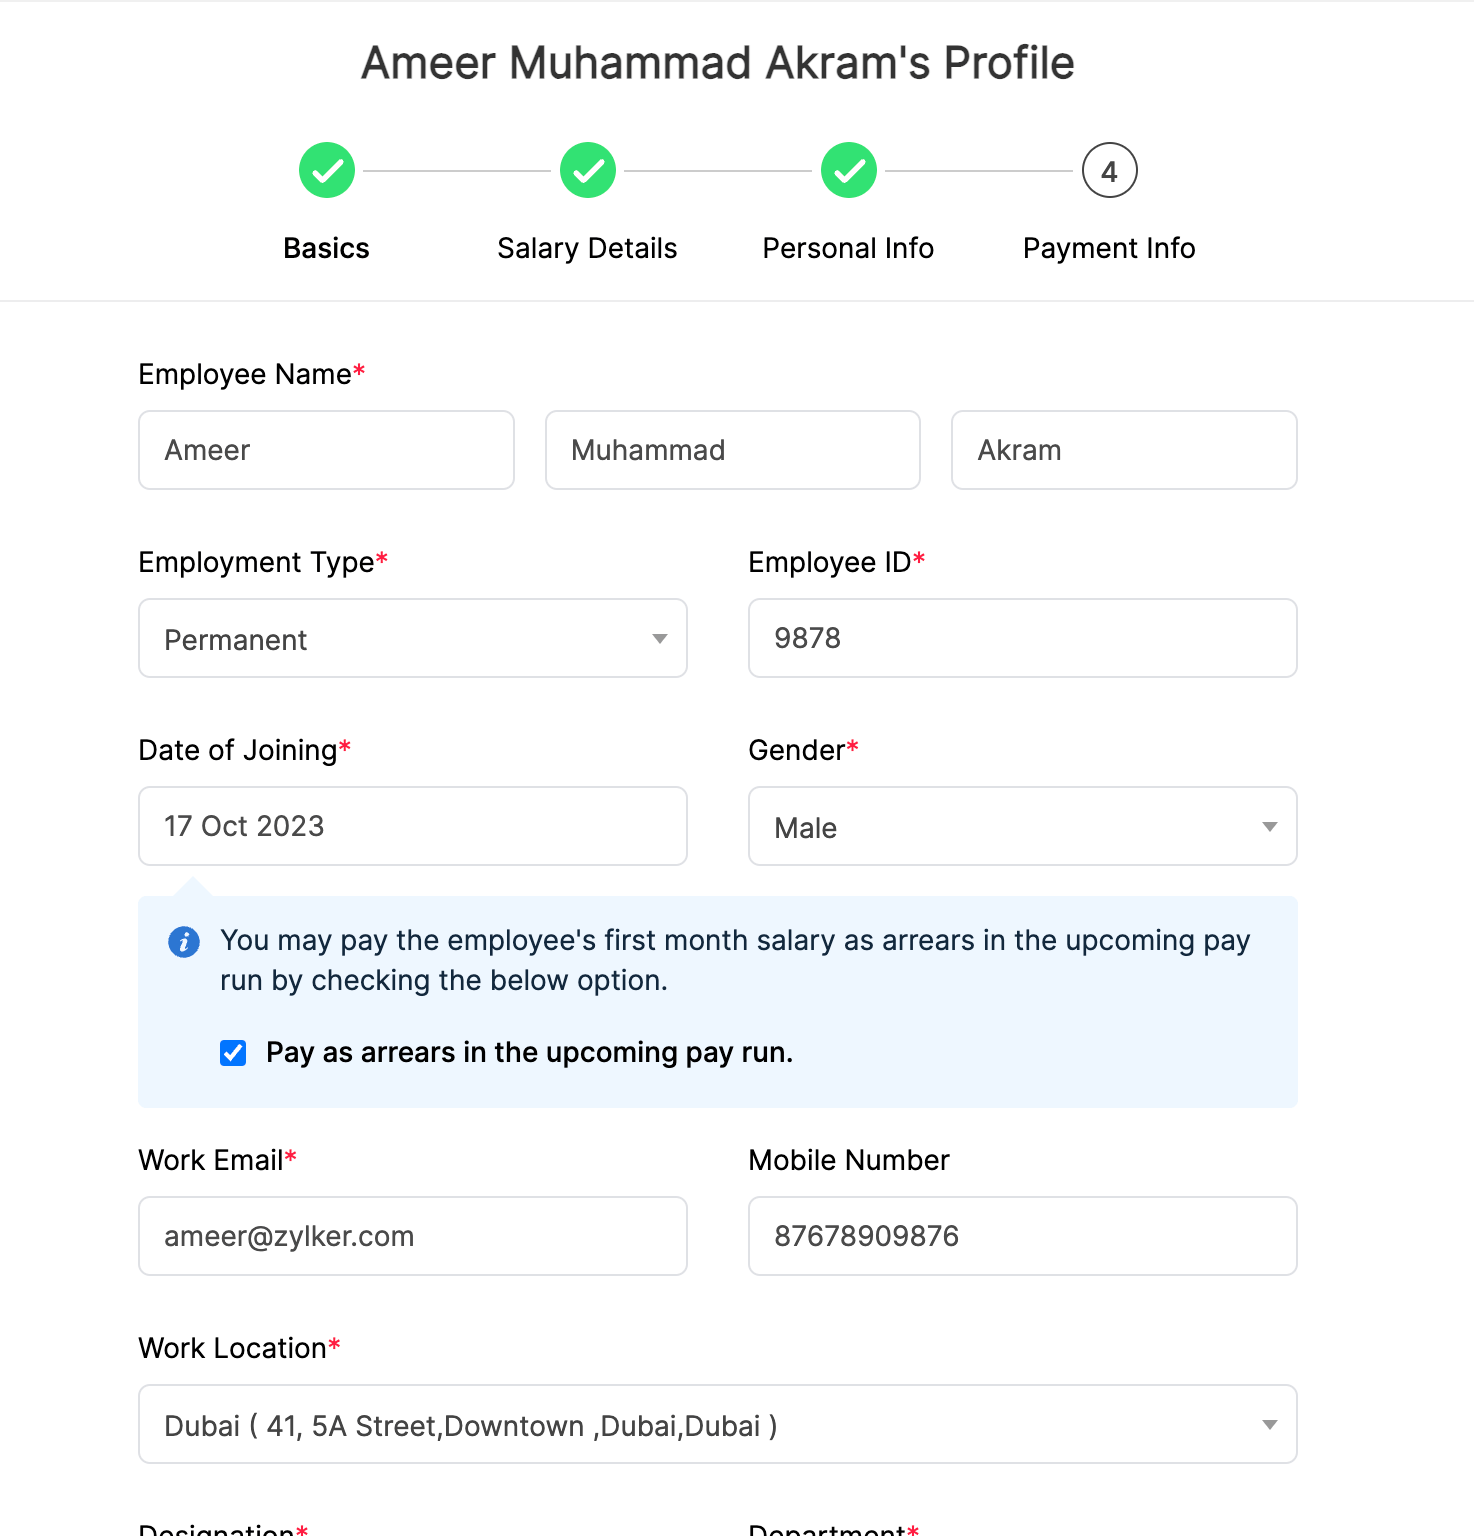
To process new joinee arrears when you are adding a new employee or editing an employee,
- Click Employees on the left sidebar.
- Click Add Employee in the top right corner or edit an existing employee.
- Select the Pay as arrears in the upcoming pay run option.
- Complete the employee profile and click Save.
While processing payroll, the administrator can check if any employees have new joinee arrears. The arrears will then be processed along with the the employee’s first pay run.
To process new joinee arrears when you are processing the pay run for an employee ,
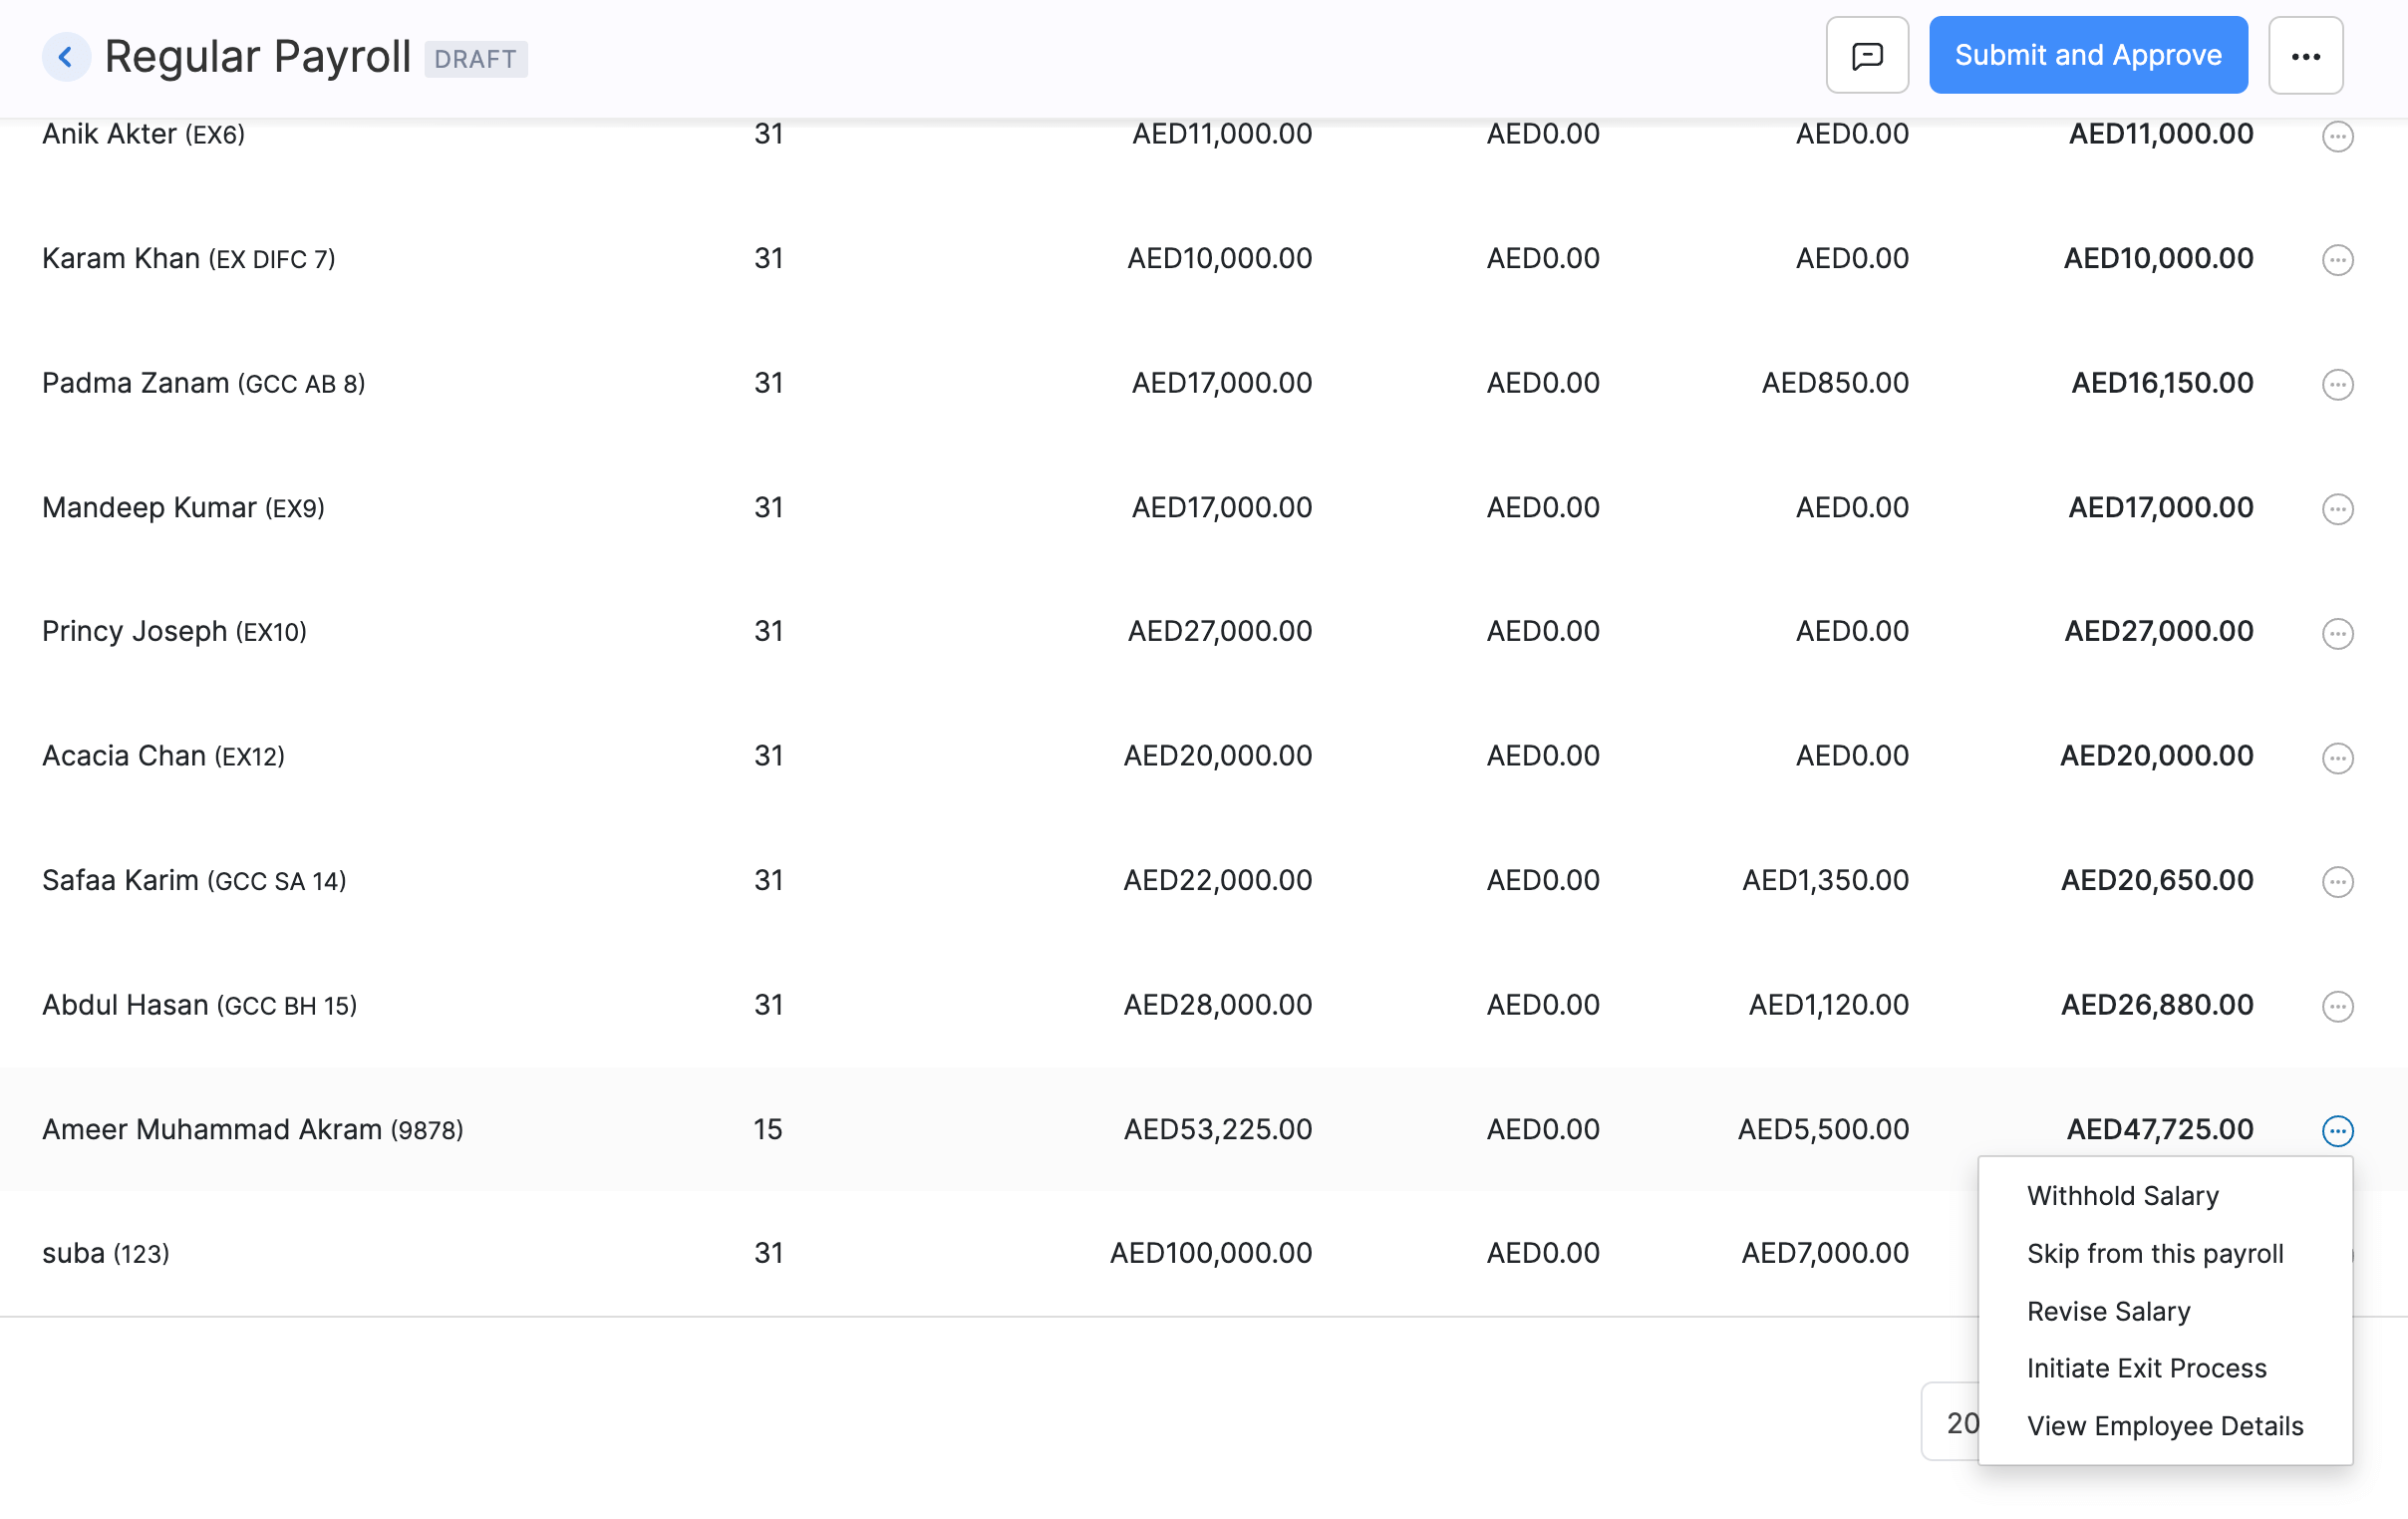
- Click Pay Runs on the left sidebar.
- Click View Details next to the pay run you are processing.
- Click the More icon next to the employee for whom you are trying to process the new joinee arrear and select Ski****p from this payroll**.**
- Select Pay as arrears in the next pay run.
- Enter the reason for skipping the employee.
- Click Proceed.
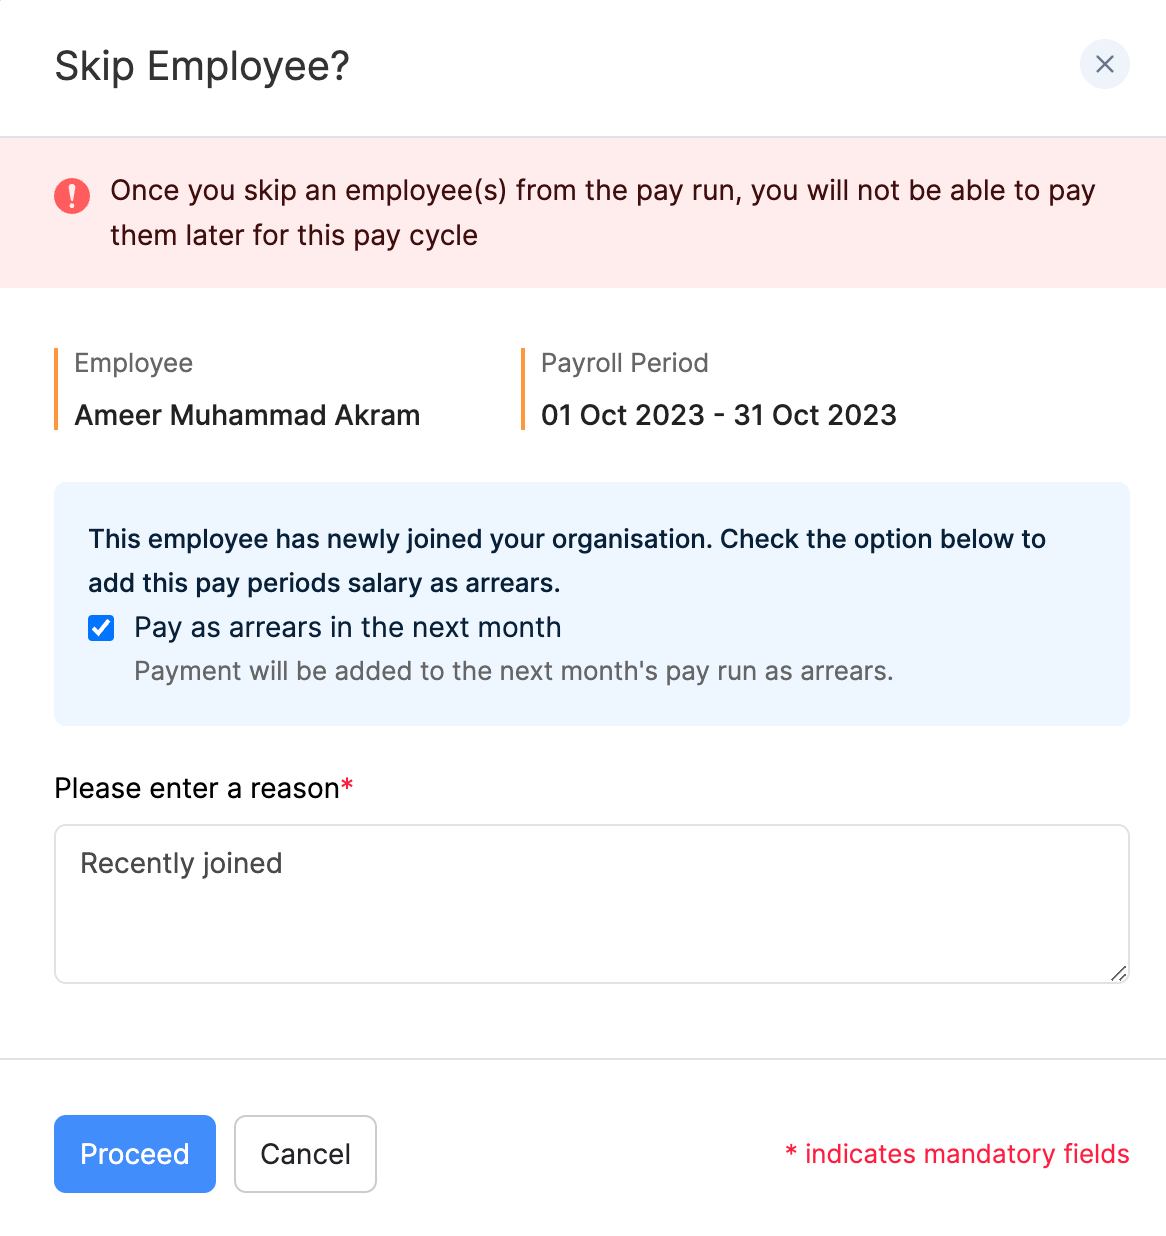
Pro Tip If there is an employee in a pay run for whom you don’t want to make a payment, you can exclude them from the current pay run and instead include their payment as arrears in the next pay run.
The employee will be skipped for the current pay run and the arrears will be processed in the upcoming pay period.
Pro Tip If you’ve skipped a new joinee arrear it can be reverted by adding the skipped employee to the payroll.
Import New Joinee Arrear Details
You can import the new joinee arrear details if you have to add themin bulk.
Here’s how you can import them:
- Click Employees on the left sidebar.
- Click the More icon in the top right corner and click Import Employees.
- Select Employee Basic Details or Employee Details as the import type.
- Upload the file containing the details in the format prescribed below.

- Select how you want to handle duplicate entries.
- Map the import file fields with the fields in Zoho Payroll and click Import.
LOP Reversal
In Zoho Payroll, the process of reversing the Loss of Pay (LOP) deduction for an employee is referred to as LOP Reversal.
What is LOP?
LOP is deduction from an employee’s salary in case they are absent from work without prior approval or if they’ve exhausted their paid leaves.
How does LOP Reversal work?
When an employee takes unapproved leaves, you can apply the corresponding LOP deduction in Zoho Payroll. However, if the employee later provides a valid reason for their absence, you can reverse the LOP deduction in the upcoming months.
Here are three use cases for LOP reversal:
The employee’s absence was due to taking approved leave, which was granted after the unpaid leave of absence (LOP) was applied. If the leave is approved, the LOP can be reversed.
The cause for the employee’s absence was medical: A worker might have missed work because of an illness or another medical issue that was not previously covered by paid leave. The LOP deduction can be reversed if the employee subsequently submits medical certifications or other acceptable proof.
Oversight in payroll calculation: In some cases, the LOP deduction may have been made in error due to an oversight in payroll processing. If this is identified and corrected, the LOP reversal process can be initiated to ensure that the employee is paid the correct salary amount.
Overall, LOP reversal helps ensure that employees are paid accurately and fairly. It helps to avoid unnecessary deductions and promotes transparency and efficiency in payroll processing.
Reversing LOP in Zoho Payroll
Here’s how you can reverse LOP in Zoho Payroll:
- Go to Pay Runs on the left sidebar.
- Click View Details next to the current Regular pay run.
- Select the employee for whom you want to reverse the LOP of a previous month.
Pro Tip Click the dropdown below Employee Summary and select Employees with LOP to filter employees with LOP.
- Click the dropdown next to Add LOP and select LOP Reversal.
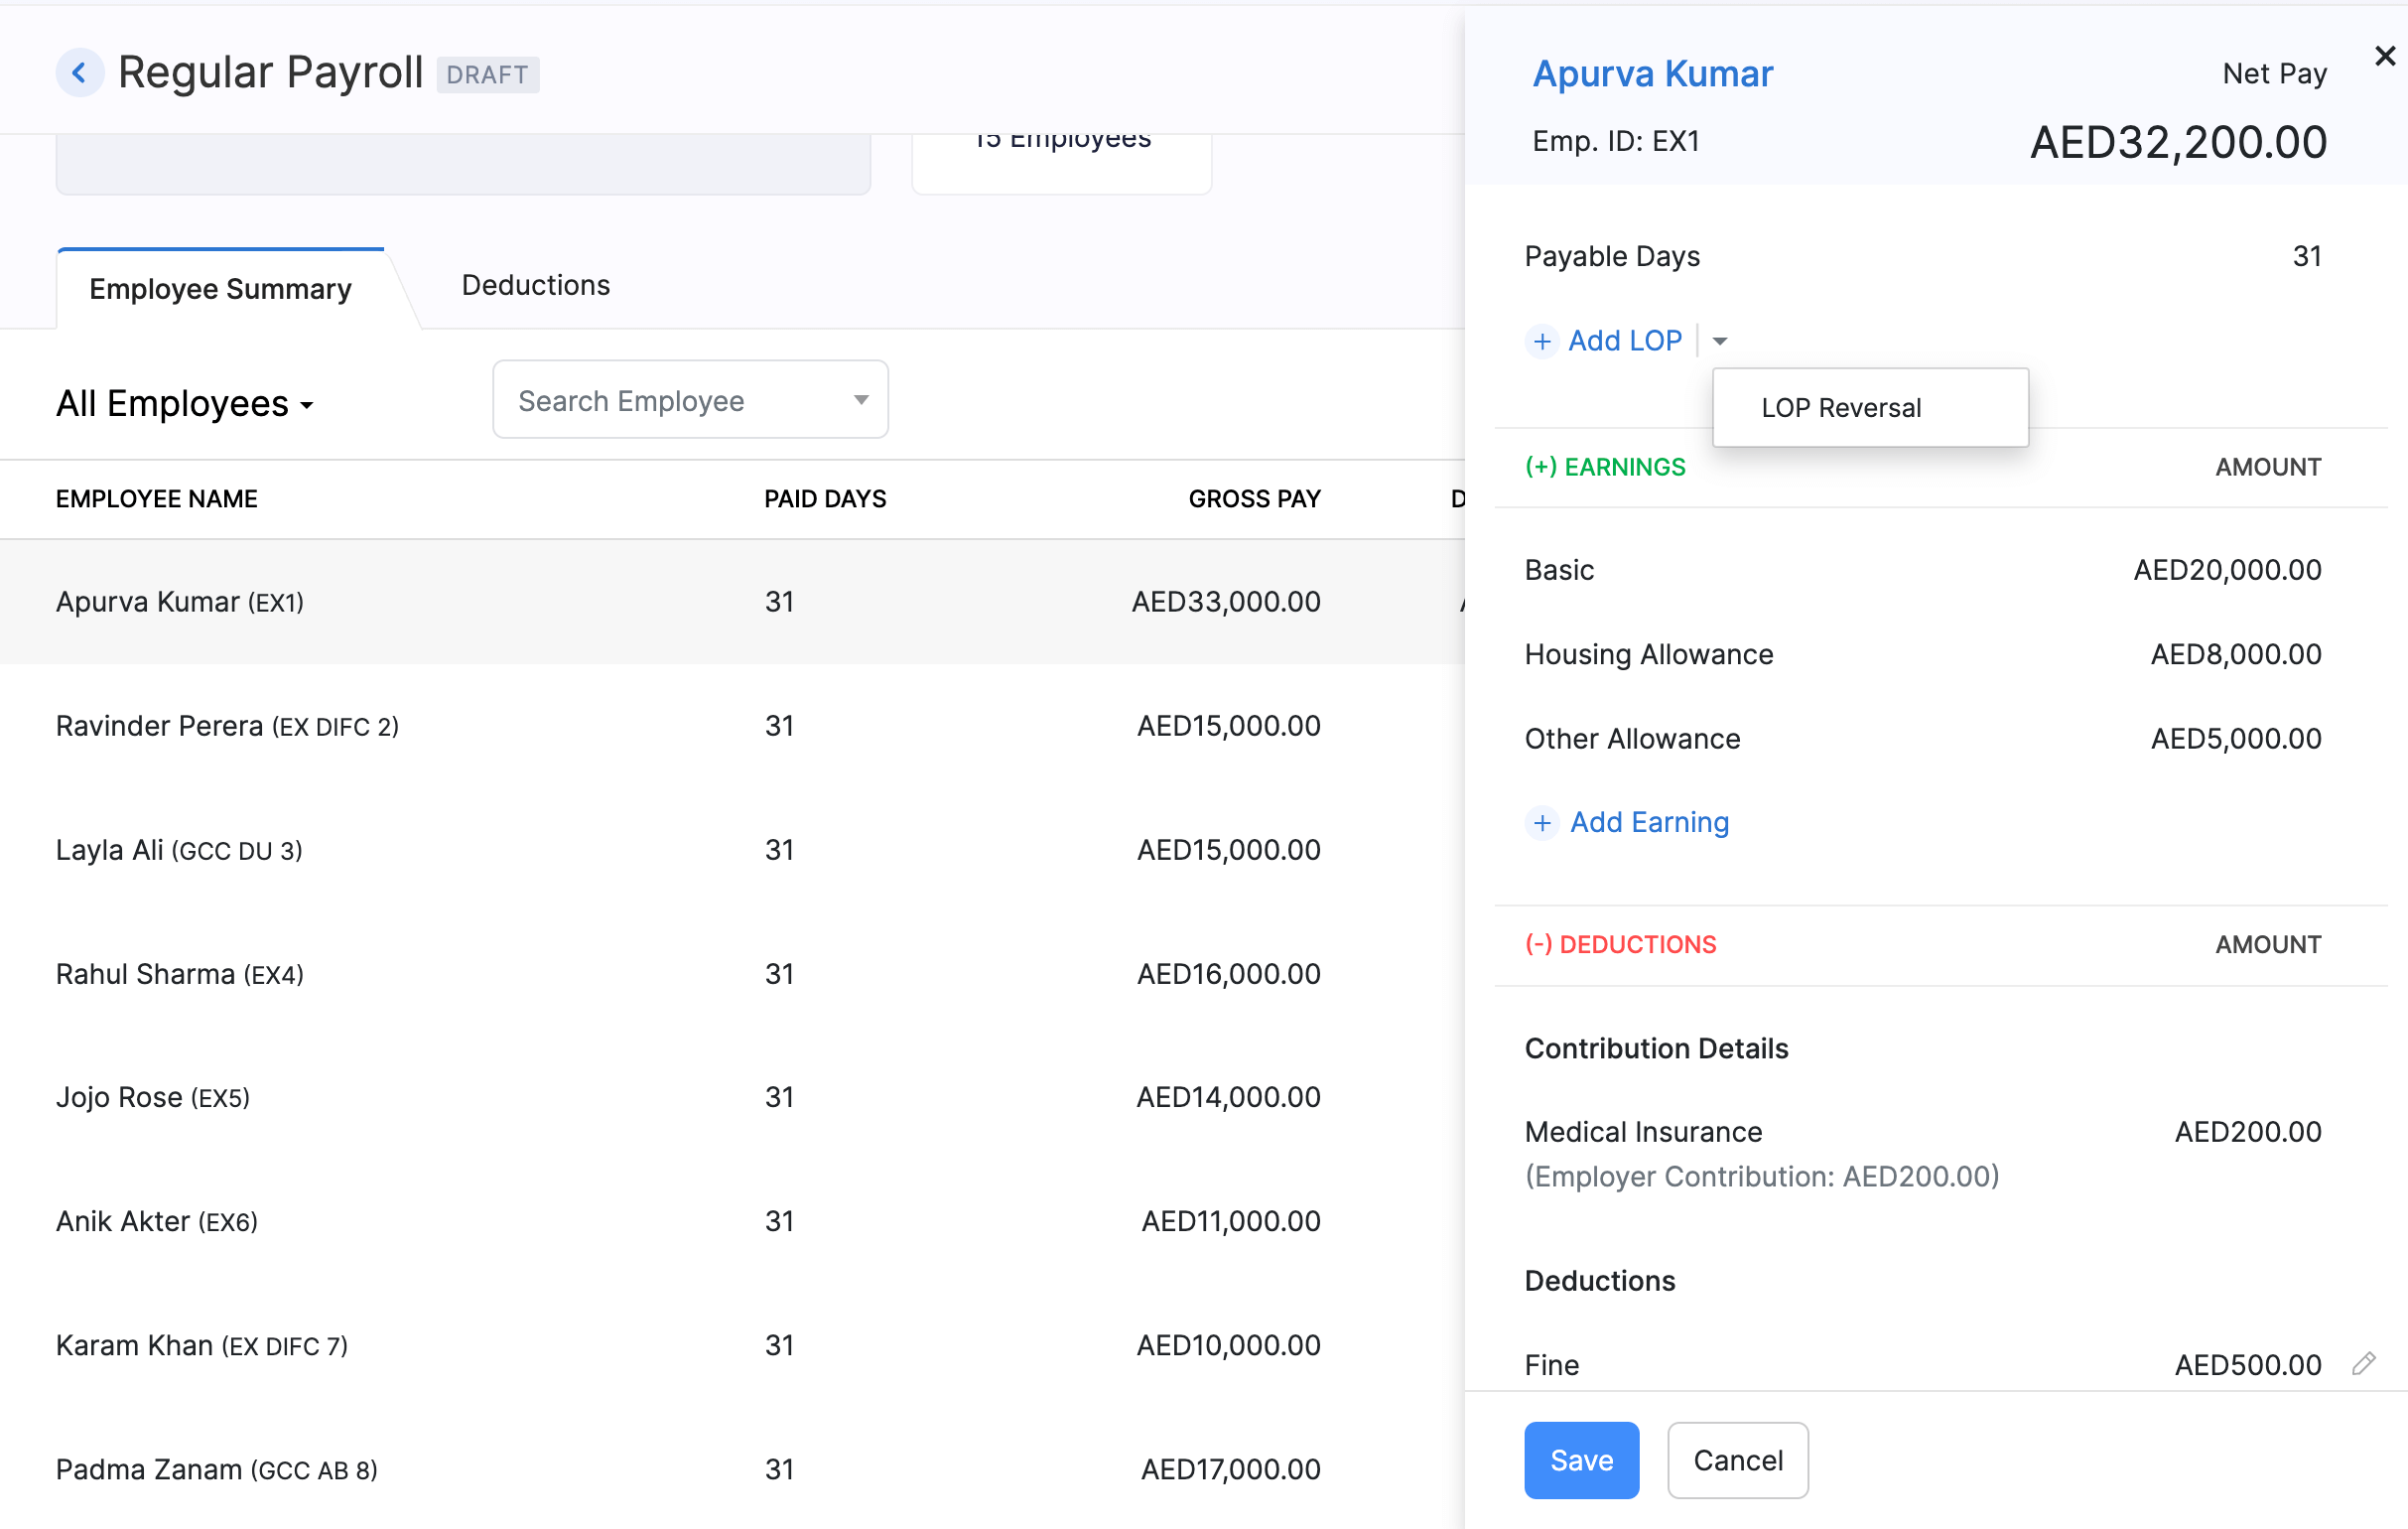
- Select the month for which you want to reverse the LOP.
- Enter the number of days for which you want to reverse the LOP.
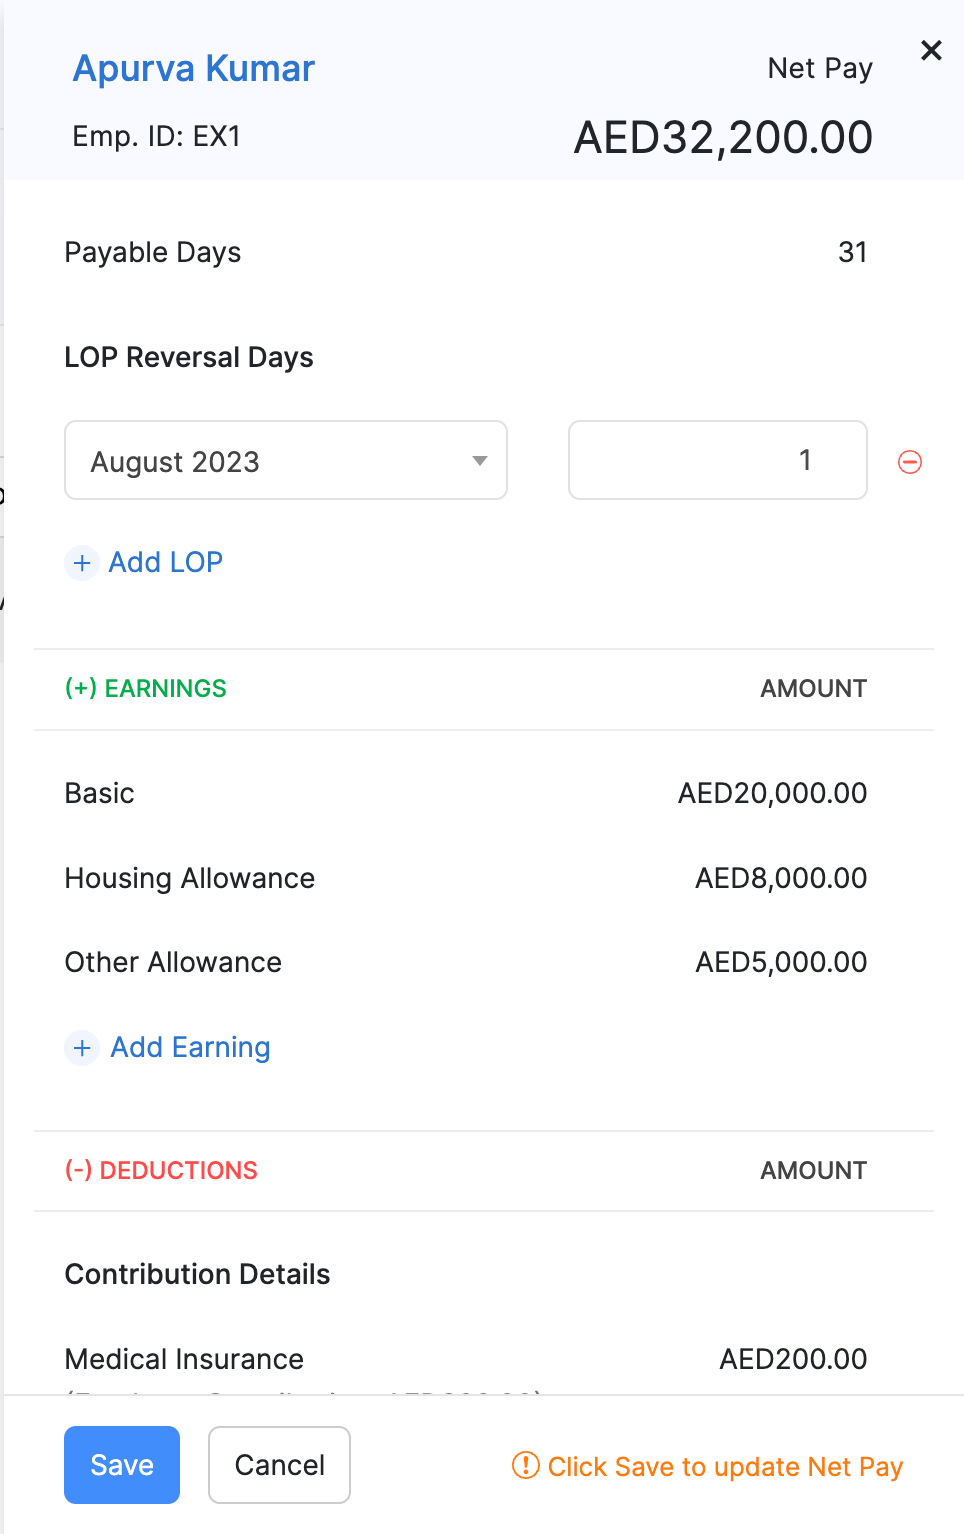
Insight The maximum number of days you can reverse is based on the LOP applied during that particular month.
- Click Save.
The LOP will be reversed, and the employee will be compensated in the current payroll.
Pro Tip The LOP deducted in the past fiscal year can be reversed only at once along with the April pay run of the current financial year, whereas the deduction of LOP in a single pay run can be reversed over several months.
By following the above steps, you can quickly and easily reverse LOP deductions and ensure your payroll processing is transparent and efficient.
Import LOP Reversal Details
You can also import the LOP reversal details of employees in the Pay Run module. This feature will come in handy if you have to add LOP Reversal details in bulk. Here’s how you can import them:
- Click Pay Run on the left sidebar.
- Click Import/Export in the right side of the screen and select LOP Reversal.
- Upload the file containing the details in the format prescribed below:
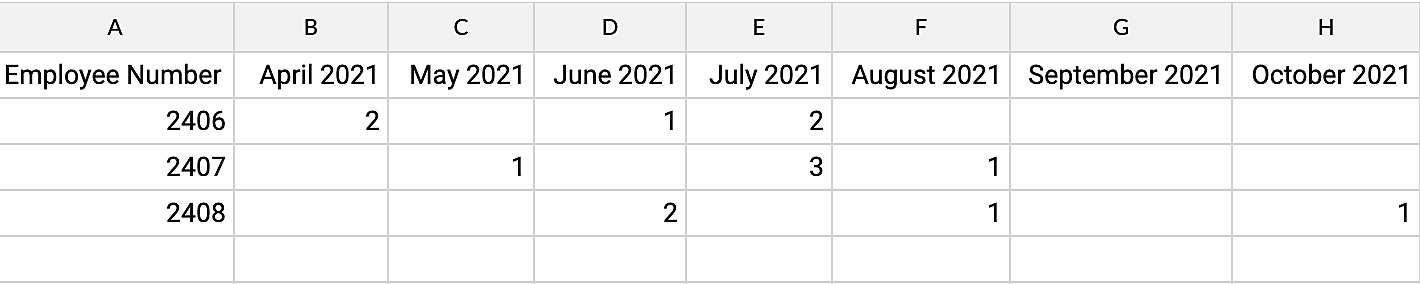
- Select how you want to handle duplicate entries.
- Map the import file fields with the fields in Zoho Payroll and click Import.
The file will be imported and the LOP reversal details will be mapped against each employee.
Resettlement Payroll
Note This feature is only available in early access. Contact support@zohopayroll.com to get access for your organisation.
In certain situations, employees may be terminated from their positions without receiving their due compensation. With the Resettlement Payroll feature in Zoho Payroll, you can efficiently process payroll for terminated employees who were not compensated at the time of termination.
This feature ensures that such payments are separated from the regular payroll. You can easily include the terminated employees in the Resettlement Payroll.
Scenario Zylker, an organisation with 500 employees, recently went through a restructuring process. This led to the termination of several employees. Due to the complexities involved, these employees did not receive their final compensation when they left. Ahmed, the head of payroll at Zylker, can use the Resettlement Payroll feature in Zoho Payroll to efficiently process the pending payments for these terminated employees in a single go.
Initiate a Resettlement Payroll
To initiate a resettlement payroll for your terminated employees:
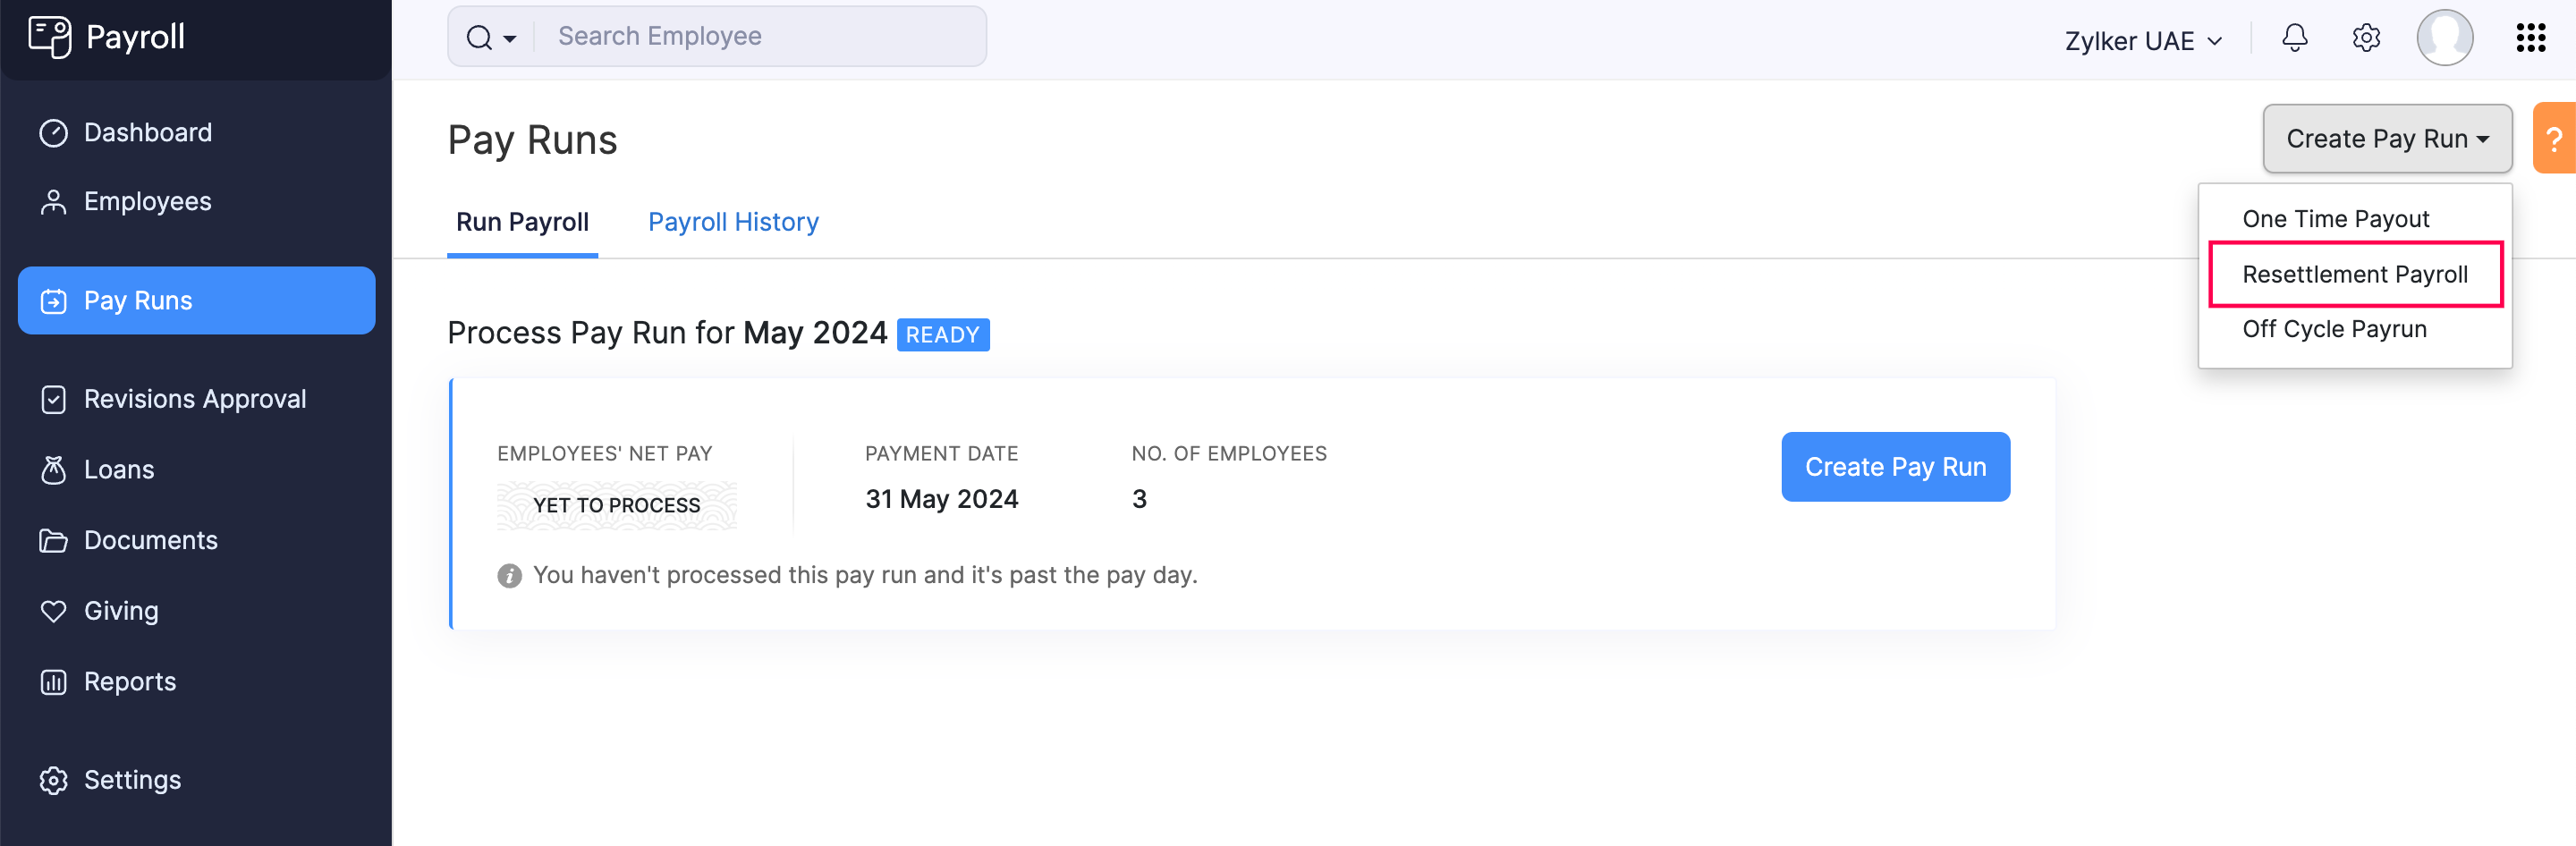
- Click Pay Runs on the left sidebar.
- Click Create Pay Run in the top right corner and select Resettlement Payroll.
- In the popup that appears, select the payment date for the exited employees.
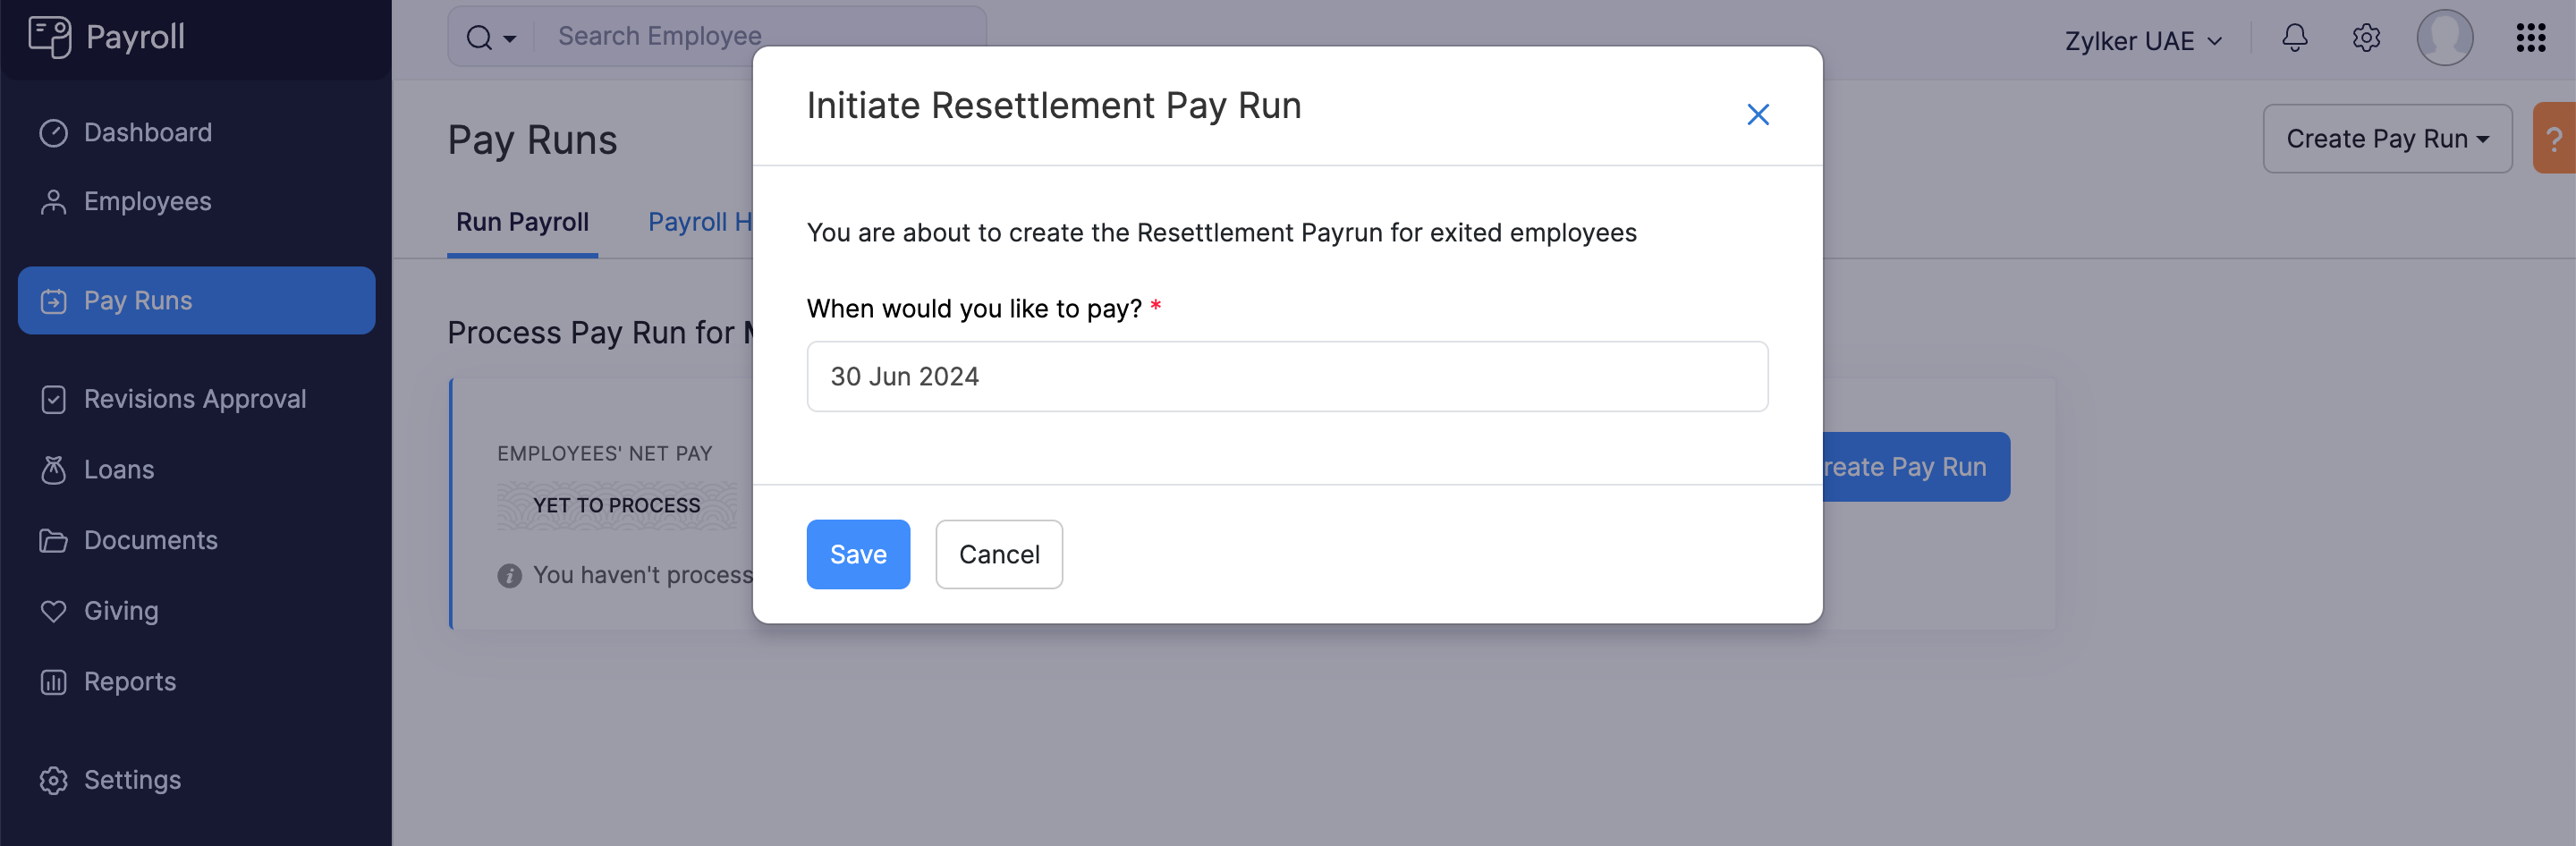
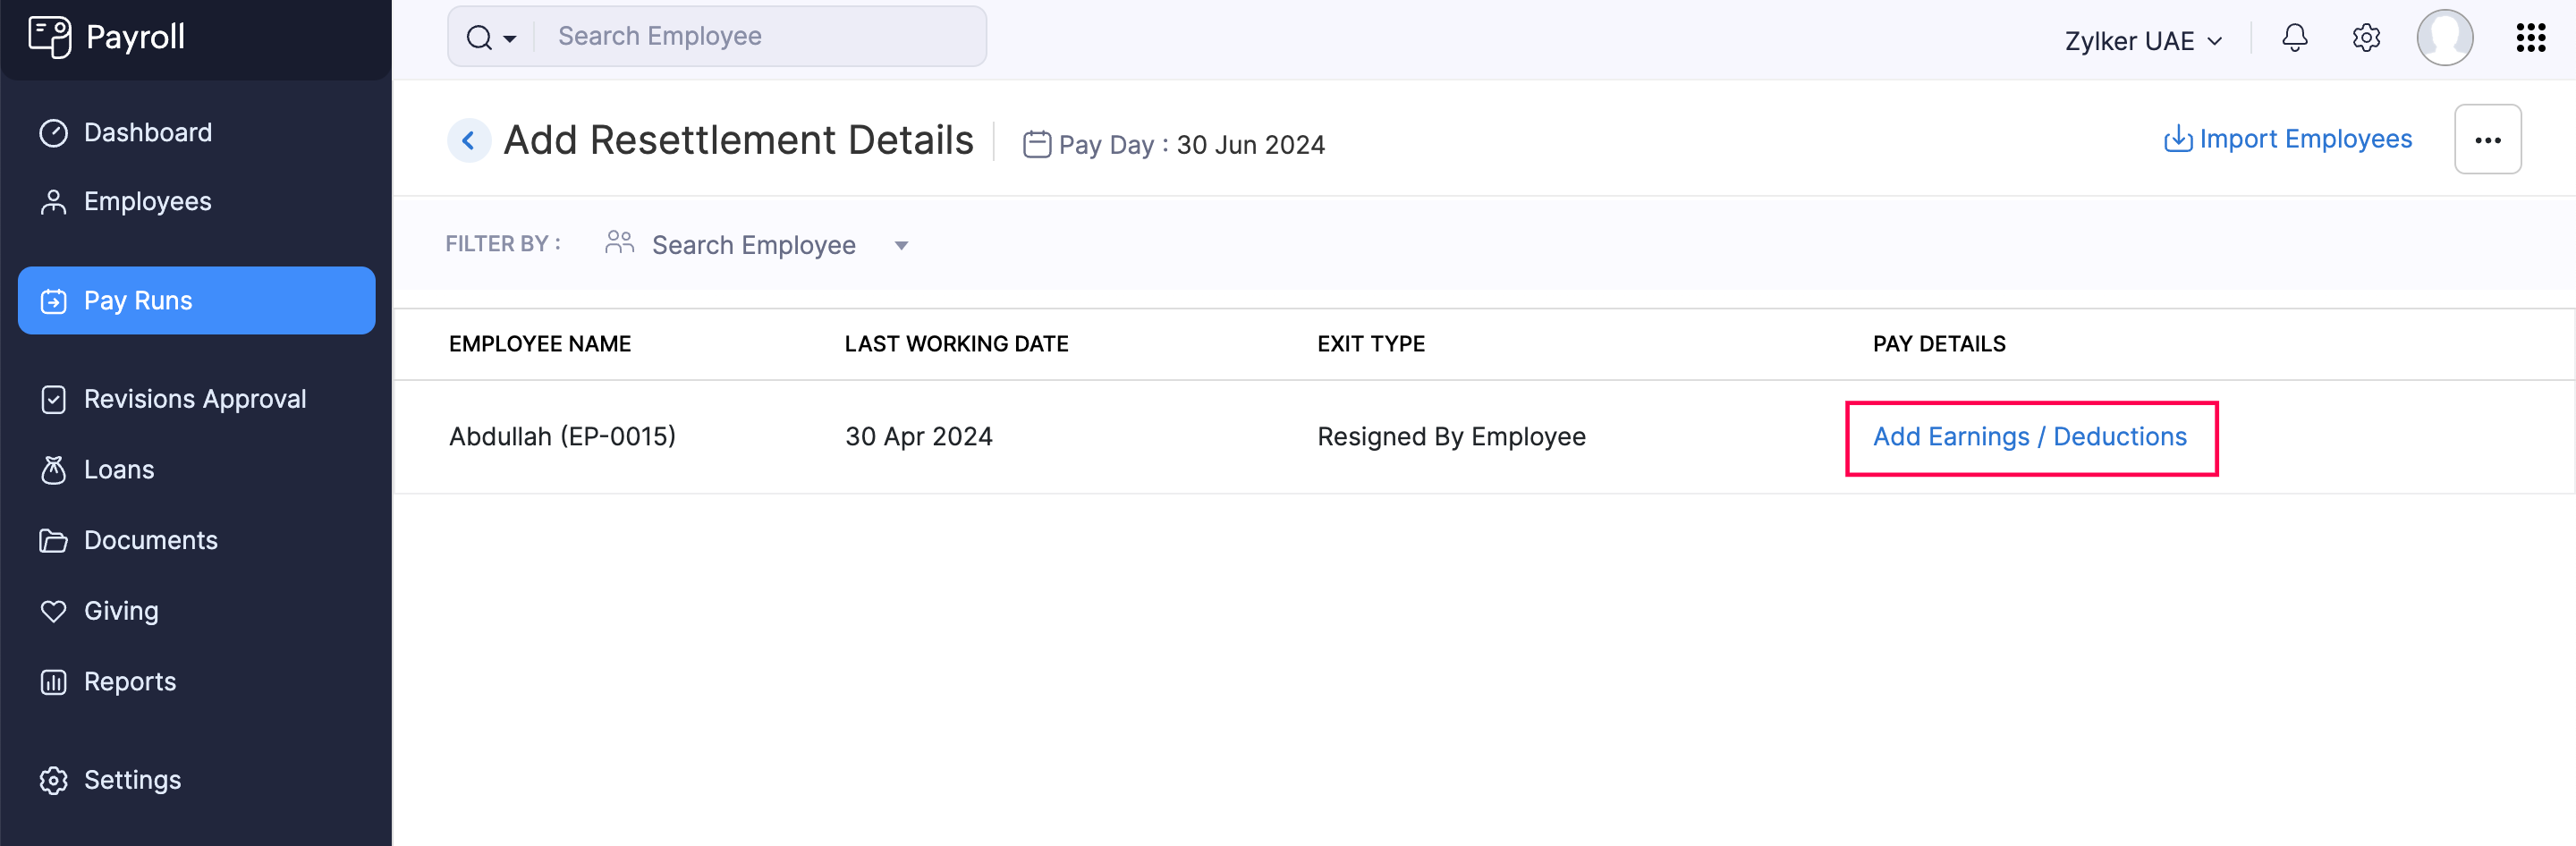
- Click Save. You’ll be redirected to the Add Resettlement Details page, where all terminated employees will be listed.

Add Earnings and Deductions
To add earnings and deductions for the eligible employees:
In the Add Resettlement Details page, click Add Earnings / Deductions for an employee.
Enter the earning and deduction amounts applicable for the particular employee.
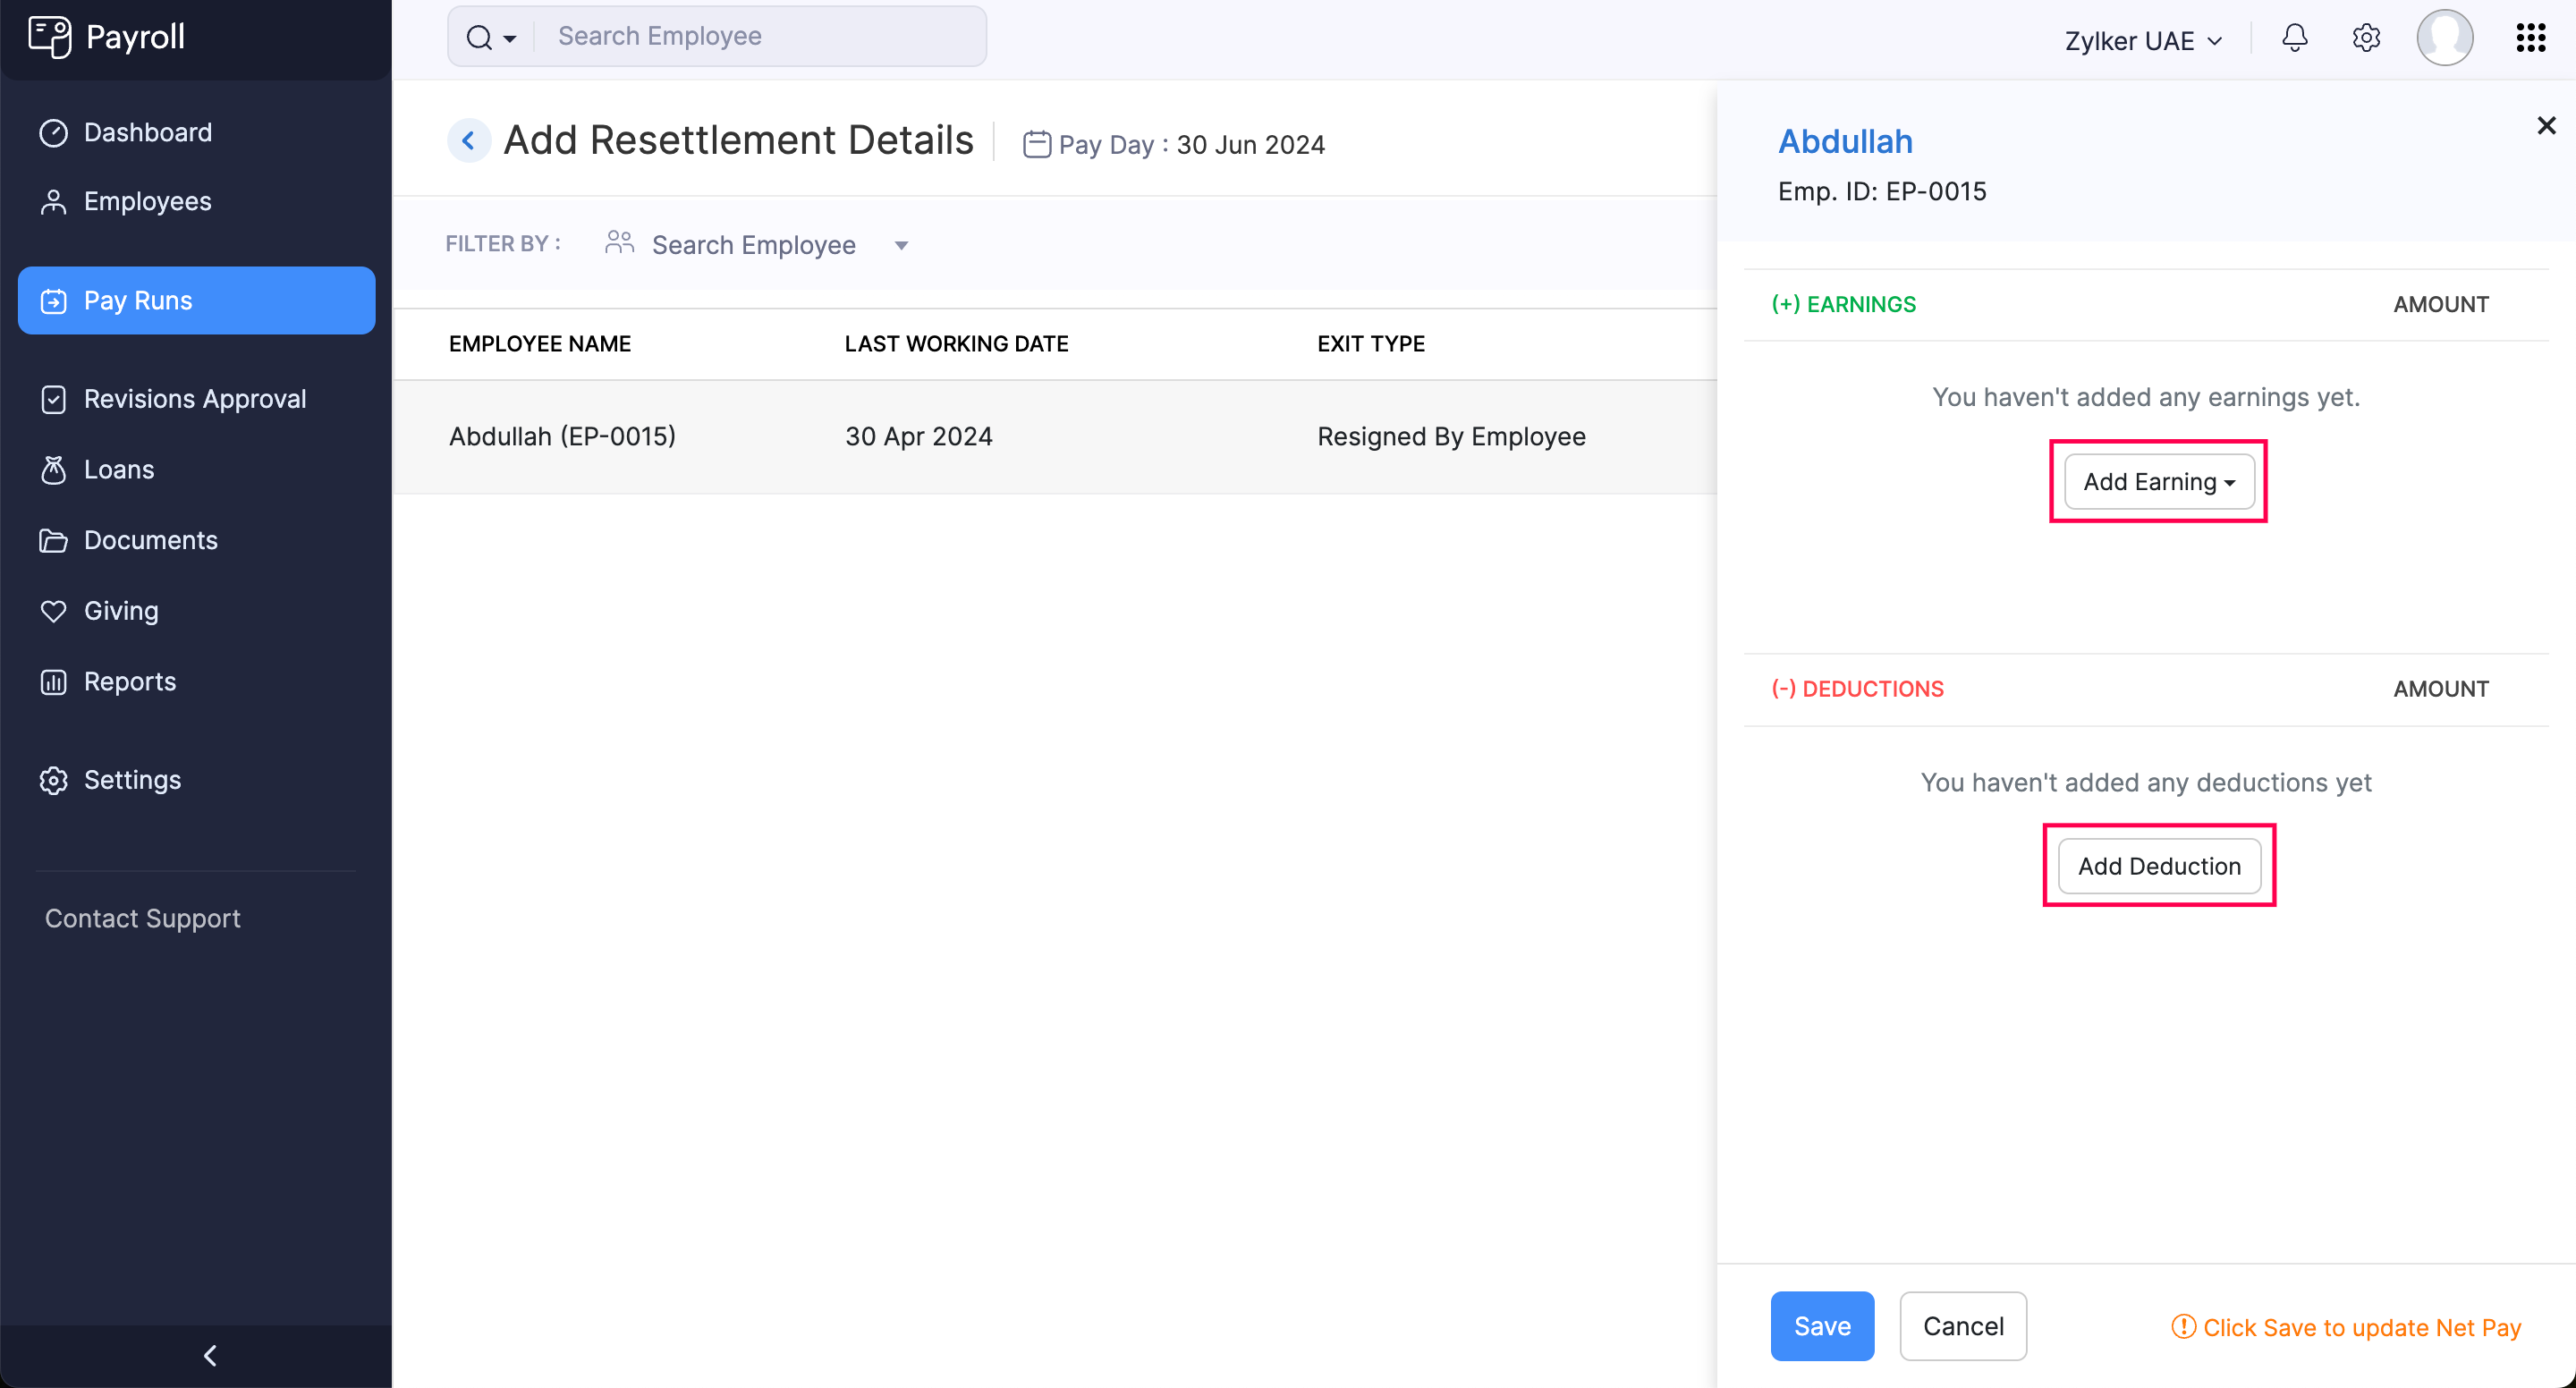
Insight
- Under Earnings, you can add Bonus, Commission, Leave Encashment, and Gratuity.
- Under Deductions, you can add Salary Advance and Fines and Damages.
Click Save.
Click Continue To Payroll.
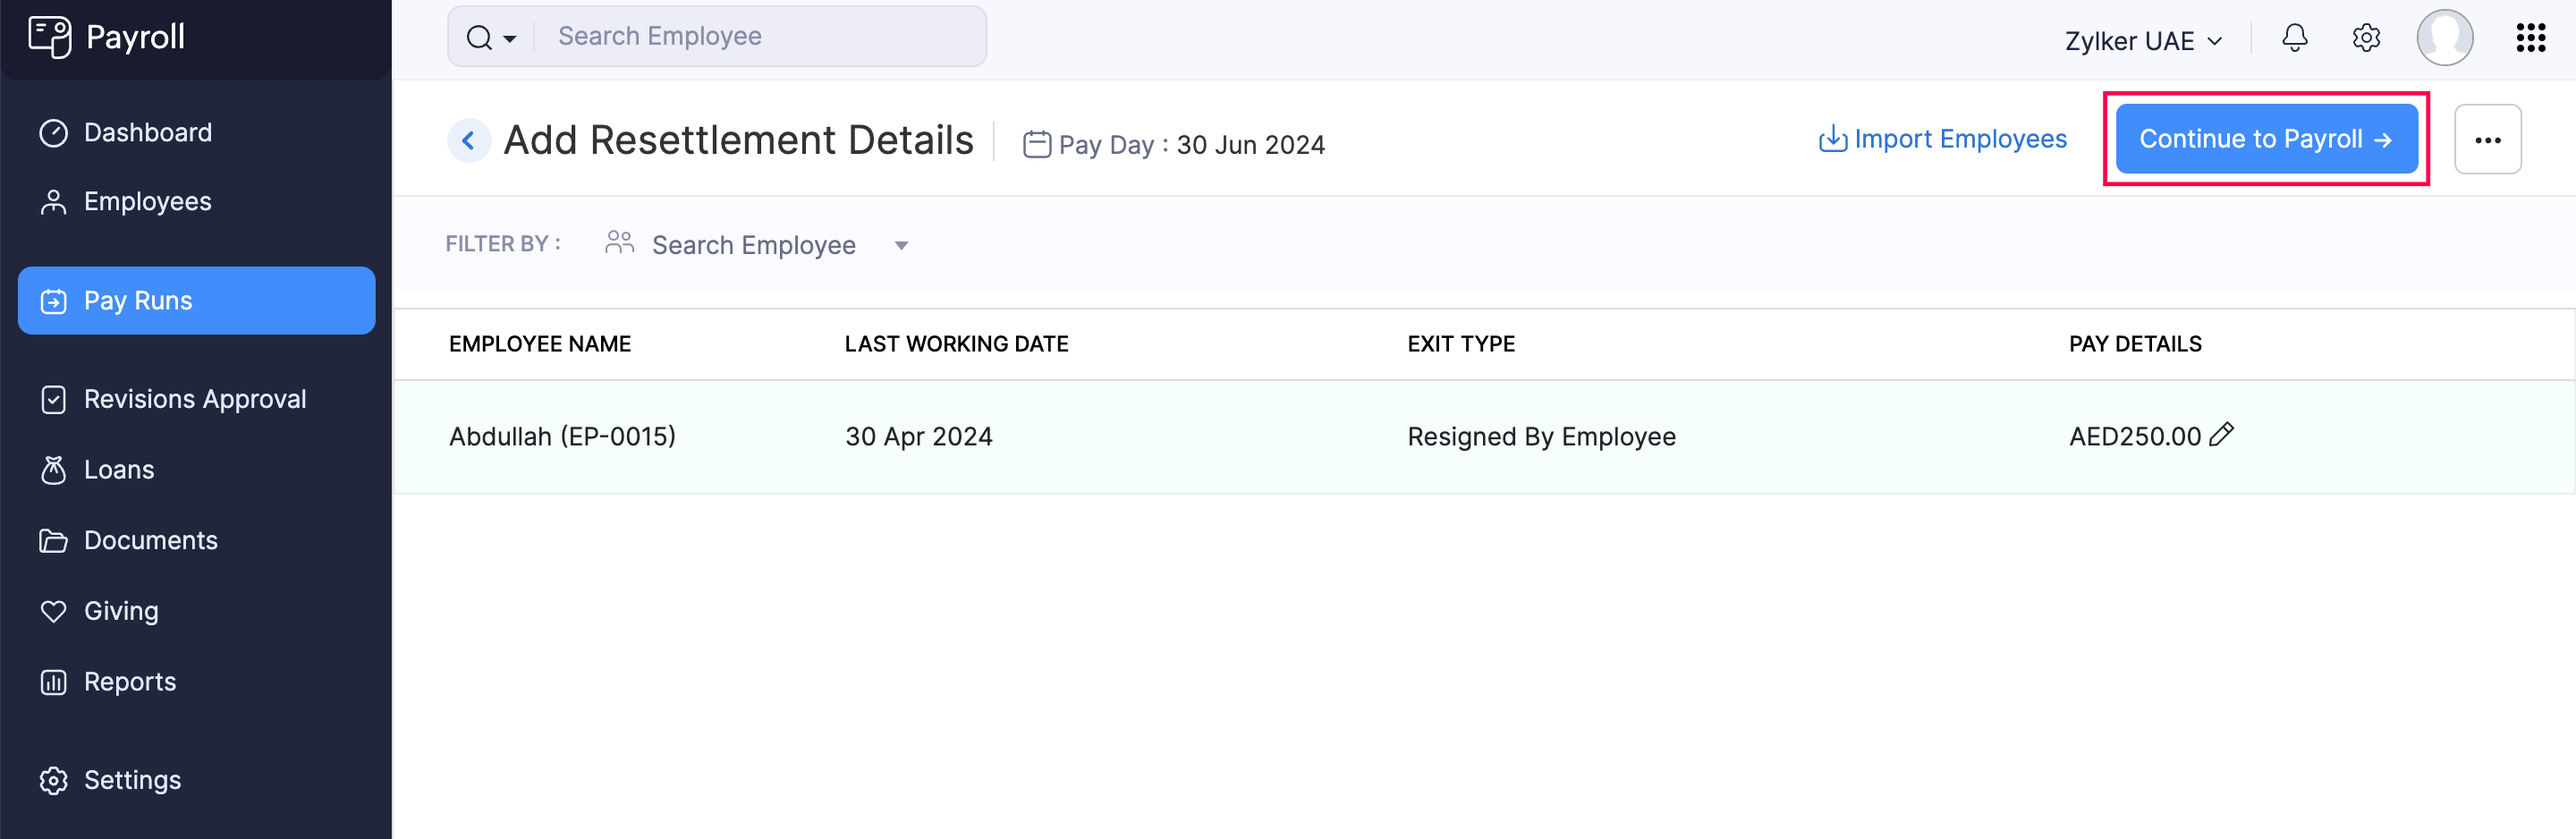
The Resettlement Payroll will be created in Draft status.
Pro Tip If you initiate exit processes for employees, they won’t be included in Resettlement Payrolls that are in Draft status. You can add these newly terminated employees by clicking Add Employees on the Resettlement Payroll page.
Once you have added the necessary details, you can approve the Resettlement Payroll and proceed with making the payments to your employees.
Download Bank Advice and SIF Files
Once you approve the payroll, the Bank Advice and SIF files will be available for download.
Download SIF File
- Navigate to the payroll summary page and select Download SIF File.
- Select whether to include employees based on the status of their salary payments:
- Unpaid: Choose this option to include only those employees who have not yet received their salaries. This is helpful for generating SIF files in anticipation of upcoming payments.
- Both (Paid & Unpaid): This option includes all employees in the SIF file, regardless of whether they have been paid or not.
- You can also futher filter for whom you want generate SIF file for based on the below criteria.
- Department: Select a specific department if you need to generate the SIF file for a particular segment of your organization.
- Designation: Filter the SIF by job designation to target specific roles or levels within the company.
- Add a Tag: Use this option to filter employees based on custom reporting tags that you’ve applied within your organization. Tags allow you to create tailored reports that meet specific internal or regulatory requirements.
- Select Disbursement Account number from which the payroll funds will be released. This account is usually tied to your company’s primary bank account and is required to ensure the correct processing of salary payments. This field is mandatory.
- Provide the Establishment ID associated with your company. This ID is often required by regulatory bodies and is used to track payroll submissions. Ensure that the ID entered here matches the official records.
- Select the work location for which the SIF file is being generated.
- Choose the required format for the SIF file. The format you select should comply with the regulatory requirements or the specific needs of the financial institution to which the file will be submitted.
- Select the file format for the download.
- Once all the necessary information has been entered and the appropriate filters and options have been set, click the Save & Download.
This will generate the SIF file and save it to your device, ready for submission to the relevant financial institutions or regulatory bodies.
Download Bank Advice
- On the payroll summary page, click the Download Bank Advice option.
- You can filter for whom you want generate bank advices for based on the below criteria:
- Department: Use this field to select a particular department. This is helpful if you want to generate a Bank Advice file for employees from a specific department, such as HR, Finance, or Sales. If you wish to include all employees across departments, leave it set to “All Departments.”
- Designation: This filter lets you select employees based on their job titles or roles within the company. For instance, you might want to generate advice only for managers or executives. Leaving this field set to “All Designations” will include employees of all roles in the file.
- Add a Tag: This option allows you to apply custom tags to further categorize or filter the employees. Tags can be used for a variety of purposes, such as identifying custom groupings within your organization.
- Select the Bank Statement Format in which the bank statement will be generated. The format might vary depending on your bank’s requirements or the standard practice in your region.
- Choose the file format for downloading the Bank Advice.
- If you want to add an extra layer of security to the Bank Advice file, check the Protect this file with a password box to enable password protection. You will be prompted to set a password, which will be required to open the file. This is especially useful for files containing sensitive employee salary information.
- After configuring all settings and filters, click Download to generate and save the Bank Advice file to your computer. The file will be ready for submission to your bank or for internal use, depending on your needs.