Configure ZeptoMail Plugin for WordPress
- Published : April 5, 2023
- Last Updated : May 2, 2023
- 633 Views
- 3 Min Read
One of the essential parts of running a successful business is owning a fully functional website. Having an online presence is necessary to connect with your customers and also to market your brand. Take the case of an e-commerce business, it is absolutely necessary to own a website in order to even run it. So, now that we've agreed it is vital to own a website in tandem with your business, how do we connect with our customers? The internet has numerous web hosting and self-hosting services that make owning a website a cakewalk. And one such service is WordPress.WordPress allows you to host your websites on their platform and use the services they provide and also allows you to self-host them too.
However, for emailing your customers, you need to configure your servers to send them via authorized channels. Configuring them can be too cumbersome and will be time-consuming. Hence, to make it easier, you can install ZeptoMail plugins on your self-hosted WordPress site to send emails to your customers. You can make use of the MailAgents in your ZeptoMail account to interact with your customers, with ease.
Why use ZeptoMail plugins?
You can send emails from your WordPress account, but there is always a lingering question of whether they are reaching the desired destination. ZeptoMail plugin clears this uncertainty and ensures that your emails are delivered on time. Here are some reasons why you should use the ZeptoMail plugin :
Deliverability :
Your emails will be sent through authentic Zoho servers and hence they will be delivered securely and on time.
Avoid spam filters:
You can prevent your emails from falling into spam folders easily by sending emails using ZeptoMail plugins. Your emails will be sent along with your name and domain name. This way, you can avoid spam and also increase your sender reputation.
Email tracking :
Apart from sending your emails, you can also track them using your ZeptoMail account. This way, you will know how they are performing and in turn, you can improve your performance.
Build brand recognition:
Since your emails contain your name and your domain name, your customers will be familiarised with your brand. This establishes a connection with them, thereby improving your brand identity.
Pre-requisites to install the ZeptoMail plugin :
- You need to have a self-hosted WordPress website.
- A ZeptoMail account.
- PHP 5.6 and above.
Installation of ZeptoMail plugin :
Follow the steps below to install the ZeptoMail plugin :
- In your self-hosted WordPress account, go to the Admin Dashboard.
- Under plugins, select add new section from the left pane.
- Search for the ZeptoMail plugin in the search bar and select install.
- To use this plugin, under plugins, go to installed plugins section. Click activate button under ZeptoMail's plugin.
- The plugin is now activated in your WordPress account.
Configuring ZeptoMail plugin in WordPress :
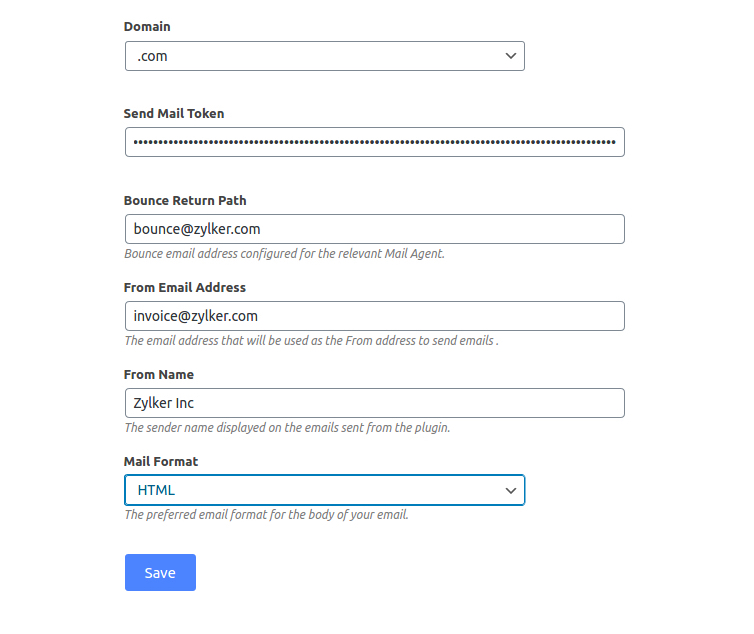
Once you have installed the plugin, you need to configure the settings in order to send your emails. To do so :
- Navigate to the ZeptoMail plugin tab in the left menu and go to the ZeptoMail account configuration page. Fill up the details.

- Under domain, choose the region where your ZeptoMail account is hosted.
- To fill the send mail token, login to your ZeptoMail account and go to the corresponding MailAgent for your WordPress account.
- Copy the send mail token from the SMTP and API info section and paste it in the ZeptoMail account configuration page in the WordPress dashboard.
- Fill up the bounce return path details.
- Enter the from email address and fromname that is to be used in the emails sent from your website.
- Choose the email format you wish to send your emails in.
- Click save.
Your ZeptoMail plugin is now functional and can be used to send emails.


