WordPress SMTP email setup: Plugins and PHPMailer guide
- Published : April 30, 2026
- Last Updated : May 8, 2026
- 243 Views
- 6 Min Read
WordPress is one of the most popular platforms for building websites, blogs, and online businesses. Millions of site owners rely on it to stay connected with their customers, subscribers, and team members. Emails are a big part of that communication.
From account confirmations and one-time passwords (OTPs) to password reset links, contact form messages, and system alerts, these emails often carry time-sensitive information.
That’s why reliable email delivery in WordPress matters. When your emails consistently reach the inbox, your website feels more professional, trustworthy, and responsive.
Why is it important to set up WordPress SMTP?
By default, WordPress sends emails using PHP’s built-in wp_mail() function. This method depends on your hosting server to deliver messages. The problem is that many hosting providers don’t configure mail servers properly. Because of this, your emails may fail to send, get delayed, or land in the spam folder.
Reasons why the default PHP mail() function isn’t a reliable option:
- No authentication: The
mail()function doesn’t support SMTP authentication natively, and major mail servers (such as Gmail and Outlook) often reject unauthenticated emails as spam. - Shared hosting restrictions: Many hosts block
mail()entirely to protect their server’s IP addresses from being used for spam. - IP reputation issues: Emails are sent from your web server’s IP. If that IP is shared with users who send spam, email providers may block it.
- No tracking or visibility: The
mail()function only returns true or false. It doesn’t confirm delivery, delays, or rejection after sending.
To fix these issues, you can set up WordPress SMTP. Simple Mail Transfer Protocol (SMTP) routes your emails through a real mail server (such as ZeptoMail) with proper authentication. This improves deliverability and helps keep your emails out of spam folders.
WordPress SMTP set up with PHPMailer (without a plugin)
WordPress includes PHPMailer as a built-in library, so there’s no need to install it separately. You can configure WordPress’s built-in mail system to send emails through SMTP by using the phpmailer_init hook.
This method works best if you’re comfortable editing code.
Before you start, make sure you have:
- SMTP host and port
- SMTP username and password
- A verified sender email address
Steps:
- Go to WordPress dashboard >Appearance > Theme File Editor.
- Open
functions.php - Paste your SMTP configuration code at the bottom.
. 
Points to remember:
- Replace credentials with your SMTP provider details
- Use TLS (port 587) or SSL (port 465)
- Avoid storing your email password directly in code
WordPress SMTP plugin (with ZeptoMail as the server)
If you prefer a no-code approach, using a plugin is much easier. Plugins offer a simple UI, email logs, and you can test email sending without writing a single line of code.
Zoho ZeptoMail is a transactional email service that works via SMTP or API. In ZeptoMail, you create an "Agent," which manages your email settings and analytics. Each Agent has its own SMTP credentials, including an SMTP username (API key) and password.
You can send order confirmations, password reset links, form submissions, and user notifications from your WordPress site with ZeptoMail with more security and better deliverability.
Before you start:
- A self-hosted WordPress website
- An active ZeptoMail account
- A verified sending domain
ZeptoMail SMTP credentials (for plugins)
ZeptoMail only allows emails to be sent through secure connection ports 465 (SSL) and 587 (TLS). Here’s a quick-reference table:
| Setting | Value |
|---|---|
| SMTP host | smtp.zeptomail.com |
| Port (SSL) | 465 |
| Port (TLS) | 587 |
| Username | emailapikey |
| Password | Your Send Mail API Token |
| Encryption | SSL or TLS |
ZeptoMail uses modern security (TLS 1.2) to protect emails sent through SMTP, so your login details and email data are encrypted while being sent. Some apps, plugins, or devices may not accept very long passwords in their SMTP settings field. In these cases, you can generate a shorter password in your ZeptoMail account.
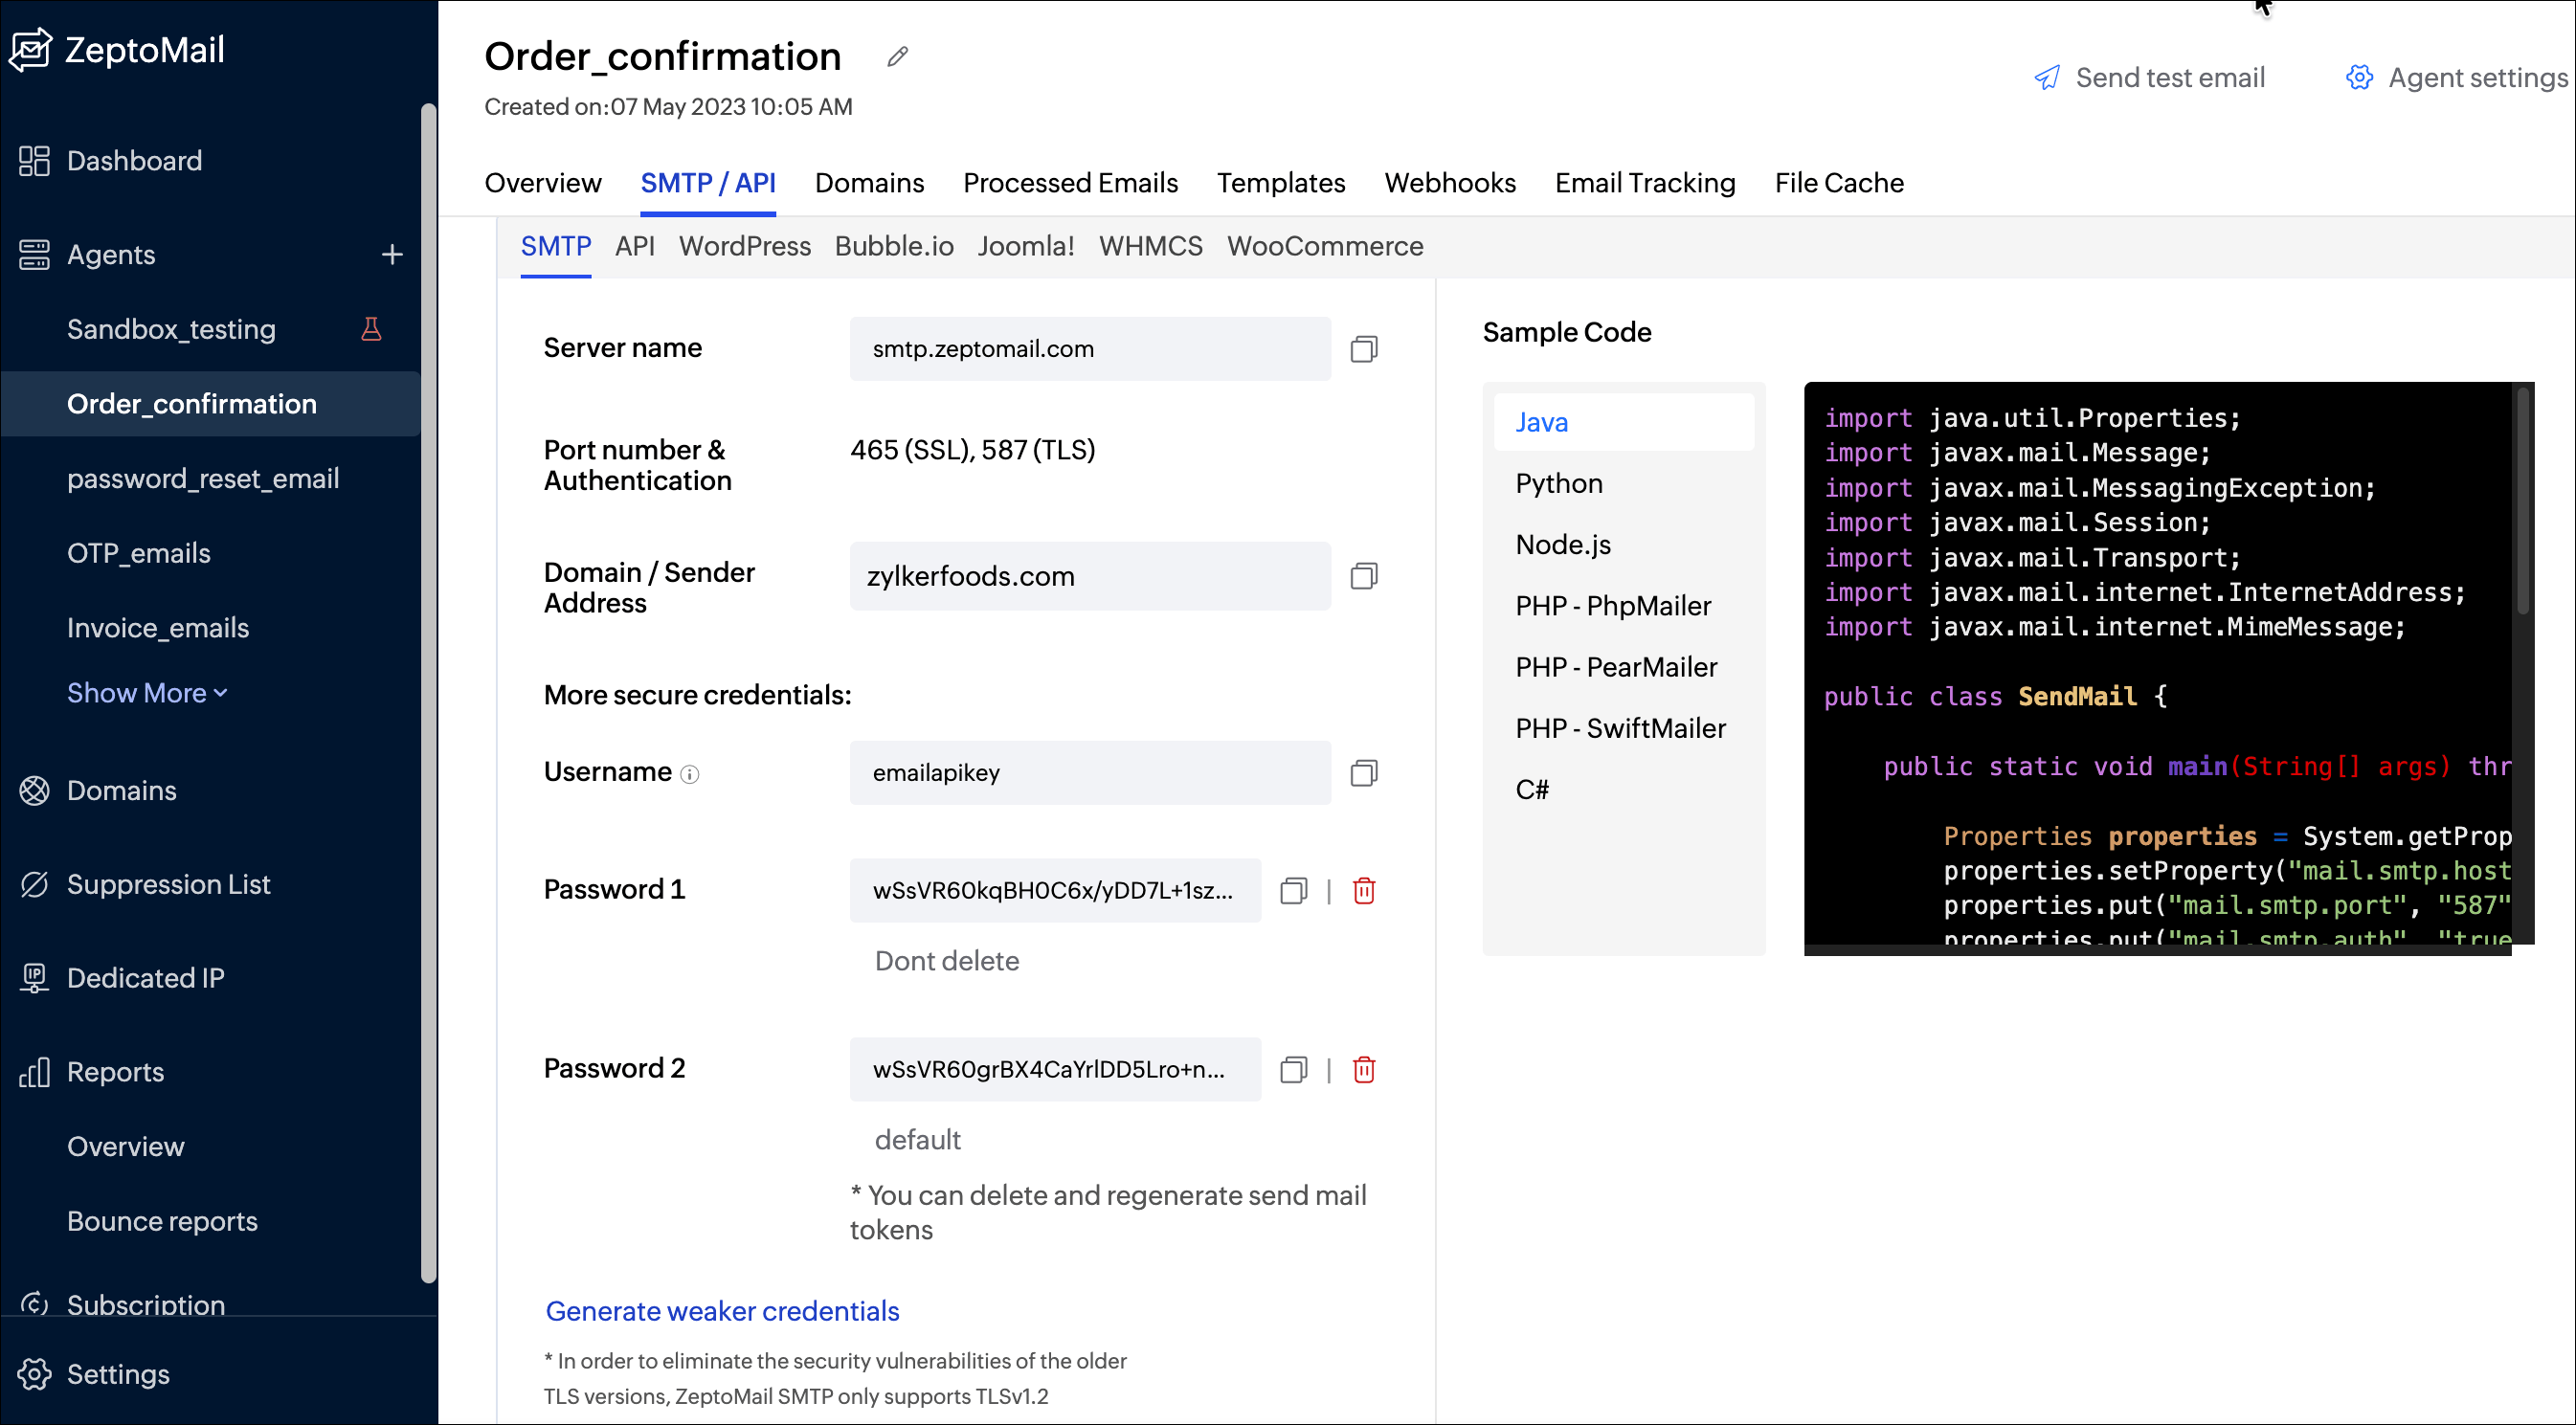
How to get your ZeptoMail credentials
Before you configure any plugin, do this in your ZeptoMail account:
- Log in to your ZeptoMail account.
- Create or open an Agent.
- Go to the SMTP/API tab. You’ll find the SMTP server details, username, and password (API token).
- Copy the username and password.You’ll paste them into whichever plugin you choose.
WP SMTP plugin setup with ZeptoMail
WP Mail SMTP is the most popular SMTP plugin for WordPress. It replaces the default WordPress email method wp_mail() with proper SMTP to send emails through real mail servers. This improves email delivery for time-sensitive emails, such as contact forms, password resets, orders, and notifications, and reduces the number of emails going to spam.
Setup guide (step-by-step)
- Go to your WordPress dashboard > Plugins > Add New.
- Search for “WP Mail SMTP” and install and activate the plugin.
- Once activated, access the "WP Mail SMTP" settings menu.
- Under the Mailer section, scroll down to "Other SMTP" and manually enter the ZeptoMail SMTP credentials.
- Click Save settings.
- To send a test email, go to Email Test > WP Mail SMTP > Tools > Email Test. If the email arrives without any errors, your setup is completed.
Post SMTP plugin setup with Zeptomail
Post SMTP helps your WordPress website send emails using a more reliable SMTP service (such as ZeptoMail) instead of the default WordPress email method (wp_mail). It also shows useful details such as whether the email was delivered successfully, when it was sent, and the email subject line.
Setup guide (step-by-step)
- Go to your WordPress dashboard > Plugins > Add New.
- Search for "Post SMTP Mailer" and install and activate the plugin.
- In your WordPress sidebar, click Post SMTP plugin > Settings.
- Click the Start the Wizard button.
- Enter your sender details, your name (From Name) and your email address (From Email).
- Select SMTP and enter the ZeptoMail SMTP settings.
- Finish the wizard and send a test email to check the configuration.
If an email fails or doesn’t arrive, you can open Post SMTP > Email Log in your WordPress dashboard to check what happened and troubleshoot the issue.
Fluent SMTP plugin setup with ZeptoMail
Fluent SMTP captures emails sent through the default WordPress wp_mail() system and routes them through trusted email service providers for better deliverability. It can also use direct API connections for faster and more secure sending. You can connect multiple SMTP accounts at the same time and choose which account should send emails based on the From Email address.
Setup guide (step-by-step)
- Go to your WordPress dashboard > Plugins > Add New.
- Search for "FluentSMTP" and install and activate the plugin.
- In the WordPress sidebar, click FluentSMTP and choose your SMTP connection.
- Select Other SMTP (for ZeptoMail), enter the details, and click Save Settings.
- Go to the Email Test tab, enter your personal email, and click Send Test Email.
- Once the test email is received, you’re done configuring ZeptoMail to send WordPress emails using Fluent SMTP.
PHPMailer vs. SMTP plugin
There are two common ways to improve email sending in WordPress.
PHPMailer: Use it when you’re comfortable making changes in website code files or don’t want to install any plugin. It’s often a better choice for custom-made or advanced WordPress websites where more control is needed over how emails are sent.
SMTP plugin: Choose this option if you don’t want to work with code and prefer an easy setup. It also helps you view email logs to check whether messages were sent successfully or failed. If you plan to switch email providers in the future, an SMTP plugin makes that process much quicker and easier.
Conclusion
If your WordPress emails aren’t reaching inboxes, setting up SMTP is one of the easiest ways to fix this issue. You can choose a manual setup with PHPMailer or use plugins such as WP Mail SMTP, Post SMTP, or FluentSMTP. They all help your website send emails more reliably and improve delivery. Additionally, when you connect WordPress with a trusted email service such as ZeptoMail, your emails are more likely to reach the inbox, giving your users a more dependable experience.
FAQ
1. How do you set up WordPress SMTP email using PHPMailer?
You can configure WordPress’s built-in mail system to send emails through SMTP using the phpmailer_init hook. Use this hook to enable SMTP mode and set your SMTP host, port, encryption method (TLS or SSL), username, and password.
2. How do you configure WordPress SMTP email using the WP SMTP plugin?
To install the WP SMTP plugin, go to Settings, go to WP SMTP, and enter your SMTP host, port, and credentials. Save and send a test email to confirm it’s working.
3. How do you test WordPress SMTP email after configuration?
Most WordPress SMTP plugins include a built-in Send Test Email feature. You can use it to confirm that your SMTP settings are working correctly. You can also install the "Check Email" plugin to test email delivery from your site, or use "Mail Tester" to check inbox placement, spam score, and email authentication.
4. Can you send WordPress emails using the Post SMTP plugin?
Yes. Post SMTP supports most SMTP providers (such as ZeptoMail) and includes a setup wizard plus logs for debugging delivery issues.
5. How can you improve WordPress email deliverability using SMTP?
You can use a dedicated transactional email service (such as ZeptoMail), verify your sending domain with SPF, DKIM, and DMARC records, and always send from a domain-based email address.