 Inventory
Related Lists
The Related Lists feature allows you to fetch data from third-party services and view them within Zoho Inventory. This comes in handy when you want to cross-reference data from different entities.
Related lists can be created for the following modules in Zoho Inventory: Customers and Vendors, Items, Sales Orders, Invoices, Credit Notes, Purchase Orders, and Bills.
Note: This feature is available only for selective pricing plans.
IN THIS PAGE…
Create Related List
There are two ways to create a related list:
By creating a lookup custom field
The lookup custom field allows you to pull data from one module and access it inside another module in Zoho Inventory. When you create a lookup field in one module, its associated details will be available as a related list in the other module.
Scenario: Patricia wants to track the efficiency of users in her organization. So, she decides to track the sales orders they create for customers. For this, she creates a Lookup custom field in the Sales Orders module and for the module whose data she wants to access (in this case, Users).
Learn more about the lookup custom field.
By writing a deluge script
With deluge scripts, you can connect Zoho Inventory with other third-party services to access their data.
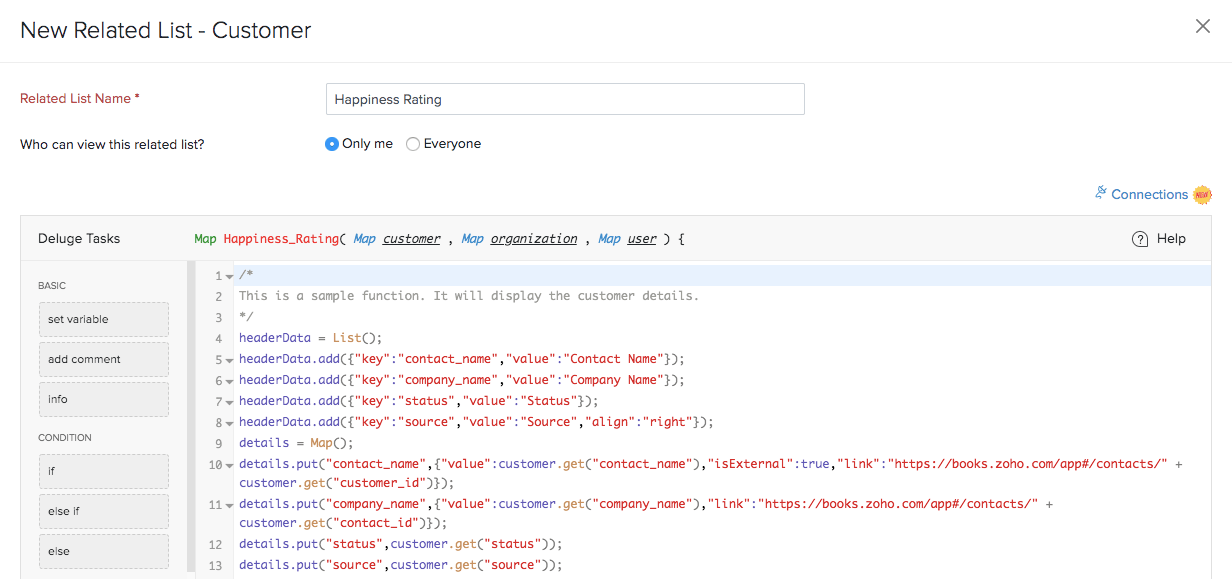
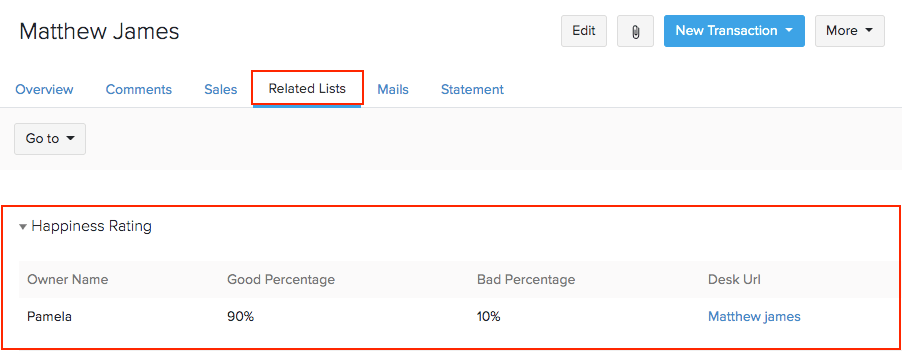
Scenario: Consider a firm that uses Zoho Inventory for their order management needs and Zoho Desk to address their customer queries. Now, the admin writes and executes a deluge script to fetch the customer happiness rating from Zoho Desk and show the consolidated data in a tabular form under each customer in Zoho Inventory.
To create a related list using deluge:
- Go to Settings > Preferences.
- Go to the module for which you wish to create a related list. In this case, Customers and Vendors.
- Navigate to the Related Lists tab.
- Click the New button, and select New Related List.
- Enter a suitable title for the related list, and choose which users can see this list.
- Write a deluge script to fetch data from the connected third-party service. In this case, from Zoho Desk.
Pro Tip: Learn how you can link third-party services with Zoho Inventory using Connections.

Sample code
This will be the deluge code written in Zoho Inventory used to access customer details in Zoho Desk.
searchMap = Map();
searchMap.put('fullName', customer.get("contact_name"));
searchMap.put('orgId', XXXXX); //Zoho desk orgId

searchList = invokeurl
[
  url : "https://desk.zoho.com/api/v1/contacts/search"
  type : GET
  parameters: searchMap
  connection: "zohodesk"
];

contacts = searchList.get('data').toList();
contact = contacts.get('0');
contactId = contact.get('id');

paramsMap = Map();
paramsMap.put('orgId', XXXXX);
paramsMap.put('include','owner');

contactInfo = invokeurl
[
  url : "https://desk.zoho.com/api/v1/contacts/" + contactId
  type : GET
  parameters: paramsMap
  connection: "zohodesk"
];

owner = contactInfo.get('owner');
happiness = contactInfo.get('customerHappiness');

headerData = List();
headerData.add({"key":"owner_name", "value":"Owner Name"});
headerData.add({"key":"good_percent", "value":"Good Percentage"});
headerData.add({"key":"bad_percent", "value":"Bad Percentage"});
headerData.add({"key":"desk_url", "value":"Desk Url"});

details = Map();
details.put("owner_name", owner.get('firstName') + owner.get('lastName'));
details.put("good_percent", happiness.get('goodPercentage'));
details.put("bad_percent", happiness.get('badPercentage'));
details.put("desk_url", {"value":contact.get('lastName'), "isExternal":true, "link":contactInfo.get('webUrl')});

listData = List();
listData.add(details);

resultMap = Map();
resultMap.put("header_context", headerData);
resultMap.put("data", listData);
return resultMap;
- Click Save or Save and Execute to run the script.
The result will be displayed in a tabular form within the respective modules for which you’ve created a related list.

Note:
- Up to 10 related lists can be created for a module.
- The deluge script must return a map that contains ‘header_context’ and ‘data’ in the following format:
{
 header_context: [
  {
   key: 'customer_name',
   value: 'Customer Name'
  },
  {
   key: 'invoice_number',
   value: 'Invoice Number
  }
 ],
 data: [
  {
   customer_name: <customer_name>,
   invoice_number: <invoice_number>
  }
 ]
}
There are two ways to specify the value of the data node:
- To display a customer name as a string:
customer_name: <customer_name>
- To display a customer name as a hyperlink:
customer_name: {
 "value": <customer_name>,
 "isExternal":true, // To open the link in separate tab.
 "link": <web_url_path>
}
Edit Related List
To edit a related list:
- Go to Settings > Preferences.
- Select the module which has the related list you wish to edit.
- Click the Related Lists tab.
- Select the related list or hover over the related list and click Edit.
- Make the desired changes.
- Click Save or Execute.

Delete Related List
To delete a related list:
- Go to Settings > Preferences.
- Select the module which has the related list you wish to delete.
- Click the Related Lists tab.
- Hover over the list that you wish to delete.
- Click the down arrow icon and click Delete.


