 Inventory
Australia GST
The Australia tax module is exclusive to the Australian edition of Zoho Inventory. This feature will be available when you select Australia as your country during quick setup of an organization. Below are a list of operations you can perform with tax.
Guide Layout:
- General Information on Australian Taxes
- Terminologies
- Prerequisites
- Country & Currency requirements
- Enable Tax
- Setting up Taxes for Australia in Zoho Inventory
- Contacts
- Items, Item Groups & Composite items
- Sales Orders & Invoices
- Purchases
- Additional Functions
General Information on Australian Taxes
GST: Goods and Services Tax is a value added tax of 10% that is applied on the sale of goods and services in Australia.
BAS Report: The Business Activity Statement(BAS) is a report that businesses have to submit to the Australian Tax Office(ATO). It is used to report and pay their GST on a monthly or quarterly basis.
Terminologies
| Name | Description |
|---|---|
| Tax Name | It refers to the name you’d like to assign to a particular tax. Ex: GST in Australia is 10%. |
| Rate | Refers to the tax rate pertaining to a province in percentage. Ex: GST in Australia is 10% |
| Exemption Reason | Users have to select why a customer / transaction / item is exempt from sales tax. Ex: GST FREE, GST FREE EXPORT and INPUT TAXED SALES. |
Prerequisites
Country & Currency requirements
- Your organization must have it’s country as Australia and its currency must be Australian Dollars(AUD).
Enable Tax
To enable tax,
- Open your Zoho Inventory.
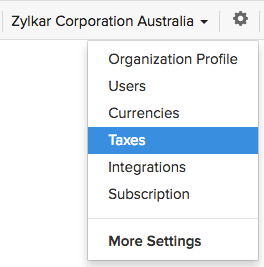
- Click on the gear icon from the top-right corner.
- Select Taxes from the drop-down.
- You will be redirected to Tax Settings section under the Taxes module.

- Enable the “Is your business registered for GST?” option by selecting the checkbox near this option.
- Enter your Australian Business Number.
- When you are ready, click Save.
- Your tax module will be activated and a new Tax Rates section will be enabled for your organization.
Setting up Taxes for Australia in Zoho Inventory
Creating Taxes
To add a new tax,
- Open your Zoho Inventory organization.

- Click on the gear icon from the top-right corner.
- Select Taxes from the drop-down.
- If you are accessing your tax module for the very first time, you have enable tax for your organization. Learn how to enable tax for your organization.
- Navigate to the Tax Rates section under the tax module.
- Click on the + New Tax button from the top-right corner of the taxes window.

- On the new tax pop-up that appears, enter the Tax Name and Rate(%).
- Click on the Save button to save the tax.
Creating Tax Groups
To add a new tax group,
- Open your Zoho Inventory.

- Click on the gear icon from the top-right corner.
- Select Taxes from the drop-down.
- Click on the + New Tax Group button from the top-right corner of the taxes window.
- Before you add a tax group, please make sure that you have already added the necessary taxes. Learn how to add taxes.
- Enter the Tax Group Name and select the taxes that are needed.

Click on Save the tax group.
Setting up your Default Tax
The Default Tax will be used in transactions when tax preference(Taxable/Tax Exempt) is not set for the involved customers. The first tax you create will be marked as the Default Tax initially. However, you can mark a different sales tax as default as well.
Default Tax can be useful for the following scenarios.
- When customers are imported into Zoho Inventory, their tax preference is not set. When these customers are involved in transactions, the Default Tax will be applied to those transactions.
- Customers created before enabling tax for our organization will also not have their tax preferences set. Once again, the Default Tax will be used for such transactions where such customers are involved.
Default Tax is not automatically associated with a customer. It is only used when tax preference(Taxable/Tax Exempt) is not set for the customers in question.
Note: To mark a different tax as default, hover your mouse over the tax you wish to select as default. You will find the mark as default button appearing next to the tax. Select it to make the tax a default tax.

Contacts
Associating tax for a contact
You can associate taxes to contacts either while creating or editing them.
To set the tax preference of a new customer,
- Navigate to the Contacts module and create a customer contact. Learn how to create a customer
- After filling the details of the customer, under the Tax & Payment Details section, select Taxable for Tax Preference.
- For the Tax Rate, select the appropriate tax from the drop-down which has already been created. You can also create a new tax by selecting + Add New in the drop-down.
- Click on Save to save the customer.
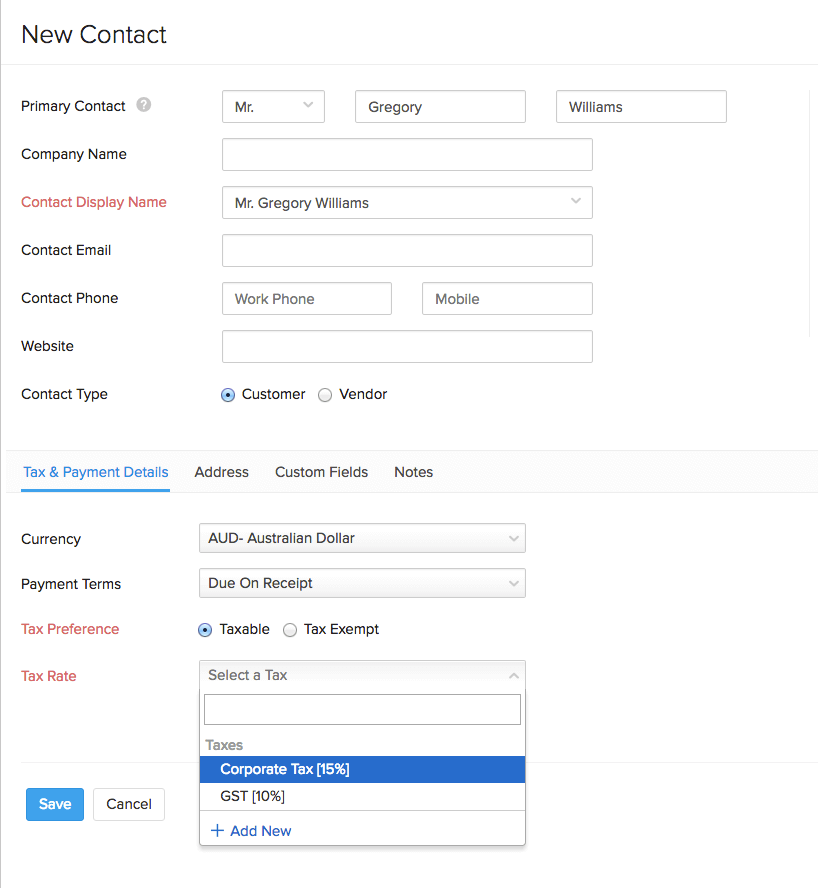
Henceforth, the customer’s tax preference will be applied to all their associated transactions.
Making a contact nontaxable
You can exempt a contact from taxes while creating or editing them.
To set the tax preference of a new customer,
- Navigate to the Contacts module and create a customer contact. Learn how to create a customer
- Select Tax Exempt under Tax Preference.
- Select the appropriate Exemption Reason from the drop-down. For exemptions, we have two standard choices - GST FREE and GST FREE EXPORT.
- Click on Save.
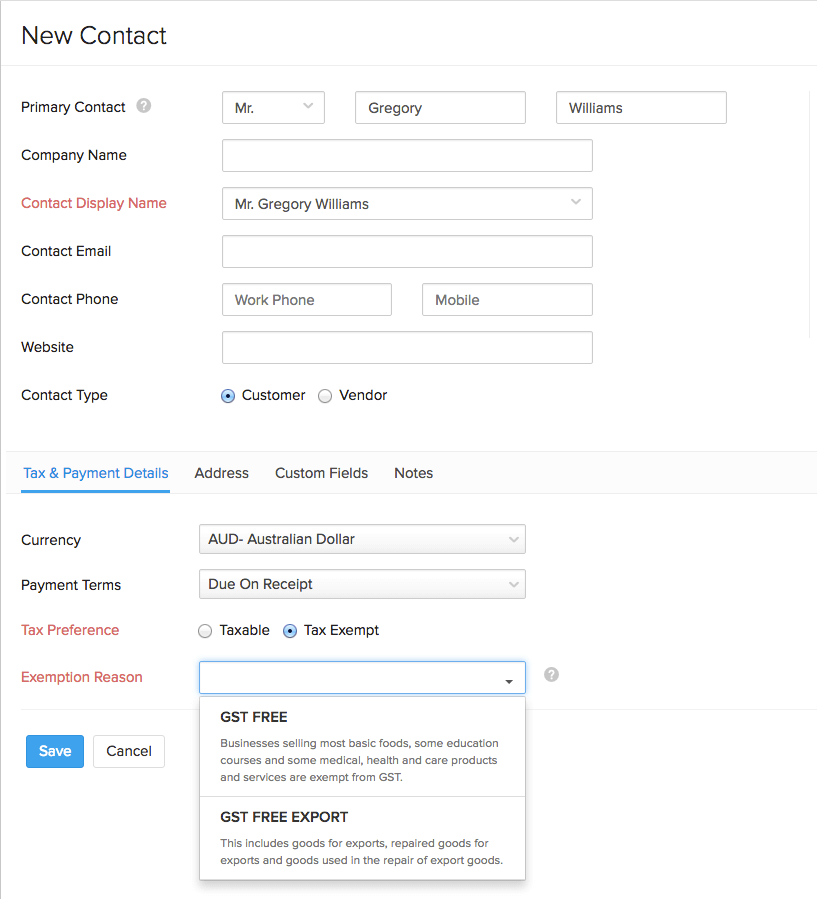
Henceforth, the customer’s tax preference will be applied to all their associated transactions.
Note:
- GST FREE: The price of the product or service you sell to a contact will not include GST.
- GST FREE EXPORT: The price of the product will not include the GST if you intend to export and sell your items outside Australia.
Click here to learn more about it.
Items, Item Groups & Composite Items
Associating tax to items
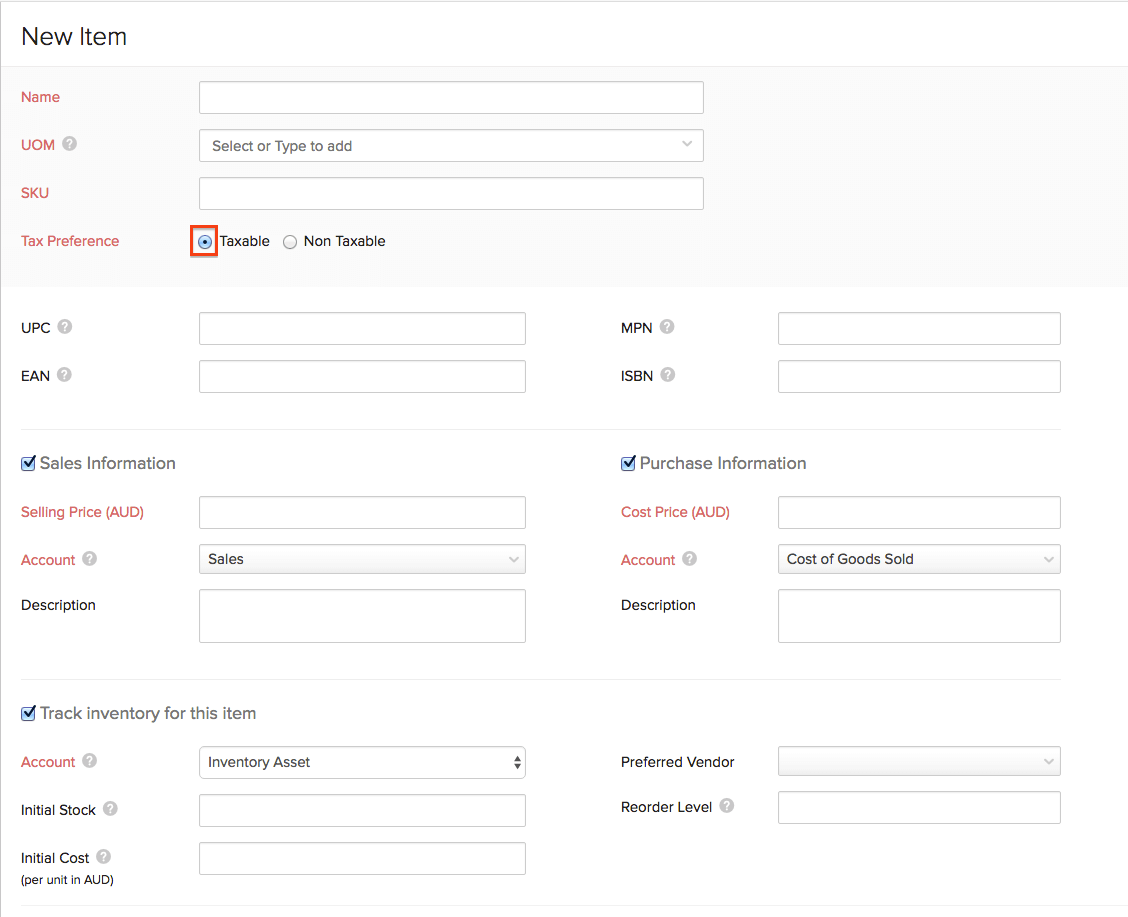
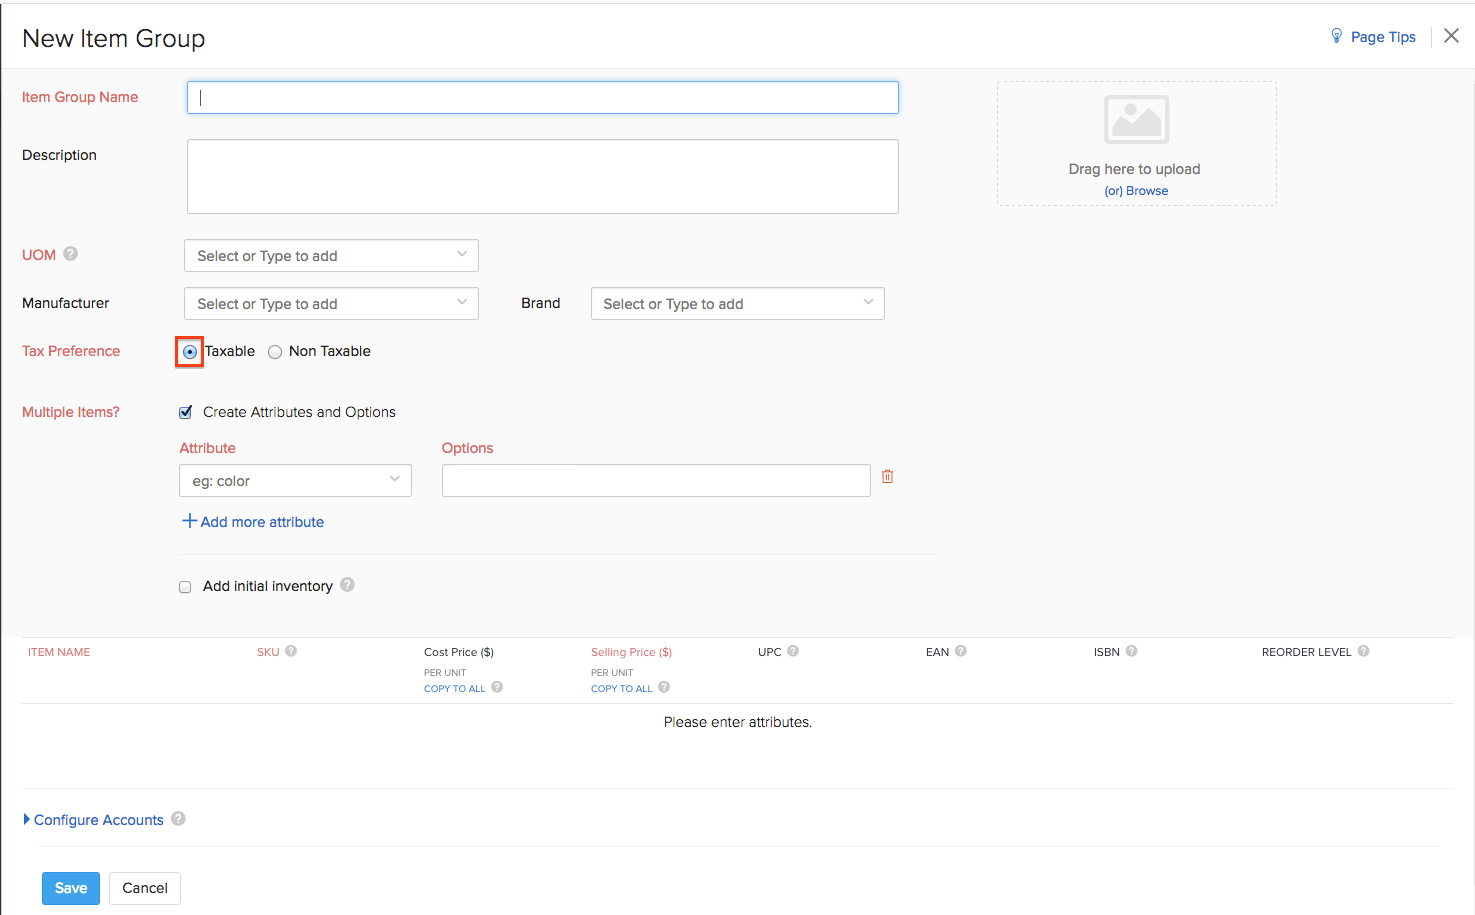
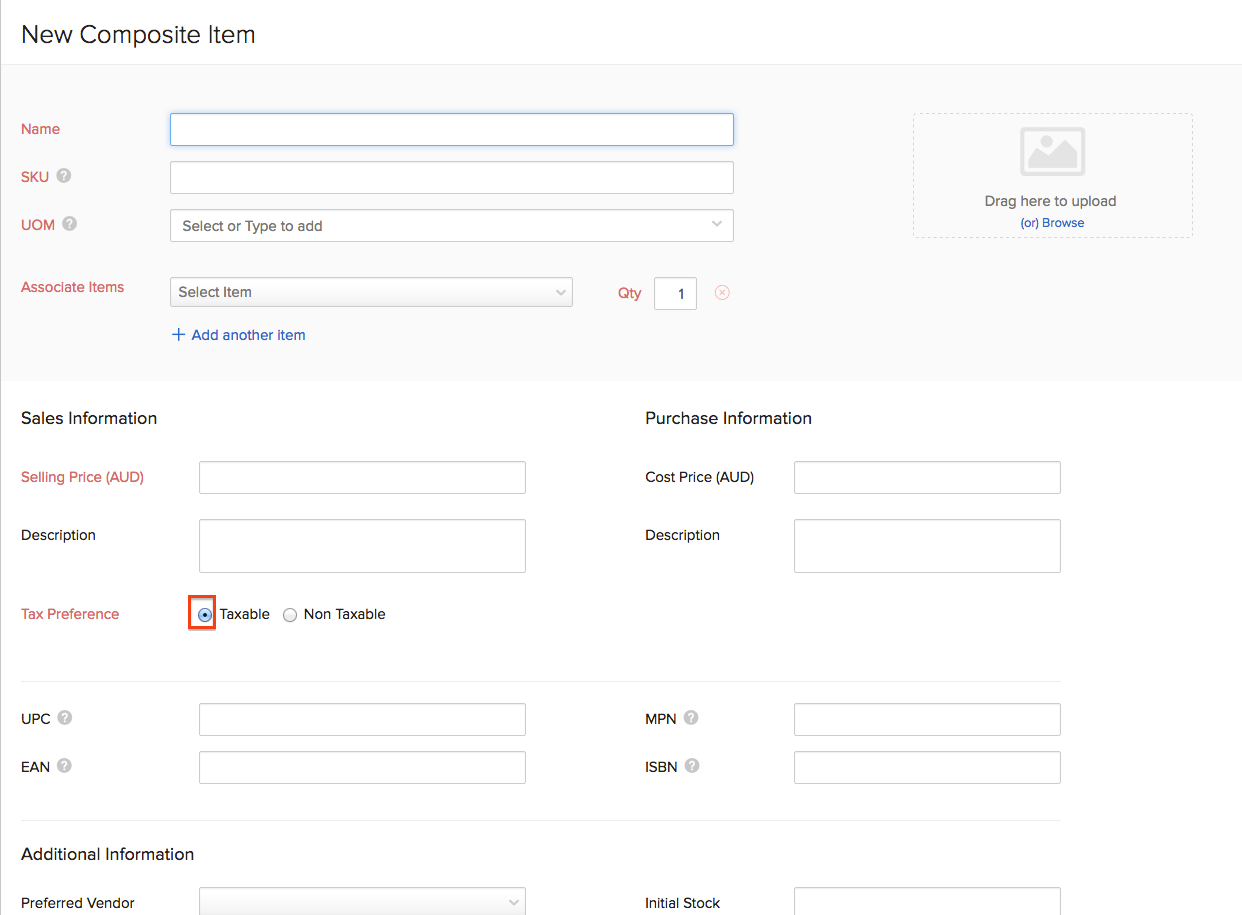
- While creating an item, an item group or a composite item, you can choose to make it taxable or non-taxable.
- After entering the relevant details, select the Taxable check box and save it. This will make the item taxable.
Items - Learn how to create items
Item Groups - Learn how to create an item group
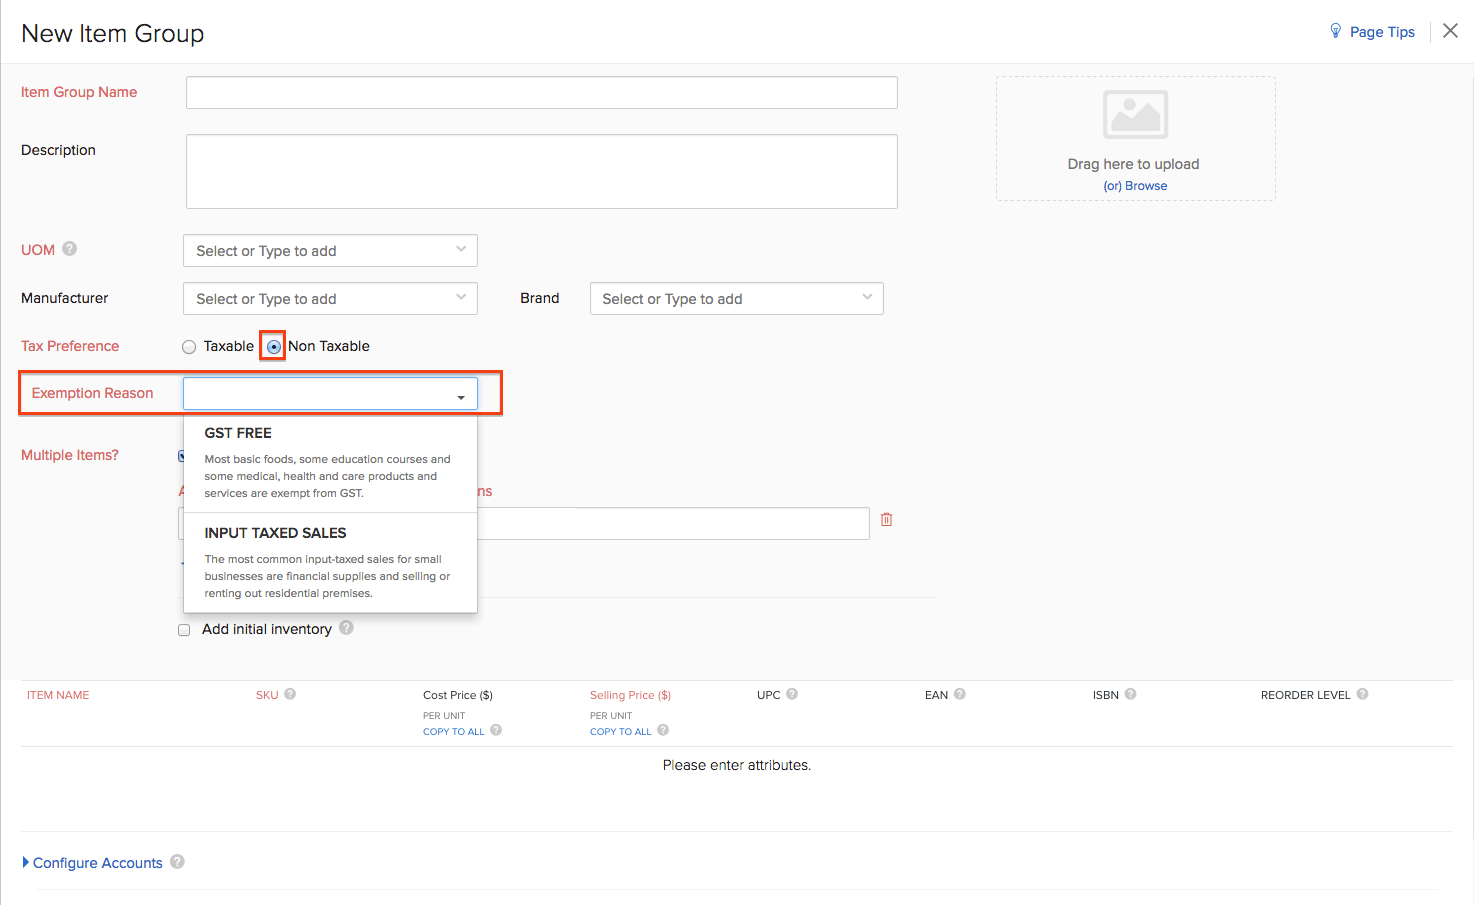
Setting the tax preference of an item group as Taxable will make all the items under this group taxable.
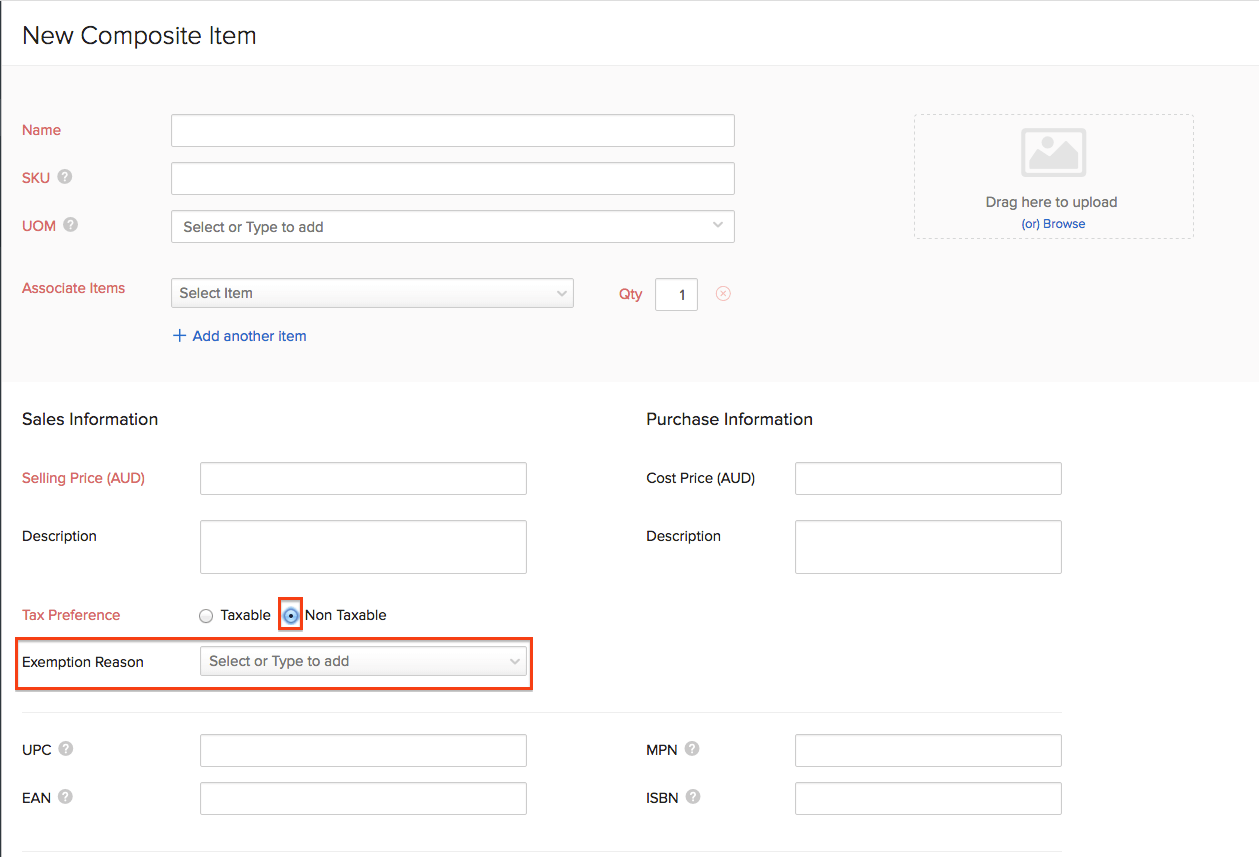
Composite Items - Learn how to create a composite item
Making an item nontaxable
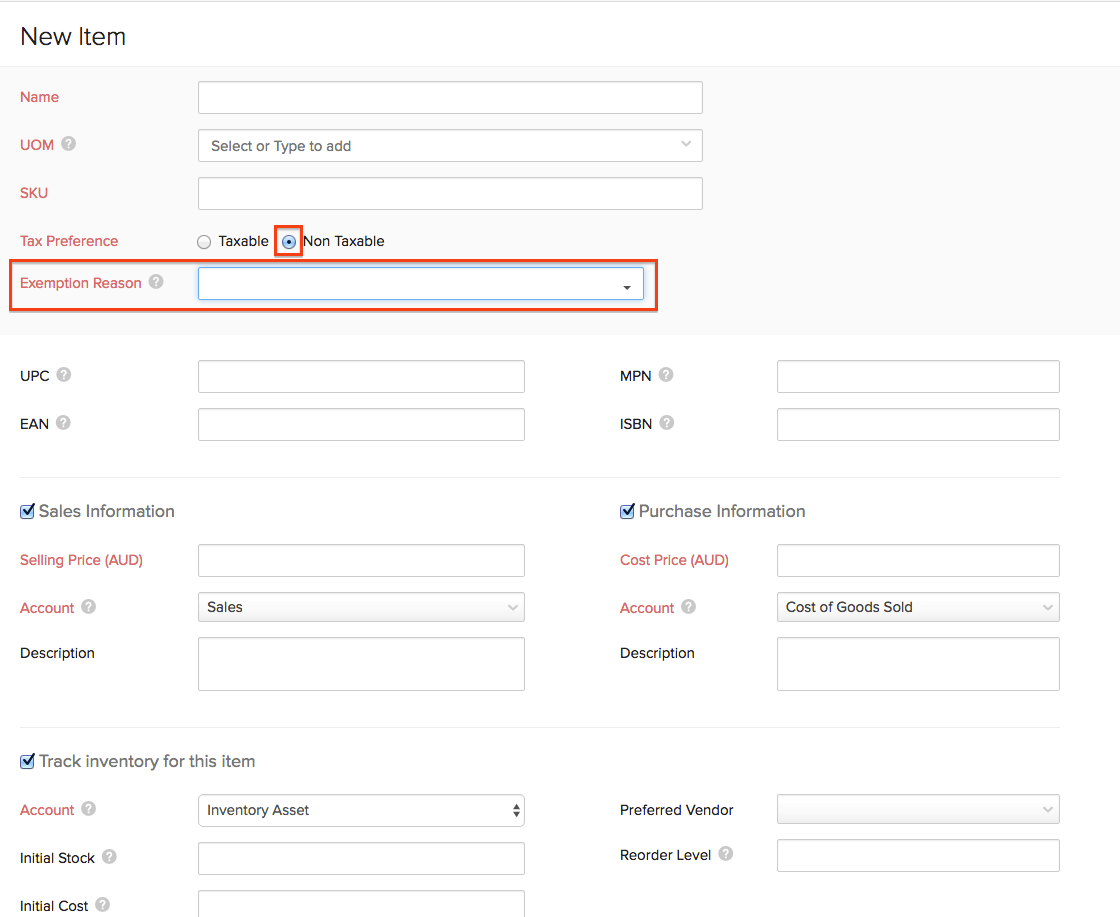
- While creating an item, an item group or a composite item, you can choose to make it taxable or non-taxable.
- If you wish to make the non-taxable, select the Non-Taxable option. You will be prompted to select an Exemption Reason - GST FREE or INPUT TAXED SALES, which you can select from the drop down.
Note:
- INPUT TAXED SALES: The price of goods and services do not include GST.
- Click here to learn more about it.
Items - Learn how to create items
Item Groups - Learn how to create an item group
Setting the tax preference of an item group as Non-Taxable will make all the items under this group non-taxable.
Composite Items - Learn how to create a composite item
Sales Orders & Invoices
Tax Information in Sales Orders & Invoices](#tax-on-orders-and-invoices)
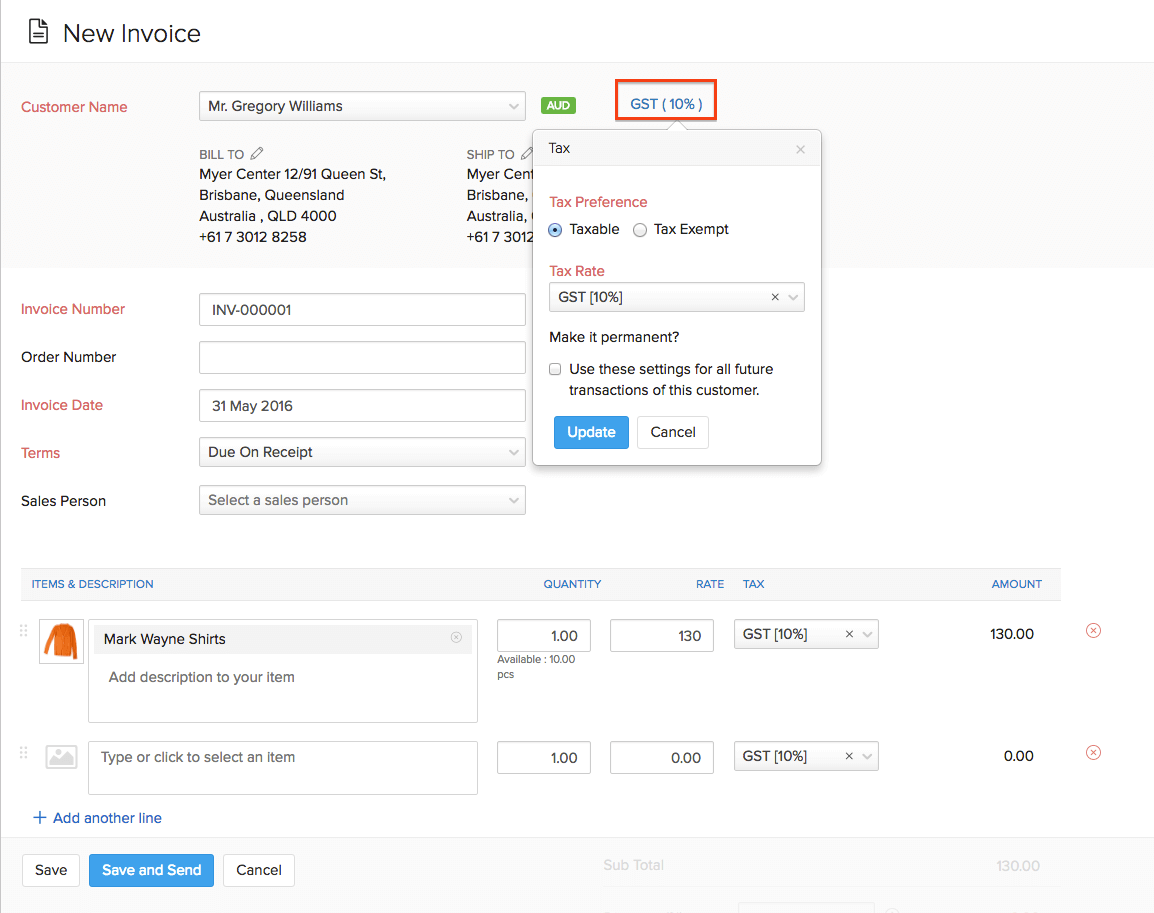
- While creating a sales order or an invoice, the tax information can be seen adjacent to the Customer Name field.
- Here, you can change the tax preference for the particular sales order or invoice. i.e: you can make it taxable and associate a particular tax or also make the invoice non-taxable by selecting the Tax Exempt option. Selecting the Make it permanent? option, the tax preferences for the contact will get updated.
Note:
- INPUT TAXED SALES: The price of goods and services do not include GST.Click here to learn more about it.
Making an Item Non-Taxable on a Sales Order or an Invoice](#non-taxable-item-on-orders-and-invoices)
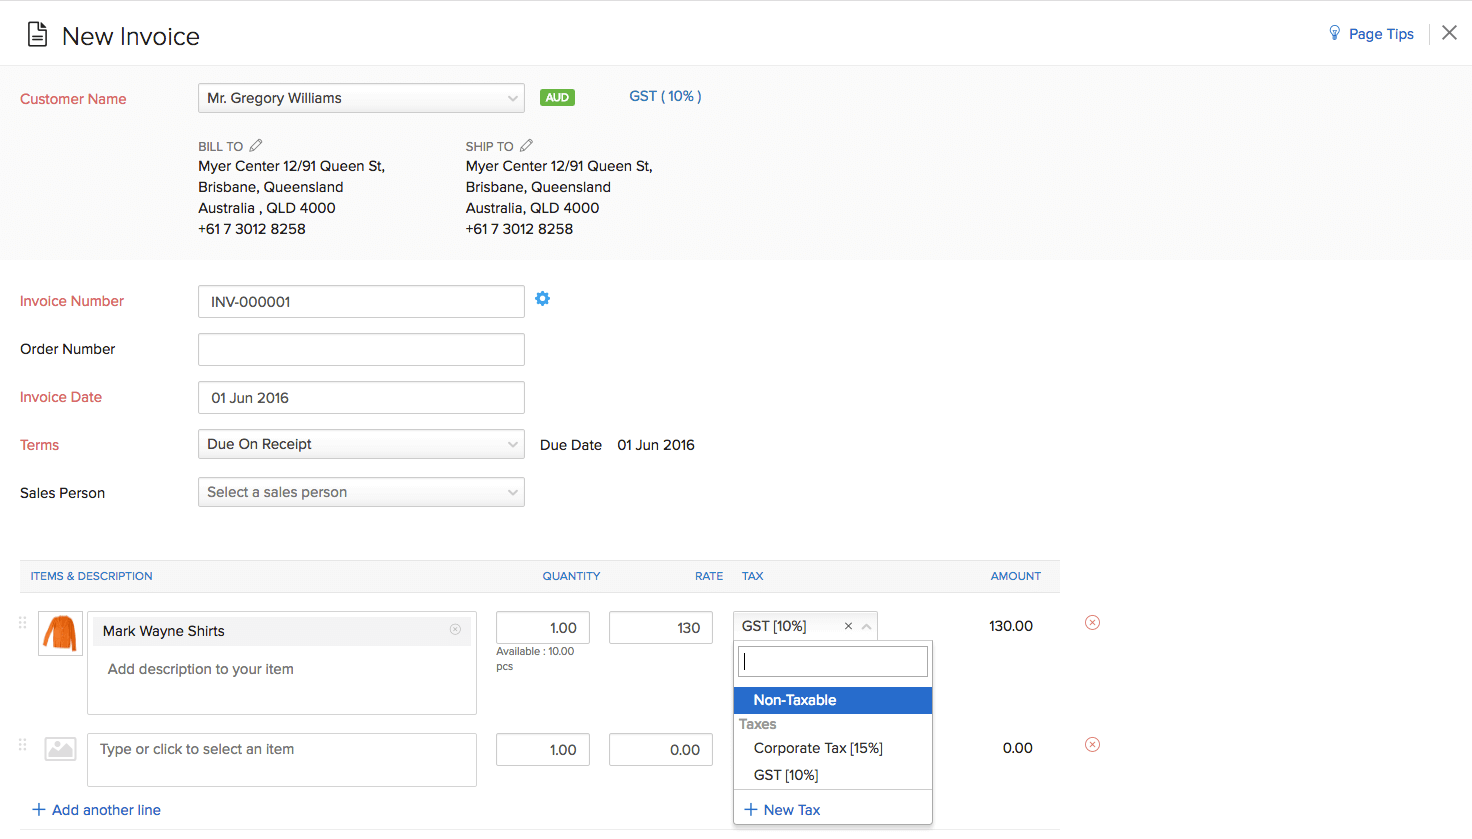
- If you are adding an item under item details while creating an invoice or a sales order, and if you wish to make it non-taxable, select Non-Taxable option from the Tax drop down.
- In the next window that appears, choose the appropriate Exemption Reason.
- Click on Update to apply it.
Showing Tax Registration Number in Sales Transactions
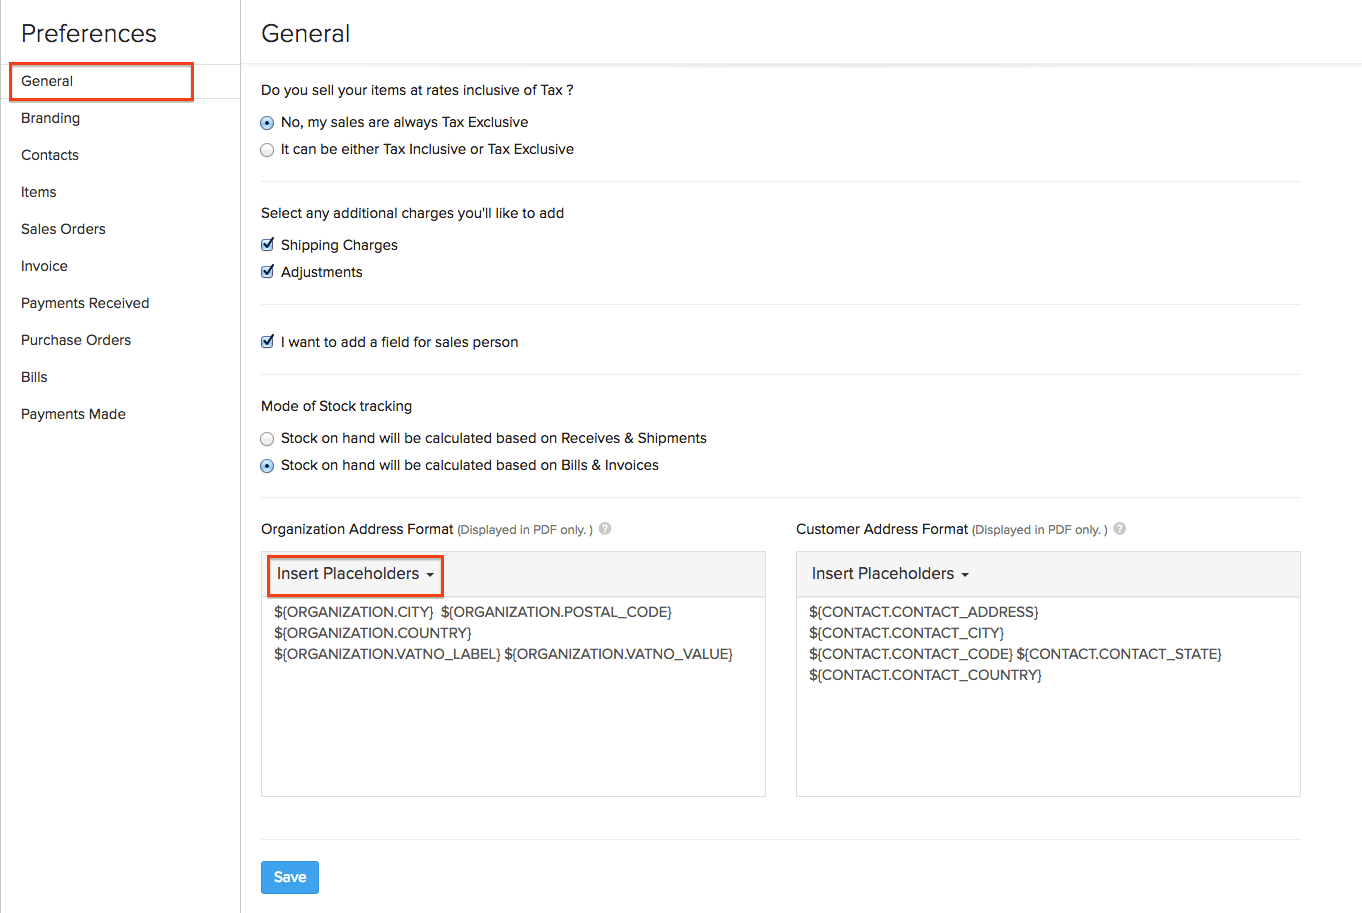
- Click on the gear icon from the top-right corner.
- Select More Settings from the drop-down.
- Navigate to the General tab under Preferences.
- Scroll down to the Organization Address Format section.
- In the Insert Placeholder drop-down, you will find ABN which stands for ‘Australian Business Number’.
- Insert the placeholder in the address format.
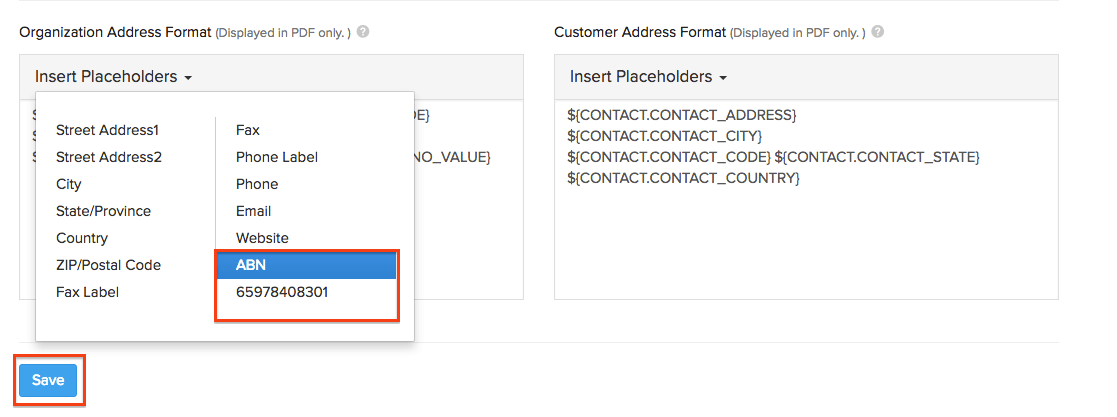
- Click on Save.
- Now create a sales transaction, and you can find the Tax Registration No. with the organization address.
Purchases
Taxes for Purchases
- You can also choose to make purchase transactions such as Purchase Orders and Bills as Taxable or Non Taxable while creating or editing them.
- While creating such transactions, navigate to the ITEMS & DESCRIPTION section to find the TAX field for your items.
- You may associate a tax or make an item non-taxable from the drop-down.
Additional Functions
BAS Report
This part can taken care by integrating your Zoho Inventory with Zoho Books. Click here to know more about generating BAS reports for your Zoho Inventory organization in Zoho Books.


