Enhancing transactional email experience using Schema.org
- Published : August 27, 2024
- Last Updated : January 8, 2026
- 813 Views
- 10 Min Read
Hide-and-seek is best left to the playground. When it comes to an inbox, people prefer a more direct and easy-to-navigate model. What if someone could view and access their redirection URLs in their email preview? This allows them to view and interact with the message without opening the message, giving way to an enhanced user experience.
If you’re using Gmail, you’ve probably noticed small buttons on the right side of the mail preview. These buttons, called quick actions, help you quickly navigate to links embedded within your email. They’re useful for emails that require a user to perform some action. Apart from personal emails, quick actions can be leveraged for your important transactional emails, too. Not only do they give quick access to the content, they enhance the user experience.
This article will show you how you can incorporate these elements into your transactional emails.
Introducing Schema.org
Quick actions in emails are embedded using a markup called schema. Not only emails, Schema is used in designing webpages, too. Schema was developed as a joint venture by Google, Yahoo, Bing, and Yandex to help search engines better understand content. If you use SEO, you’ll be familiar with how schema is helpful in ranking webpages. Given the extensive use of schema in webpages, this article is limited to understanding how it works for emails.
Before getting to know schema.org, it’s important to understand the concept of structured pages.
Structured data
Search engines don’t view a webpage like we view it. For example, while reading this article, you’ll be able to identify the gif, the author’s name, and the publishing date. However, this data might be Greek or Latin to search engines. Structured data informs search engines of all the elements in the page in a language they understand. They provide a format in which code snippets can be added while creating a webpage. This format helps webpages identify the different sections in a page.
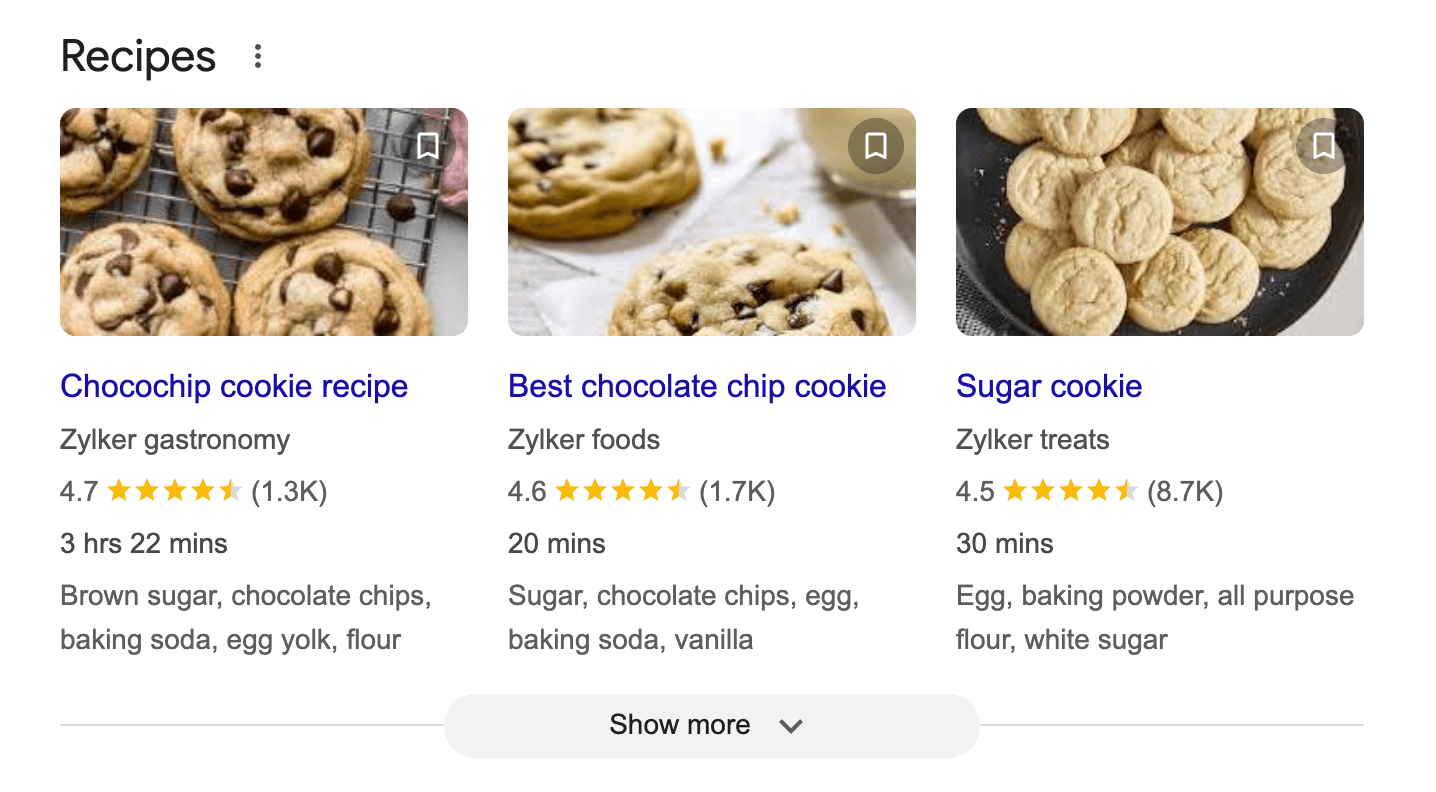
By adding structured data to your webpages, you help the search engine extract relevant information related to your page and display the information prominently in search results. Take a look at the search result for a cookie recipe below; you’ll find quick information about the raw materials along with the time to prepare it. This search result informs you of the basics of preparing a cookie. Webpages crafted using structured data types help attract traction to your pages and rank them better.
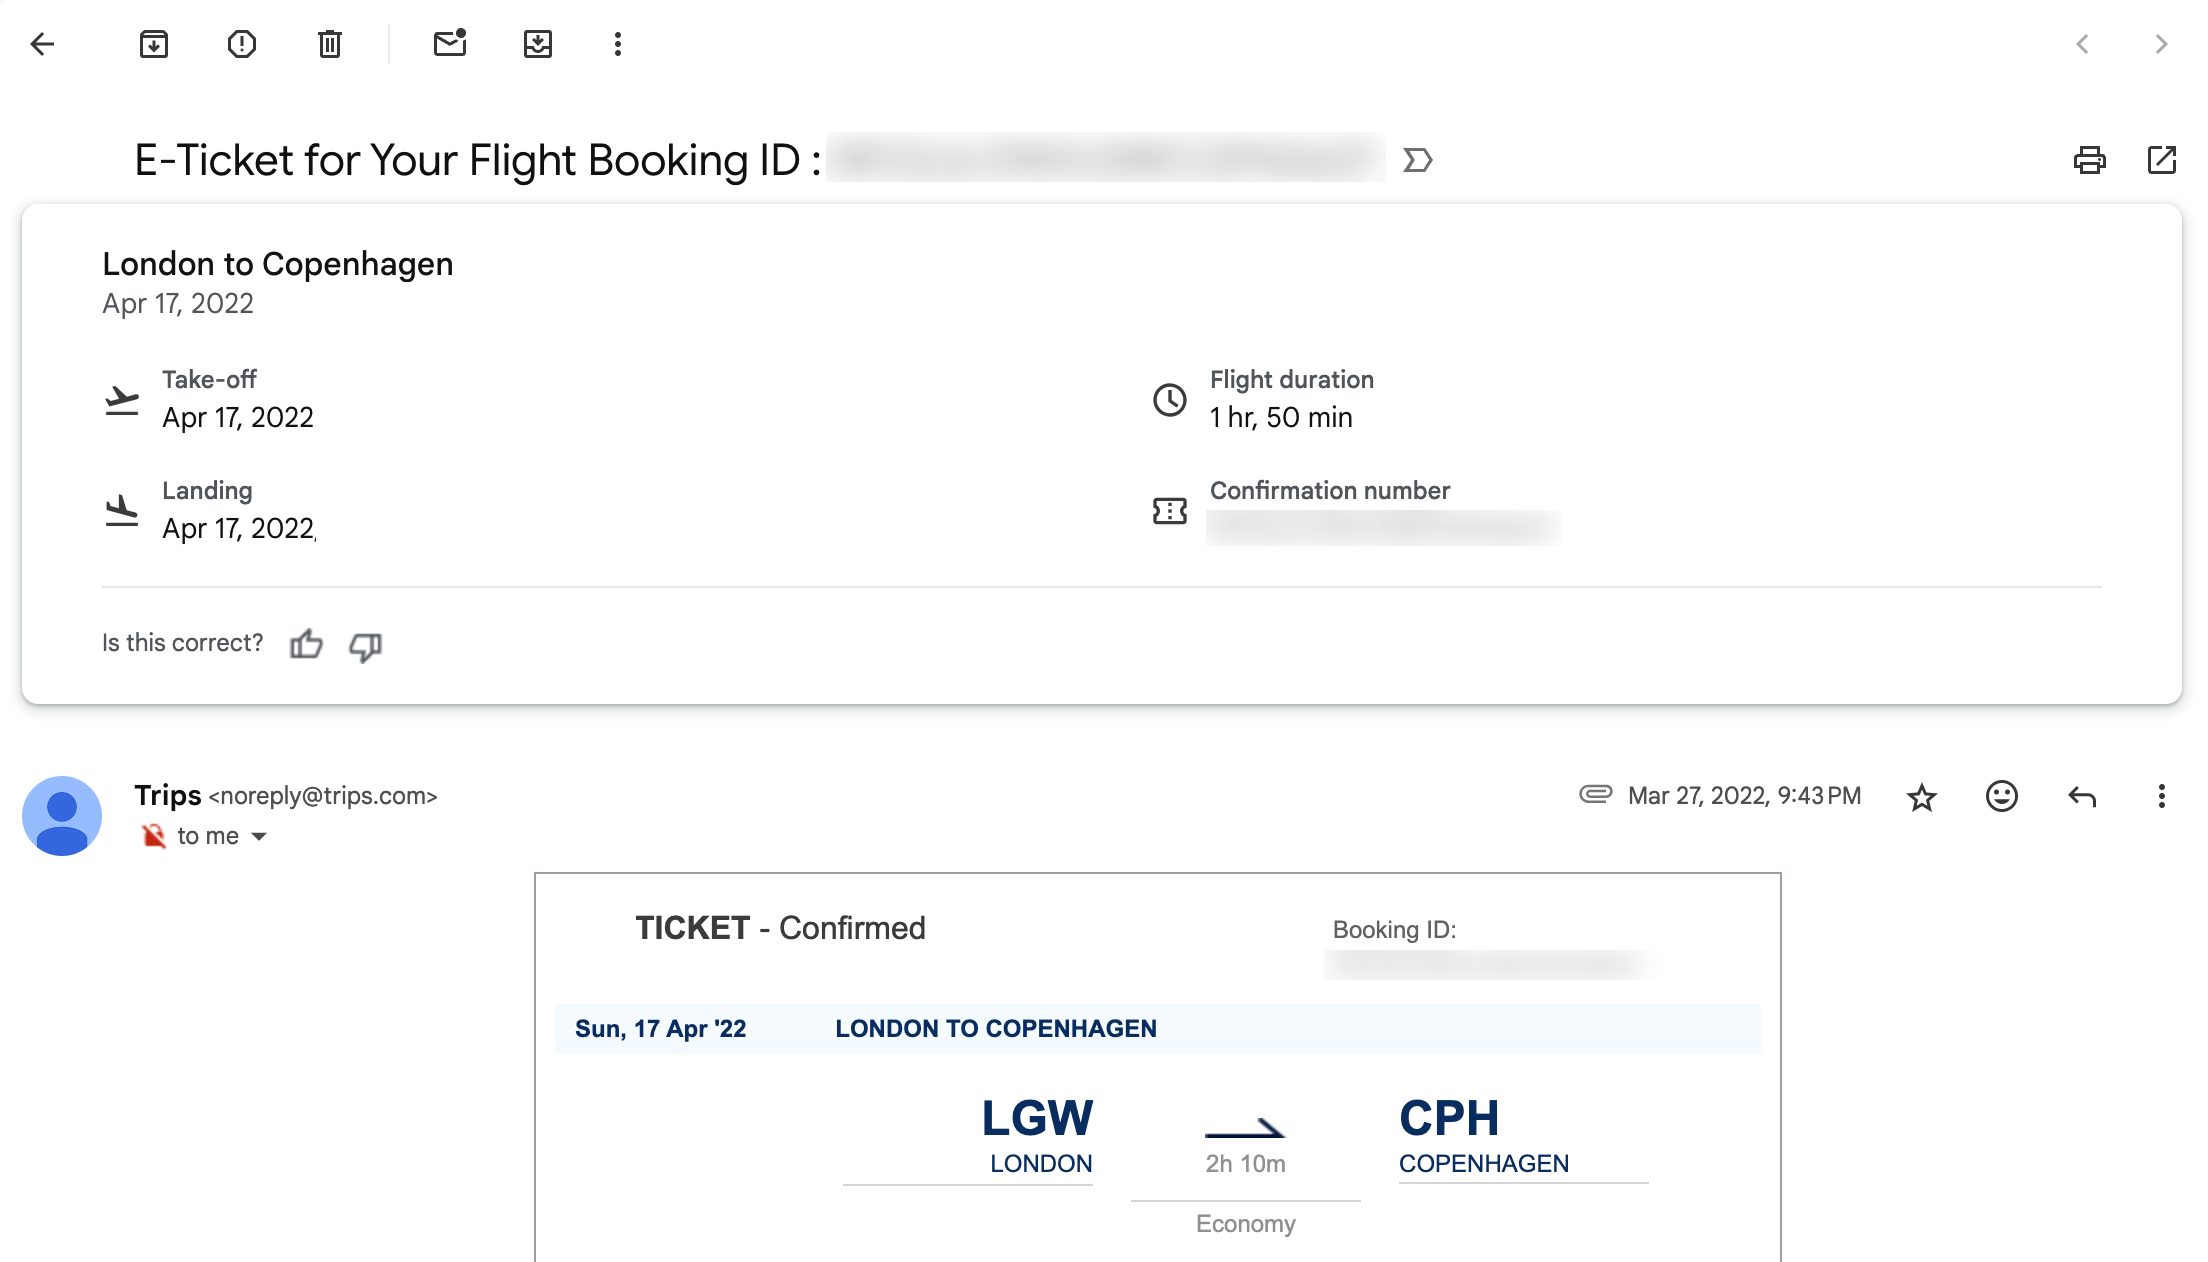
The above example gives information on webpages. In the context of emails, structured data help arrange important information at the top of the email for a quick preview. For example, if you’ve made a flight reservation, you’ll find the flight details highlighted at the top of the email. This is possible because of structured data.
The language that helps you create this structured data type is email schema. It serves as a common and accepted language for your structured data. The schema.org page has a repository of the schema vocabulary which you can use to build your webpages as well as emails.
How does schema work?
Schema requires instructions based on which it can be executed. These instructions are called encoding mechanisms, and there are three encoding mechanisms that can be used with the structured data. They are Microdata, RDFa, and JSON-LD.
Microdata and RDFa encode structure to the HTML webpage/email code using attributes. These attributes will be added right within the HTML code.
Consider the example of a Microdata-encoded schema for a flight reservation:
<div itemscope itemtype="http://schema.org/FlightReservation”>
<meta itemprop="reservationNumber" content="TJK743"/>
<link itemprop="reservationStatus" href="http://schema.org/Confirmed"/>
<div itemprop="underName" itemscope itemtype="http://schema.org/Person”>
<meta itemprop="name" content=“Rebecca Anderson”/>
</div>
<div itemprop="reservationFor" itemscope itemtype="http://schema.org/Flight">
<meta itemprop="flightNumber" content="914"/>
<div itemprop="airline" itemscope itemtype="http://schema.org/Airline">
<meta itemprop="name" content="Pan American World Airways"/>
<meta itemprop="iataCode" content=“PA"/>
</div>
<div itemprop="departureAirport" itemscope itemtype="http://schema.org/Airport">
<meta itemprop="name" content="John F. Kennedy International Airport"/>
<meta itemprop="iataCode" content=“JFK"/>
</div>
<meta itemprop="departureTime" content="2018-04-07T18:20:00-06:00"/>
<div itemprop="arrivalAirport" itemscope itemtype="http://schema.org/Airport">
<meta itemprop="name" content="Miami International Airport"/>
<meta itemprop="iataCode" content=“MIA"/>
</div>
<meta itemprop="arrivalTime" content="2018-04-08T14:30:00-05:00"/>
</div>
</div>
There are three attributes here: itemscope, itemtype, and itemprop.
- Itemscope denotes that the code block between <div> and </div> talk about a particular topic, and itemtype defines the topic, in this case, the flight reservation.
- Next, itemprop is used to label the properties of the topic. It gives the name of the reservation number, reservation status, user’s name, and more.
RDFa employs a similar model where there will be certain variations in the attributes used.
While JSON-LD adds the structured data separate from the HTML code. The JSON-LD code can be added at any point either, i.e., at the top of the HTML or at the bottom of the HTML. This separation allows the code to be easily reviewed. Given that JSON-LD is in a format that can be understood by humans and machines alike, it’s much easier to implement.
Google also recommends using the JSON-LD format for the schema; however, schema.org does support all three formats.
An example of the same flight reservation details using JSON-LD is shown below:
<script type="application/ld+json">
{
"@context": "http://schema.org",
"@type": "FlightReservation",
"reservationNumber": “TJK743",
"reservationStatus": "http://schema.org/Confirmed",
"underName": {
"@type": "Person",
"name": “Rebecca Anderson"
},
"reservationFor": {
"@type": "Flight",
"flightNumber": “914",
"airline": {
"@type": "Airline",
"name": “Pan American World Airways",
"iataCode": “PA"
},
"departureAirport": {
"@type": "Airport",
"name": "John F. Kennedy International Airport",
"iataCode": “JFK"
},
"departureTime": “2018-04-07T18:20:00-06:00",
"arrivalAirport": {
"@type": "Airport",
"name": "Miami International Airport",
"iataCode": “MIA"
},
"arrivalTime": "2018-04-08T14:30:00-05:00"
}
}
</script>
What can schema do?
Schema can be used for any emails you send and, in the case of transactional emails, to display information related to the customers’ actions, like a tracking link to their order. Generally, email schema can be used to deploy two types of operations:
- Actions
- Highlights
Actions
Actions allow users perform certain operations right from their email preview window. For example, a user who has made a flight reservation can easily navigate to the airline’s website using the reservation button.
The actions provided by schema can be classified into two types:
- In-app or one-click actions
- Go-to actions
In-app actions
In-app actions are those that don’t require any navigation to an external website and can be performed right from where they are. There are two use-cases that satisfy this: the save action and the confirm action.
A confirm action allows the user to approve, confirm, or acknowledge an action. A save action allows the user to add items to a queue. In-app actions are one-time actions, and once the operation has been performed, they cannot be revisited. An example of this would be an RSVP button in the email preview.
![]()
You can incorporate this for transactional emails too. Given below is an example code for a user confirming their order subscription made on a website.
<script type="application/ld+json">
{
"@context": "http://schema.org",
"@type": "EmailMessage",
"potentialAction": {
"@type": "ConfirmAction",
"name":  “Confirm Subscription",
"handler": {
"@type": "HttpActionHandler",
"url": "https://nigella.com/confirm?subscriptionId=567qwe"
}
},
"description":  “Confirm your subscription to Nigella Lawson’s Newsletter"
}
</script>
Go-to actions
Go-to actions are buttons that can be used to redirect the user to a third-party website. There are two types of buttons that can be used for this purpose: view action and track action.
View action
The view action button redirects the user to an external website to view some content. An example of this is an order confirmation email, which will take a user to the application to view a list of items. The example code for this is:
<script type="application/ld+json">
{
"@context": "http://schema.org",
"@type": "EmailMessage",
"potentialAction": {
"@type": "ViewAction",
"target": "https://www.saltychocolate.com/gp/ref=nav_youraccount_orders",
"name":  “View Order"
},
"description":  “View Order Details and Tracking Information"
}
</script>
Track action
The track action button is used to provide quick links to track an order or a package. This button will redirect the user to a website to track their orders.
<script type="application/ld+json">
{
"@context": "http://schema.org",
"@type": "ParcelDelivery",
"deliveryAddress": {
"@type": "PostalAddress",
"streetAddress": "42 Shirley Ave.",
"addressLocality":  “West Chicago",
"addressRegion":  “CA",
"addressCountry”:  “US",
"postalCode":  “60185"
},
"expectedArrivalUntil": "2017-03-12T12:00:00-08:00"
;,
"carrier": {
"@type": "Organization",
"name":  “DHL"
},
"itemShipped": {
"@type": "Product",
"name": “Dark Chocolate Syrup"
},
"partOfOrder": {
"@type": "Order",
"orderNumber": “127963",
"merchant": {
"@type": "Organization",
"name": “Rebecca Anderson"
}
},
"trackingUrl": "https://dhl.com/track/645287829"
"potentialAction": {
"@type": "TrackAction",
"target": "https://dhl.com/track/645287829"
},
}
</script>
These are the action buttons. The next set of buttons a user can use for their emails are highlights.
Highlights
Highlights allow users to view the information highlighted at the top of the email. For example, an email about a flight reservation will show the details of the reservation prominently at the top as a highlighted chip.
You can use the code given here to obtain the above result:
<script type="application/ld+json">
{
  "@context": "http://schema.org",
  "@type": "FlightReservation",
  "reservationNumber": "TJK743",
  "reservationStatus": "http://schema.org/Confirmed",
  "underName": {
    "@type": "Person",
    "name": "Rebecca Anderson"
  },
  "reservationFor": {
    "@type": "Flight",
    "flightNumber": "914",
    "airline": {
      "@type": "Airline",
      "name": "Pan American World Airways",
      "iataCode": "PA"
    },
    "departureAirport": {
      "@type": "Airport",
      "name": " John F. Kennedy International Airport ",
      "iataCode": "JFK"
    },
    "departureTime": " 2018-04-07T18:20:00-06:00",
    "arrivalAirport": {
      "@type": "Airport",
      "name": " Miami International Airport ",
      "iataCode": "MIA"
    },
    "arrivalTime": " 2018-04-08T14:30:00-05:00 "
  },
  "airplaneSeat": "5C",
  "airplaneSeatClass": {
    "@type": "AirplaneSeatClass",
    "name": "Economy"
  },
  "ticketNumber": "FIG546",
  "ticketToken": "qrCode:FG56",
  "checkinUrl": "http://panam.org/onlinecheckin.html"
}
</script>
Sending transactional emails using Schema.org
Registering for schema.org
Now that you understand email schema and its types a bit better, if you’re looking to get your hands dirty implementing them, we have a set of processes that will help you get started.
As a first step, to be eligible to use schema in your emails, ensure that you satisfy the following guidelines:
- The domain you send your emails from should be authenticated using SPF and DKIM. This tells the recipient server that the emails coming from your domain are legitimate.
- You have a consistent bulk-email sending practice.
- The sender IP you use should have the forward and reverse DNS records.
- Ensure that the emails you send have low spam rates—below 0.3%.
- The messages you send should follow the Internet Message Format given here.
- The email address you use should be a static email address.
These guidelines cover the outline of the required parameters. The specifics of each guideline are mentioned here.
Here’s how you can do it. Let's say you prepare an email with a view action to send using a transactional ESP like Zoho ZeptoMail.
If you fall under the bracket given above, you should register your email sending domain with Google. This way, all emails sent using the registered domains will be processed for quick actions in the recipient’s inbox.
Follow the steps below to register with Google:
- Ensure you follow the email sending guidelines mentioned here.
- Send an email from your domain (SPF, DKIM, and DMARC-authenticated domain) using the schema to schema.whitelisting+sample@gmail.com. This is done to check that you follow the email guidelines. Some points to keep in mind while sending the email:
- Do not send blank emails or an email without schema; it will be rejected.
- If you do not send an email, the application will not be processed and will be discarded.Test your schema and ensure the markup is correct using tester tools.
- Because Gmail removes any sort of markup in forwarded emails, ensure that you don’t forward the email and send it from the source.
- Once you send the test email, follow the form given here. It’s essential to send the email before filling out the form because this will help Google assess your email’s performance.
Once you register for Schema.org, the next step is preparing the content for your emails. You’re in luck especially if you use transactional email schema because Google recommends using schema actions especially for these emails.
Here’s how you can do it. Let's say you prepare an email with a view action to send using a transactional ESP like ZeptoMail.
Prepare the action template
As a first step, you should prepare the HTML structured data using one of the following encoders: JSON-LD or Microdata. The JSON-LD markup for our example email to view a particular action will be as follows:
<script type="application/ld+json">
{
"@context": "http://schema.org",
"@type": "EmailMessage",
"potentialAction": {
"@type": "ViewAction",
"target": "https://www.saltychocolate.com/gp/ref=nav_youraccount_orders",   to
"name":  “View Order"
},
"description":  “View Order Details and Tracking Information"
}
</script>
You can also add a markup of your choice using the structured data markup tool. Copy and paste your HTML code in the box and choose the category based on which you wish to markup the code. This tool will help you mark up your existing emails, too.
Markup tester
- Once you register with Google and craft the required email, you can test the code using the markup tester.
- Navigate to this link.
- Enter the HTML code with the schema markup and run the code.
- Correct the highlighted errors and use it.
- Once you test your markup, you can send a test email to yourself and check it. Given that you need to register yourself with Google to send your emails, you can still bypass it if the sender and the recipient of the email are the same. However, you’re still required to authenticate the domain (SPF and DKIM authentication) used to send out emails.
- After you send the test emails and finalize the content with your quick actions, you can create a custom template in ZeptoMail which will help you easily fetch the email as and when you need. Preset templates will reduce the time required to craft an email. If you are looking to add preset templates for emails using schema, you can refer to our guide here.
- Once a template is set for your emails, you can connect your application with ZeptoMail to send out your schema-rich emails without any delay.
Securing actions
Given how crucial transactional emails are, any enhancements that you add should protect your emails, so Google has outlined a detailed process to secure one-click actions here.
Here’s a quick summary about all of the points you should keep in mind while securing your emails:
- Basic requirements enforced by Google are SPF, DKIM-authorized domains and the sender should be registered with Google to send out quick-action emails.
- The URL embedded within the email should be protected using HTTPS.
- All URLs should have the proper access token installed to protect themselves against replay attacks.
- Google recommends the use of bearer tokens to verify that the emails are coming from google.com.
When you following these steps, you’ll be on your way to sending out schema-encoded transactional emails.
Wrapping up
Adding schema to your transactional emails can improve the user experience of a large group of your user-base. Initially, quick actions were parsed only for Google users; however, multiple clients have started to accept emails sent using structured data.
While interactive elements in your transactional emails enhance user experience, getting these emails to your customers on time Is essential to earn their trust. A good transactional email has equal parts user experience and deliverability. While you can tackle user experience, having a good email service provider will ensure maximum deliverability. These pointers will help you choose a good email service provider. This guide will help you get started in your transactional email sending journey.
If you wish to bypass this guide and go for one option, we would suggest Zoho ZeptoMail, which is dedicated to sending transactional emails. This singular focus ensures that your emails reach your recipients on time.