See complaints through to meaningful closure

Introduction
Gone are the days when responding to customers promptly and resolving their complaints quickly were considered hallmarks of great customer service. Today, your customers consider these practices the norm, and rightly so. With this being the case, what can you do to ensure customer satisfaction and loyalty?
For starters, you can quote a reasonable and realistic amount of time to resolve complaints and try to deliver results within the said time. A bit of preparation and organization is all that you need to make sure your Zoho Desk portal is well-equipped to help you achieve this.
From Chaos to Clarity
The primary challenge that most customer support teams face is the volume of tickets received every single day. Needless to say, it gets compounded if the organization offers varied products or services. Keeping track of which ticket pertains to which product and deciding which agent/team works on which ticket becomes difficult in such a scenario. So, as a first step, you must establish an easy way to organize tickets. And the first and best way to do this in Zoho Desk is using Departments.
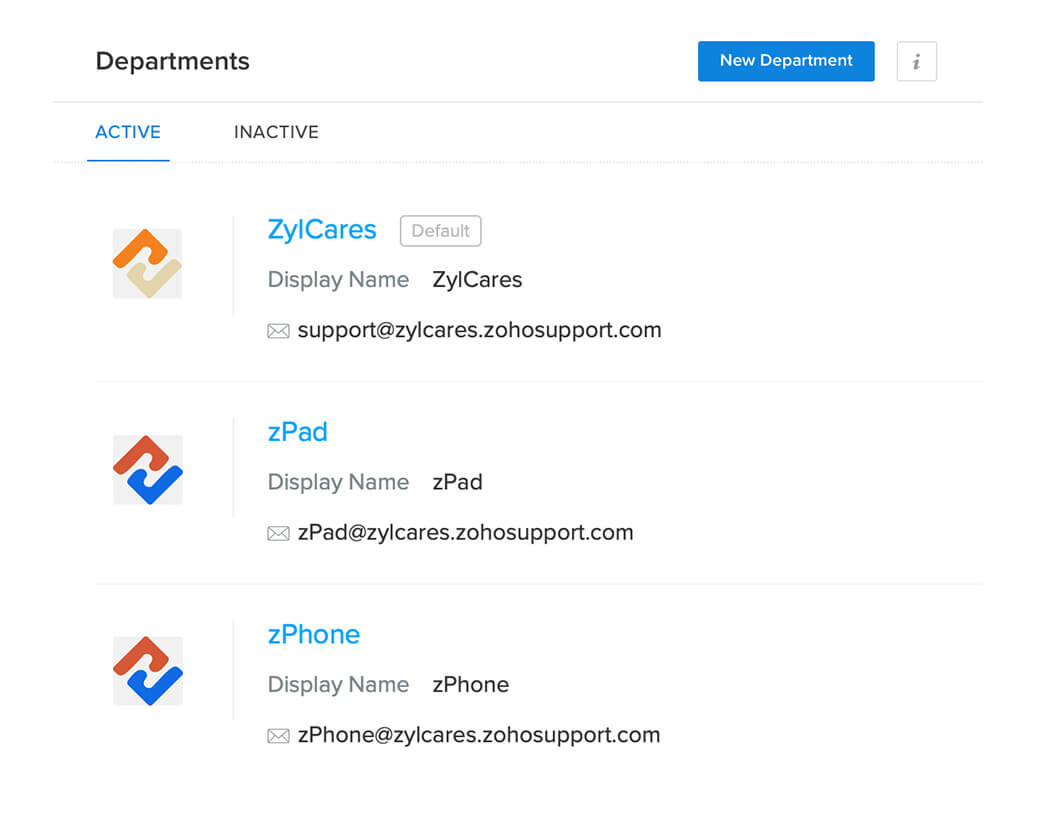
Departments are organizing units that help you streamline the tickets your help desk receives. You can configure departments based on the products or services you offer, or the regions in which you operate, or the different business teams in your organization.
By configuring departments, you gain the ability to provide consistent, quality support, irrespective of the product/service. Moreover, with focused departments, training support agents becomes easier—you do not have to train all your agents on all your products/services. You can, instead, form smaller groups of agents and train them on specific products. This way, you know fully well who (which agents) handles support for which product.
So, based on your support requirements, first create as many departments as needed. After doing this, you can proceed to the next step, which is assigning the right agents to handle the complaints.
Accountability
Automated
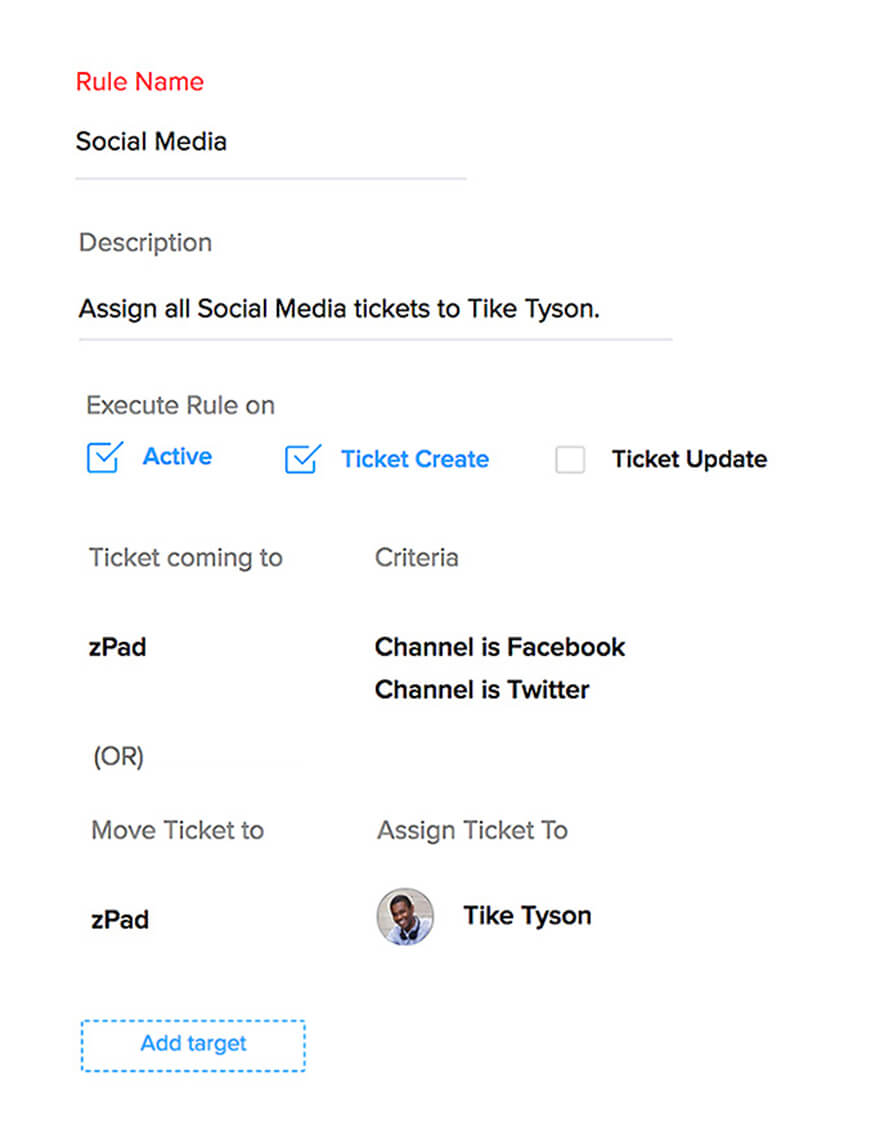
Thanks to ticket templates and/or workflow rules, any new ticket created in your help desk can reach the right department automatically and immediately. Keeping this level of automation as a stepping stone, you can go on to engage other automation capabilities that aid in: a) determining which agent handles which ticket, and b) distributing agents' workload uniformly.
Zoho Desk's automation rules related to ticket assignment — direct assignment and Round Robin — help you do this. With direct assignment, you can define clear-cut rules, such as "if ticket channel is chat, assign to Catherine", "if product code is XT372, assign to Miriam", "if subject contains refund, assign to Adebayo" and so on. By configuring such well-defined automation rules, you can bring critical tickets to the notice of the right agents at the right time.
On the other hand, using Round Robin assignment, you can distribute incoming tickets equally between specific agents or all agents in a department. At a granular level, you can limit the maximum number of tickets that can be assigned to each agent, choose whether tickets can be assigned to offline agents as well, and determine if backlog tickets can be considered for assignment or not.
These automation rules help you keep the wheels turning, such that when the tickets are assigned, your agents can quickly start working on resolving them.
No More Clueless;
Know More Context
To resolve any complaint, your agents would first need background information about the customer and the complaint itself. The ticket detail page in Zoho Desk is designed in such a way that all vital information are easily accessible. For instance, on this page, you can view basic details, such as the customer's name, the organization they work at, the Service Level Agreement (SLA) applicable to the ticket, and so on. If you explore further, you can view other details, such as the updates made towards resolving the ticket and the customer's past interactions.
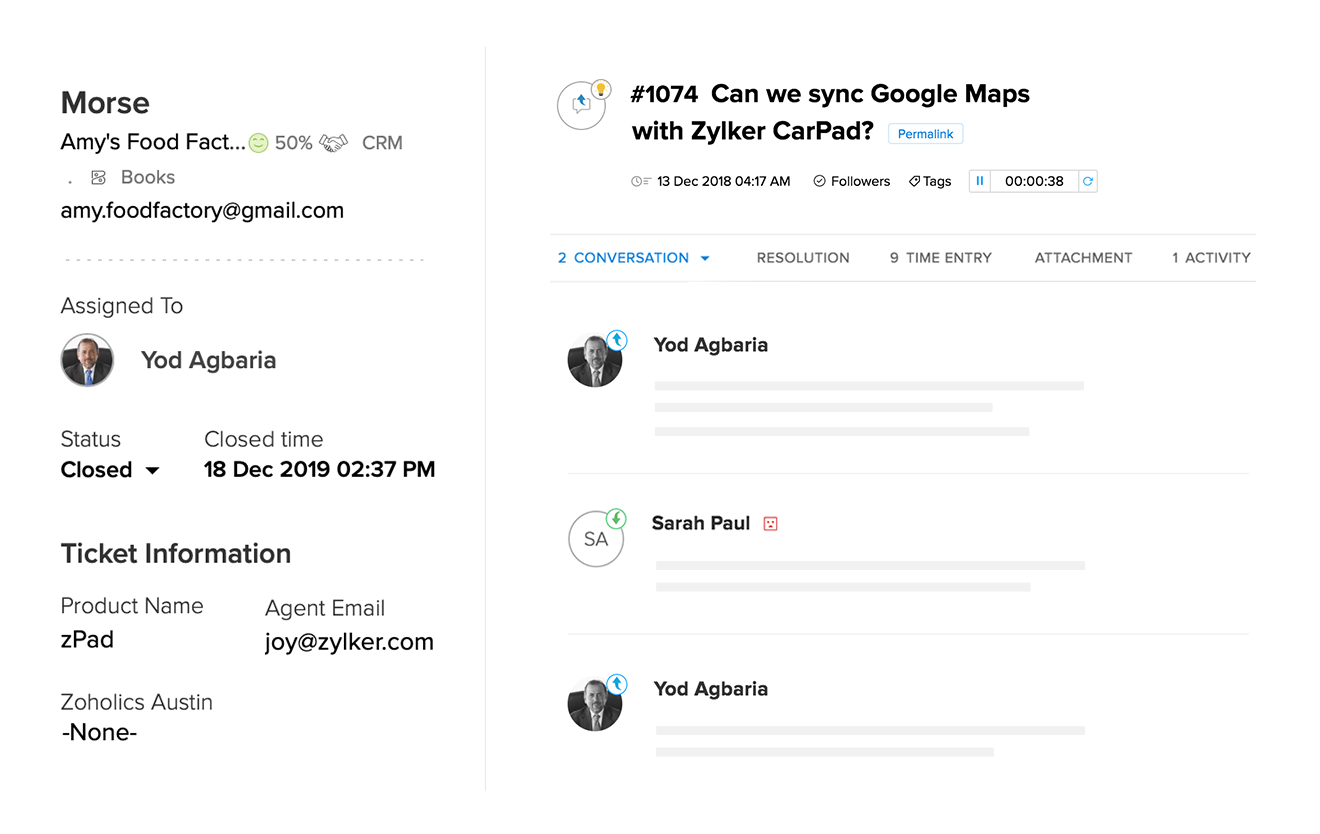
What more? The customer detail page, which shows the customer's currently open tickets and past happiness ratings, is also just a click away. The knowledge gained by accessing these details can help your agents get a better idea about the customer and tailor responses accordingly.
Further, when faced with a particularly tricky/critical ticket, your agents would need additional information on the customer's requirements. Details, such as the customer's overall purchases and invoice information come in handy in such cases. This is where integrations come into play.
By integrating your Zoho Desk and Zoho CRM portals, you can get a comprehensive picture of the customer's relationship with your organization. You can view details about the products purchased by the customer, deal size, number of licenses, and so on, right from the ticket detail screen in Zoho Desk.
If you have integrated your portal with other Zoho apps, or third-party apps, such as Jira or Trello, your agents will be able to access relevant customer data from these apps as well, right from within Zoho Desk.
Collaborate, Cooperate
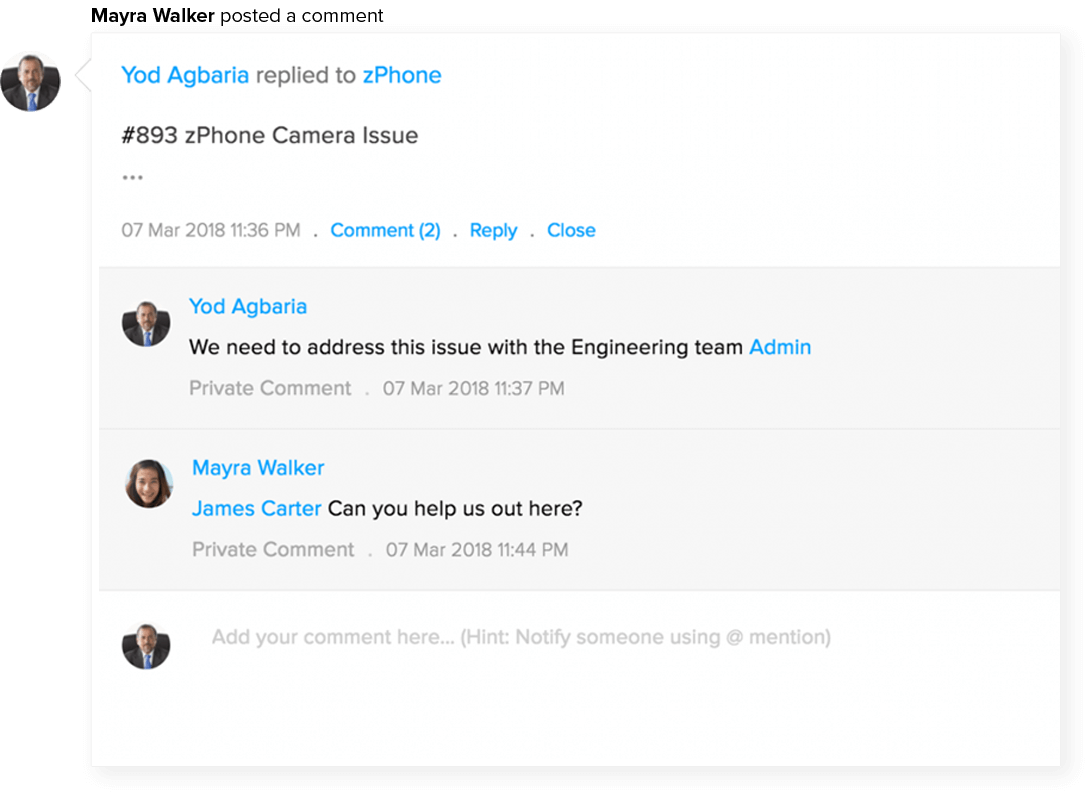
Many a time, a satisfactory resolution to your customers' requests becomes possible only through cross-functional collaboration. Regardless of whether the information is related to something critical like a product refund or something to be known immediately — like shipping status — your agents often have to collaborate with colleagues from other functions to pass on updates to customers.
In Zoho Desk, you can carry out such real-time collaboration through ticket comments and the agent chat tool. These collaboration capabilities extend to all Zoho Desk users in a portal, irrespective of whether they are agents or light agents. To make the best use of these capabilities, make sure to add teammates from other business functions as light agents in your portal.
Divide, Delegate
After thoroughly analyzing a customer complaint and figuring out the best way to resolve it, you must prepare the action plan. It is at this stage that you rope in other teammates, based on their level of involvement in resolving the ticket.
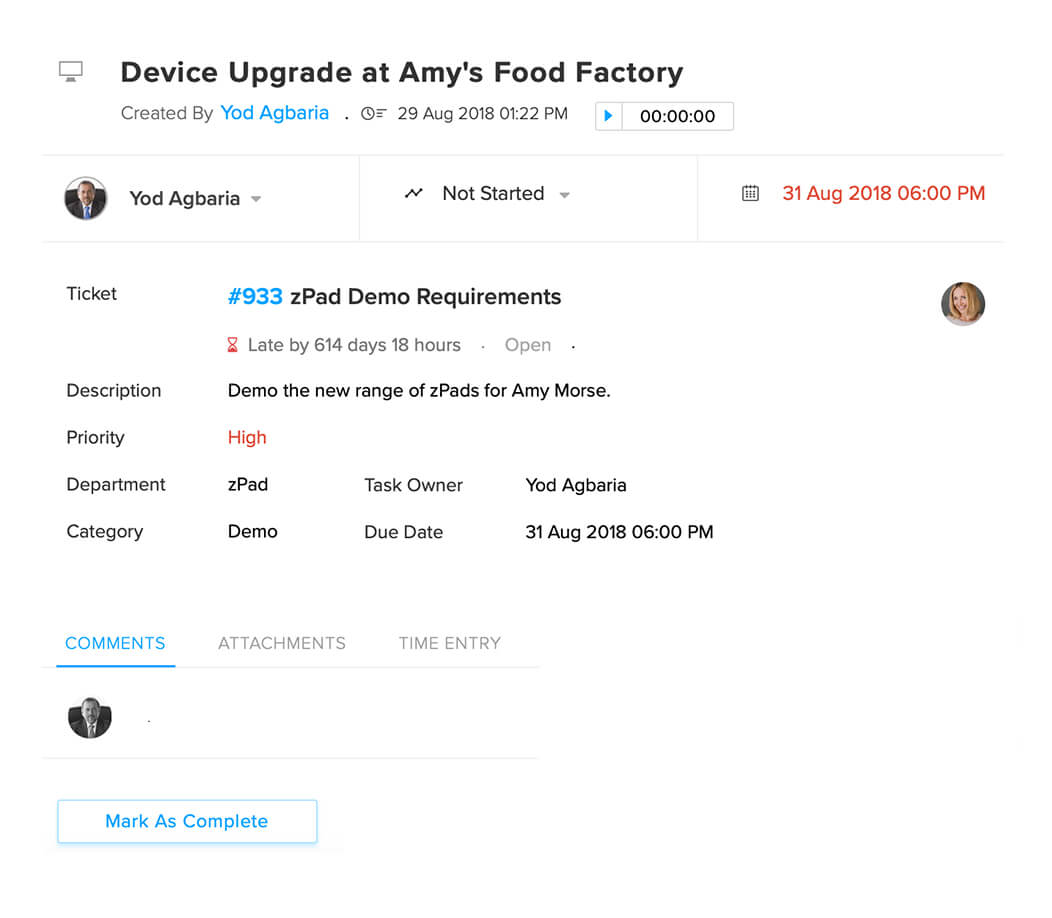
Use the Tasks module in Zoho Desk to assign specific work items to the colleagues involved, set a due date for performing the task, and also set reminders for the tasks.
If you use a third-party project/task management app like Trello, you can integrate your Trello workspace with your Zoho Desk portal and assign/track task progress from within Zoho Desk. With this integration, you can attach support tickets and ticket views to Trello cards and edit ticket details in Trello as and when the tasks are completed. You can also install the Trello extension in your Zoho Desk portal to add and track Trello cards from the Zoho Desk user interface.
Having assigned specific tasks to each stakeholder involved in the resolution process, you can move on to the next step, which is...
Progress is in form?
Inform!
It is essential to quote a tentative time for ticket resolution to your customers. But will that level of limited information suffice? Absolutely not. It is equally important to keep customers abreast of any progress that you make in resolving their complaint. Providing updates without being asked for them reassures your customers that their complaint is being worked upon and gives them an estimate about the time it would take for full resolution. This, in turn, increases your credibility and trustworthiness.
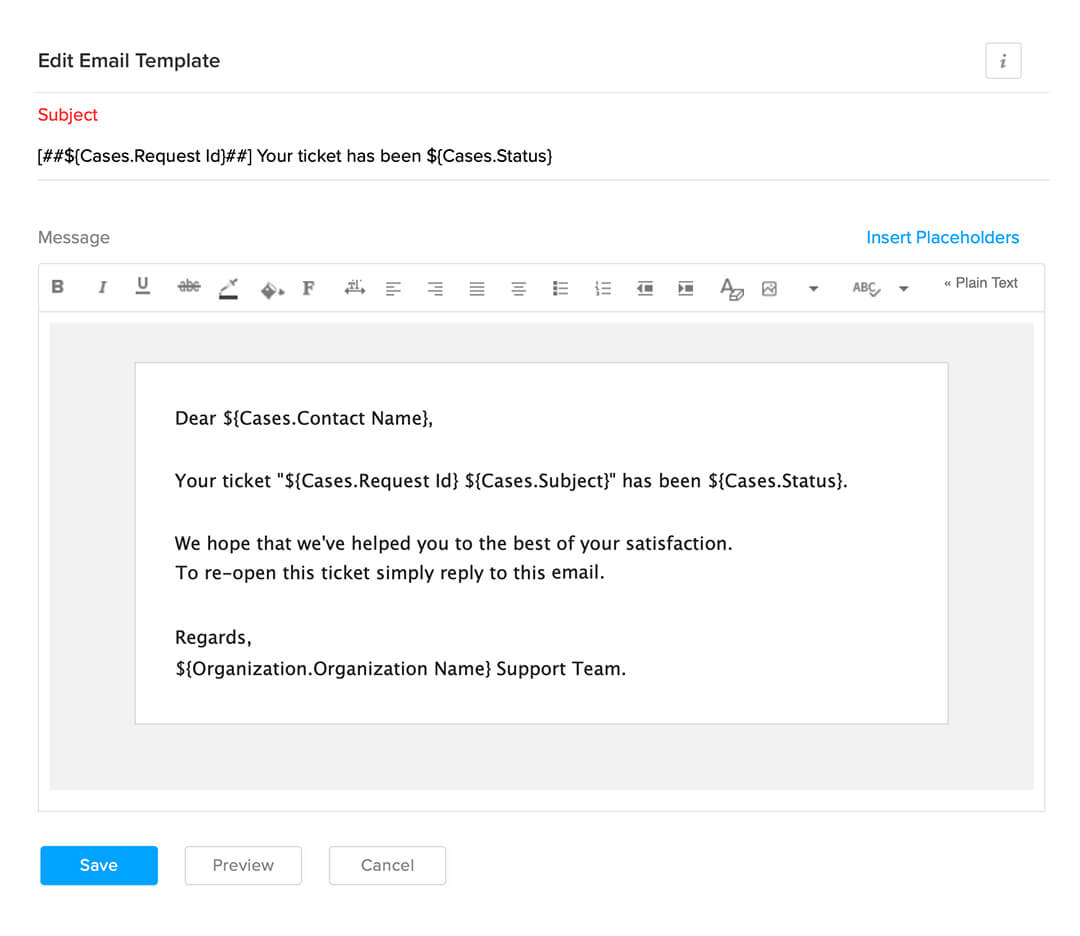
Use the email templates in Zoho Desk to create customized notification/response emails that serve different purposes. For example, you can create a template that informs customers that their ticket has been received, another that says a solution has been created and is undergoing testing, or another that shares details about the shipping status of an item that has not reached the customer yet.
The best part is that you can personalize the content such that the customer's name, ticket number, and other such unique details are included in the email. But make sure to not overuse these notification emails because you run the risk of being considered intrusive.
Write Now, Refer Later
So, the tricky complaint is resolved and the customer is happy with the way it was handled. You can now lean back on your chair and relax? NOT! There is just one other final step that is essential to keep things going when your help desk receives a similar complaint in the future: Documentation.
A note on how the complaint was resolved serves as a quick guide for other agents and teammates. This is where the Resolution tab in tickets comes in handy. This tab contains just a text box in which you can enter all details related to the resolution process.
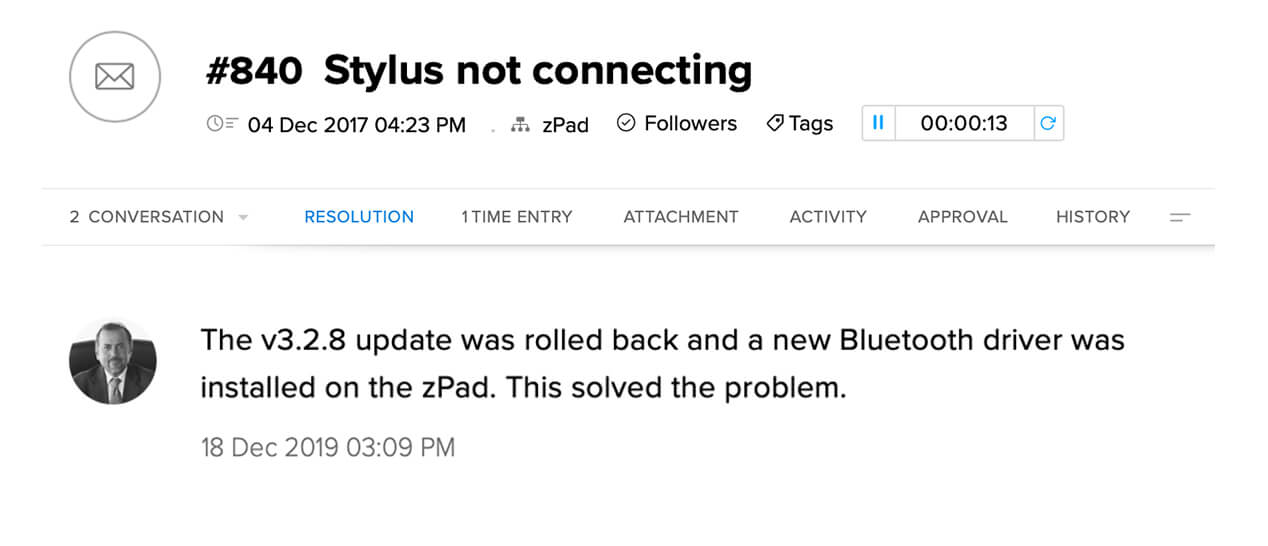
Look at it like this... If customer support is an ongoing relay race, the information in the resolution tab is the baton that one agent passes on to the next. The more comprehensive and clear the information, the more helpful it would be for your peers.
Pro Tip: Make sure to include as many details as possible, so that you can use the nifty Save and Add Article option, which turns the content of the Resolution tab into a help article in your knowledge base. This capability makes support readily available for your customers and enhances the self-service facilities that your help desk has to offer.
Further, if the overall action plan for resolution turns out to be effective, you can define a Blueprint for the process. By doing this, you can ensure that future complaints of the same nature are also resolved efficiently through cross-functional collaboration.