Bin Locations
Note: This feature is available in the Premium plan (2,000 bins/warehouse) and Enterprise plan (5,000 bins/warehouse). It is also available under Advanced Warehouse Operations add-on if you want more bins or want to add bin locations to other plans.
Bin locations are the smallest space in which goods are stored within a warehouse. This feature helps optimize warehouse operations by creating an effective tracking and labelling system. Bin locations make it easier to locate items quickly and efficiently within a warehouse. This feature can help you create multiple levels of storages and track the items to the smallest unit space of your storage.
Scenario: Patricia runs a business and wants to optimize her warehouse space to ensure accurate inventory counts, and ease the picking processes. She enables bin locations and adds the items to the respective bin locations in Zoho Inventory. Now, every time the staff creates a transaction, they can easily track the bin and the warehouse in which the items are available. This helps her staff quickly locate specific items for timely order fulfilment, enhancing overall operational efficiency.
Enable Bin Locations
Note: If Batch Number Tracking and Serial Number Tracking options are enabled, ensure Inventory Tracking Preference is set to Packages, Purchase Receives, and Return Receipts and Mandate serial number or batch tracking in transactions option is enabled.
Let’s take a look at how you can enable bin locations in Zoho Inventory, so you never miss out on where to find goods in your warehouse.
- Click the Gear icon in the top right corner.
- Navigate to Warehouses under Organizations in Settings.
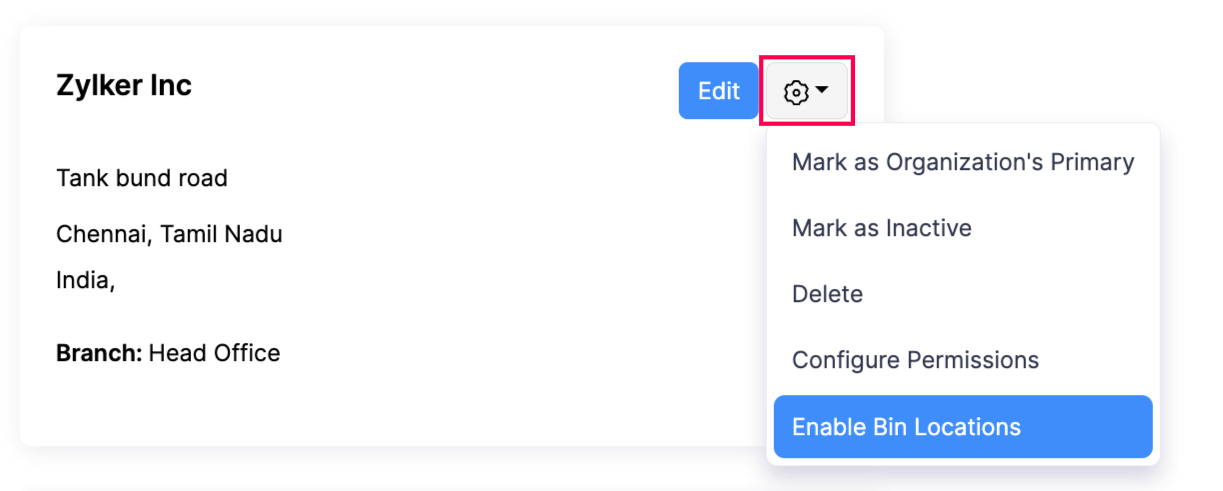
- Click the Gear icon in the warehouse that you’d like to enable bin locations.
- Click Enable Bin Locations.
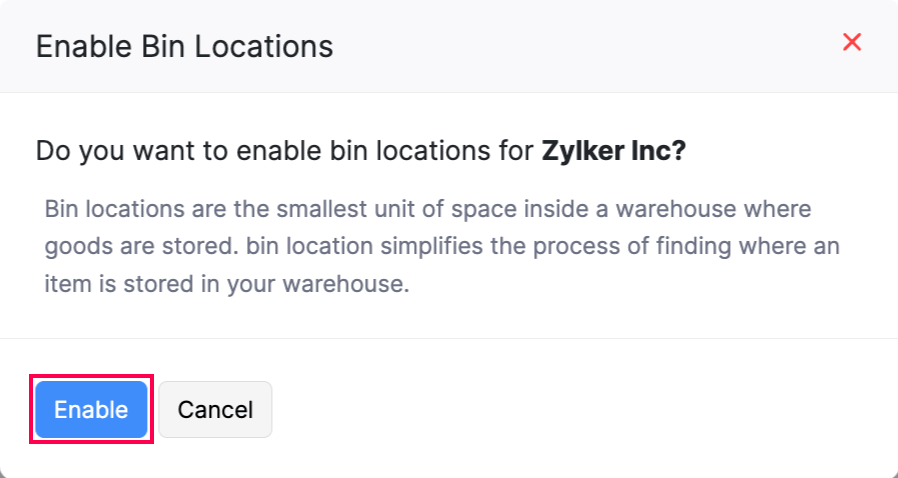
- Click Enable in the pop up that appears.
Note: Bin locations can’t be enabled for warehouses with existing transactions. Create a new warehouse to enable bin locations. you can write to support@zohoinventory.com with your organisation details and we will help you enable it.
Zones
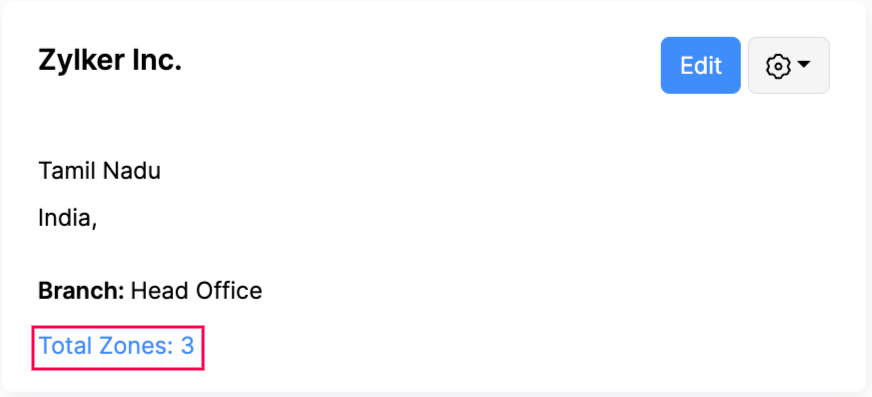
Zone location is an area or a room within a warehouse that contains multiple bins. For example, in a warehouse with a designated area for heavy machinery parts, the zone for these items might be “Machinery Parts Area” and within that area, each bin might represent a specific type of machinery part.
Create Bin Locations
Once you have enabled bin locations, you can start creating bins in your warehouse and start storing your goods in its designated bin locations. Here’s how you can create bin locations:
- Click the Gear icon in the top right corner.
- Navigate to Warehouses under Organizations in Settings.
- Click Total Zones in the warehouse you’d like to create bins.
- Click + New in the top right corner.
| Field | Description |
|---|---|
| Level | This specifies the levels within the storage area. For example: “Level 1” might represent a shelf in the bin location. |
| Location | It is the area within the warehouse where the bin location is placed. For example: Aisle, section, bay, etc. |
| Delimeter | This defines the character or symbol that separates components of the bin location code, such as the hyphen (-) in A-01. |
| Alias Name | This field lets you assign an alternative, user-friendly name to the bin location for easier reference. |
| Total | This field indicates the total number of bin locations. |
- Click Save after filling all the necessary details.

Disable Bin Locations
- Click the Gear icon in the top right corner.
- Navigate to Warehouses under Organizations in Settings.
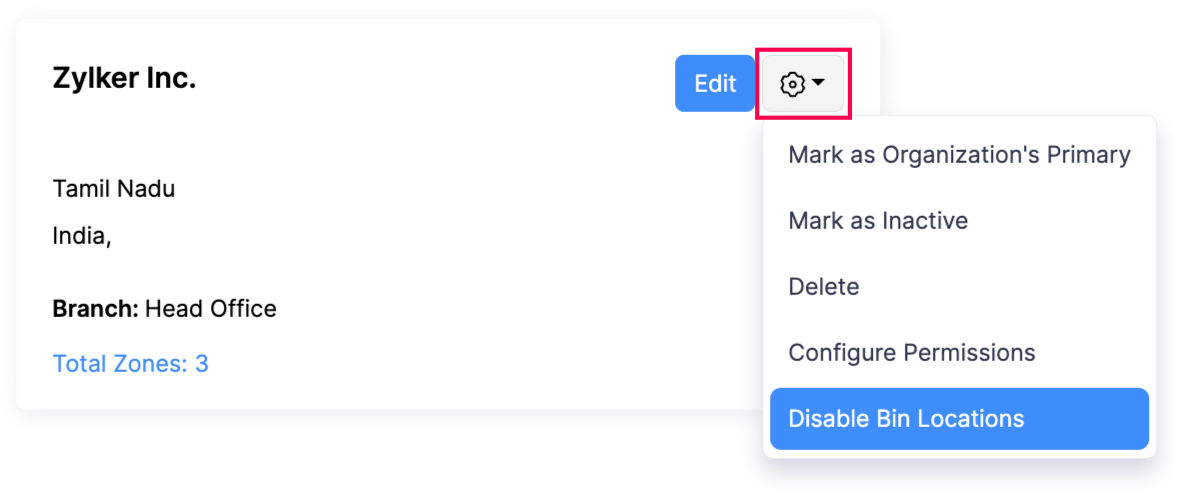
- Click the Gear icon right next to Edit.
- Click Disable Bin Locations.
Edit Bin Locations
This function allows you to update and manage the specific zones within a warehouse where bins are located. Here’s how you can do it:
- Click the Gear icon in the top right corner.
- Navigate to Warehouses under Organizations*.*
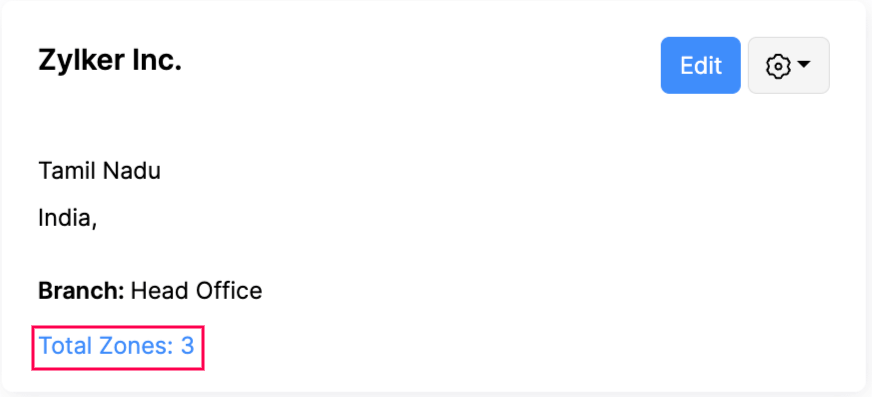
- Click Total Zones on the warehouse.
- Hover over the Zone you would like to edit, click the Edit icon in the right corner.

- Click Save once you’ve made the necessary changes.
Delete Bin Locations
Warning: Once you start associating a bin locations to transactions, you won’t be able to edit, disable or delete bin locations.
You can remove specific bins within a warehouse that are no longer needed, ensuring the inventory system remains up-to-date. Here’s how you can delete bin locations:
- Click the Gear icon in the top right corner.
- Navigate to Warehouses under Organizations.
- Click Total Zone on the warehouse.
- Hover over the Zone you would like to delete.
- Click the Trash icon on the right corner.

- Click Delete on the pop-up to confirm.
Bin Locations in Inventory
Including bin locations in inventory transactions like picklists, move orders and transfer orders helps improve inventory accuracy, streamline the movement of goods, make tracking and retrieving items easier, optimising warehouse space.
Note: You can use the Bin Location feature on both Android and iOS devices.
Track Bin Locations for Opening Stocks (Items, Compostite Items)
Here’s how you can enable bin location to an item:
- Go to the Items/Composite Items module in the left sidebar under Inventory.
- Click the + New on the top right corner of the page.
- Enter the necessary details.
- Select the box Track Inventory for this item.
- Select Track bin location for this item option to start tracking bin locations for this item.

Choose a method for Advanced Inventory Tracking. You can select Track Serial Number or Track Batches. If you don’t want to track, you can select None.
Select an account to track the inventory for your item.
Select Track Serial Number or Track Batches.
Select a Warehouse from the dropdown.
Once you enter the Opening Stock, you will see a Three Dot icon appear. Click the Three Dot icon and enter the necessary details.

Click Save to confirm.
Bundling
Bundling is the process of putting together different components in desired quantities to produce a single commodity. Here’s how you can create a bundle for bin locations items:
Go to Composite Items module in the left sidebar under Inventory.
Click the preferred composite item that you’d like to bundle.
Click Create Bundle button in the top right corner.
Enter the Bundling#, Bundling Date, Quantity to Bundle and the warehouse within which you’d like to create the bundles for this composite item.
If you have enabled serial or batch number tracking for your composite item, you’ll be able to enter the serial or batch numbers for the bundle quantity.
- Click Add Serial Number or Add Batches & Bins option below the Quantity to Bundle.
- Add the serial numbers or the batch details for the bundling quantity in the following pop-up.
- Click Save.
- Select the items you would like to bundle.
If you have enabled batch number tracking for the item, follow these steps:
- Click Select Batches & Bins in the line item.

- Enter Batch Reference number.
- Select the Bin Location, you can add multiple bin locations by clicking + New Row.
- Enter the Quantity Out.
- You can add another batch by clicking + Select another batch.
- Click Save.
If you select items that have enabled serial number tracking for this item, follow these steps:
- Click Add Serial Numbers in the live item level.

- Enable Barcode Scanning if you want to scan the serial numbers.
- Click the dropdown and select or type the items.
- Click Save.
If you have selected none in the advanced inventory tracking for the item, follow these steps:
- Click Select Bins in the line item.

- Select the Bin Location, you can add multiple by clicking + New Row.
- Enter the Quantity you’d like to add.
- Click Save
Click Save Bundle.
Inventory Adjustments
Quantity Adjustments
A quantity adjustment fixes differences between recorded and actual stock caused by issues like theft, damage, errors, write-offs, or donations. In Zoho Inventory, you can record these adjustments for all types of tracked items.
Note: You can only adjust stock for inventory-tracked items.
Go to the Inventory Adjustments module under Inventory from the left sidebar.
Click the + New button on the top right corner of the page.
In the New Adjustment page, select Quantity Adjustment as your mode of adjustment.
Enter the necessary details.
Select the item and enter the New Quantity on Hand. (For e.g., +10,-10)
If you have enabled batch number tracking for the item, follow these steps:
- Click Add Batches & Bins in the line item.

- Enter Batch Reference and Manufacturer.
- Select Manufactured Date and Expiry Date.
- Select the Bins and Quantity IN. You can add multiple by clicking + New Row.
- You can add another batch by clicking + Select another batch.
- Click Save.
If you select items that have enabled serial number tracking for this item, follow these steps:
- Click Add Serial Numbers

- Select the Bins from the dropdown. You can add multiple bins by clicking + New Row.
- Enter the Serial Numbers of all the items you want to add.
- Click Save.
If you have selected none in the advanced inventory tracking for the item, follow these steps:
- Click Select Bins

- Select the Bin Location. You can add multiple by clicking + New Row.
- Enter the Quantity you’d like to add.
- Click Save
Click Save as Draft or Save as Open.
Transfer Orders
You can transfer items between bin locations to a different warehouse or a location that uses a designated bin location. Here’s how to do it:
Go to the Transfer Orders module in the left sidebar under Inventory.
Click + New in the top right corner.
Your Transfer Order# will be auto-generated, you can click the Gear icon to change the preference.
Enter the Date of the transfer order.
Choose a Source Warehouse and Destination Warehouse from the dropdown.

Select the items you want to transfer from the bin location.
If you have enabled batch number tracking for the item, follow these steps to create a transfer order between one warehouse with Bin Locations enabled and one without bin locations:
- Click Select Batches & Bins in the line item.

- Enter the Source Batch Reference number from the dropdown and enter the Destination Batch Reference number.

- Enter the Quantity Out.
- Select the Destination Bins from the dropdown menu and enter the Quantity IN. You can add more bins by clicking + New Row.
- Click + Select Another Batch to add more batches.
- Click Save.
If you have enabled batch number tracking for the item, follow these steps to create a transfer order between a warehouse with Bin Locations enabled on both the warehouse:
- Click Select Source Batches & Bins in the line item.

- Enter the Source Batch Reference number from the dropdown.
- Select the Source Bins from the dropdown and enter the Quantity Out. You can add more bins by clicking + New Row.
- You can create more batches by clicking + Select another batch.
- Click Save.
- Click Add Destination Batches & Bins.

- Enter the Destination Batch Reference number.
- Select the Destination Bins from the dropdown and enter the Quantity In. You can add more bins by clicking + New Row.
- Click Save.
If you have enabled serial number tracking for the item, follow these steps:
- Click Select Source Serial Numbers and Bins in the line item.

- In the pop-up that appears, Click or Type to select the serial numbers from the dropdown and select the Bins.
- Click Save.
If you have selected none in the advanced inventory tracking for the item, follow these steps to create a transfer order between one warehouse with Bin Locations enabled and one without:
- Click Select Destination Bins in the line item.

- Select the Bin Location from the dropdown and enter the Quantity.

- You can also add more bins by clicking + New Row.
- Click Save.
To create a transfer order between a warehouse with Bin Locations enabled on both the warehouse, follow these steps:
- Click Select Source Bins in the line item.

- In the following pop-up, select the Bin Location from the dropdown and enter the Quantity. You can add more bins by clicking + New Row.
- Click Save.
- Click Select Destination Bins in the line item.

- In the following pop-up, select the Bin Location from the dropdown and enter the Quantity. You can add more bins by clicking + New Row.
- Click Save.
Click Initiate Transfer to finish. You can also click the arrow to Save and Submit or Mark as Transferred.

Move Orders
Move Orders are created to transfer inventory within or between facilities. They optimize stock levels, prevent stock outs, and reduce excess inventory, ensuring efficient operations. Understanding Move Orders is key to effective inventory management. Here’s how you can create a move order:
Navigate to the Move Orders module in the left sidebar under Inventory.
Click + New in the top right corner
Your Move Order# is auto-generated, you can click the Gear icon and enter it manually
Enter the Date when you want the move order to take place.
Choose the Warehouse Name from the dropdown
Select the items you wish to move within your organisation
If you have enabled batch number tracking for the item, follow these steps:
- Click Select Source Batches & Bins in the line item.

- Select the source batch reference number from the dropdown.
- Select Source Bins and Enter the Quantity Out, you can add more bins by clicking + New Row.
- You can add another batch by clicking + Select another batch.
- Click Save.
- Click Add destination batches & bins,

- Select the Destination Bins from the dropdown. You can add more bins by clicking + New Row.
- Enter the Quantity In.
- Click Save.
If you have enabled serial number tracking for the item, follow these steps:
- Click Select source serial numbers and bins in the line item.

- In the pop-up that appears, Click or Type to select the serial numbers from the dropdown and select the Bins.
- Click Save.
If you have selected none in the advanced inventory tracking for the item, follow these steps:
- Click Select Source Bins in the line item.

- Enter the Quantity. You can add more bins by clicking + New Row.
- Click Save.
- Click Select Destination Bins
- Enter the Quantity. You can add more bins by clicking + New Row.
- Click Save.
- Click Select Source Bins in the line item.
Click Generate Move Order to finish.
Bin Locations in Transactions
The primary purpose of including bin locations in transactions is to enhance inventory accuracy, streamline picking and packing processes, facilitate easy tracking and retrieval of items. Let’s dive into how bin locations can be associated in transactions.
Picklists
A pick list is a document assigned to a warehouse picker, communicating the list of items and their quantities to pick from a specific warehouse to fulfil orders.
To create a picklist for bin location enabled item:
Go to the Picklists module under Sales in the left sidebar.
Click + New in the top right corner.
Enter the necessary details.
If you select items that have enabled batch tracking for this item, follow these steps:
- Click Select Batches & Bins in the line item.

- Enter Batch Reference number.

- Select the Bin Location. You can add multiple bin locations by clicking + New Row.
- Enter the Quantity Out.
- You can add another batch by clicking + Select another batch.
- Click Save.
If you select items that have enabled serial number tracking for this item, follow these steps:
- Click Select Serial Numbers in the line item.

- Enable Barcode Scanning if you want to scan the serial numbers.

- Click the dropdown and select or type the items.
- Click Save.
If you have selected none in the advanced inventory tracking for the item, follow these steps:
- Click Select Bins in the line item.

- Select the Bin Location and enter the Quantity. You can add multiple items by clicking + New Row

- Click Save.
Click Generate Picklist.
Packages
The Packages module allows you to create and assign package slip numbers to the items in your sales orders and keep track of your consignments when they are shipped.
Go to the Packages module under Sales in the left sidebar.
Click + New in the top right corner.
Fill in the necessary details.
If you select items that have enabled batch tracking for this item, follow these steps:
- Click Select Batches & Bins in the line item.

- Enter Batch Reference number.

- Select the Bin Location. You can add multiple bin locations by clicking + New Row.
- Enter the Quantity Out.
- You can add another batch by clicking + Select another batch.
- Click Save.
If you select items that have enabled serial number tracking for this item, follow these steps:
- Click Select Serial Numbers in the line item.

- Enable Barcode Scanning if you want to scan the serial numbers.

- Click the dropdown and select or type the items.
- Click Save.
If you have selected none in the advanced inventory tracking for the item, follow these steps:
- Click Select Bins in the line item.

- Select the Bin Location and enter the Quantity. You can add multiple items by clicking + New Row.

- Click Save.
- Enter the Quantity of items you want to pack
- Click Save in the pop up.
Click Save to finish.
Invoices
An Invoice is a document sent to your client that indicates the products/services sold by you and the payment information that the client has to make. Learn more about creating an Invoice in Zoho Inventory.
Go to the Invoices module under Sales in the left sidebar.
Click + New in the top right corner.
Enter the necessary details.
If you select items that have enabled batch tracking for this item, follow these steps:
- Click Select Batches & Bins in the line item.

- Enter Batch Reference number.

- Select the Bin Location. You can add multiple by clicking + New Row.
- Enter the Quantity Out.
- You can add another batch by clicking + Select another batch
- Click Save.
If you select items that have enabled serial number tracking for this item, follow these steps:
- Click Select Serial Numbers in the line item.

- Enable Barcode Scanning if you want to scan the serial numbers.

- Click the dropdown and select or type the items.
- Click Save.
If you have selected none in the advanced inventory tracking for the item, follow these steps:
- Click Select Bins in the line item.

- Select the Bin Location and enter the Quantity. You can add multiple items by clicking + New Row.

- Click Save.
Enter the necessary details.
Click Save
Sales Receipts
A sales receipt is a document sent to customers when you sell them goods or services and record payment for them simultaneously. In a retail environment, this means that you only need to create one single transaction to record sales and collect payment. Sales receipts are commonly used in places where cash and sale is recorded instantly, such as e-commerce websites and POS.
- Go to the Sales Receipts module under Sales in the left sidebar
- Click + New in the top right corner
| Field | Description |
|---|---|
| Customer Name | Select the customer for whom the invoice is created |
| Receipt Date | Select the date on which the sales receipt is generated. |
| Branch | Select the branch for which the sales receipt is created |
| Sales Receipt | The sales receipt number will be auto-generated. However, you can change the auto-generation series or enter a unique number by clicking the Gear icon. |
| Place of Supply | Select the state where the items are delivered. |
Select the Warehouse and Selection type
If you select items that have enabled batch tracking for this item, follow these steps:
- Click Select Batches & Bins in the line item.

- Enter Batch Reference number.

- Select the Bin Location, you can add multiple by clicking + New Row.
- Enter the Quantity Out.
- You can add another batch by clicking + Select another batch.
- Click Save.
If you select items that have enabled serial number tracking for this item, follow these steps:
- Click Select Serial Numbers in the line item.

- Enable Barcode Scanning if you want to scan the serial numbers.

- Click the dropdown and select or type the items.
- Click Save.
If you have selected none in the advanced inventory tracking for the item, follow these steps:
- Click Select Bins in the line item.

- Select the Bin Location and enter the Quantity. You can add multiple items by clicking + New Row.

- Click Save.
Write Customer Notes and Terms and Conditions if any.
Click Save and Send, or you can click the arrow and select Save and Print.
Credit notes
A Credit Note is a document issued by a vendor to a customer when goods are returned to the vendor after a sale. This can happen due to reasons like the goods being damaged or not satisfactory. The credit note is created for the value of the goods returned. Here’s how you can create credit notes for bin locations items:
Go to the Credit Notes module under Sales in the left sidebar.
Click the + New button in the top right corner.
Enter the customer and item details for which you want to create a credit note.
If you select items that have enabled batch tracking, follow these steps:
- Click Add Batches & Bins in the line item.

- Enter Batch Reference and Manufacturer.

- Select Manufactured Date and Expiry Date from the calendar.
- Select the Bins and Quantity IN. You can add multiple by clicking + New Row.
- You can add another batch by clicking + Select another batch.
- Click Save.
If you select items that have enabled serial number tracking for this item, follow these steps:
- Click Add Serial Numbers

- Select the Bins from the dropdown. You can add multiple bins by clicking + New Row.

- Enter the Serial Numbers of all the items you want to add.
- Click Save.
If you have selected none in the advanced inventory tracking for the item, follow these steps:
- Click Select Bins

- Select the Bin Location. You can add multiple by clicking + New Row.

- Enter the Quantity you’d like to add.
- Click Save
Click Save as Draft or Save as Open.
Purchase Receives
A purchase receive in Zoho Inventory is a document that is used to record the items that are delivered or yet to be delivered by your vendor to your warehouses.
Go to the Purchase Orders module under Purchases from the left sidebar
Select a purchase order for which you want to create a purchase receive
In the purchase order’s details page, click Receive

In the purchase receive creation screen, fill in the necessary details like the Purchase Receive# and the Receive Date.
Enter the quantity of items you want to receive.
If you select items that have enabled batch tracking, follow these steps:
- Click Add Batches & Bins in the line item

- Enter Batch Reference and Manufacturer

- Select Manufactured Date and Expiry Date.
- Select the Bins and Quantity IN. You can add multiple by clicking + New Row.
- You can add another batch by clicking + Select another batch.
- Click Save.
If you select items that have enabled serial number tracking for this item, follow these steps:
- Click Add Serial Numbers

- Select the Bin from the dropdown. You can add multiple bins by clicking + New Row.

- Enter the Serial Numbers of all the items you want to add
- Click Save
If you have selected none in the advanced inventory tracking for the item, follow these steps:
- Click Select Bins

- Select the Bin Location. You can add multiple by clicking + New Row.

- Enter the Quantity
- Click Save
If you’ve already received the items, click the arrow next to Save as In Transit, or select Save as Received.
Putaways
Putaway refers to all the processes that happen from the time a warehouse receives a supply of goods from a vendor until they have been stored in the warehouse.
Go to the Putaways module under purchases in the left sidebar.
The Putaways number are automatically generated, you can enter manually this by clicking the gear icon
Select a Date when you want the putaways to take place
Select the Warehouse
Select the Items Details and the Quantity Transferred
If you have enabled batch number tracking for the item:
- Click Select Batches & Bins

- Select Batch Reference Number.
- Click Select Bins. You can add multiple by clicking + New Row
- Enter the Quantity Out.
- You can add another batch by clicking + Select another batch
- Click Save
If you have enabled serial number tracking for the item, follow these steps:
- Click Select Serial Numbers.

- Select the Bins from the dropdown. You can add multiple by clicking + New Row

- Select or type the Serial Numbers.
- Click Save.
If you have selected none in the advanced inventory tracking, follow these steps:
- Click Select Bins

- Select the Bin Location. You can add multiple by clicking + New Row.

- Enter the Quantity you’d like to add.
- Click Save.
Click Generate Putaway to finish.
Bills
When a vendor gives you goods or services, they will send you a bill showing what you owe. You can enter this bill in Zoho Inventory and keep track of it.
Go to Bills module under Purchases in the left sidebar.
Click the + New in the top right corner.
Enter the necessary details.
Select the items you would like to bill from bin locations in the line item
If you have enabled batch number tracking for the item, follow these steps:
- Click Add Batches & Bins

- Enter Batch Reference and Manufacturer

- Select Manufactured Date and Expiry Date
- Select the Bins and Quantity In. You can add multiple by clicking + New Row.
- You can add another batch by clicking + Select another batch.
- Click Save.
If you have enabled serial number tracking for the item, follow these steps:
- Click Add Serial Numbers.

- Select Bins from the dropdown. You can add multiple bins by clicking + New Row.

- Enter the Serial Numbers that you’d like to add.
- Click Save.
If you have selected none in the advanced inventory tracking for the item, follow these steps:
- Click Select Bins.

- Select the Bin Location. You can add multiple by clicking + New Row

- Enter the Quantity you’d like to add.
- Click Save
Enter the necessary details.
Click Save as Open to finish.
Vendor Credits
Vendor Credits are a crucial aspect of accounts payable, allowing businesses to manage returns, refunds, or adjustments with their suppliers. These credits help reconcile discrepancies, correct billing errors, and streamline financial transactions. Here’s how you can create vendor credits in Zoho Inventory:
Go to the Vendor Credits module under Purchases in the left sidebar.
Click the + New in the top right corner.
Enter the necessary details.
Select the items for which you would like to create a vendor credit in the line item.
If you have enabled batch number tracking for the item, follow these steps:
- Click Select Batches & Bins

- Enter Batch Reference Number.

- Select the Bin Location. You can add multiple by clicking + New Row
- Enter the Quantity Out
- You can add another batch by clicking + Select another batch
- Click Save
If you have enabled serial number tracking for the item, follow these steps:
- Click Select Serial Numbers

- Enable Barcode Scanning if you want to scan the serial numbers.

- Click the dropdown and select the items
- Click Save
If you have selected none in the advanced inventory tracking for the item, follow these steps:
- Click Select Bins

- Select the Bin Location. You can add multiple by clicking + New Row.

- Enter the Quantity.
- Click Save.
Enter the necessary details.
Click Save As Open.


