
Individual Losses
Note: You can only generate and submit Individual Losses for the 2025–26 tax year.
Under Making Tax Digital (MTD) for Income Tax, you may need to report or update loss-related details for a tax year, depending on the business source, the type of loss and HMRC rules. In Zoho Books, you can use the Brought Forward Loss and Loss Claims forms to record supported loss details, review figures available from HMRC where applicable, and submit updates to HMRC.
Scenario:
A sole trader reported a qualifying loss in an earlier tax year and wants to use that loss in a later year, or change how an eligible loss is claimed. They can create the relevant form in Zoho Books, review the available figures, finalise the form and submit the update to HMRC.
Brought Forward Loss
A Brought Forward Loss is a loss from a previous tax year that can be carried forward to reduce taxable profit in a later tax year, subject to HMRC rules. For example, if you made a loss last year and a profit this year, you can offset the earlier loss against the current profit and pay tax only on the remaining amount.
Using Zoho Books, you can generate a Brought Forward Loss form, review figures fetched from HMRC, enter the loss amount you want to use, and submit the update to HMRC.
Generate Brought Forward Loss Form
Before generating a Brought Forward Loss form, you must first create a Brought Forward Loss form. Here’s how:
- Go to Filing & Compliance on the left sidebar and select Income Tax.
- Click Create Additional Submission in the top right corner.
- In the Create Additional Submission pop-up, fill in the following fields:
- Select the tax year for which you want to generate the form in the Tax Year field.
- Select Brought Forward Loss in the Submission Type field.
- Click Create.

The Brought Forward Loss form will now be created in the Draft status and listed under the End of Year section of the To Be Filed tab.
To generate the Brought Forward Loss form:
- Click the newly created Brought Forward Loss form from the End of Year section.
- In the Generate Brought Forward Loss page, select your Business Name for which you want to record the Brought Forward Loss details.
- Select the tax year from which you wish to carry forward the loss in the Tax Year Brought Forward From field.
- Select the loss type (such as UK Property or Self Employment) in the Type of Loss field.
- Enter the amount in the Loss Amount field.
- Click + Add New Row if you want to carry forward losses from another tax year. Each row allows you to add loss details for a different tax year and is treated as a separate entry in the submission. To delete a row, click the More icon next to the row and select Delete.
- Click Save and Generate.
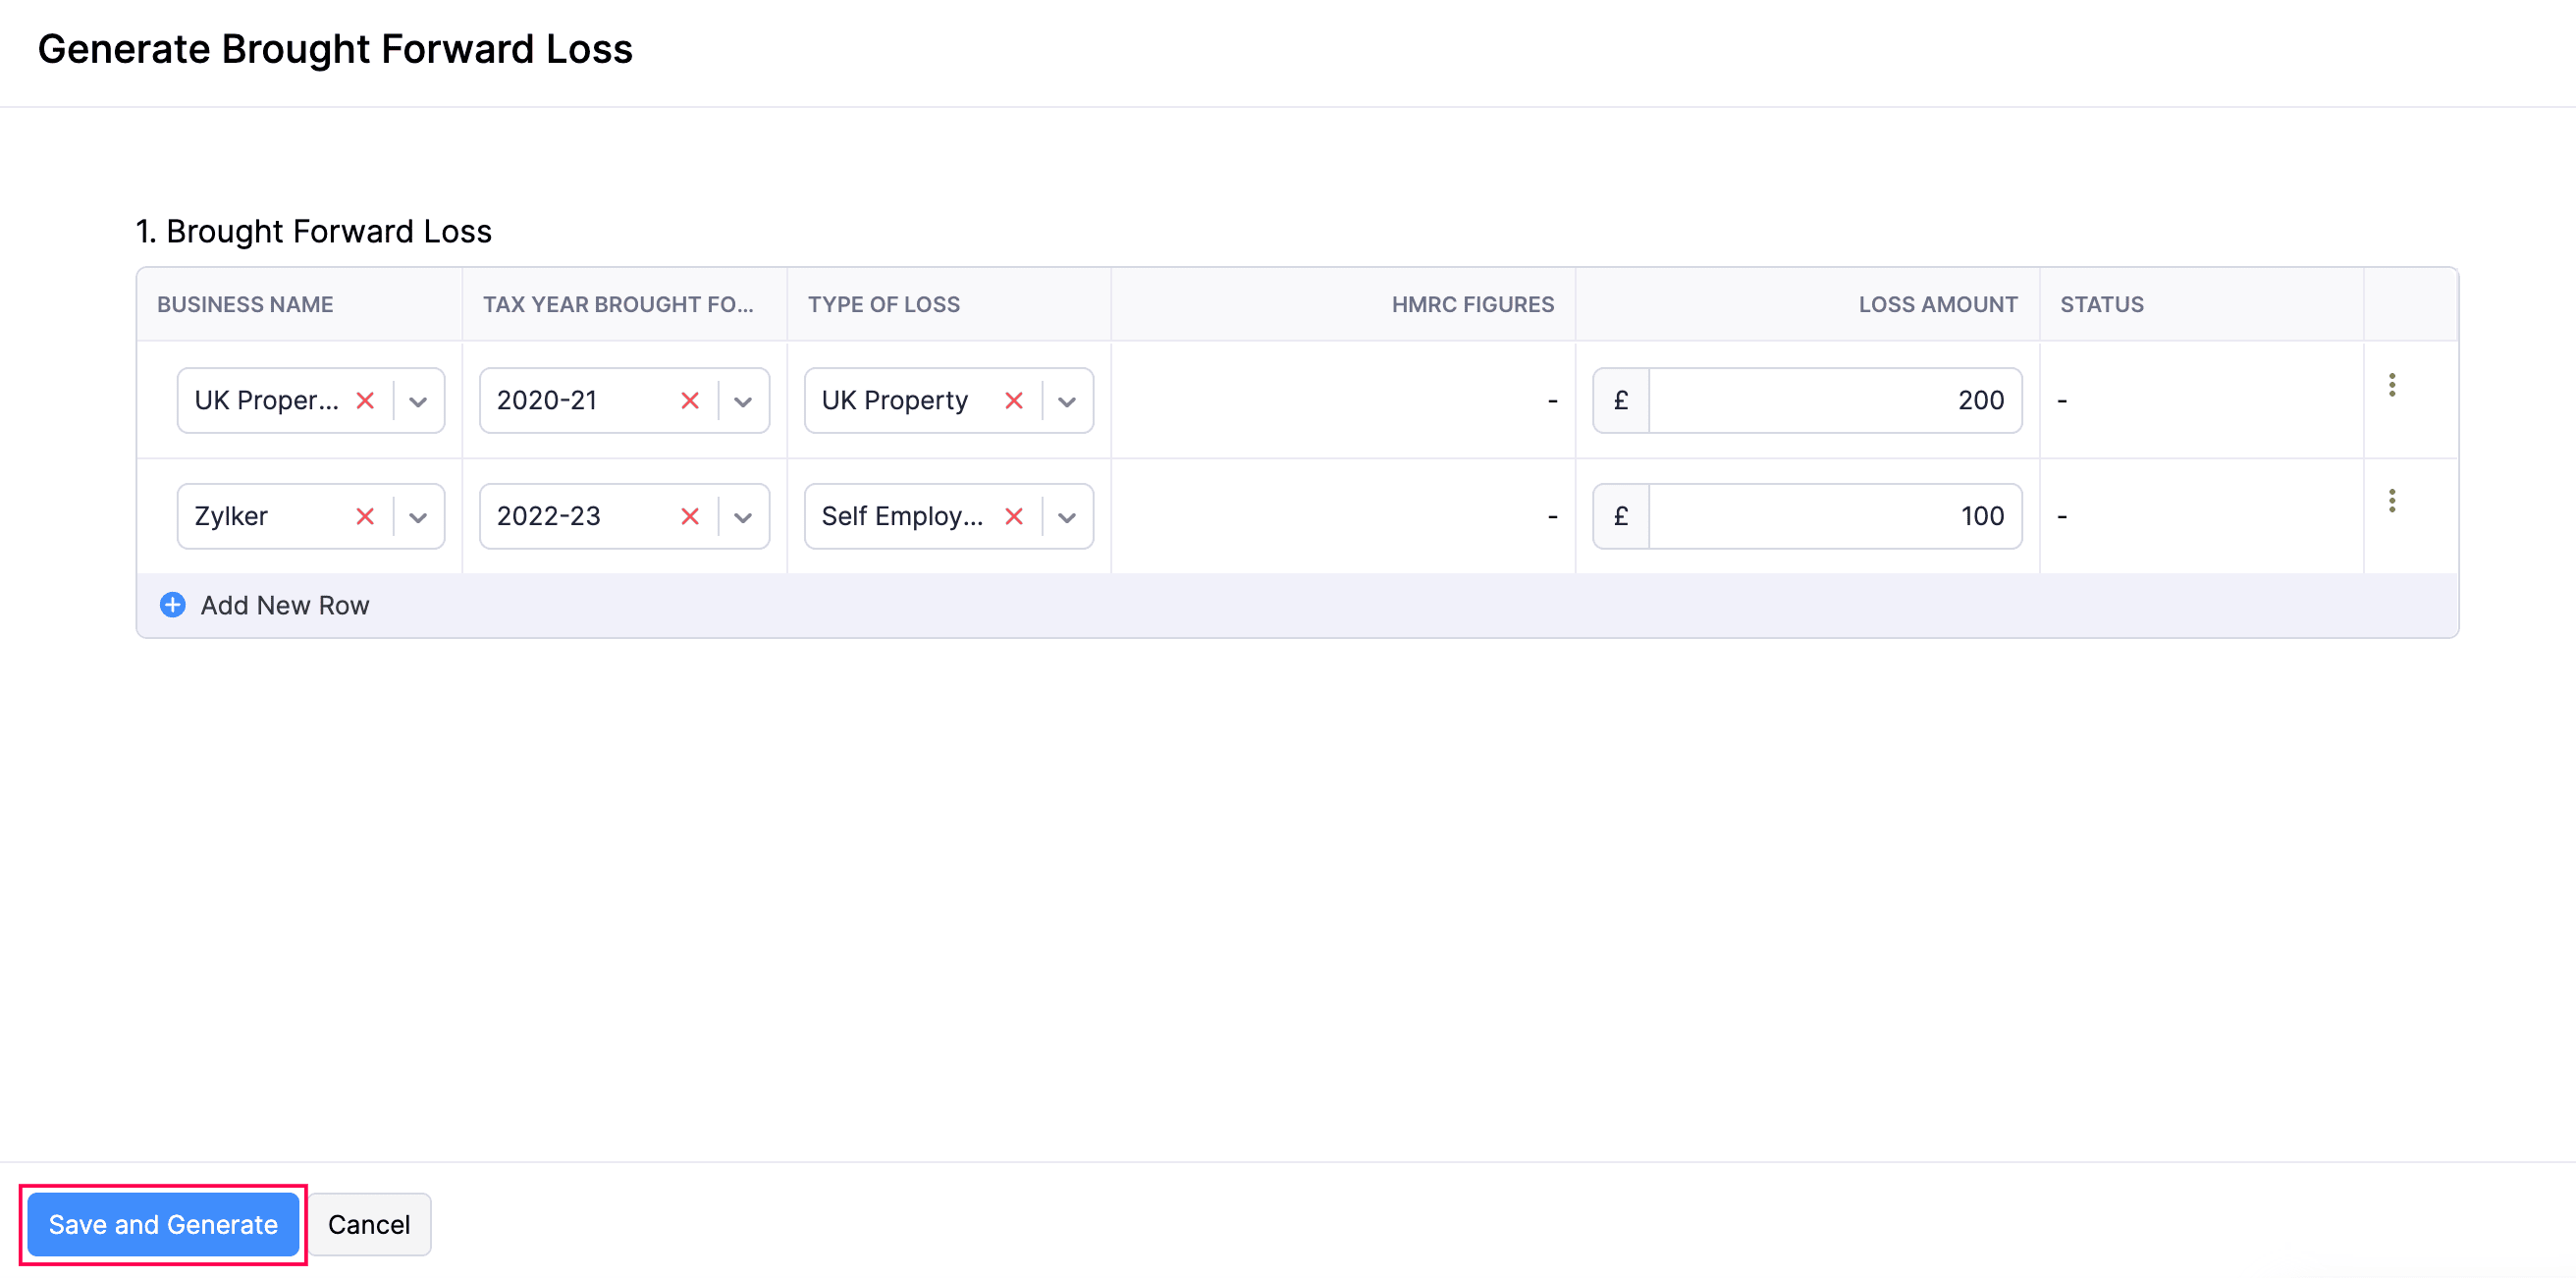
- In the confirmation pop-up, click Finalise Update.
The form will now be generated and saved in Zoho Books, and its status will change to Finalised.
Edit Brought Forward Loss Form
To edit a Brought Forward Loss form in the Finalised status before submitting it to HMRC:
- Go to Filing & Compliance on the left sidebar and select Income Tax.
- Select the finalised Brought Forward Loss form that you want to edit.
- Click the More icon in the top-right corner and select Edit.
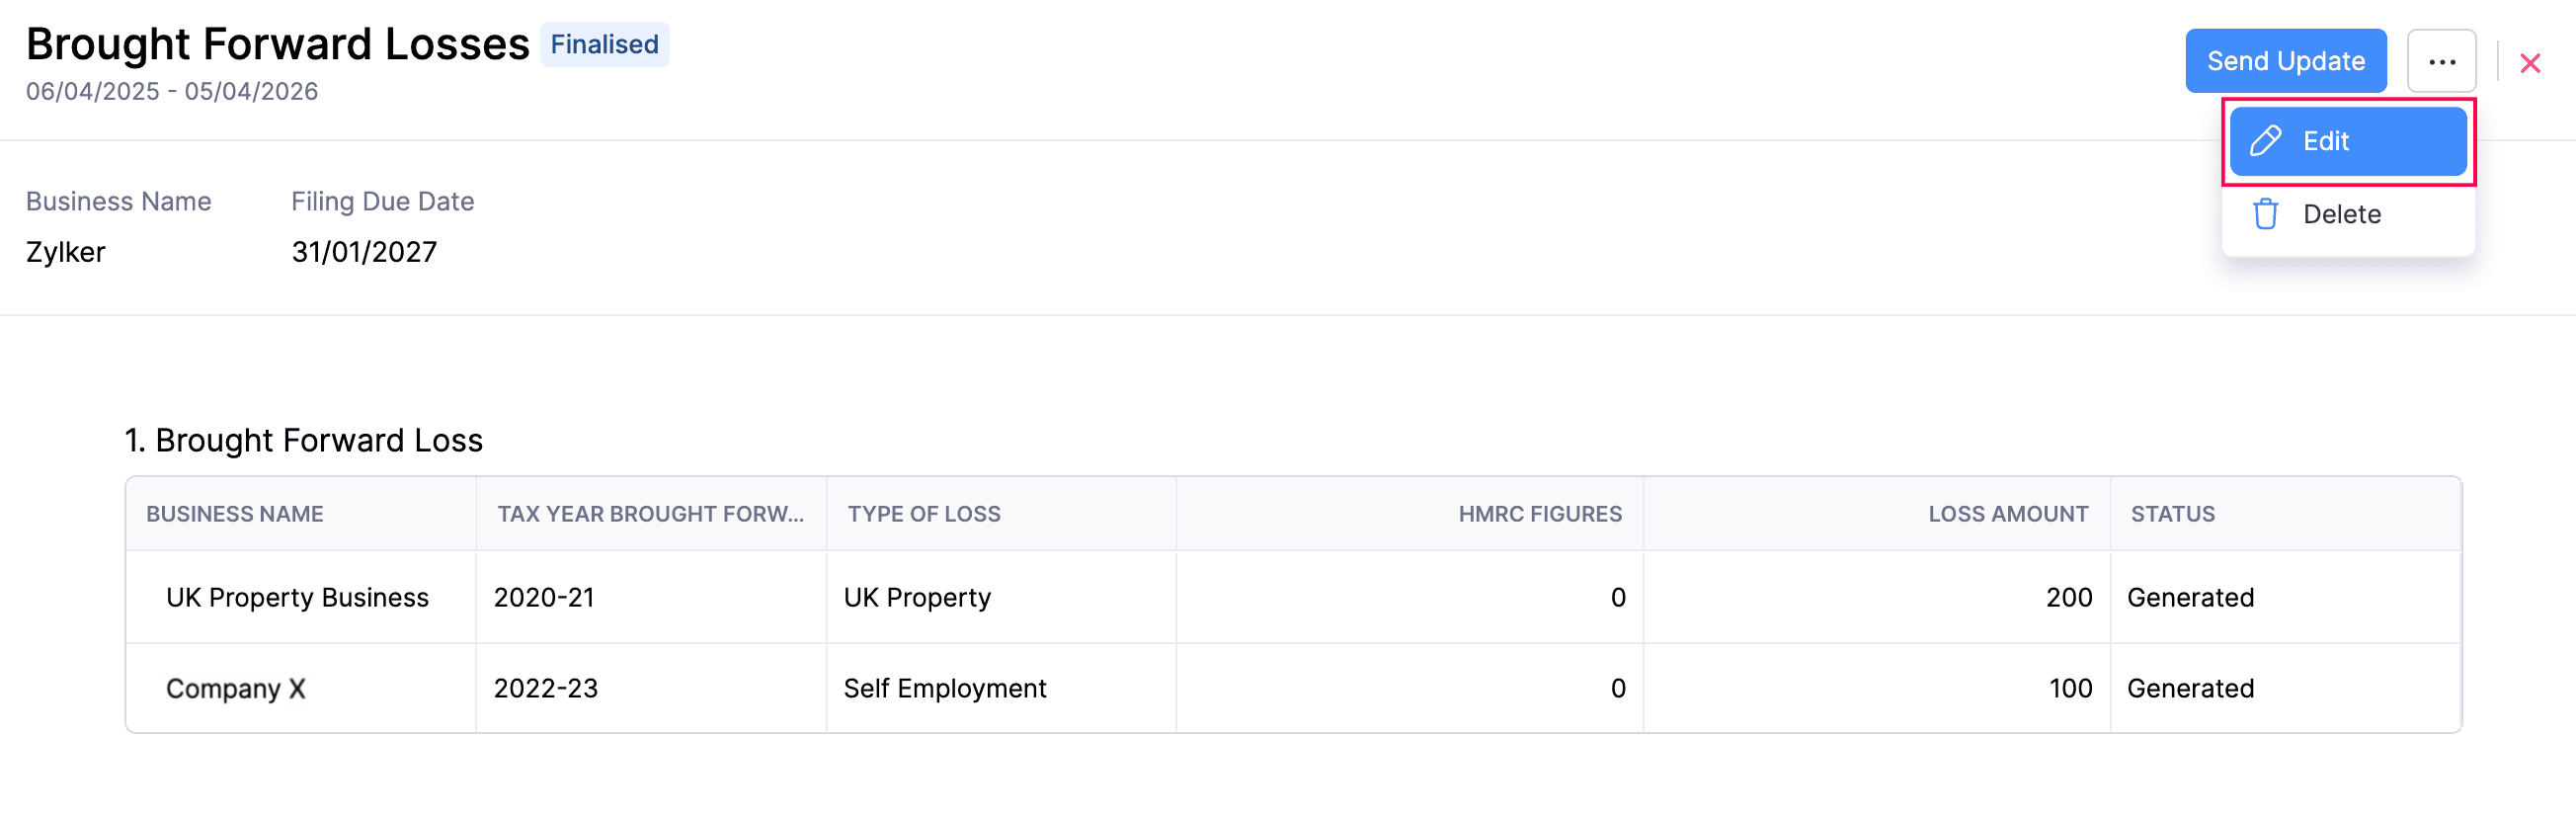
- In the confirmation pop-up that follows, click Continue to Edit.
- The status of the form will now be changed to Draft and you can make the necessary changes in the required fields.
- Click Save and Generate once you have made all the necessary changes.
- In the confirmation pop-up, click Finalise Update.
The changes will now be updated and saved in Zoho Books.
To edit a Brought Forward Loss form in the Submitted status:
Note:
If you edit a Brought Forward Loss form in the Submitted status, the changes will also be reflected in the HMRC portal. Note that after submission, only the Loss Amount field can be edited.
- Go to Filing & Compliance on the left sidebar and select Income Tax.
- Select the submitted Brought Forward Loss form that you want to edit.
- Click the More icon in the top-right corner and select Edit.
- In the confirmation pop-up that follows, click Continue to Edit.
- The status of the form will now be changed to Draft after which only the Loss Amount field will be available for editing. You can refer to the HMRC Figures column to view the loss amount that was submitted previously.
- Click Save and Generate once you have made all the necessary changes.
- In the confirmation pop-up, click Finalise Update.
After editing the form, you have to submit it again.
You can track the amendment status of the form in the Status column of the Brought Forward Loss table.
| Status | Description |
|---|---|
| Amended | The changes made have been successfully submitted to HMRC. |
| Amendment Failed | The changes made could not be submitted to HMRC. Review the details and submit the form again. |
Delete Brought Forward Loss Form
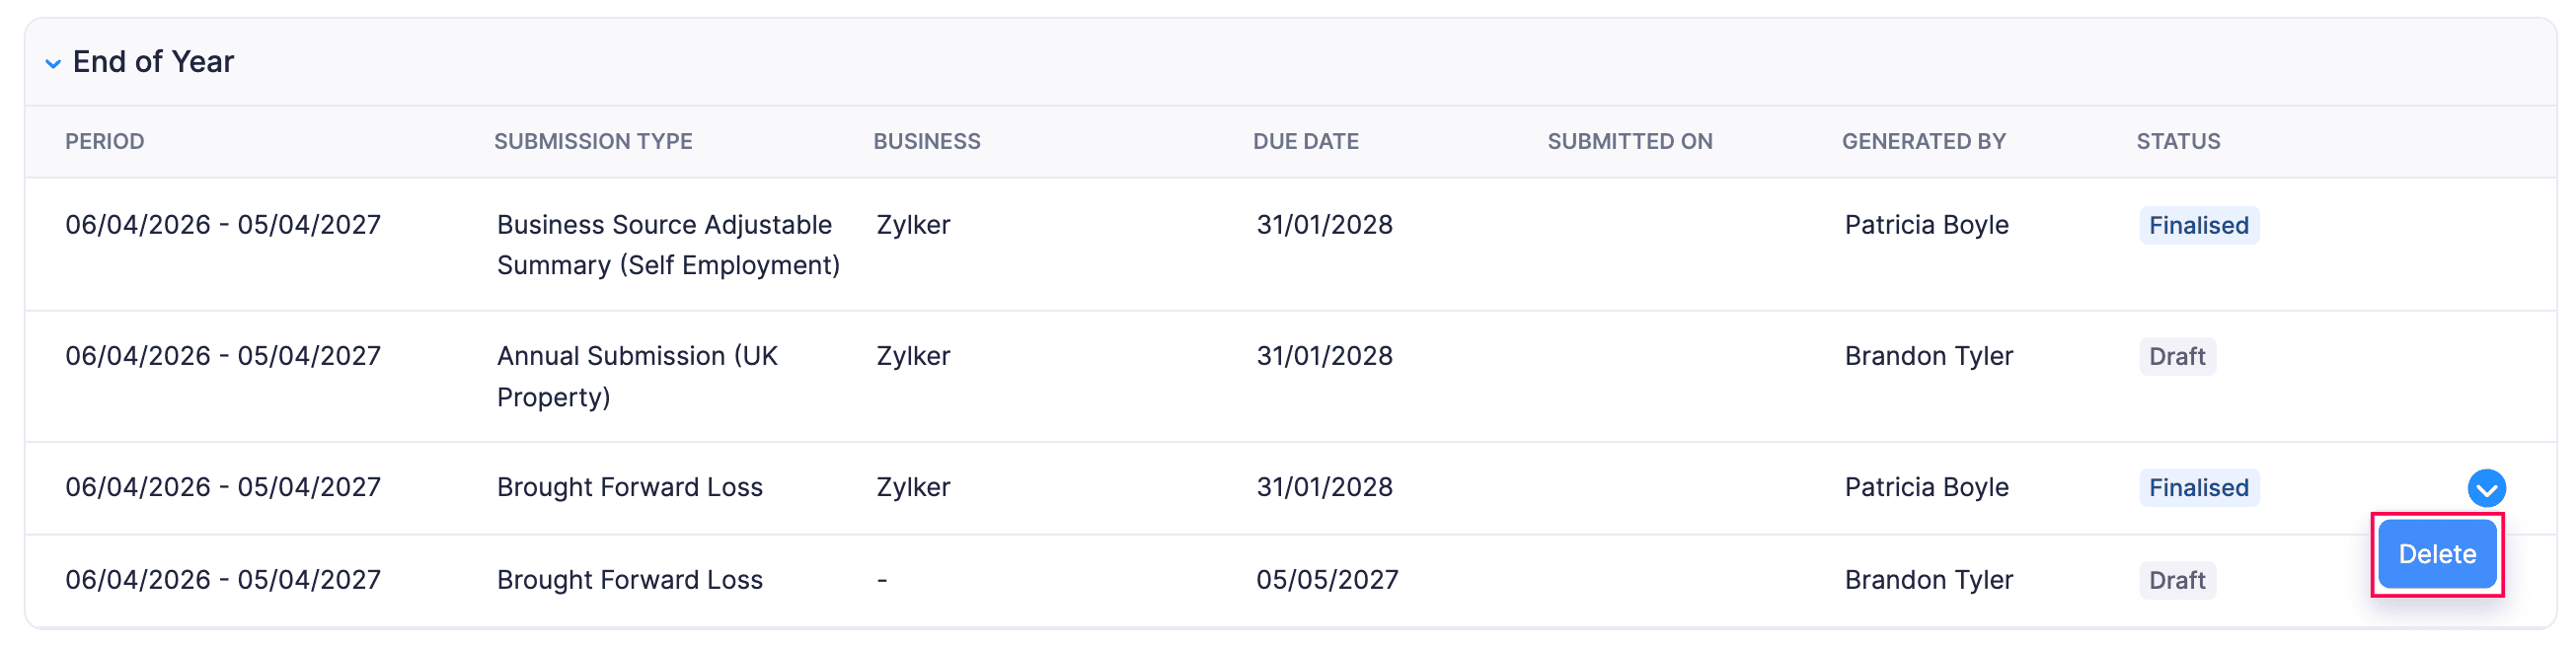
To delete a Brought Forward Loss form in the Finalised status:
- Go to Filing & Compliance on the left sidebar and select Income Tax.
- Hover over the Brought Forward Loss form in the Draft or Finalised status that you want to delete, click the dropdown that appears and select Delete.
(or)
- Select the finalised Brought Forward Loss form that you want to delete.
- Click the More icon in the top-right corner and select Delete.
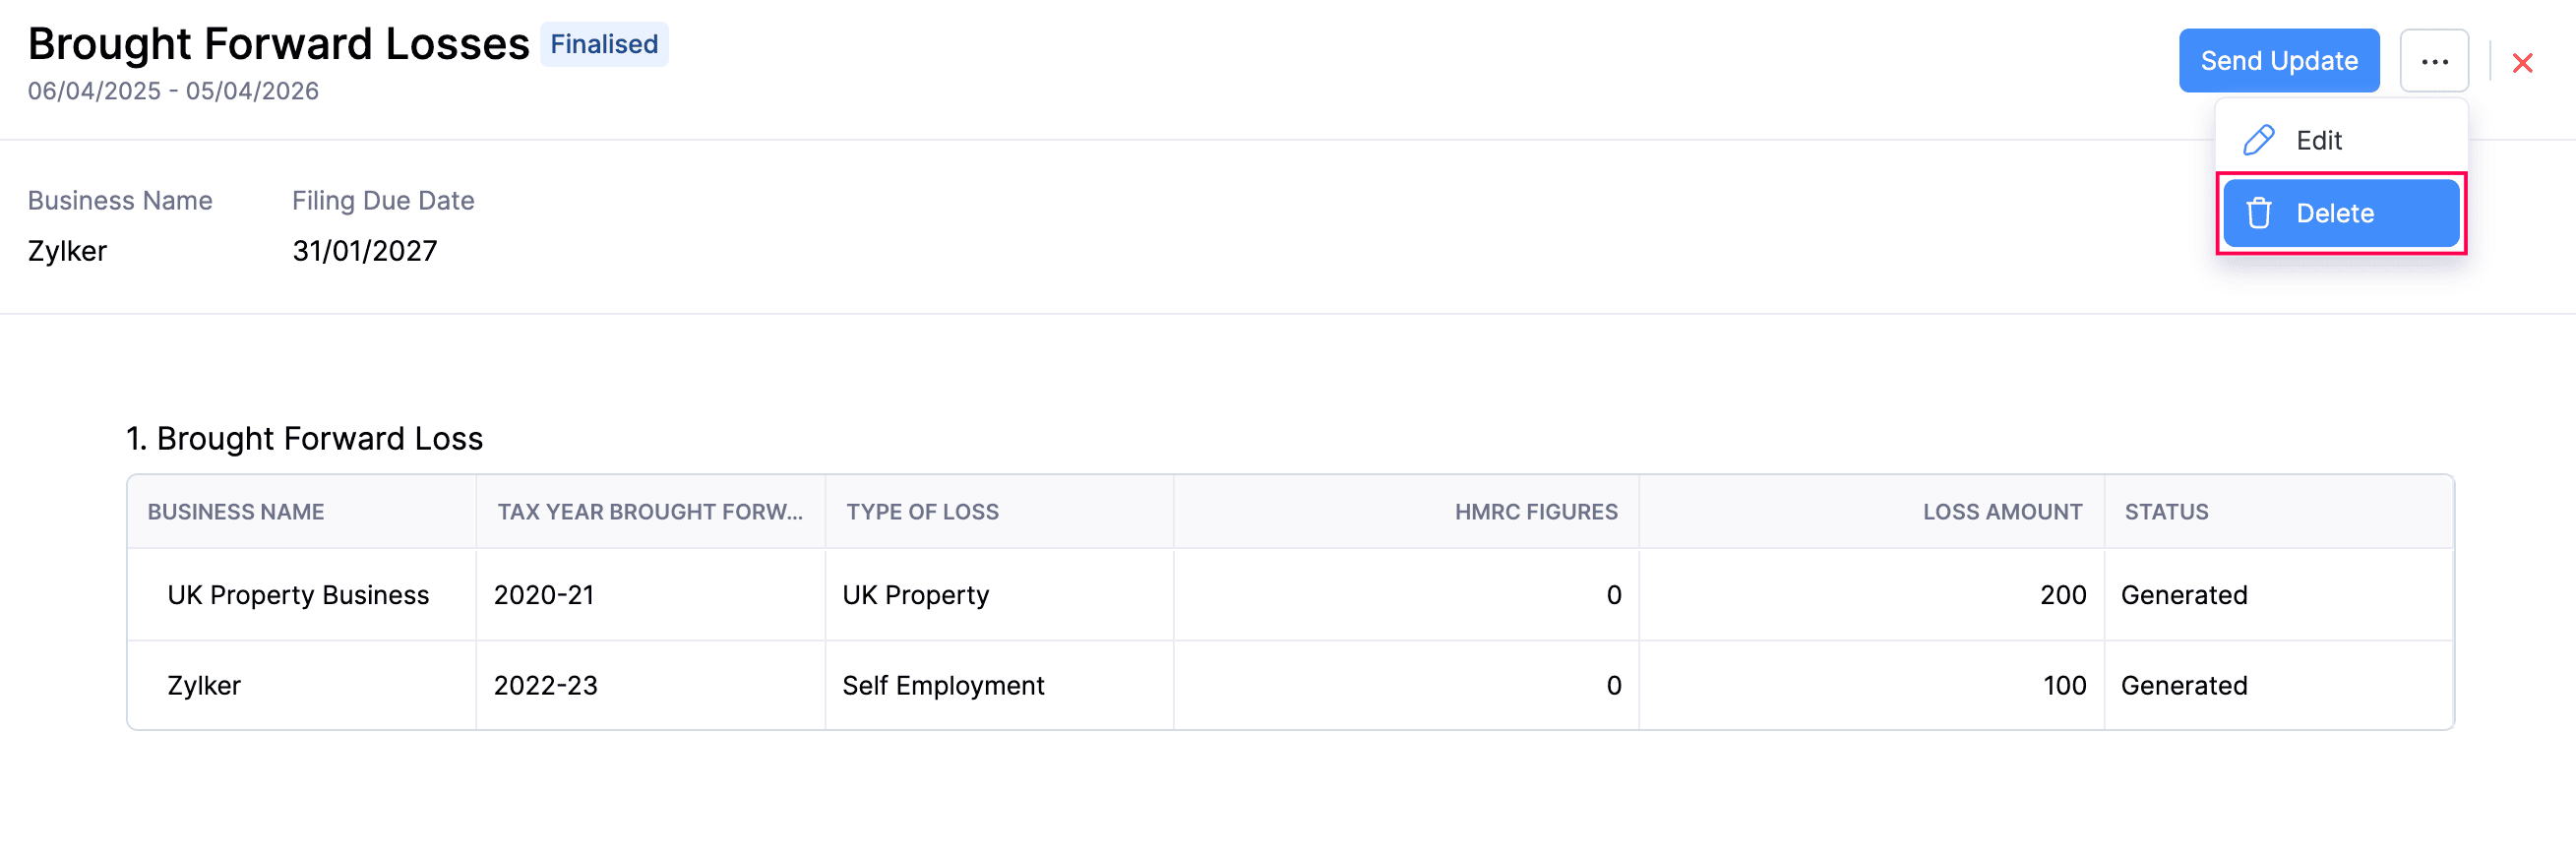
The form will now be deleted in Zoho Books.
To delete a Brought Forward Loss form in the Submitted status:
Note:
If you delete a submitted Brought Forward Loss in Zoho Books, the changes will also be reflected in the HMRC portal.
- Go to Filing & Compliance on the left sidebar and select Income Tax.
- Select the Brought Forward Loss form in the Submitted status that you want to delete.
- Click the More icon in the top-right corner and select Delete.
The form deletion will now be initiated and you can track its status in the Status column of the Brought Forward Loss table.
| Status | Description |
|---|---|
| Marked as Deleted | All the rows (returns) in the Brought Forward Loss form has been successfully deleted in HMRC portal. |
| Deletion Failed | The Brought Forward Loss form has not been deleted in the HMRC portal yet. |
Submit Brought Forward Loss Form
Once you’ve reviewed the figures in the Brought Forward Loss form, you can submit it to HMRC. Here’s how:
- Go to Filing & Compliance on the left sidebar and select Income Tax.
- Select the Brought Forward Loss form that you want to submit.
- On the Brought Forward Losses page, click Send Update in the top-right corner.

- In the confirmation pop-up, click Send Update.
The Brought Forward Loss form will now be submitted to HMRC.
After a Brought Forward Loss is submitted to HMRC, it can have one of the following statuses:
| Status | Description |
|---|---|
| Submitted | The entire Brought Forward Loss form was successfully submitted to HMRC. |
| Partially Submitted | The form contains multiple rows (returns), and only some of them were submitted to HMRC. Review the form details, edit and submit it again. |
| Submission Failed | None of the rows (returns) in the Brought Forward Loss form were submitted to HMRC. Review the form details, edit and submit it again. |
Insight:
If you realise that you missed a tax year after submitting the Brought Forward Loss, you can edit the form and add a new row for that year. In this case, the previously submitted row will remain in the Submitted status, and the newly added row will be in the Generated status. When you submit the form again, the newly added row will also be submitted to HMRC.
Loss Claims
A Loss Claim form is a request to use a business loss to reduce your taxable income or profits. For example, if you made a loss in one tax year, you may be able to use it against eligible income or profits in the same or a later tax year, depending on the claim type allowed by HMRC. Using Zoho Books, you can generate and submit a Loss Claim form directly to HMRC.
Types of Loss Claims
Below are the ways in which you can claim your losses, according to HMRC:
| Type of Claim | Description |
|---|---|
| Carry Forward | Use the loss in a later tax year to reduce profits from the same business source. |
| Carry Sideways | Use the loss against other income in the same tax year instead of carrying it forward. |
| Carry Sideways FHL | Use a Furnished Holiday Letting (FHL) loss against other eligible income in the same tax year, in line with HMRC rules. |
| Carry Forward to Carry Sideways | Change a loss that was previously carried forward so that it is instead used against other income, where allowed by HMRC. |
Generate Loss Claim Form
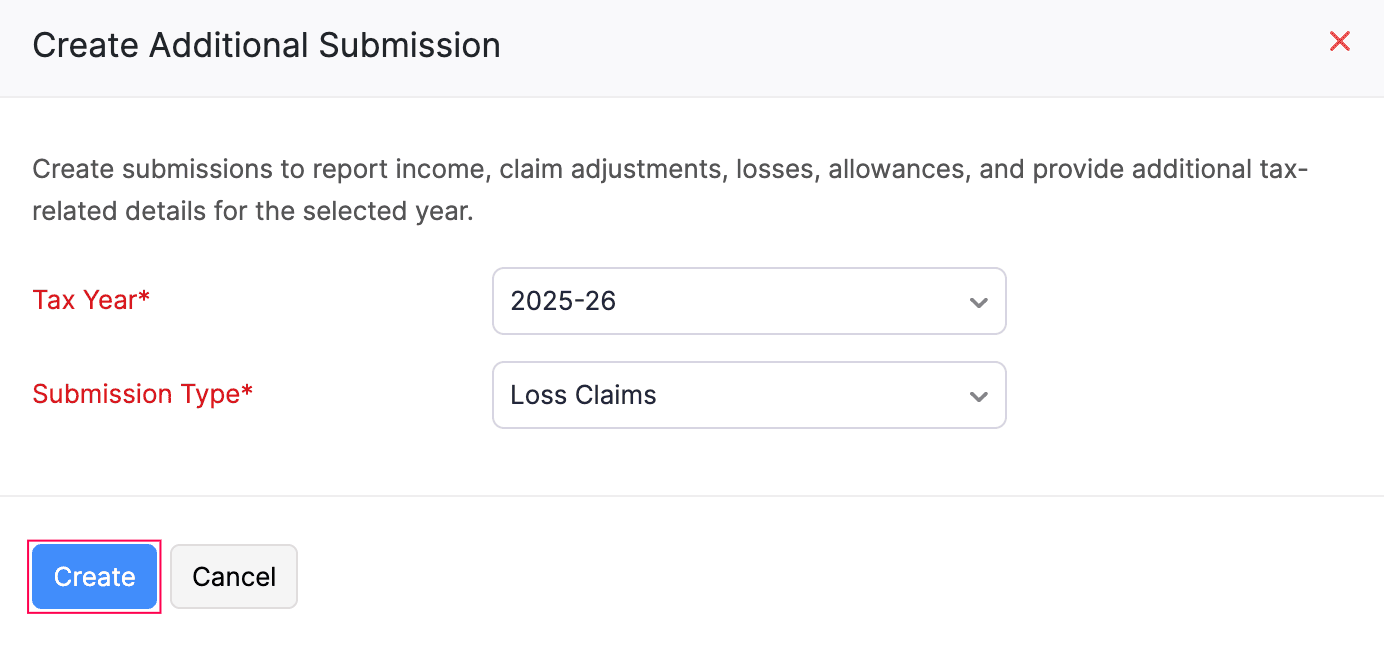
Before generating a Loss Claim form, you must first create a Loss Claim form. Here’s how:
- Go to Filing & Compliance on the left sidebar and select Income Tax.
- Click Create Additional Submission in the top right corner.
- In the Create Additional Submission pop-up, fill in the following fields:
- Select the tax year for which you want to generate the form in the Tax Year field.
- Select Loss Claims in the Submission Type field.
- Click Create.
The Loss Claim form will now be created in the Draft status and listed under the End of Year section of the To Be Filed tab.
To generate the Loss Claim form:
- Click the newly generated Loss Claim form.
- Select your Business Name for which you want to record the Loss Claim details.
- Select the tax year for which you want to claim the loss in the Tax Year Claimed For field.
- Select the loss type in the Type of Loss field.
- Select the claim type in the Type of Claim field.
- Click + Add New Row if you want to add loss claims for another tax year. Each row allows you to add loss details for a different tax year and is treated as a separate entry in the submission. To delete a row, click the More icon next to the row and select Delete.
- Click Save and Generate.
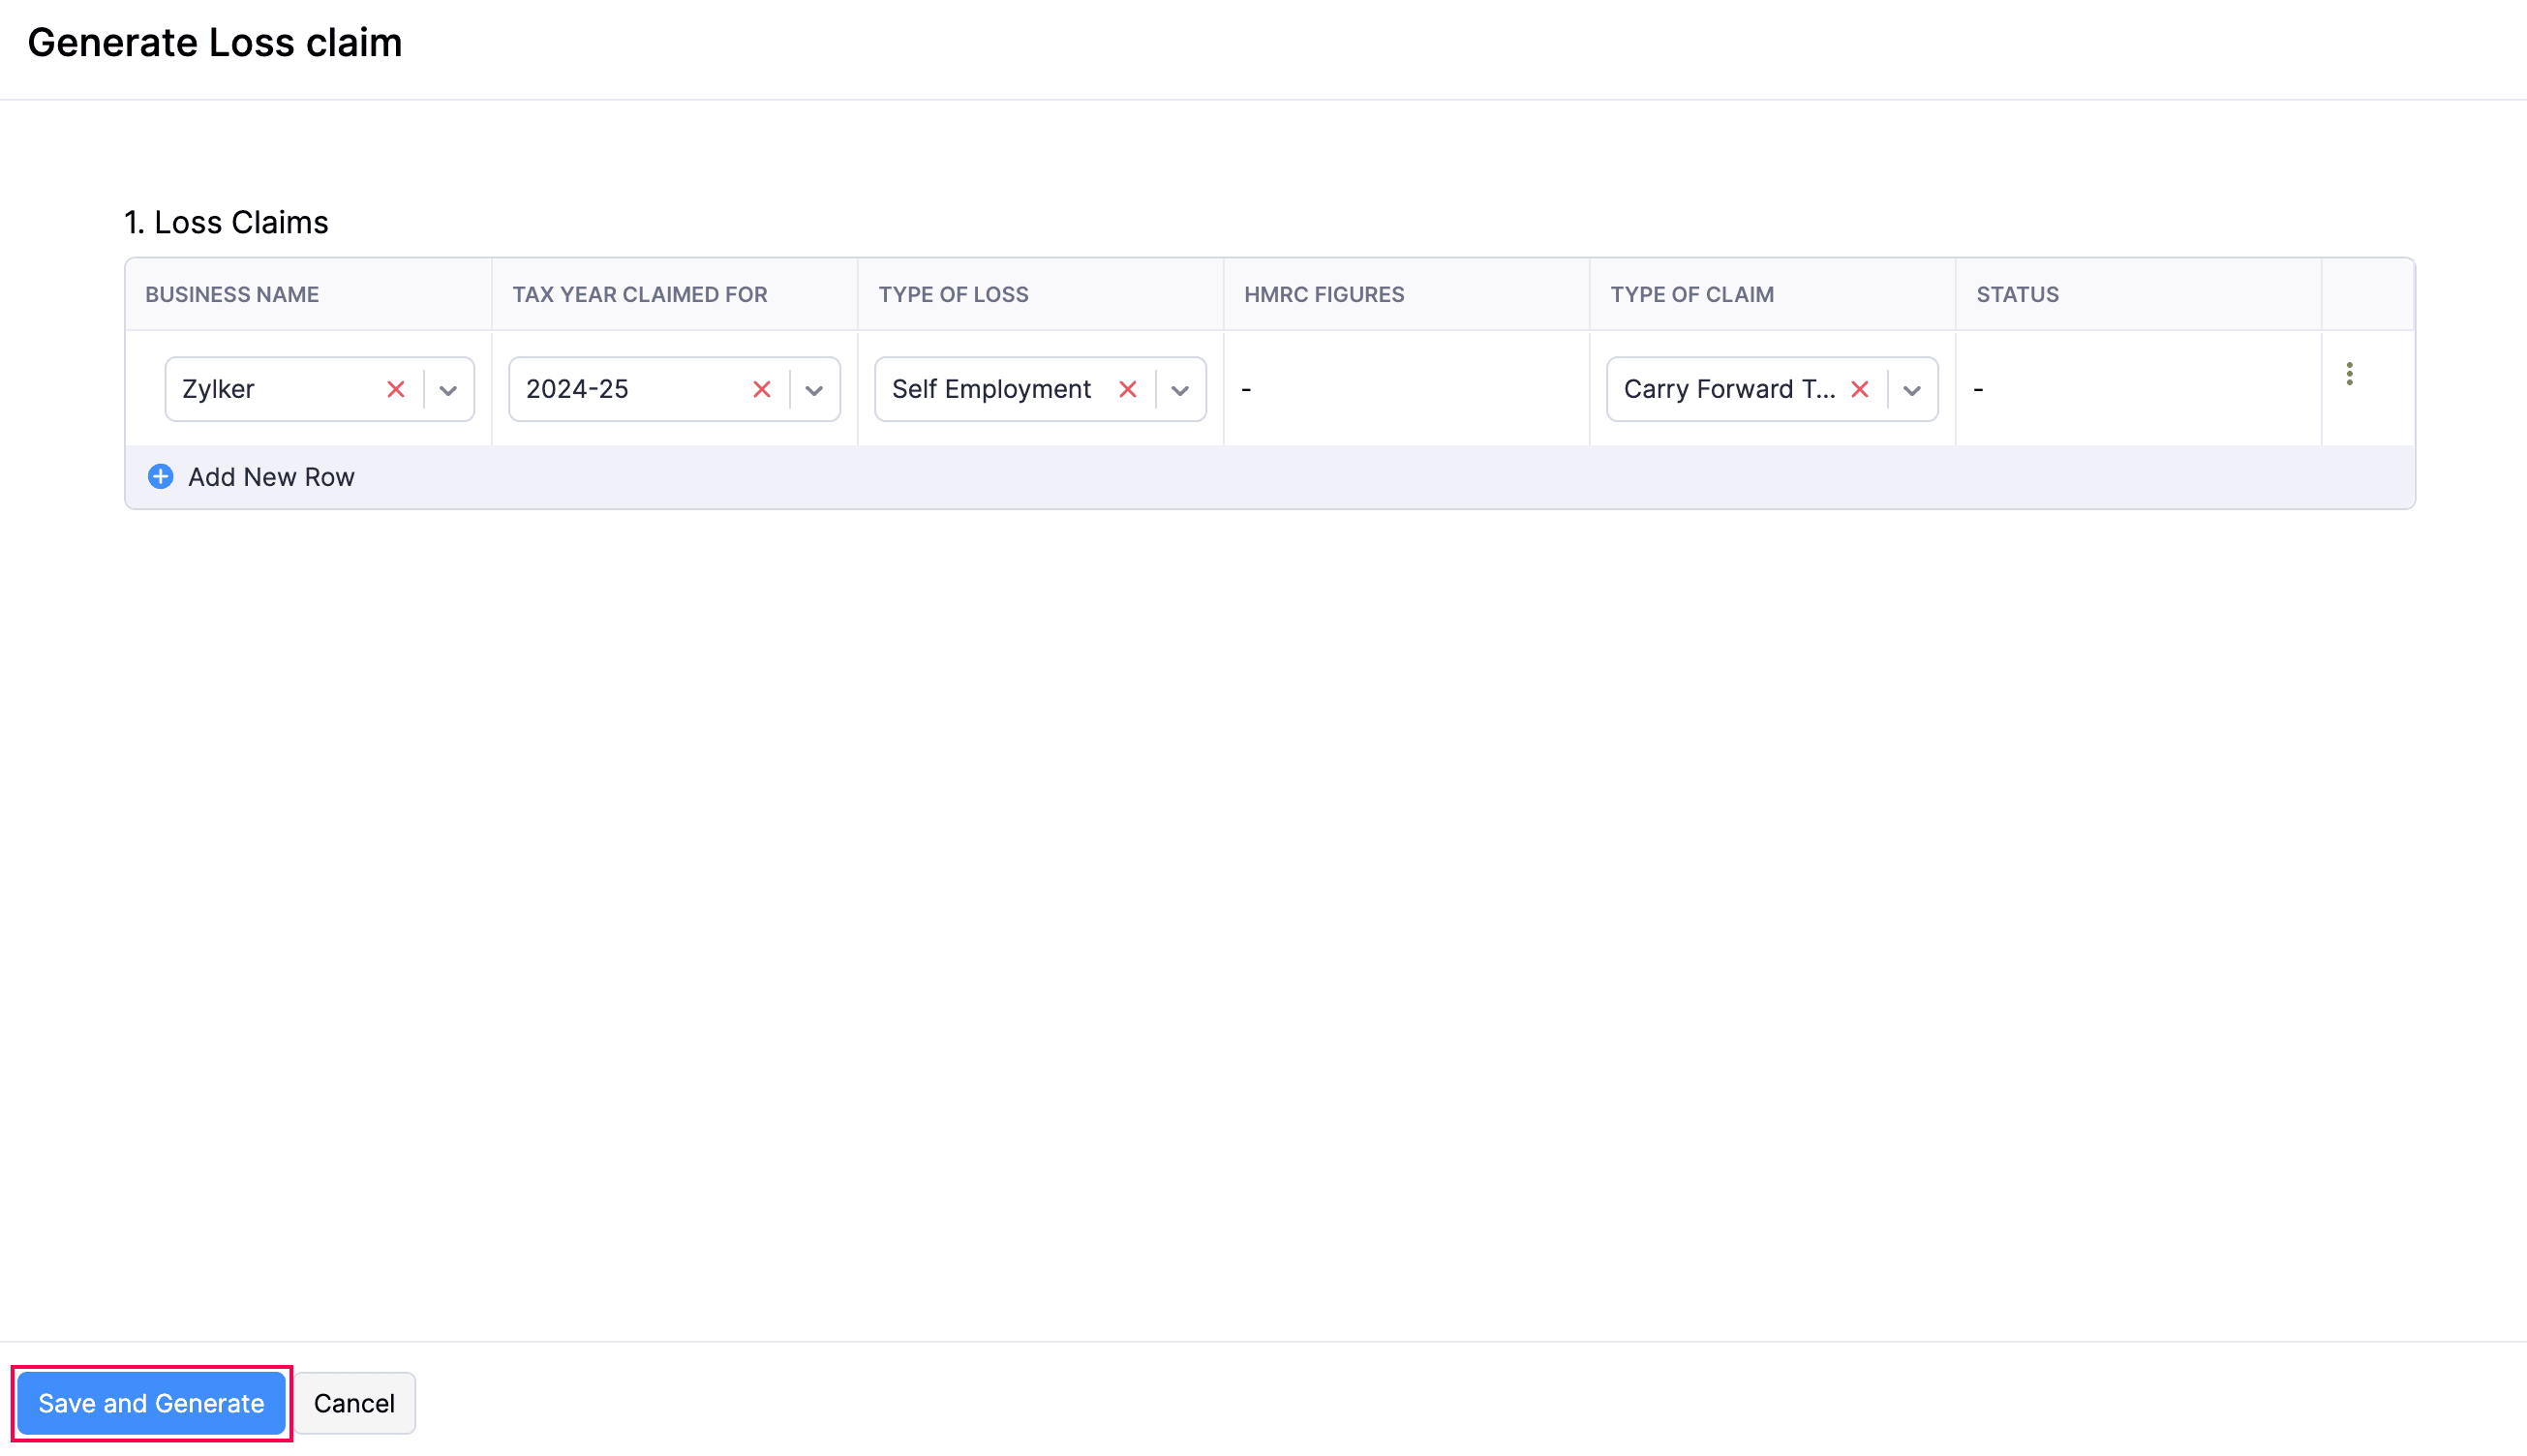
- In the confirmation pop-up, click Finalise Update.
The form will now be generated and saved in Zoho Books, and its status will change to Finalised.
Edit Loss Claim Form
To edit a Loss Claim form in the Finalised status:
- Go to Filing & Compliance on the left sidebar and select Income Tax.
- Select the finalised Loss Claim form that you want to edit.
- Click the More icon in the top-right corner and select Edit.
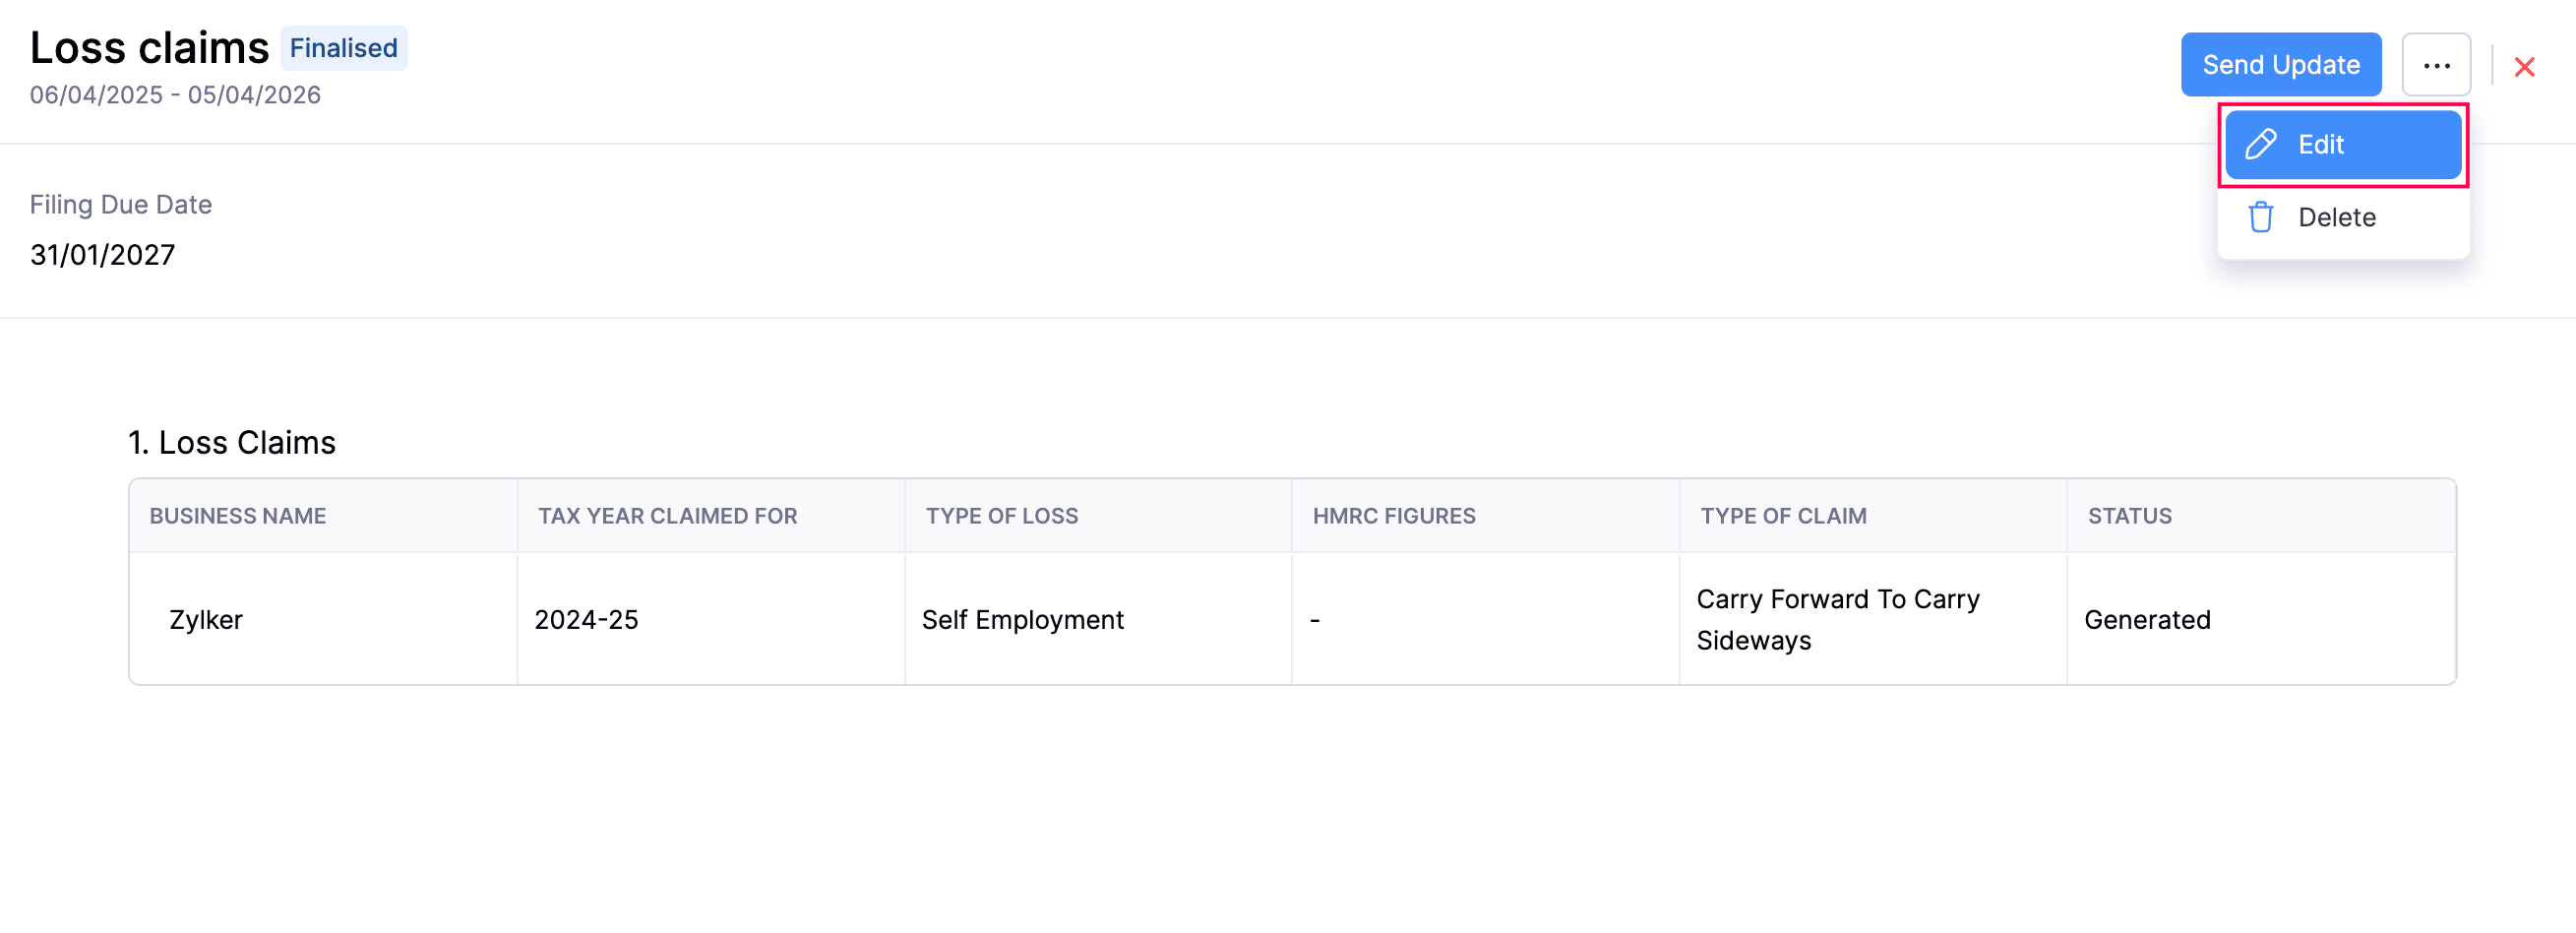
- In the confirmation pop-up that appears, click Continue to Edit.
- The status of the form will now change to Draft, and you can make the necessary changes.
- Click Save and Generate after making the required changes.
- In the confirmation pop-up, click Finalise Update.
The changes will now be updated and saved in Zoho Books.
To edit a Loss Claim form in the Submitted status:
Note:
If you edit a submitted Loss Claim in Zoho Books, the changes will also be reflected in the HMRC portal.
- Go to Filing & Compliance on the left sidebar and select Income Tax.
- Select the submitted Loss Claim form that you want to edit.
- Click the More icon in the top-right corner and select Edit.
- In the confirmation pop-up that appears, click Continue to Edit.
- The status of the form will now change to Draft, after which only the Type of Claim field will be available for editing. You can refer to the HMRC Figures column to view the type of claim that was submitted previously.
- Click Save and Generate after making the required changes.
- In the confirmation pop-up, click Finalise Update.
After editing the form, you have to submit it again.
You can track the amendment status of the form in the Status column of the Loss Claims table.
| Status | Description |
|---|---|
| Amended | The changes were submitted to HMRC successfully. |
| Amendment Failed | The changes could not be submitted to HMRC. Review the details and submit the form again. |
Delete Loss Claim Form
To delete a Loss Claim form in the Finalised status:
- Go to Filing & Compliance on the left sidebar and select Income Tax.
- Hover over the Loss Claim in the Finalised status.
- Click the dropdown that appears and select Delete.
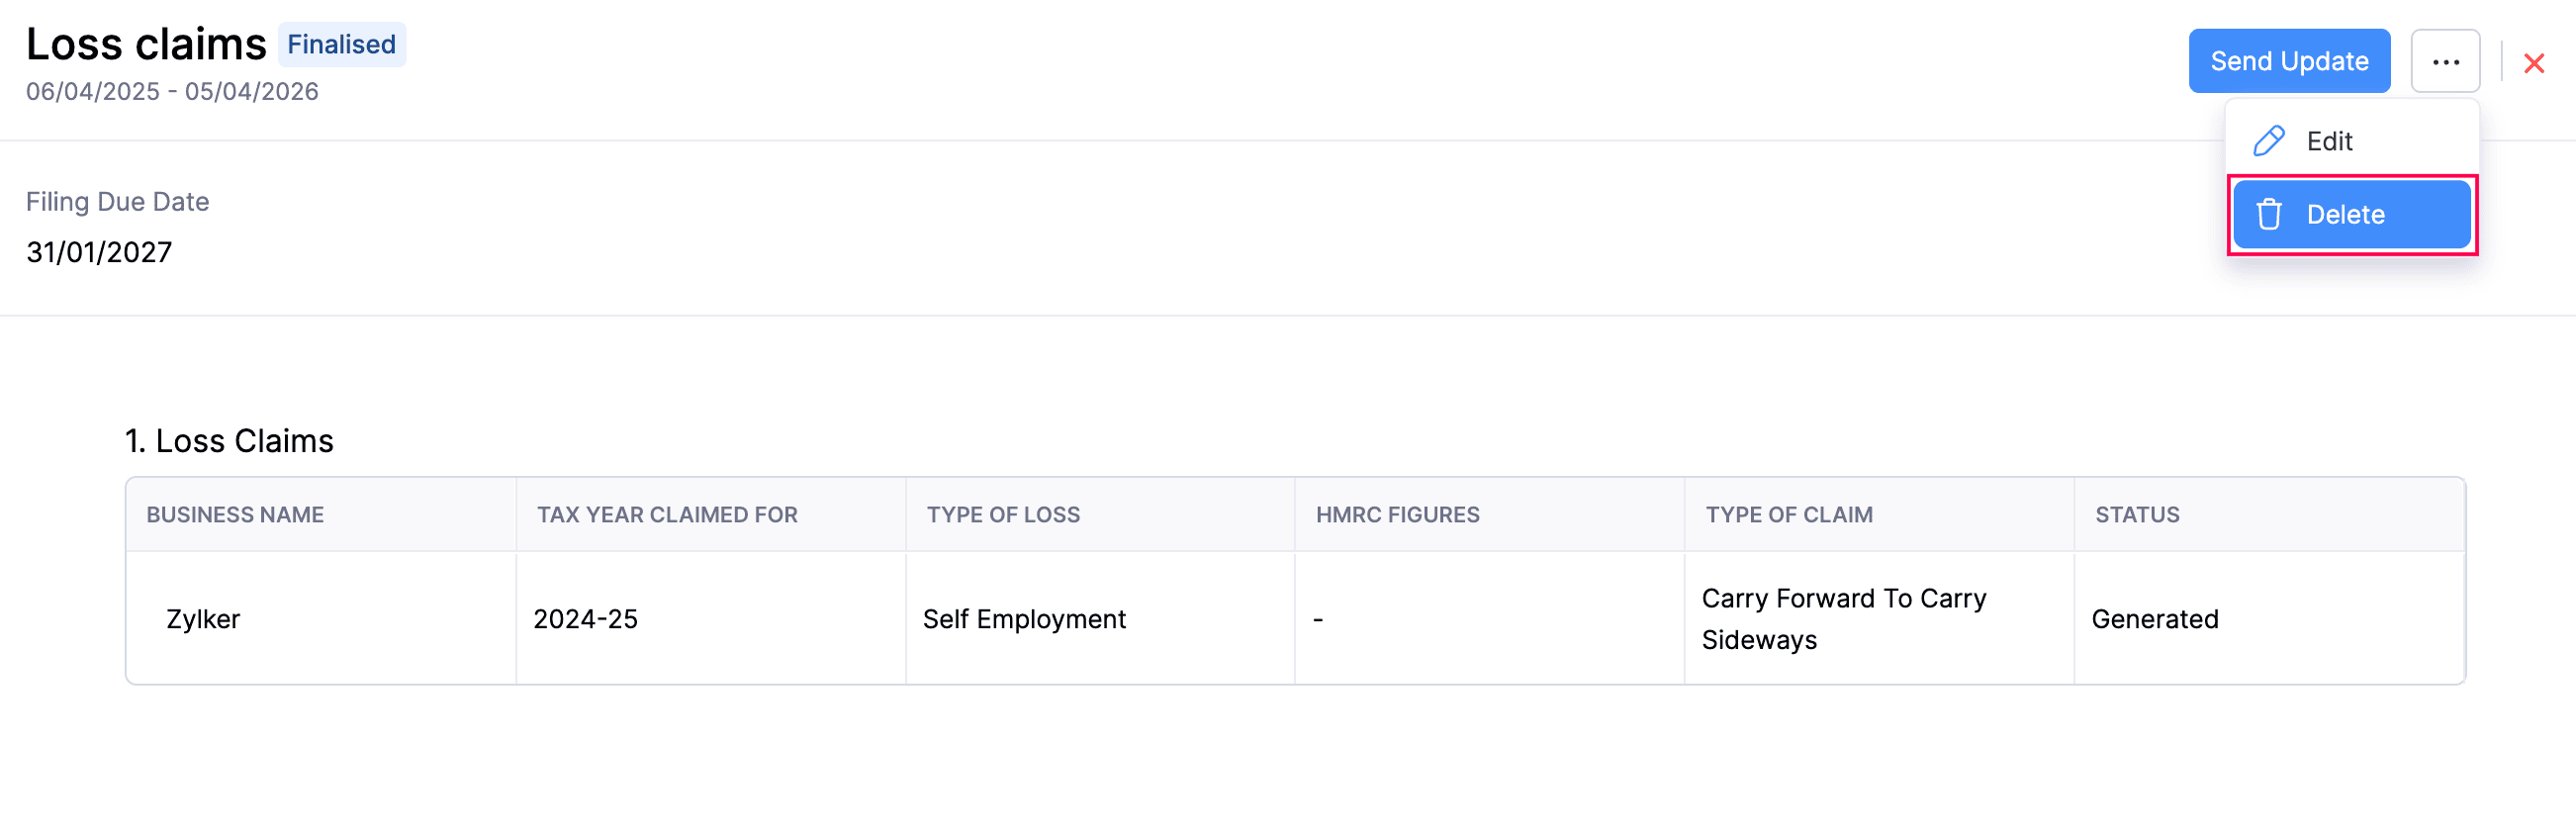
(or)
- Select the Loss Claim form that you want to delete.
- Click the More icon in the top-right corner and select Delete.
The form will now be deleted from Zoho Books.
To delete a Loss Claim form in the Submitted status:
Note:
If you delete a submitted Loss Claim in Zoho Books, the changes will also be reflected in the HMRC portal.
- Go to Filing & Compliance on the left sidebar and select Income Tax.
- Select the Loss Claim form in the Submitted status that you want to delete.
- Click the More icon in the top-right corner and select Delete.
The form deletion will now be initiated and you can track its status in the Status column of the Loss Claims table.
| Status | Description |
|---|---|
| Marked as Deleted | All the rows in the Loss Claim form were deleted successfully in the HMRC portal. |
| Deletion Failed | The Loss Claim form could not be deleted in the HMRC portal. Review the details and try deleting the form again. |
Submit Loss Claim Form
Once you’ve reviewed the details and finalised the form, you can submit it to HMRC. Here’s how:
- Go to Filing & Compliance on the left sidebar and select Income Tax.
- Select the Loss Claim form that you want to submit.
- On the Loss Claim page, click Send Update in the top-right corner.
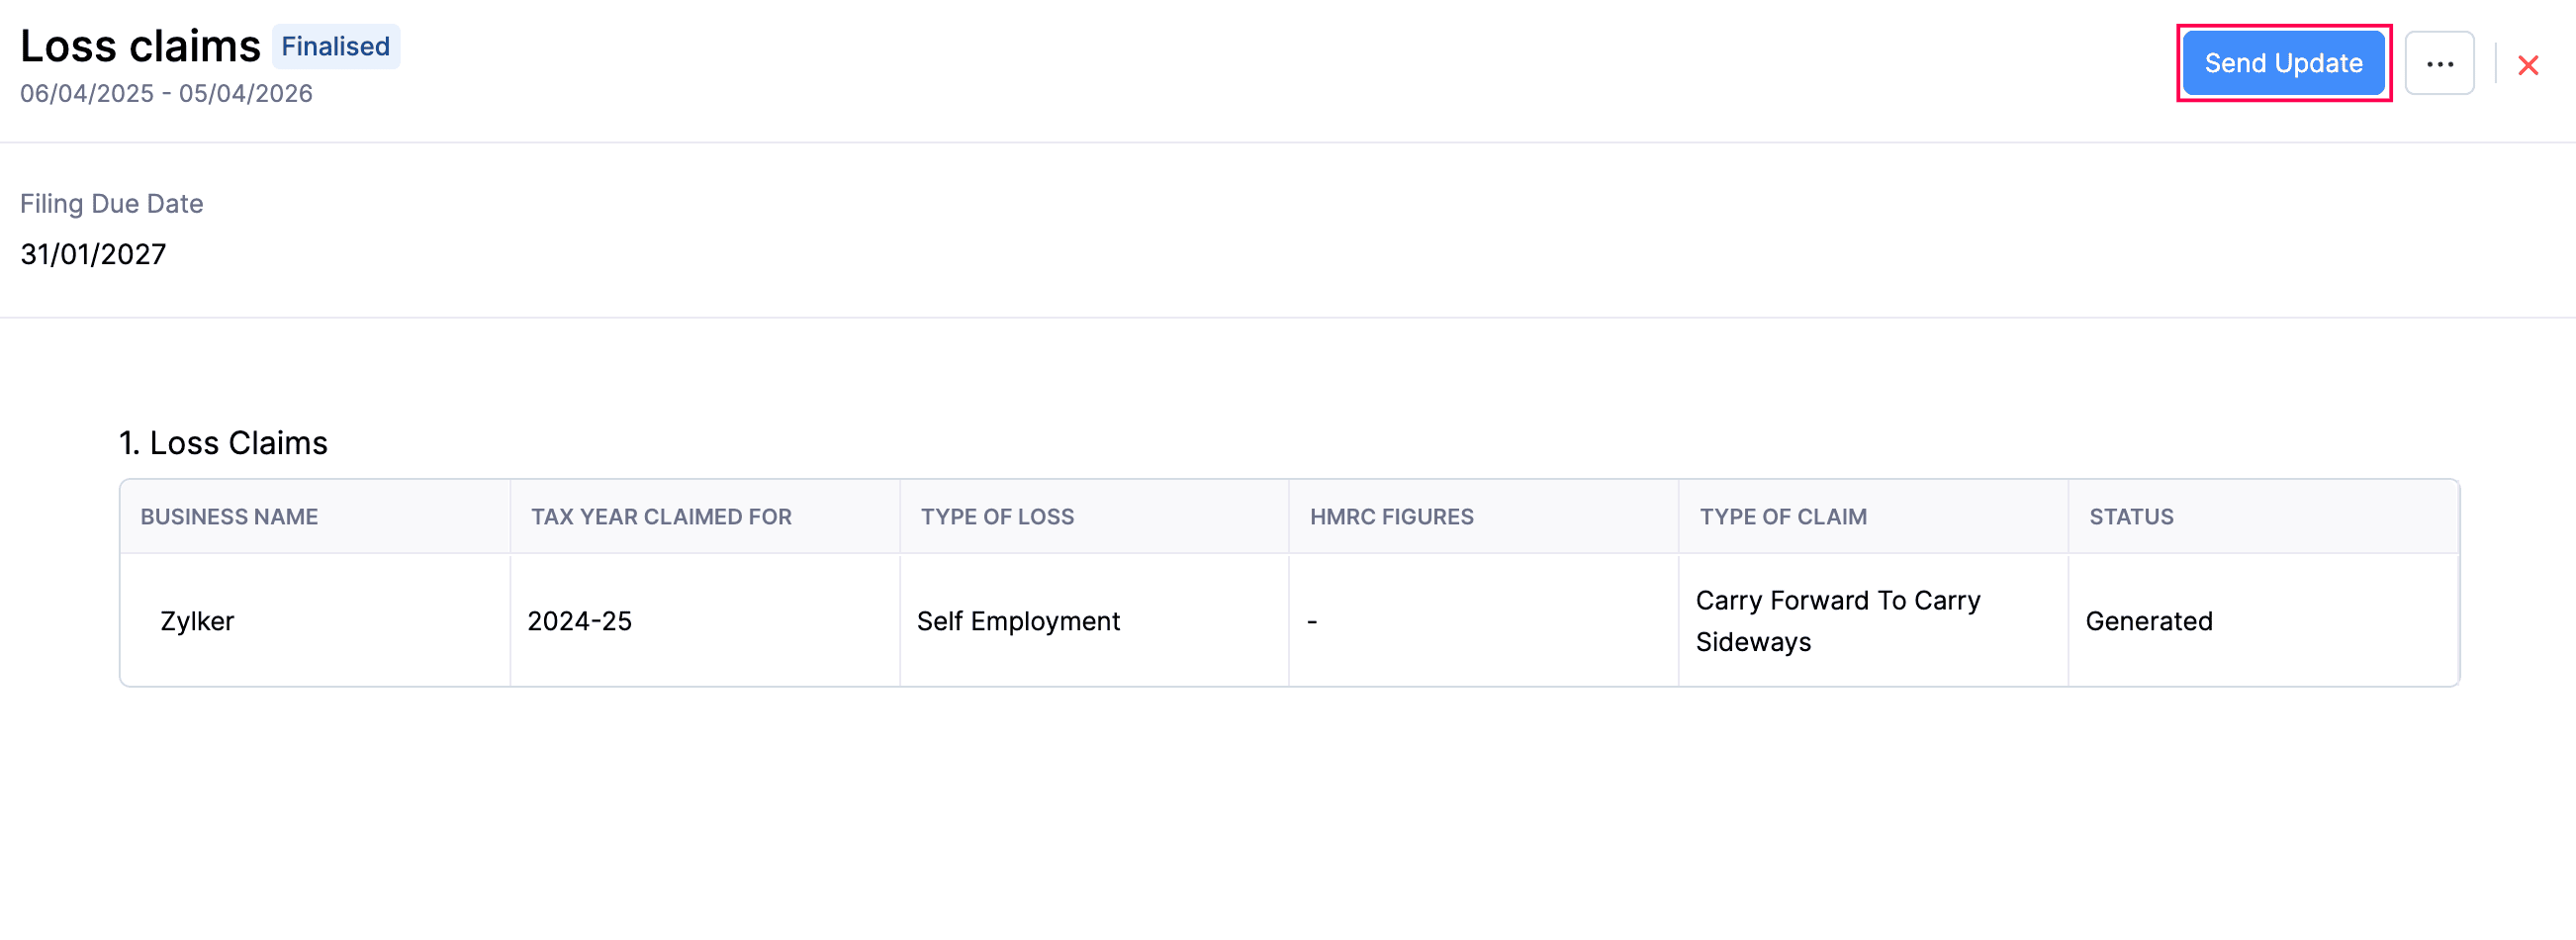
- In the confirmation pop-up, click Send Update again.
The Loss Claim form will now be submitted to HMRC.
After a Loss Claim is submitted to HMRC, it can have one of the following statuses:
| Status | Description |
|---|---|
| Submitted | The entire Loss Claim form was submitted to HMRC successfully. |
| Partially Submitted | The form contains multiple rows, and only some of them were submitted to HMRC. Review the form details, edit and submit the form again. |
| Submission Failed | None of the rows in the Loss Claim form were submitted to HMRC. Review the form details, edit and submit the form again. |
Insight:
If you realise that you missed a tax year after submitting the Loss Claim, you can edit the form and add a new row for that year. In this case, the previously submitted row will remain in the Submitted status, and the newly added row will be in the Generated status. When you submit the form again, the newly added row will also be submitted to HMRC.
 Yes
No
Yes
No
Thank you for your feedback!