
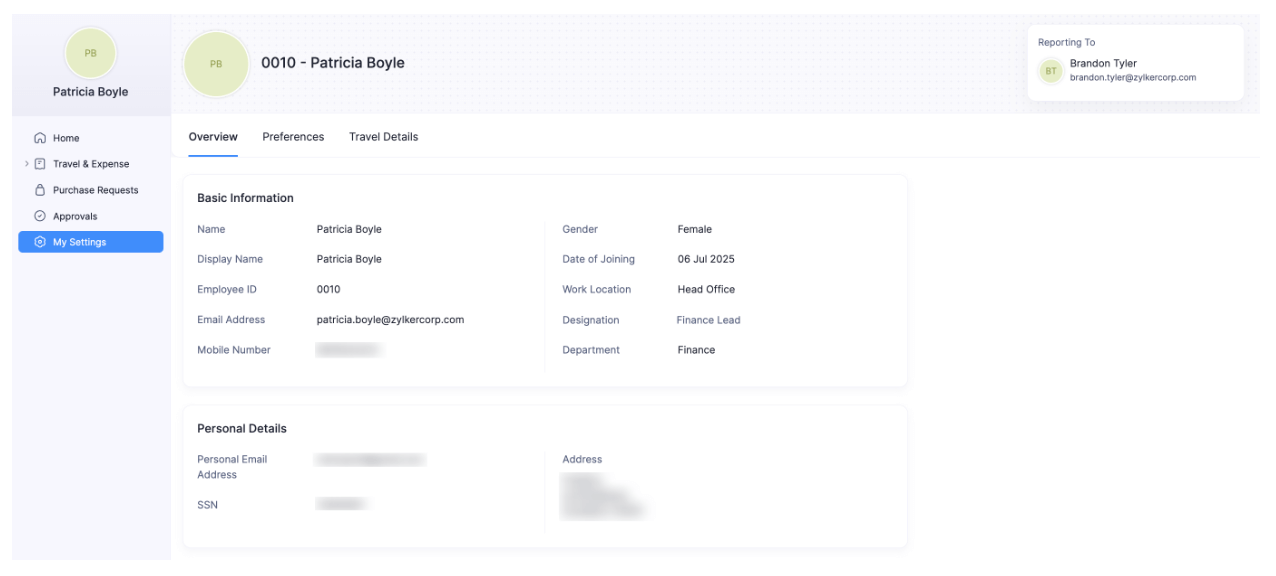
Basic Information
When inviting you to an organization, your admin would have added your basic information. In the Basic Information tab, you can view and update these details. You can also add additional information, such as your bank details, delegate, and out of office approver.
Personal Details
In this section, you can find your personal details such as your date of birth, personal email address, mobile number, and other personal details.
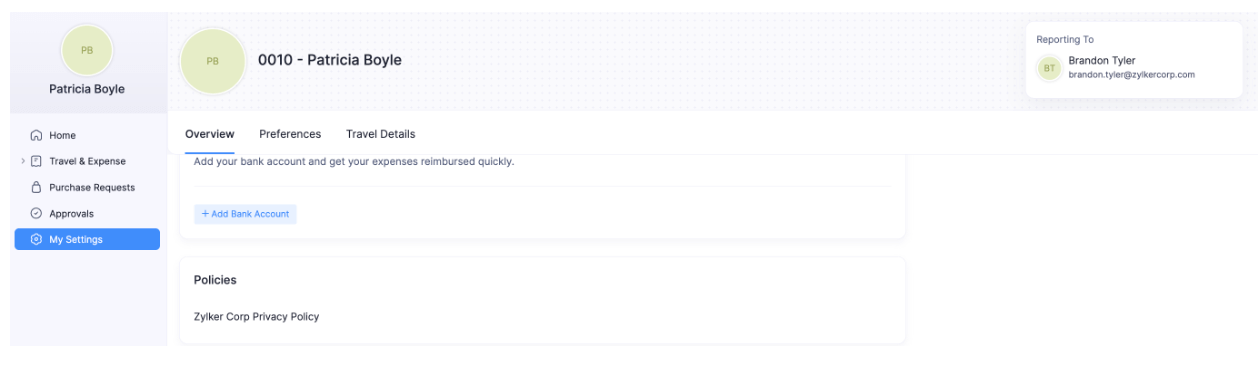
My Bank Account
In this section, you can add or update the bank account through which you would like to receive expense reimbursements and your salary.
Add Your Bank Account
To add your bank account:
- Click My Settings on the left sidebar.
- In the Basic Information tab, navigate to the My Bank Account section.
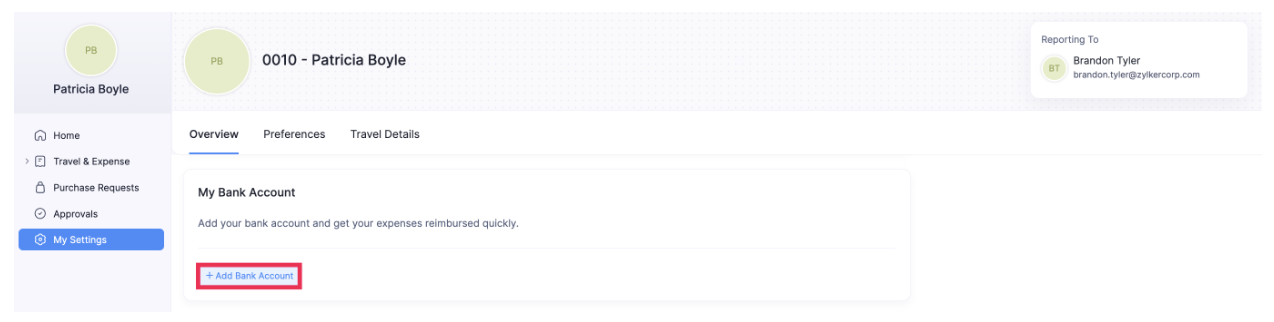
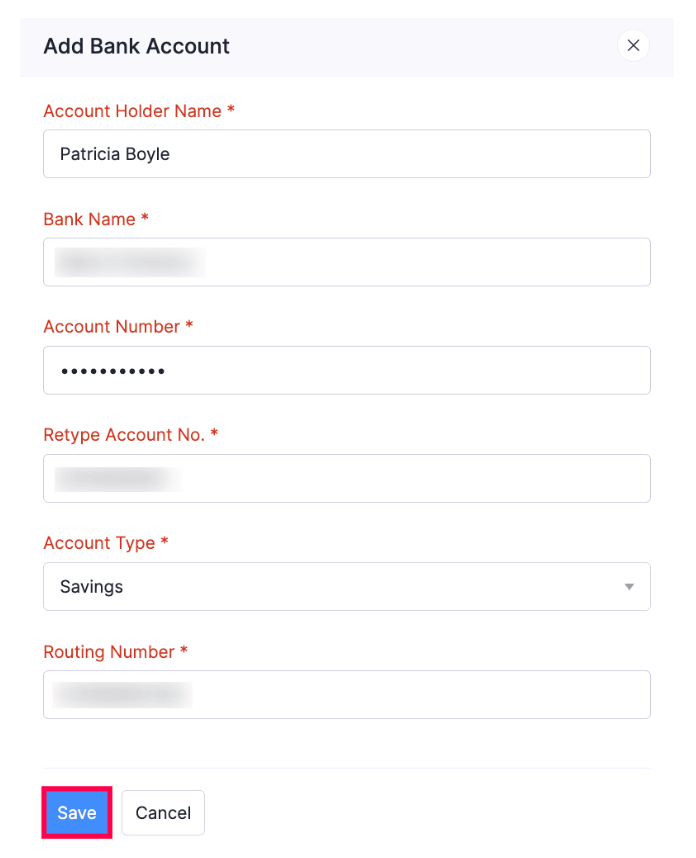
- Click + Add Bank Account. The Add Bank Account pop-up will open.
- Enter the Account Holder Name and Bank Name.
- Enter the Account Number and Retype Account No.
- Select the Account Type.
- Enter the Routing Number if you’re using the US edition of Zoho Spend.
- Enter the IFSC Code if you’re using the India edition of Zoho Spend.
- Click Save.
Edit Your Bank Account
To edit your bank account’s details:
- Click My Settings on the left sidebar.
- In the Basic Information tab, navigate to the My Bank Account section.
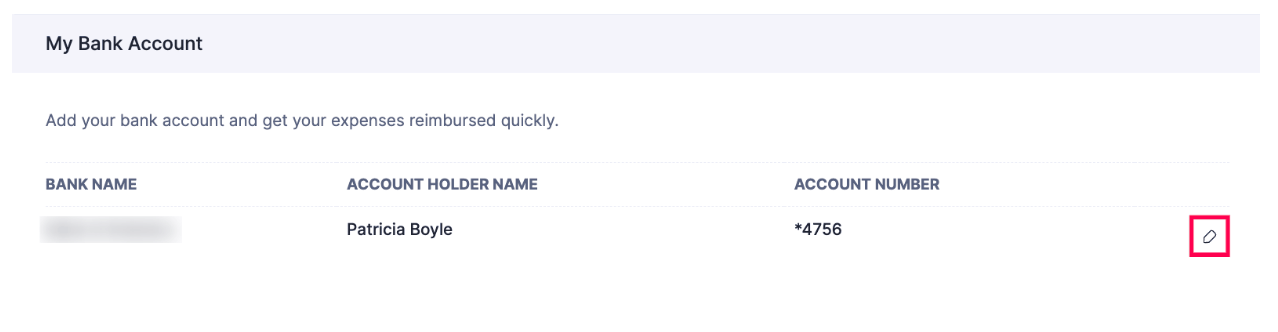
- Click the Edit icon next to your bank account. The Edit Bank Account pop-up will open.
- Make the necessary changes and click Save.
Delete Your Bank Account
To delete your bank account:
- Click My Settings on the left sidebar.
- In the Basic Information tab, navigate to the My Bank Account section.
- Click the Edit icon next to your bank account. The Edit Bank Account pop-up will open.
- Click Delete in the bottom right corner of the pop-up.
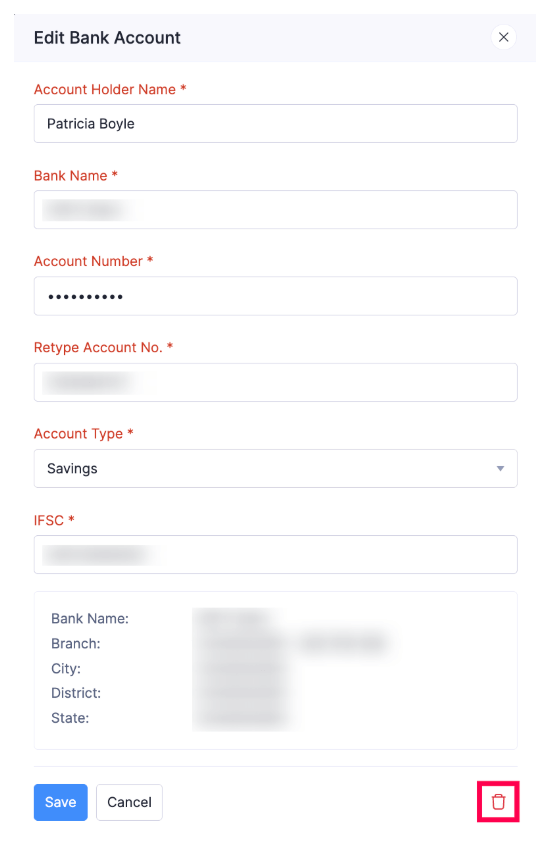
- Click Delete again in the pop-up that appears to confirm your action.
Policies
In this section, you can view the policies you’re associated with.
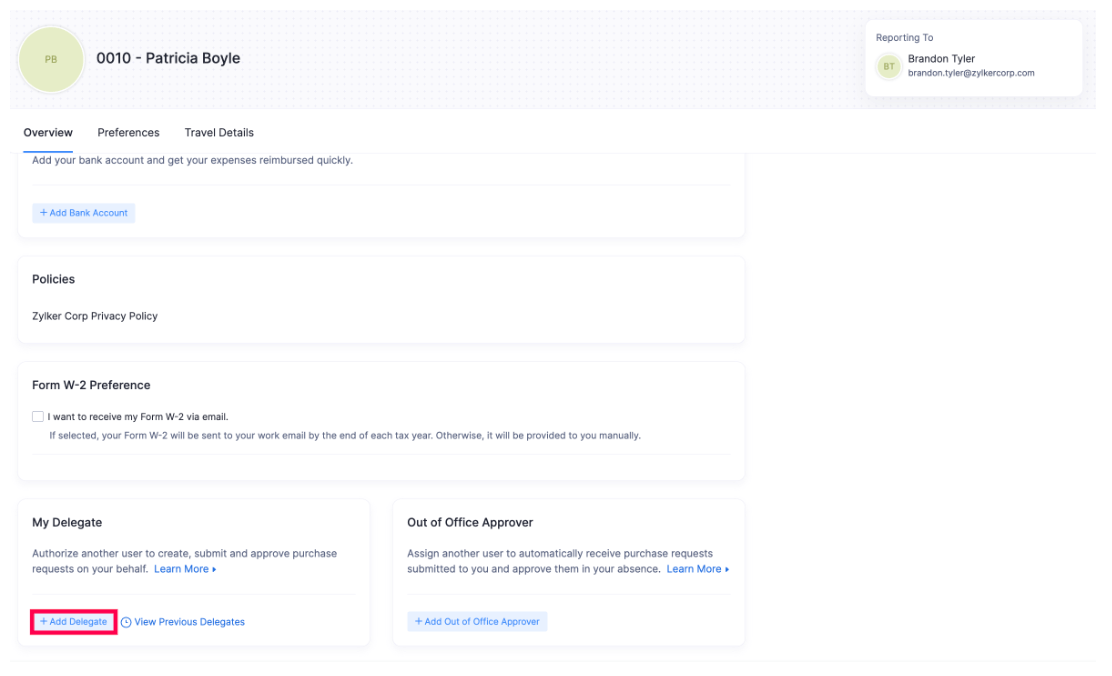
My Delegate
When you are away from the office, Zoho Spend allows you to delegate your expense reporting tasks to another employee without sharing your login credentials. You can easily grant access to your view and configure the duration for which the delegate will have access. Let’s consider a scenario to understand this better.
Scenario: Patricia is the business head of Zylker Ltd. She plans to organize an important business meeting at her office. Due to her busy schedule, she wants her assistant to track all the expenses incurred while organizing the meeting and to report the same. To do this, Patricia sets up the delegation workflow in Zoho Spend and adds her assistant as a delegate by providing access for her to record the expenses incurred during the business meeting.
Abilities of a Delegate
Once you have added a delegate, the delegate can start performing tasks on your behalf. Let’s look into all the abilities of a delegate based on their access type.
Submit Access
A delegate with submit access cannot view the delegator’s transactions which are in Approved and Reimbursed statuses.
The delegates will be able to view and access the following modules:
- Trips
- Expenses
- Reports
- Cards
- Advances
- Purchase Requests
A delegate with submit access can perform the following actions and view the following transactions:
| Module | Actions | View |
|---|---|---|
| Trips | Create and submit trips | 1. Trips created by the delegator in Draft, Awaiting Approval, Recalled, and Rejected statuses. 2. Trips in all statuses created by the delegate. |
| Expenses | Create new expenses and add them to reports. | 1. Expenses created by the delegator in Unreported, Unsubmitted, Awaiting Approval, and Rejected statuses. 2. Expenses in all statuses created by the delegate. |
| Reports | Create and submit reports. | 1. Reports created by the delegator in Draft, Awaiting Approval, Recalled, and Rejected statuses. 2. Reports in all statuses created by the delegate. |
| Cards | Categorize and match transactions. | 1. All corporate cards associated to the delegator. |
| Advances | Record or request advances. | 1. Unreported advances requested by the delegator. 2. All advances recorded by the delegate. |
| Purchase Requests | Create and submit purchase requests. | 1. Purchase request created by the delegator in the Awaiting Approval, Approved, and Rejected statuses. 2. Purchase requests in all statuses created by the delegate. |
Approve Access
The delegates with approve access will be able to view and access the Approvals module. They can perform the following actions and view the following transactions:
| Module | Actions | View |
|---|---|---|
| Approvals | 1. Approve or reject trips. 2. Update, close, or cancel the trip. 3. Approve or reject reports. 4. Apply advances to reports. 5. Approve or reject advances. 6. Approve or reject purchase requests. | 1. Trips submitted to the delegator. 2. Trips approved or rejected by the delegate. 3. Reports submitted to the delegator. 4. Reports approved or rejected by the delegate. 5. Advances requested to the delegator. 6. Purchase requests submitted to the delegator. 7. Purchase requests approved or rejected by the delegate. |
Submit and Approve Access
This delegate will have access to all the modules that a delegate with Submit Access and Approve Access has.
Add a Delegate
You can assign a delegate who can perform tasks on your behalf. You can add only one delegate for yourself. However, you can be a delegate to any number of employees. If you’re an employee with the Submitter role, you can provide only submit access to your delegates.
To give access to a delegate:
- Click My Settings on the left sidebar.
- In the Basic Information tab, navigate to the My Delegate section.
- Click + Add Delegate.
- Click the employee to whom you want to give the delegate access under the Delegate Access to field.
- Enter the Start Date and End Date for the delegate access.
Note: If you do not specify an end date, the date will be set as indefinite, that is, the delegate will have access until you revoke it manually.
- Select the Access Type. You can choose from Submit Access, Approve Access, and Submit and Approve Access.
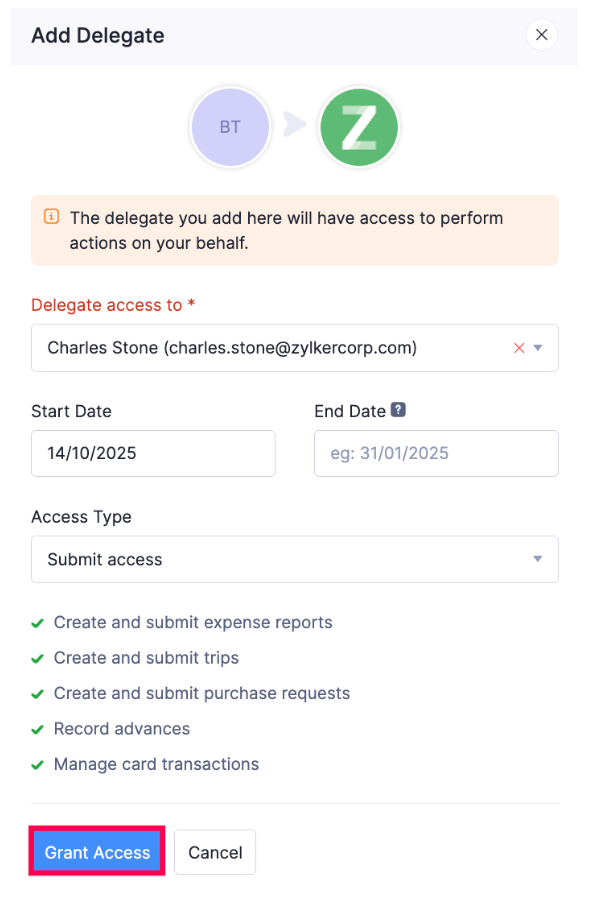
- Click Grant Access.
Acting as a Delegate
To act as a delegate for a employee, you need to switch to the delegate’s view. The Delegate’s View in Zoho Spend refers to what the delegate (the person to whom tasks are delegated) can see in the delegator’s (the person who delegates) account. Once you’ve been added as a delegate, you can switch from your view to the delegate’s view and perform actions on behalf of your delegator.
Switch to Delegate View
To switch to the delegate’s view:
- Click the profile picture in the top right corner.
- Click Delegated To Me.
- Select the employee for whom you want to perform actions. You will be taken to the Delegate’s View.
- If you want to switch back to your view, click Switch To My View at the top of the page.
OR
- Click the profile picture in the top right corner and click Switch To My View. You will be taken back to your account.
After switching to the delegate’s view you can perform actions such as creating expenses, submitting reports, and other actions on behalf of your delegator, based on the access given to you.
Update Delegate Access
Once you’ve added a delegate, you can update the access permissions given to them or change the delegate. Here’s how:
- Click My Settings on the left sidebar.
- In the Basic Information tab, navigate to the My Delegate section.
- Click the Edit icon next to your delegate.

- To change the delegate, select another employee under the Delegate access to field.
- Change the Access Type and End Date, if required.
- Click Update Access.
End Delegate Access
You can end the delegate access given to a employee. Here’s how:
- Click My Settings on the left sidebar.
- In the Basic Information tab, navigate to the My Delegate section.
- Click the Edit icon next to your delegate.
- Click End Access.

- Click End Access again in the pop-up that appears to confirm your action.
Out-Of-Office Approver
If you’re going on a vacation or caught up with business meetings, you can assign another approver to approve transactions on your behalf. When you assign an out of office approver, all the transactions that are submitted to you will be auto-forwarded to them, and they can use the Approvals tab to approve your transactions. Besides approving the transactions that are auto-forwarded to them, an out of office approver can also perform other actions such as editing transactions, forwarding transactions, etc., that an approver or an admin can normally perform in their Approvals module.
Unlike delegates, out of office approvers need not switch between views. Once an out of office approver is appointed, all the transactions will be automatically forwarded to their account. You can also configure the duration after which the transactions will cease to be auto-forwarded to your out of office approver. Your out of office approver will be the approver of all the transactions that are auto-forwarded from your account during the configured duration.
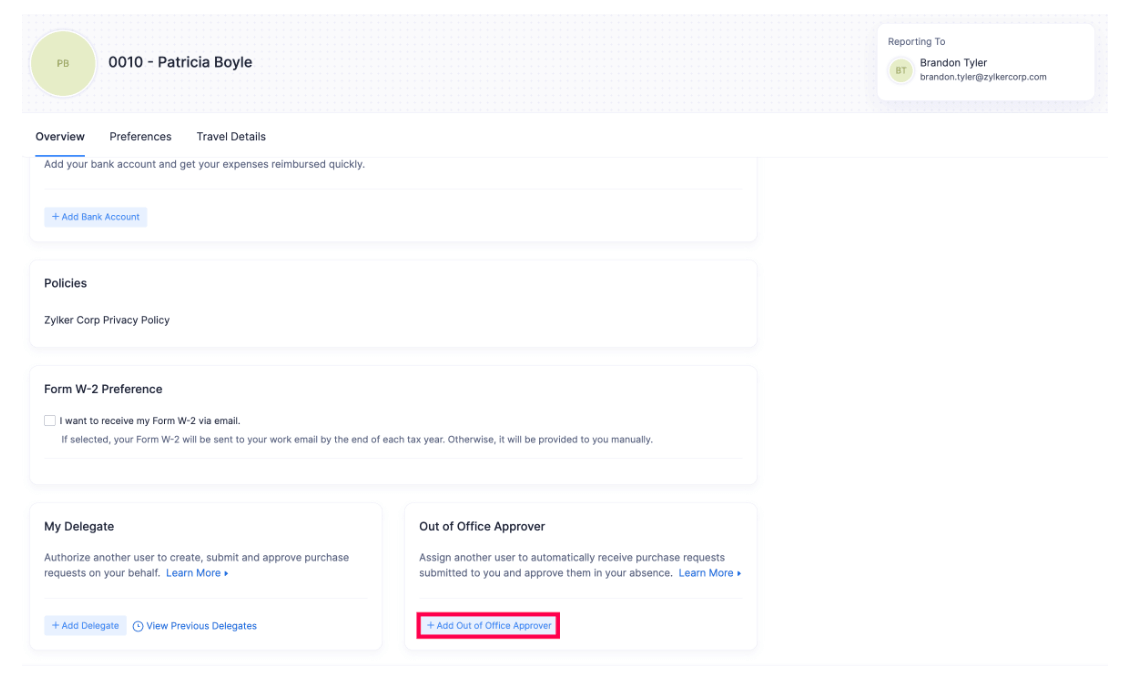
Add Out Of Office Approver
Prerequisite: Only approvers and admins can be appointed as out of office approvers. You can add only one out of office approver for yourself.
To add an out of office approver:
- Click My Settings on the left sidebar.
- In the Basic Information tab, navigate to the Out of Office Approver section.
- Click + Add Out Of Office Approver.
- Select the employee you want to appoint as your out of office approver in the User Name field.
- Select a Start Date and an End Date, after which the access given to your out of office approver will expire.
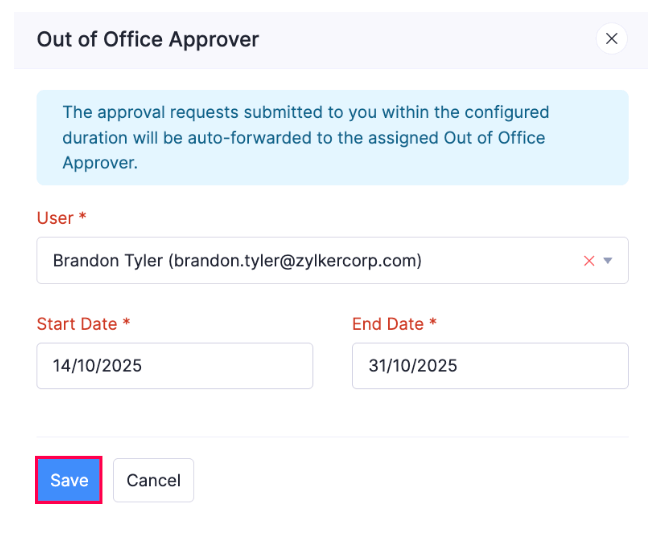
- Click Save. All the transactions that will be submitted to you during the configured duration will be automatically forwarded to your out of office approver.
Change Out Of Office Approver
You can change the out of office approver that you’ve already appointed or you can have update the duration of access given to the current out of office approver. Here’s how:
- Click My Settings on the left sidebar.
- In the Basic Information tab, navigate to the Out of Office Approver section.
- Click the Edit icon next to your out of office approver.
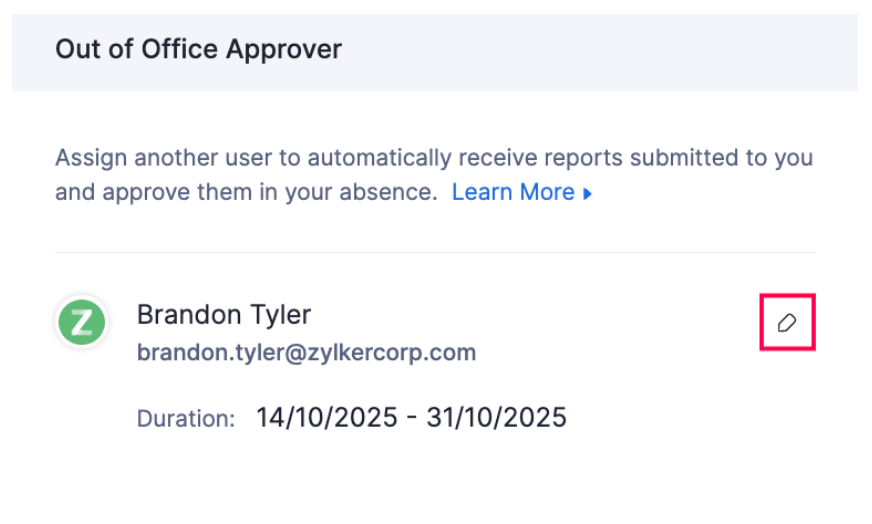
- Modify the access duration or change your out of office approver.
- Click Save.
Delete Out Of Office Approver
You can delete the out of office approver you’ve added. Here’s how:
- Click My Settings on the left sidebar.
- In the Basic Information tab, navigate to the Out of Office Approver section.
- Click the Edit icon next to your out of office approver.
- Click the Delete icon in the bottom right corner.
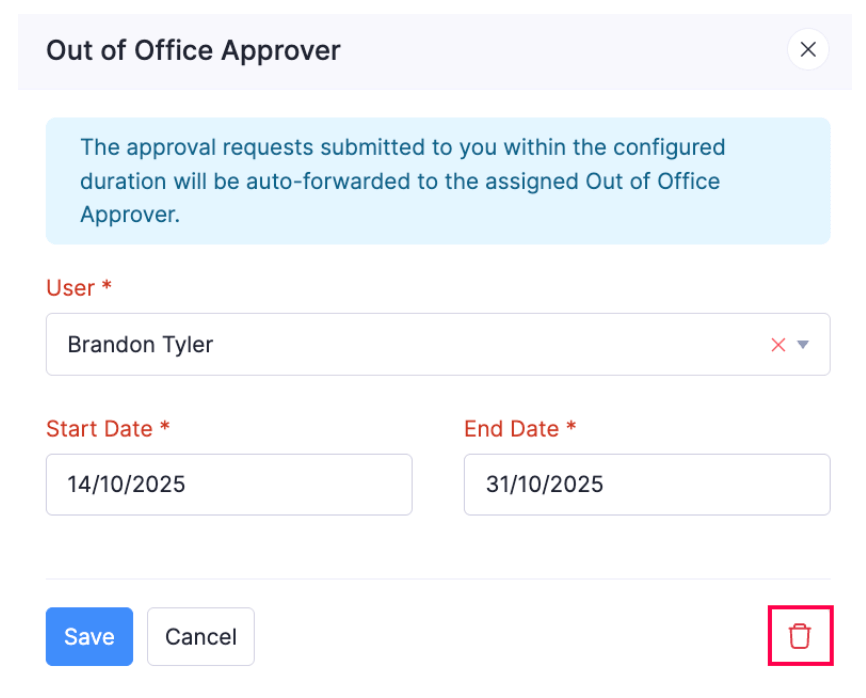
- Click Delete again in the pop-up that appears to confirm your action.