
Custom Approval
Note: You can set Custom Approval only for the Trips, Reports, Advances, Purchase Requests, Request for Quotes, Purchase Orders, Purchase Receives, Bills, and Vendor Credits modules.
Custom Approvals in Zoho Spend allows admins to create flexible approval workflows based on specific business requirements. Instead of following a fixed approval path, you can define custom rules and conditions that determine who should approve a transaction.
Scenario: Patricia, an employee at Zylker Corp, is working on a project. Her manager wants all the expenses related to this project to be reviewed and approved by the Project Head, instead of going through the default approval path.
In this case, instead of changing Patricia’s default approver, you can set up custom approval to ensures that any expense Patricia submits under that project is submitted to the Project Head for approval.
Create Custom Approval
To enable and create a new custom approval flow:
- Go to Settings on the left sidebar.
- Click the module for which you want to set custom approval.
- Go to the Approvals tab.
- Click Custom Approval.
- Click + New Custom Approval.

Choose the Criteria
You can configure the criteria based on which, the approval flow will be triggered. Trigger criteria can be set using parameters specific to each module. By defining values for these parameters, you can set conditions that, when met, automatically trigger the approval flow.
Approval Flow
Custom approval uses a level-based hierarchy, that is, you can set up multi-level approvals. The submitted record will first have to get approved by the Level one Approver, followed by the Level two Approver, and so on. You can select any of the following approvers to configure an approval flow:
- Submits To: The default approver of the user. It follows the reporting hierarchy in your organization.
- Choose an approver manually: Select an approver manually from the existing users.
- Project Head: Select this option if a particular report is associated with a project and needs the approval of the project head.
- Project Heads of Expenses: The Project Heads of all the expenses in a report or a trip.
- Project Heads of Purchase Request Items: The Project Heads associated with the line items of the purchase request.
- Department Head of the logged-in user: The head of the department to which the owner of the report belongs.
- Department Head: The approver will be the department head of the department you choose.
- Designation-Hierarchy: The approver will be the first user mapped in the Submits To field hierarchy of the report owner who is assigned in the mentioned designation.
- Choose a Lookup Field: The approver will be the user selected in the lookup custom field you have chosen.
- You can remove any approval level by clicking the (-) icon in the right corner of the flow.
- Click Save.
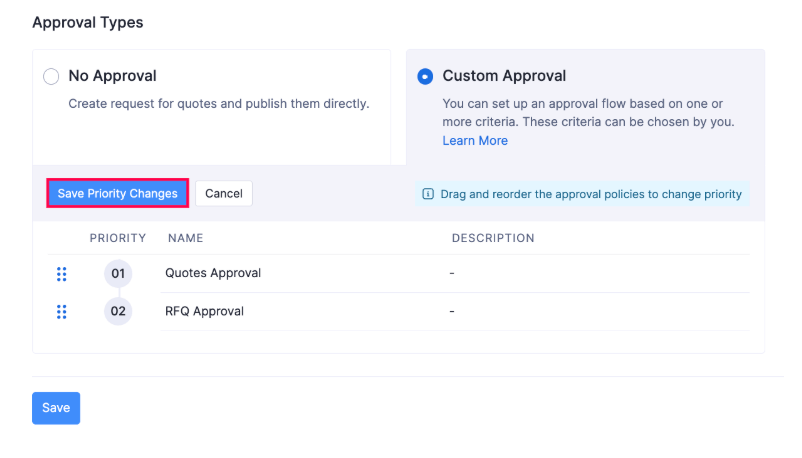
Prioritize an Approval Flow
In some cases, the records might fulfil the criteria of more than one approval flow. In such cases, you can choose which approval flow should be triggered first by prioritizing the approval flows.
To prioritize an approval flow:
- Go to Settings on the left sidebar.
- Click the module for which you want to prioritize the custom approval flow.
- Go to the Approvals tab.
- Click Change Priority. Drag and reorder the approval flow such that it comes at a higher level than the rest. The approval flow with priority number 1 will be prioritized over the other approval flows.
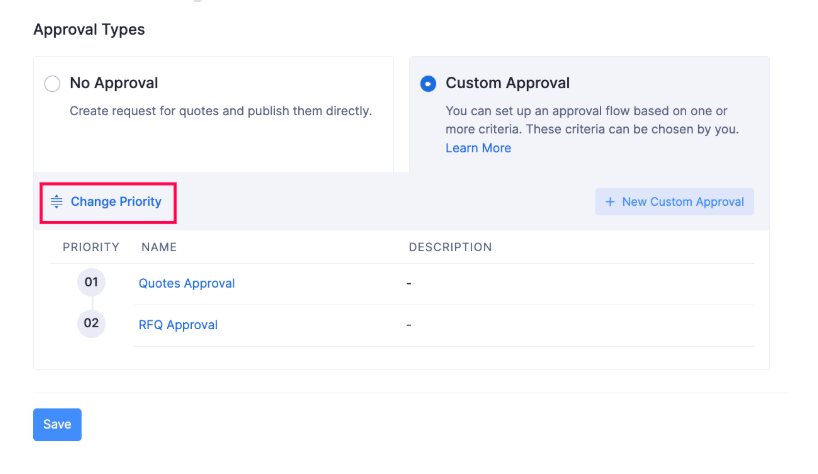
- Click Save Priority Changes.
Set up Multiple Criteria
You can set up multiple criteria on AND (or) OR basis. You can set up to 10 criteria based on several conditions and limits.
For example, let’s say an admin creates a custom approval where he sets the criteria based on AND (or) OR:
AND: When report total > ‘2000’ (AND) Customer is ‘Zylker Global’. In this case, the custom approval will be triggered only if the report total is > 2000 AND if the customer is Zylker Global.
OR: When Project is ‘Web Design’ (OR) Owner of the Report is ‘Mark’. In this case, the policy will be triggered if either the project is Web Design OR if the Owner of the report is Mark.
To set up multiple criteria:
- Go to Settings on the left sidebar.
- Click the module for which you want to set multiple criteria to trigger the custom approval flow.
- Go to the Approvals tab.
- Click + Add Criteria to add a new criteria. Configure the criteria.
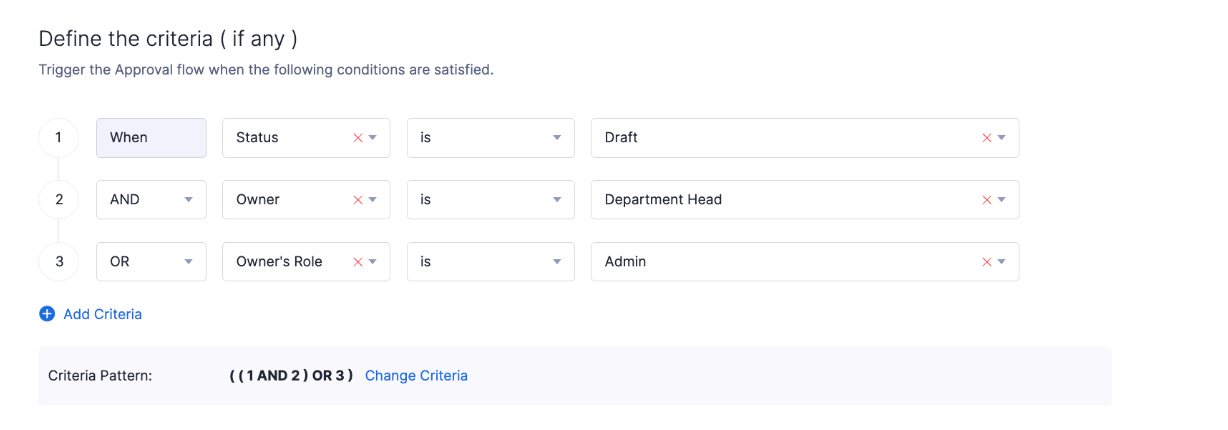
- You can also manually edit the criteria by clicking Change Criteria. Type your preferred criteria pattern, for example, (1 AND 2), ((1 AND 2 ) OR 3), etc and click Save.

- You can remove a criteria by clicking the (-) icon at the right corner of the criteria.
- Click Save.
The approval flow will be triggered on satisfying the multiple criteria you have set.
Edit an Approval Flow
Here’s how you can edit an existing custom approval flow:
- Go to Settings on the left sidebar.
- Click the module for which you want to edit the custom approval.
- Go to the Approvals tab.
- Click the More icon at the right corner of the approval flow.
- Select Edit.
- Make the necessary changes and click Save.
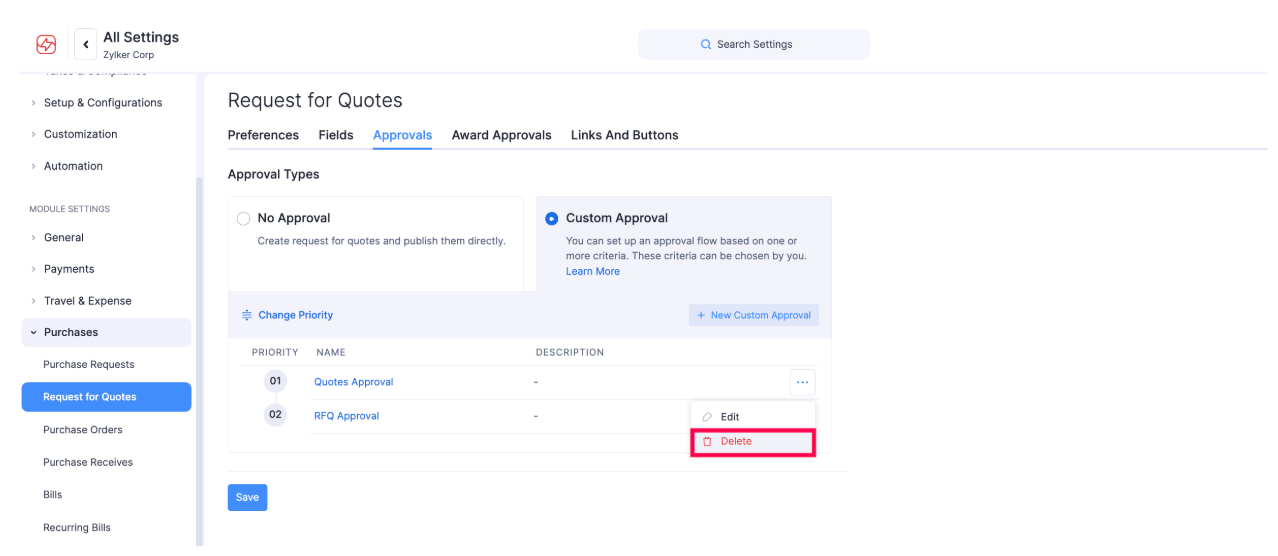
Delete an Approval Flow
Here’s how you can delete an existing custom approval flow:
- Go to Settings on the left sidebar.
- Click the module for which you want to delete the custom approval.
- Go to the Approvals tab.
- Click the More icon at the right corner of the approval flow.
- Select Delete.
- Confirm your action by clicking Delete again in the pop-up.