e-Invoicing
The Zakat, Tax and Customs Authority (ZATCA) in the Kingdom of Saudi Arabia (KSA) has mandated e-Invoicing for all registered tax payers starting from 4 December 2021. This process will be rolled out in two phases, with the first phase commencing from 4 December 2021 and the second phase from 1 January 2023.
In the first phase, registered tax payers are expected to generate e-invoices based on the regulations provided by ZATCA. To help facilitate this, Zoho Books is fully equipped to deal with the new regulations. Here’s what you can do to stay compliant:
Enable e-Invoicing
The e-Invoicing feature will be enabled for all the organisations by default from 1 December 2021. If you would like to enable it before that:
- Click Settings on the top right corner of the page.
- Click e-Invoicing under Taxes & Compliance.
- Slide the toggle next to e-Invoicing in Zoho Books to Enabled.
Note:You will not be able to disable e-Invoicing in your organisations from 4 December 2021.

e-Invoicing Template
As per the ZATCA regulations, invoices must be in Arabic and certain fields are mandatory. To comply with this, you can select a standard e-invoice template and mark it as default. Here’s how:
- Click Settings on the top right corner of the page.
- Click PDF Templates under Customisation.
- In the PDF Templates pane, click Invoices.
- Click the Gear icon in the standard e-invoice template and click Set as Default from the dropdown.

Similarly, you can also set simplified e-Invoice as the default retail template if required.
Configure Customers
To create an e-invoice, you’ll have to configure your customer’s addresses in Arabic. Here’s how:
- Go to Sales from the left sidebar and click Customers.
- Click + New in the top right corner to create a new customer or select an existing customer and click the Edit button to edit their details.
- Enter the necessary details in Arabic. You can add the details in an additional language along with Arabic as well.
- Go to the Address section and ensure that all the fields are filled and are in Arabic. If you wish to have the address in both English and Arabic, you can separate it with “/”. i.e., Saudi Arabia/المملكة العربية السعودية.

- Click Save.
Create e-invoices
Prerequisite:Ensure that you’ve entered the Organisation ID and all the organisation fields in Settings > Organisation > Profile.
Once you’ve marked the required e-Invoice template as default and have configured customers, you can start creating invoices from the Invoices module. Here’s how:
- Go to Sales from the left sidebar and click Invoices.
- Click the + New icon in the top right corner of the page.
- Enter the required details and click Save.

Warning: Ensure that the details entered in the invoice are correct as you cannot edit or delete the invoice once it has been marked as Sent.
Points to remember:
- It is mandatory that the invoice should be in Arabic. However, you can add another language alongside the Arabic text, as mentioned above.
- A physical invoice that has been copied or scanned is not considered an e-invoice.
- e-Invoicing is applicable for all taxable goods and services.
- The invoices must be in a sequential order. The sequence should not be changed.
- Once an invoice has been marked as Sent, the values displayed in the PDF cannot be edited and the invoice cannot be deleted. Instead, you can create a corresponding debit or credit note if you need to make any adjustments.
Edit or Delete e-Invoices
If you’ve entered the wrong amount or there’s been a change in the invoice amount, you cannot delete or edit it once it has been marked as Sent. To rectify the error, you can either create a debit note or a credit note.
Let’s say you’ve created an incorrect invoice for SAR 400/- instead of SAR 350/- you cannot edit or delete this invoice. To correct this error , you can create a credit note for SAR 50/-. Likewise, if you created an invoice for SAR 50/- instead of SAR 500/- you can create a debit note for SAR 450/-.
To create a debit or credit note:
- Go to Sales from the left sidebar and click Invoices.
- Select the invoice with the incorrect amount.
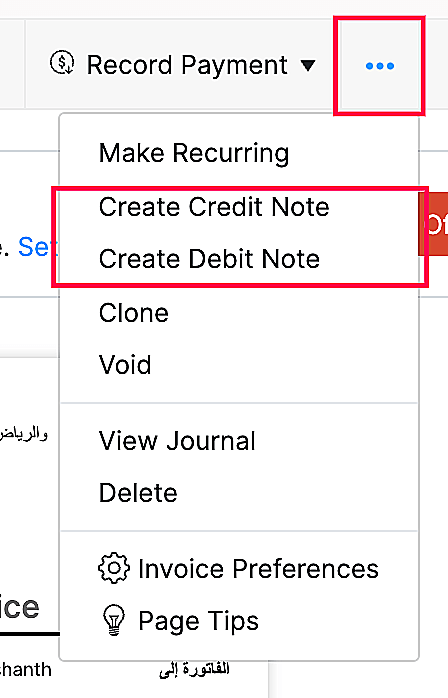
- Click the Ellipsis icon in the top corner of the page.
- Select Create Debit note if you wish to increase the invoice amount or Create Credit note if you wish to decrease the invoice amount.

- Enter the necessary details in the following page and click Save.

