
Generate e-Way Bills
Let’s look at how you can generate e-Way Bills in Zoho Books.
Enable e-Way Bills
To generate e-Way Bills, you should first enable the e-Way Bills module in your Zoho Books organization. Here’s how:
- Go to Settings.
- Navigate to Organization Settings.
- Select e-Way Bills under Taxes & Compliance.
- Click Enable in the top right corner of the e-Way Bills page.
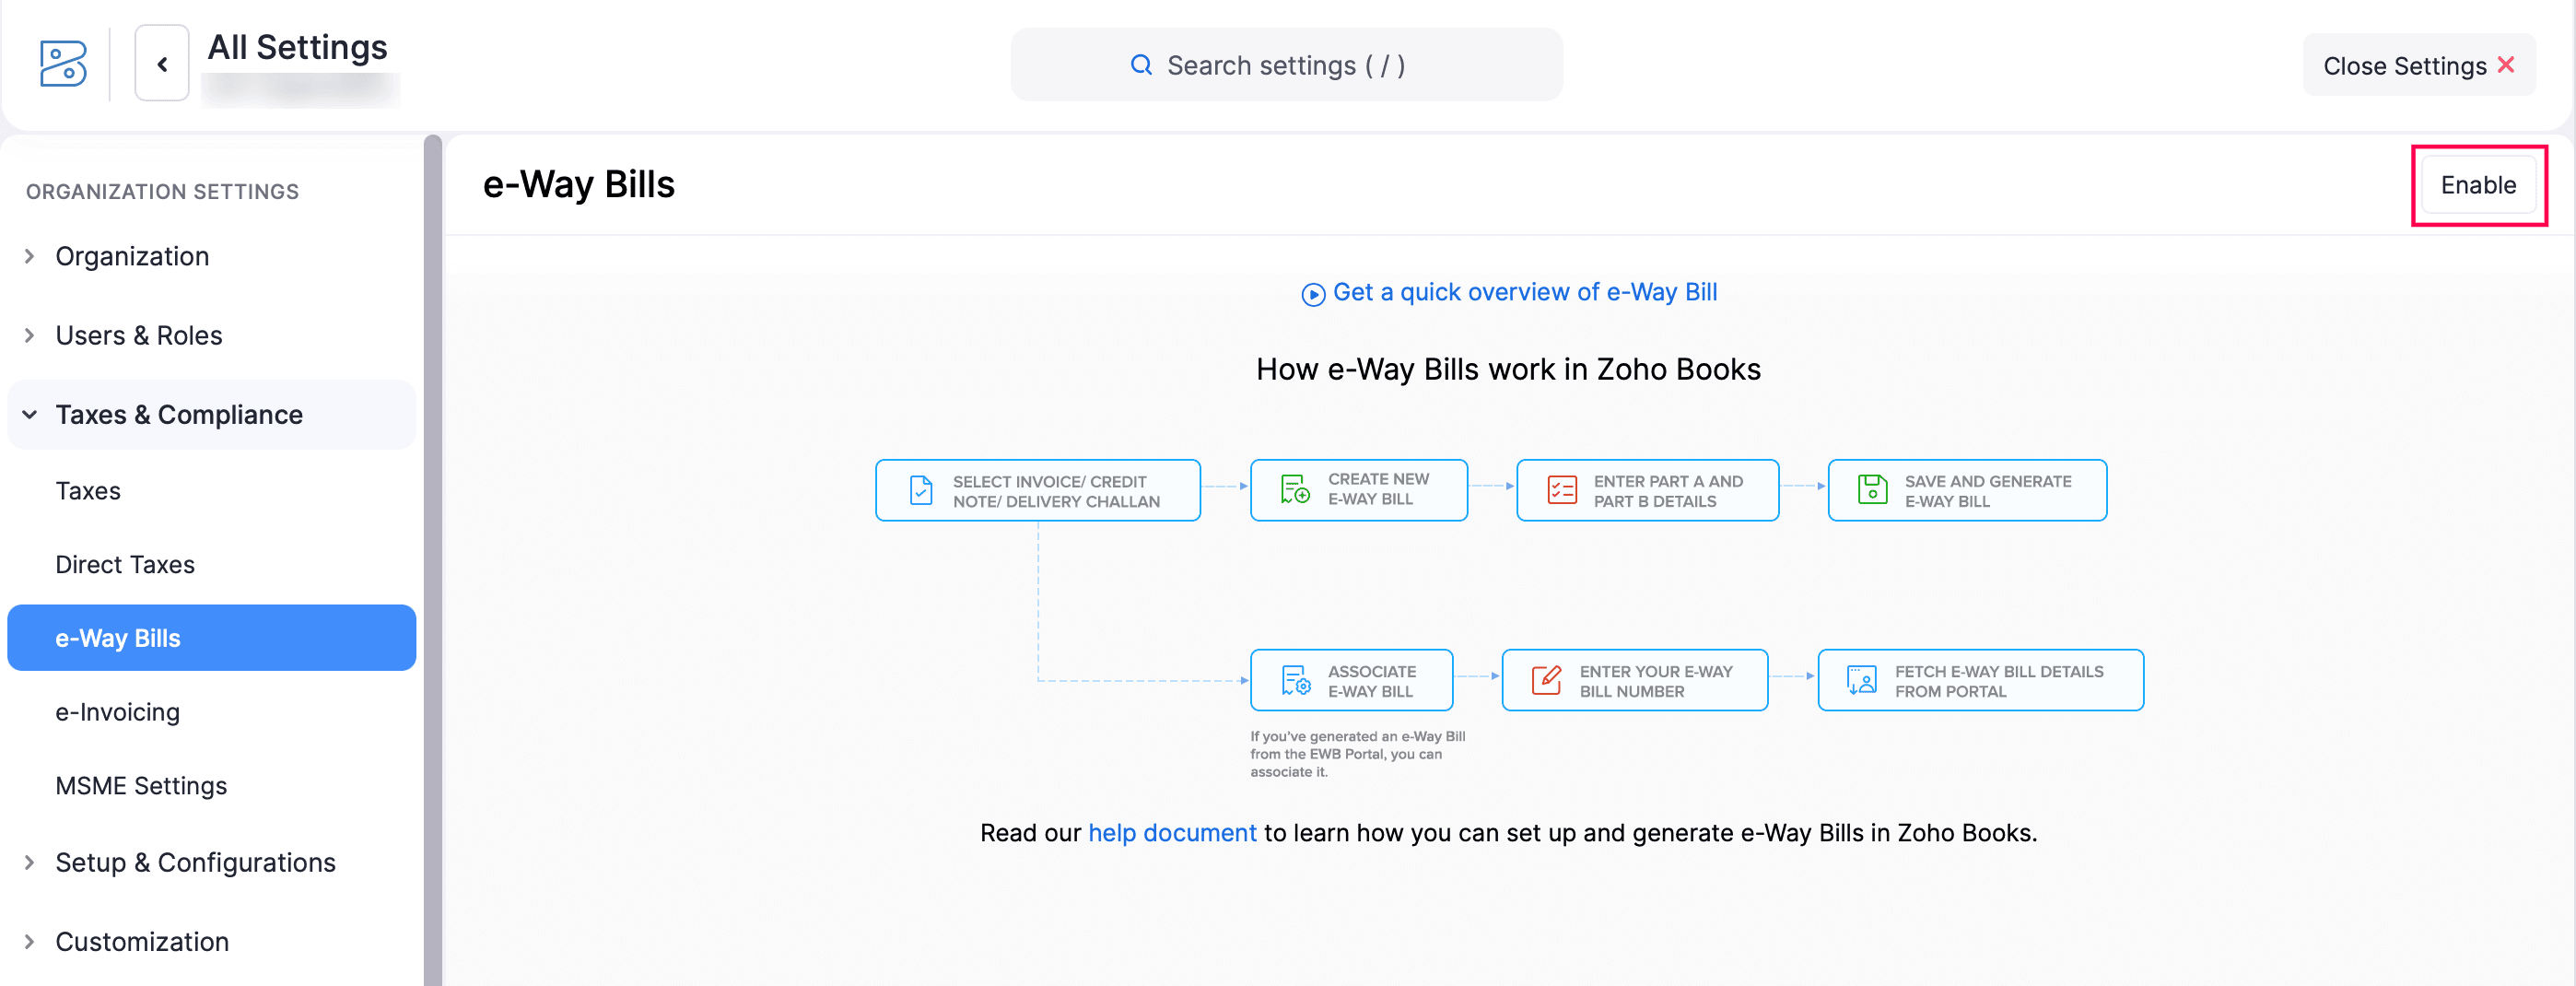
Once enabled, the e-Way Bill module will be available in the left sidebar, and you can add e-Way Bill details to your invoices, bills of supply, credit notes, and delivery challans.
There are two ways to generate e-Way Bills:
- Generate e-Way Bills directly from Zoho Books.
- Generate e-Way Bills manually from the EWB portal
Generate e-Way Bills Directly From Zoho Books
When you need to create multiple e-Way Bills each day, manually entering details on the EWB portal can be time-consuming. With Zoho Books, you can generate e-Way Bills effortlessly. The transaction details are pre-filled, and you only need to add the transporter’s details to complete the process. When you create an e-Way Bill through Zoho Books, your credentials are securely shared with the EWB system.
Note: From January 1, 2025, e-Way Bills and Part-A slips cannot be generated or updated for invoices older than 180 days. This rule also applies to updating or consolidating Part-B details.
Register Zoho Corporation As Your GST Suvidha Provider
Before you can start generating e-Way Bills from Zoho Books, you must register Zoho Corporation as your GST Suvidha Provider(GSP). To do this:
- Log in to the e-Way Bill System.
- Click the Registration dropdown.
- Select For GSP from the menu.
- Your GST-registered email ID and phone number will be auto-filled.
- Click Send OTP.
- Enter the 6-digit OTP and click Verify OTP.
- On the next screen:
- Click the Add/New button.
- Click the GSP Name dropdown and select Zoho Corporation.
- Enter the Suffix ID and Password, User Name and Password.
- Click Add.
Once registered, Zoho Corporation will appear under the View tab, and you’ll be able to generate e-Way Bills from Zoho Books. This is a one-time registration.
Note: Your e-Way Bill portal credentials can also be used to sign in to the e-Invoicing portal.
Connect Zoho Books to the e-Way Bill Portal
After registering Zoho Corporation as your GSP, you can generate e-Way Bills directly from Zoho Books. To do this, you first need to connect Zoho Books with the e-Way Bill Portal. Here’s how:
- Go to Settings.
- Navigate to Organization Settings.
- Select e-Way Bills under Taxes & Compliance.
- Click Connect Now.
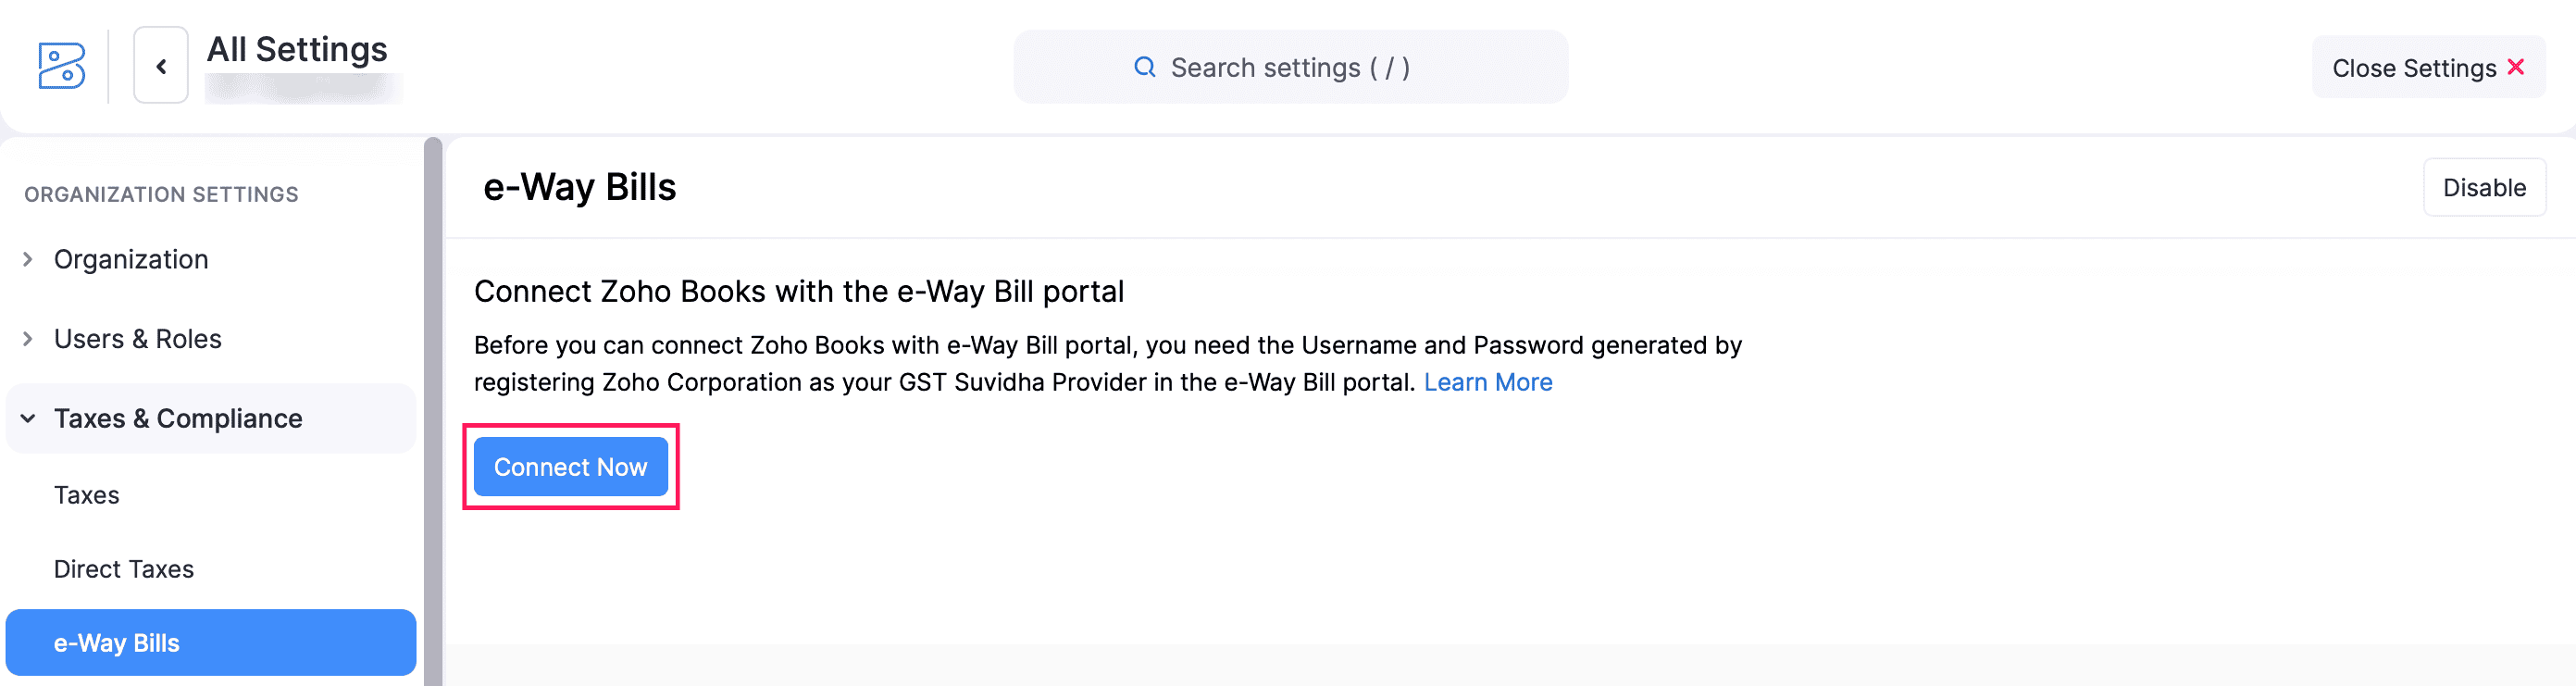
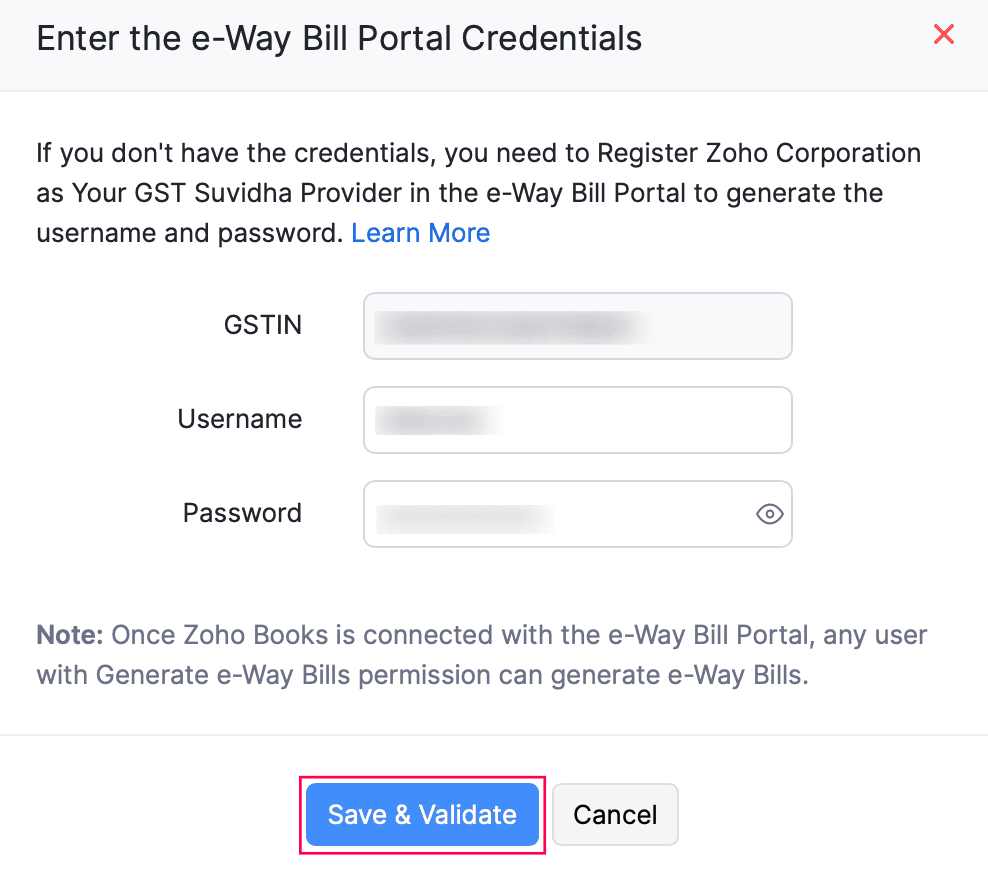
- In the Enter the e-Way Bill Portal Credentials pop-up, enter the GSTIN, Username and Password that you used while registering Zoho Corporation as your GST Suvidha Provider in the e-Way Bill System’s website.
- Click Save & Validate.
Now you will be able to generate e-Way Bills from Zoho Books.
Configure Threshold Limit
The e-Way Bill threshold limit for intra-state transactions varies by state. For example, Maharashtra has a threshold of ₹1,00,000, while Sikkim follows a ₹50,000 limit. For interstate transactions, CGST regulations mandate the generation of an e-Way Bill if the consignment value exceeds ₹50,000. Zoho Books lets you configure the e-Way Bill threshold limit for intra-state transactions. Here’s how:
- Go to Settings.
- Navigate to Organization Settings.
- Select e-Way Bills under Taxes & Compliance.
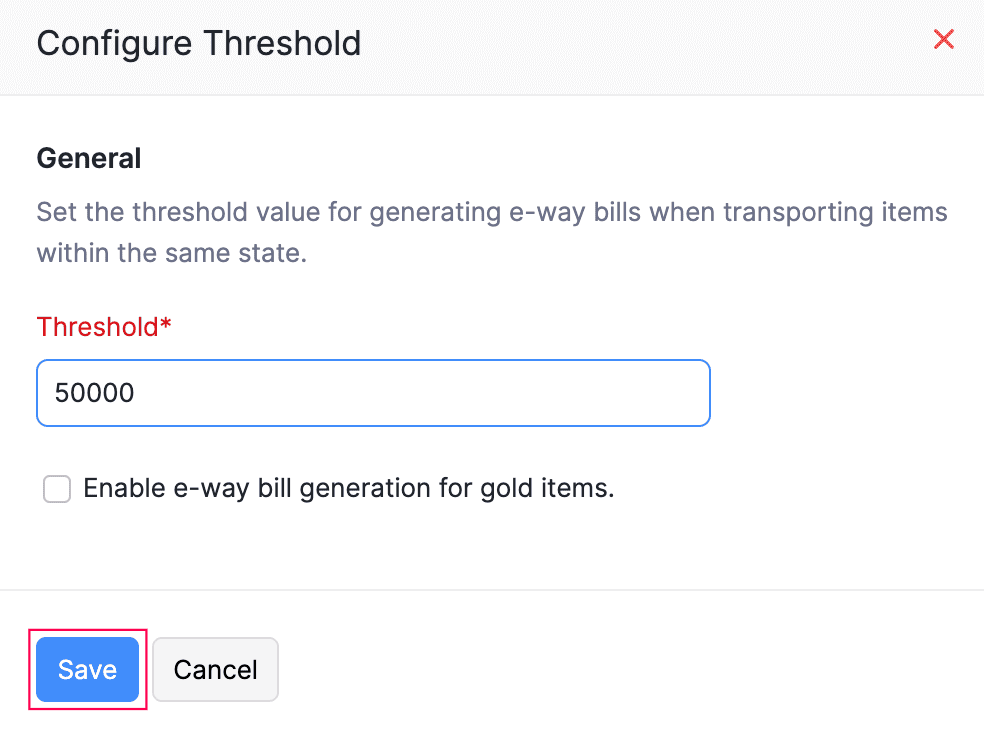
- Click Configure Threshold for the GSTIN you want to set the e-Way Bill threshold limit.
- In the Configure Threshold pop-up, enter the Threshold limit.
- Click Save.
Now, e-Way Bills will be generated for transactions whose value exceeds the set threshold limit.
Generate e-Way Bills From Zoho Books
When the value of the invoice, credit note or delivery challan exceeds the threshold limit, those transactions will be available in the Not Generated status in the e-Way Bill module.
Here’s how you can generate an e-Way Bill for those transactions:
- Go to Sales on the left sidebar and select e-Way Bills.
- In the e-Way Bills page, you can filter the e-Way Bills based on Location, Transaction Period, Transaction Type and e-Way Bill Status.
- Select the transaction for which you want to generate an e-Way Bill.
- Select the Document Type, Transaction Sub Type, Location, Customer Name, the transaction number based on the Document Type that you select (for example, Invoice#), Transaction Type and Place of Delivery.

| Field | Description |
|---|---|
| Document Type | Select the type of the document (for example, Invoice, Credit Note or Delivery Challan). |
| Transaction Sub Type | Nature of the transaction (for example, Supply, Export, Job Work) |
| Location | Business location of the transaction. |
| Customer Name | Name of the customer. |
| Transaction Number | Select the Invoice#, Credit Note#, or Delivery Challan# you want to associate with the e-Way Bill. |
| Transaction Type | The Transaction Type field refers to the type of transaction taking place between the parties involved in the movement of goods. |
| Place of Delivery | Destination where the goods will be delivered. |
Once you select the transaction number, the Transportation Details and PART - B section will be visible.
- Under Transportation Details, select the Transporter and enter the Distance (in Km).
| Field | Description |
|---|---|
| Transporter | A person or company responsible for transporting the goods. Note: To create a new transporter, go to e-Way Bills > Create or Edit an e-Way Bill > Transporter > Manage Transporters > + Add New Transporter. Enter the Name and Transporter ID, then click Save and Select. |
| Distance (in Km) | Distance between source and delivery location. If you are uncertain of the exact distance, enter 0 in the Distance field, and the e-Way Bill system will automatically determine it based on the source and delivery locations. (or) Click Calculate Distance. You will be redirected to the e-Way Bill Portal, where you can calculate the distance based on the Dispatch From and Ship To Pin Codes. |
- Enter the necessary details in the PART B section.
| Field | Description |
|---|---|
| Mode of Transportation | Select whether the consignment is being transported via road, rail, air or ship. |
| Vehicle Type | Select the vehicle type used (Regular or Over Dimensional Cargo). |
| Vehicle No | Enter the vehicle number used for transporting the consignment. |
| Transporter’s Doc No | If the mode of transportation is via road, enter the transporter’s document number. |
| Transporter’s Doc Date | Enter the transporter document date. |
| RR No | If the mode of transportation is via rail, enter the Railway Receipt No. |
| RR Date | Enter the Railway Receipt Date. |
| Airway Bill Number | If the mode of transportation is via air, enter the Airway Bill Number. |
| Airway Bill Date | Enter the Airway Bill Date. |
| Bill of Lading No | If the mode of transportation is via ship, enter the Bill of Lading No. |
| Bill of Lading Date | Enter the Bill of Lading date. |
- Click Save to save the e-Way Bill as a draft or click Save and Generate to generate an e-Way Bill from Zoho Books.
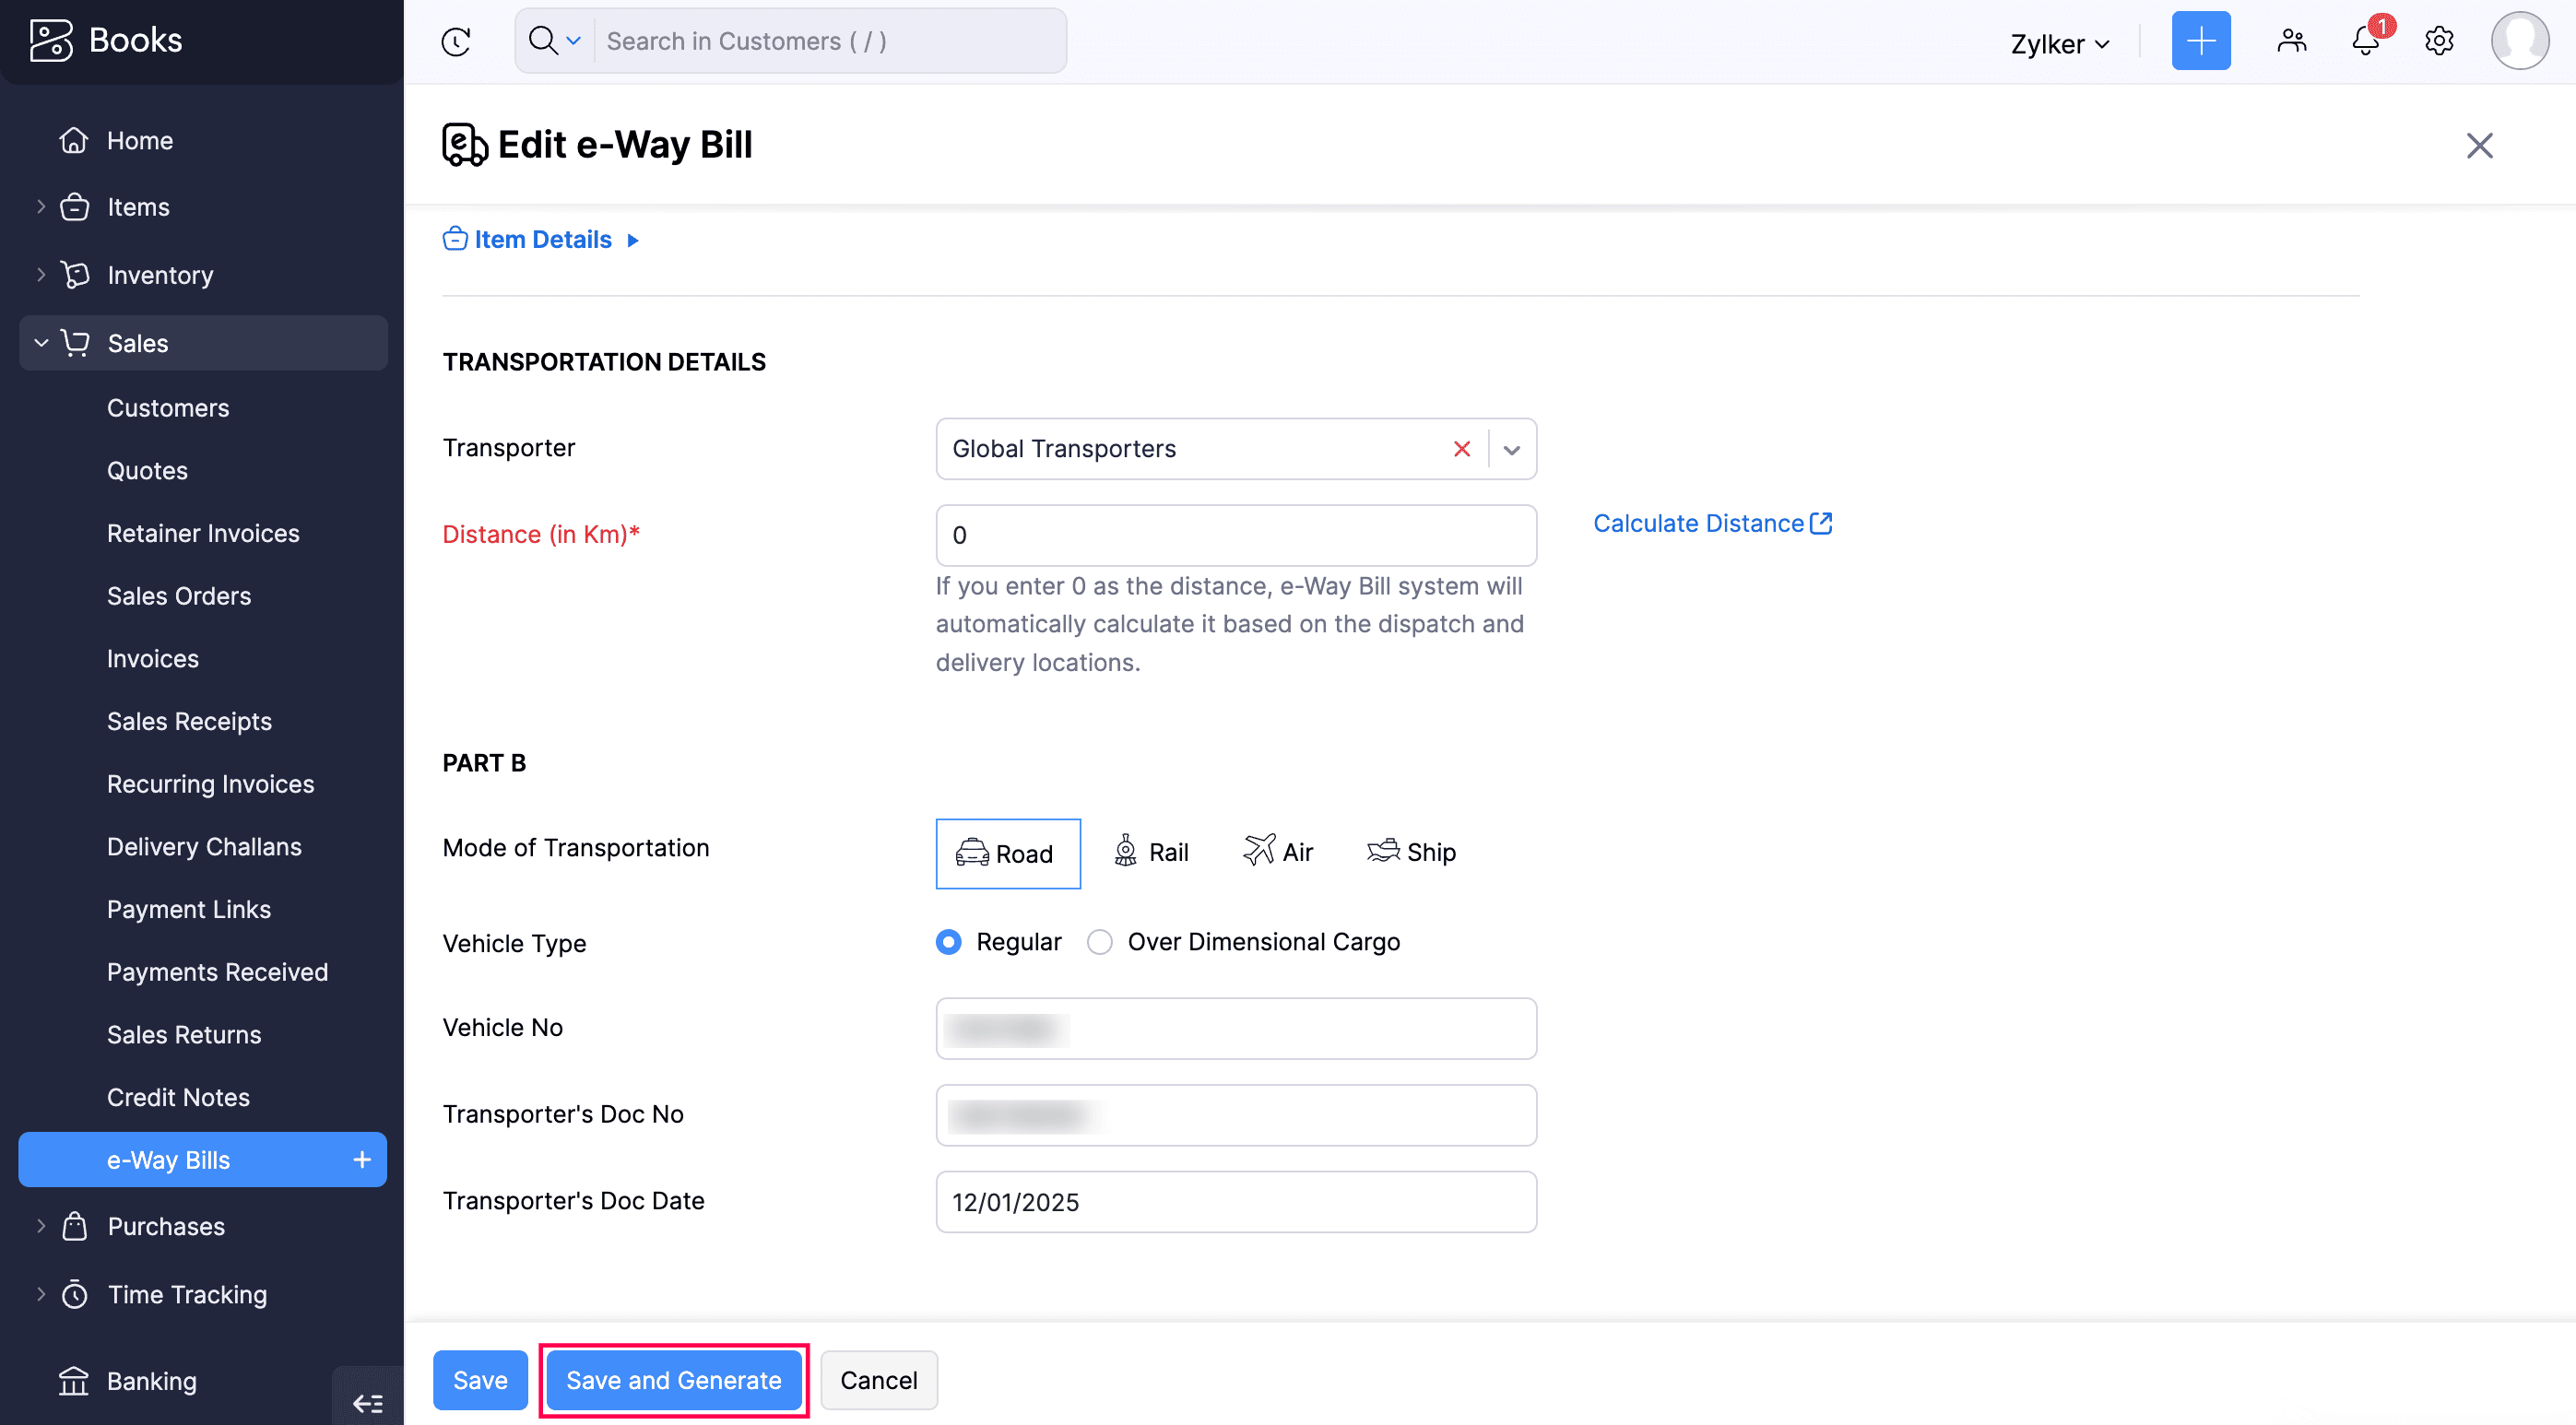
The e-Way Bill will be generated and the validity details will be updated automatically in Zoho Books.
Note: As per government norms, in the case of a sales return, e-Way Bills generated against a credit note will be saved with the Document Type as Delivery Challan.
Generate e-Way Bills Manually From the EWB Portal
You can manually generate e-Way Bills from the EWB portal by first exporting invoices, credit notes, and delivery challans as a JSON file, or exporting invoices and credit notes as an Excel file from Zoho Books, and then uploading the file to the EWB portal. Once uploaded, you can bulk-generate multiple e-Way Bills.
Export e-Way Bills as a JSON File
Generating e-Way Bills one by one each day can be time-consuming if you handle large volumes. Instead, you can export all the required transaction details as a JSON file and upload it to the EWB portal to generate e-Way Bills in bulk. Here’s how:
- Go to Sales on the left sidebar and select e-Way Bills.
- Select the transactions you want to export as a JSON file.
- Click Export as JSON button.
Note: Before exporting transactions as a JSON file from Zoho Books, review each transaction and ensure all mandatory details are entered. The mandatory fields for an e-Way Bill are: Pin Code, Place of Supply, Distance, Vehicle Number (or Transporter Document No and Transporter Document Date), Mode of Transport, Supply Type, HSN Code for goods, and Organization Address.
The JSON file will be downloaded to your system, and you can upload it to the EWB portal to generate multiple e-Way Bills at once.
Export e-Way Bills as an Excel File
If you want to verify the e-Way Bill details of your invoices and credit notes before uploading them to the EWB portal, or if your transporter generates e-Way Bills on your behalf and you don’t have Part-B details (such as the Vehicle Number or Transporter’s Document No), you can export the details as an Excel file, make the necessary changes, convert it to JSON using the EWB offline tool, and upload it to the EWB portal to generate the e-Way Bills.
Note: Exporting delivery challans in Excel format is not supported.
To export the e-Way Bill details as an Excel file:
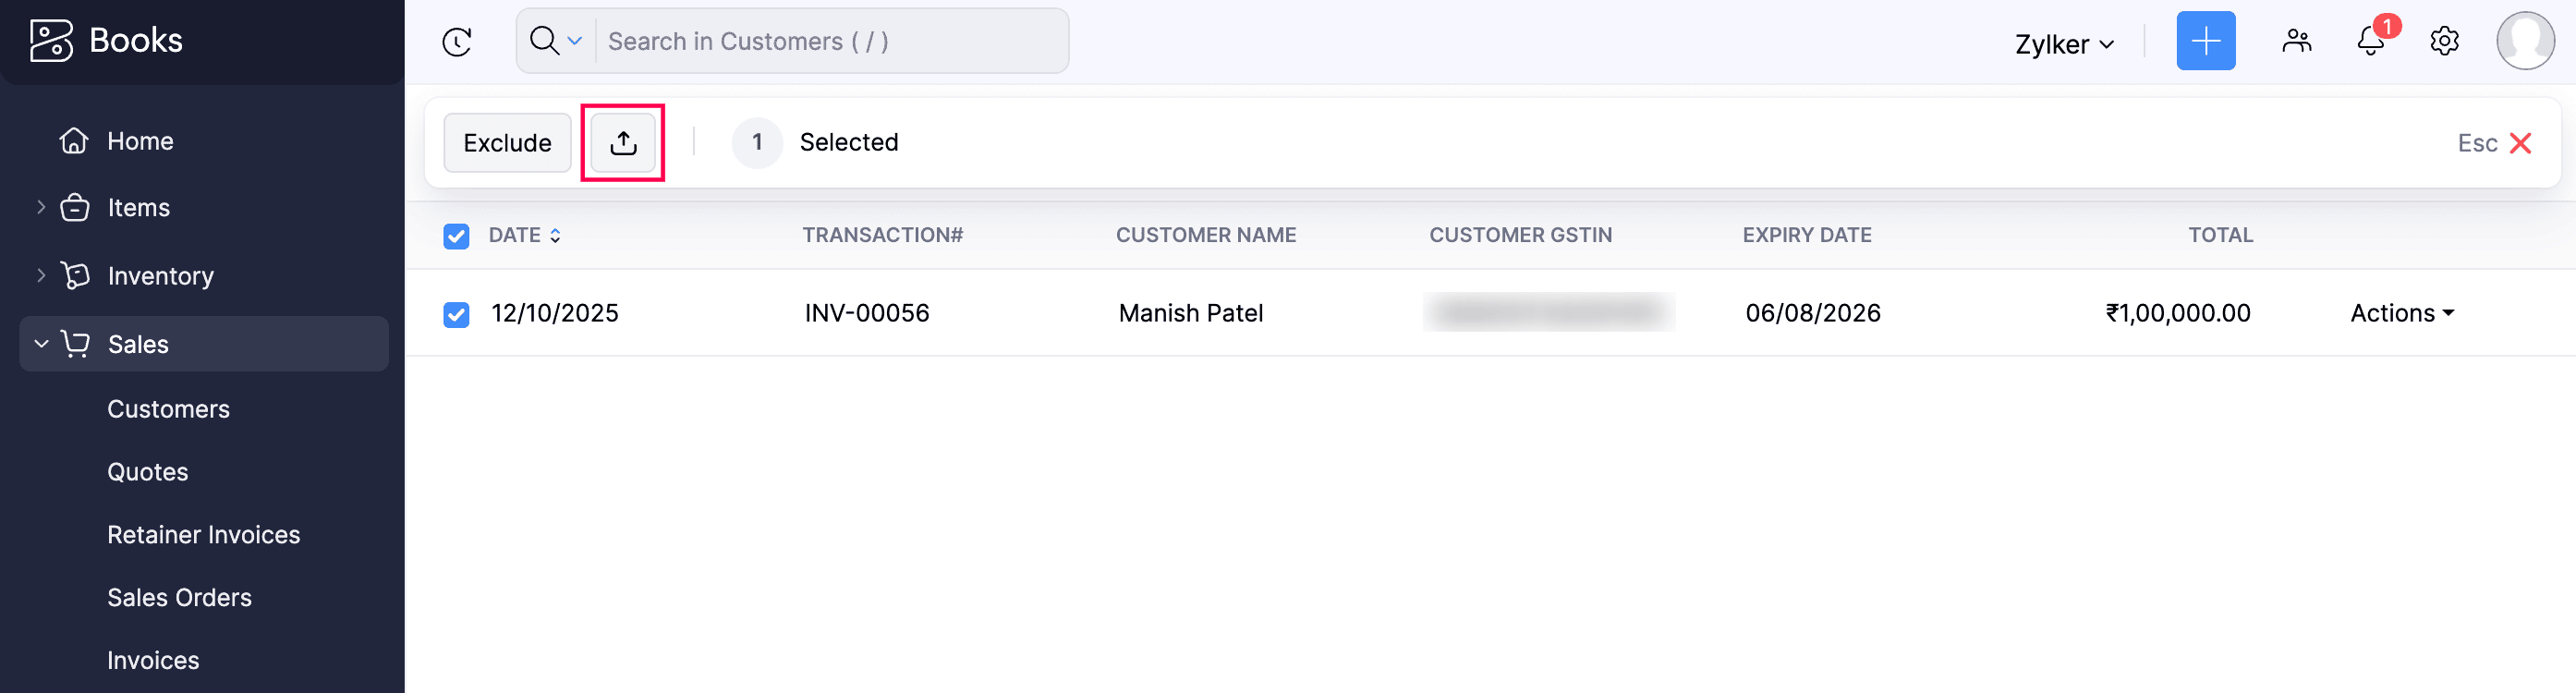
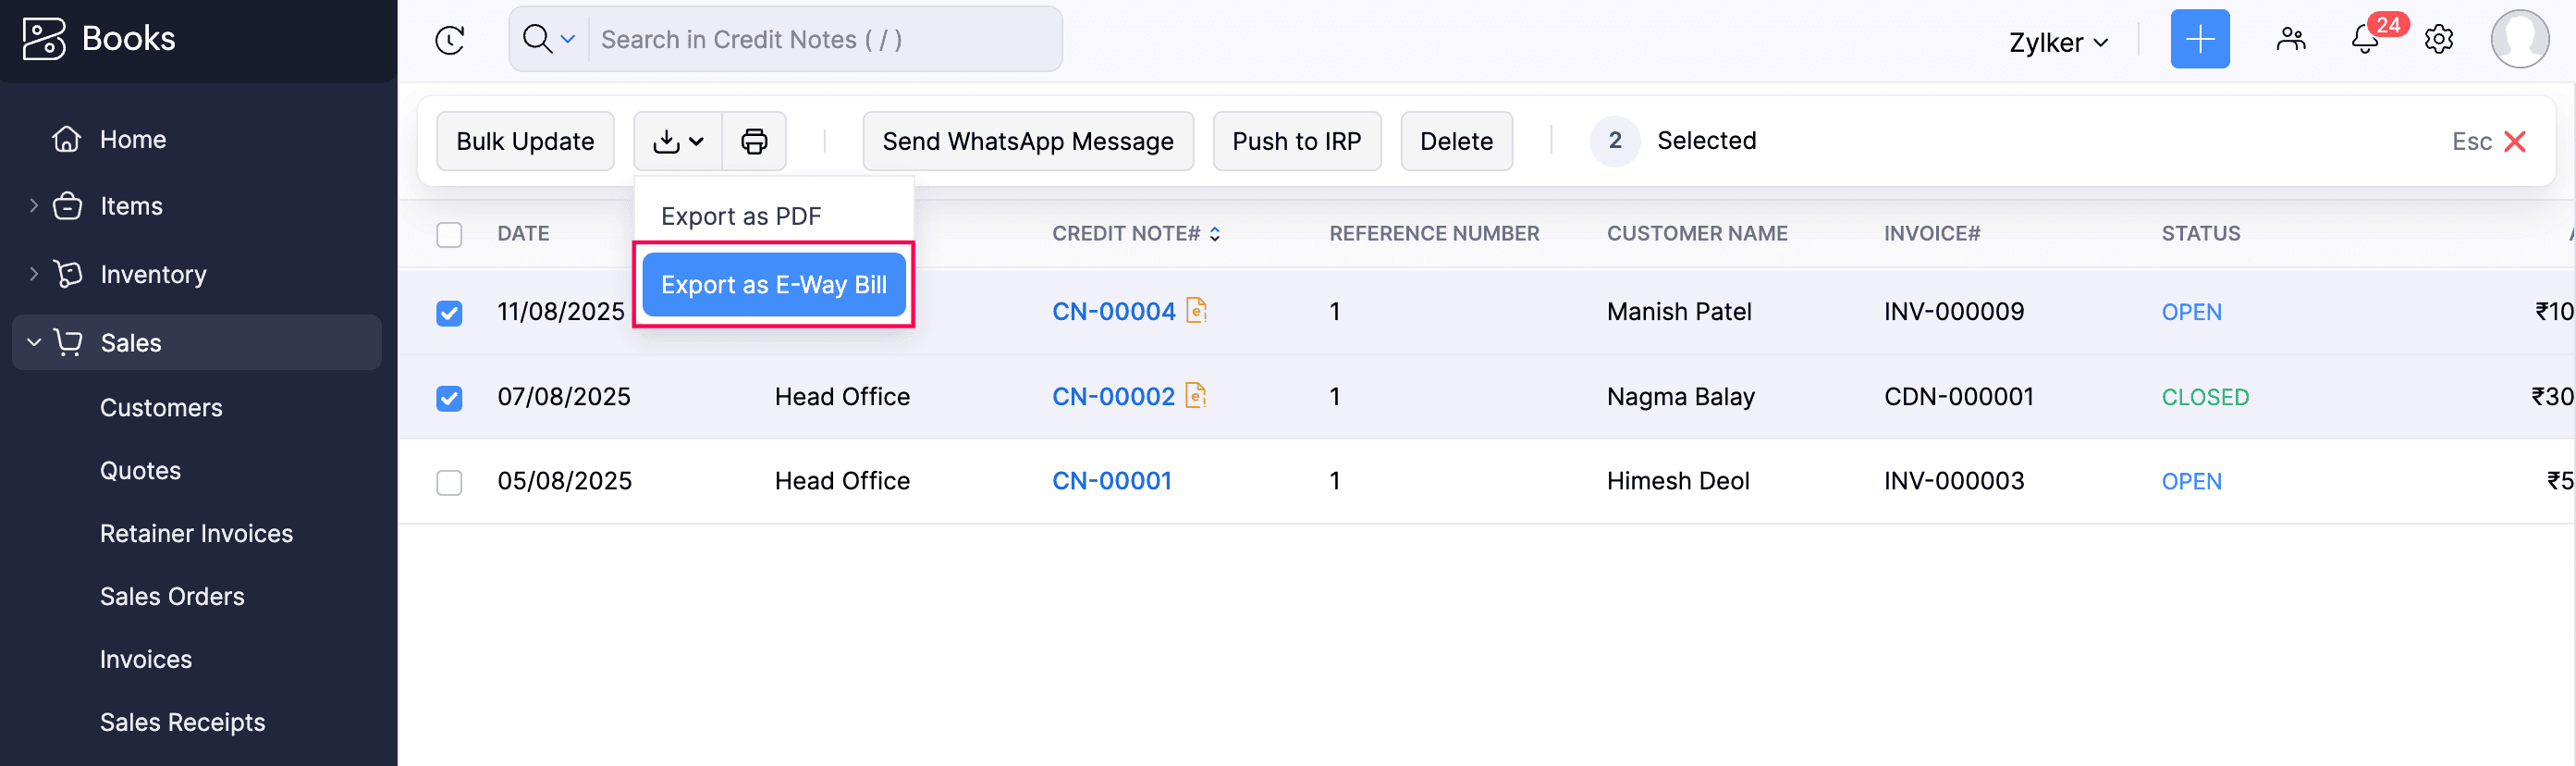
- Go to the respective module you want to export from (for example, Invoices).
- Select the transactions you want to export as an Excel file.
- Select the Download icon and select Export as E-Way Bill from the dropdown.
Note: You can use the filter dropdown in the top left corner to filter the transactions you want to export. If you need to further narrow down your results based on specific criteria, you can use the common search or advanced search options.
The excel file will be downloaded to your system. Ensure that mandatory e-Way Bill details such as Pin Code, Place of Supply, Distance, Vehicle Number (or Transporter Document No and Transporter Document Date), Mode of Transport, Supply Type, and HSN Code for goods are entered in Zoho Books.
After verifying the Excel file, it must be converted into a JSON file before uploading it to the e-Way Bill portal. Here’s how:
- Download the EWB offline tool.
- Copy all the data from the Excel file, excluding the headers, and paste it into the offline tool.
- Click Validate. If there are any errors, the error messages will appear in the last column to help you correct them.
Note: Please ensure that all columns in the offline tool are filled in correctly before converting the file to JSON. Entering incorrect details will result in a JSON file with inaccurate data.
- Click Prepare JSON.
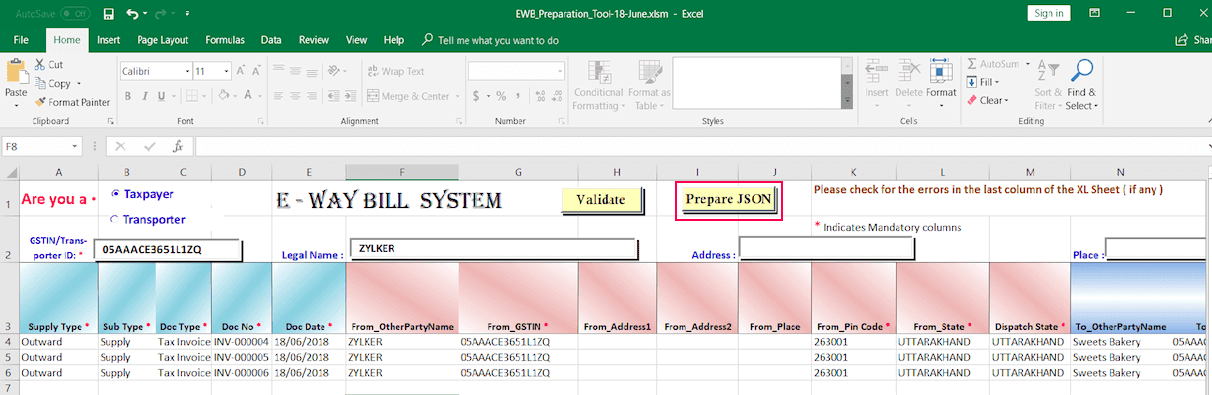
A pop-up will display the path where the converted file is stored. Once your JSON file is ready for import, you can upload it to the EWB portal. Here’s how:
- Log in to the EWB portal.
- Navigate to the e-Way Bill section.
- Select Generate Bulk.
- Click Choose File and select the JSON file you want to upload.
- Click Upload & Generate to generate the e-Way Bills.
Once the e-Way Bills are generated in bulk, their e-Way Bill Number can be associated with the transactions, and the recent updates can be fetched from the portal in Zoho Books.
Statuses of e-Way Bills
The table below explains the types of transactions for each e-Way Bill status.
| Status | Description |
|---|---|
| Not Generated | Transactions for which e-Way Bills have either not been generated or, have been generated on the EWB portal but are not yet linked in Zoho Books. |
| Generated | Transactions for which e-Way Bills have been generated. |
| Part A Generated | Transactions for which only Part A of the e-Way Bill has been filled. Part B is pending, so the e-Way Bill is not yet valid for the movement of goods. |
| Cancelled | Transactions for which e-Way Bills were created and later cancelled for valid reasons. |
| Expired | Transactions for which e-Way Bills were created but are no longer valid due to the expiry of the validity period. |
| Excluded | Transactions that have been marked as excluded from the yet-to-be-generated transactions. |
| Manually generated | Transactions for which e-Way Bills were generated on the portal and the corresponding e-Way Bill numbers were associated with transactions in Zoho Books. |