
How do I create and set up a payment page in Zoho Checkout?
Creating a payment page is straightforward. Once you set up your payment gateway, you can set up the page, preview it live, and publish it when you’re ready.
Here’s how you can create a payment page:
- Go to Payment Pages.
- Click + New Payment Page in the top-right corner.
The payment page creation window opens with two panes: the left pane to enter details and the right pane to preview the live page.
Configure the page properties, preview the page as you update it, and then click Save & Publish.
Your payment page will be created.
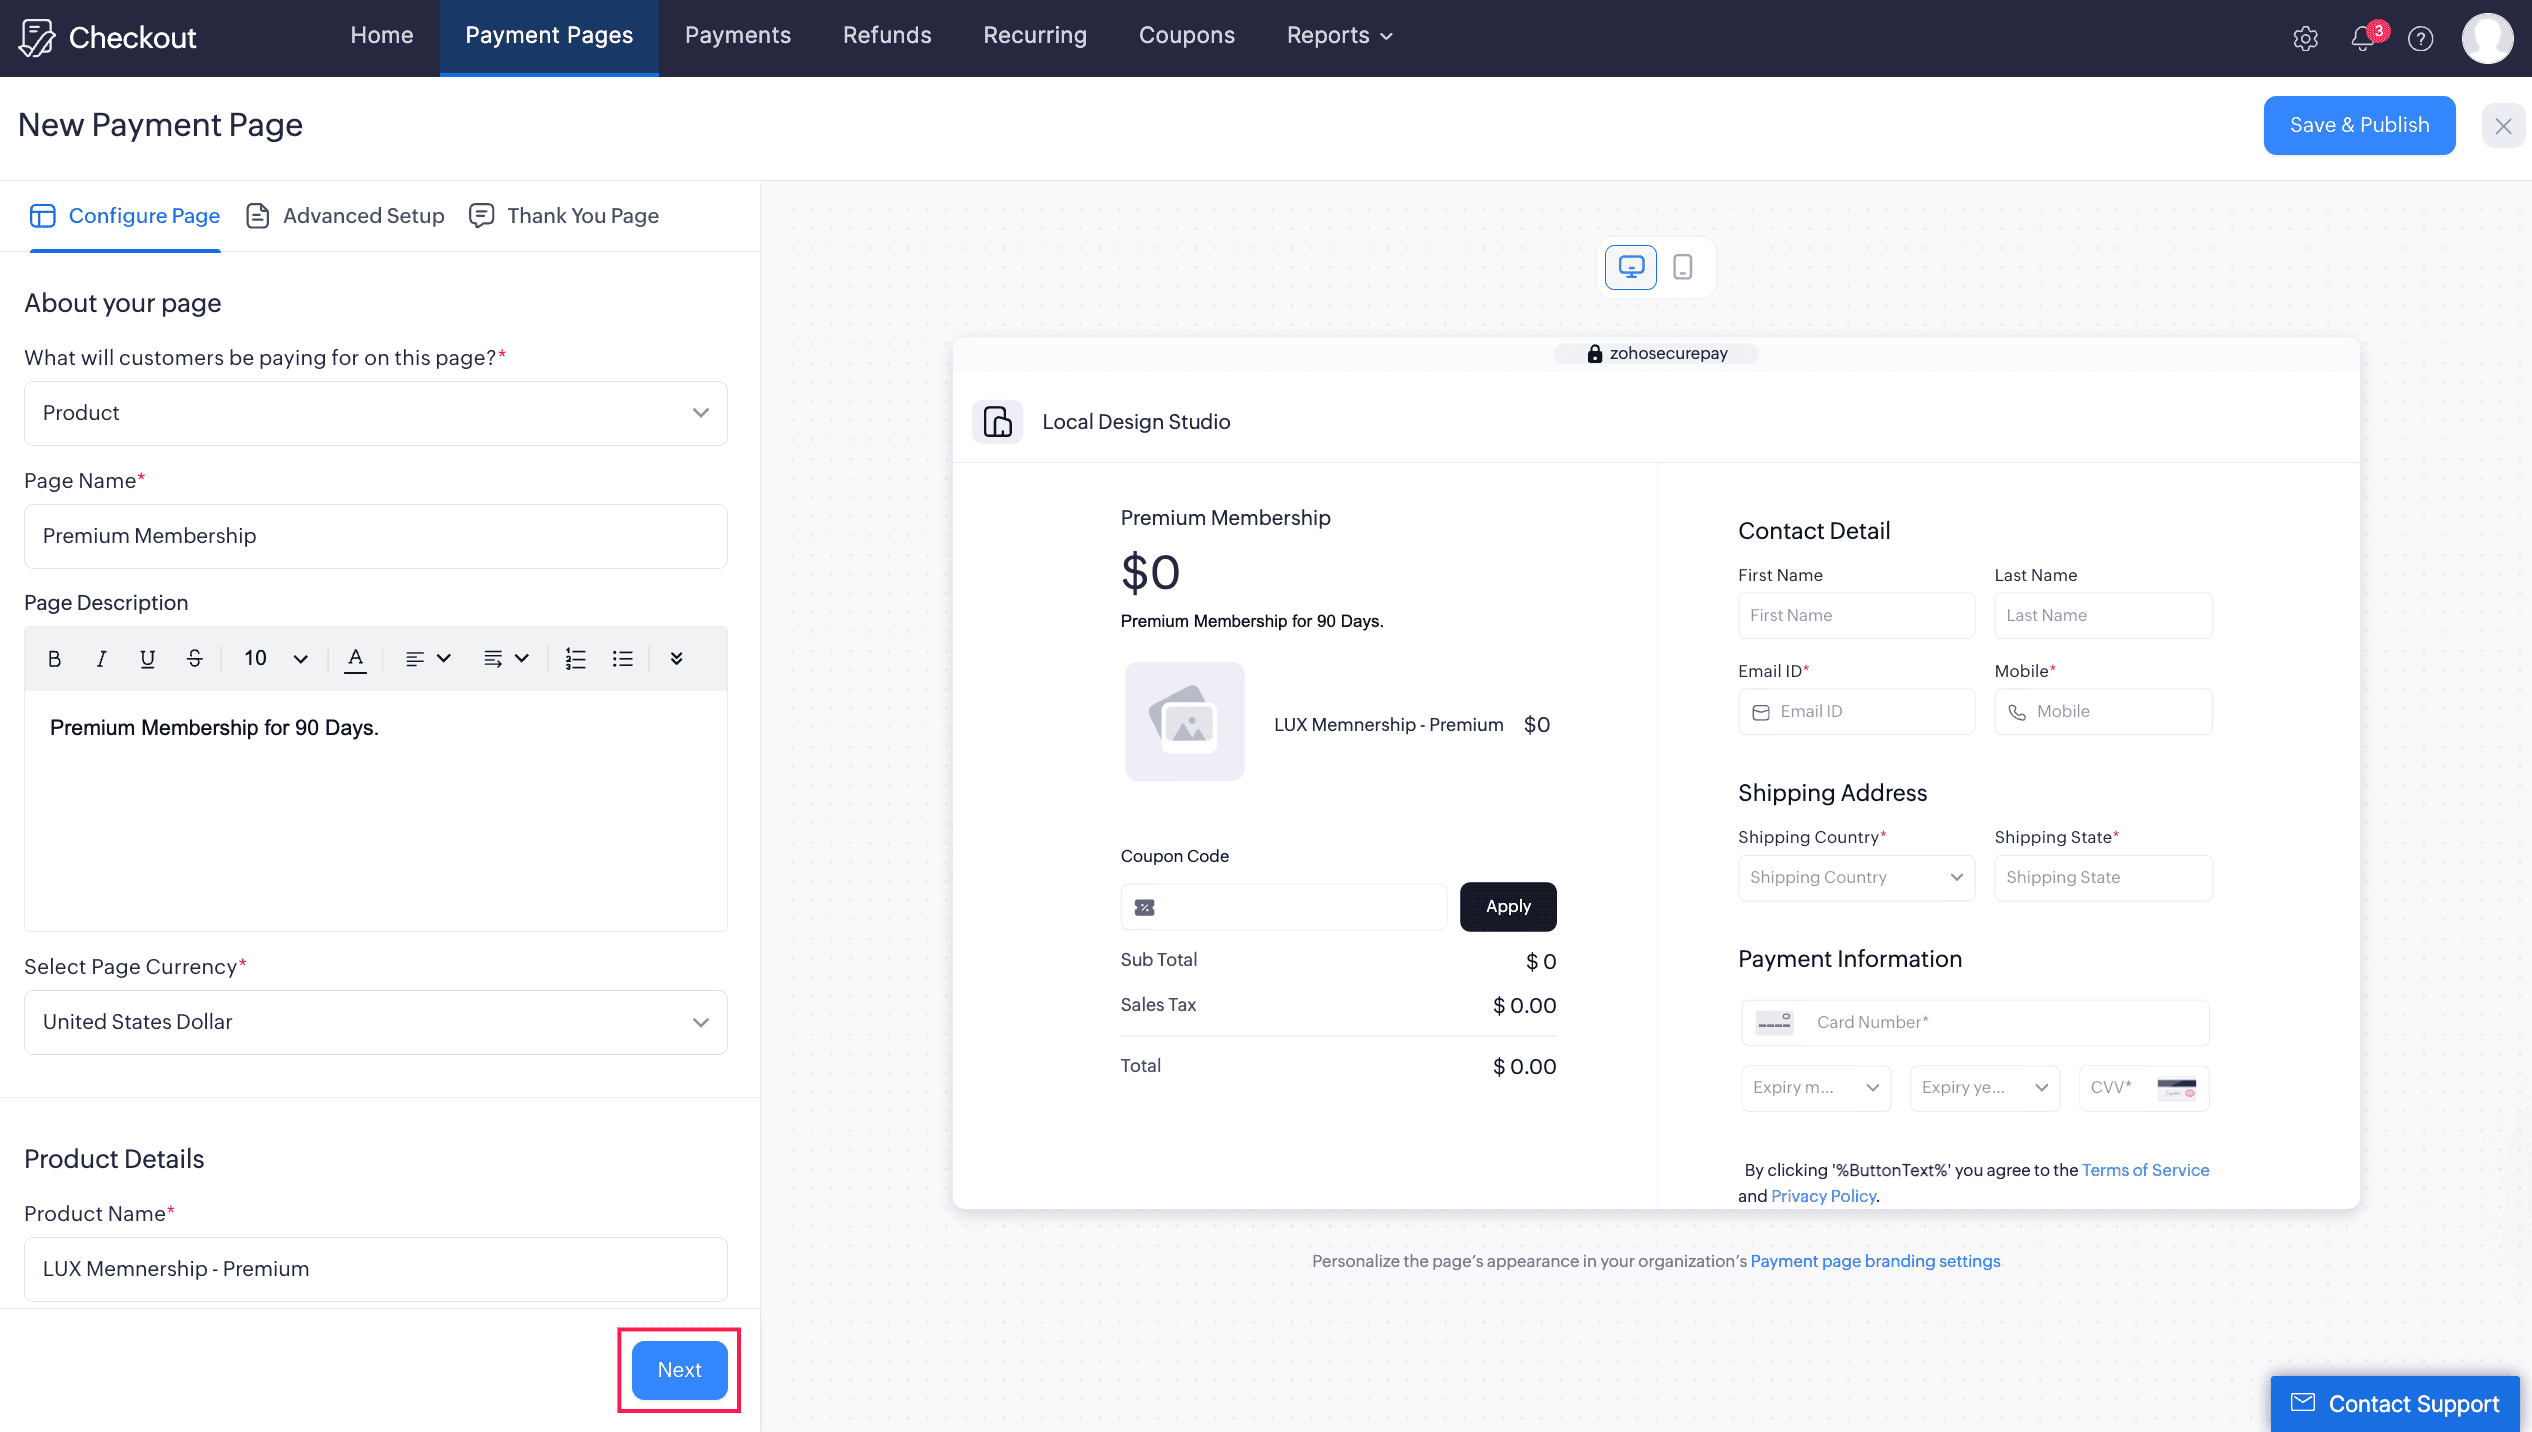
1. Configure Page
Under this section, configure the core details of your payment page.
About Your Page
Under this section, select the primary purpose of the page and enter the basic details.
- Enter Page Name to add an appropriate title for your payment page.
- Enter Page Description to tell customers why you are collecting the payment.
- Choose Currency to define the currency in which you want to accept payments.
- Select what your customers will be paying for on this page: Product or Contribution.
Insight: Ensure that your configured payment gateway supports the currency selected for this payment page.
Product Details
Note: This section is applicable only if you have chosen Product under what your customers will be paying for on this page.
Under this section, configure product details.
- Enter Product Name to specify the product.
- Enter Product Description to give customers more information about the product.
- Select Product Type as Goods or Services.
- Choose Account to track the payments you receive in Zoho Books.
Note: The Account field will be visible only after you integrate Zoho Checkout with Zoho Books.
- Enter Amount for the product, or select Allow customers to decide the amount at checkout to let customers enter the amount and set a minimum amount.
- Enable Quantity Preference by selecting Allow customers to modify quantity at checkout if customers should choose the quantity.
- Upload the Image by dragging and dropping or selecting a file.
Prerequisite: Before you upload your image, verify the following: Format: Must be a square image. Dimensions: At least 256x256px. File Size: Under 1MB. Supported File Types: PNG, JPG, and JPEG.
Contribution Details
Note: This section is applicable only if you have chosen Contribution under what your customers will be paying for on this page.
This section is designed for donations and non-profit contributions.
- Choose Account to track the payments you receive in Zoho Books.
Note: The Account field will be visible only after you integrate Zoho Checkout with Zoho Books.
- Enter Amount for the contribution, or select Allow customers to decide the amount at checkout to allow flexible payments and set a minimum amount.
- Upload an Image for your contribution page.
Prerequisite: Before you upload your image, verify the following: Format: Must be a square image. Dimensions: At least 256x256px. File Size: Under 1MB. Supported File Types: PNG, JPG, and JPEG.
Billing Preferences
Under this section, configure your preferred payment frequency.
- One-time: Use this for single, non-recurring payments.
- Recurring: Use this for recurring payment services and configure billing frequency, billing day, and billing duration.
- At Checkout: Allow customers to decide the default frequency and billing preferences at checkout.
For recurring payments, you can configure:
- Billing Frequency to choose a standard interval such as Weekly, Monthly, 3 Months, 6 Months, Yearly, or Custom. See supported billing intervals.
- Billing Day to charge customers on the Day of Checkout or on a Set a Specific Day each month.
- Billing Duration to select Unlimited Cycles or Limited Cycles, and specify the number of cycles if needed.
- Default Frequency to display One-Time or Recurring by default.
You can also allow customers to choose billing frequency and billing duration at checkout.
Tax Information
Prerequisite: This section is visible only if you’ve enabled Taxes under Settings.
Under this section, configure tax preferences for your payment page.
- Select the tax category: Taxable, Non-Taxable, Out Of Scope, or Non-GST Supply.
- If you’ve chosen Non-Taxable, select the Exemption Reason.
Note: Your payment page will not be accessible if you do not have a default tax rate set.
Page Expiration
This section allows you to configure when your payment page expires.
Never Expires: Select this if you do not want the page to expire.
Expires On: Select this if you want the page to expire on a designated day.
Expires After: Select this if you want the page to expire after a specific number of transactions.
2. Advanced Setup Section
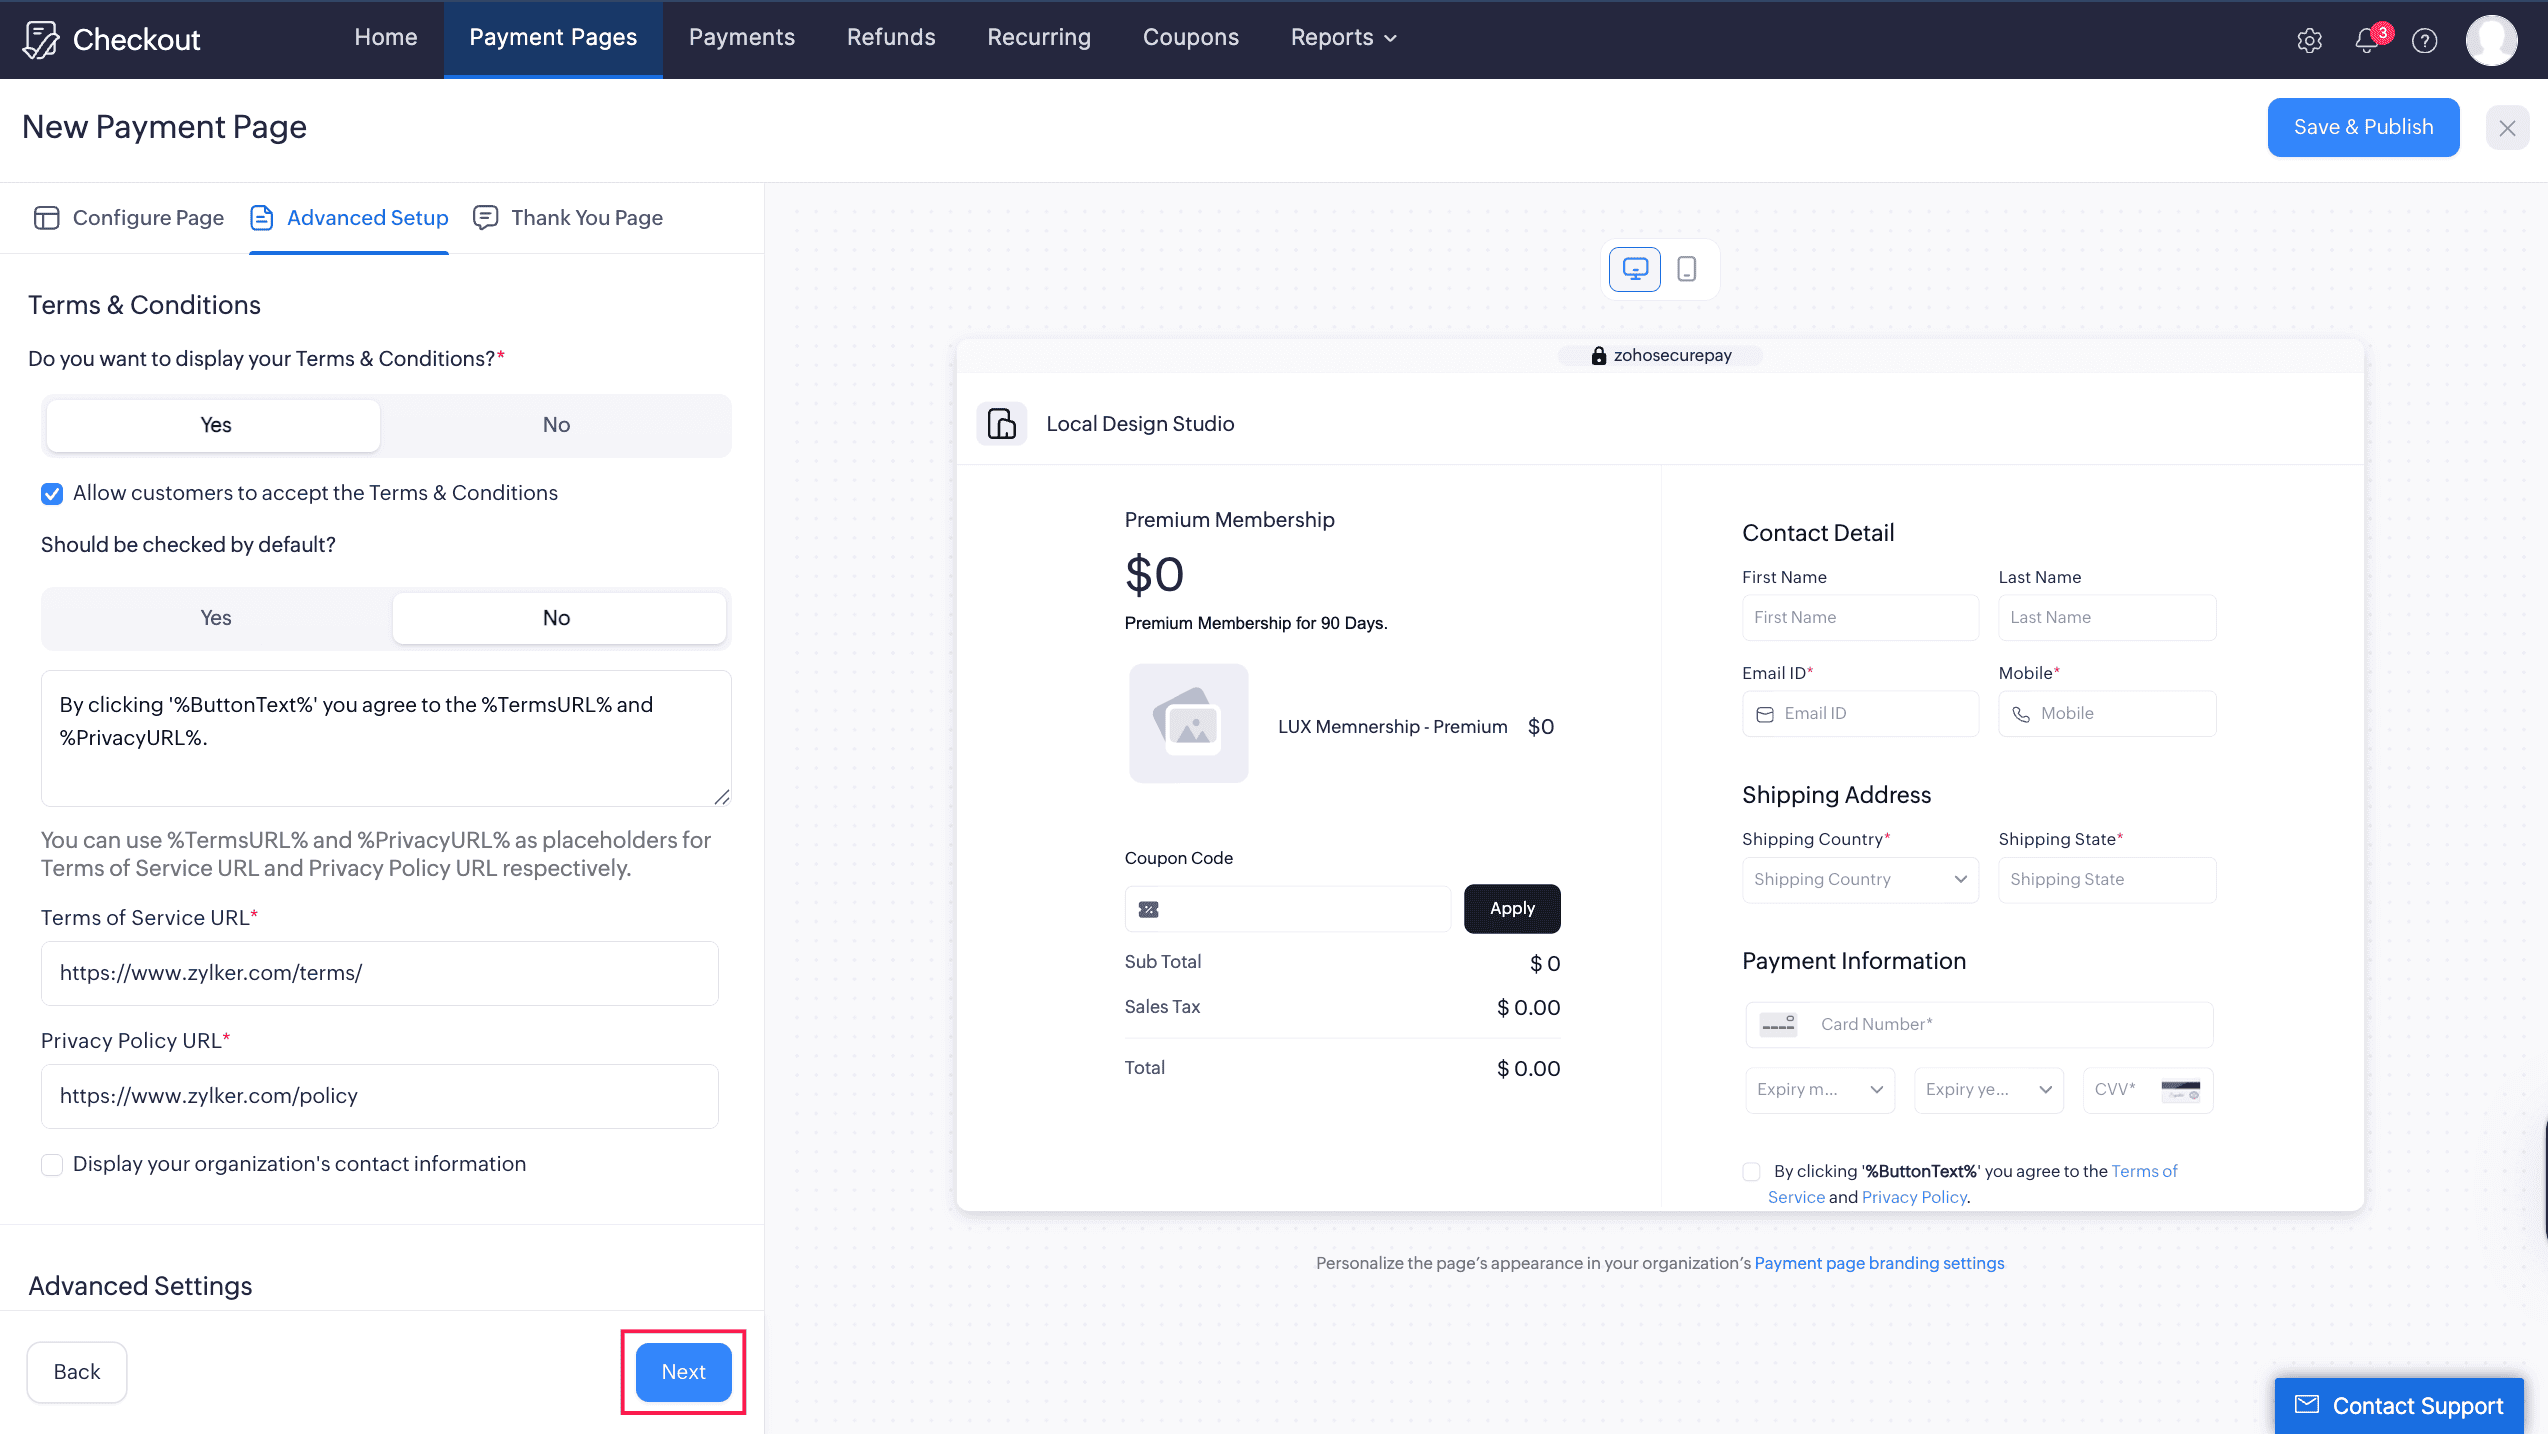
Under this section, configure legal information, payment gateways, card details, and address preferences.
Terms and Conditions
To display legal agreements on your payment page, enable the Do you want to display your Terms & Conditions? toggle. Once enabled, configure the following:
- Terms of Service URL to enter the link to your terms and conditions page.
- Privacy Policy URL to enter the link to your privacy policy.
- Show License agreement if you want customers to manually accept your terms before proceeding.
Advanced Settings
Under this section, configure CAPTCHA, coupons, custom fields, and the button label.
Coupons: Select active coupons to link to your payment page.
Custom fields: Select active custom fields to display on the payment page.
Button label: Change the Pay button label to your preferred text.
Display CAPTCHA for authentication: Enable this to protect your page from bots and automated traffic.
Display Organization’s Contact Information: Enable this to show your organization’s contact details to customers.
Associate Payment Gateways
Payments are processed through your organization’s default payment gateway. You can associate multiple gateways with your payment page for more flexibility.
Note: Ensure to set up a payment gateway in Organization Settings. This page will remain a draft until the configuration is complete.
To associate gateways to your payment page:
- Go to Associate Payment Gateways under Advanced Setup.
- Under Would you like to associate a specific gateway? select Yes.
- Select the checkboxes for the integrated gateways you want to enable.
- If you select multiple gateways, all chosen options will be displayed on your live payment page.
Contact Information
Under this section, configure billing details, billing address, and shipping address.
- Expand the section you want to configure.
- Choose the fields you want to display by selecting them under the FIELD column.
- Check the corresponding box under the MANDATE column to make a field mandatory.
- Drag and drop fields to change their display order.
Note: If you’ve enabled taxes for your Checkout organization, customers must enter Country and Zip under Shipping Address.
Card Details
If you want to record your customer’s card address details, configure them under this section.
3. Thank You Page Section
After a customer completes a payment, you can display an automated thank-you message or redirect them to another page.
Choose Display Message to enter custom thank-you text.
Or choose Redirect URL to send customers to a destination URL after payment.
Review the provided details and preview the page by switching tabs on the right side window.
Click Save and Publish.
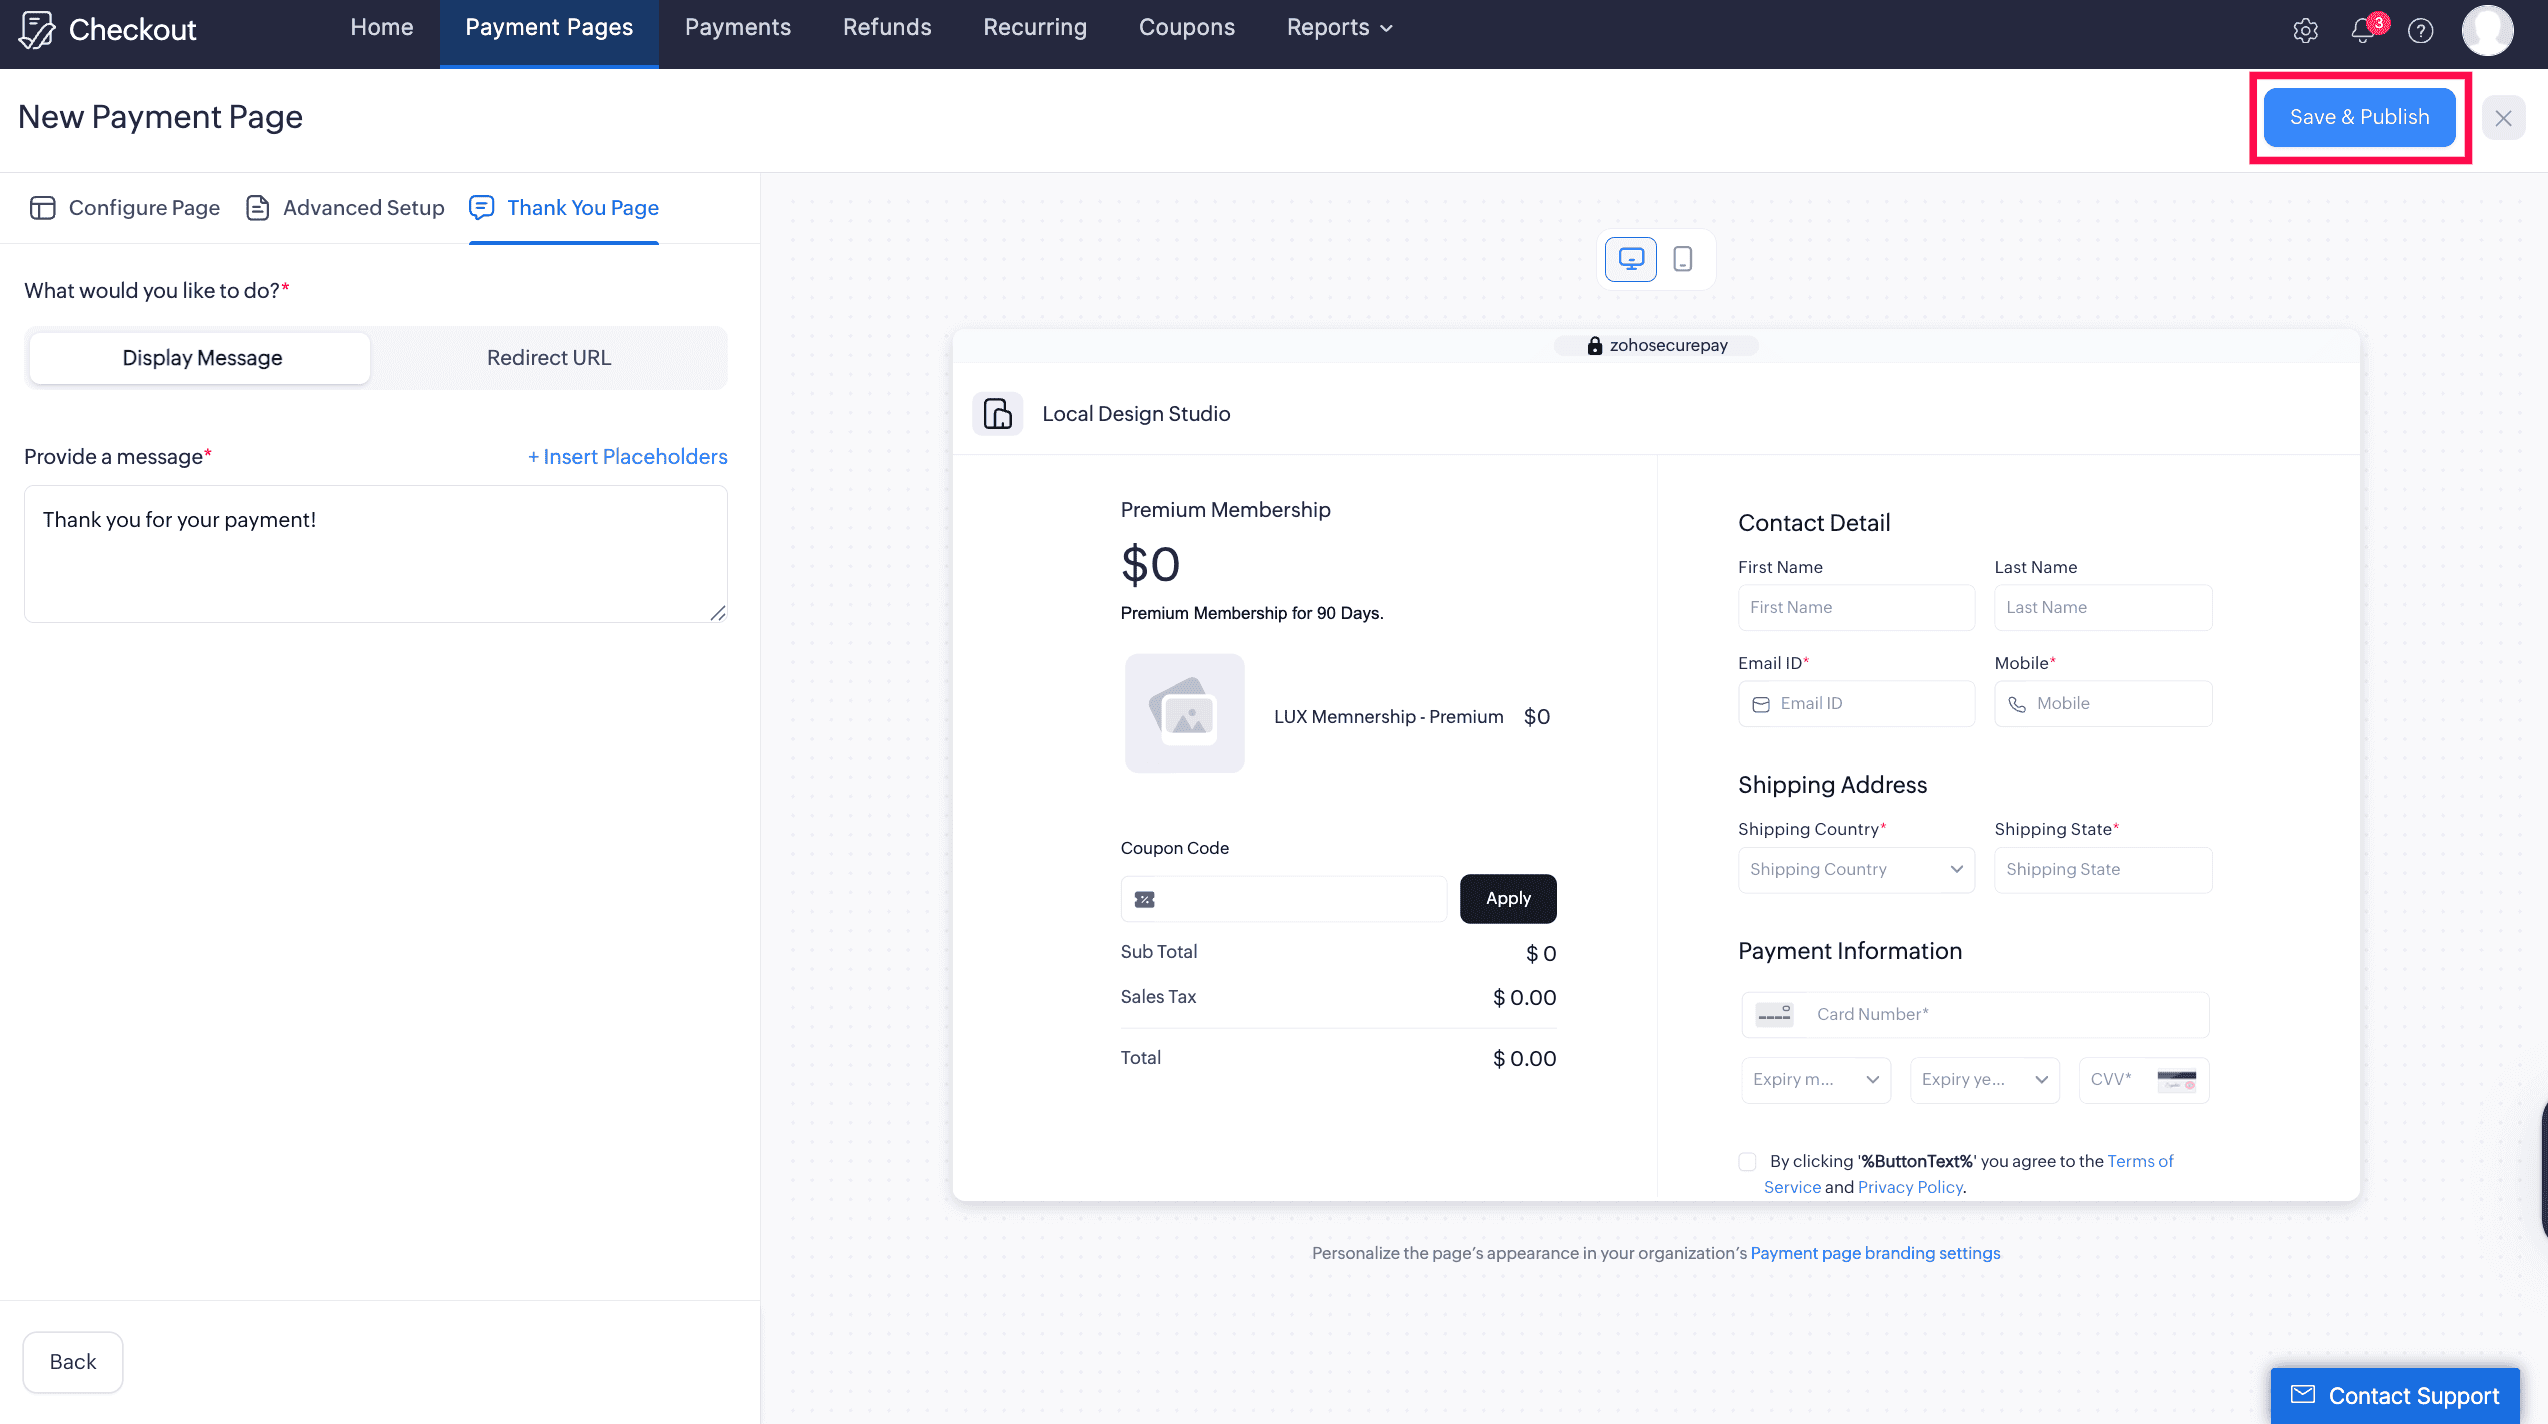
Your payment page will be created and ready to share.