

E-Invoicing - Overview

The UAE is introducing mandatory electronic invoicing (E-Invoicing) for all transactions to modernise its tax infrastructure, reduce VAT fraud, strengthen compliance, and enhance transparency. All UAE businesses will be required to issue, exchange, and report structured electronic invoices for B2B and B2G transactions through the Peppol network. Zoho Books connects to the Peppol network, enabling you to send and receive e-invoices securely within your Zoho Books organisation.
What Is an E-Invoice?
An e-invoice is a machine-readable invoice issued by a supplier in a structured data format that allows for its automatic processing. The buyer can import it directly into their system instead of entering the details manually.
E-Invoicing Implementation Timeline
The UAE is introducing mandatory e-invoicing in a phased manner. Businesses will be required to comply based on their annual revenue, with a separate timeline for government entities.
- 1 July 2026: A voluntary pilot was launched with selected businesses.
- 30 October 2026: Businesses with revenue over AED 50 million must select an Accredited Service Provider (ASP).
- 1 January 2027: Mandatory e-invoicing begins for businesses with revenue over AED 50 million.
- 31 March 2027: Businesses with revenue under AED 50 million and government entities must select an ASP.
- 1 July 2027: Mandatory e-invoicing begins for businesses with revenue under AED 50 million.
- 1 October 2027: E-invoicing begins for government entities for B2G transactions.
How E-Invoicing Works in Zoho Books
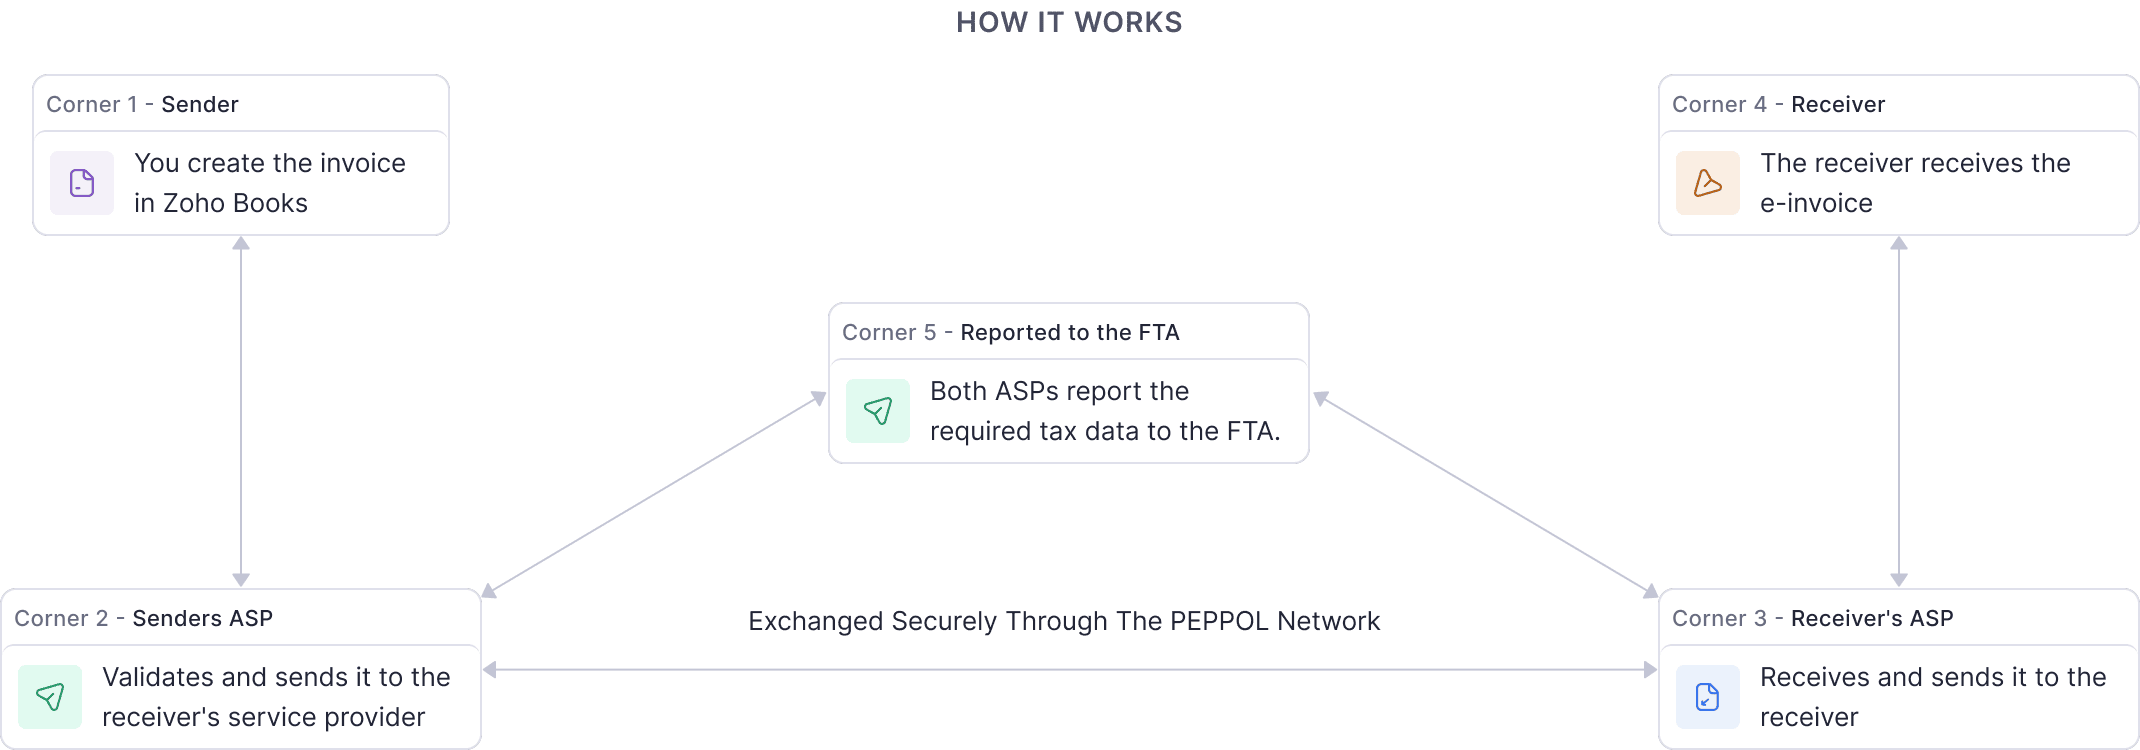
Zoho Books is a Federal Tax Authority (FTA) and Ministry of Finance (MoF)-approved Accredited Service Provider (ASP) that enables you to send invoices and credit notes as well as receive purchase bills and vendor credits through the Peppol network. When you enable e-invoicing and connect your organisation to the network, the following workflow applies:
Creating a Transaction in Zoho Books
You create an invoice or credit note in Zoho Books and save it as a draft. At this stage, the transaction has an e-invoice status of Yet To Be Pushed and has not yet been submitted through the Peppol network.
Sending the Transaction via Peppol
When you click Send Invoice on the invoice details page, Zoho Books submits the transaction to the Peppol network. The system checks that all required fields are present, including your Tax Registration Number (TRN) and your customer’s TRN, before sending. If your customer is not registered on the Peppol network or is not eligible for e-invoicing, you can send the invoice as a PDF via email instead.
Validating and Delivering the Transaction via Peppol
The Peppol network validates the transaction. If validation is successful, the transaction is delivered to your customer through their Accredited Service Provider (ASP) and simultaneously reported to the FTA through the fifth corner (C5) of the Peppol network. The transaction’s e-invoice status in Zoho Books changes to Pushed, and a Universally Unique Identifier (UUID) is generated for the transaction. This UUID serves as a permanent reference ID for the e-invoice on the Peppol network. If validation fails, the status changes to Failed and the error details are displayed on the transaction’s details page. You can resolve the errors and resend the transaction.
Locking the Transaction
Once a transaction is successfully pushed, you cannot edit any fields that affect the pushed e-invoice data. Also, you cannot delete a pushed transaction. To make corrections to a pushed invoice, you can create a credit note against it. The credit note follows the same send and validate workflow.
Receiving Transactions from Vendors
When a vendor sends you an invoice or credit note through Peppol, you can receive it into Zoho Books as a bill or vendor credit. Received transactions are saved with a Draft status. You can then open each transaction to verify its details.
Set Up E-Invoicing
Setting up E-Invoicing in Zoho Books is a one-time process that involves three steps: verifying your organisation’s details, connecting with the FTA and an ASP, and finishing the setup in Zoho Books. Here’s how:
Prerequisite: You can set up E-Invoicing only if you have enabled taxes in your Zoho Books organisation and entered your TRN.
Step 1: Verify Your Details
Start by verifying your business and tax details in Zoho Books. To do this:
- Go to Settings in the top right corner of the page.
- Select E-Invoicing under Taxes & Compliance in the Organisation Settings pane.
- Click Setup Now.
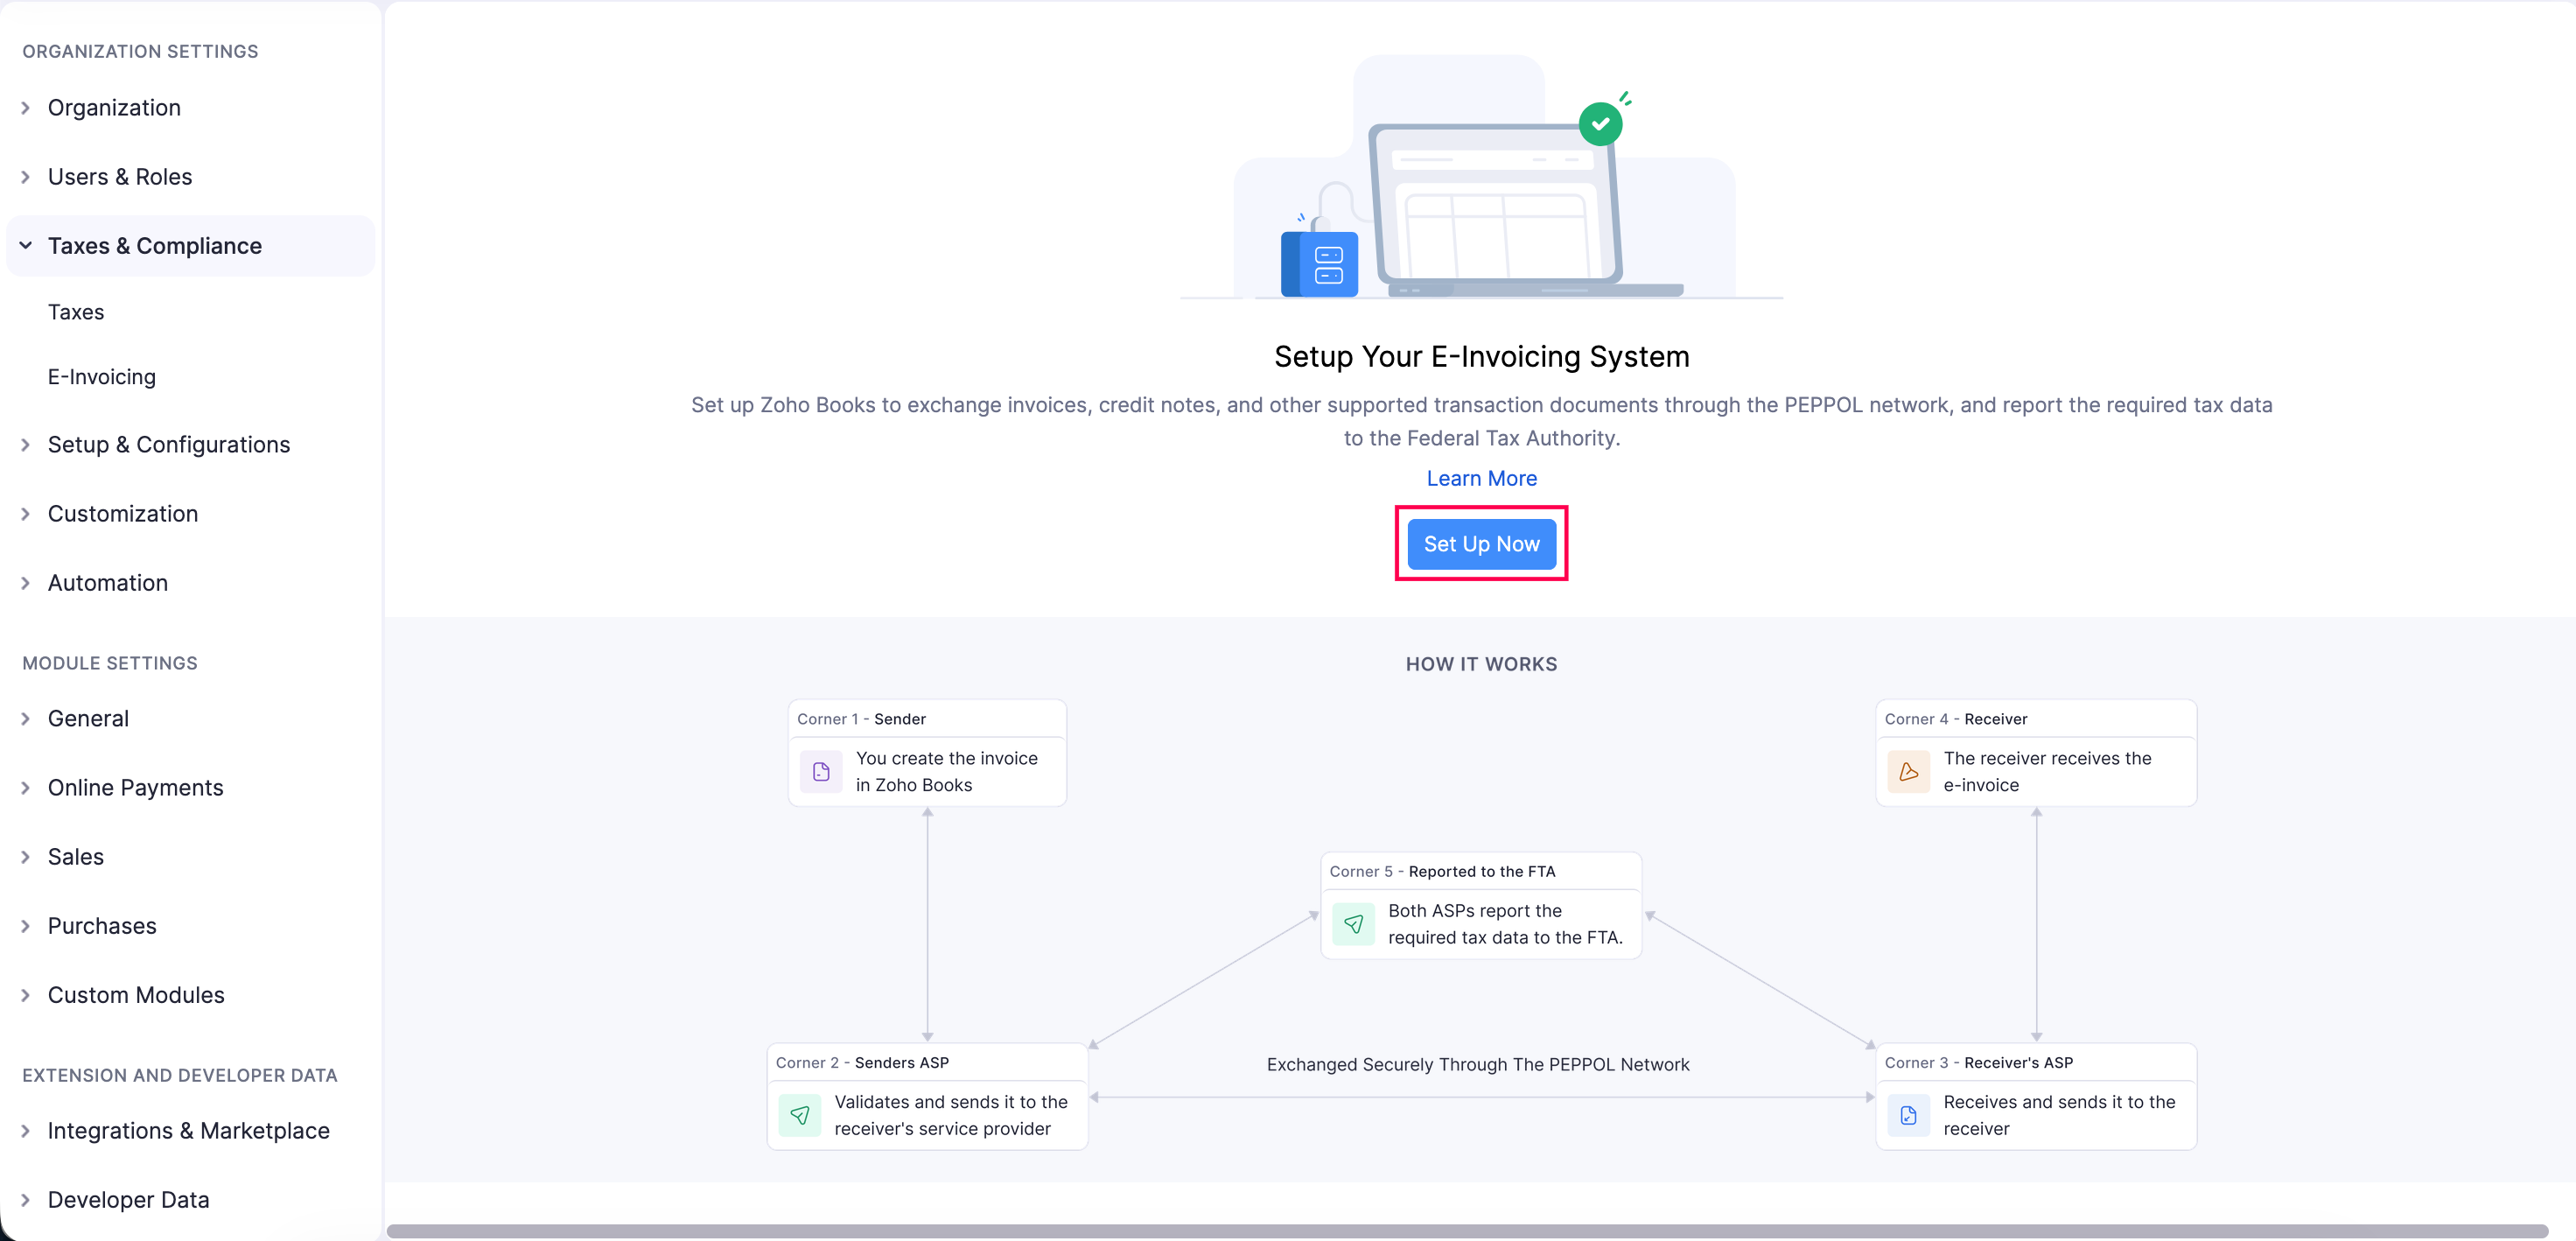
- Under Verify Your Details, add the following details:
- Registered Business Name
- TIN
- TRN
- Organisation Address
- FTA Registered Email ID (The email address you use to sign in to the EmaraTax portal)
Note: Any changes you make to the organisation details here will also be updated in the Organisation Profile section.
- Read and accept the Terms & Conditions.
- Click Save & Continue.
Once verified, you’re ready to connect your organisation to the FTA and select your ASP.
Step 2: Connect with FTA & ASP
Next, link your Zoho Books organisation to the FTA’s EmaraTax portal and select Zoho as your ASP. To do this:
Click Go to EmaraTax under Connect with FTA & ASP.
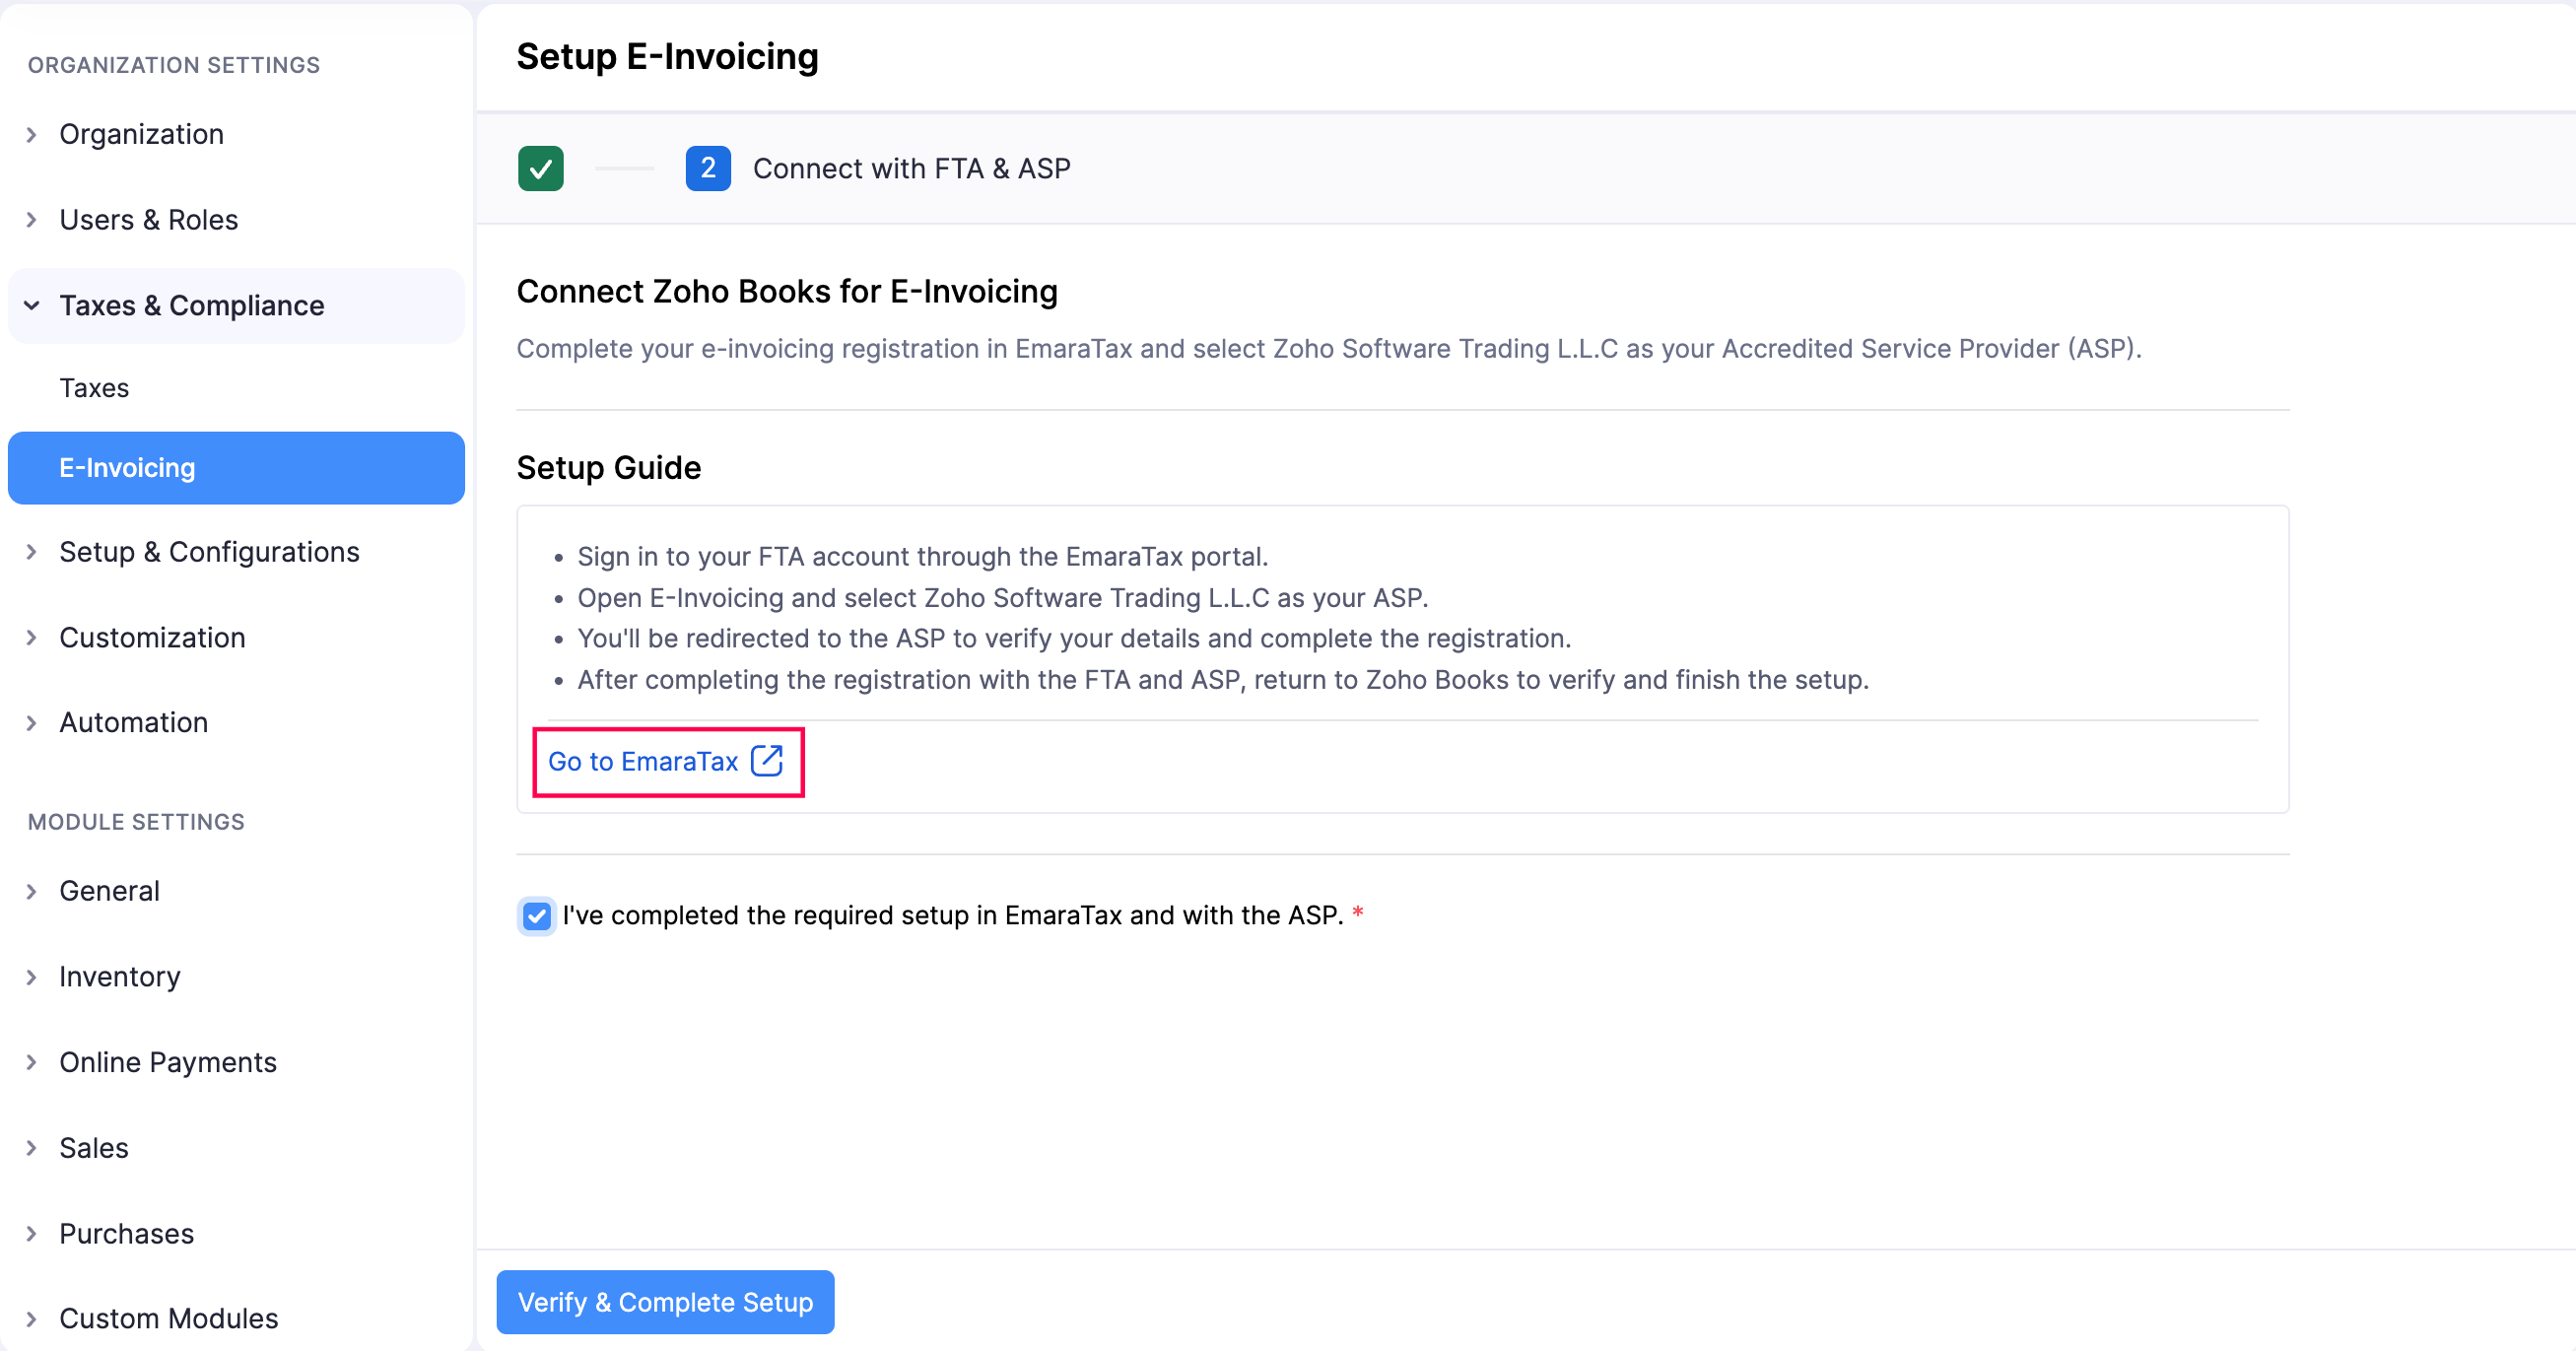
You will be redirected to the login page of the FTA EmaraTax portal.
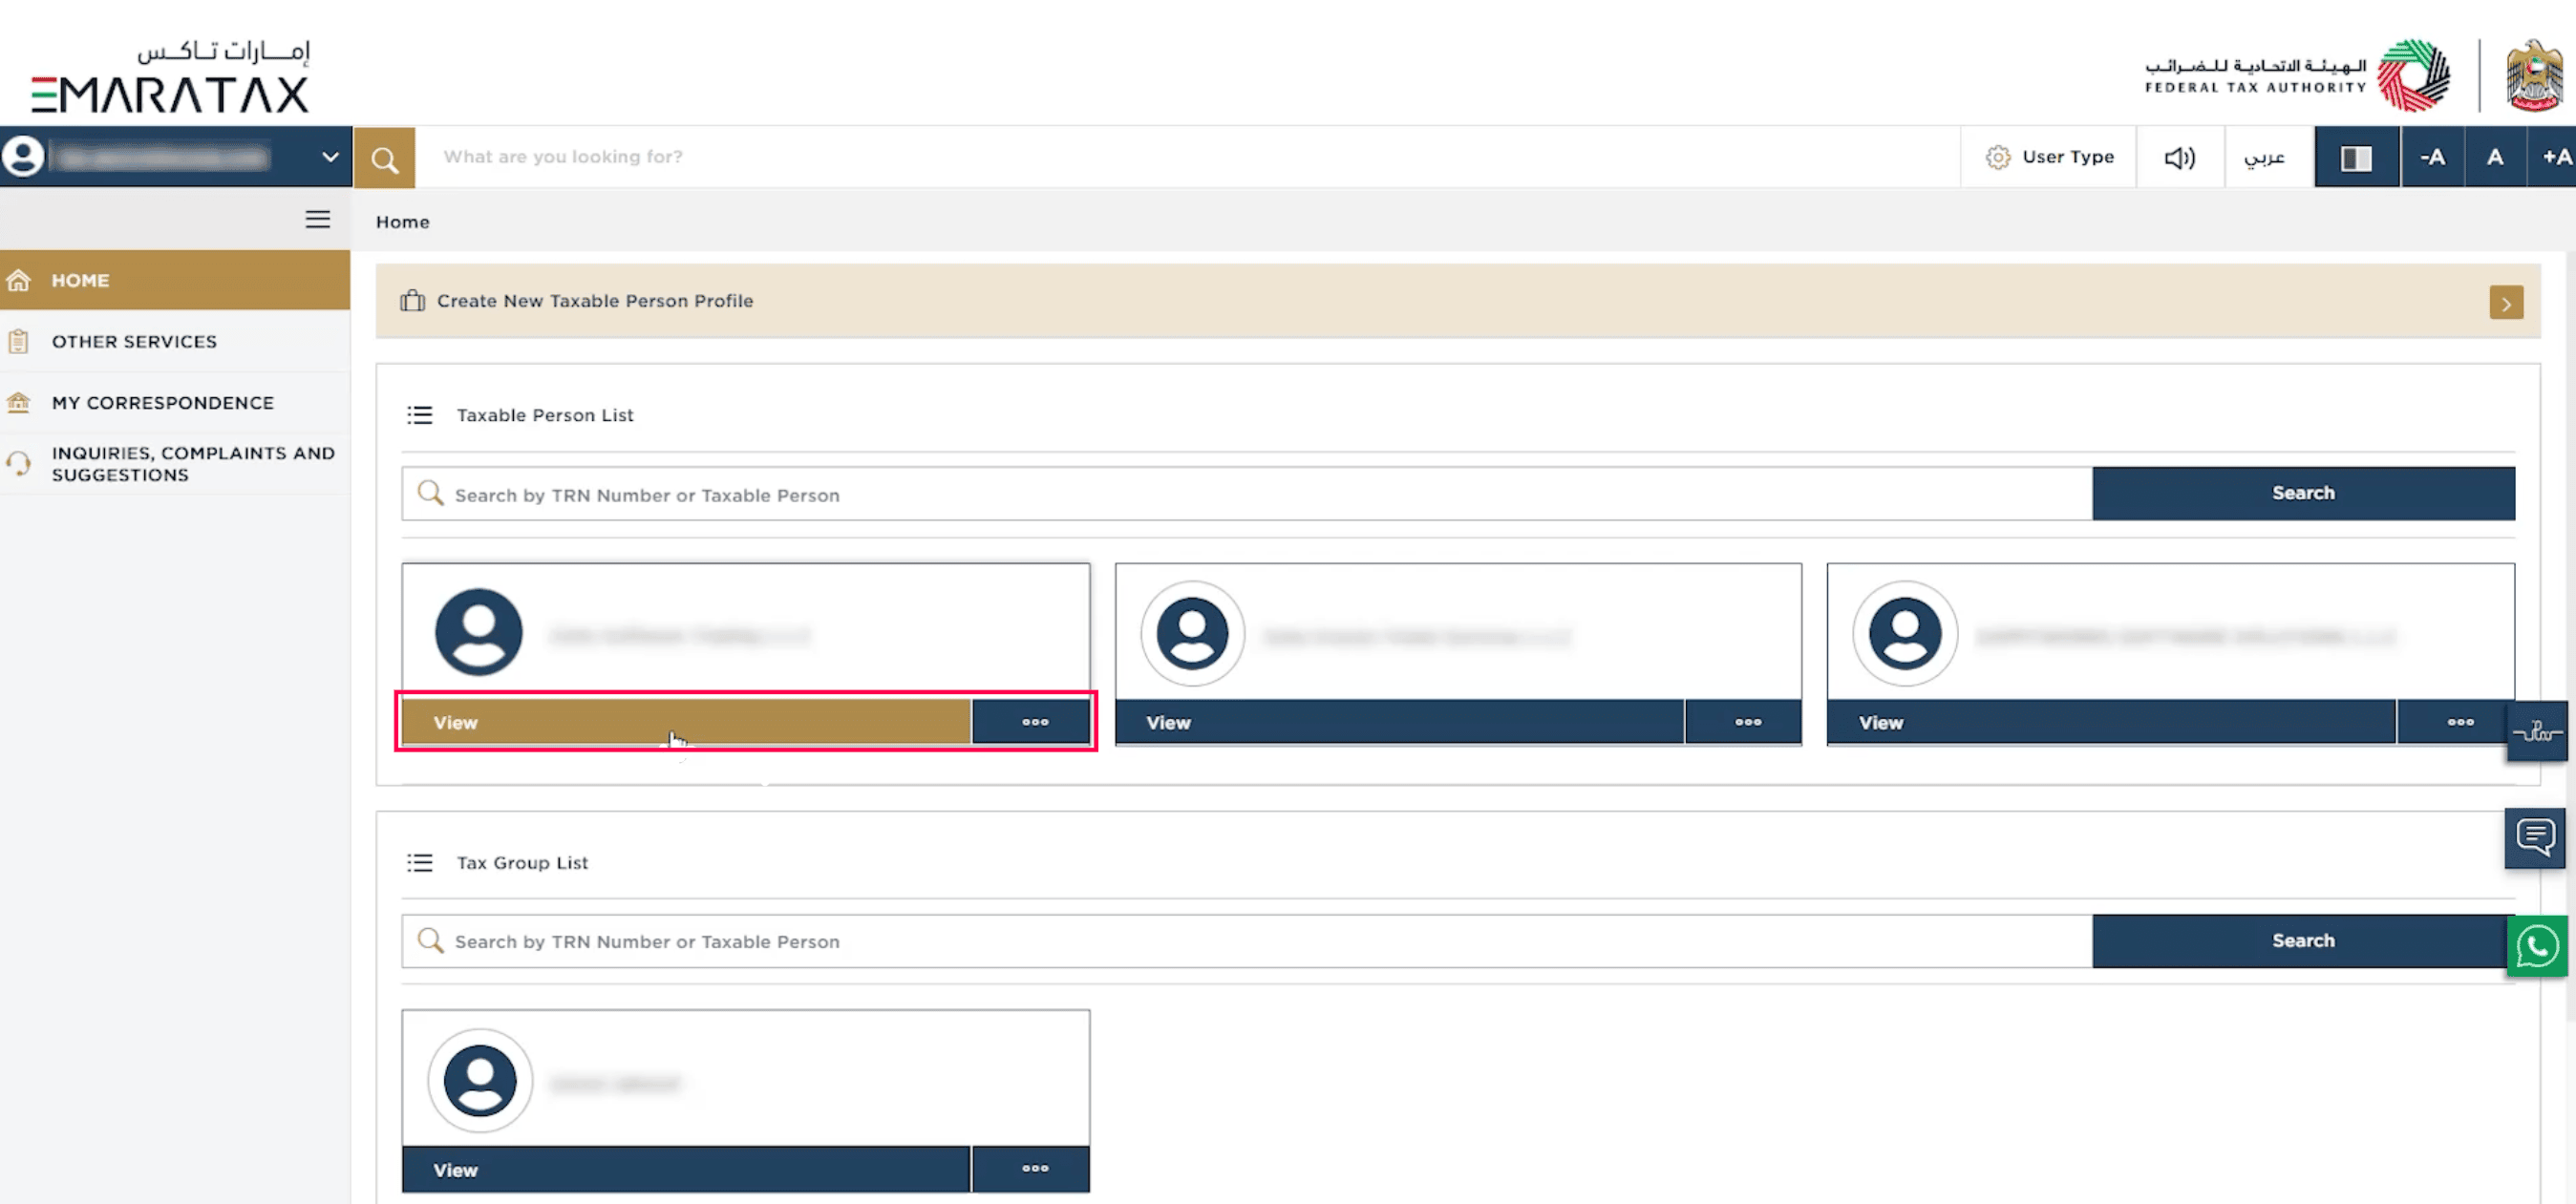
Enter your details and click Login.
Hover over the required taxable person and click View.
- In the pop-up that appears, verify your email and mobile number.
- Click Proceed.
Go to E-Invoicing on the left sidebar.
- Read the instructions and mark I confirm that have read the above instructions and guidelines.
- Click Submit and a pop-up opens on the EmaraTax page.
- Read the details and click Proceed.
Under List of ASPs for onboarding, search and select Zoho Software Trading LLC.
- Click Proceed to ASP.
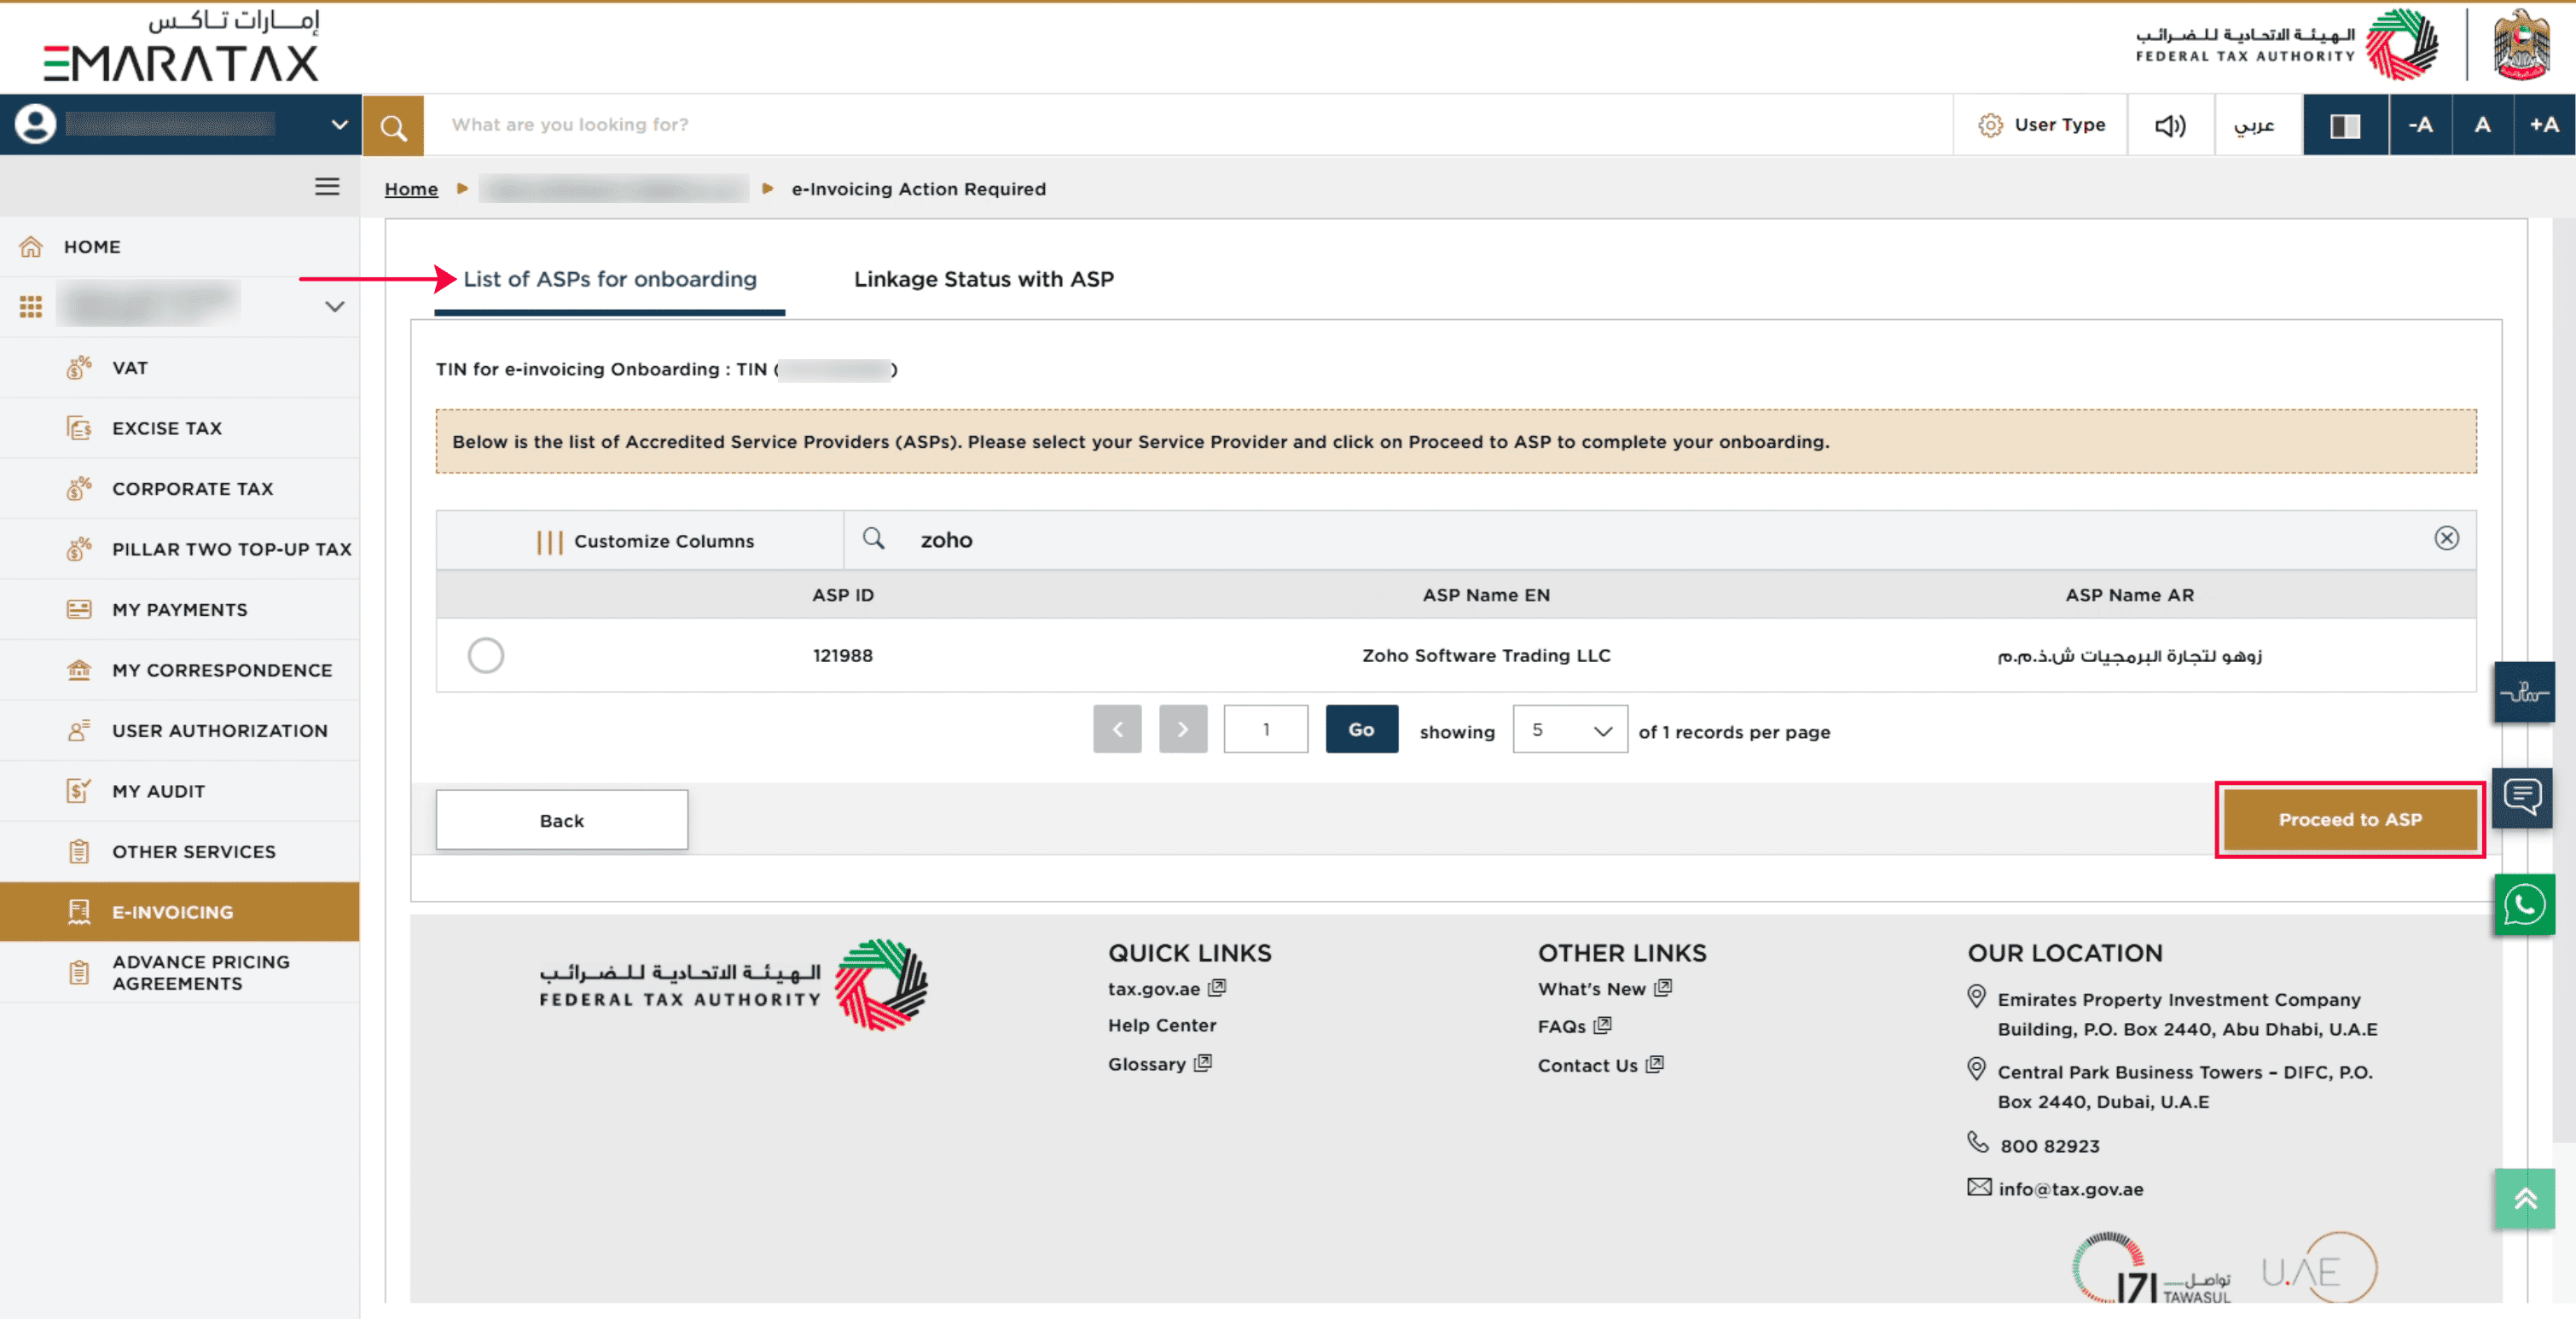
- Click Yes in the confirmation pop-up that appears. You will be redirected to the Zoho ASP page.
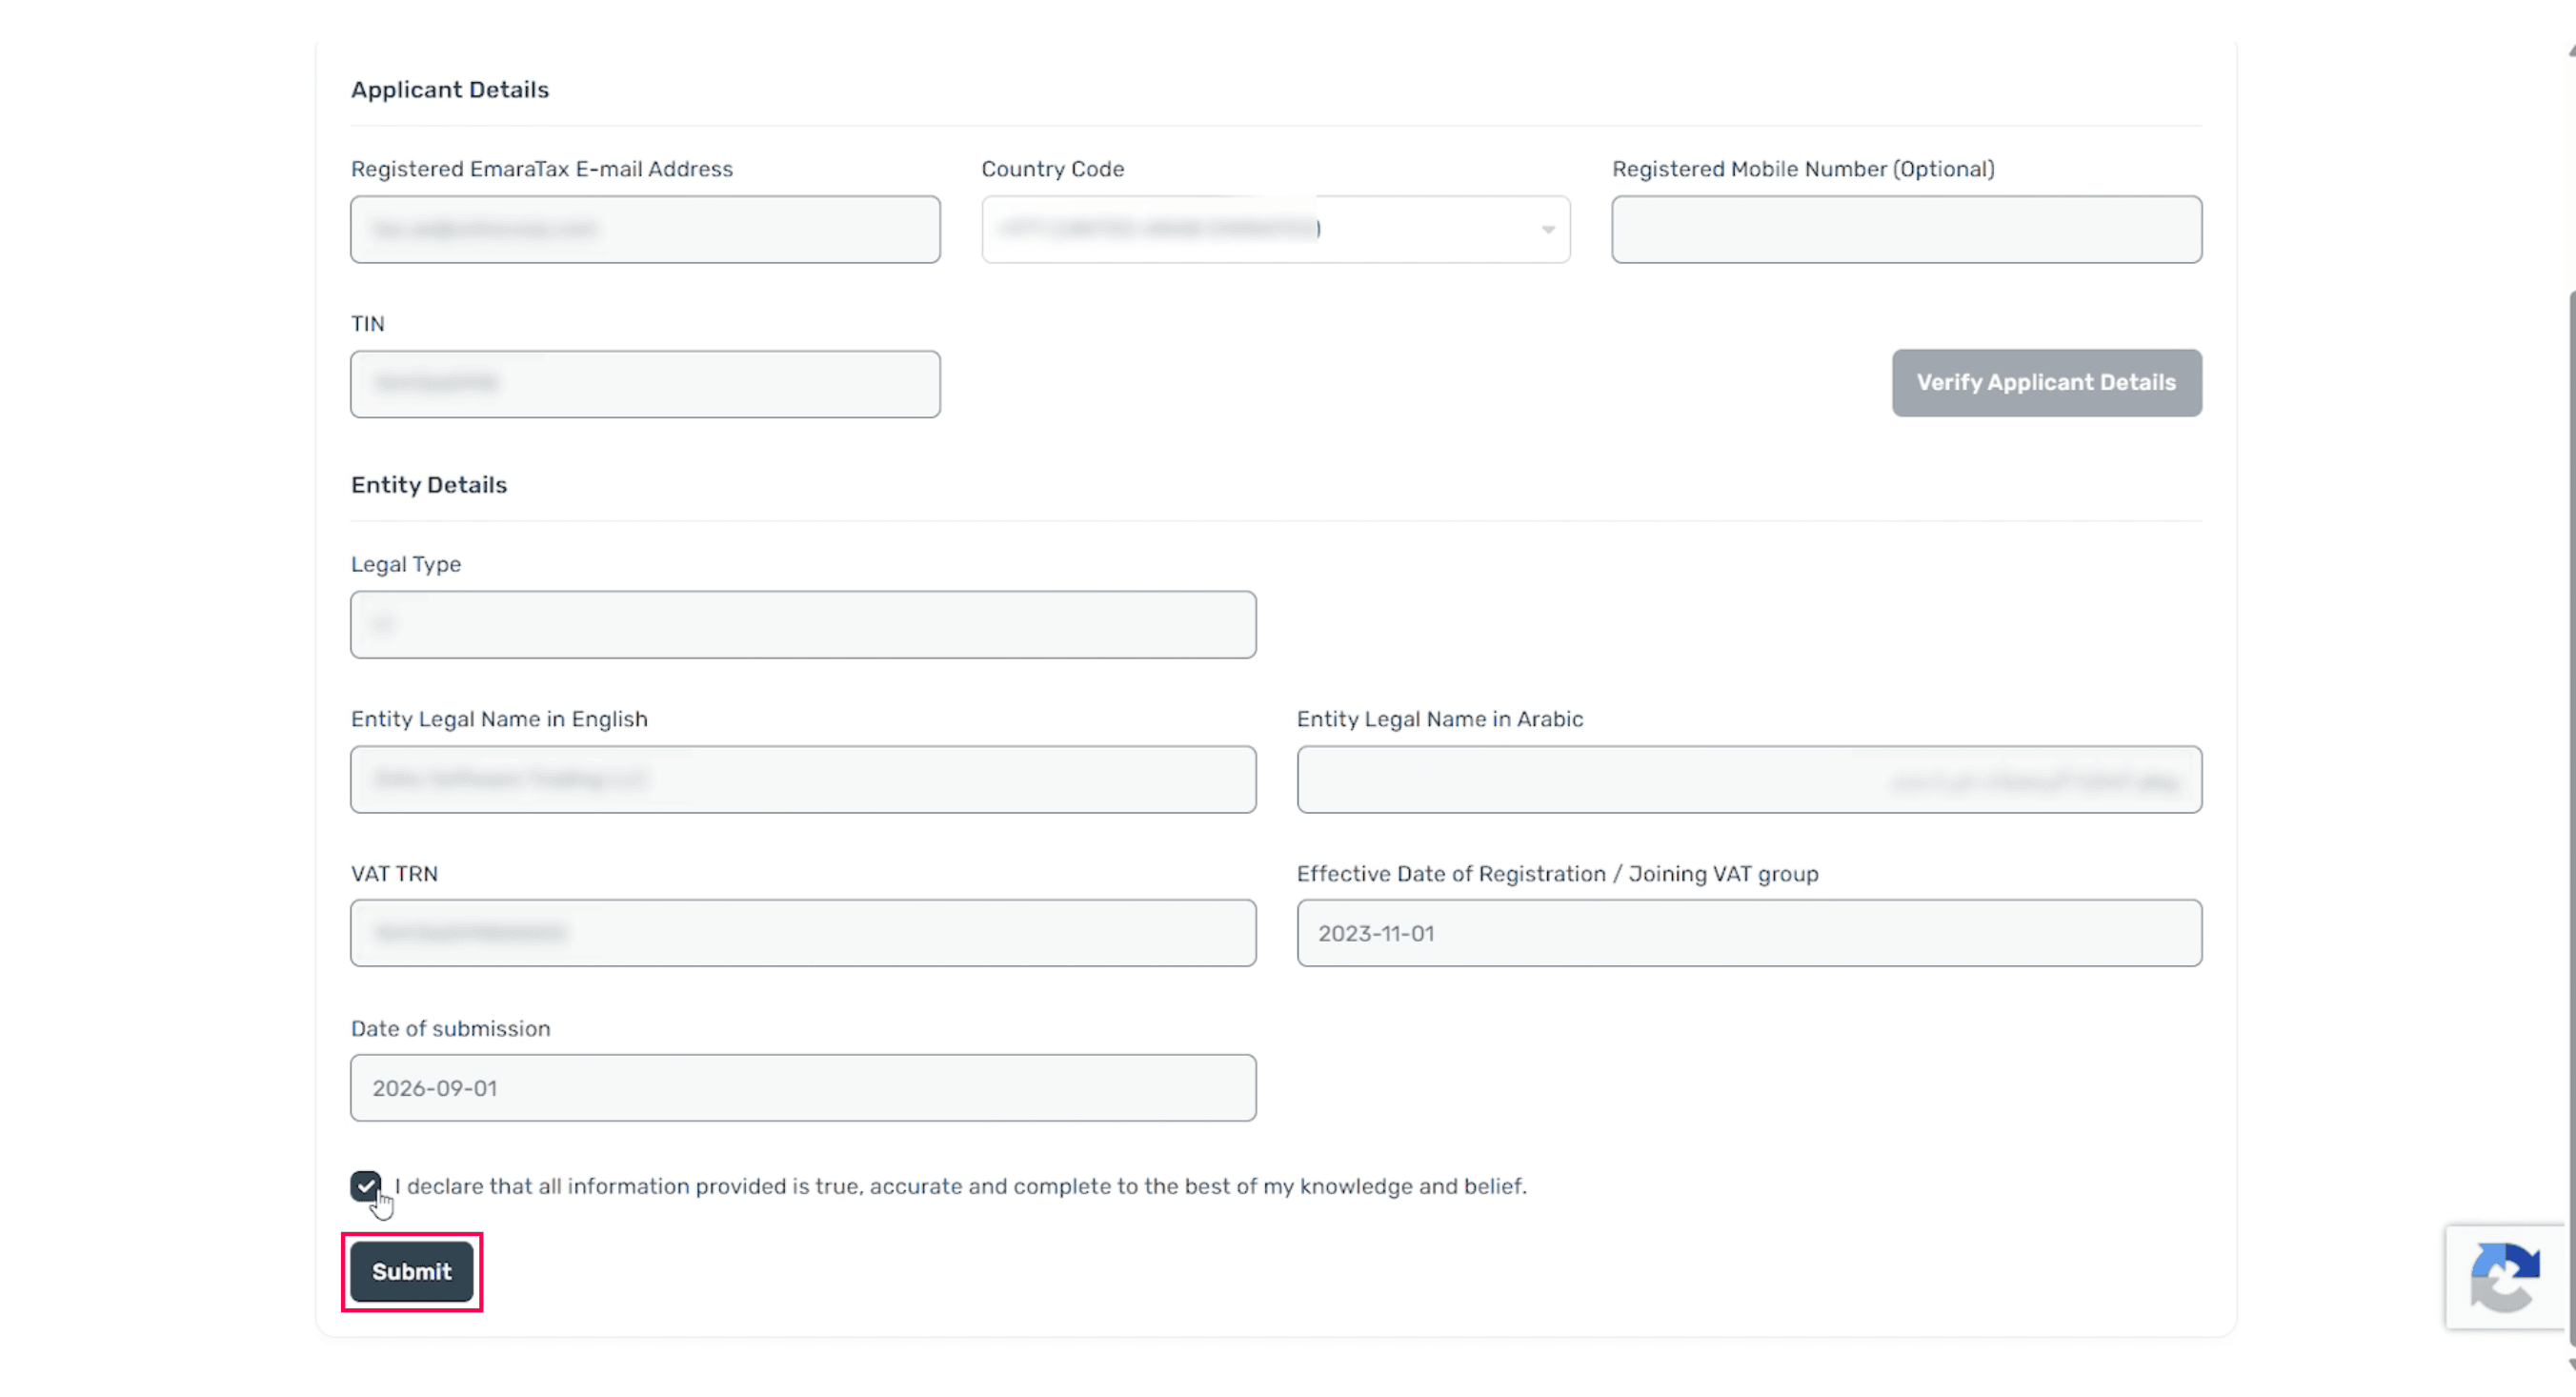
In the ASP page, under Applicant Details, add the following details:
- Registered EmaraTax E-mail Address
- TIN
- Registered Mobile Number (Optional)
Click Verify Applicant Details.
Check the details in Entity Details and mark the checkbox.
Click Submit.
Click Got it, Close Tab to finish the setup on the FTA portal.
Once done, go back to Zoho Books to complete the setup.
Step 3: Finish Setup in Zoho Books
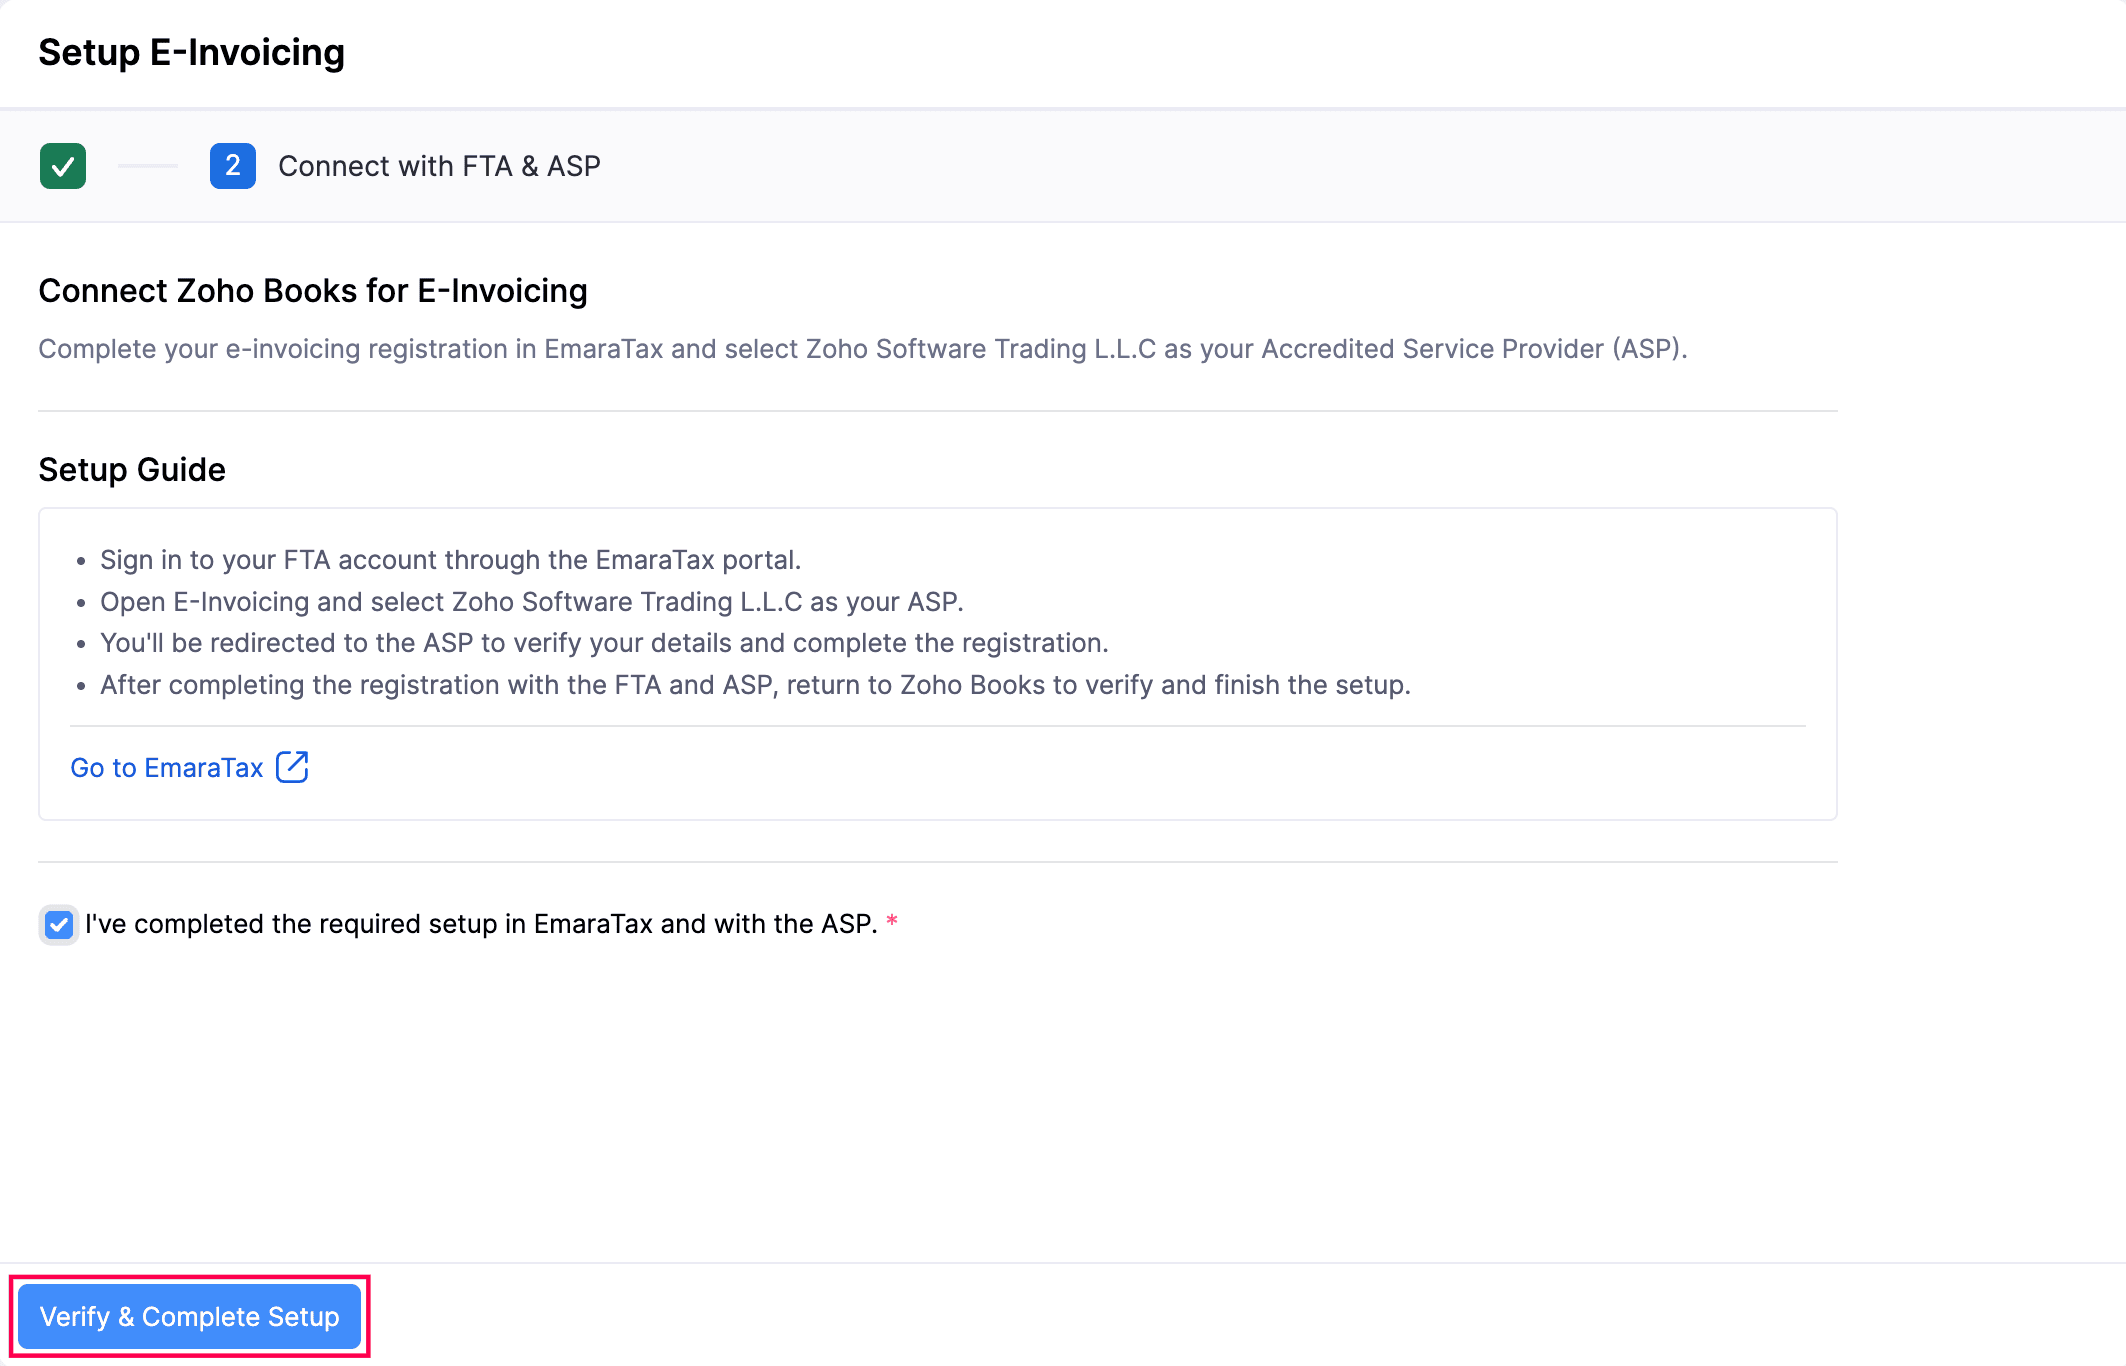
Complete the setup by verifying the connection in Zoho Books. To verify:
Go to Zoho Books E-Invoicing Setup page.
Click Verify & Complete Setup.
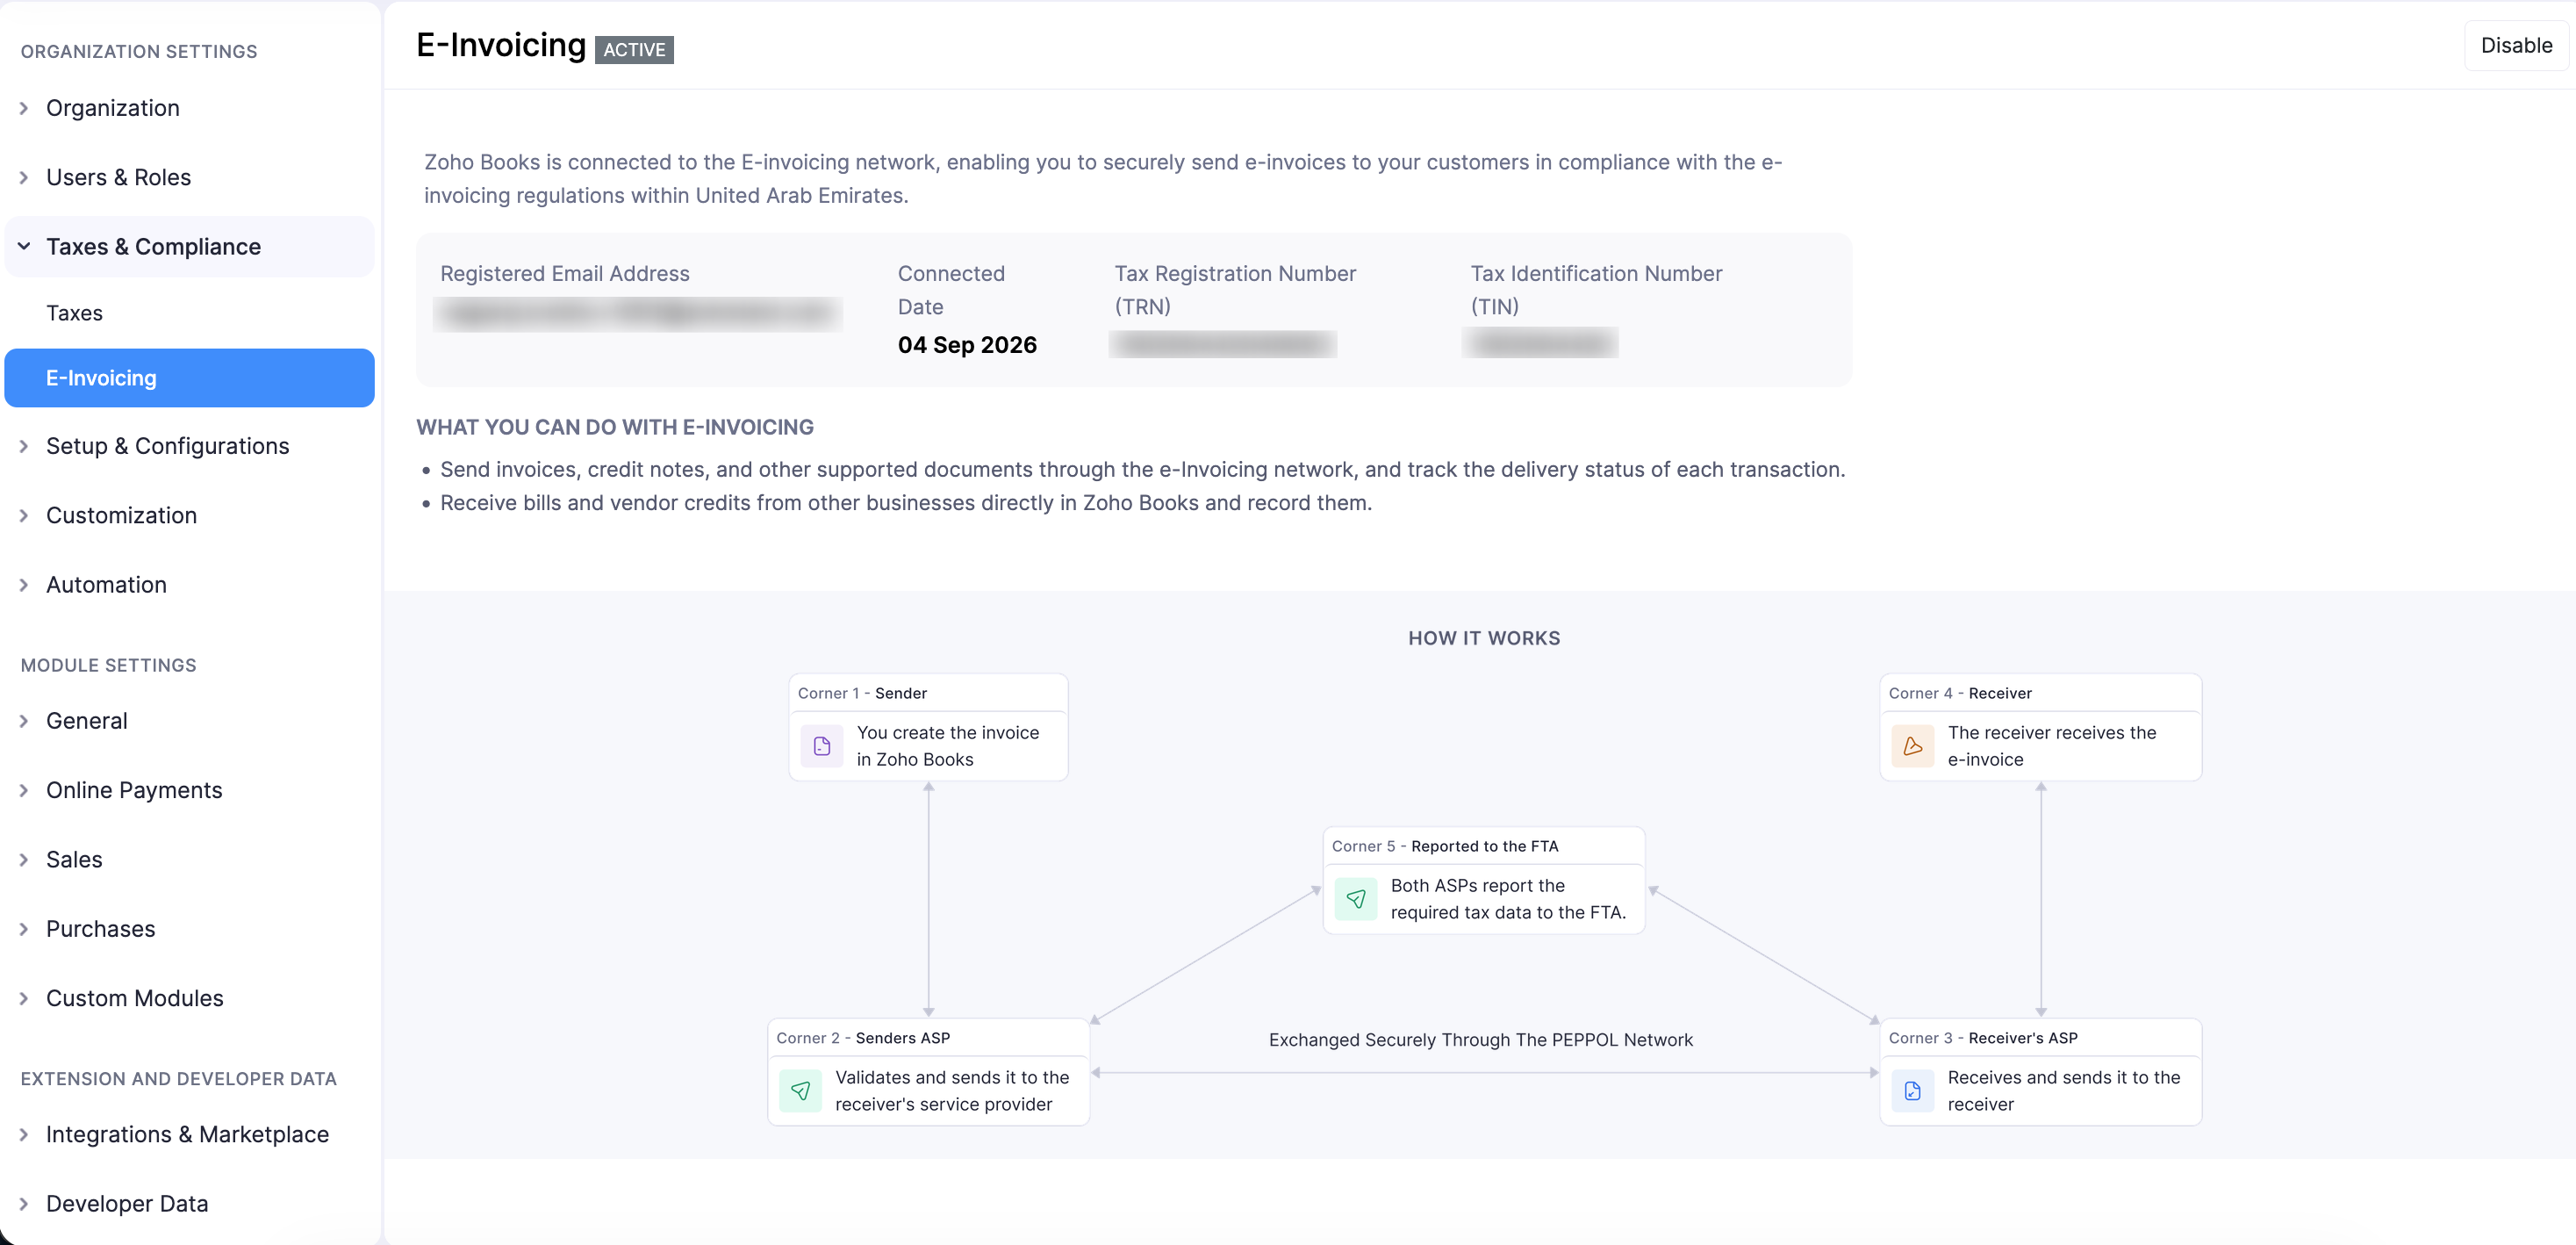
Once the setup is complete, Zoho Books connects your organisation to the FTA portal.
Send Transactions via Peppol
After E-Invoicing is configured, you can send e-invoices and credit notes to your customers through the Peppol network.
To send an invoice via Peppol:
Go to Invoices under Sales.
Create a new invoice or open an existing draft invoice.
Enter all the required details and save the invoice as a draft.
Open the invoice and click Send Invoice in the What’s Next section.
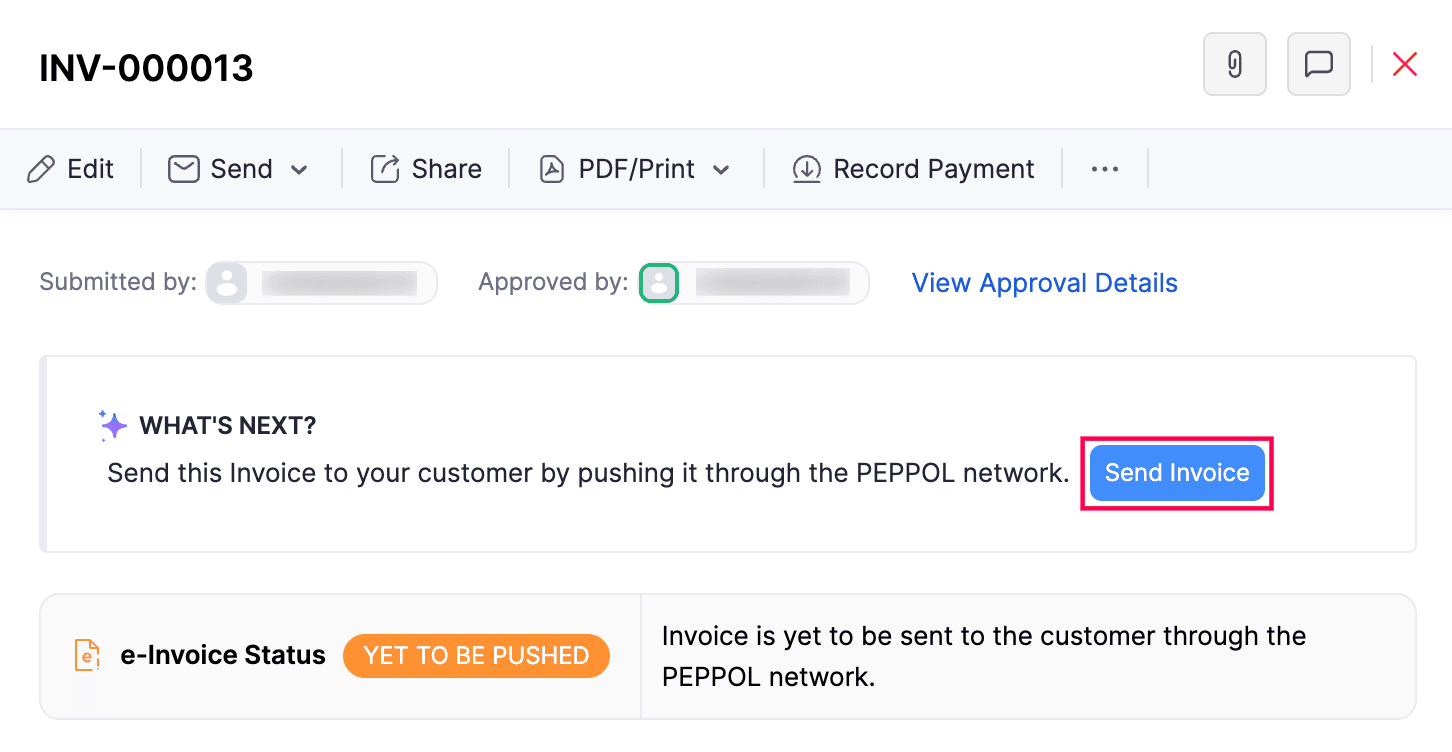
Insight: Invoices sent through Peppol use the Standard E-Invoice Bilingual Template by default, which generates a bilingual PDF in English and Arabic as required for UAE compliance. You can change the template by clicking Change next to the PDF Template label at the bottom of the invoice details page.
The invoice is sent to your customer through the Peppol network. Once successfully sent, the e-Invoice Status on the invoice details page will update to Pushed, and a UUID will be generated for the invoice. You can copy it by clicking Copy UUID next to the e-invoice status to use as a reference when tracking the transaction or raising a query with the FTA or your ASP.
Your customer will receive the invoice as a purchase bill in their accounting system.
Note:
- Once an invoice is sent through Peppol, it cannot be edited or deleted.
- Child invoices generated from recurring invoices will be sent automatically through Peppol. If there are any errors while sending, you will be notified both in the app and by email.
- If an invoice fails to send, the e-Invoice Status will show Failed along with the reason. Correct the errors and click Send Invoice again to retry.
You can also view a summary of your e-invoice activity in the Invoices list view. The Einvoice Summary bar at the top of the list shows the count of pushed, yet to be pushed, and failed invoices. To filter by e-invoice status, click the All Invoices dropdown and select the relevant status.
Receive Transactions via Peppol
In Zoho Books, you can receive transactions sent by your vendors via Peppol. When a vendor sends you an invoice, it will be received as a bill in your organisation. When a vendor sends you a credit note, it will be received as a vendor credit.
Received transactions are saved in the Draft status. To verify a received transaction:
- Go to Bills or Vendor Credits under Purchases.
- Select the transaction to open and verify its details.
Statuses of Transactions in E-Invoicing
The e-invoice status of each transaction is displayed on the transaction’s details page. The possible statuses are:
| Status | Description |
|---|---|
| Yet To Be Pushed | When you create a transaction and save it as a draft, the status of the transaction will be Yet To Be Pushed. |
| Pushed | When you send the transaction to your customer and there are no errors, the status of the transaction will be changed to Pushed. |
| Failed | If there are any errors, such as missing fields in the transaction, the e-invoice will not be sent and the status will be changed to Failed. You can rectify the errors and try again. |
Allow Users to Push Transactions
You can allow users in your organisation to push transactions through Peppol by assigning the appropriate roles. This ensures that only authorised users can push transactions through Peppol.
To allow users to push transactions:
- Go to Settings in the top right corner of the page.
- Select Roles under Users & Roles in the Organisation Settings pane.
- Create a new role or edit an existing one.
- Mark Push Transactions under E-Invoicing to allow users with this role to push transactions.
After enabling the permission for a role, users assigned to that role will be able to push transactions through Peppol. You can unmark this option at any time to restrict users from performing these actions.
Disable E-Invoicing
You can disable E-Invoicing in Zoho Books if you no longer want to use Zoho Books as your e-invoicing service provider. Disabling E-Invoicing requires completing two steps: disabling it in Zoho Books and then de-linking Zoho Books on the FTA portal.
Warning: Disabling E-Invoicing will disconnect Zoho Books from the Peppol network. You will not be able to send or receive transactions through Peppol until you reconfigure E-Invoicing.
Step 1: Disable in Zoho Books
To disable E-Invoicing in Zoho Books:
Go to Settings in the top right corner of the page.
Select E-Invoicing under Taxes & Compliance in the Organisation Settings pane.
Click Disable at the top of the page.
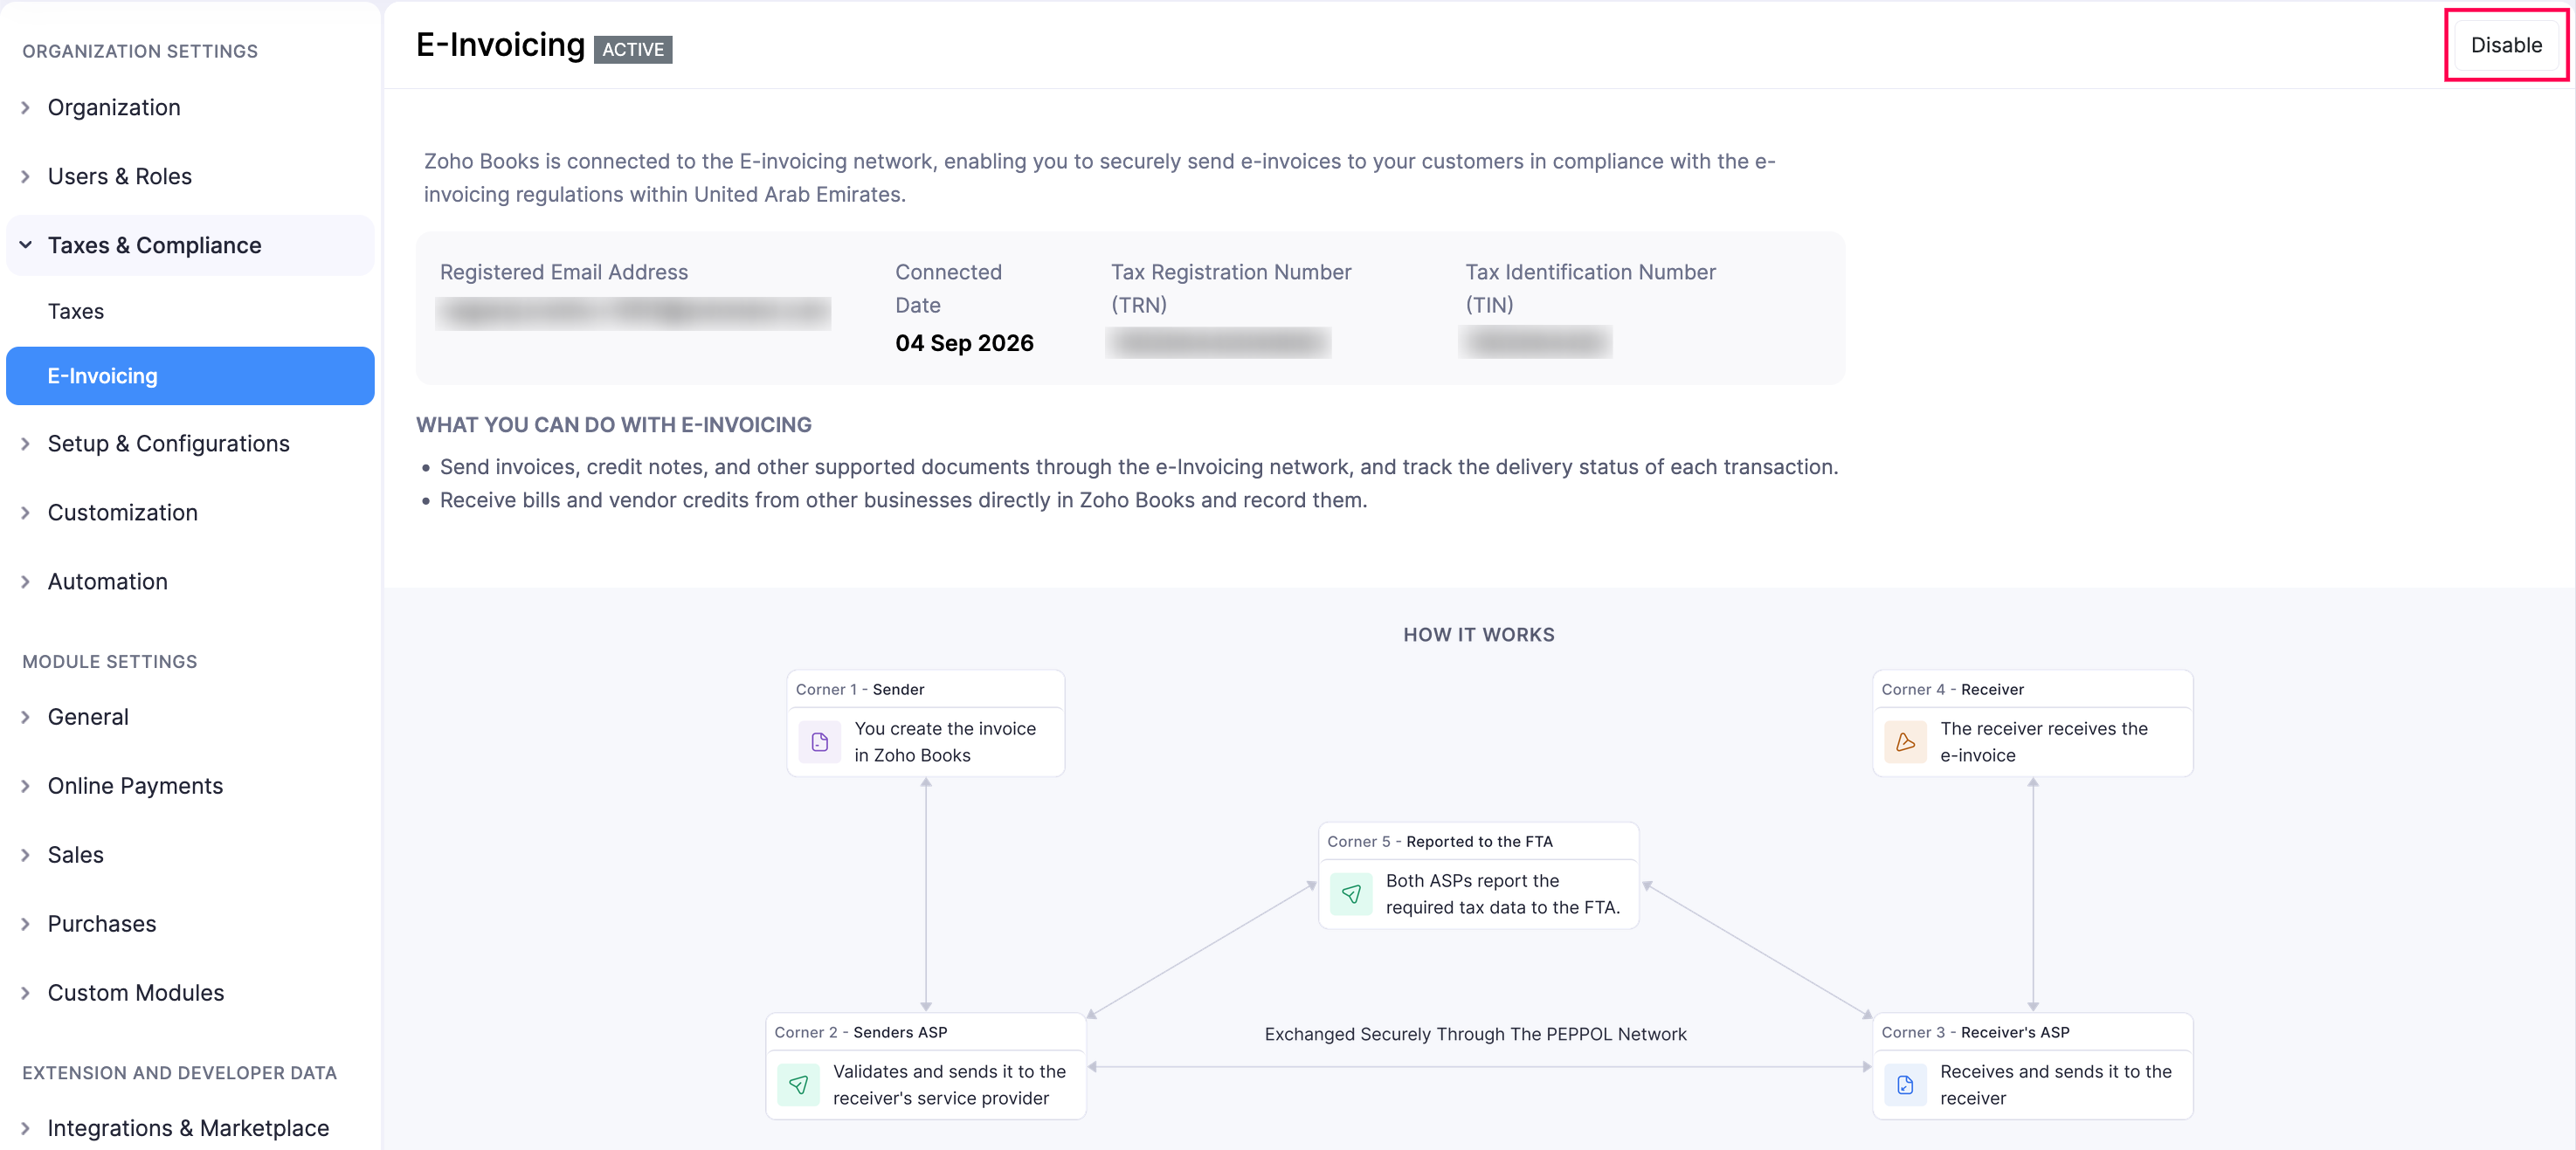
Confirm the action in the pop-up that appears.
Click Go to FTA Portal in the pop-up that appears.
You will be redirected to the login page of the FTA EmaraTax portal.
Step 2: De-link Zoho Books on the FTA Portal
To de-link Zoho Books on the FTA portal:
Enter your details and click Login in the FTA portal.
Hover over the required taxable person and click View.
Go to E-Invoicing on the left sidebar.
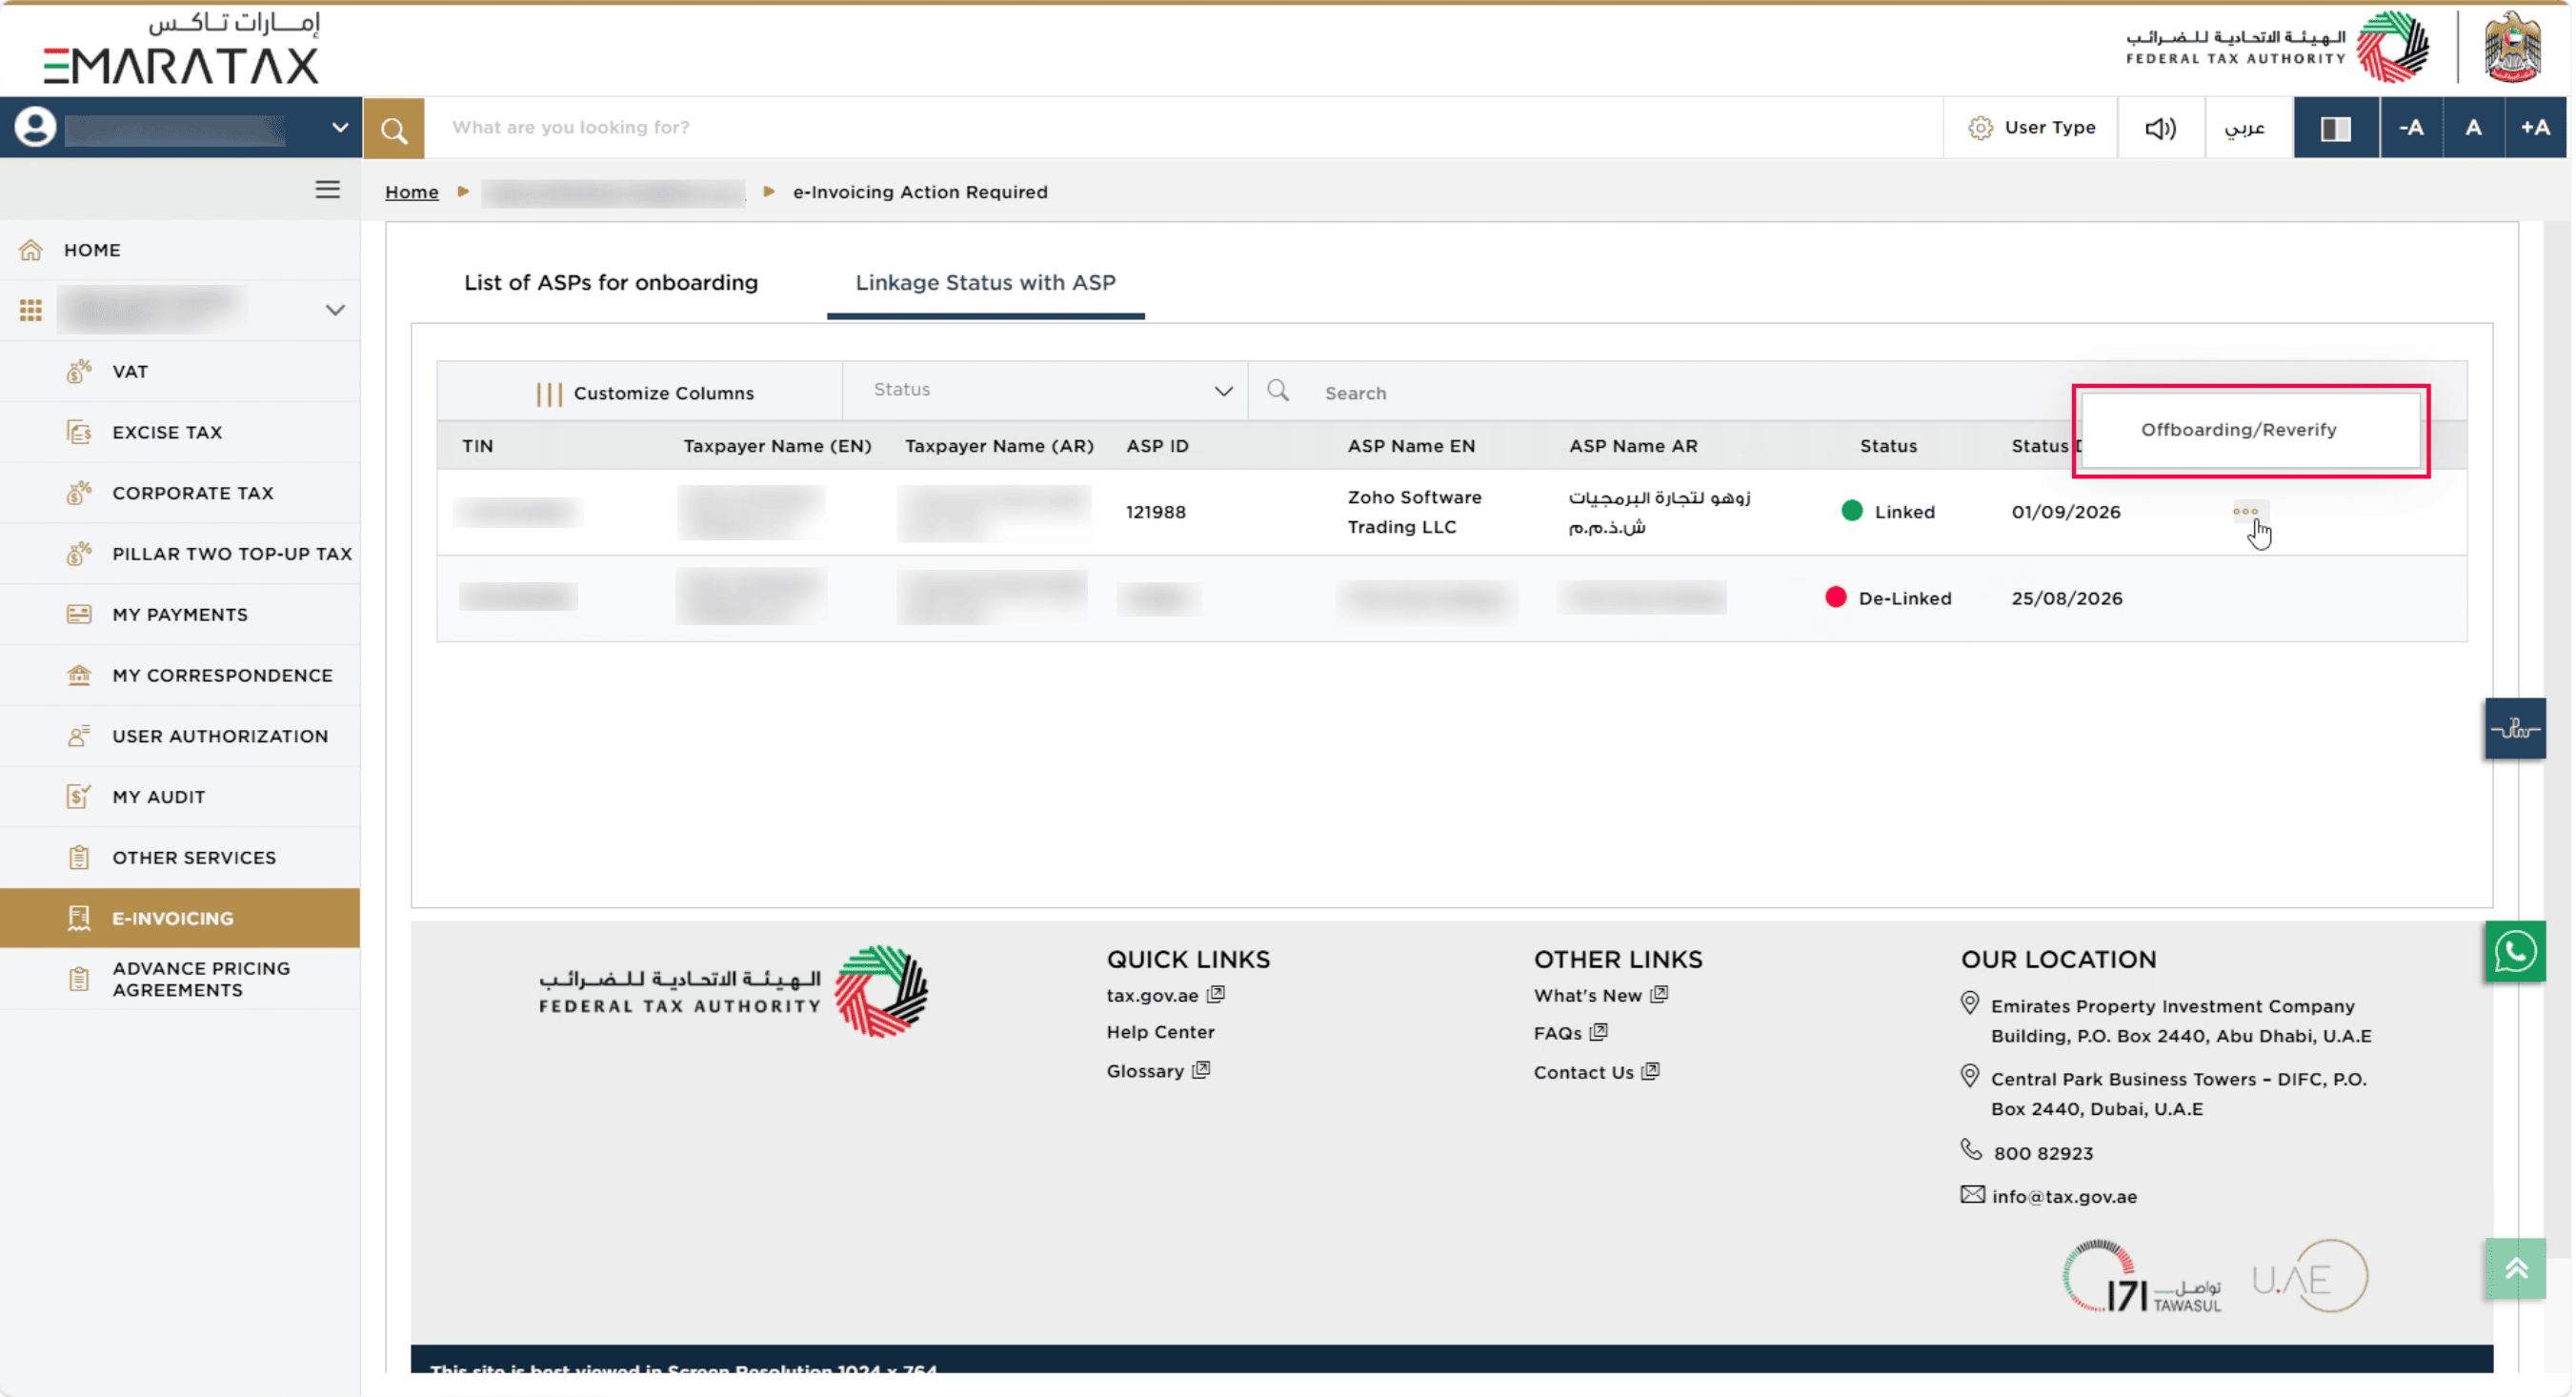
Navigate to the Linkage Status with ASP tab.
Click the More icon next to the ASP which you want to disable.
Select Offboarding/Reverify.
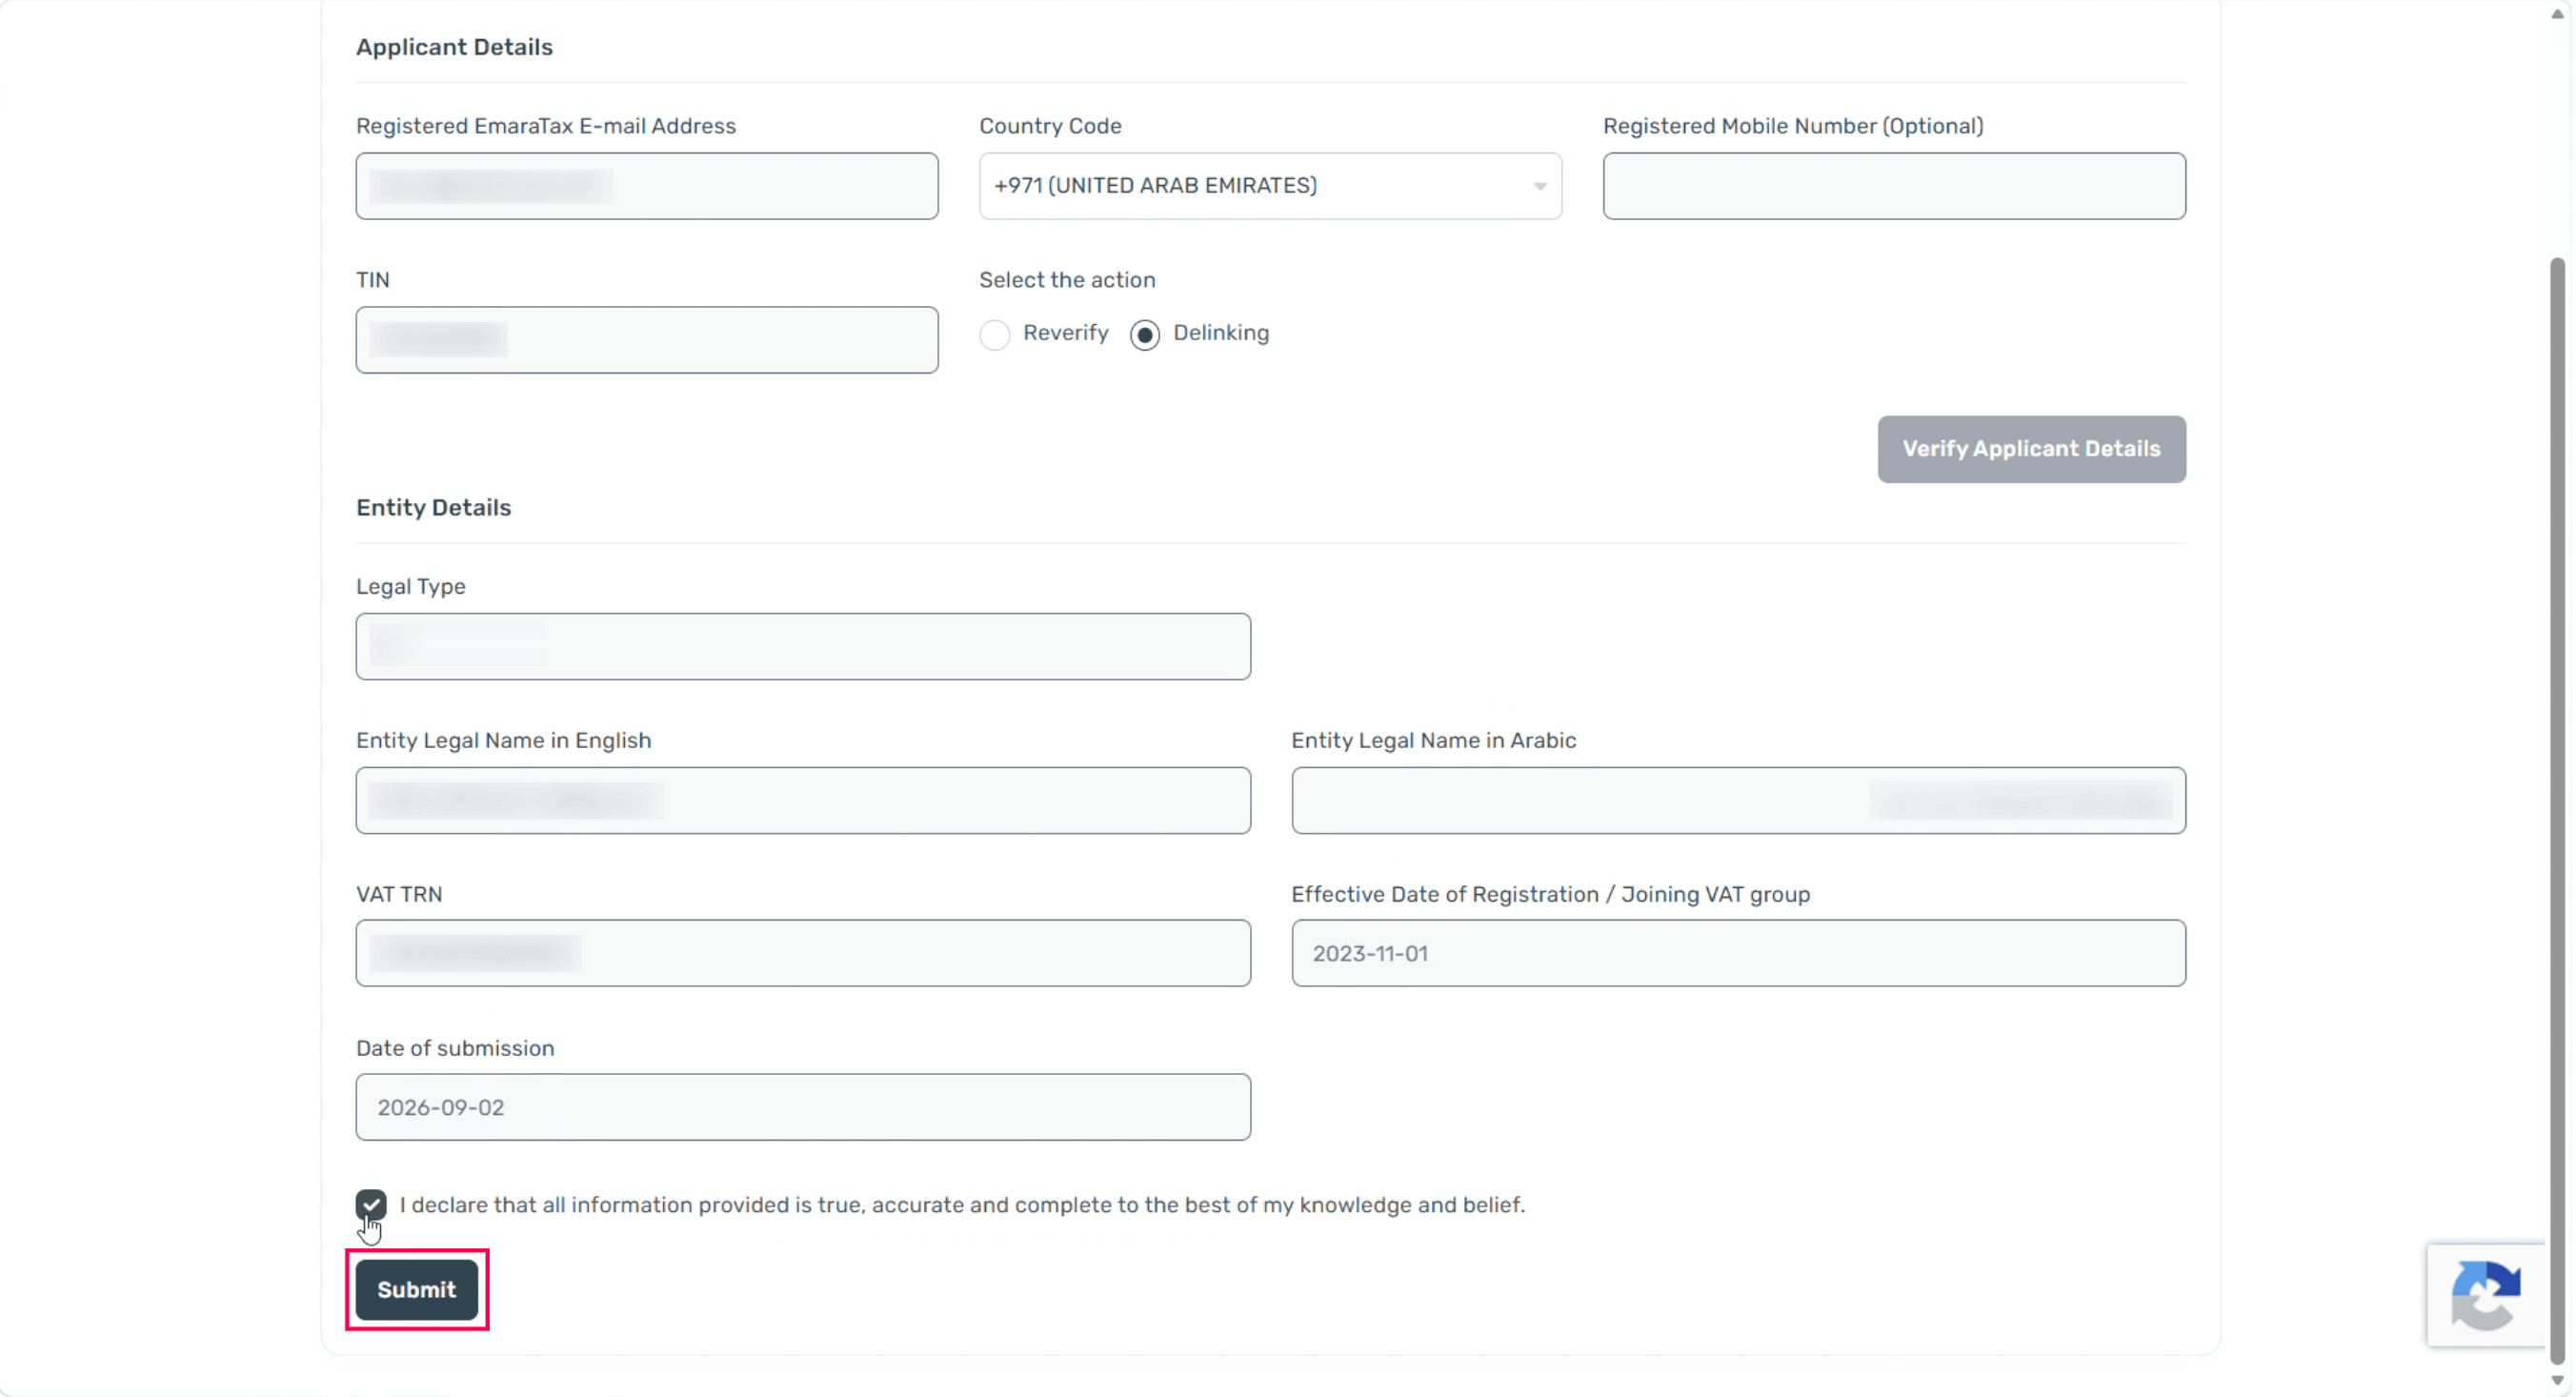
In the ASP page, select De-link next to Select the action.
- Click Verify Applicant Details.
- Check the details in Entity Details and mark the checkbox.
- Click Submit.
- Click Got it, Close Tab to finish.
Then back in Zoho Books, click Proceed to complete the process.
E-Invoicing will be disabled in both EmaraTax portal and Zoho Books. To send and fetch transactions through Peppol again, configure E-Invoicing from Settings.
 Yes
Yes