Buy new domains through Zoho Mail
To host custom email addresses in Zoho Mail, you can either use the domain you already own or purchase a new one. In case you want to purchase a new domain, you can do so right from your Zoho Mail Admin Console during or after sign-up. Purchasing a new domain via Zoho allows us to automatically verify and configure the email delivery (MX records) which in turn gives you a hassle-free experience.
Note:
The number of domains that a free user can buy and host with Zoho Mail is restricted to one. For more details contact support@zohomail.com.
New domain registration
Associate Domain Registrars
Zoho Mail facilitates the registration of domains for customers by partnering with certain Domain registrars. While your domain registration is being enabled through Zoho Mail, your Whois data storage and any domain renewal process among others are handled by the relevant domain registrar.
The registrars Zoho Mail's associated with are,
- GoDaddy
- OpenSRS
Buy domain after sign-up: from Zoho Mail Admin Console
- Log in to Zoho Mail Admin Console.
- Navigate to the Domains section in the left pane.
- At the top of the Domains page, click Buy.
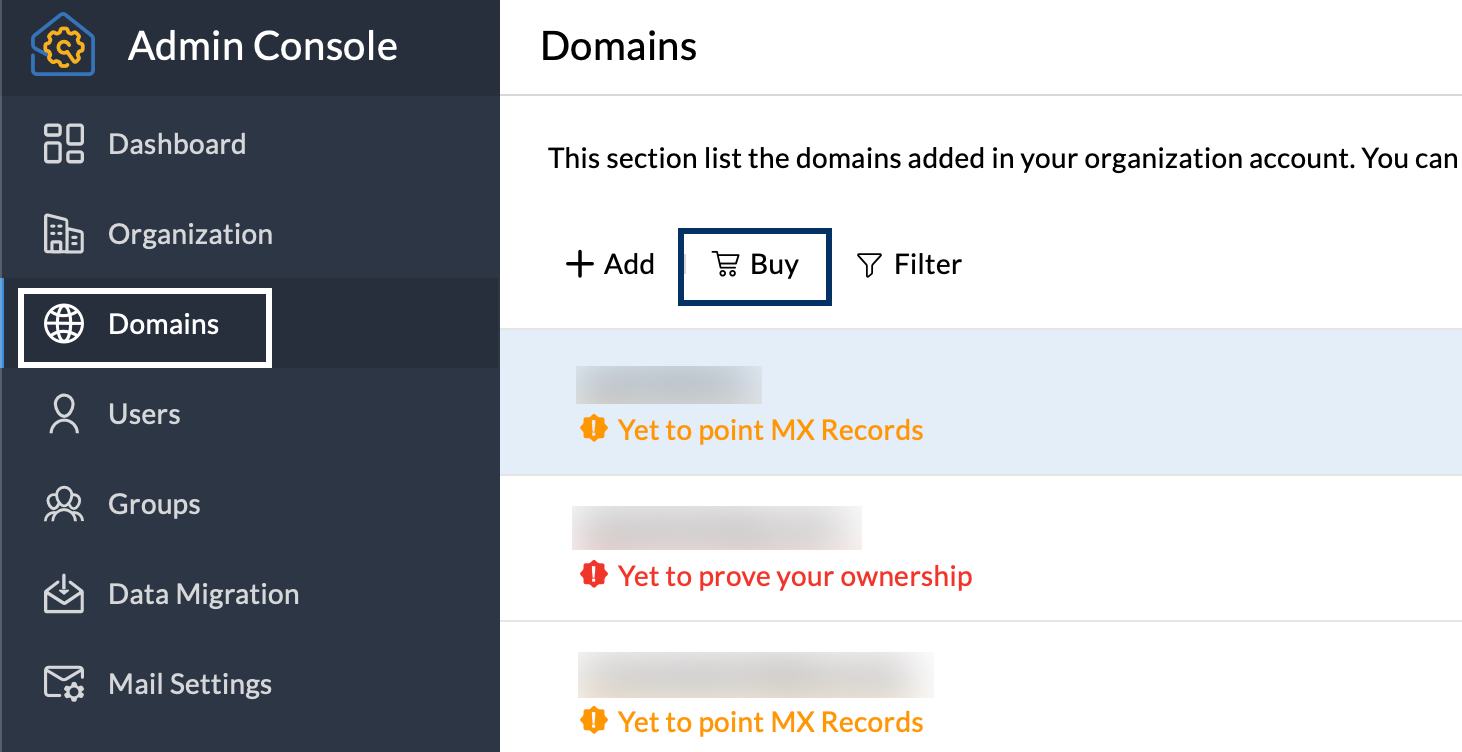
- Upon clicking Buy, you will be taken to the Buy Domain page of the Admin Console. Buying a domain in Zoho Mail involves 3 steps.
- Choose your domain
- Give your registration info
- Pay for the domain
- Search for the domain of your choice and select the one that suits your preferences the best.
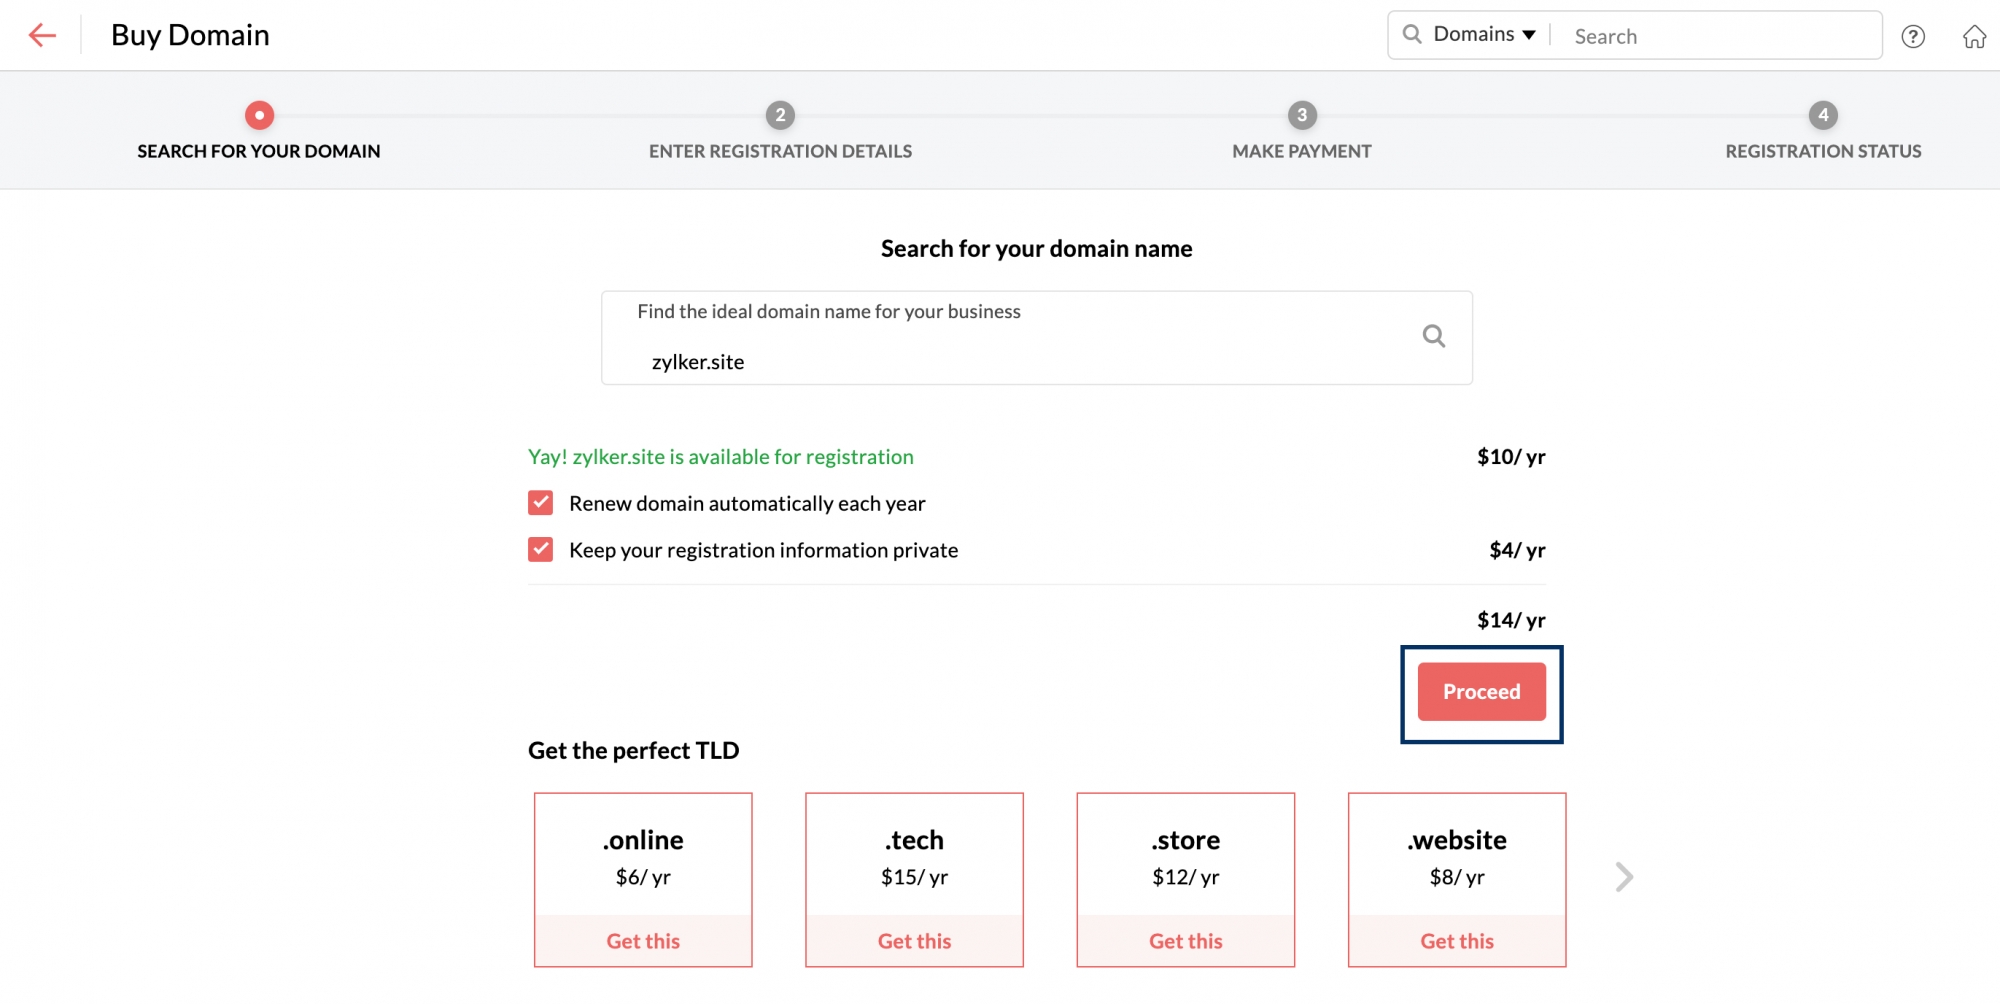
- You can uncheck the Renew domain automatically each year option if you don't want the domain service provider to automatically extend your domain's subscription time.
- In case you want to keep your domain information private and unavailable in WHOIS, check the Keep your registration information private option. If you check this option, you will be required to pay an additional cost for the same.
- Once done, click Proceed.
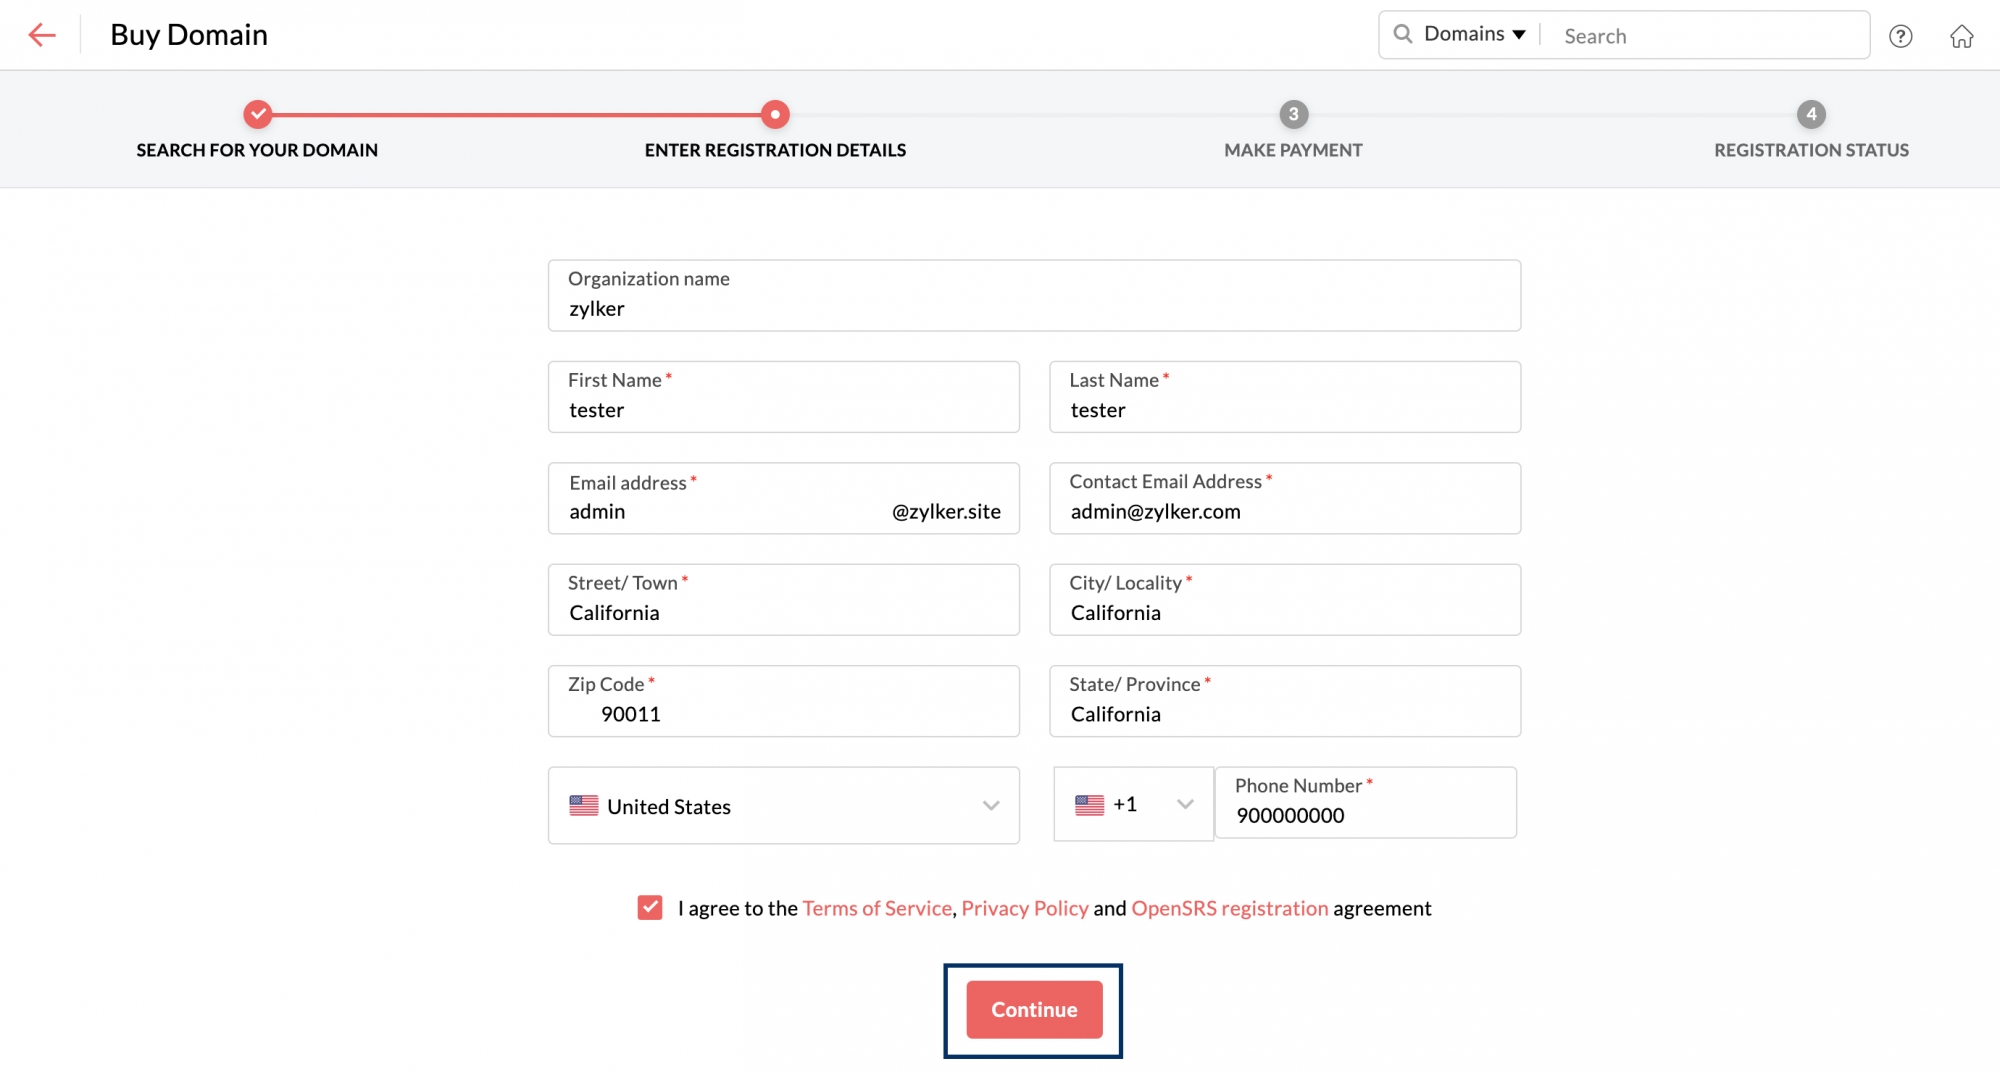
- On the registration details page, enter the required info and click Continue. Make sure you check the option to agree to the terms and conditions of the domain provider.
- Your domain is now ready to be registered under the details you provided. Click Pay Now to proceed with the payment.
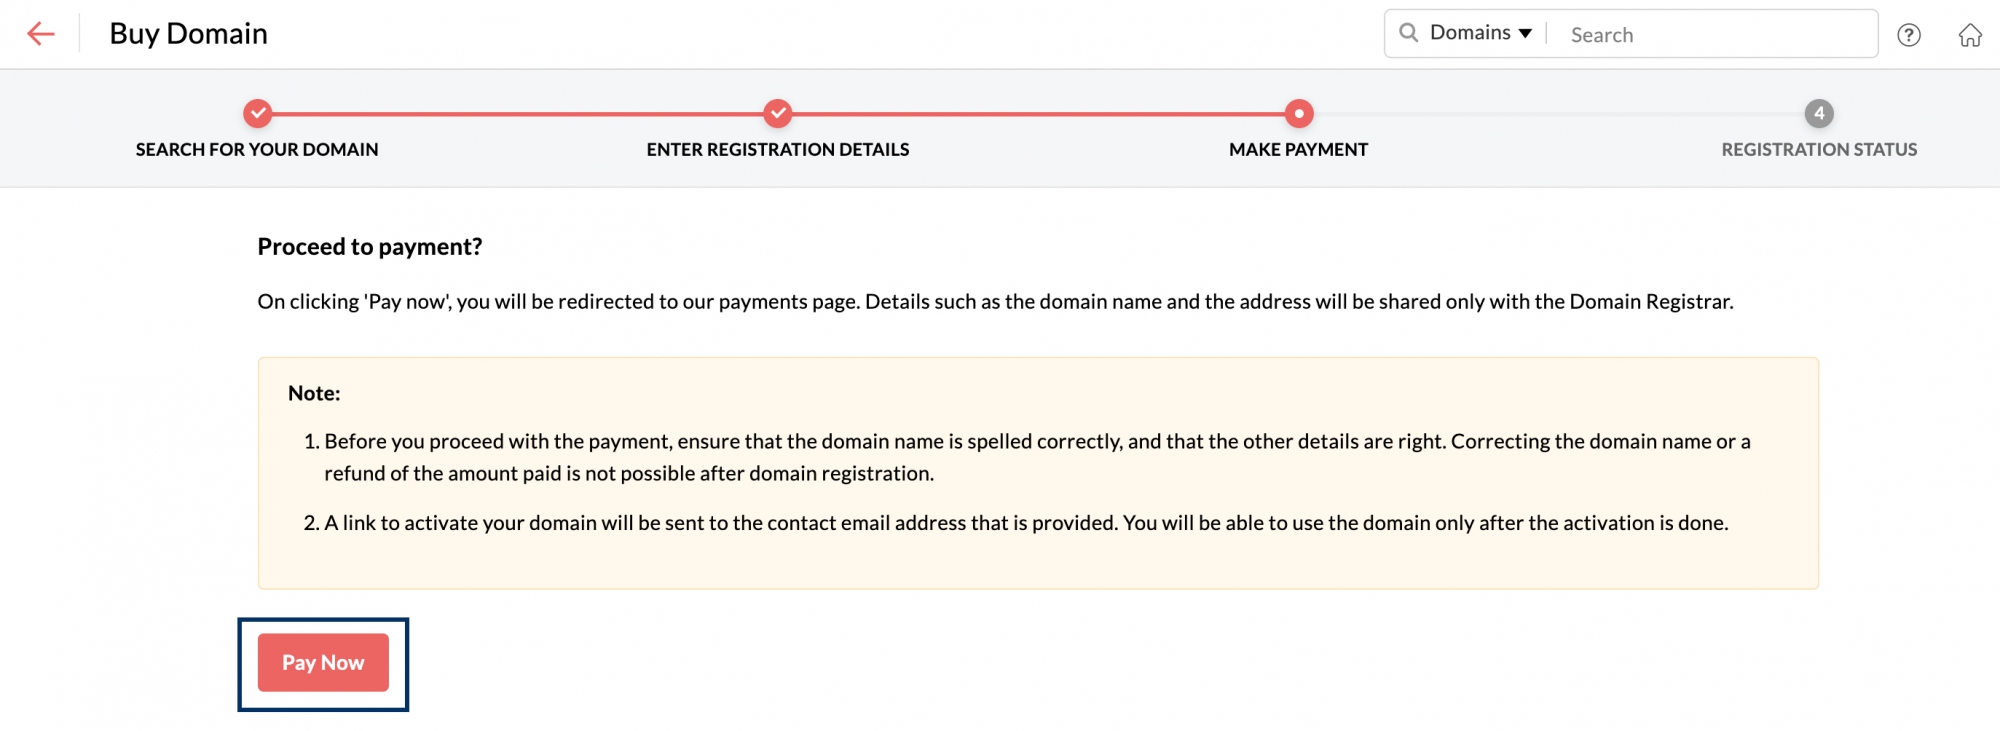
- Once you click Pay Now, you will be taken to the Zoho Payments page. In there, click Continue.
- You can review your order once again before proceeding to the final page. After reviewing the cost to be paid, click Confirm.
- Enter your billing details and make the payment using the medium you are convenient with. Once done, click Make Payment.
- Once you have completed the payment, the domain will be registered under the name you provided via Zoho. You can access this domain in your Zoho Mail Admin Console for more details.
Note:
- Once a domain is registered through Zoho, we will not be able to process any refunds or cancel the domain. The Zoho account will be set up as an organization account after you fill out the details for the Zoho account sign up.
- The Registrar Accreditation Agreement (RAA) by ICANN requires us to collect the name, email address, postal address, and telephone number during domain registration. If you do not wish for your data to be available for public view during a Whois lookup, you can opt for Private registration.
- The Buy Domain option will be available only for users from certain data centers.
- When you register a new domain with Zoho, the DNS settings like MX, CNAME etc. will be preconfigured for Zoho Mail. Hence the domain verification process is not required for the domains registered via Zoho. The admin will start receiving emails, immediately in the email address provided during the account set up.
Access domain's DNS manager
The DNS manager of a domain is a panel where you can add, edit, and/or access the DNS records of the respective domain. You will need access to the DNS manager to setup protocols such as SPF, DKIM, and DMARC among other requirements.
To access the DNS manager of your domain registered via Zoho,
- Log in to Zoho Mail Admin Console.
- Navigate to the Domains section in the left pane.
- Navigate and click the domain for which you want to access the DNS manager. You can identify the Zoho-registered domains easily with the help of the tag "Registered by Zoho" added next to the respective domains.
- In the respective domain's information section, go to the General tab.
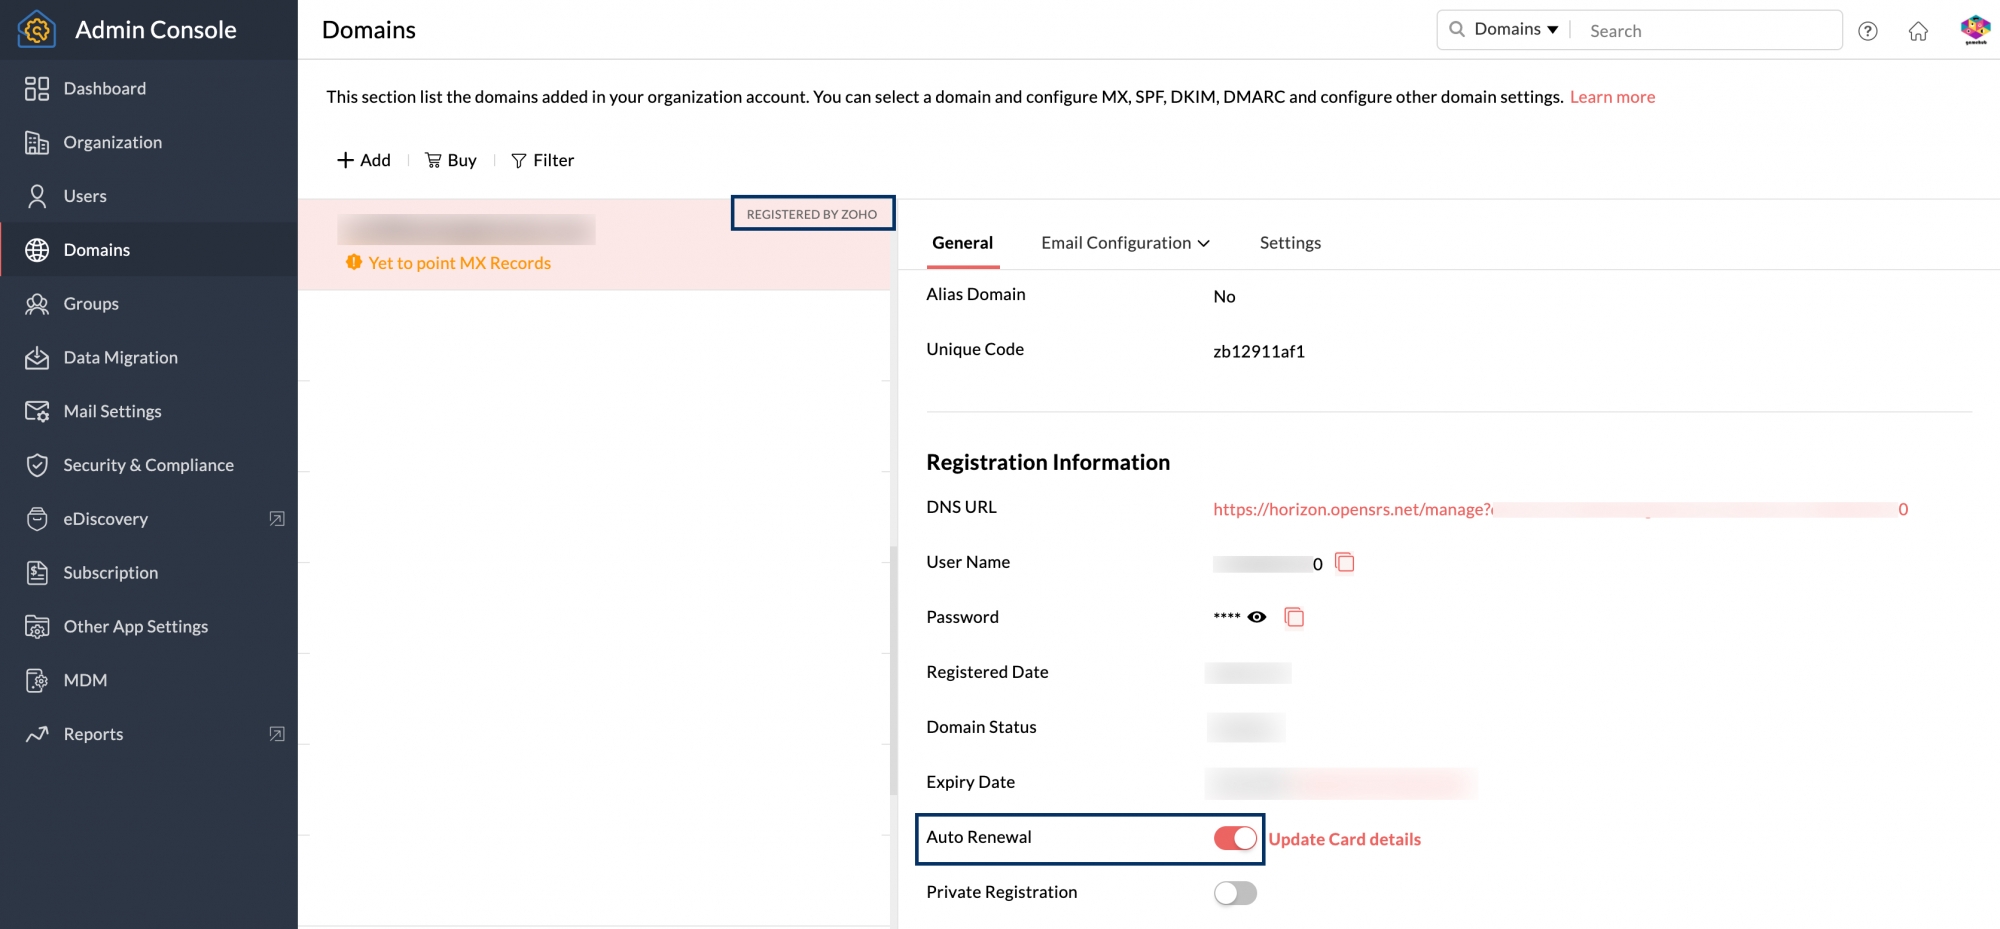
- Under the General tab, you will find the Registration information section where you can find your domain's DNS URL, User Name, and Password to access the DNS page along with the registration date, status—active or inactive, expiry date, and more.
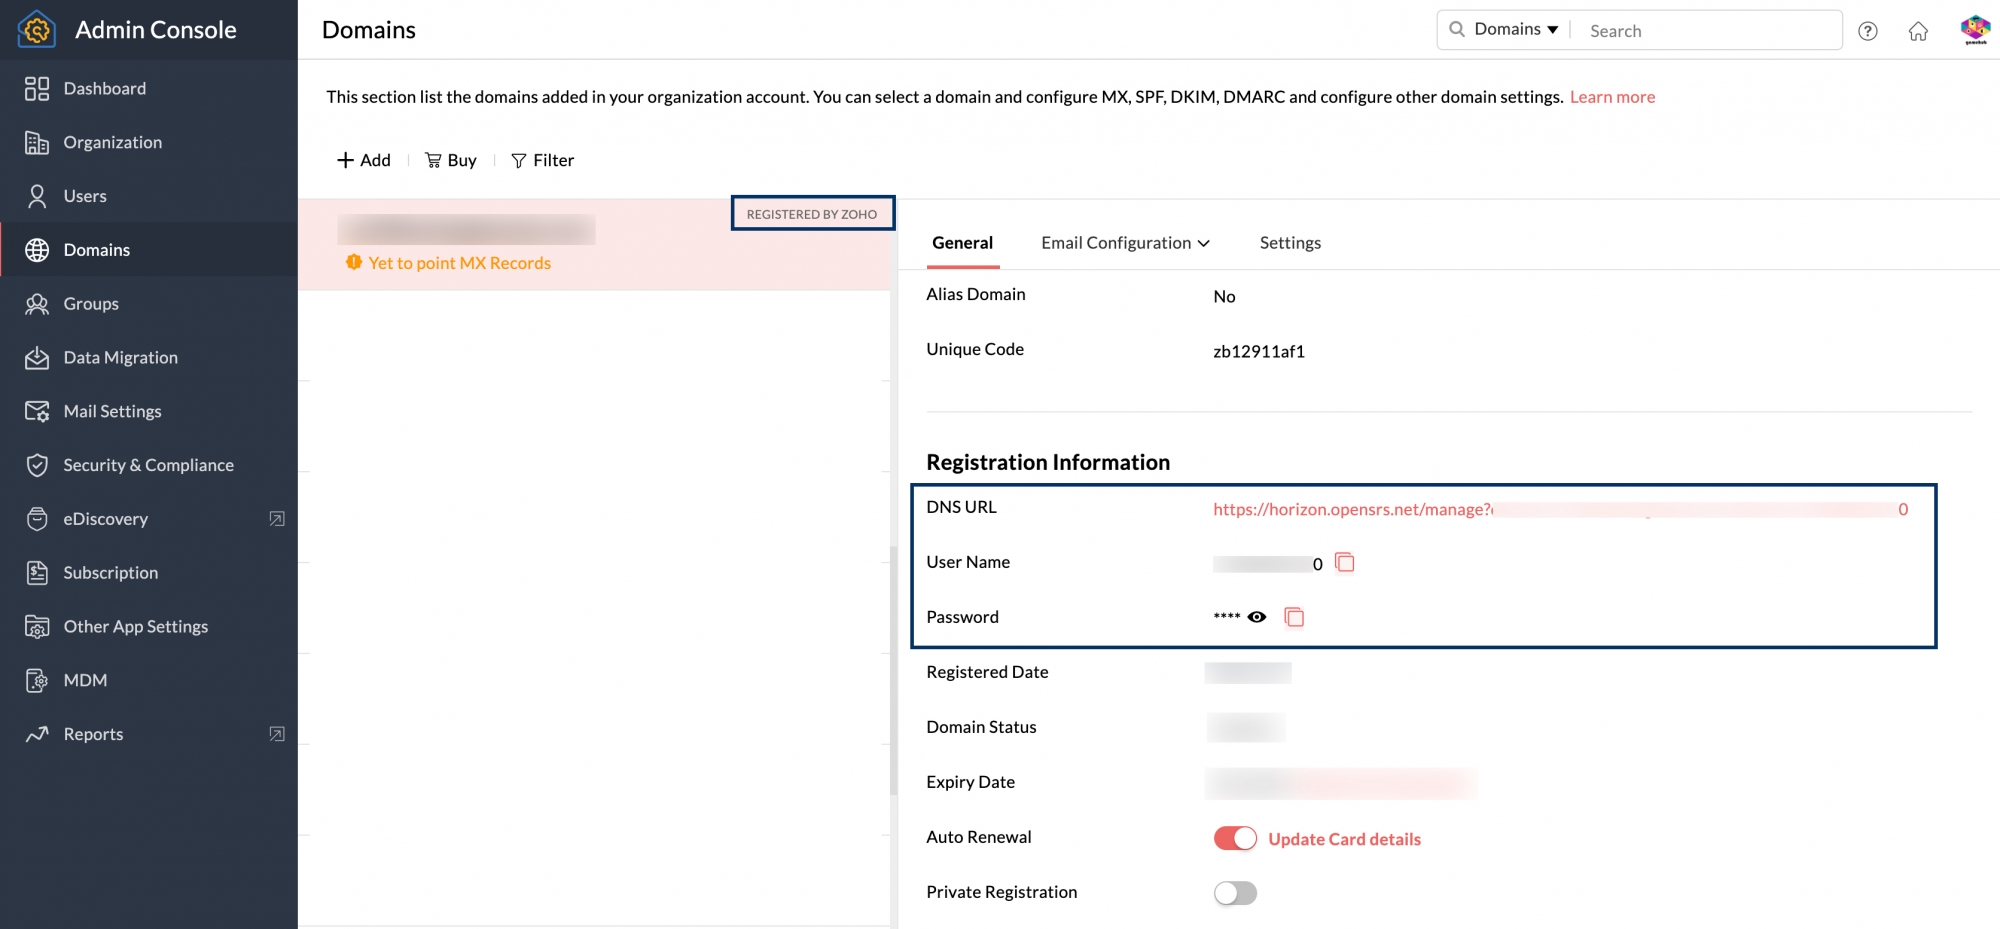
You can launch the Domain Manager URL in a browser and use the credentials to log in and access the DNS.
Domain Activation
The domain activation gets processed automatically when you buy a domain from Zoho. However, if the domain provider is OpenSRS, an activation link will be sent to the mail address you provided during registration. Confirm the account within 15 days, using the link provided in the email to activate the domain.
Note:
The Domain Activation Pending dialog will appear whenever you refresh the Admin Console. This is to remind you that the domain purchased through Zoho is not yet verified. In case you have not received the verification link email or missed the email, you can click the Resend button on the Domain Activation Pending dialog.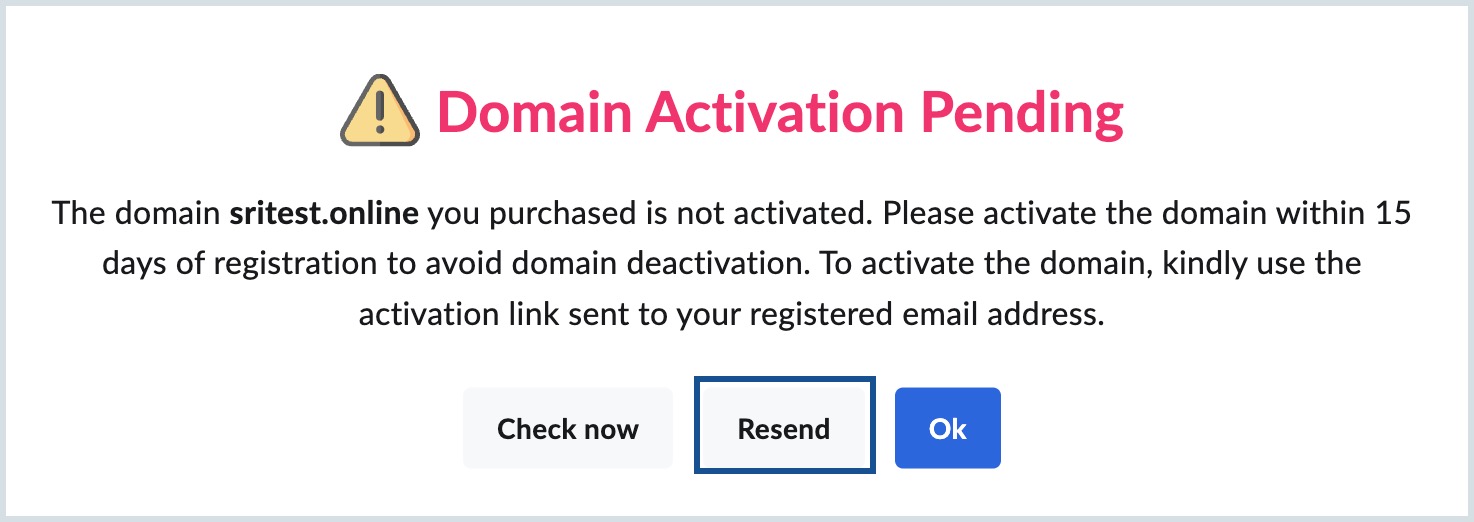
Domain WHOIS
When you register a new domain, the details of your registration like the address, telephone numbers, and email address will be linked to your domain and will be stored in the WHOIS directory as per the IETF standards.
There are a number of tools available online, which can provide the WHOIS information linked with the domain, upon request with the domain name. Personal details like your email address, phone number, and so on can also be acquired easily using your domain name. Hence to protect such confidential information from spammers or telemarketers, it is better to opt for a Private Registration option as explained below.
Private Registration
You can choose the 'Private Registration' option during domain purchase to make your contact details private. Choosing 'Private Registration' will make sure that the information connected to your domain is kept unavailable for public view via WHOIS queries. If you didn't opt for private registration during the purchase of your domain, you can do so from your Admin Console for domains purchased via Zoho.
Steps to activate/inactivate Private Registration:
- Log in to Zoho Mail Admin Console.
- Navigate to the Domains section in the left pane.
- Navigate and click the domain for which you want to access the DNS manager. You can identify the Zoho-registered domains easily with the help of the tag "Registered by Zoho" added next to the respective domains.
- In the respective domain's information section, go to the General tab and scroll down to the Registration Information section.
- Switch the Private Registration toggle to ON or OFF depending on your requirement.
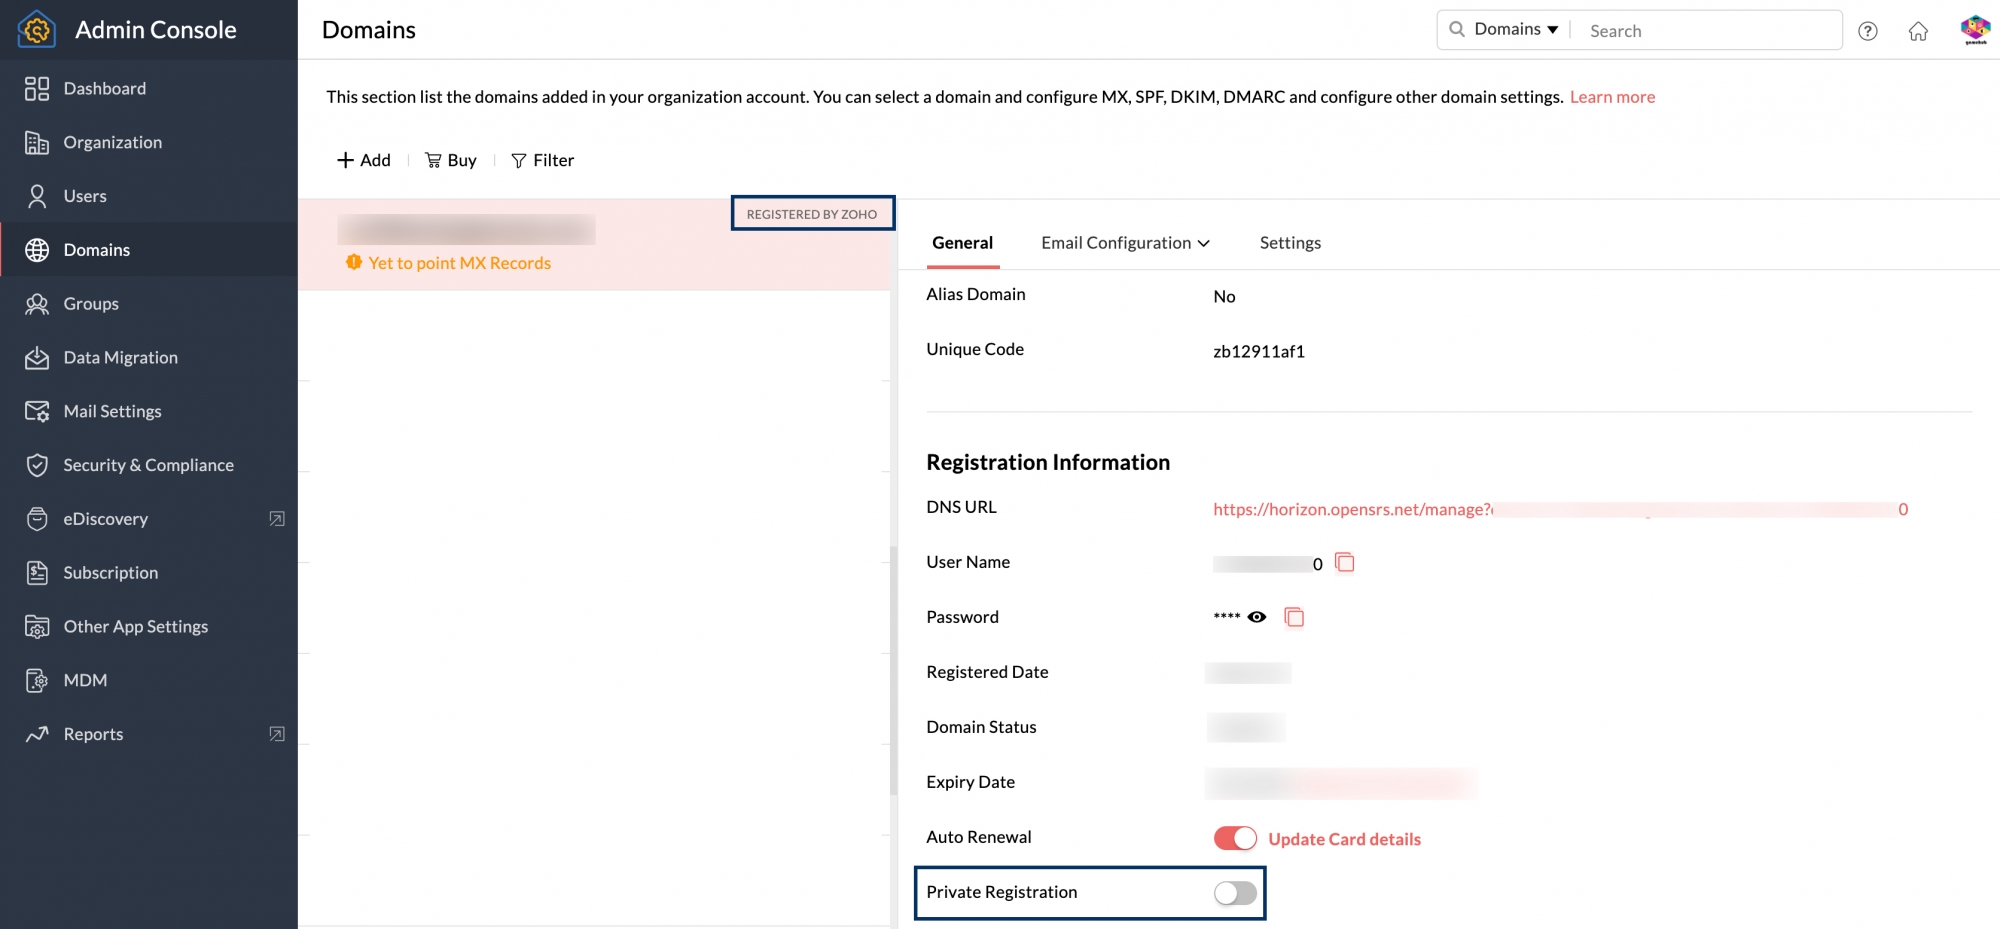
You will be charged an additional fee as private registration charges on the card you provided during. In case you have not opted for auto-renewal, you will have to provide the card details again during private registration. Reach out to support@zohomail.com for more details.
Domain Renewal
Automatic Renewal
When you register a new domain via Zoho, you need not worry about the hassles of renewal. If your domain is set for auto-renewal, it will be renewed each year with the same card details you provide during registration.
In case you want to renew the domain with a different card, you can modify the payment details before renewal. To update your card details,
- Log in to Zoho Mail Admin Console.
- Navigate to the Domains section in the left pane.
- Navigate and click the domain for which you want to access the DNS manager. You can identify the Zoho-registered domains easily with the help of the tag "Registered by Zoho" added next to the respective domains.
- In the respective domain's information section, go to the General tab and scroll down to the Registration Information section.
- Next to the Auto-Renewal toggle, you can find the Update Card details option. When clicked, you will be taken to the Zoho Payments page where you can update the existing details.
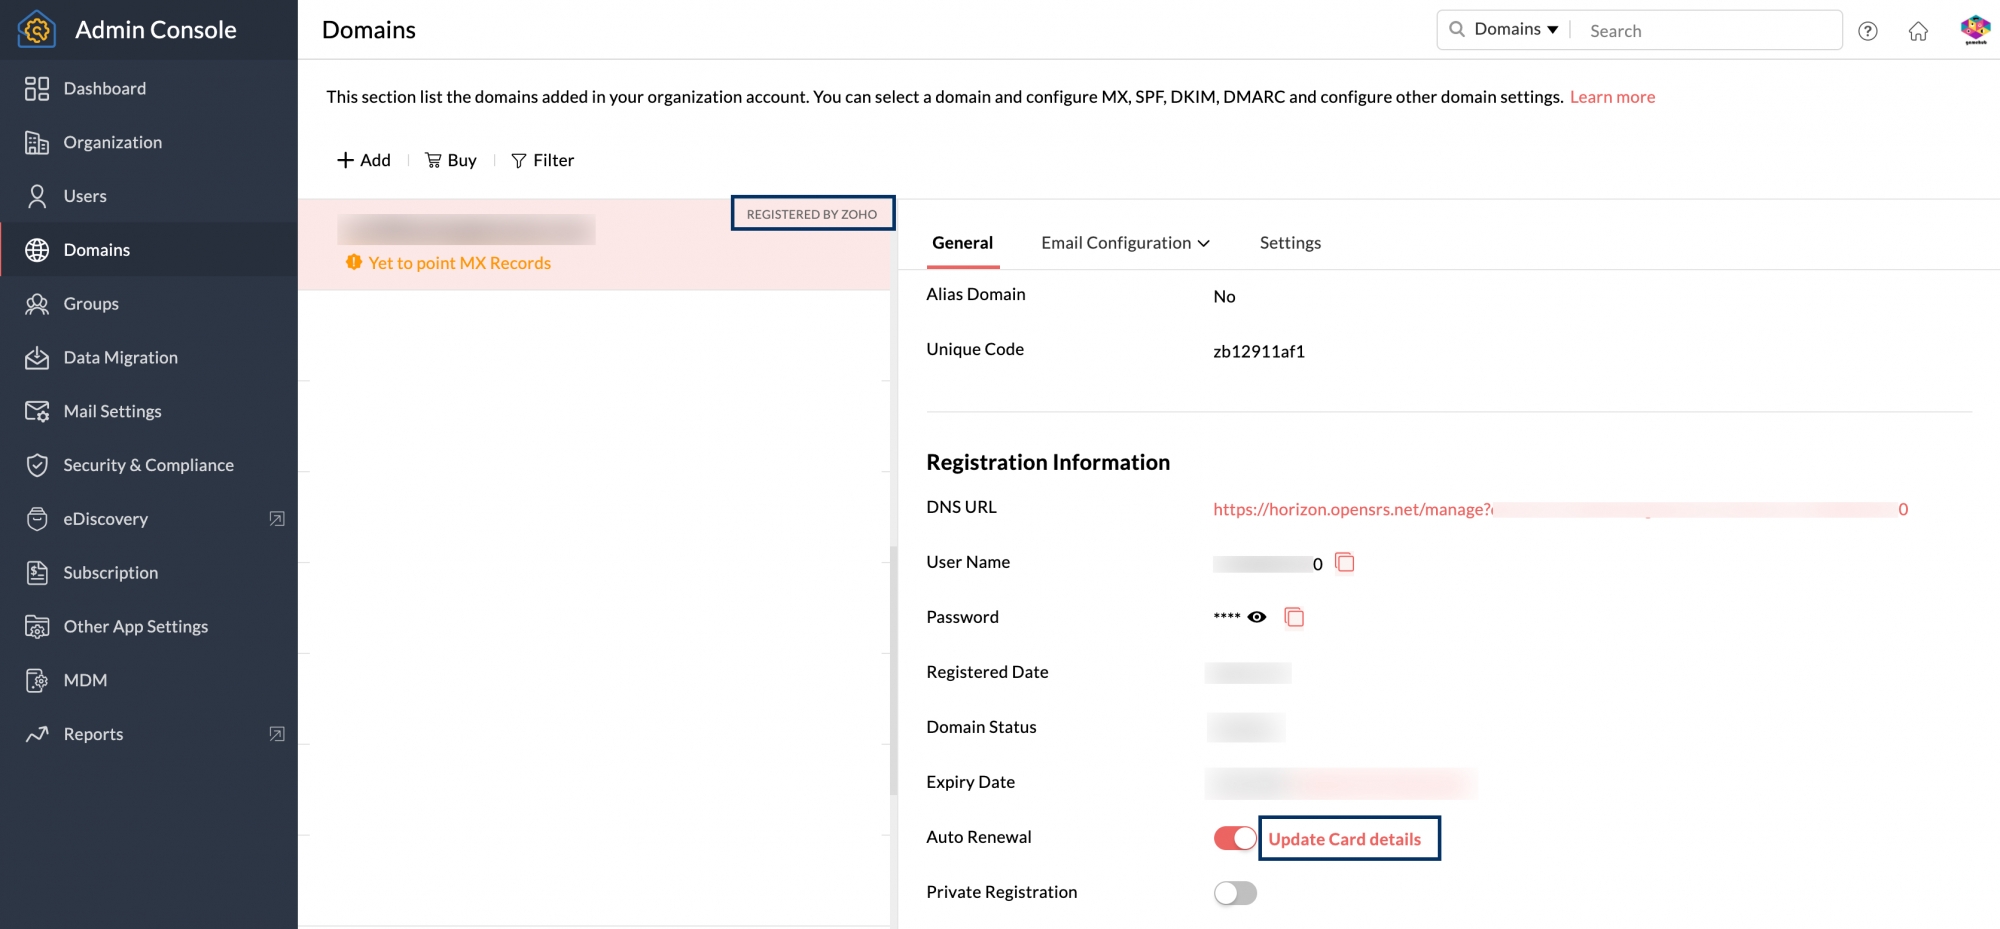
Manual Renewal
If in case you want to manually renew the domain you purchased via Zoho, you can do so as well. Once it's time for renewal, you will receive an email reminder for domain renewal. Following that, to renew your domain,
- Log in to Zoho Mail Admin Console.
- Navigate to the Domains section in the left pane.
- Navigate and click the domain for which you want to access the DNS manager. You can identify the Zoho-registered domains easily with the help of the tag "Registered by Zoho" added next to the respective domains.
- In the respective domain's information section, go to the General tab and scroll down to the Registration Information section.
- Next to the Expiry Date, you can find the Renew option. When clicked, you will be taken to the Zoho Payments page where you can give your payment details and pay to keep owning the domain.
Enable or Disable Auto-Renewal
You can choose to enable or disable the automatic renewal option depending on your requirement.
- Log in to Zoho Mail Admin Console.
- Navigate to the Domains section in the left pane.
- Navigate and click the domain for which you want to access the DNS manager. You can identify the Zoho-registered domains easily with the help of the tag "Registered by Zoho" added next to the respective domains.
- In the respective domain's information section, go to the General tab and scroll down to the Registration Information section.
- Switch the Auto Renewal toggle to ON or OFF depending on your requirement. Re-authenticate when prompted to verify your identity.
Note:
- Every time you disable auto-renewal for a domain, it is mandatory to re-authenticate your session using the MFA (Multi-Factor Authentication) method configured on your account for security purposes.
- Re-authentication will be done using the MFA (Multi-Factor Authentication) method configured on your account for security purposes. If you do not have MFA configured for your account, you will be prompted to re-authenticate your session using your account password in a new tab or window, depending on your browser preference.
- For disabling auto-renewal for domains, re-authentication is required every five minutes after you confirm your identity. Within this five-minute period, you can update the domain auto-renewal status without needing to re-verify. However, if you try to make a change after this time has expired, you will be required to verify your identity again.
RazorPay - Payment gateway for India
RazorPay is one of the safest payment gateways for India which facilitates Internet payments via Credit Card, Debit Card, Net Banking, UPI, or eWallets. Razorpay provides other modes of payment if there is no Credit Card payment option. However, in the RazorPay mode of payment, we do not support automatic renewal or registration of a domain for more than one year. If you purchase the domain using this payment mode, then you should manually renew your domain after one year.
OpenSRS DNS manager
Update contact details
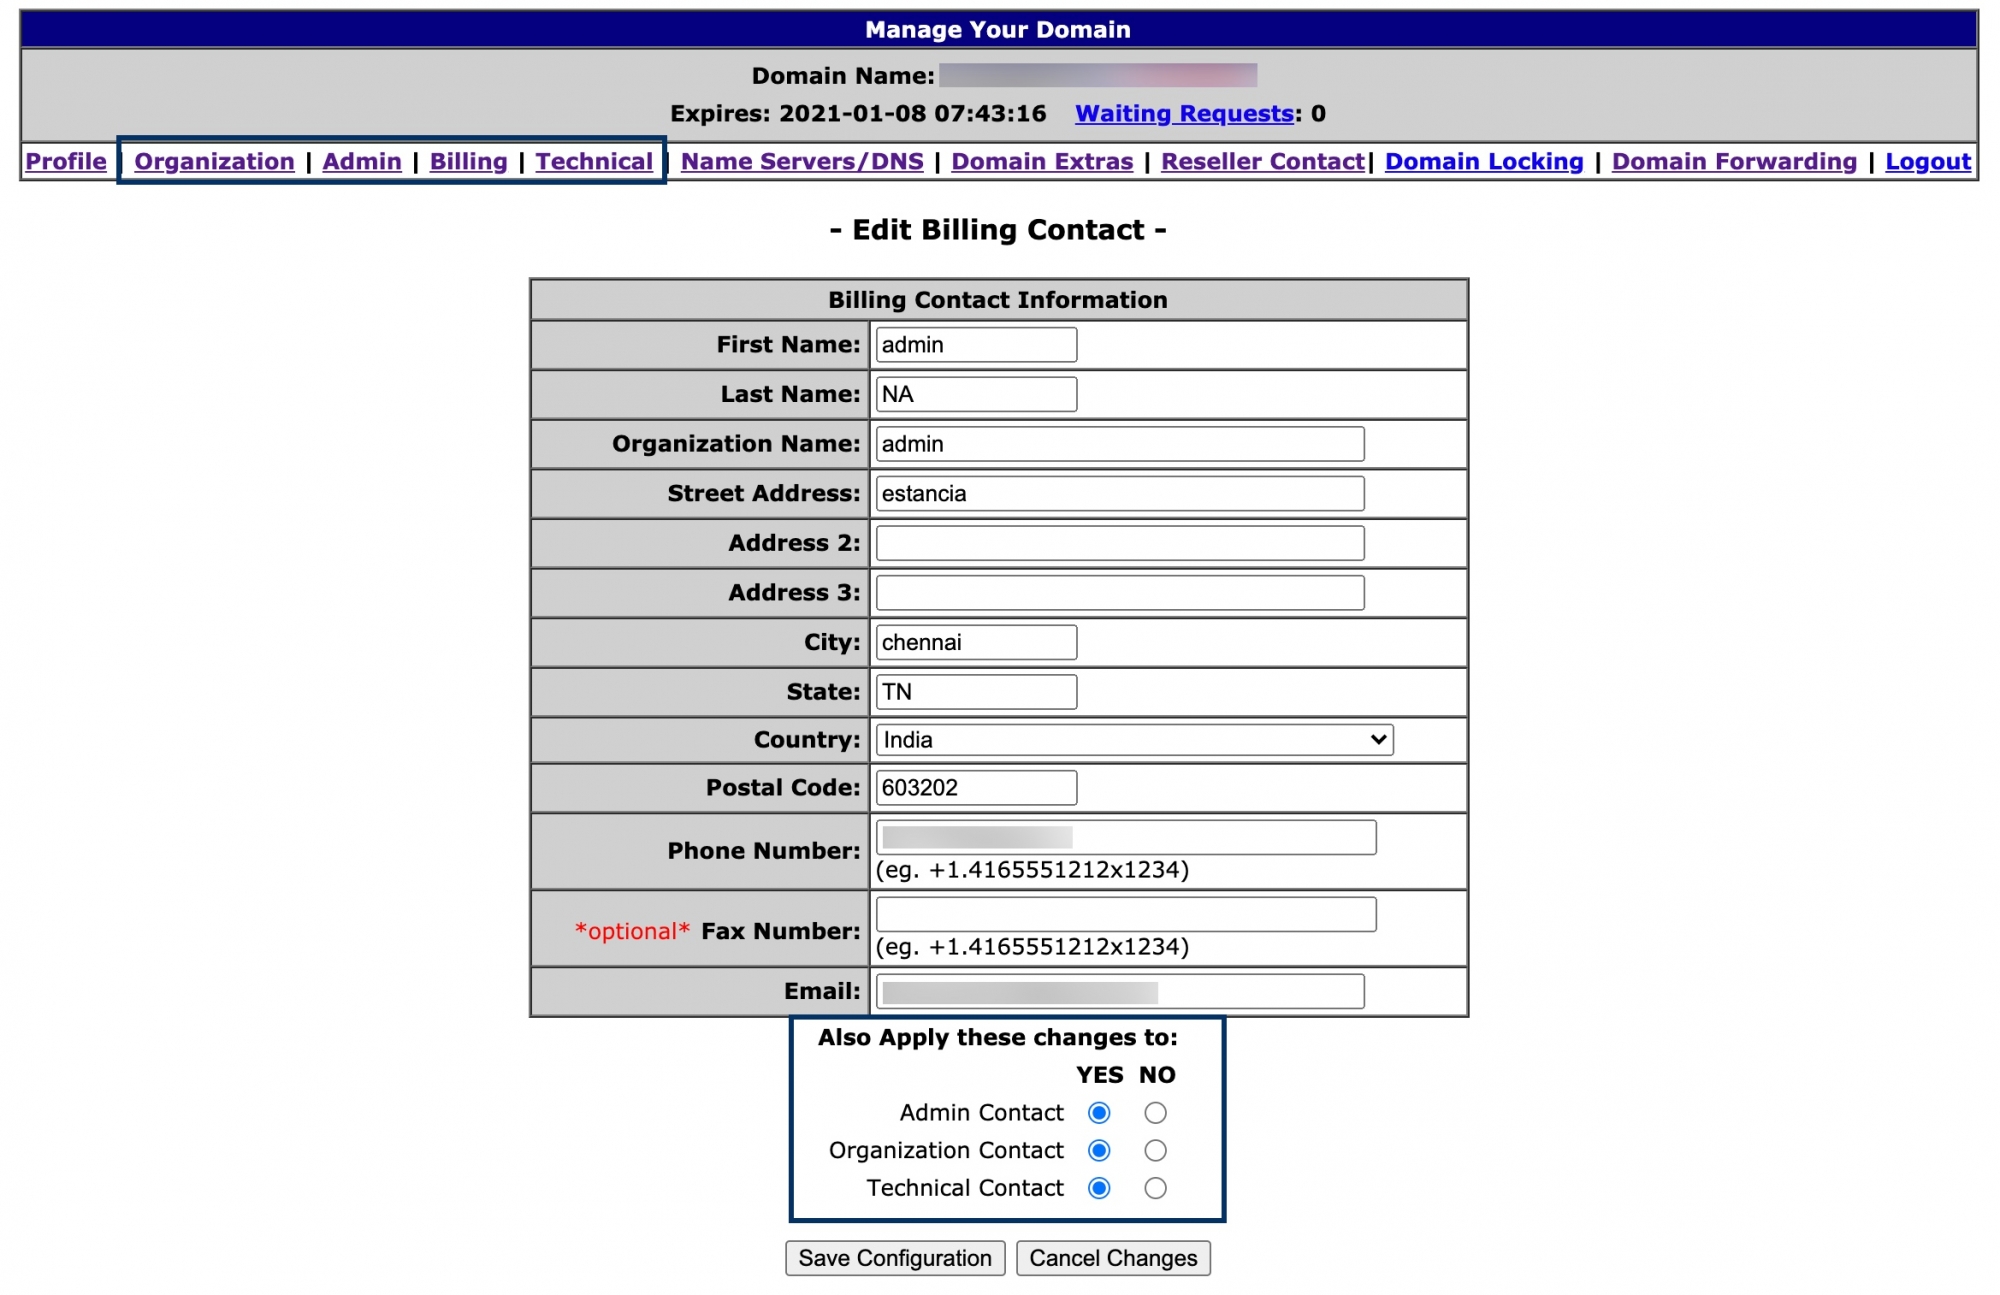
To change contact details and email address,
- Log in to your OpenSRS DNS manager.
- Choose any among Admin, Technical, Organization, or Billing and edit the contact information.
- Once done, in the Also Apply these changes to section, choose Yes for all other contacts to apply the same contact details.
- Click Save Configuration.
Update OpenSRS DNS Records
To update your DNS records in OpenSRS,
- Log in to your OpenSRS DNS manager.
- In the top menu, go to Name Servers/DNS.
- To add DNS records, scroll down and click Modify DNS Zone.
- Scroll down to spot the record you want to add in the list and click Add Record.
- Once done, scroll down and click Save DNS Zone. You can also check the status of the propagation of the values using the DNS checker tool.
Transfer Domain to a different registrar
Things to note before domain transfer:
- You need to unlock your domain, at the time of 'actual' movement of the domain from Zoho. The domain will get automatically locked again within 30 minutes from the time you unlock it.
- The domain should be in the 'unlocked' state when you provide the authorization code to your new provider for changing the hosting setup.
Open SRS domain transfer
To transfer your domain to another Domain Manager, you will be asked for a Domain Auth Code. To access the Auth Code,
- Log in to Zoho Mail Admin Console.
- Navigate to the Domains section in the left pane. You can identify the Zoho-registered domains easily with the help of the tag "Registered by Zoho" added next to the respective domains.
- Navigate and click the domain for which you want to access the DNS manager.
- In the respective domain's information section, go to the General tab.
- Under the General tab, scroll down to the Registration information section where you can find your domain's DNS URL, User Name, and Password to access the DNS page.
- Launch the Domain Manager URL in a browser and Log in to your OpenSRS DNS manager using the credentials.
- In the top menu, go to Domain Extras. You will be able to access the Domain Auth Code.
You can copy the Auth Code and provide it to your new domain host for a seamless transfer.
GoDaddy domain transfer
You may transfer the domain to another domain hosting provider, by getting an authorization code. Once you transfer the domain, the DNS records, renewal, and Name servers will be managed by the new Domain hosting provider.
- Log in to Zoho Mail Admin Console.
- Navigate to the Domains section in the left pane. You can identify the Zoho-registered domains easily with the help of the tag "Registered by Zoho" added next to the respective domains.
- Navigate and click the domain for which you want to access the DNS manager.
- In the respective domain's information section, go to the General tab.
- Under the General tab, scroll down to the Registration information section where you can find your domain's DNS URL, User Name, and Password to access the DNS page.
- Launch the Domain Manager URL in a browser and Log in to your GoDaddy domain's DNS page.
- Select your domain, select Portfolio on the left menu and turn off the Domain Lock.
- Navigate to the Transfers section.
- Read the transfer checklist and click Continue.
- Select the Click here to see Authorization code button to view the code.
The authorization code will also be sent to the admin/ contact email address provided by you at the time of registration.
Provide the authorization code to your new domain host to transfer your domain seamlessly.
Delete domain
When you purchase the domain from Zoho, you can delete the domain when you no longer need it, once you turn off the auto-renewal for the domain.
Important pointers before deleting a domain purchased via Zoho:
- Once the domain is deleted, it cannot be used anymore until the expiry and release of the domain.
- The domain will get released and be available for registration (from any provider) only after 50 days from the date of expiry of the domain.
- The DNS credentials, the URL to be used for login will be emailed to the Organization's Super Admin. If the Super Admin was changed after hosting the account with Zoho, the details will be sent to the registrant or the contact email address.
- In case you need the domain to be removed from Zoho alone and want to use it somewhere else, you can transfer the domain before deletion.
Steps to delete your domain
- Log in to Zoho Mail Admin Console.
- Navigate to the Domains section in the left pane. The domains that are associated with your Zoho Mail account can be found here.
- Click the Delete icon that appears when you hover over the domain you want to delete.

- Enter the admin password, and click Delete Now. Re-authenticate when prompted to verify your identity.
- If you have not already canceled your subscription, you will be asked to cancel it from the Payments page. Follow the link shown in the popup.
- Once you cancel the subscription, switch back to the Zoho Mail Control Panel tab and click the Delete domain button to delete it.
Note:
- Every time you want to delete a domain or domains associated with your account, it is mandatory to re-authenticate your session using the MFA (Multi-Factor Authentication) method configured on your account for security purposes.
- If you do not have MFA configured for your account, you will be prompted to re-authenticate your session using your account password in a new tab or window, depending on your browser preference.
- This additional re-authentication step helps protect your account by ensuring that only authorized users can perform this sensitive action.


